What is Learning Based Assessment and how to use it?

Learning-Based Assessment:

Learning-based assessment is designed for catering to the needs of Montessori curriculum management, assessments, and Reporting. It works only for the branches who are having Preschool as board and branch type as Montessori in MCB. It follows the true terminology and process of Montessori curriculum management, assessment grades recording and reporting.

How to use it?

It involves the following steps:
1. Update the branch board and Branch Type
2. Curriculum updation
3. Grading scale creation
4. Recording the grades
5. Generating Reports
6. Reporting for the parent

Update the branch board and branch type:

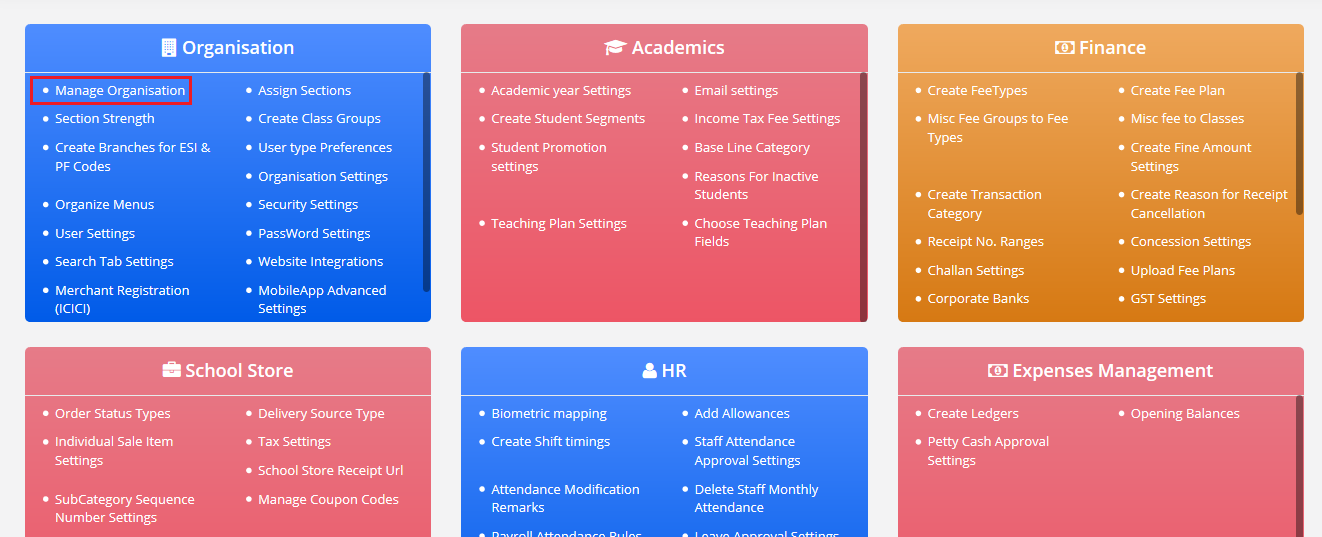
Step 1: Login to MCB with system admin login credentials. Click on Settings option which is on the right panel.

Step 2: Click on Manage Organization under Organization settings.

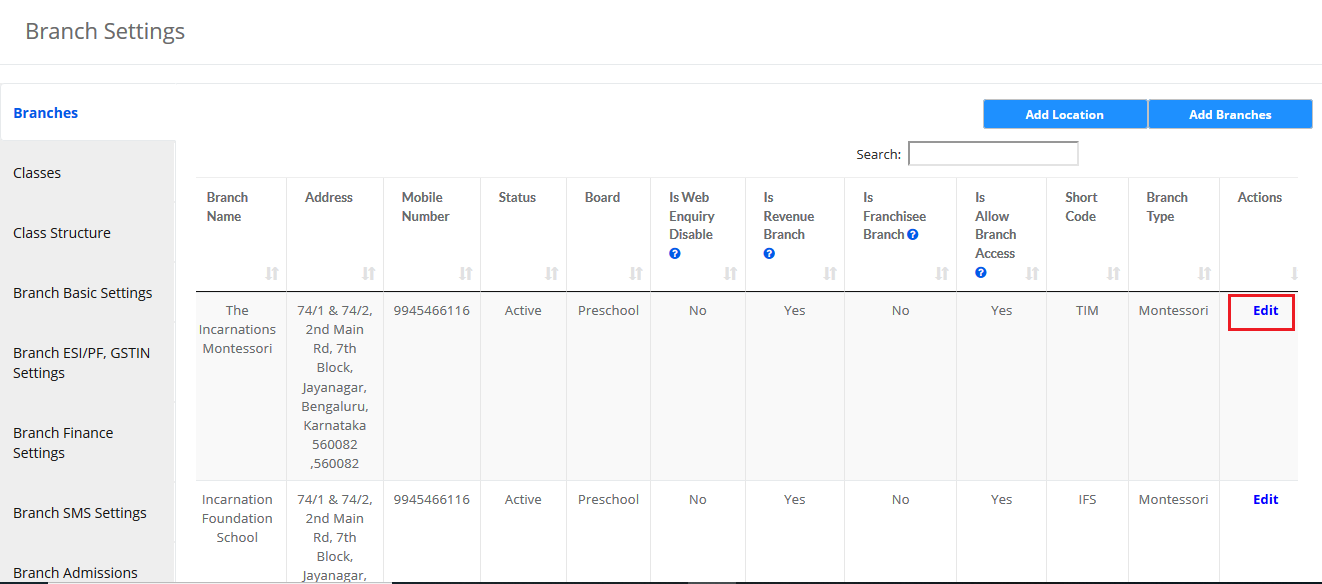
Step 3: Click on Edit option against the branch name.

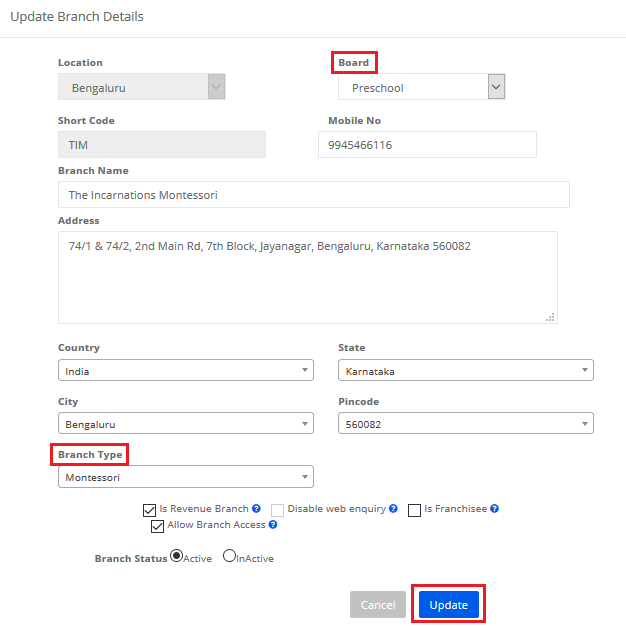
Step 4: Choose Board as Pre School, Branch type as Branch Type and click on the Update button to save the changes.

Curriculum updation:

The curriculum can be uploaded from system admin login and branch user login. Please follow the steps mentioned below.

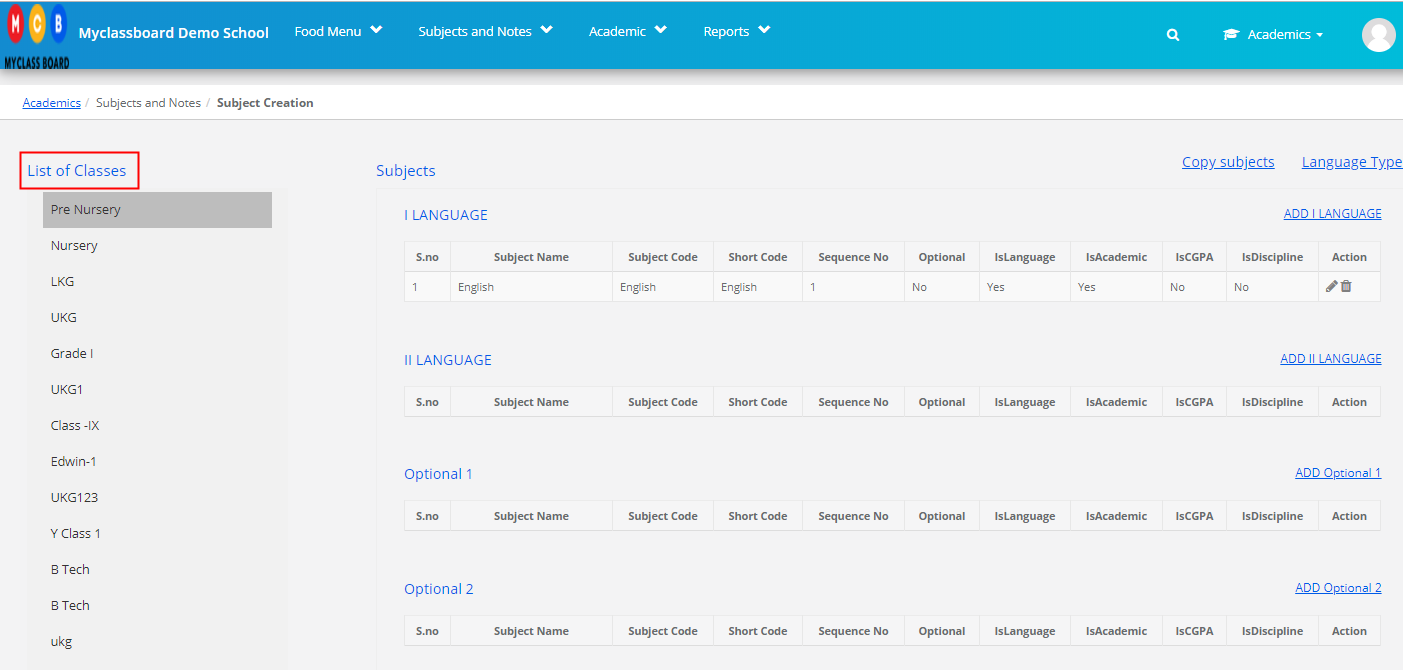
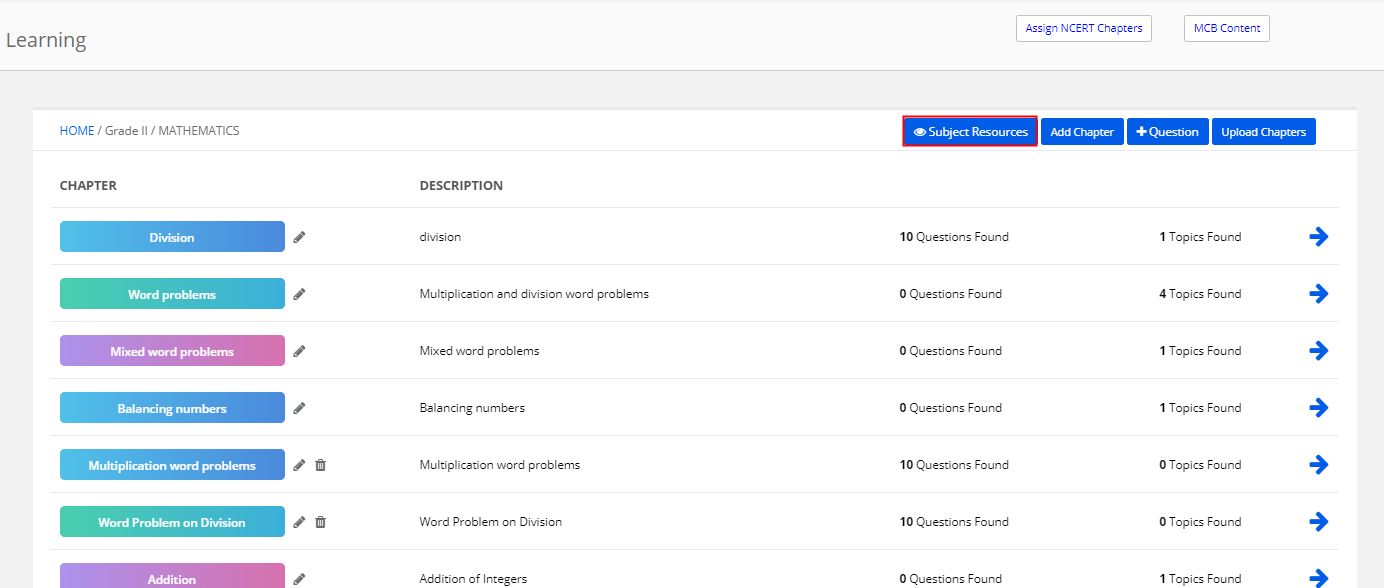
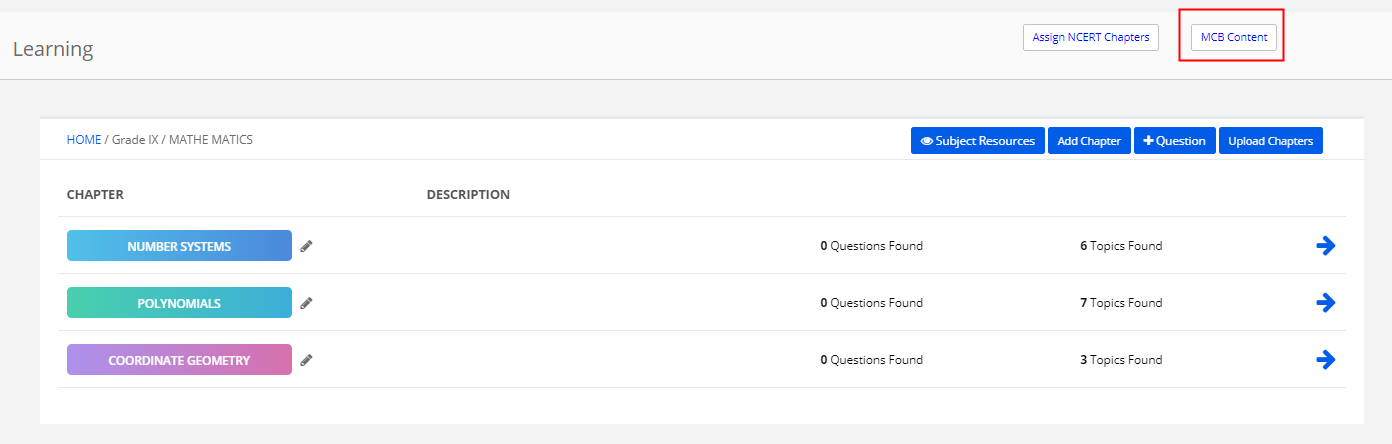
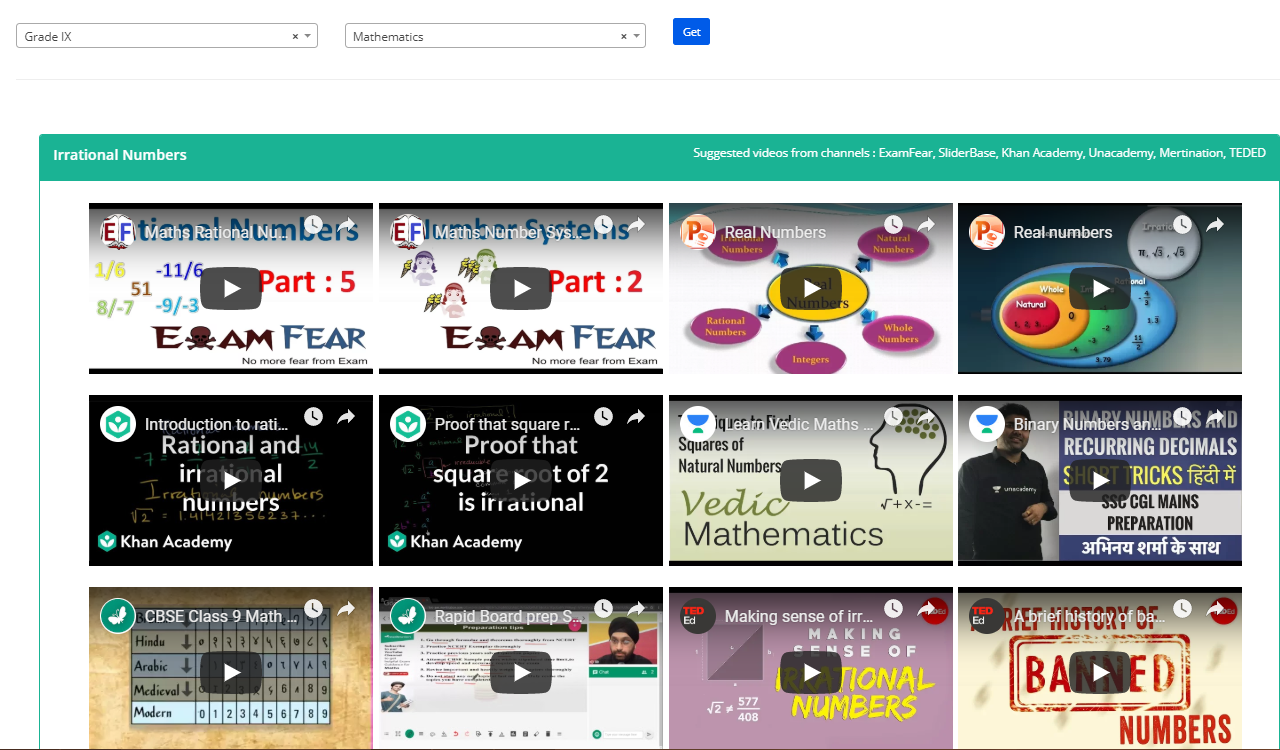
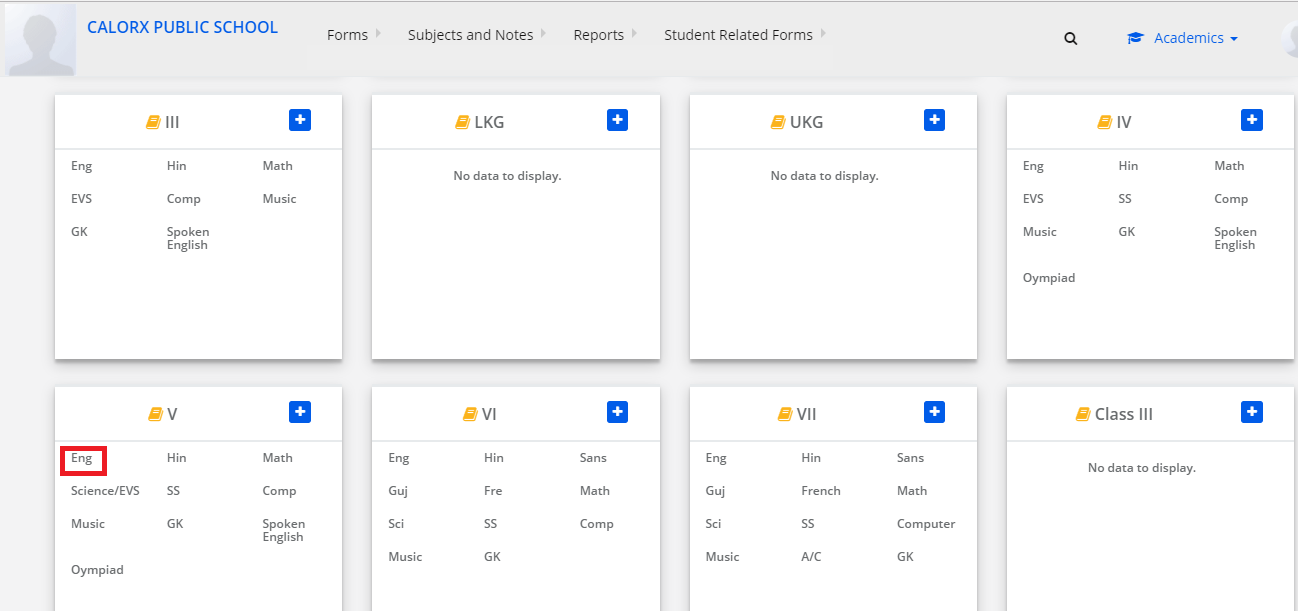
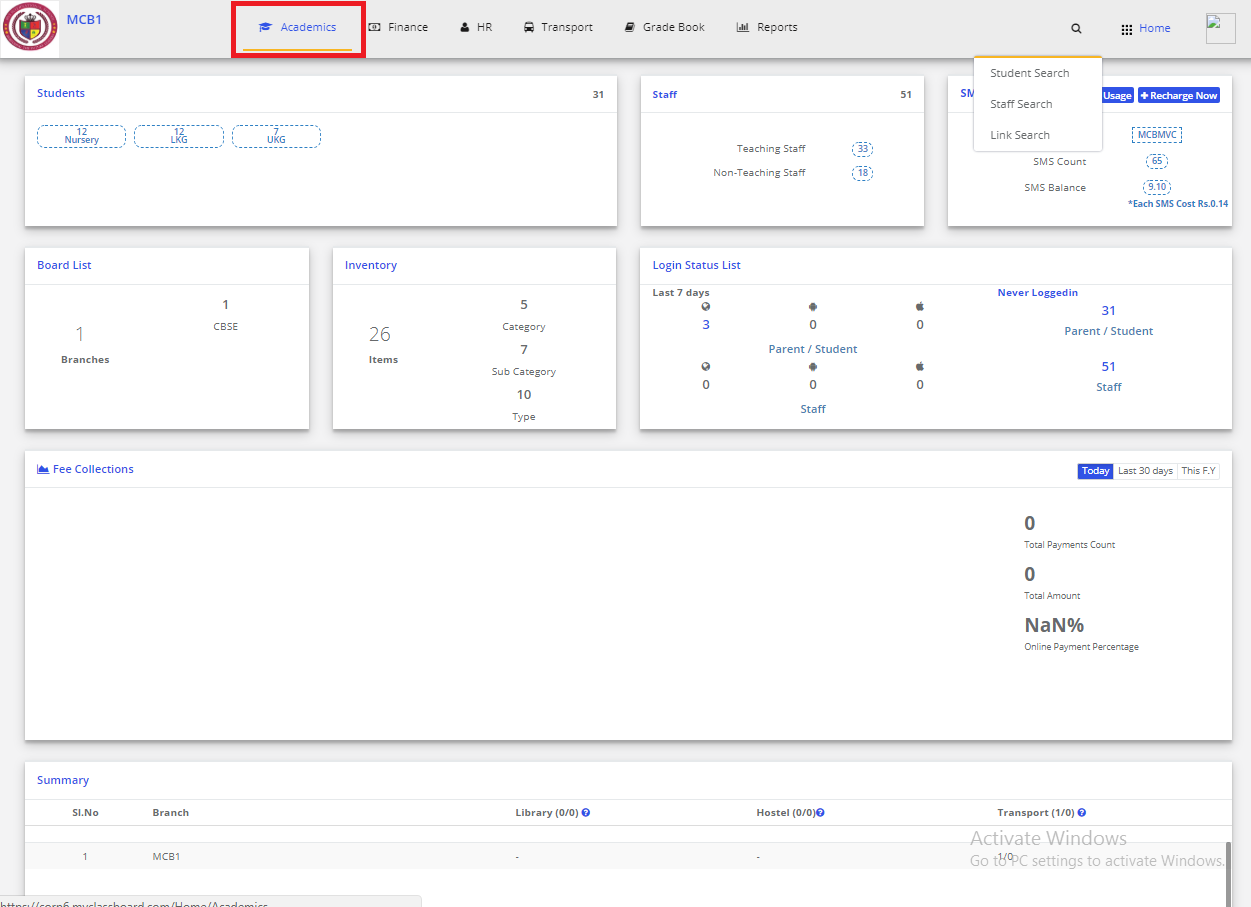
Step 5: Login to MCB and Click on Academics module.

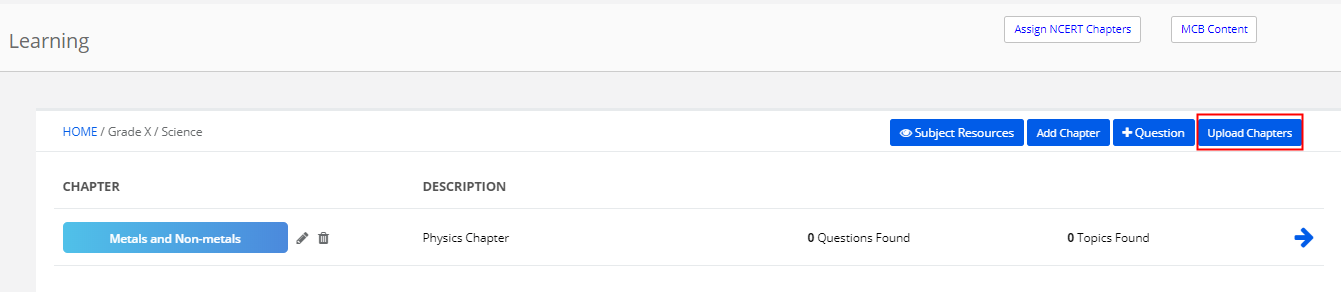
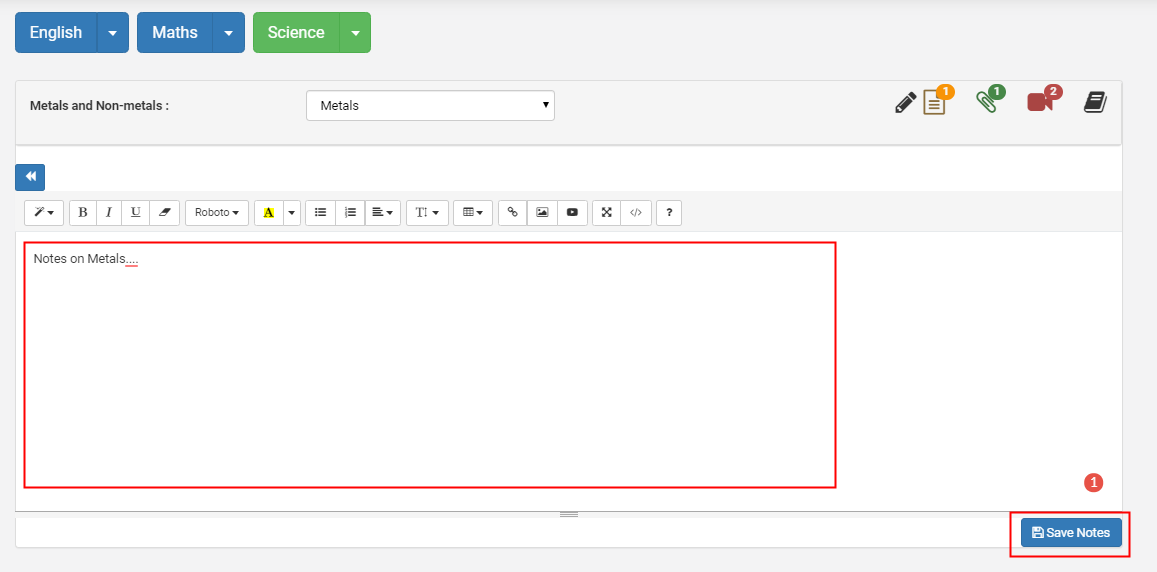
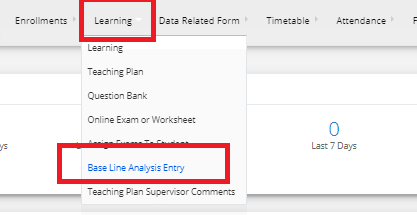
Step 6: Click on Learning option under Subjects and Notes menu.

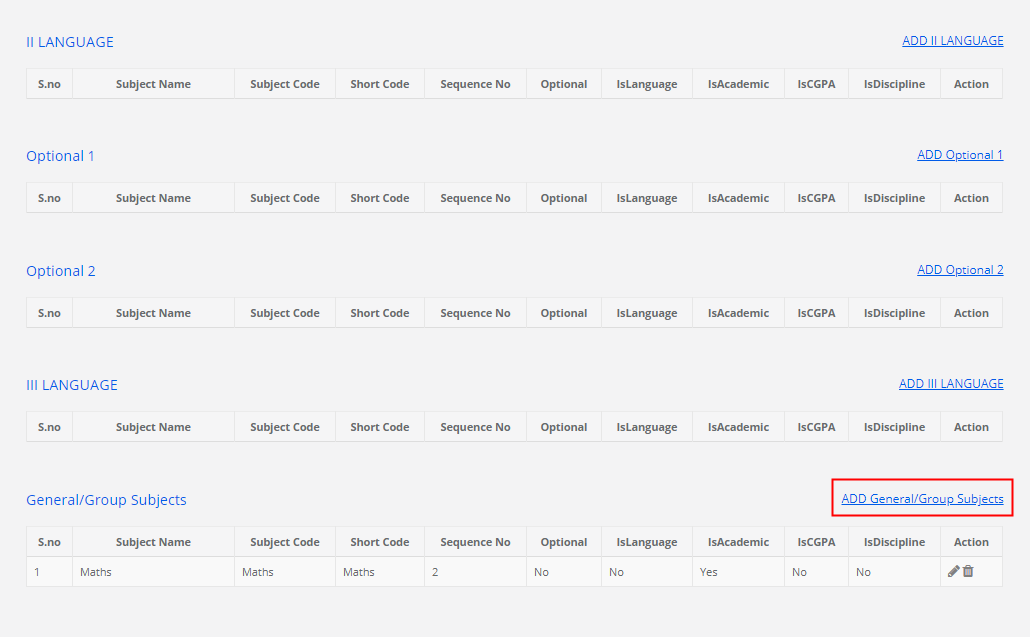
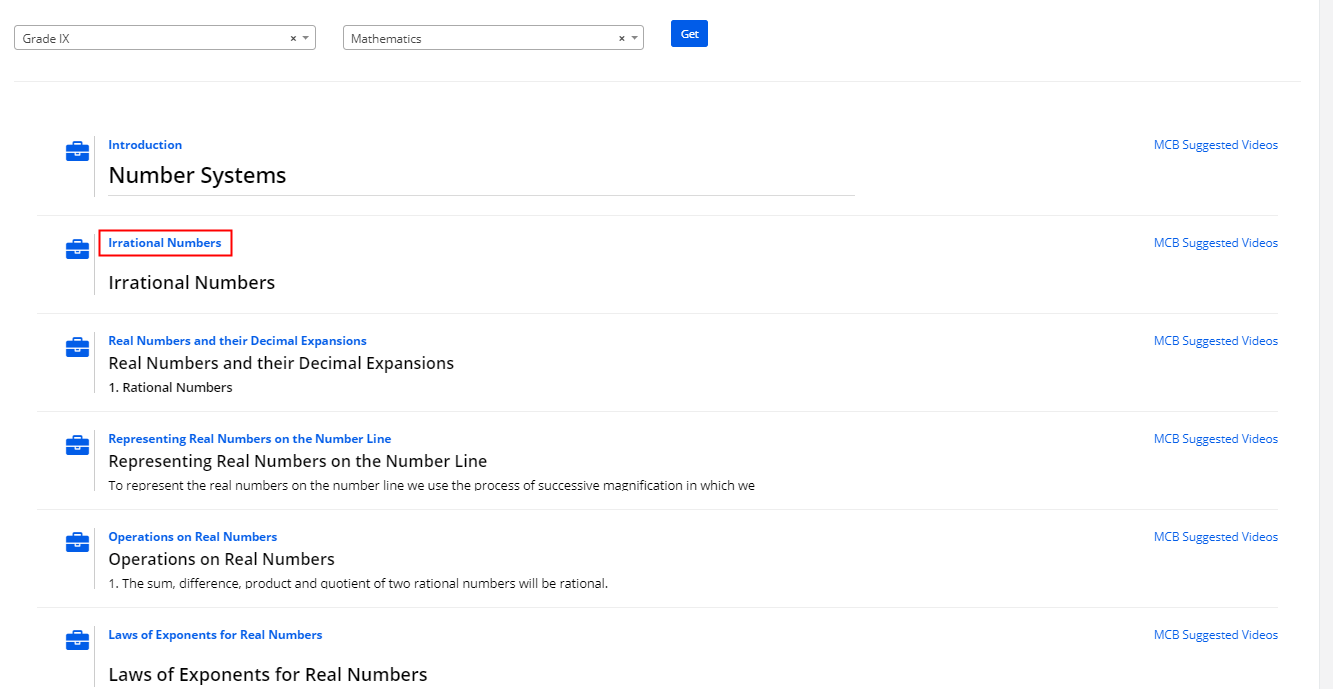
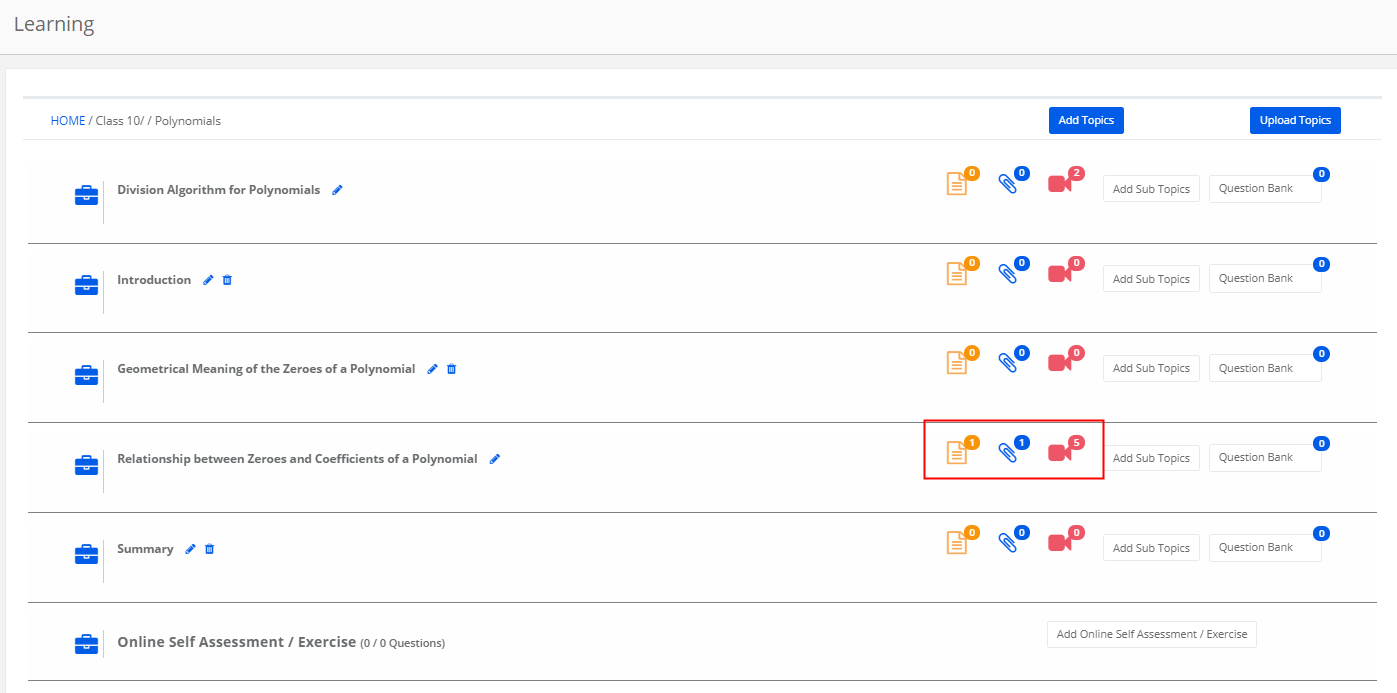
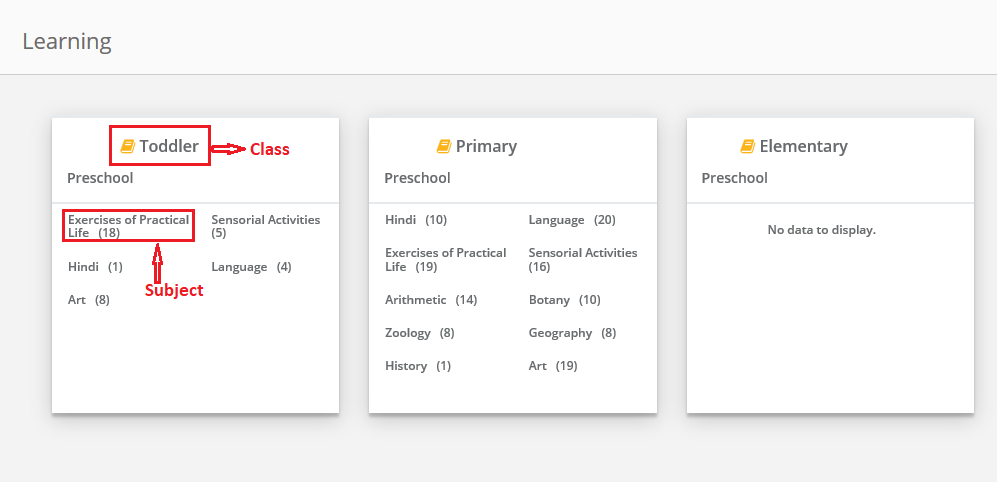
Step 7: Please note the classes and Subjects created under each class.

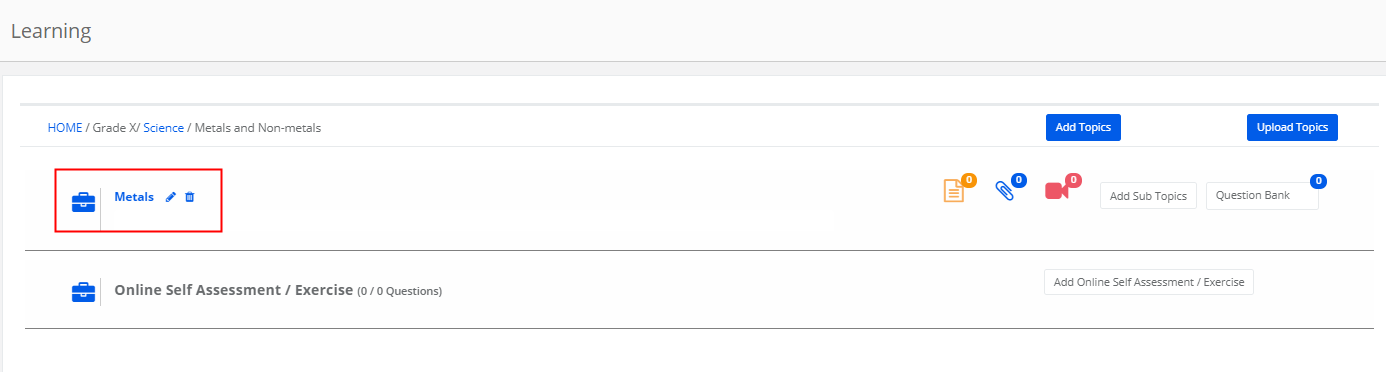
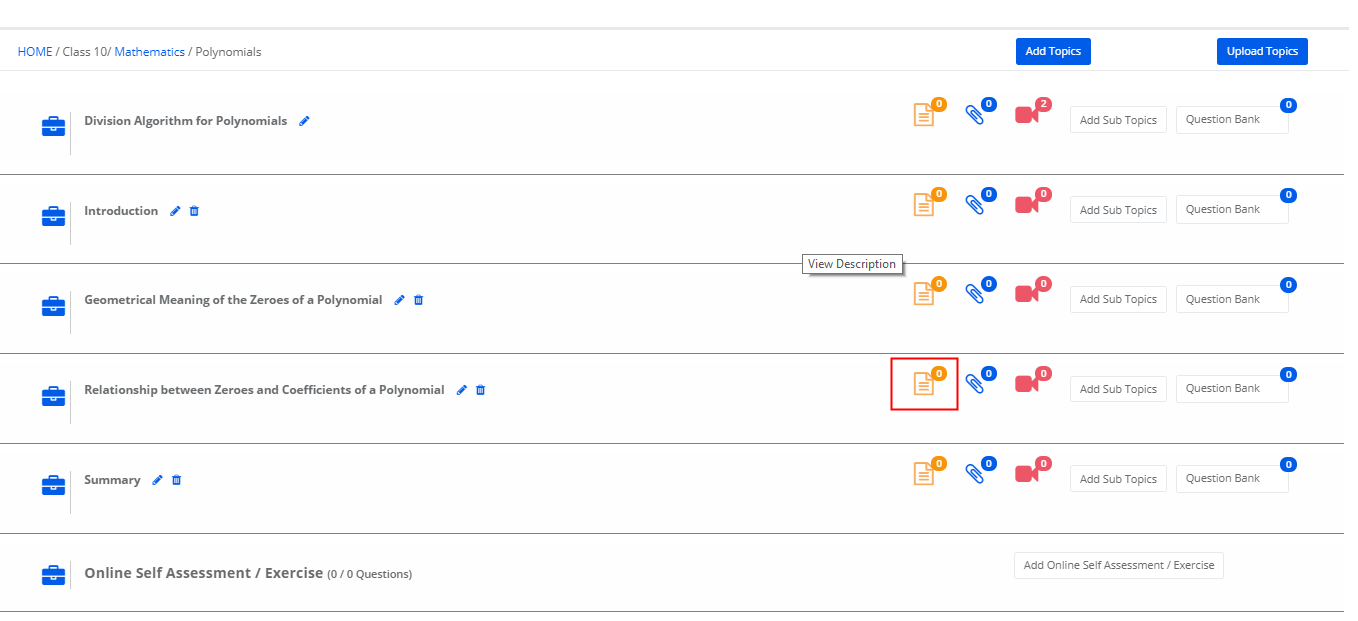
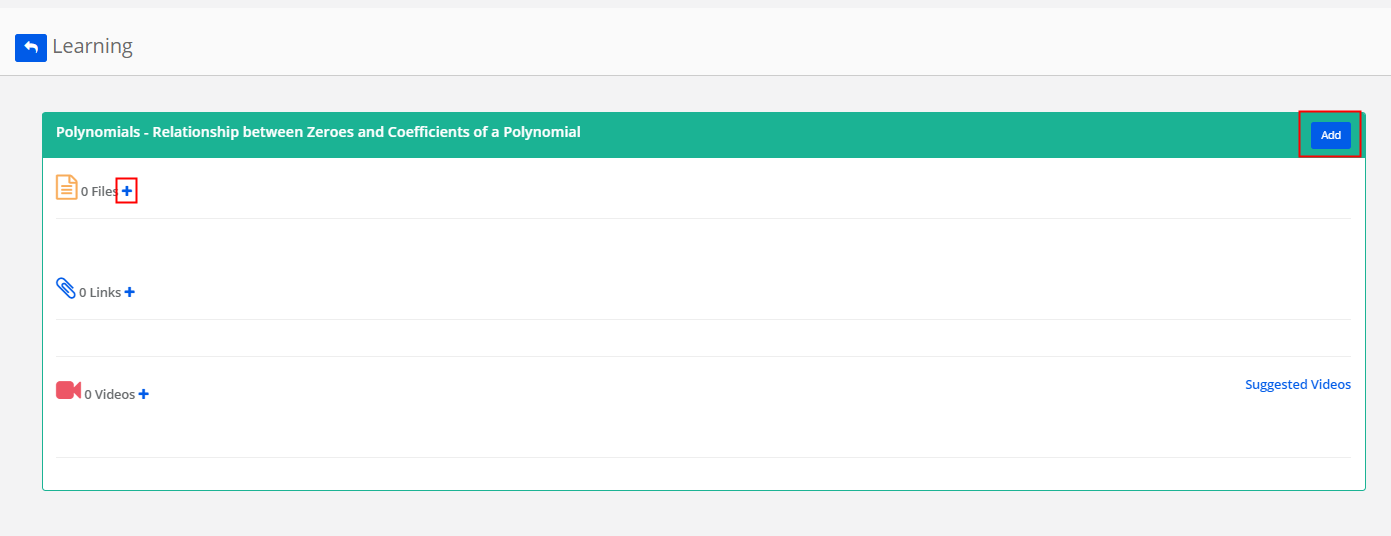
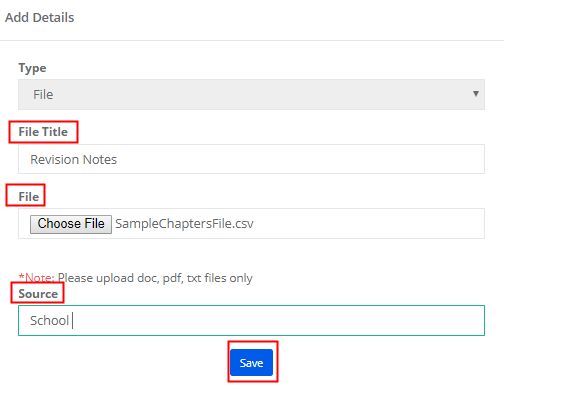
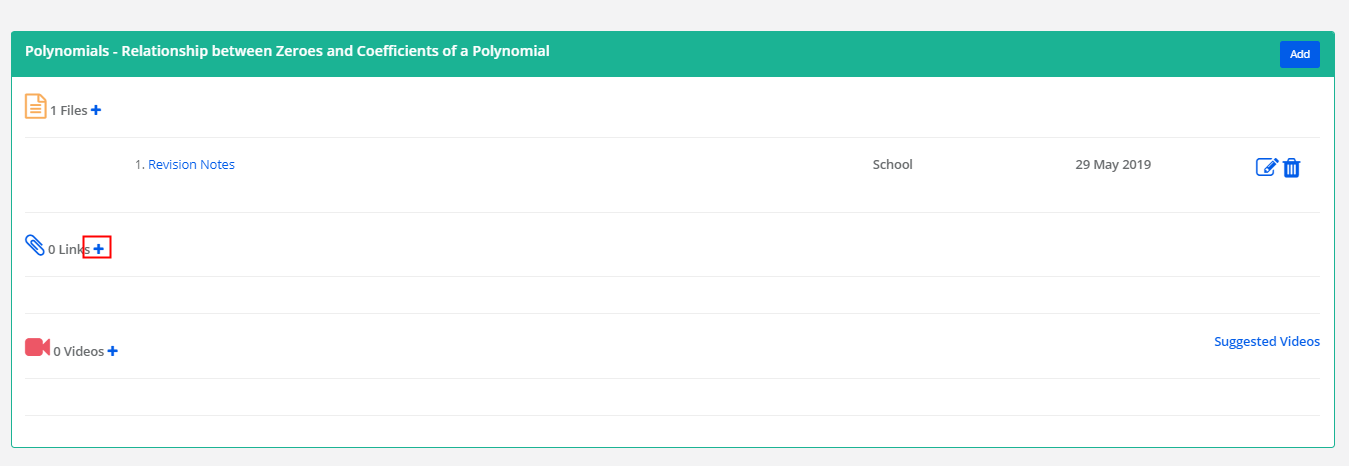
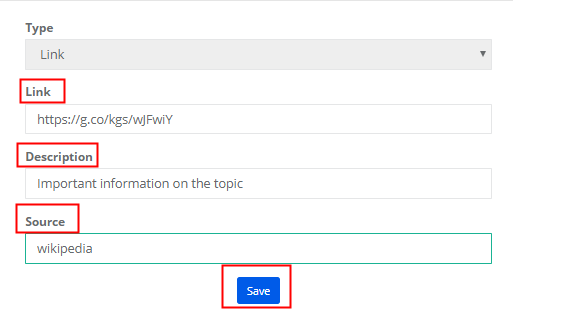
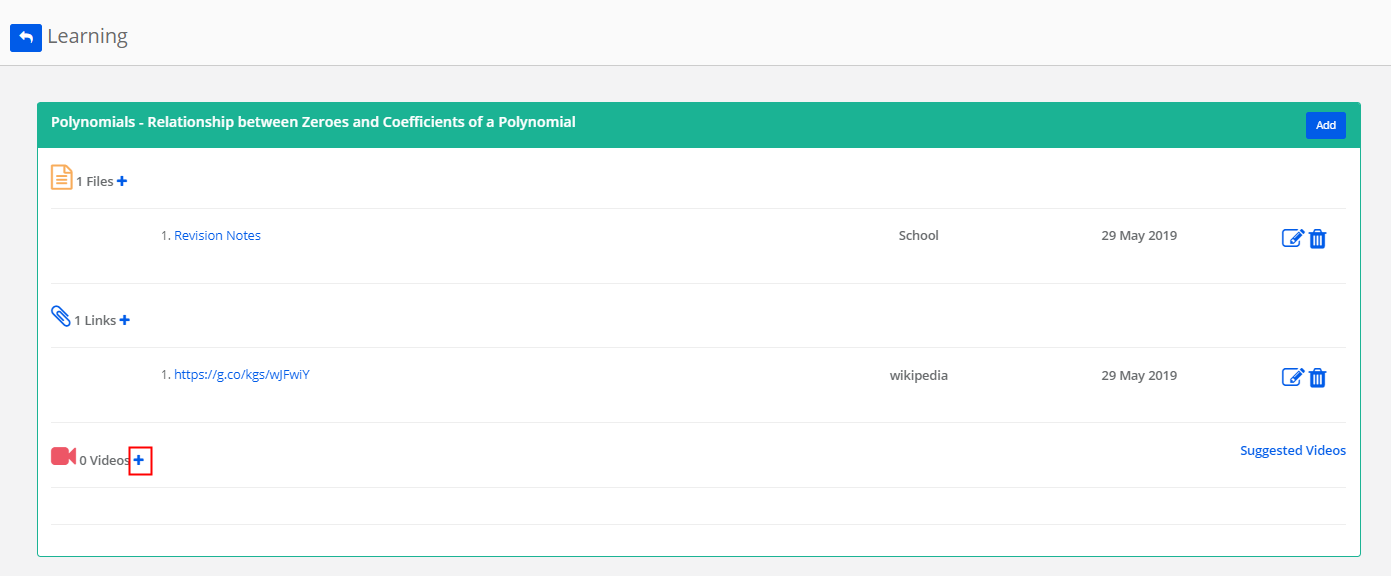
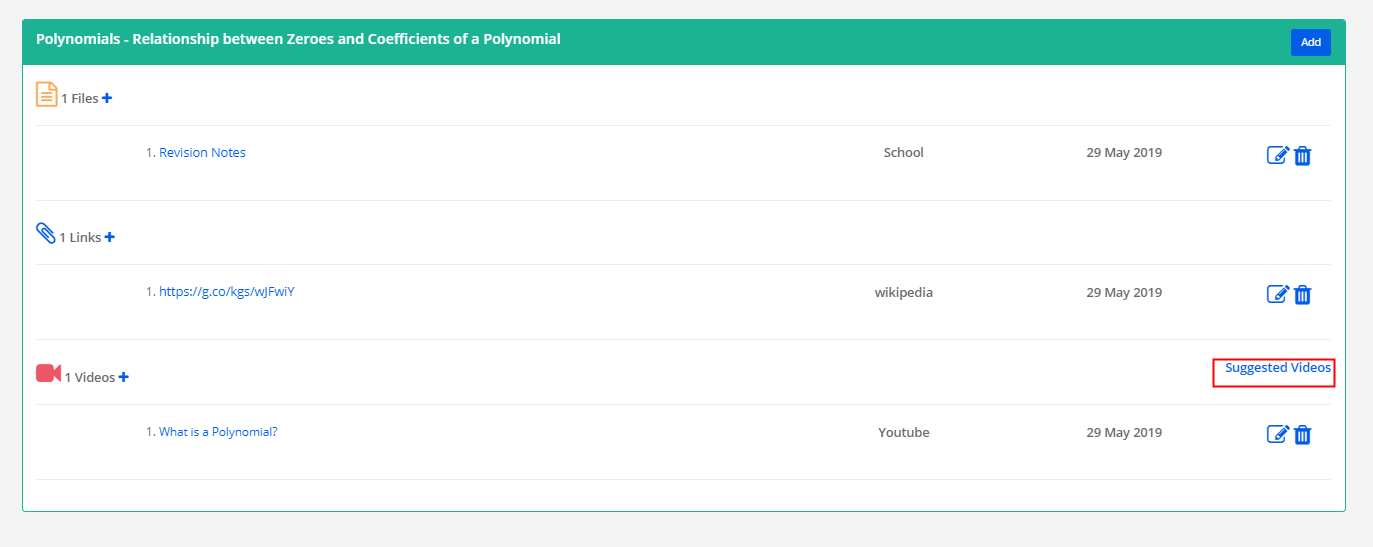
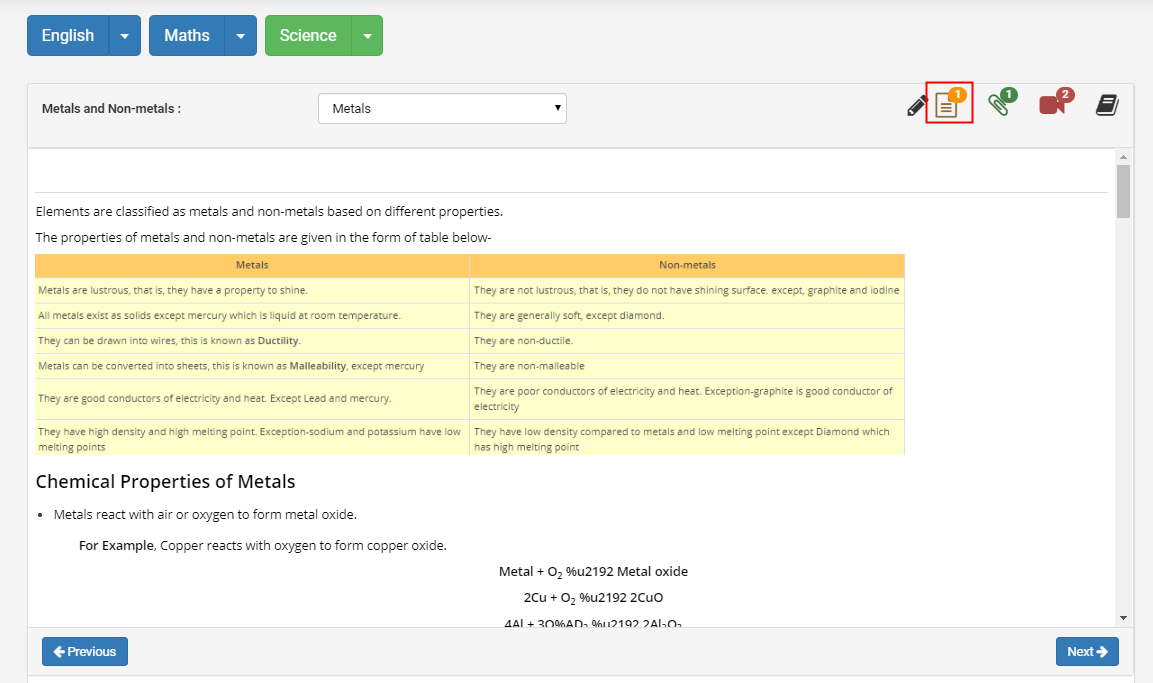
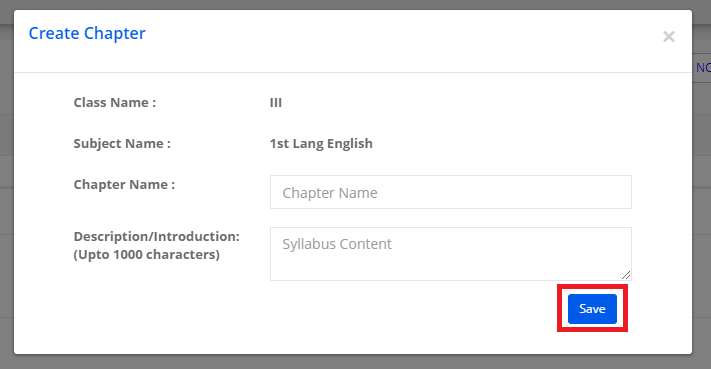
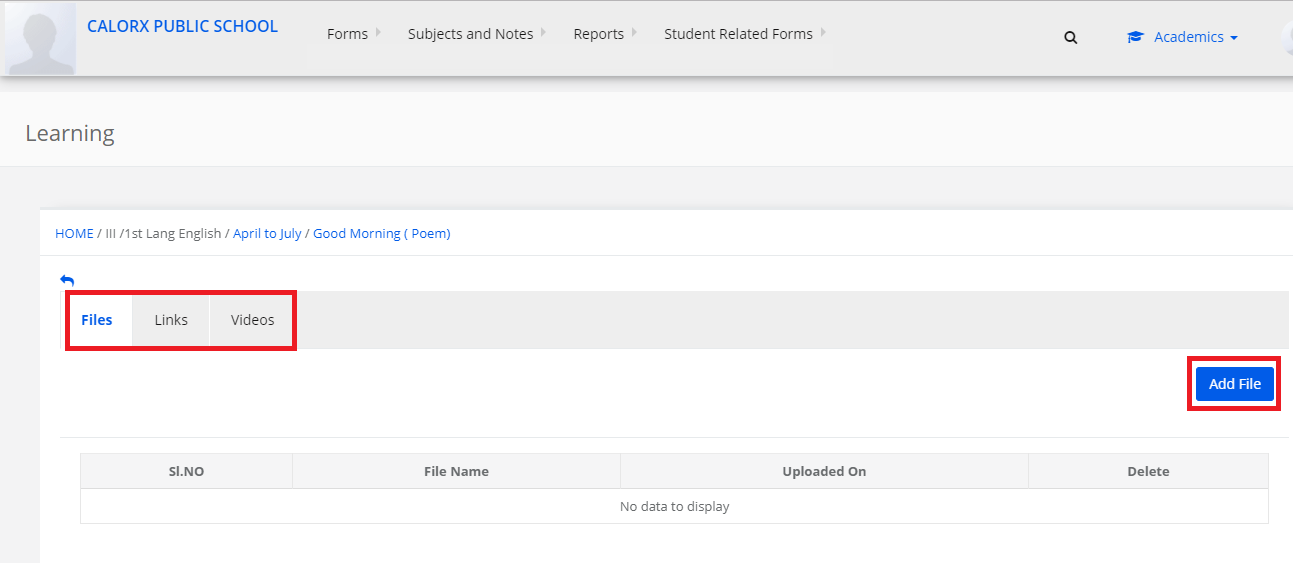
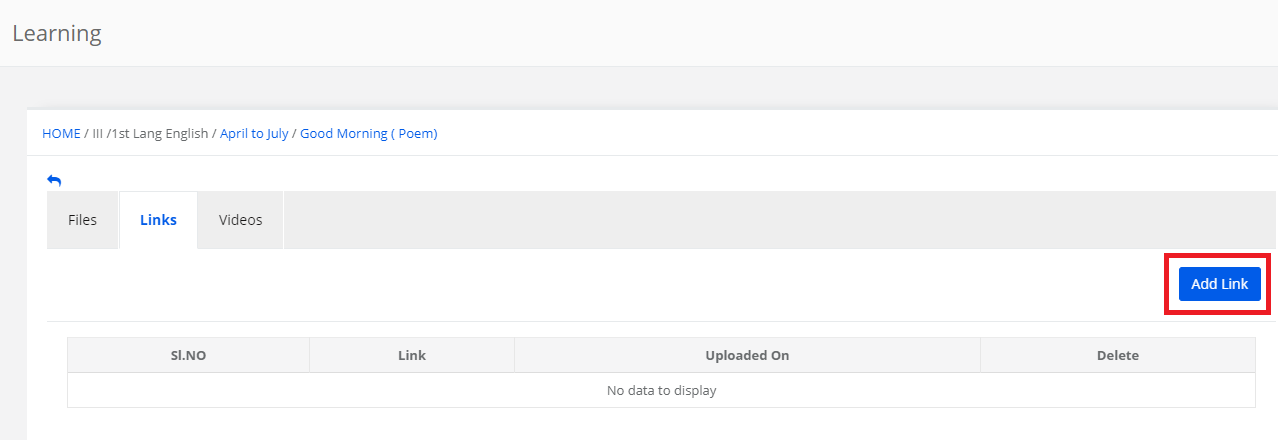
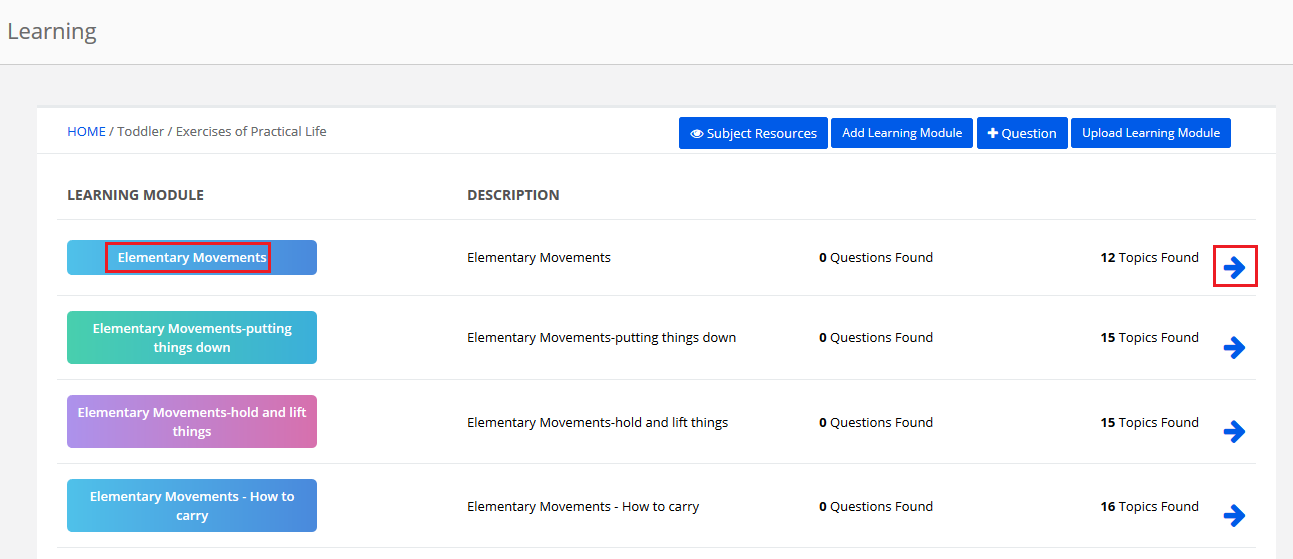
Step 8: It will list the Learning modules available for the subject. To add the new learning module, click on Add Learning Module option.

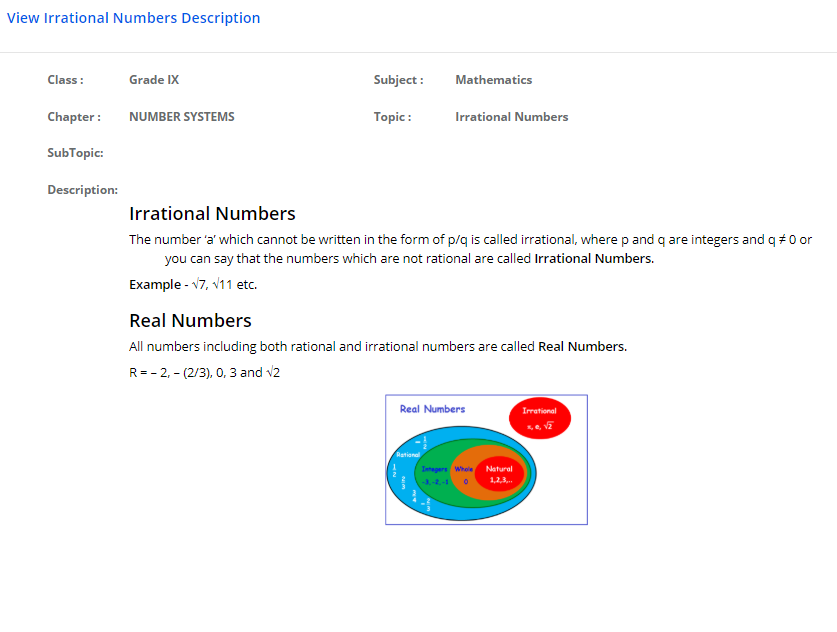
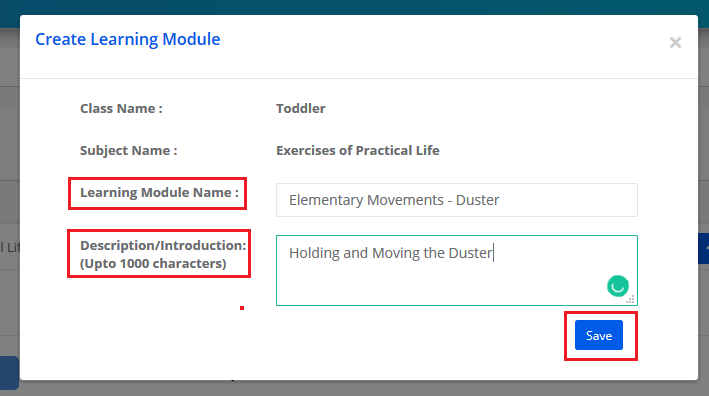
Step 9: Enter Learning Module Name, Description and click on Save button.

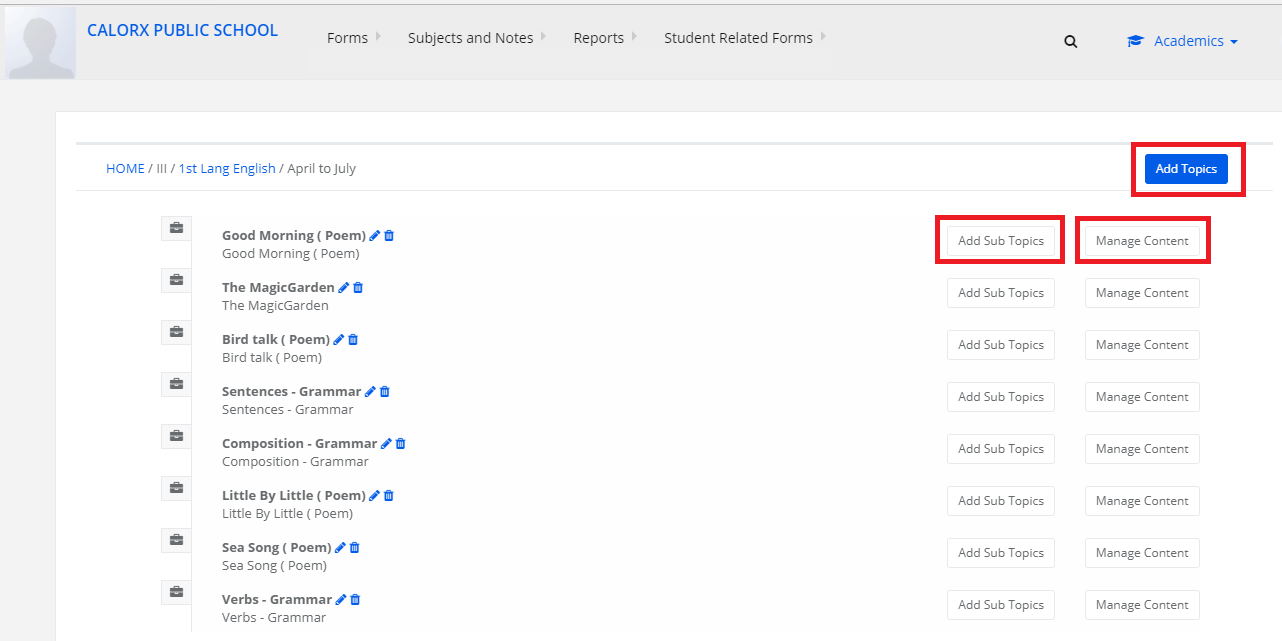
Step 10: To enter topics of the Learning module, Click on the module name or Arrow against the Module.

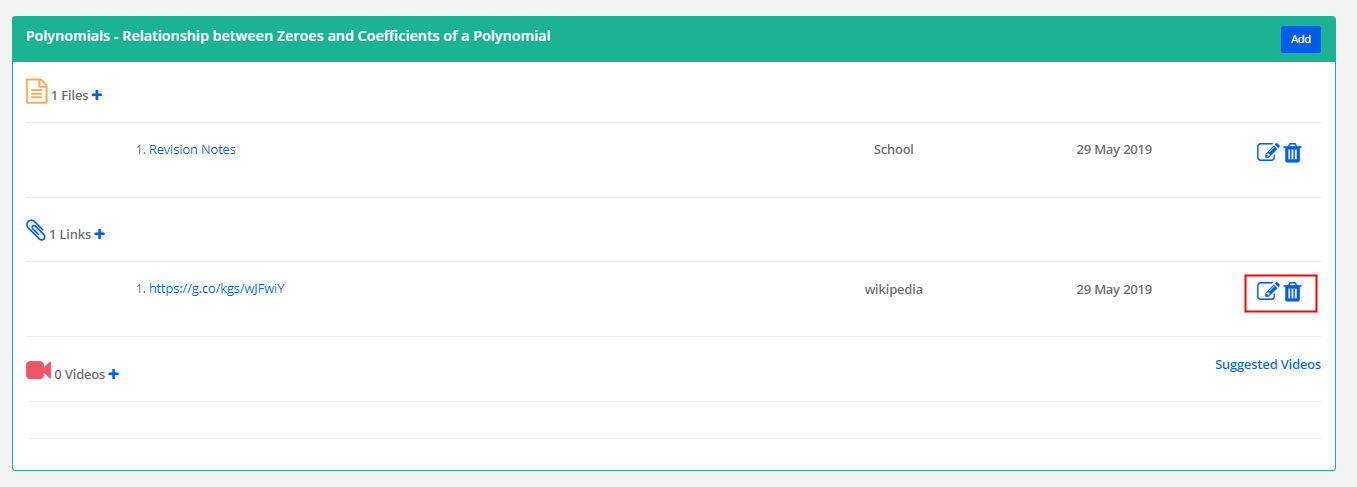
Step 11: It will list the available topics under learning module. To add a new topic, click on Add new option.

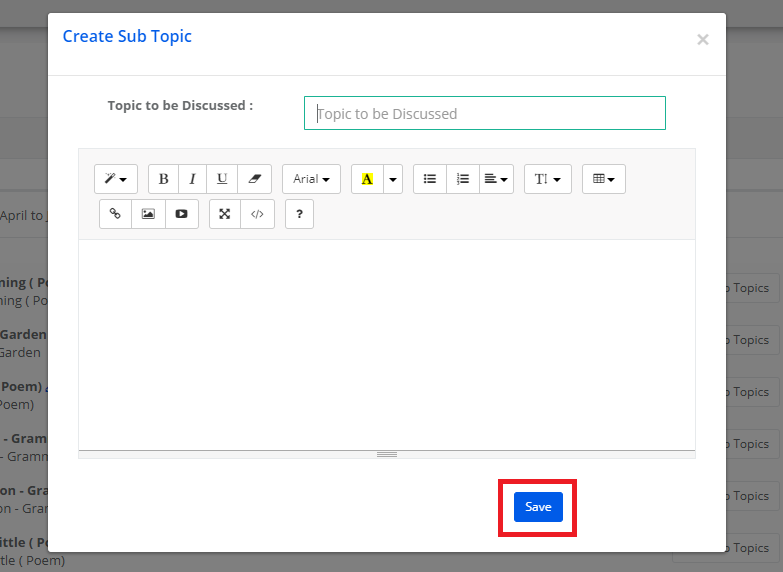
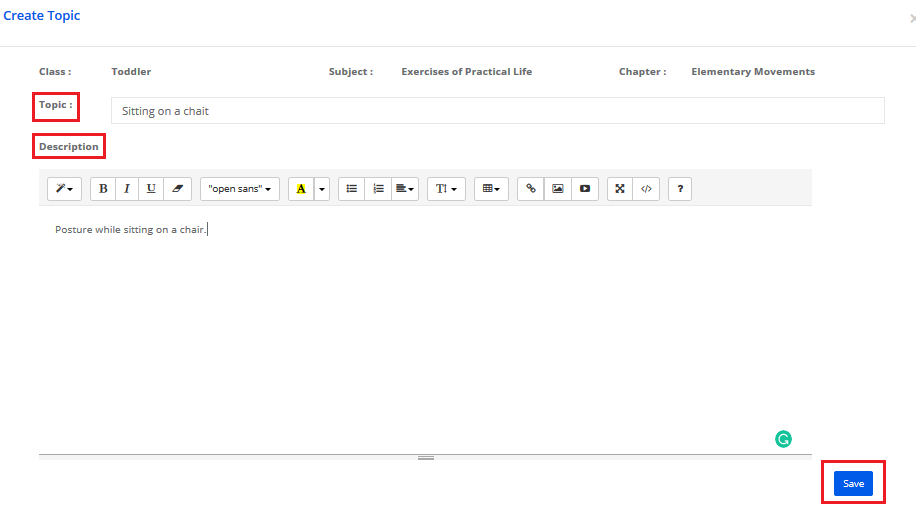
Step 12: Enter Topic, Description and click on Save button.

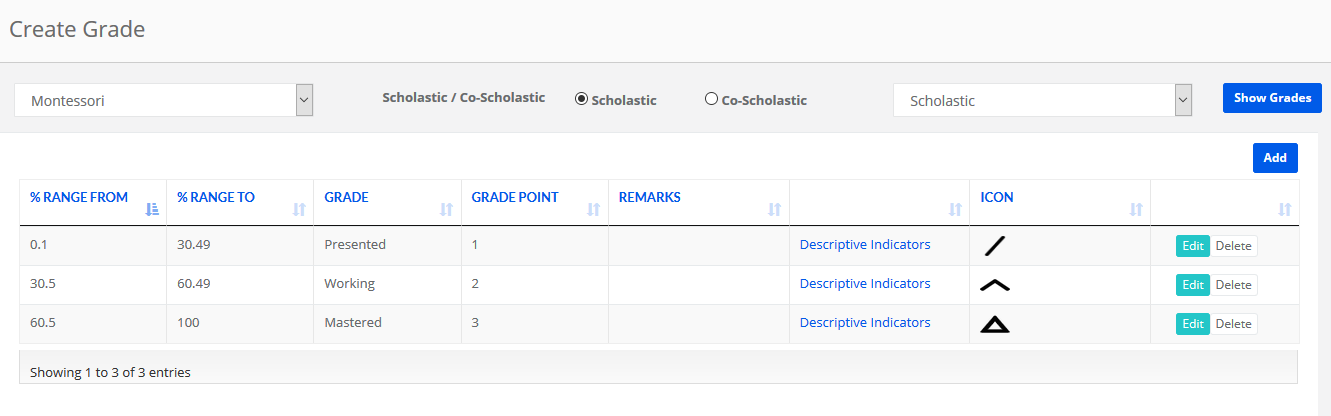
Grading scale creation:
Step 13:
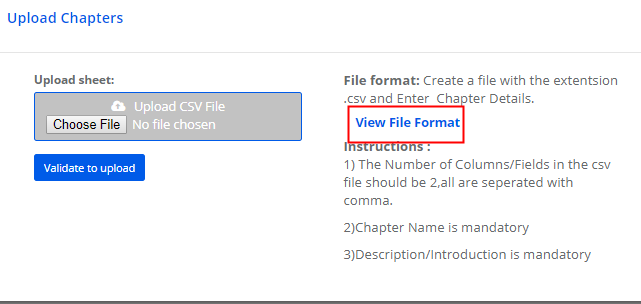
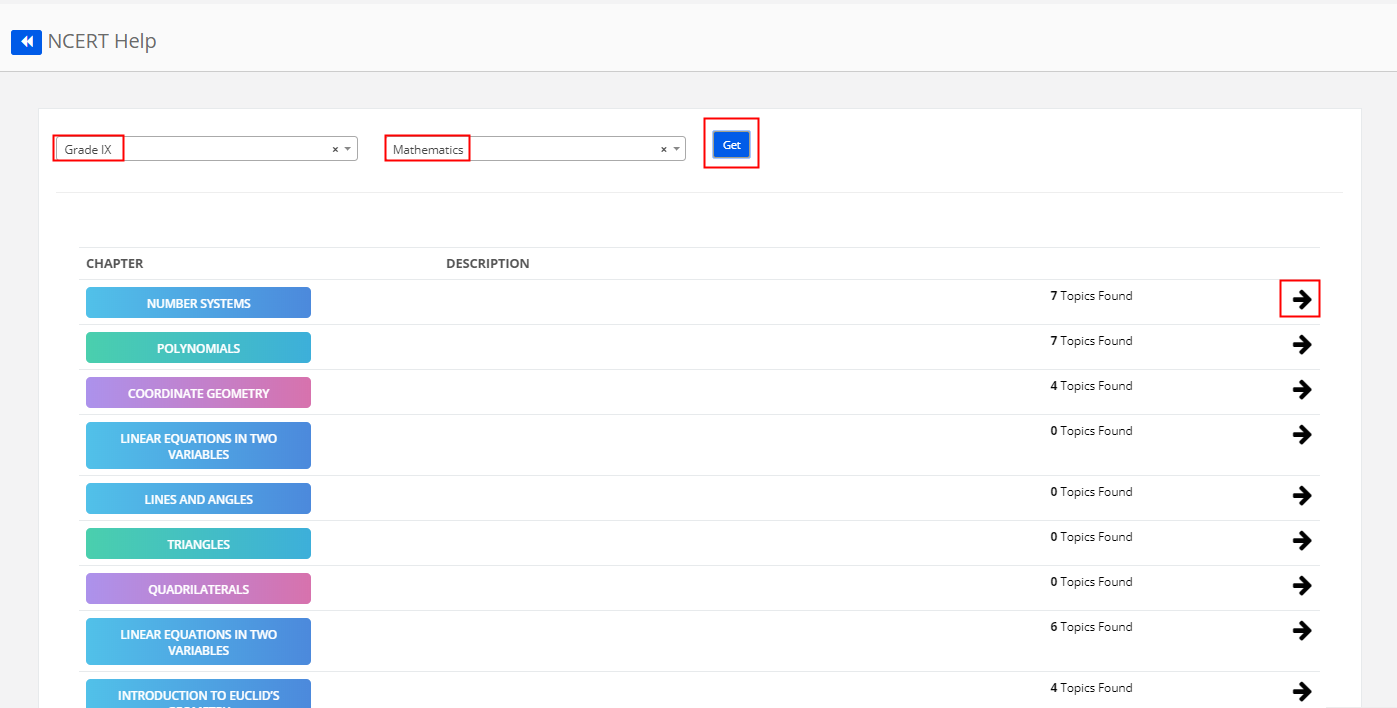
Before creating a grading scale, please make sure the structure, terms, parts, subject mapping is done. Please refer to the following link for help manual on the same.

Grade Book Structure creation:
https://kb.myclassboard.com/how-to-create-structure/
https://kb.myclassboard.com/how-to-create-terms/
https://kb.myclassboard.com/how-to-create-evaluations/
https://kb.myclassboard.com/how-to-create-parts/
https://kb.myclassboard.com/how-to-create-subjects-2/
https://kb.myclassboard.com/how-to-map-subjects/

Grading Scale creation:
https://kb.myclassboard.com/how-to-create-grading-scale/

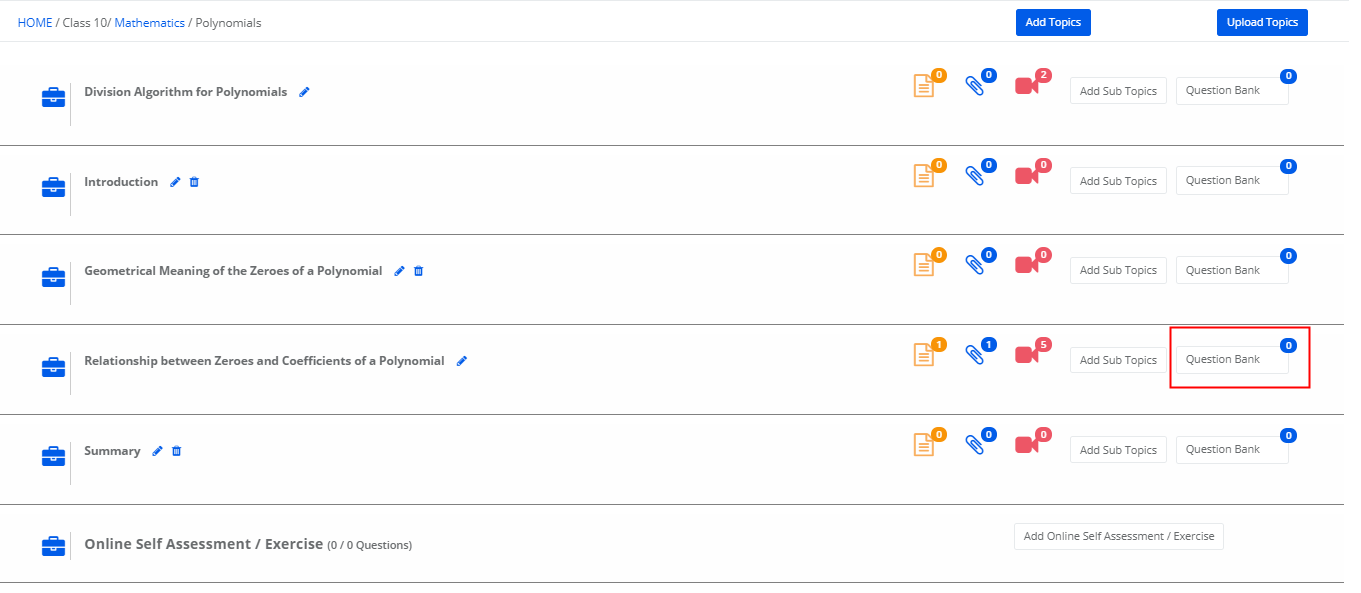
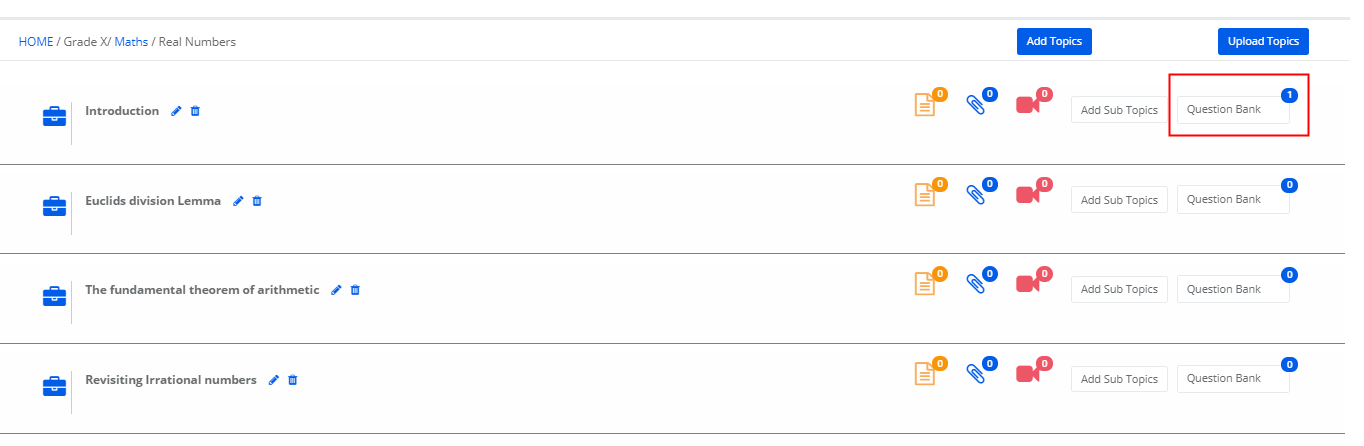
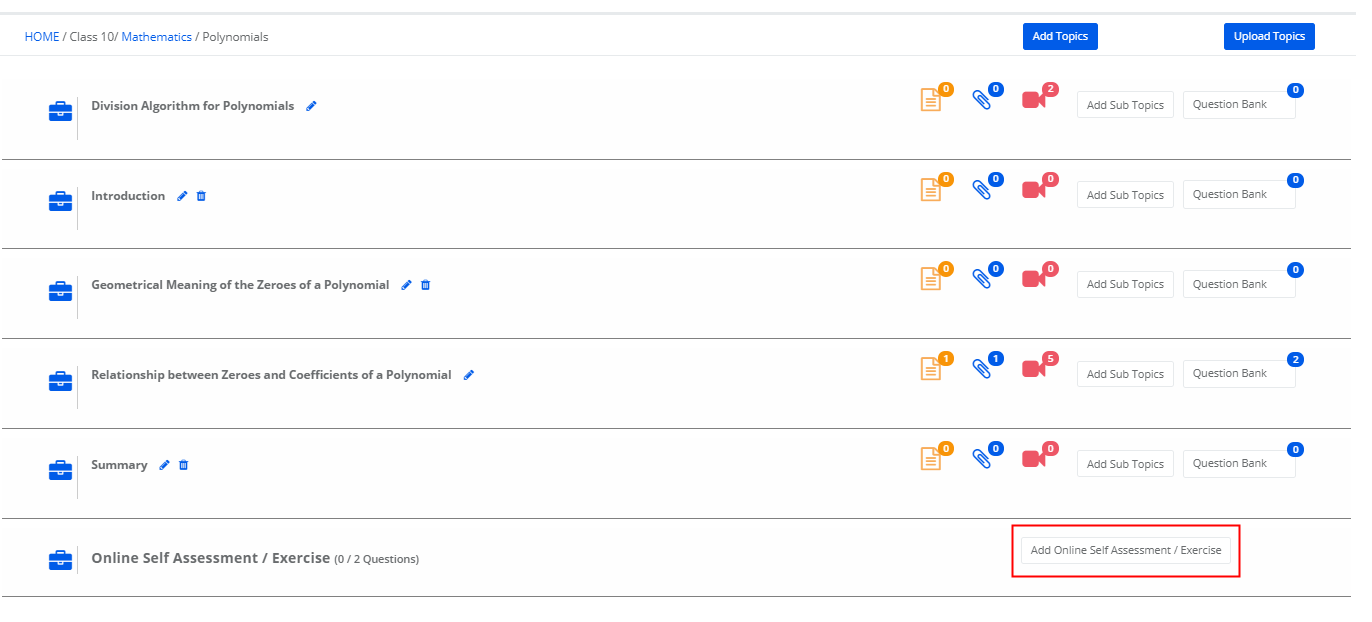
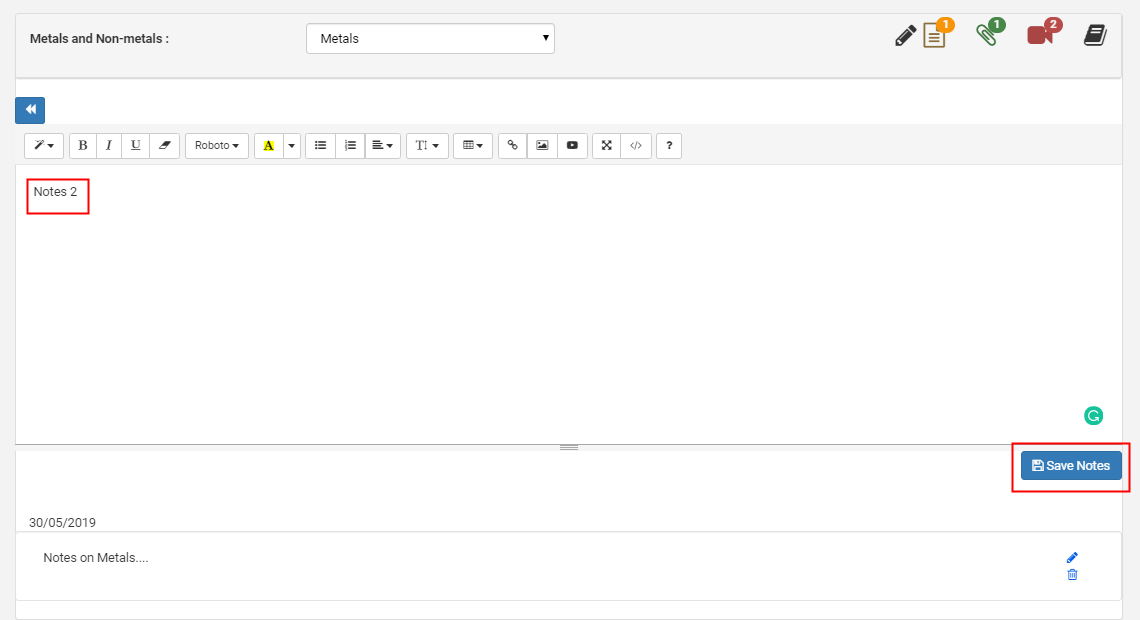
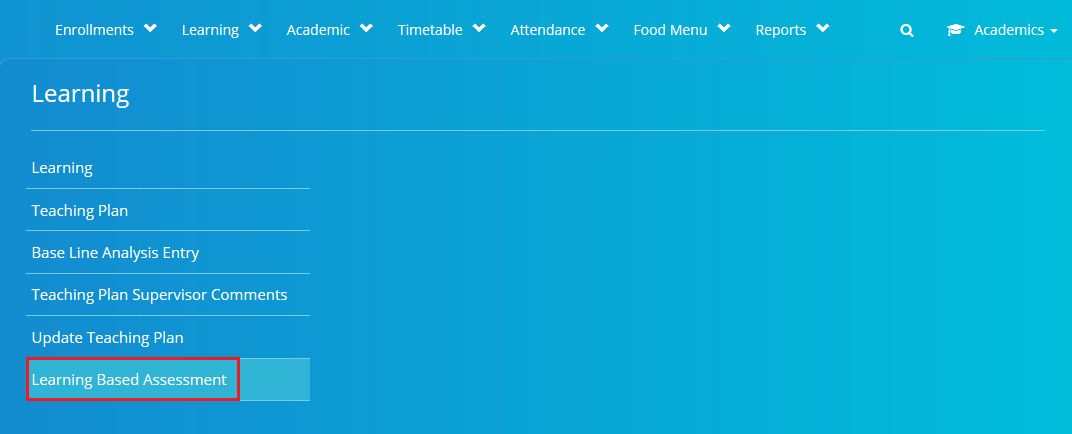
Recording the grades:

Step 14: To record the grades, click on Academics module.

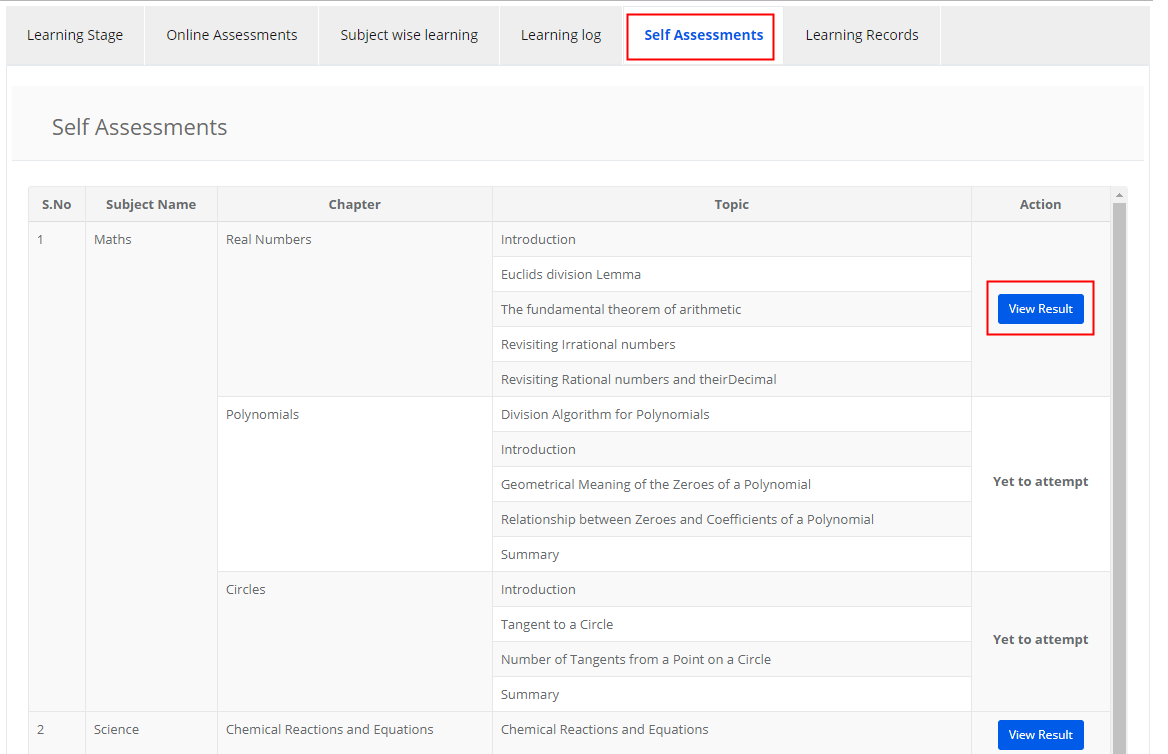
Step 15: Choose Learning-Based Assessment option under Learning Menu.

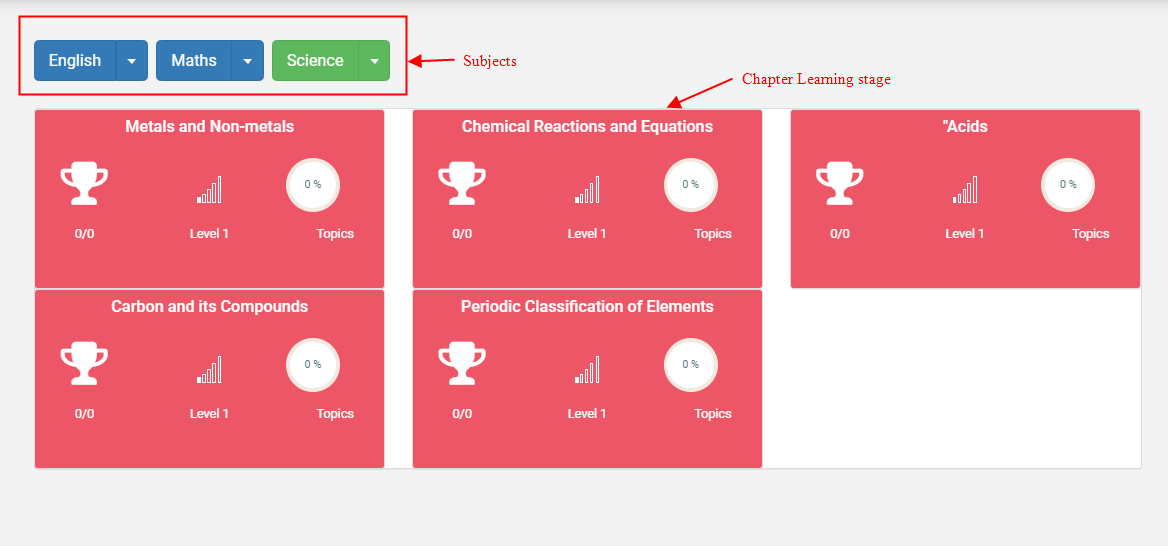
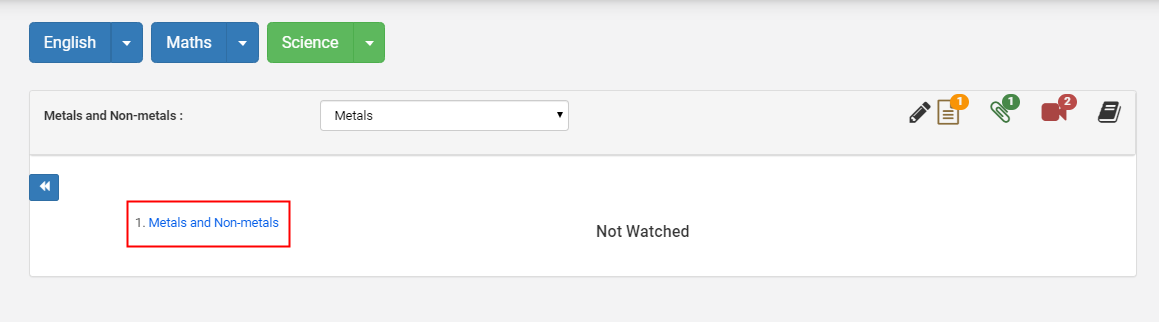
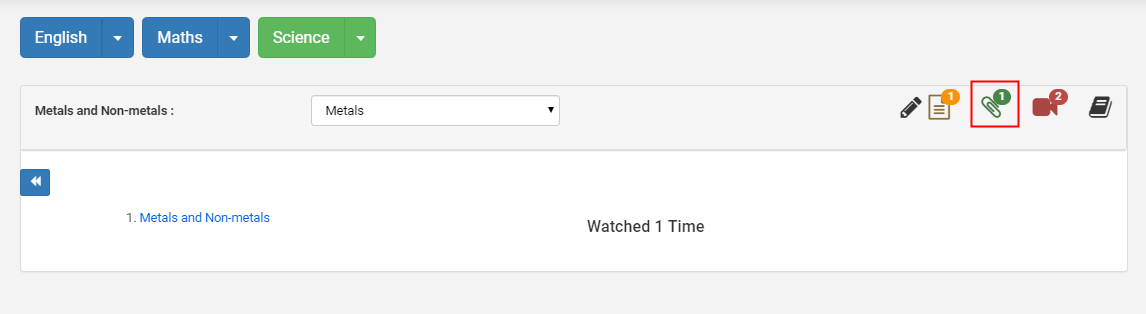
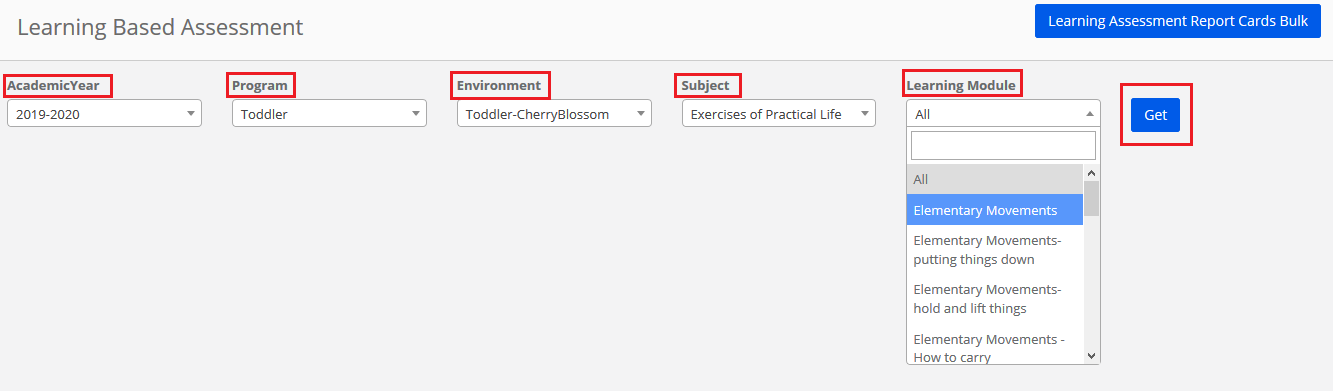
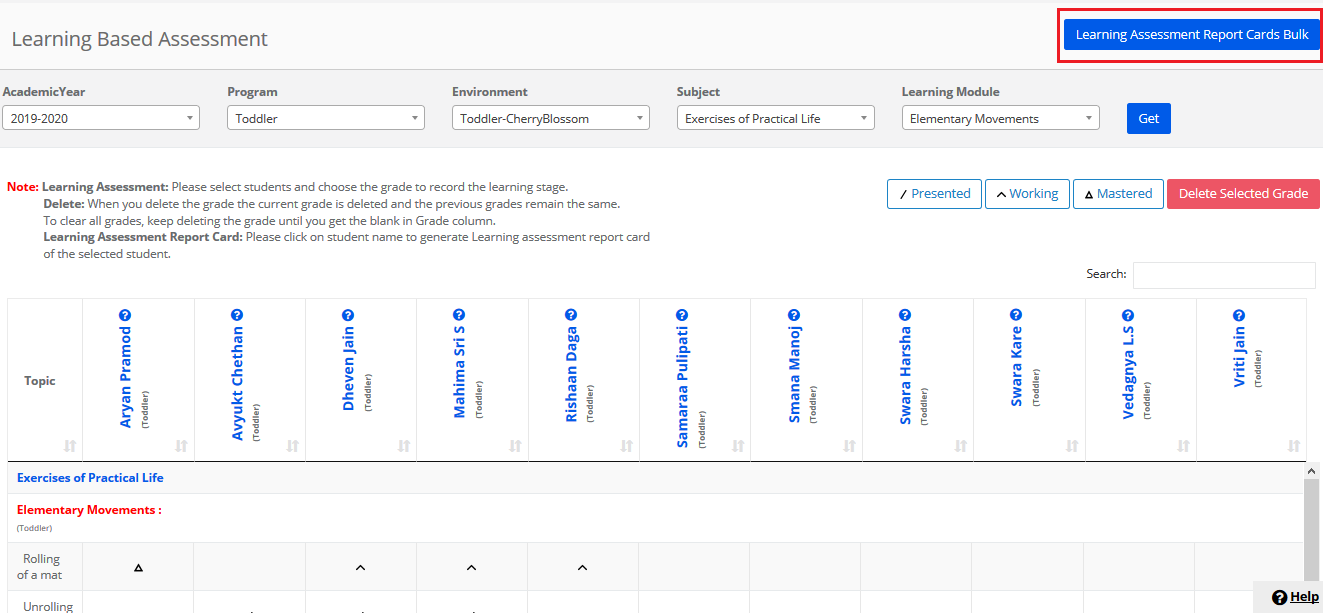
Step 16: Choose Academic year, Program, Environment, Subject, All Learning Modules or a specific Learning Module and click on Get to generate the list of students and topics of the selected Learning Environment.

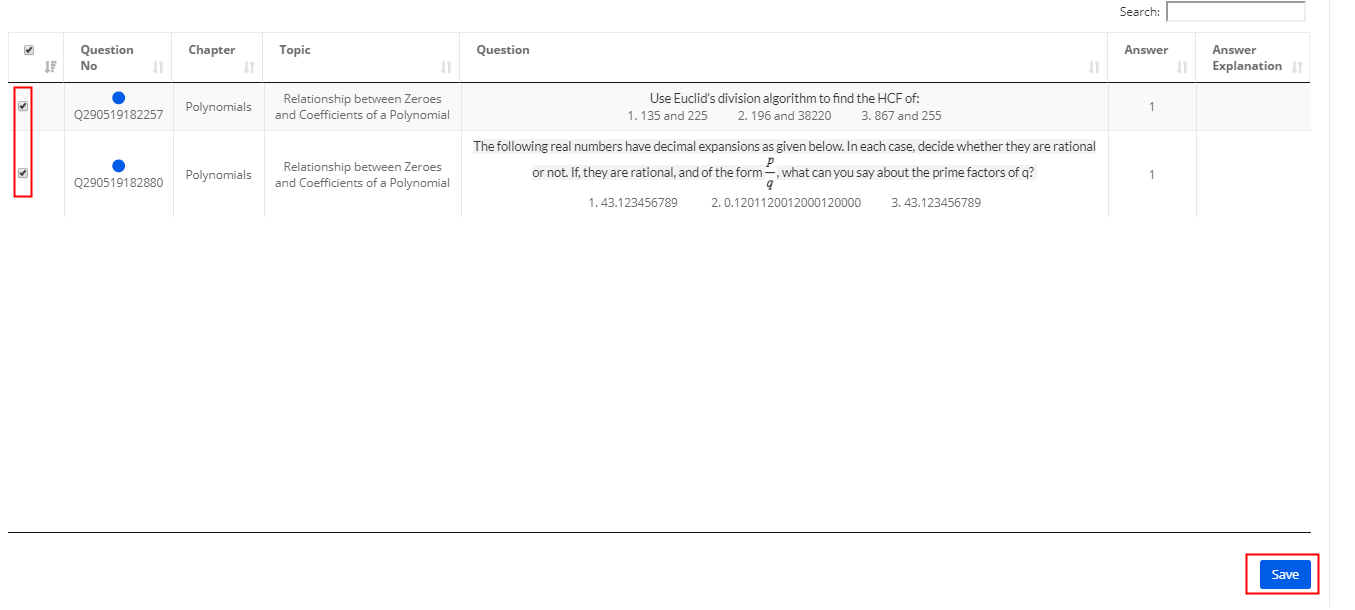
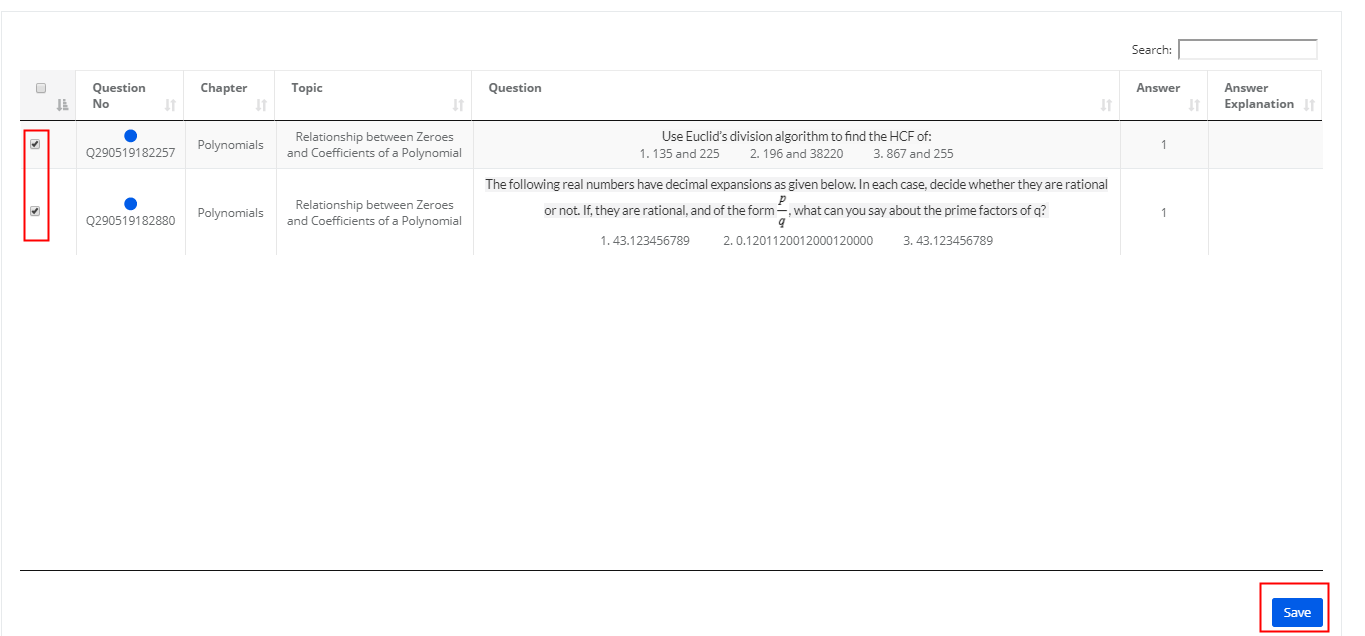
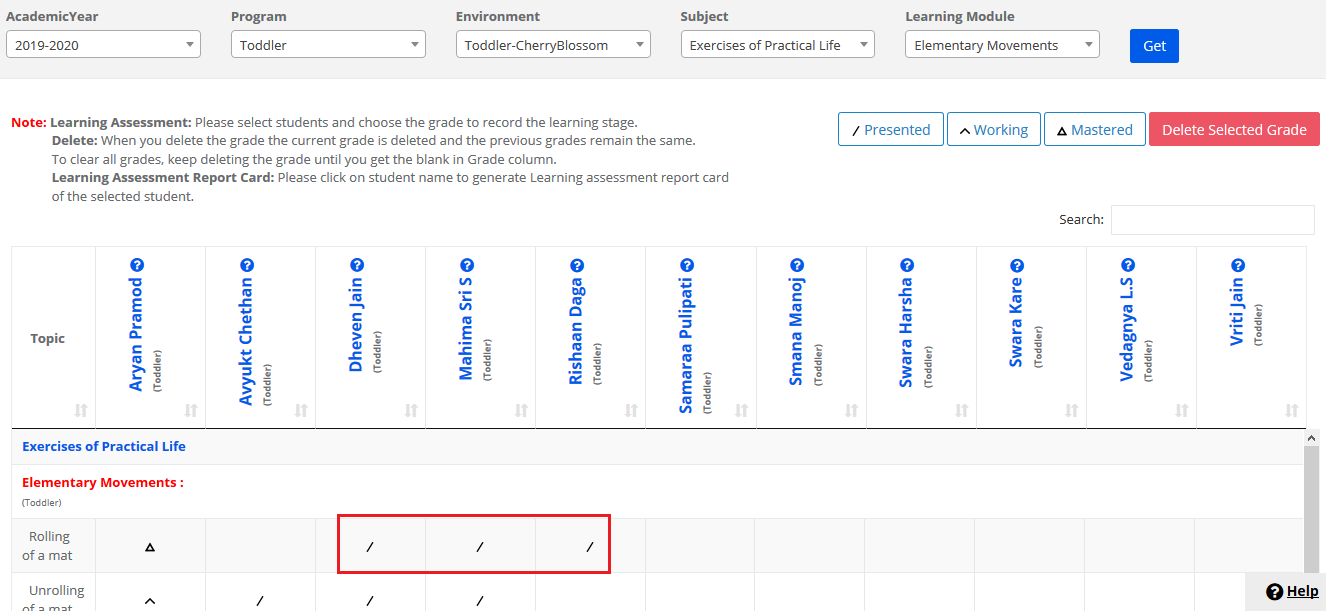
Step 17: Select the students for whom you want to save grades against a topic.
Click on the grade to save the grades for the selected students.

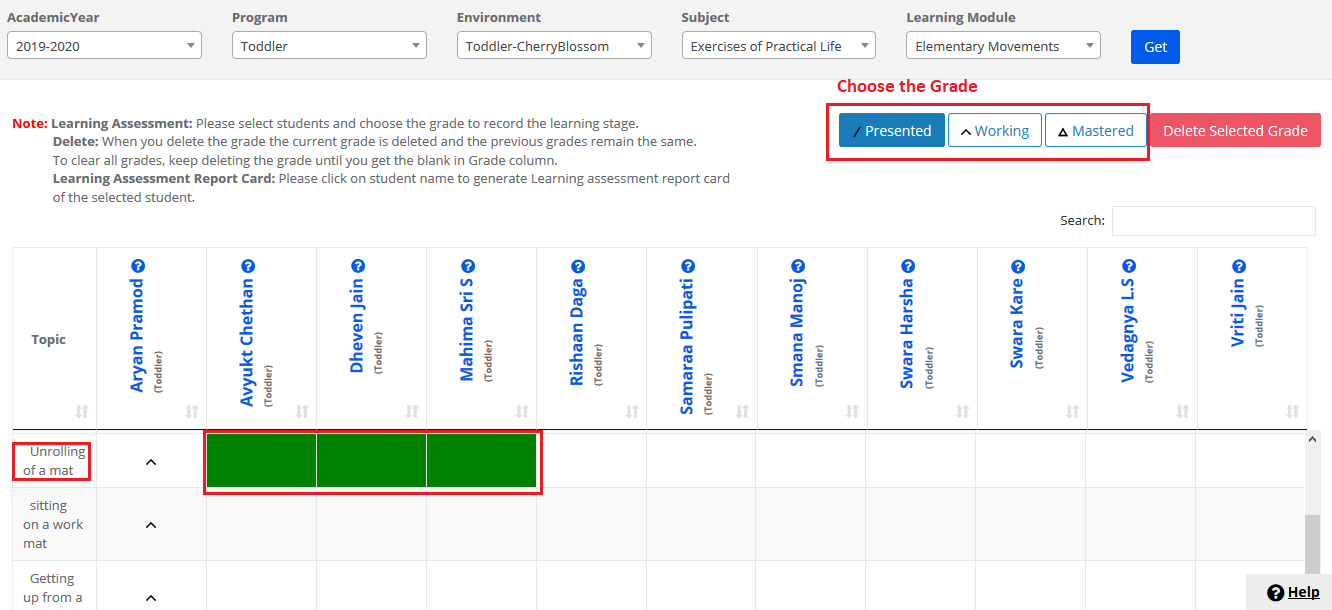
Step 18: Please note that the grade selected updates for the students.

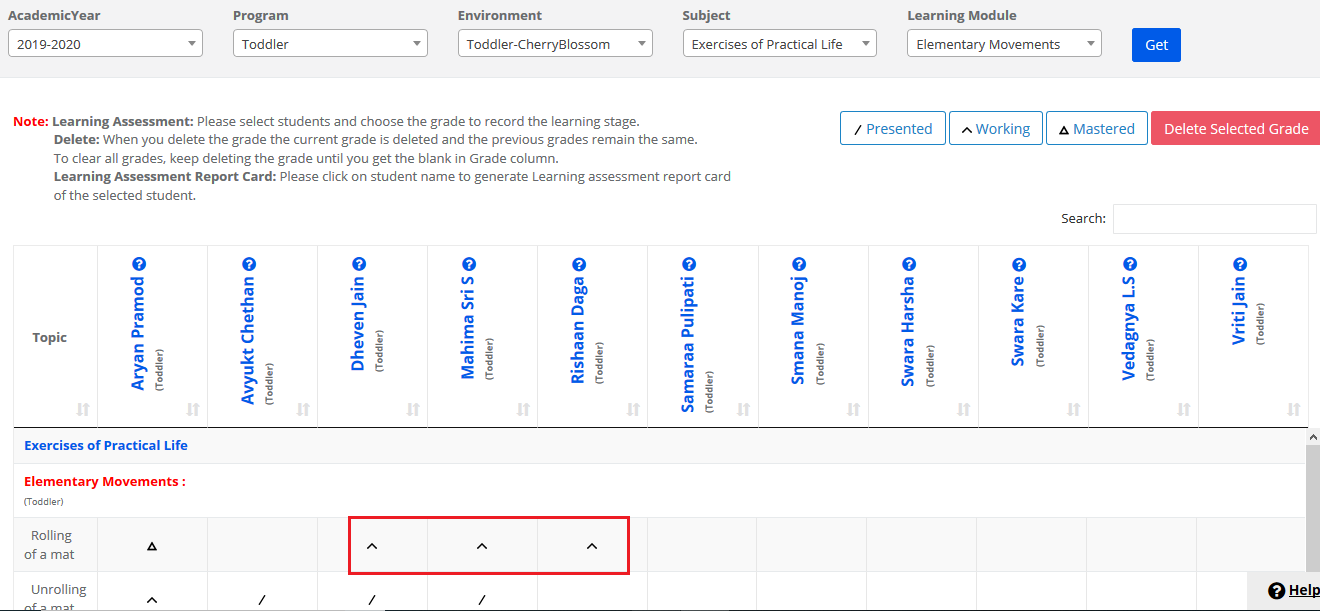
Step 19: To change the grades, Select the saved grades which you would like to change, click on the grade that you would need to update for the students.

Step 20: Please note that the grades are updated based on your selection of grade.

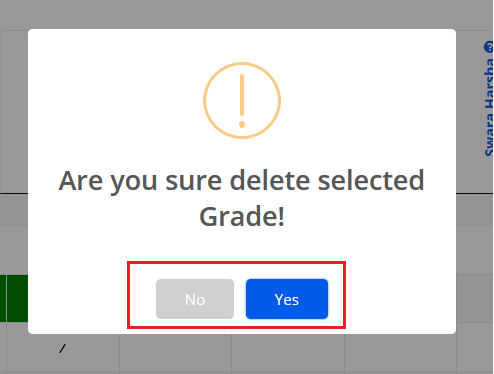
Step 21: To delete the grades, Select the grades and click on delete selected grades option.

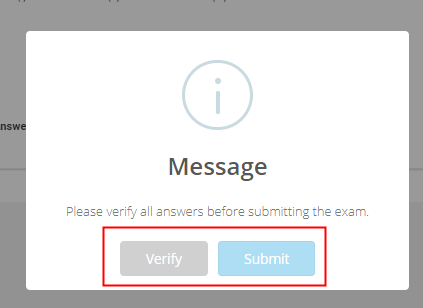
Step 22: Click Yes to confirm the deletion or No to revert.
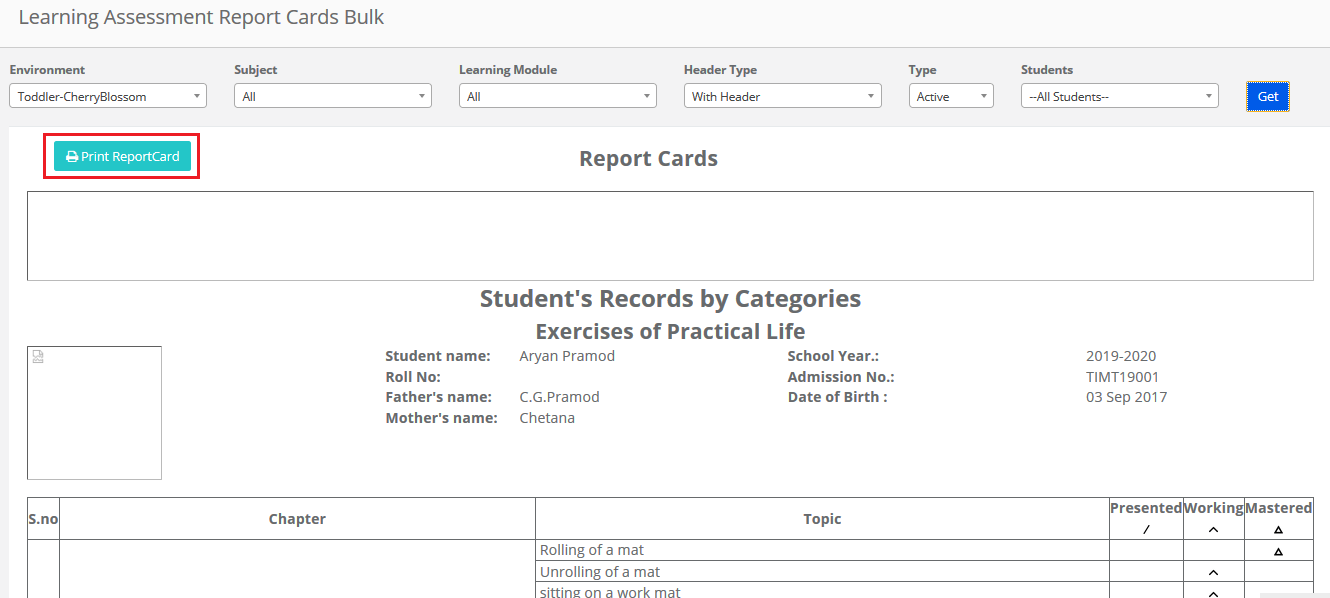
Generating Reports:
Reports can be generated individually or in bulk section wise.

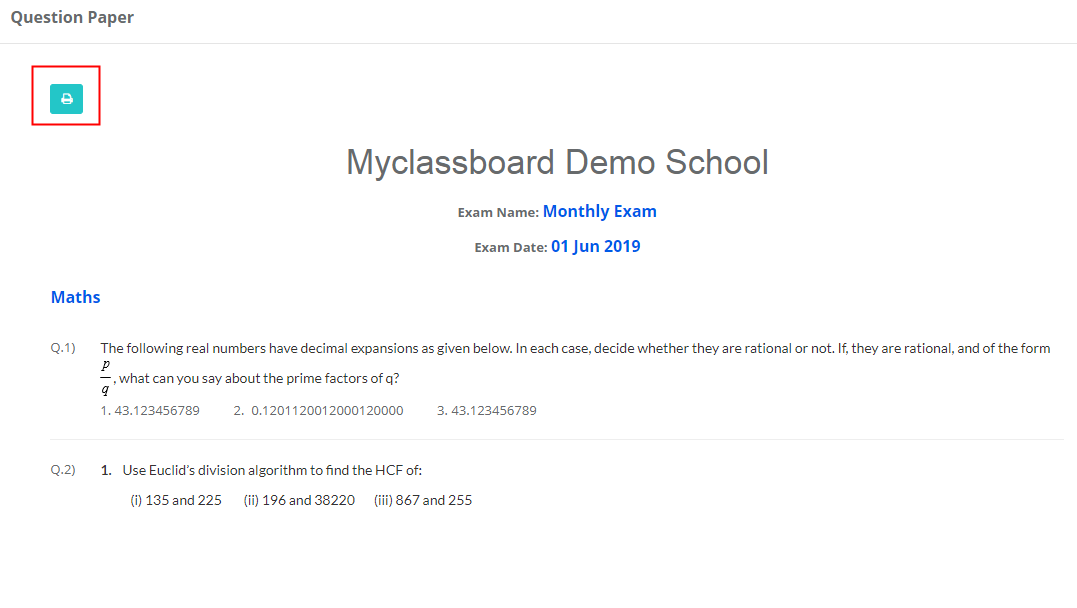
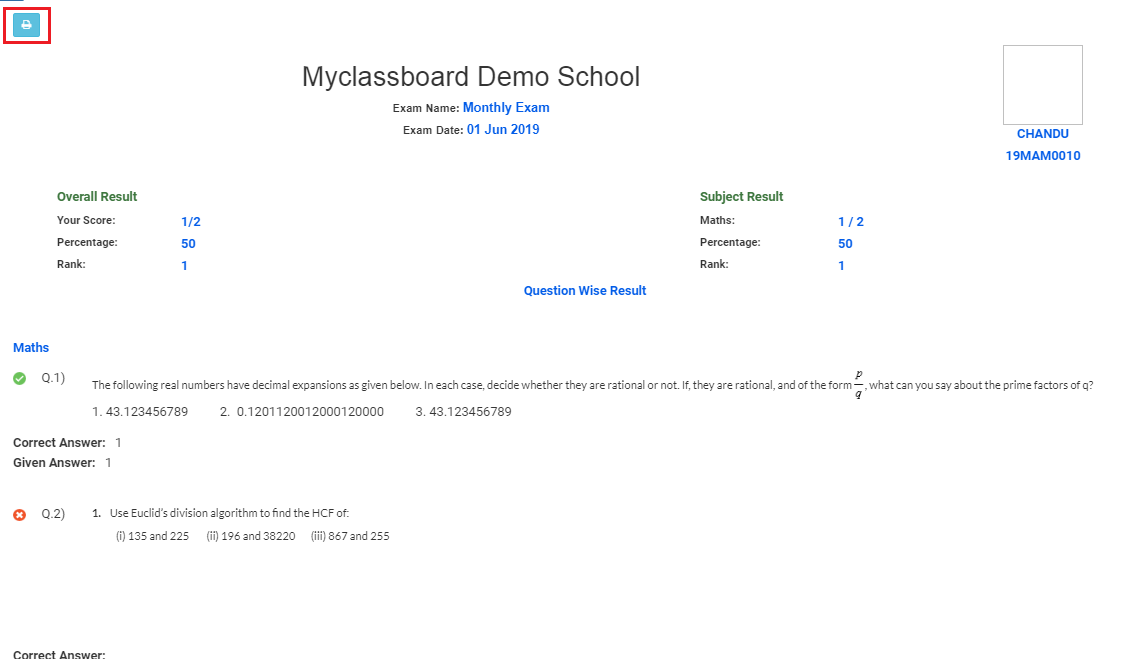
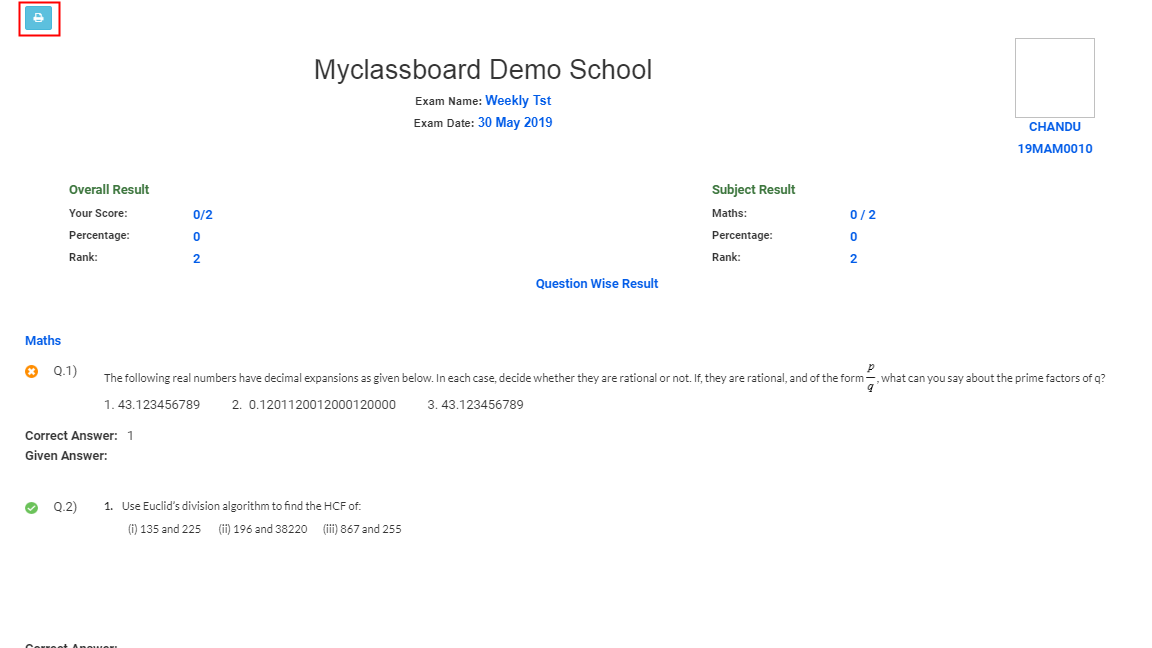
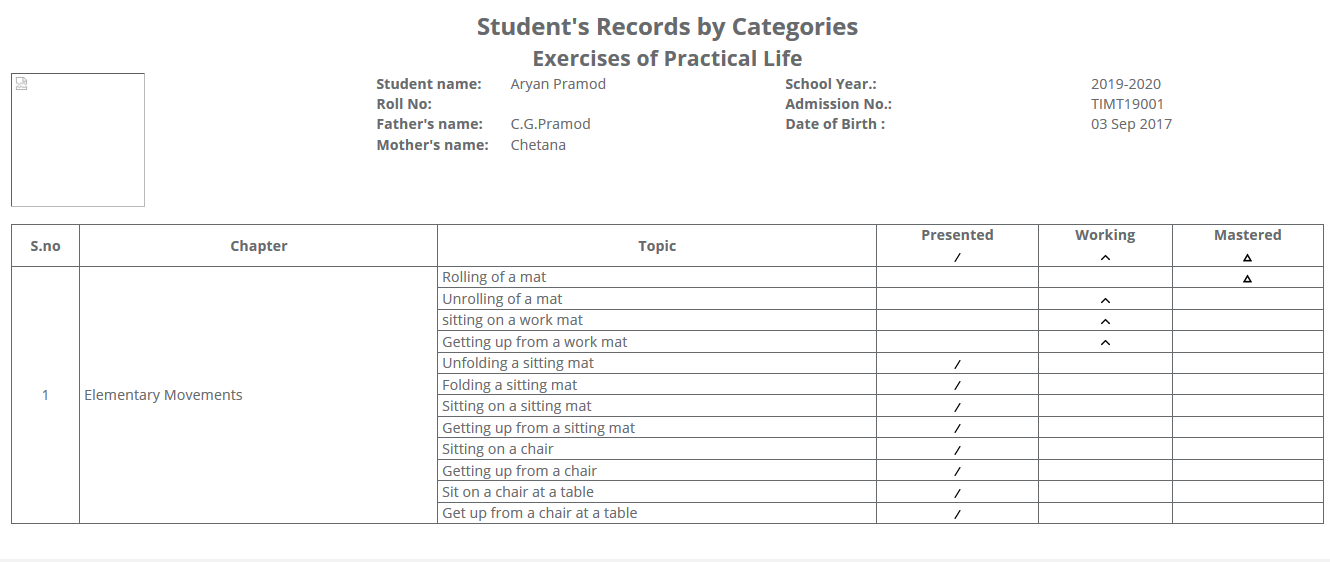
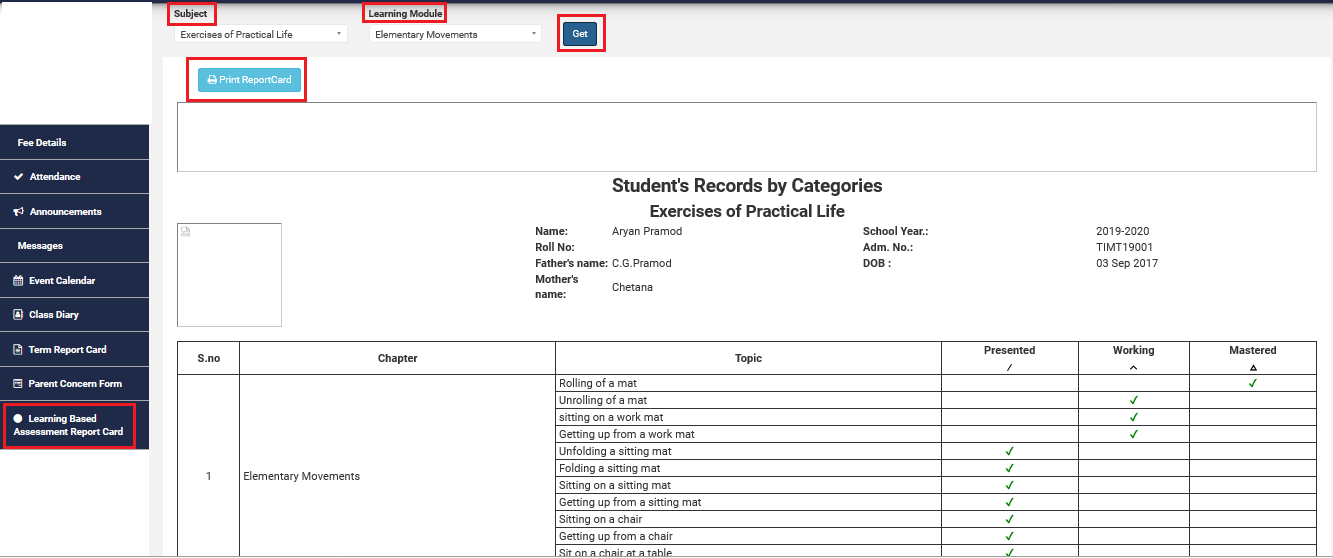
Step 23: To generate the report for an individual student, click on the name of the student to generate the report card for the selected student.

Step 24: The report card is generated as follows for the selected student.

Step 25: To generate the report cards in bulk, Click on Learning Assessment Report Cards Bulk option to generate a report card for the students in the selected Environment.

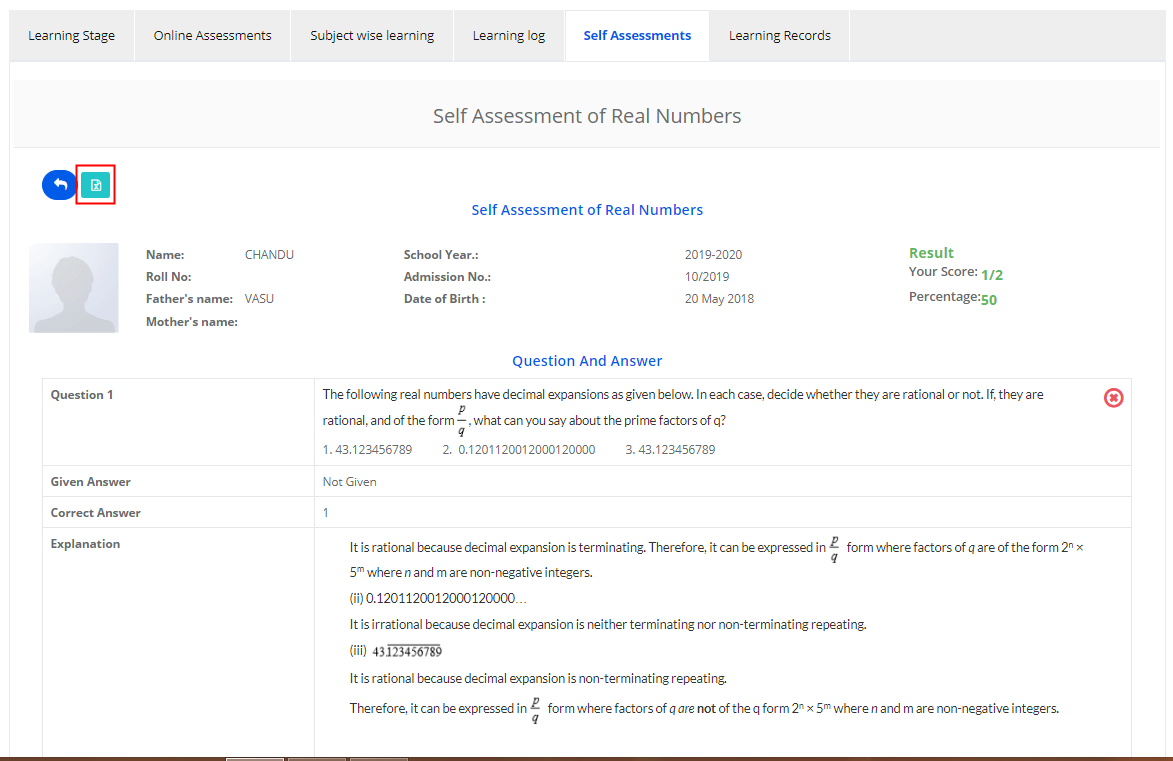
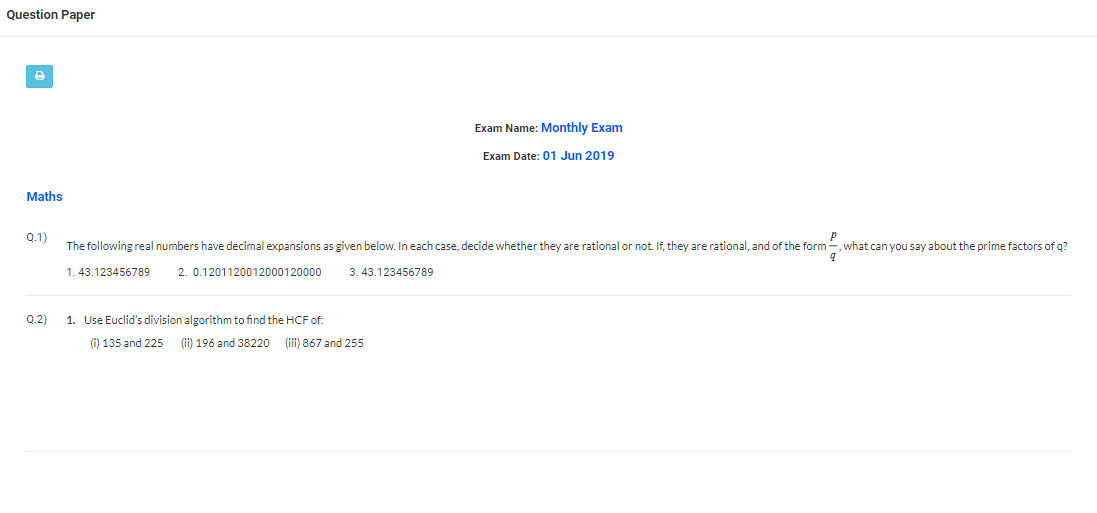
Step 26: Click on Print Report Card option print the generated reports or save the same in PDF.

Reporting for the parent: The report card of Learning-Based Assessment can be made available in parent login by enabling the link.
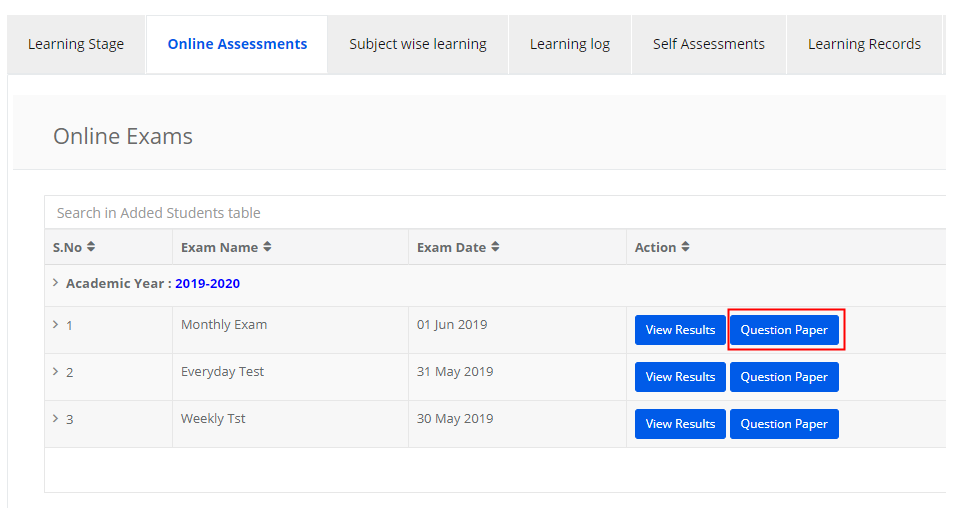
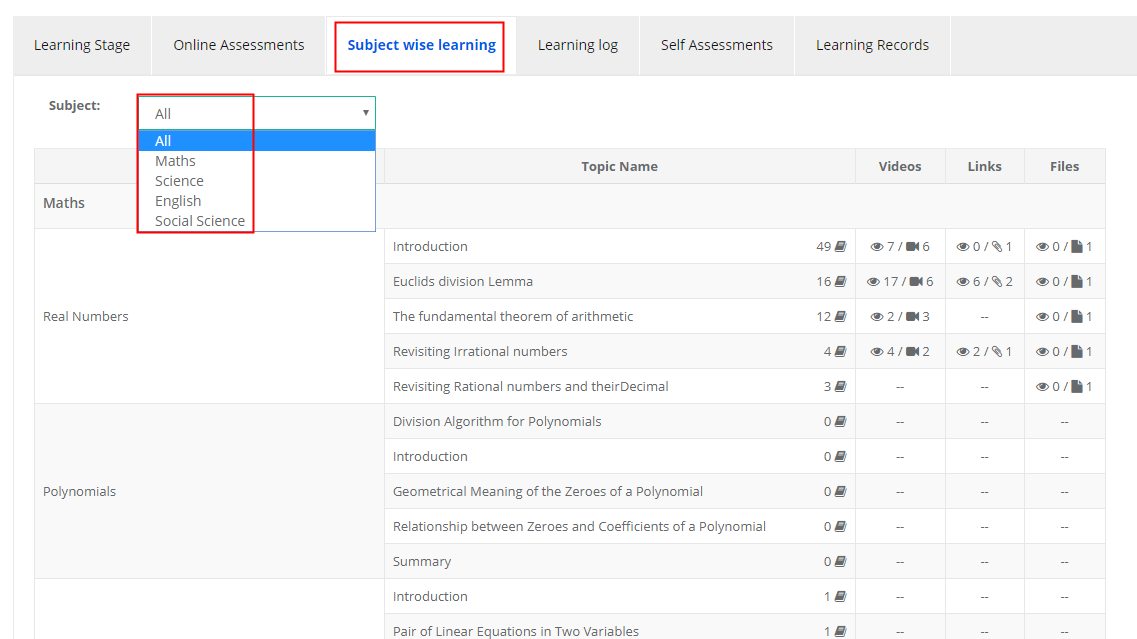
Step 27: Login to the parent portal, click on Learning-Based Assessment tab, choose Subject, learning modules as All or a selected module and click on Get to generate the report card.

Click on Print Report card to print the same or save it in PDF.

Note: Please note that when this link is enabled for a parent, As and when teacher updates the grades, they are visible for the parents in their login instantly.

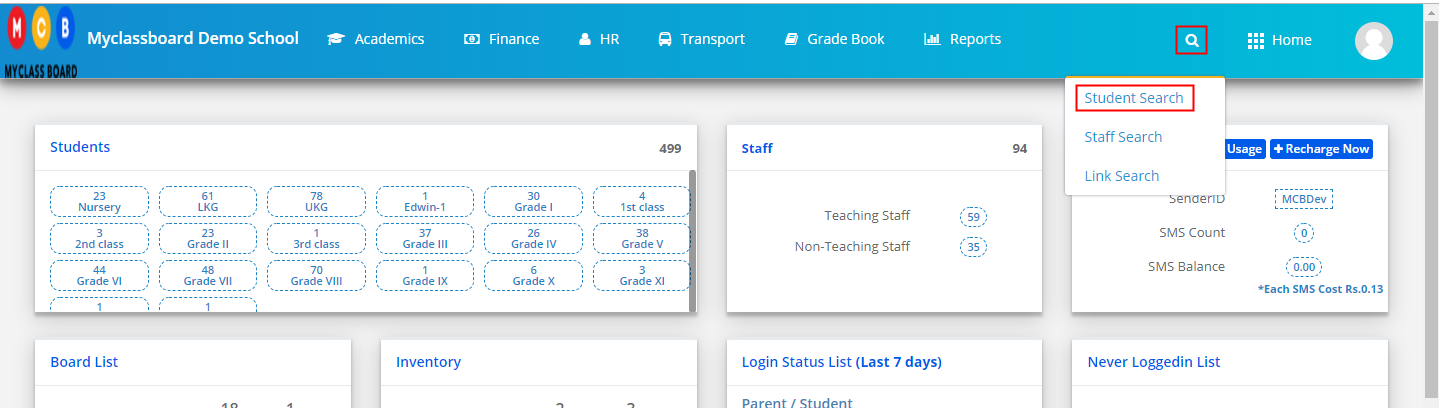
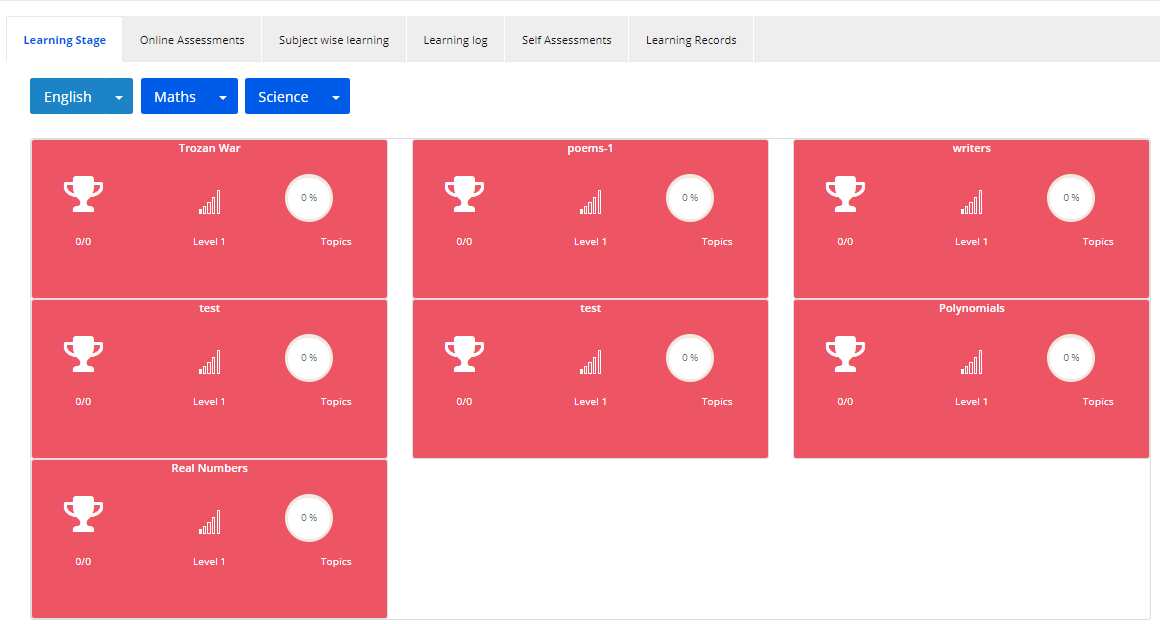
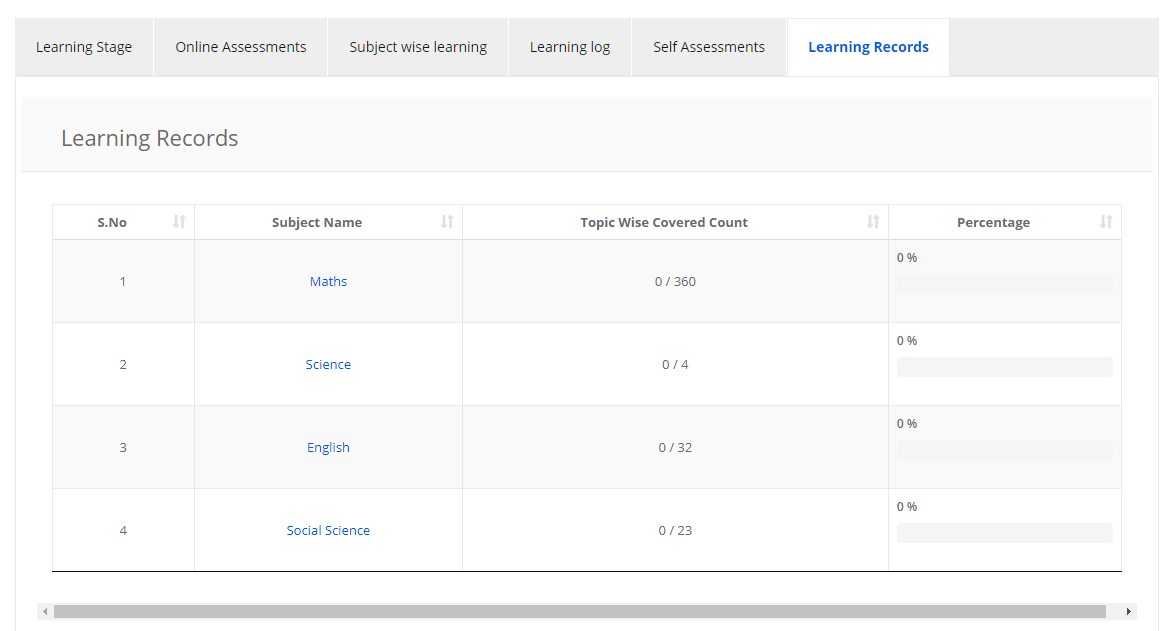
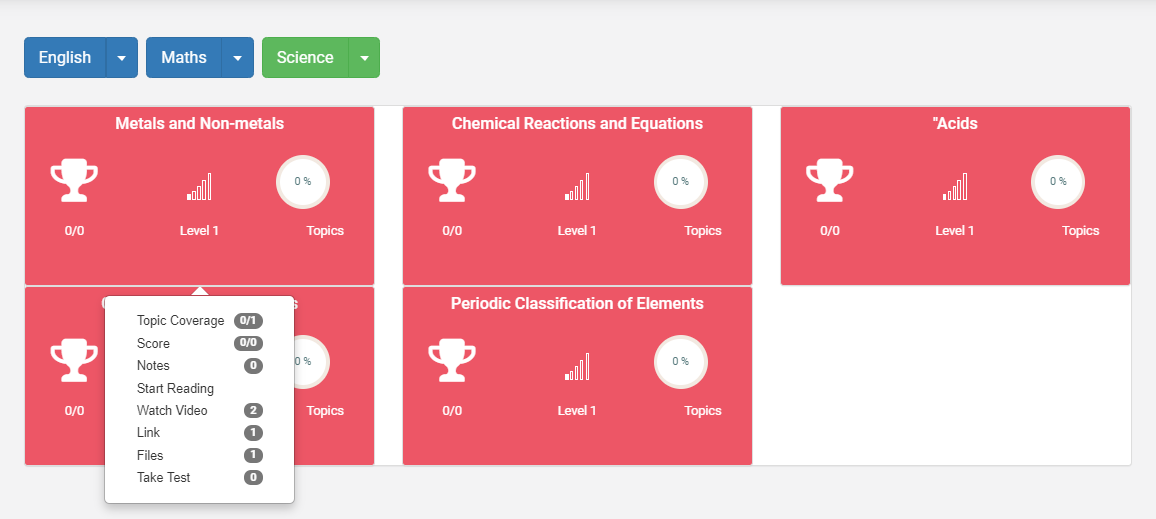
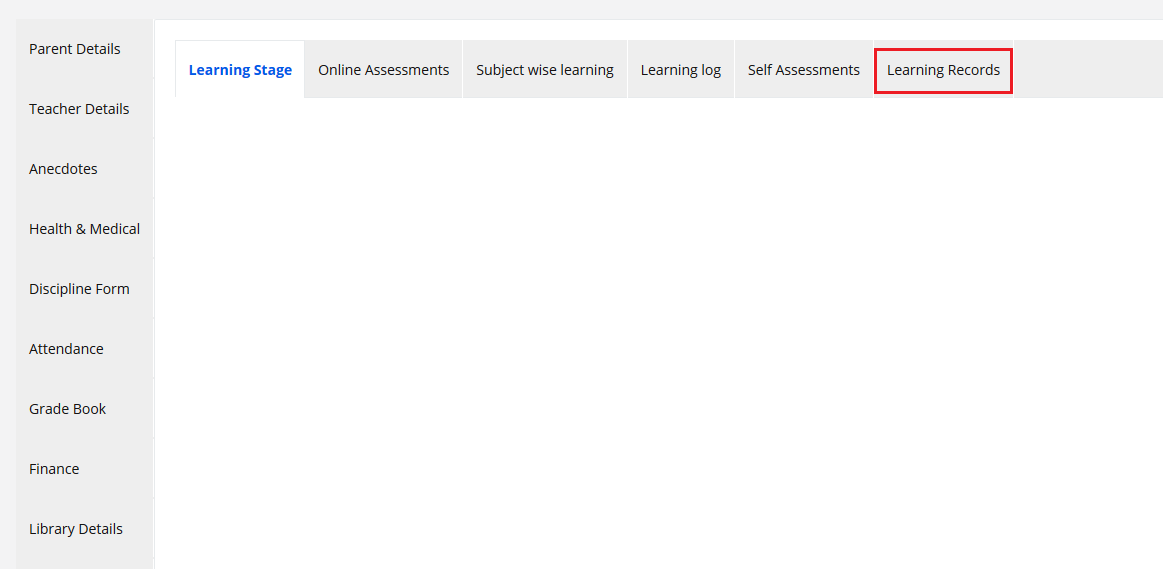
School admins and teachers can track the student’s learning topic wise from a search for student option. To view the same

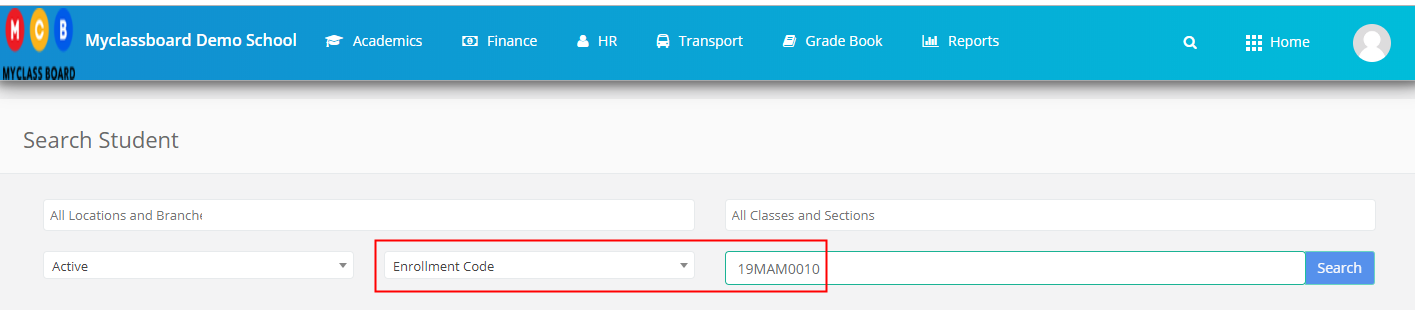
Step 28: Search for a student from the search option

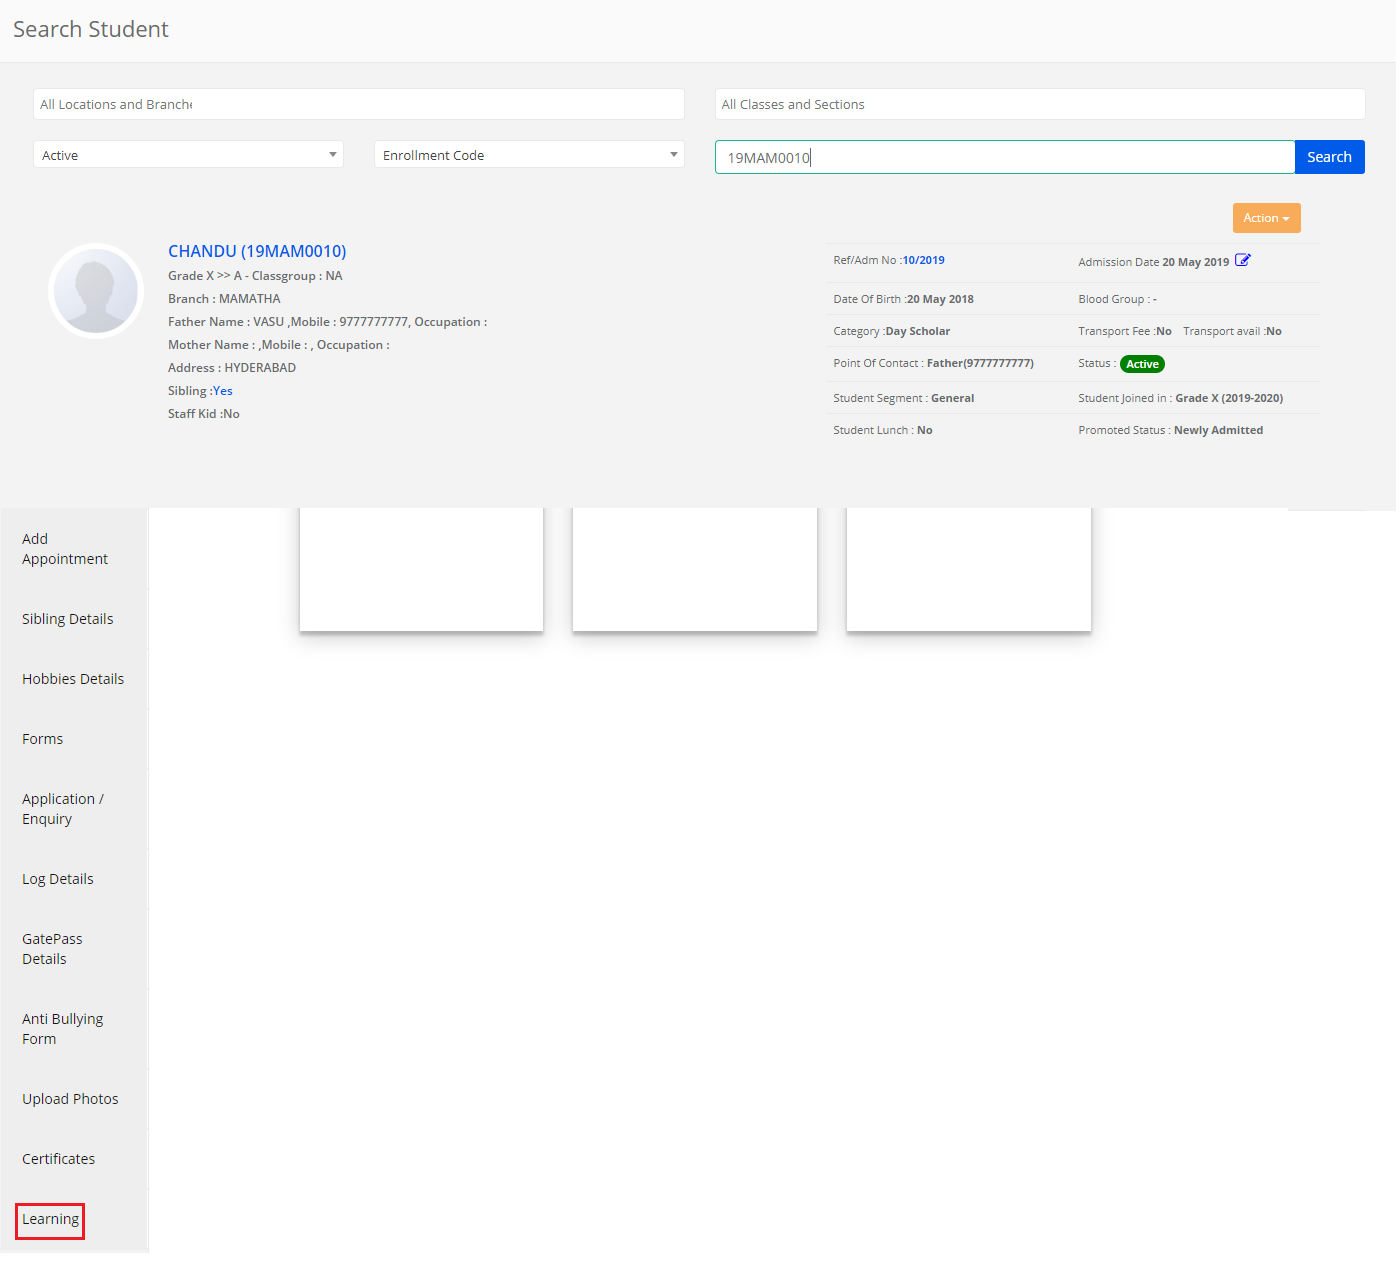
Step 29: Input the student name to get the profile of the student.

Step 30: Click on the Learning tab.

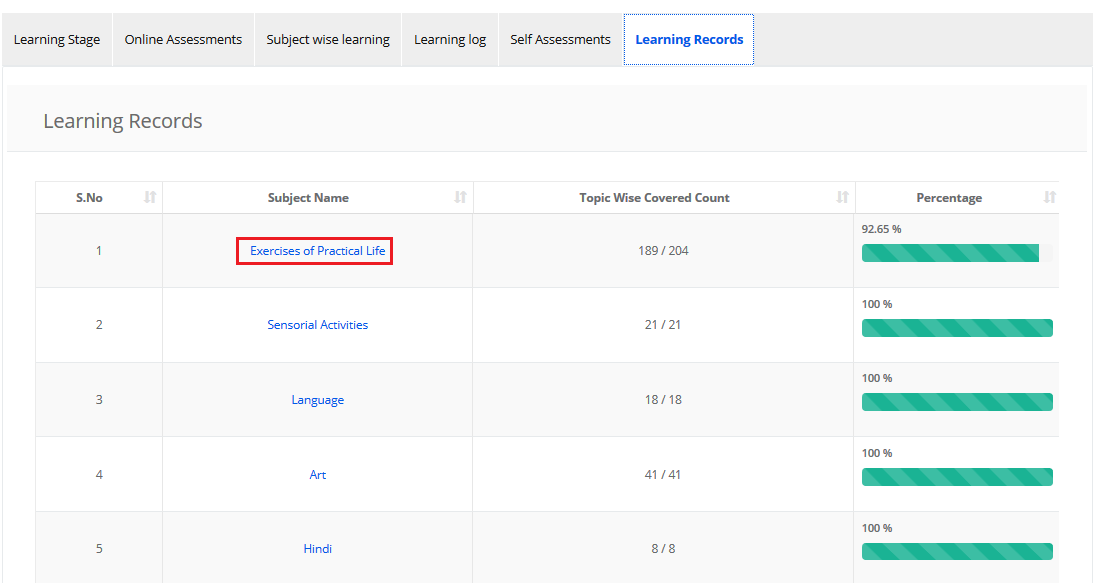
Step 31: Click on Learning Records option.

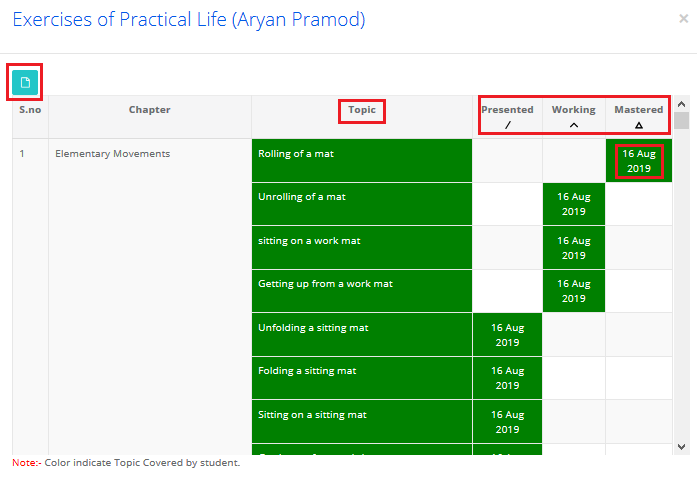
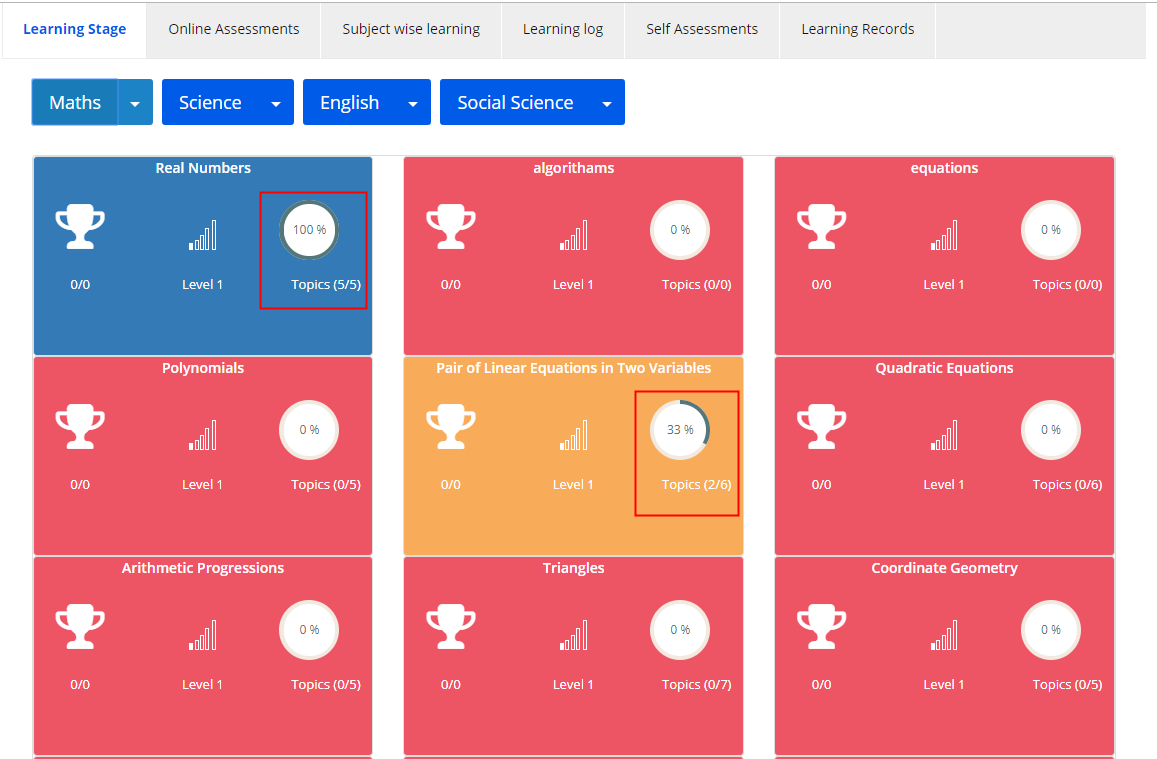
Step 32: Note the progress of the topics covered in terms of count and percentage of each subject.

Step 33: Top view the date of completion of each topic in a subject, click on Subject name.

Step 34: Please note grades obtained and the date of completion of each topic against each chapter in a subject. Click on the Export icon which is on the top left corner to export the report to Excel.

How to check the learning metrics of a student?

Learning metrics of a student can be viewed from the student profile.

Please follow the steps mentioned below.

Step 1: Login to MCB and click on search icon on the top right corner

Step 2: Choose the filter to search the student as per the user information you have and enter it. Click on search or choose the record that appears in the search results to open the student profile.

Step 3: Click on Learning tab on the left menu.

Step 4: The learning tab shows the following metric on the learning of the selected student.
1. Learning Stage
2. Online Assessments
3. Subjects Learning
4. Learning Log
5. Self Assessments
6. Learning Resources

Step 5: The learning Stage tab shows the progress of learning subject wise. As you click on the subject name, it will list the chapters for which topics are available.
The percentage indicates, how many topics have been covered by the student from the total topics available.
When student completes all topics in a chapter, the chapter box turns Blue.
The chapter box turns yellow soon after student starts covering the topics.
The red color for the chapter box indicates the student has not started learning.

Step 6: The Online Assessment tab shows the list of exams attempted by the student along with results and question paper.

Step 7: To view Results of an exam, pls click on View Results tab against the exam.

Step 8: You can view the result of the exam as follows. You may print the same by clicking on the print icon which is available on the top left corner.

Step 9: To view question paper of the exam, click on Question paper option against the exam name.

Step 10: The question paper appears as shown below. You can print it by clicking on the print icon available on the top left corner.

Step 11: To view subject wise learning, click on Subject wise learning tab. By default All subjects are listed. To view subject specific learning, choose the subject from drop down.

Step 12: Please note the number of resources available for a topic right against the topic name. As students visits the resources, it shows the count of visits for each resource / no of resources available.

Step 13: To view the learning log, Select All Subjects or a specific subject, dates range and click on Get.

Step 14: It shows the list of resources accessed by students specifying the date and time. We can clearly understand how many times and at what time and on which date the student used the resources.

Step 15: Self assessments tab lists the chapters for which the self assessments are created along with the status of students attempts.

Click on View Result tab against the tab to view the results of the self assessment of the chapter. Yet to attempt says that the student has not attempted the self assessment of the chapter yet.

Step 16: The result of the assessment is displayed as follows. Export the result to Excel by clicking on the excel icon present on the top left corner.

Step 17: The learning records tab shows the subjects syllabus coverage if school chooses to use learning based assessment.
Learning based Assessment: Teacher grades the student against the topic. When it is recorded, the learning record shows the no of topics assessed by the teacher versus the available topics. The percentage is calculated based on the assessed topic / available topics * 100.

How to create Subjects, Chapters, Topics content and Self Assessment/ Exercise?

Subjects can be created from the System admin level. The chapters can be created from both System admin and branch level.

Create Subjects:

Step 1: Choose Subject Creation under Subjects and Notes menu

Step 2: Click on the class for which you would like to create the subjects.

Step 3: You will find Different sections to create languages, optional subjects, and general subjects. Click on Add to create a new subject.

Step 4: Fill in the details, choose the appropriate status and click on the Save button.

Step 5: To edit the Subject click on edit icon against the subject.

Step 6: Make the necessary changes and click on Save.

Step 7: To delete the subject, Click on delete icon against the subject and confirm.

Step 8: Click Yes to confirm the deletion or No to cancel the deletion.

Create Chapters:

Step 9: Click on Learning under Subjects and Notes menu under Academics module.

Step 10: It will take you to the Learning Dashboard displaying the number of subjects available under each class. You can add a new subject in any class by clicking on the + button which is placed at the top right corner of each class.

The number next to the subject denotes the number of chapters available under each subject.

Step 11: To add a new chapter, click on the subject name.

Step 12: Please find the following options and their uses

1. Add Chapter – to add the chapter manually
2. Upload Chapters – to bulk upload chapters though Excel sheet
3. +Question – to add questions in the question bank under the selected subject.
4. Subject Resources – It will list the attachments shared over the diary and assignments of the selected subject. Please note that the resources listed here are from all the academic years together.
5. Assign NCERT Chapters – You can assign all chapters prescribed by NCERT without having to create manually.
6. MCB Content – when you assign chapters from NCERT, It will list the chapters and topics along with a topic description and suggested videos. So that you can, choose the videos you wish to populate for the students in their learning.

Step 13: To add Chapter manually, Click on Add Chapter option.

Step 14: Enter Chapter Name and Description. Click on Save button to save the chapter.

Step 15: To edit the chapter name, click on the Edit icon available against the chapter name.

Step 16: Make the necessary changes and click on Save to save the changes or Cancel to revert.

Step 17: To upload Chapters, Click on Upload chapters option.

Step 18: Read through the instructions and click on View File Format to download the file.

Step 19: Enter the chapter names and Description. Save the file without changing the format. Click on Choose File option, Locate the file on your computer.
Click on validate to upload, check for the correct count and click on Upload button to upload the chapters. Click on Cancel to revert.

Question Bank:
Step 20: To add questions to the chapter or topic, click on the +Question option.

Step 21: Choose question type, chapter, topic and difficulty level of the question.
Enter the Question description, options and choose the correct answer.
Enter the Answer Explanation and click on Save.

Subject Resources:
Step 22: To view the resources shared on the diary and assignment for the subject, click on the Subject Resources tab.

Step 23: You will be directed to the page where you can find three options called All, Assignments and Diary.

All: It will list all the details of the assignments and dairy in one page.
Assignments: It will list the details of assignments alone.
Diary: It will list the details of the diary alone.

You can export the report to excel by clicking on the Excel icon placed on the top left corner of the report.

Assign NCERT Chapters:

Step 24: To assign NCERT chapters and topics without having to create manually, Click on Assign NCERT Chapters option.

Step 25: Select the Chapters and the topics you wish to assign and click on the Assign button which is available at the bottom.

MCB Content:

Step 26: To view MCB content available, Click on MCB Content option.

Step 27: Select Grade, Subject and Click on Get option. To view the content, click on the arrow against the Chapter name.

Step 28: It will list the topics available under the chapter. To view the description, click on the topics name.

Step 29: It will display the description available for the topic.

Step 30: To view the suggested videos which are being streamed from different channels, Click on the suggested videos link.

Step 31: You may click on the video to play.

Create Topics:

Step 32: To create Topics under a chapter, Click on the arrow against the Chapter name. You can create the topics manually or upload them.

Step 33: To create the topic manually, click on Add topic.

Step 34: Add the Topic name, Description and Click on Save.

Step 35: You can view the description by clicking on the topic’s name. You can edit or delete the topic by clicking on the respective icons.

Step 36: MCB Learning module allows you to add learning resources in three formats like files, website links, and videos. To add resource files for the topic, Click on the file icon.

Step 37: Click on Add button on the top corner.
To add a file, Click on + sign against the Files.

Step 38: Enter the File Title, attach the file, enter the source and click on Save.

Step 39: You can edit or delete the file by clicking on the respective icon.

Step 40: To add a link, Click on +sign against the Link option.

Step 41: Enter the link, description, source and click on Save.

Step 42: You can edit or delete by clicking on the respective icons.

Step 43: To add videos, Click on +Sign against the Videos option.

Step 44: Enter video name, Embedded URL, Sources and click on Save.

Step 45: To add MCB Suggested videos from open source channels, click on suggested videos option.

Step 46: Please note the channels from which the videos are steamed. Choose the videos that you would like to add them as resources for students and click on Save.

Step 47: You may edit or delete the videos by clicking on the respective icons.

Step 48: As you go back to the topics page, it clearly displays the number of resources available against their respective icons.

Step 49: To add questions to the topic, click on Question bank.

Step 50: Click on +Question and repeat step 21.

Step 51: When the question is added, you can find them in the count against the topic.

Create a Self Assessment:

Step 52: To create self Assessment or Exercise for the students to practice from their login, Click on Add online Self Assessment / Exercise.

Step 53: Choose the questions available for the chapter and click on Save.

Step 54: To edit the online Self Assessment / Exercise, Click on Manage online Self Assessment / Exercise.

Step 55: Make the required changes and click on Save.

How can a student access learning resources and attempt online exams?

The learning resources, self-assessment/ exercise shared by teachers can be accessed from student/parent login. These resources and self-assessment help students to deepen their understanding of the topics.

The online examinations help students to understand how much more they need to work on the concepts based on their result.

To access the learning resources, please follow the steps mentioned below.

Step 1: As you login to the parent/student portal, locate the Learning management tab and look for the subjects available for learning.

The subjects are listed in the first row. By default, the first subject’s chapters are loaded for learning. If you wish to change the subject Click on the respective subject’s name to list you the chapters available.

Each box represents one chapter of the subject along with the learning stage, percentage of topics completion.

Step 2: As you click on the chapter’s box, the drop-down shows the following options

1. Topic Coverage: Percentage of topics read by the student
2. Notes: Notes made by the student during learning the topic
3. Watch the video: Shows the count of videos available for the chapter.
4. Link: Shows the count of links available for the chapter
5. Files: Shows the count of files available for the chapter
6. Take test: Shows the count of Online assessments/ exercises available for the student to practice.

Step 3: To access the learning resources click on Start reading.

Step 4: You will be directed to the page where you can find the Topics drop down. As you select the topic, it displays the Topic description, Notes, Files, Web links, Videos and Exercise options. The number in the superscript of the icons represents the quantity of the resources available.

Step 5: To enter or view the Notes, Click on Notes Icon.

Step 6: Enter the notes and Click on Save notes.

Step 7: To edit the existing notes, click on the Edit icon.

Step 8: Do the necessary changes and click on the Update button to save the changes.
To cancel the changes, click on the Cancel button.

Step 9: To add another note, Enter the note and click on Save Notes.

Step 10: To access files, Click on Files Icon.

Step 11: It will list the files available for the topic. Click on the file name to view the file. Not watched indicates that the file was not opened by you even once.

Step 12: As you open the file, it will display how many times you accessed the file.

Step 13: To access Links, Click on Links Icon.

Step 14: It will list the links available for the topic. Click on the link to visit the web page.

Step 15: As you open the link, it will display how many times you visited the web page.

Step 16: To access videos, click on the Videos icon.

Step 17: It will list the videos available for the topic along with the watch history. Click on the link to watch the video.

Step 18: As you open the link, it will display how many times you watched the video.

Step 19: To access the Exercise, Click on Exercise Icon.

Step 20: It will list the questions along with the options. Choose the right answer and click on Submit Answer.

Step 21: Once the test is submitted, it will show you the score, answers marked for each question along with the explanation. Same can be viewed when you click on the view results button.

Step 22: Once the topic is covered by accessing the resources, you may click on the Next button to go to the next topic. To access the previous topic, click on the Previous Button.

Note: As you click on Next button, MCB reads it as the completion of the topic and shows the percentage at the learning stage of the chapter. As you complete and click on next at each topic, the percentage is calculated accordingly.

Step 23: The 100 % indicates the completion of all topics learning in a chapter and the box color changes to Blue from Red.

The Red box indicates that the topics haven’t started.

The yellow color indicates that the learning has started and in progress towards completion.

Online Exams

Step 24: To attempt Online Exam, Click on Start Exam. Please note the exam cannot be attempted when the Exam date is crossed. It shows as Due Date Expired against the Exam.

Step 25: Choose the question, right answer and click on next button to attend the next question. You may go to the desired question directly by clicking on the question number.

Step 26: As you answer all the questions, click on Finish Exam.

Step 27: Click on verify to check the given answers once again. Click on Submit to confirm the exam completion.

Step 28: If your school chooses to publish the result instantly, the result is displayed soon after you hit on Submit button. The result includes the overall score, subject wise score, marked answers, and the answer key. You may print the same by clicking on the print icon which is available on the top left corner.

Step 29: The online exam dashboard will show you View Results and Question paper options against the exams which are attempted.

Step 30: To view the question paper, click on the Question paper. It will show the list of questions given for the exam. You may print the same for later use by clicking on the print icon.

Step 31: To view Results, click on View Results. It will display the result of the exam. You may print it by clicking on the print icon.

How to Create Chapters and upload learning resources?

Creation of Chapter and Topics [system admin login]:

Step 1: Login with credentials and click on click on Academics menu

Step 2: Choose Learning option form Subjects and Notes menu.

Step 3: Click on Subject name to add Chapter and topics

Step 4: To add Chapter Click on Add chapter

Step 5: To add Chapter Click on Add chapter button. Enter Chapter Name and Description and Save.

Step 6: To add Sub Topics, Click on Add Sub Topics Button.

Step 7:  Enter Topic Name and Description and Save.

Step 8:  To add subtopic, Click on Add Sub Topics Button, enter the Subtopic & Description and Save.

Step 9:  To add content for the subtopic Click on Manage Content. ( Please note that this is not compulsory for Teaching plan updation. Sharing you the process to make you familiar with the feature. The content you add here could be used by students on the parent or web portal as learning resources. )

You can upload files, website links and video links pertaining to a topic. To add files, Choose file and click on Add File.

Step 10- Choose a file from your computer and click on Add Files.

Step 11- To add website links, click on add link

Enter Website link & description and click on Add

Step 12: To add videos, click on add video

Enter Video Name and URL of the youtube video and click on Add

How to add BaseLine Analysis Entry?

Step 1: Login to MCB with Login Credentials.

Step 2: Select Academics on the dashboard and you will be directed to the Academics page.

Step 3: Click on “Learning” on the top bar and select “Assigning Exams to Students”.

Baseline Evaluation

Step 4: Select the Academic Year, Class & baseline category then click on Get, You will get the students details, Click on Edit & enter the marks to the students.

Note: In settings → Academics → Create Baseline Categories → Click on Add → Enter the name then Save.

Language Assigning

Step 5: Select the Academic Year, Class, Click on Student Wise Click on Get language Subjects, Assigned the Languages to students then click on Tick mark(saved).

Address

Step 6: Select the Academic Year, Class then click on Get. Students address will be displayed.

Transport

Step 7: Select the Academic Year, Class then click on Get. Students Transport details will be displayed.

Uniform Size:

Step 8: Select the Academic Year, Class then click on Get.

For the individual item sales; Item Name, Select the Size then click on Save Size.

Uniform Kits

Step 9: Select the Academic Year, Class then click on Get.

For Kits Item Sale, Select the Sizes Then click on Save Size.

Books Assigning

Step 10: Select the Academic Year, Class and student type then click on Get.