These guidelines have been written as a training manual for all our ardent clients for the educational experience. This training manual is a self-study tool and major focus on this user manual complements training without involving the support team in person. We believe and wish, this user manual is of much help to you saving your precious time.
To log into the portal kindly enter the respective URL.
Stage 1: Login to MCB with Sys Admin Login Credentials.
Stage 2: Choose Settings (Click on user profile picture in the right-hand top corner – Choose Settings)
You’ll be directed to the Settings page.
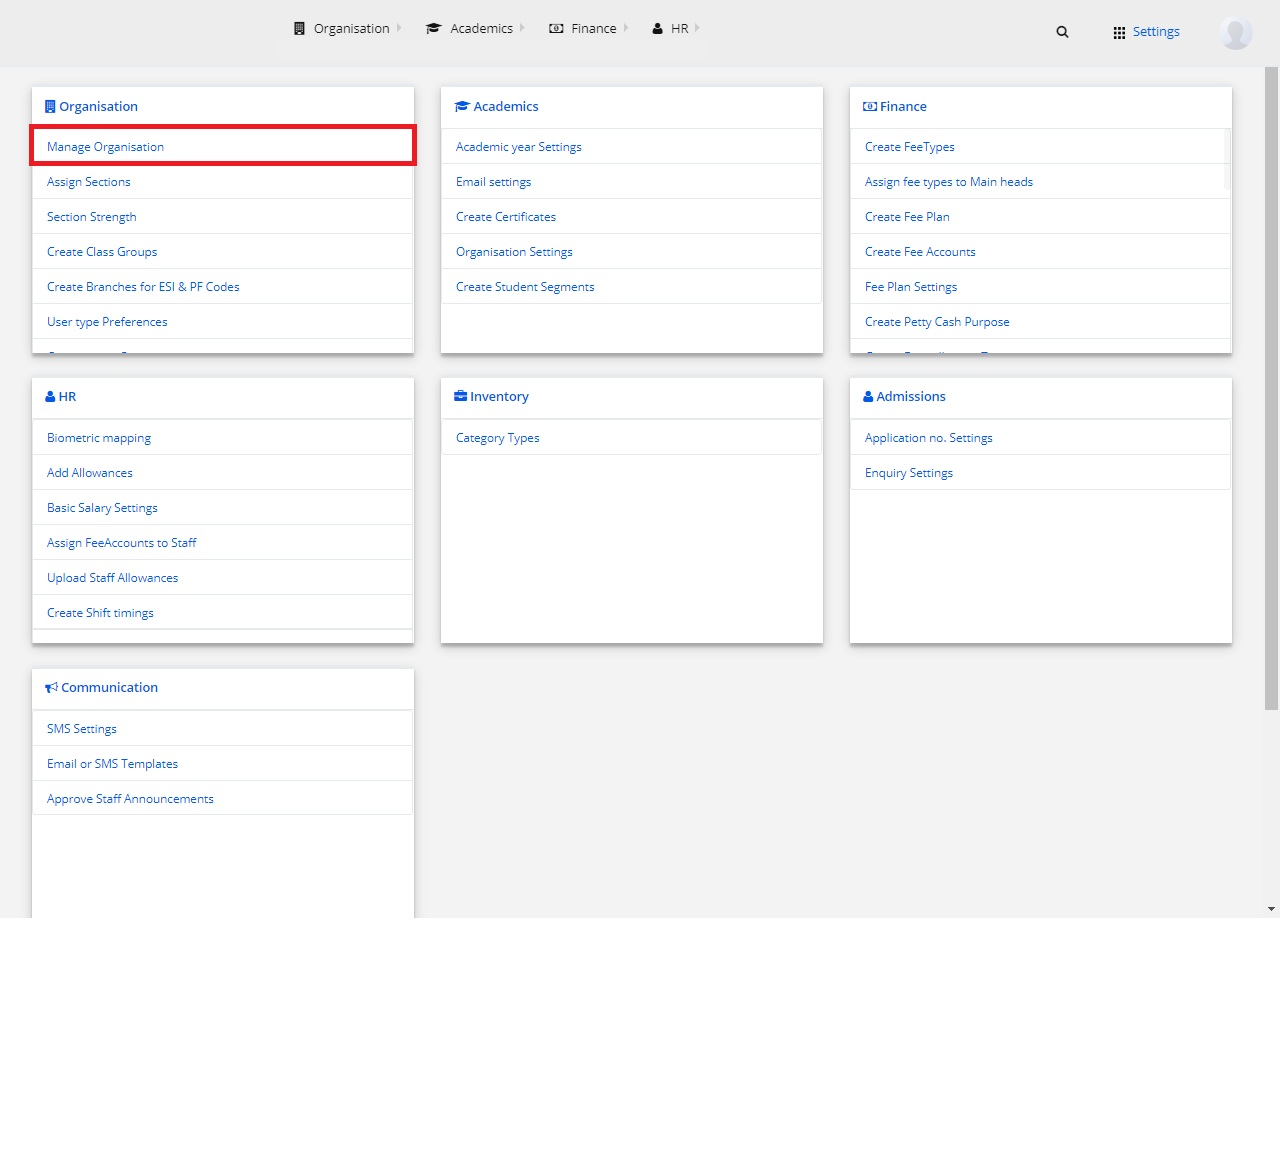
Stage 3: Organisation
Stage 4: Academics
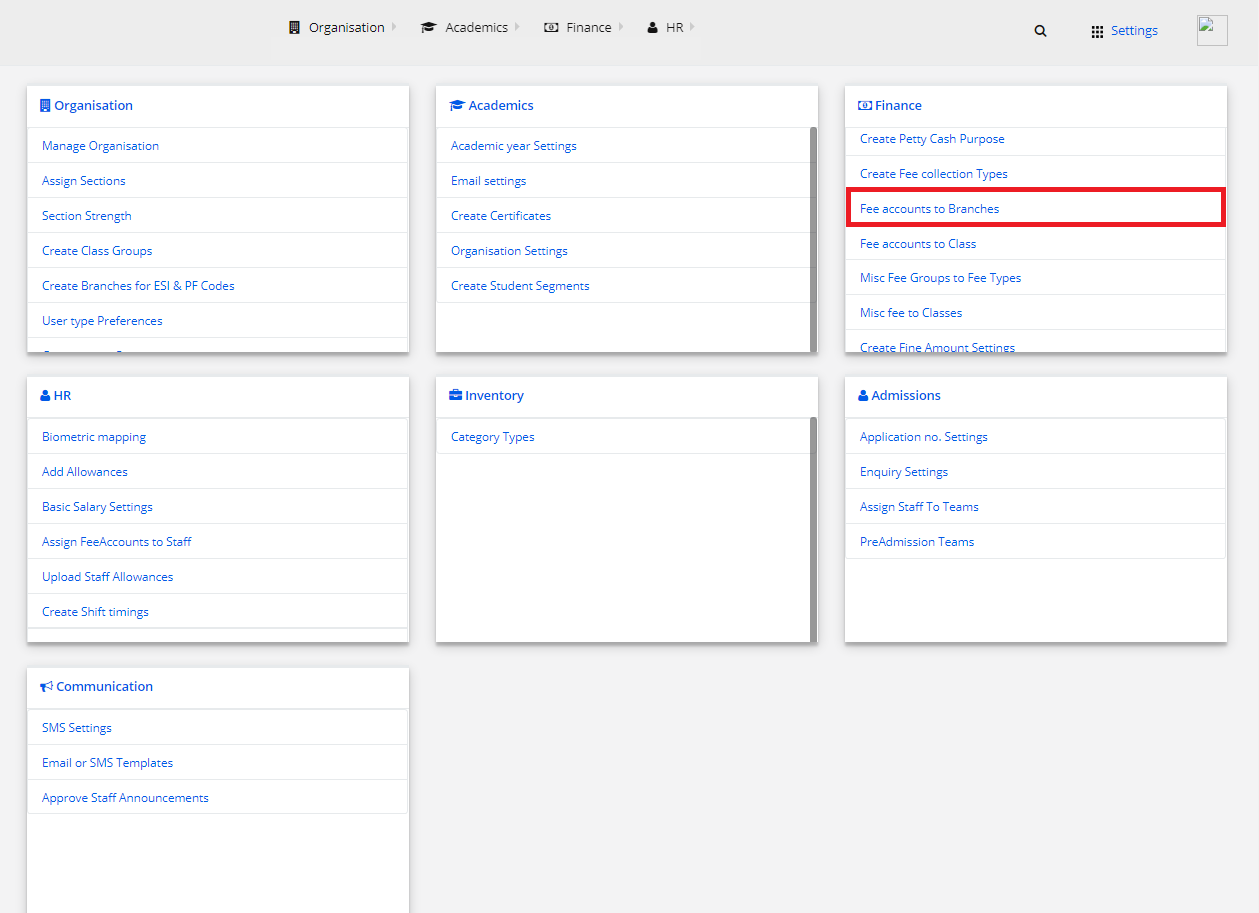
Stage 5: Finance
Stage 6: HR
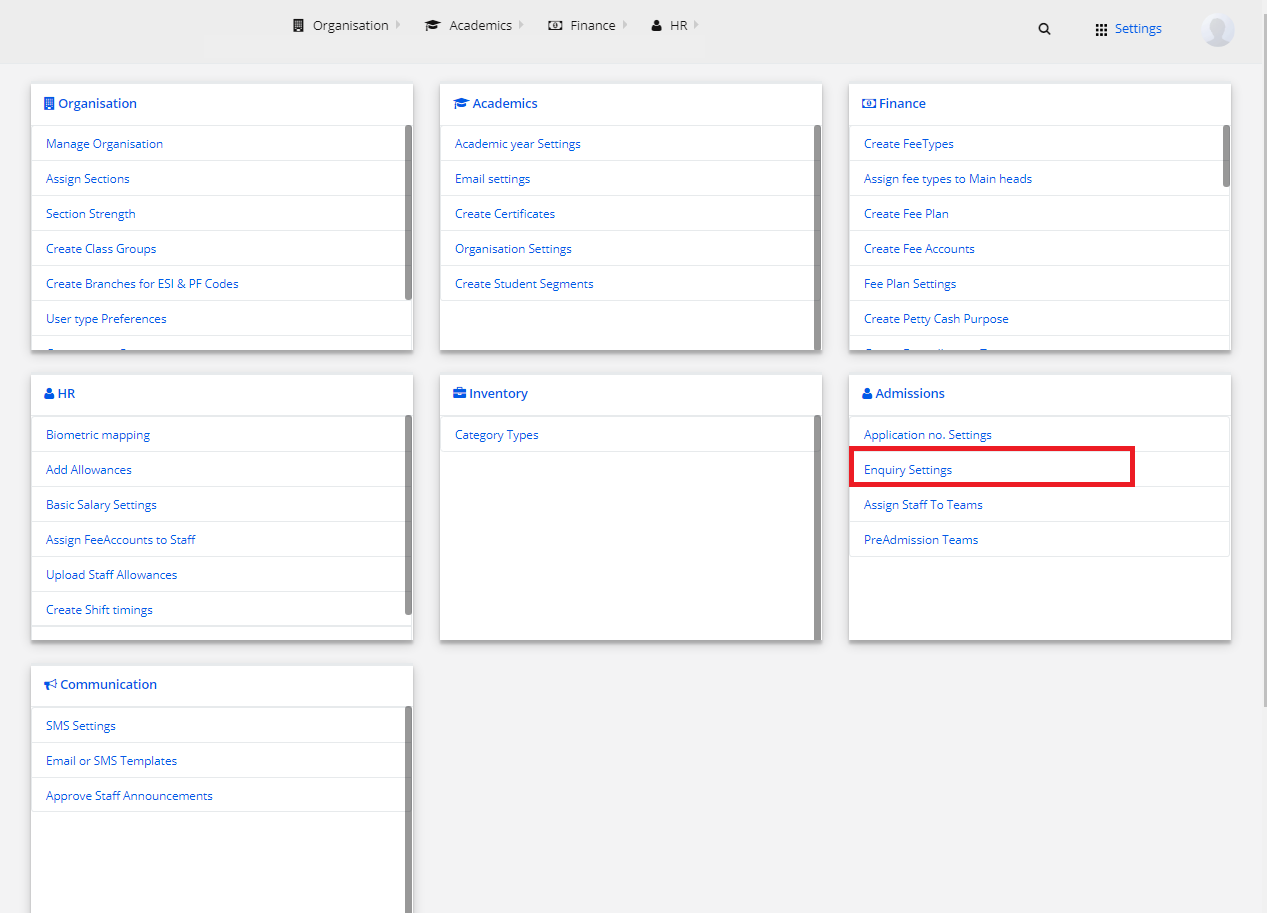
Stage 7: Admissions
Stage 8: Communication
Stage 3: Organization
1) Manage Organisation
Step 1: Select Organization and click on “Manage Organization”.
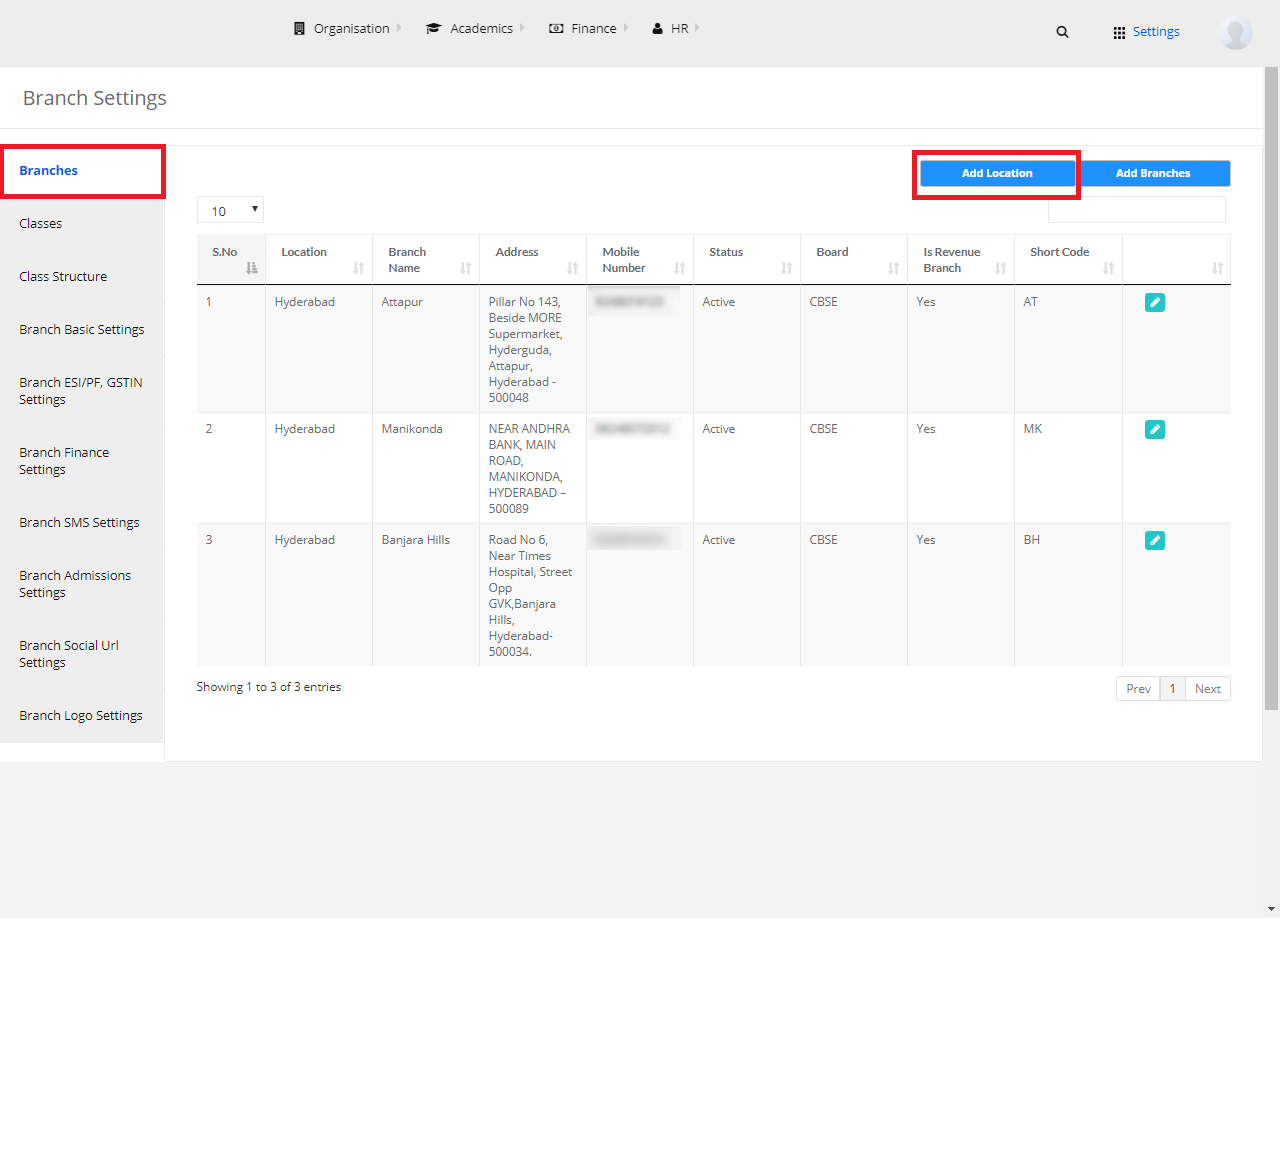
Branch Settings
Step 2: Select “Branch” from the left pane. To Add locations, click on Add Locations.
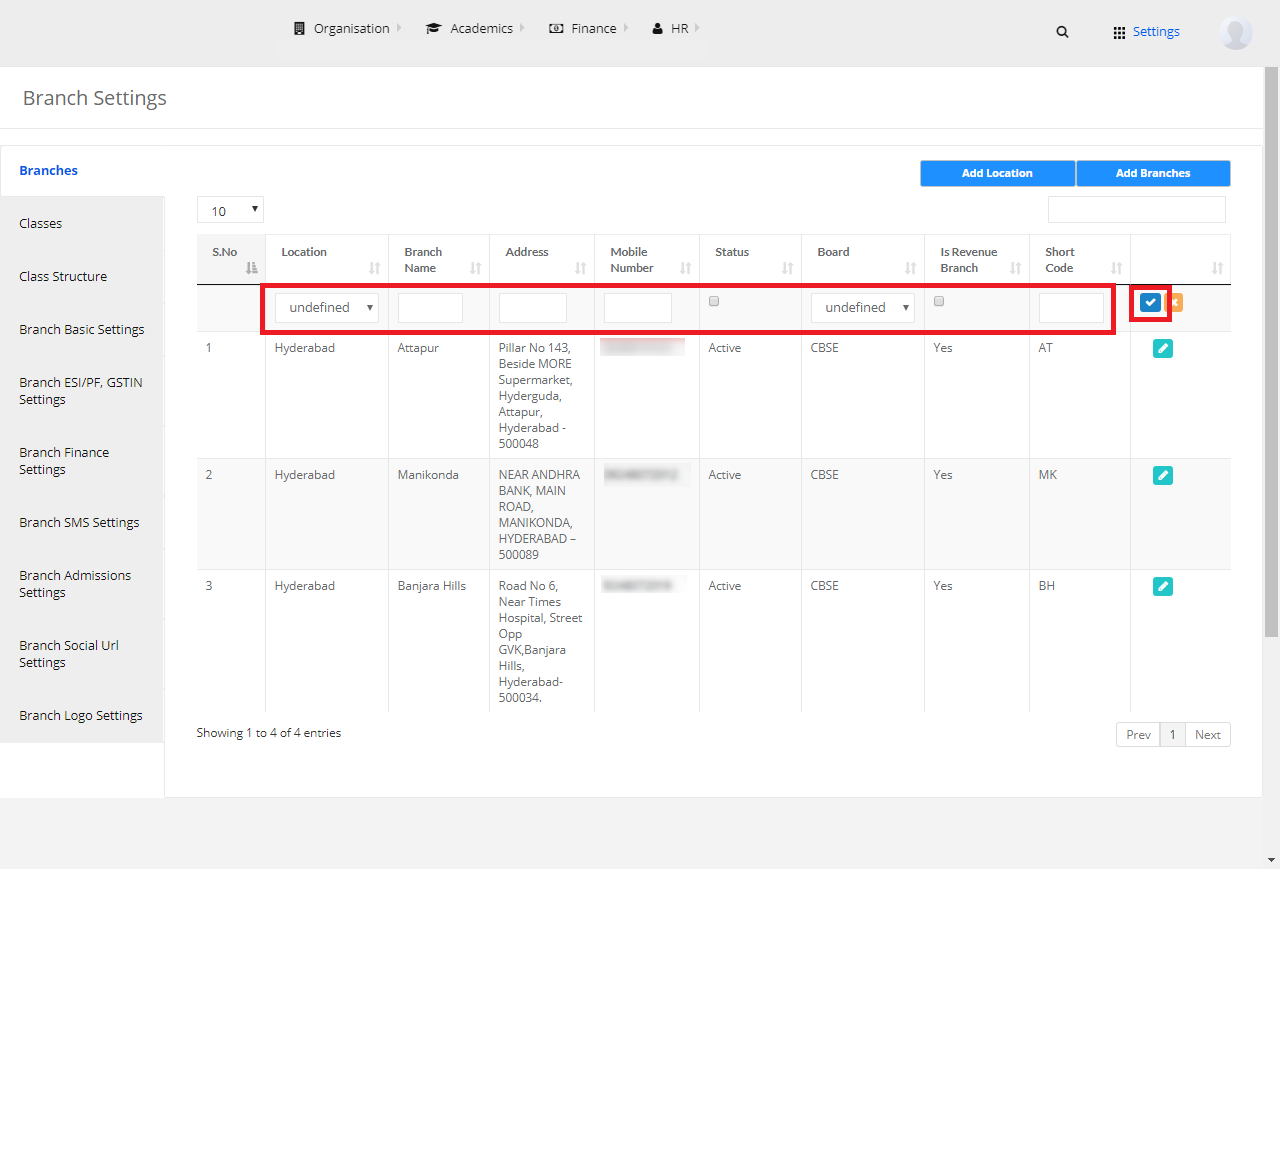
Step 3: Add Location name, priority and click on “Save.

Step 4: To Add Branches, click on “Add Branches”.

Step 5: Add the required details and click on “Save button’.
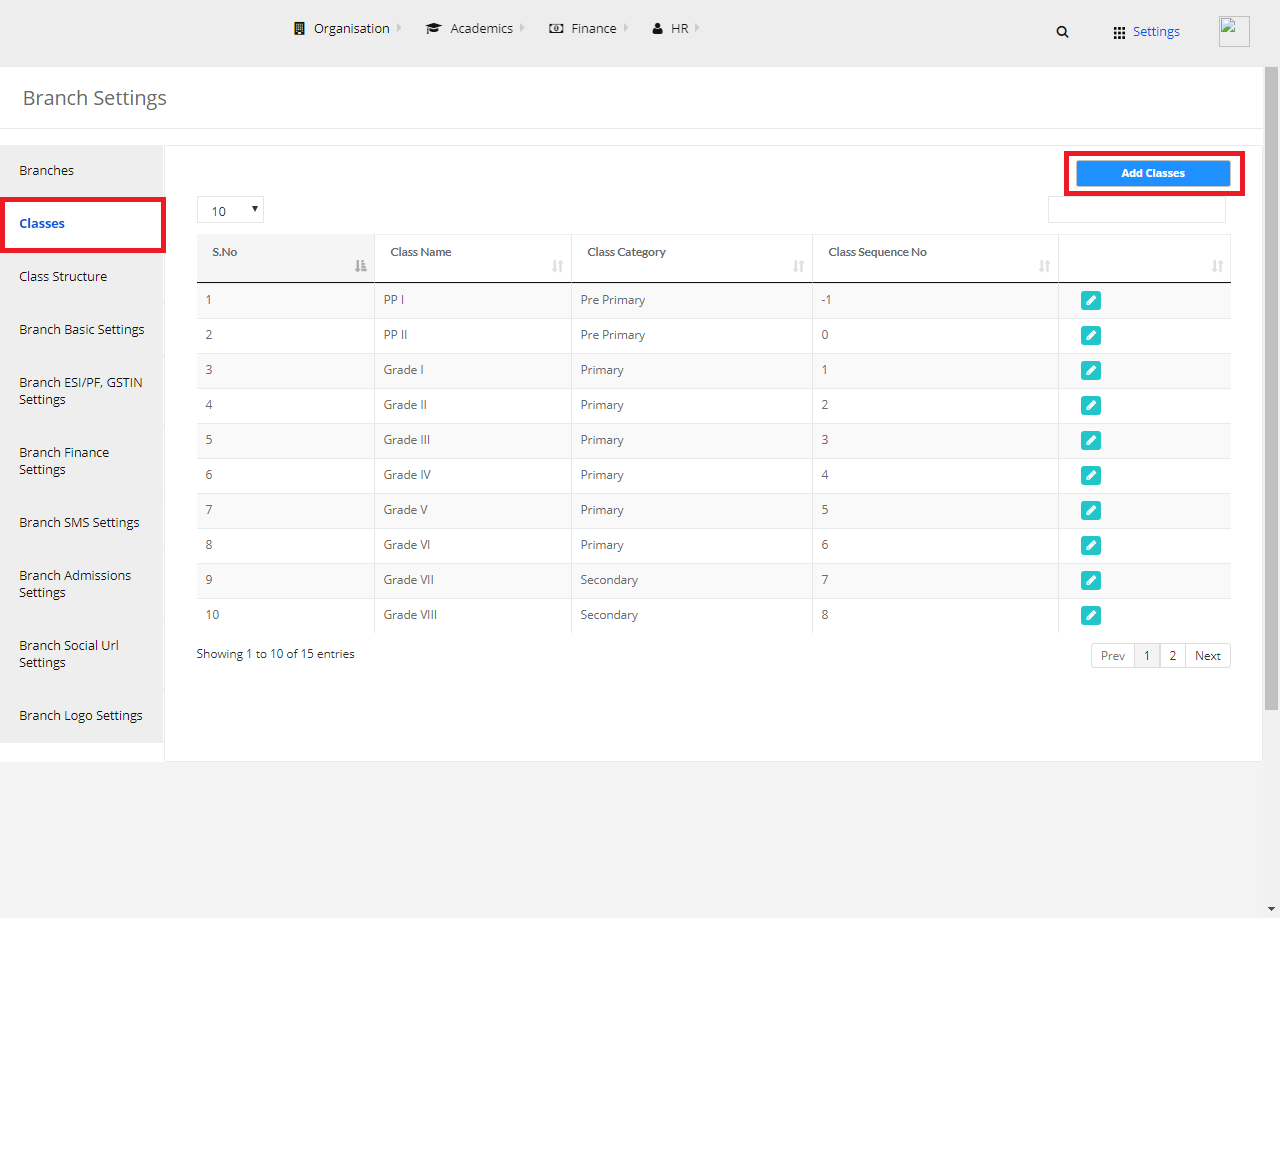
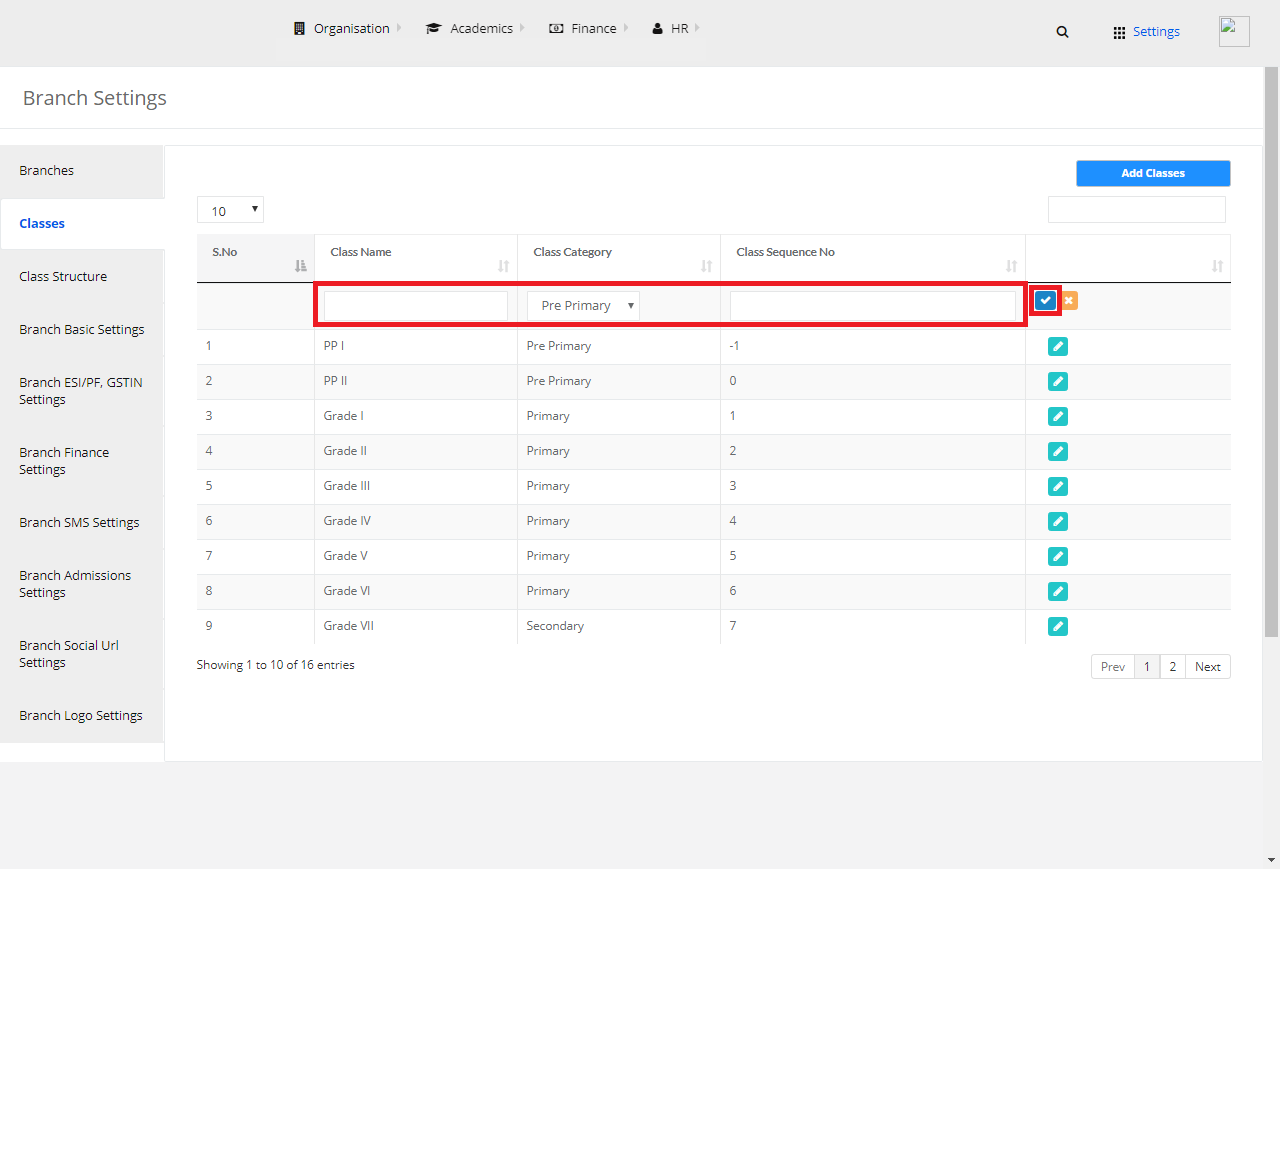
Classes
Step 6: Select “Classes” from the options in the left pane and click on “Add Classes”.
Step 7: Add the required details and click on “Save button’.
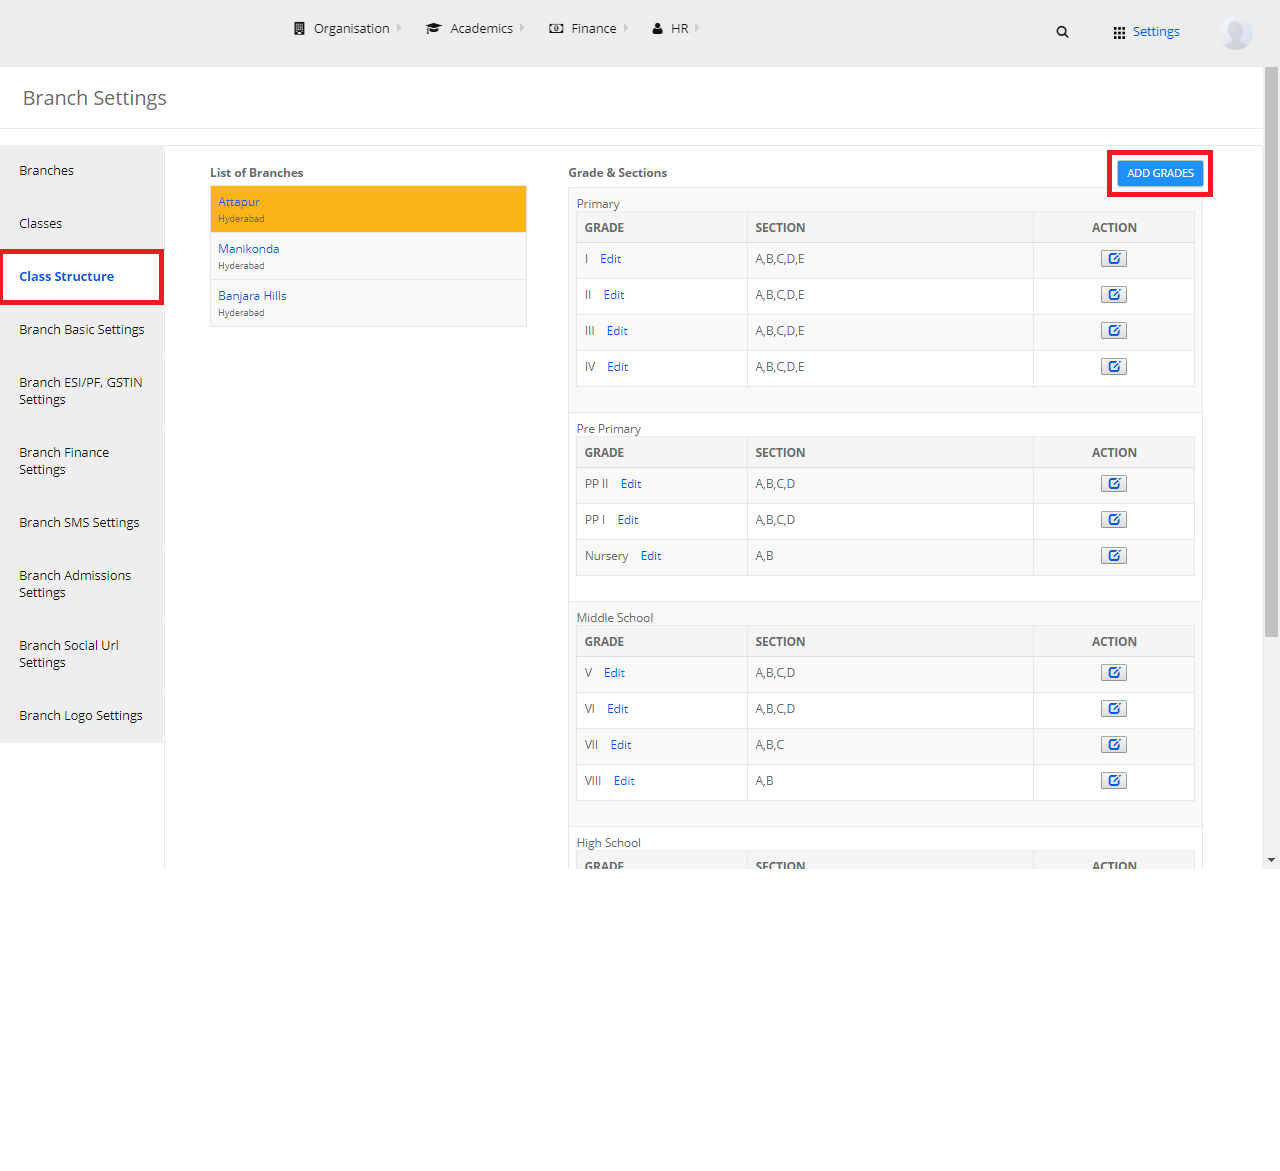
Class Structure
Step 8: Select “Classes” from the left pane and click on “Add Grades”.
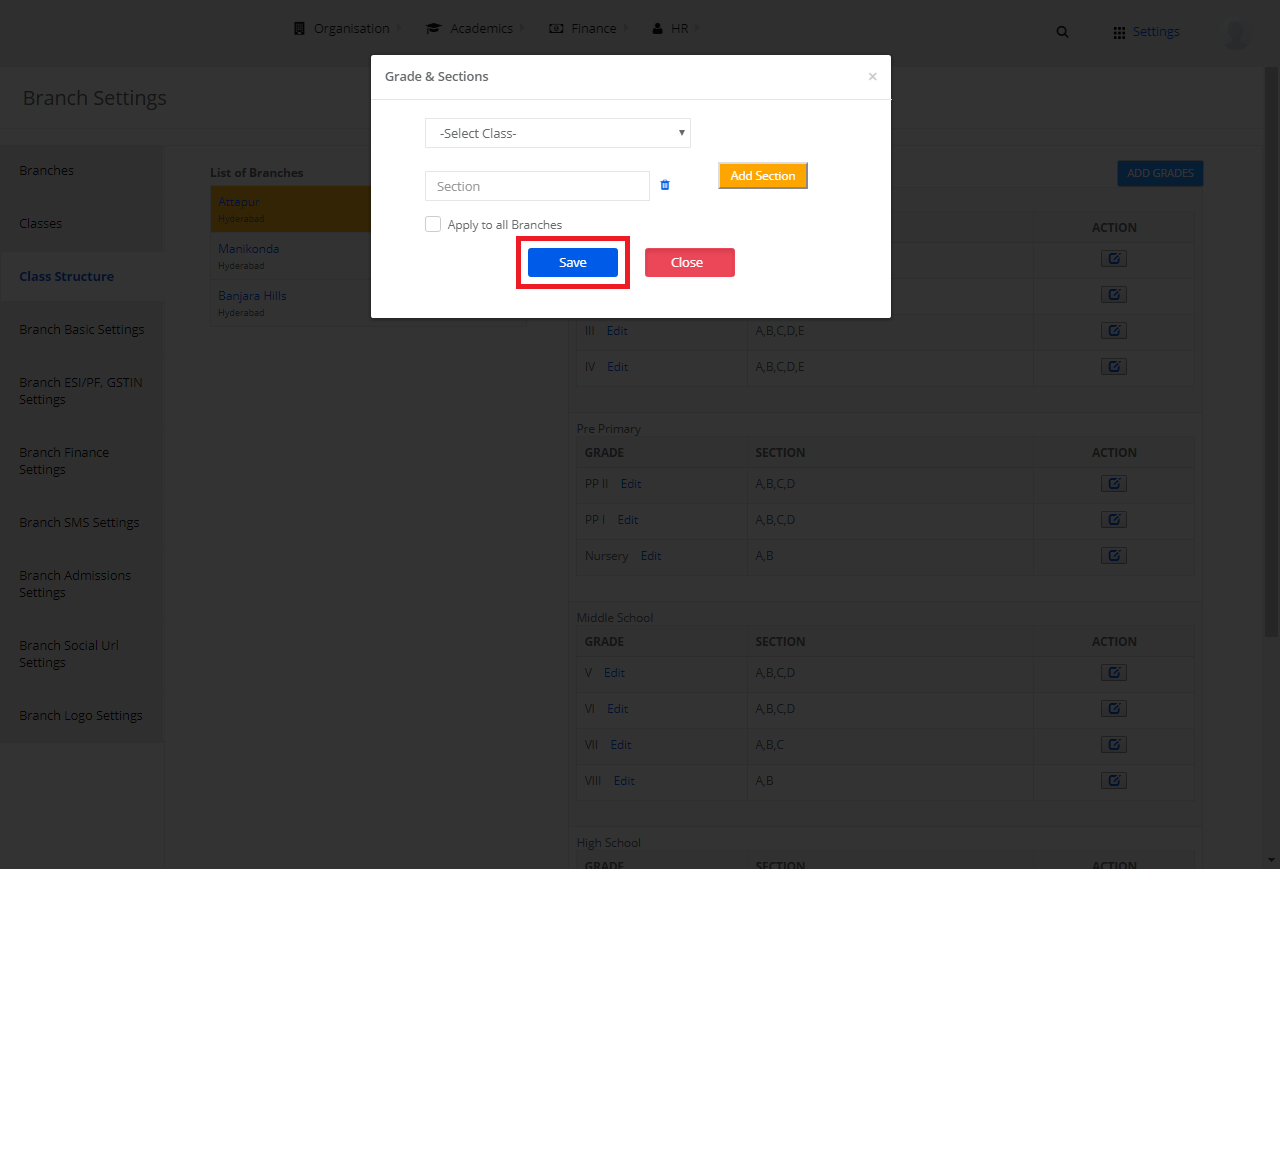
Step 9: Select Class, Add section and click on “Save Button”. A section is added to the class.
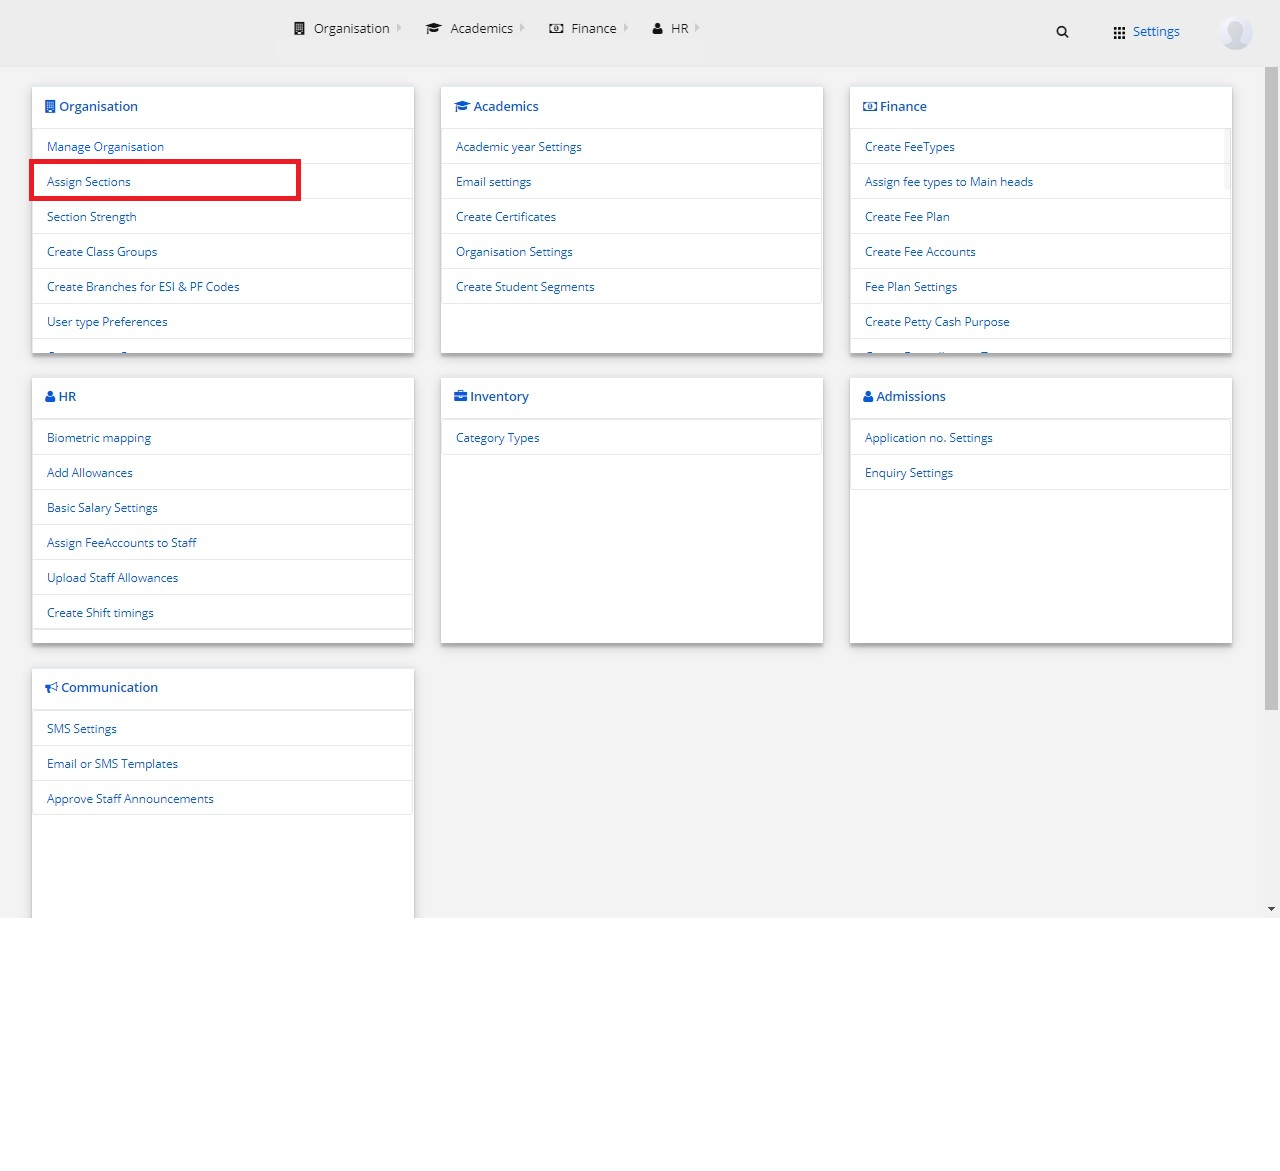
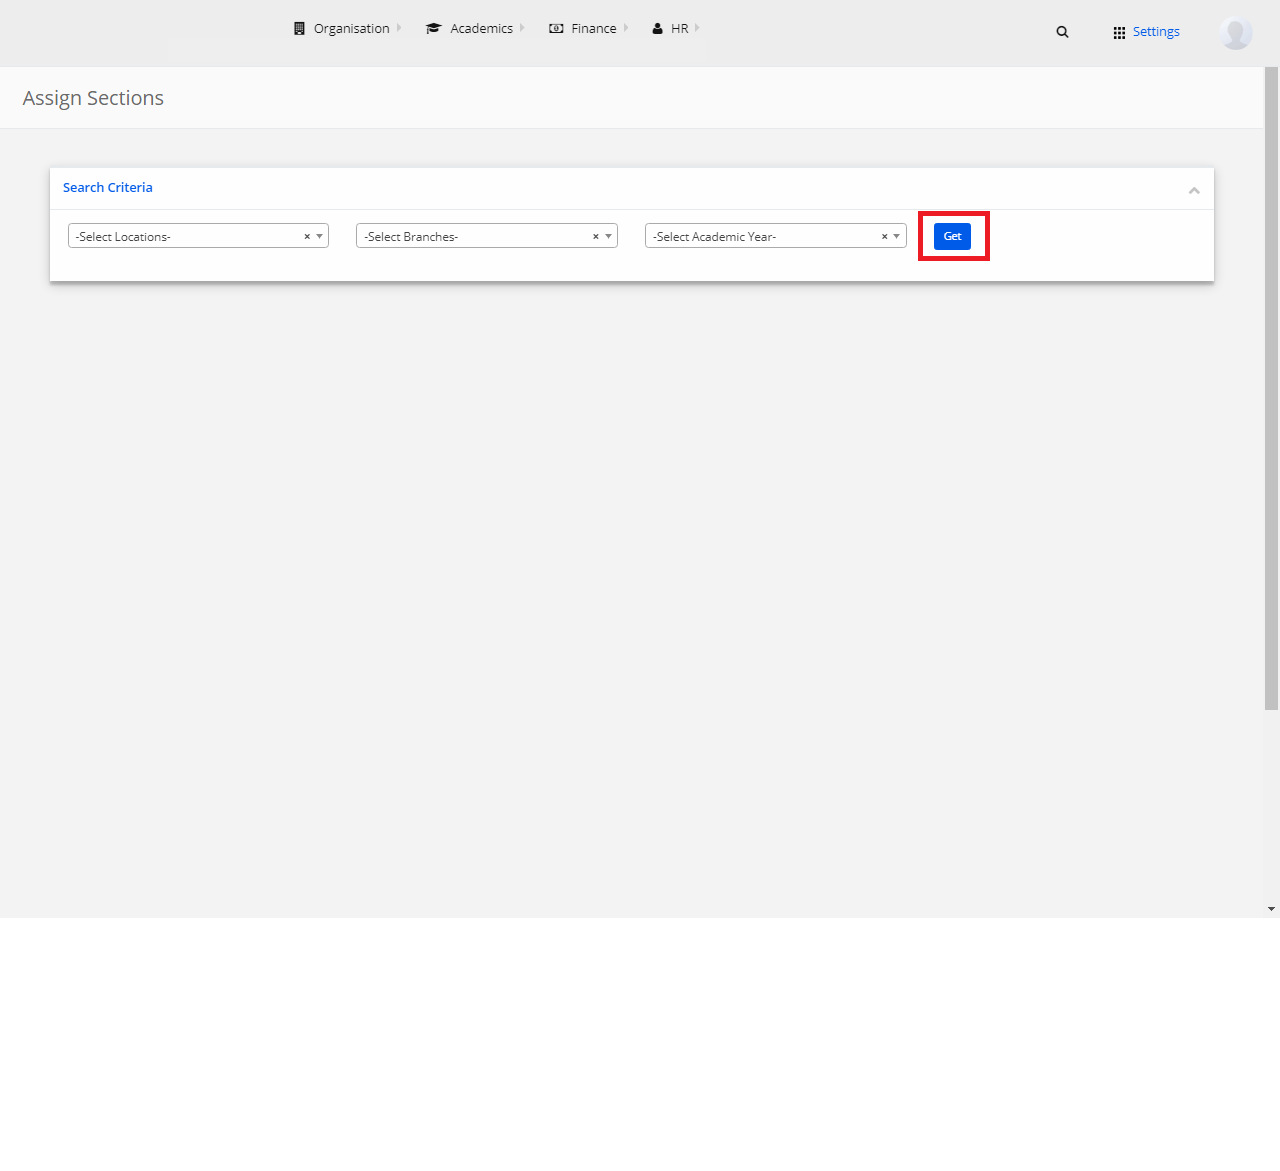
2) Assign Sections
Step 1: Select Organization and click on “Assign Sections”.
Step 2: Select Location, Branch, Academic year and click on “Get”.
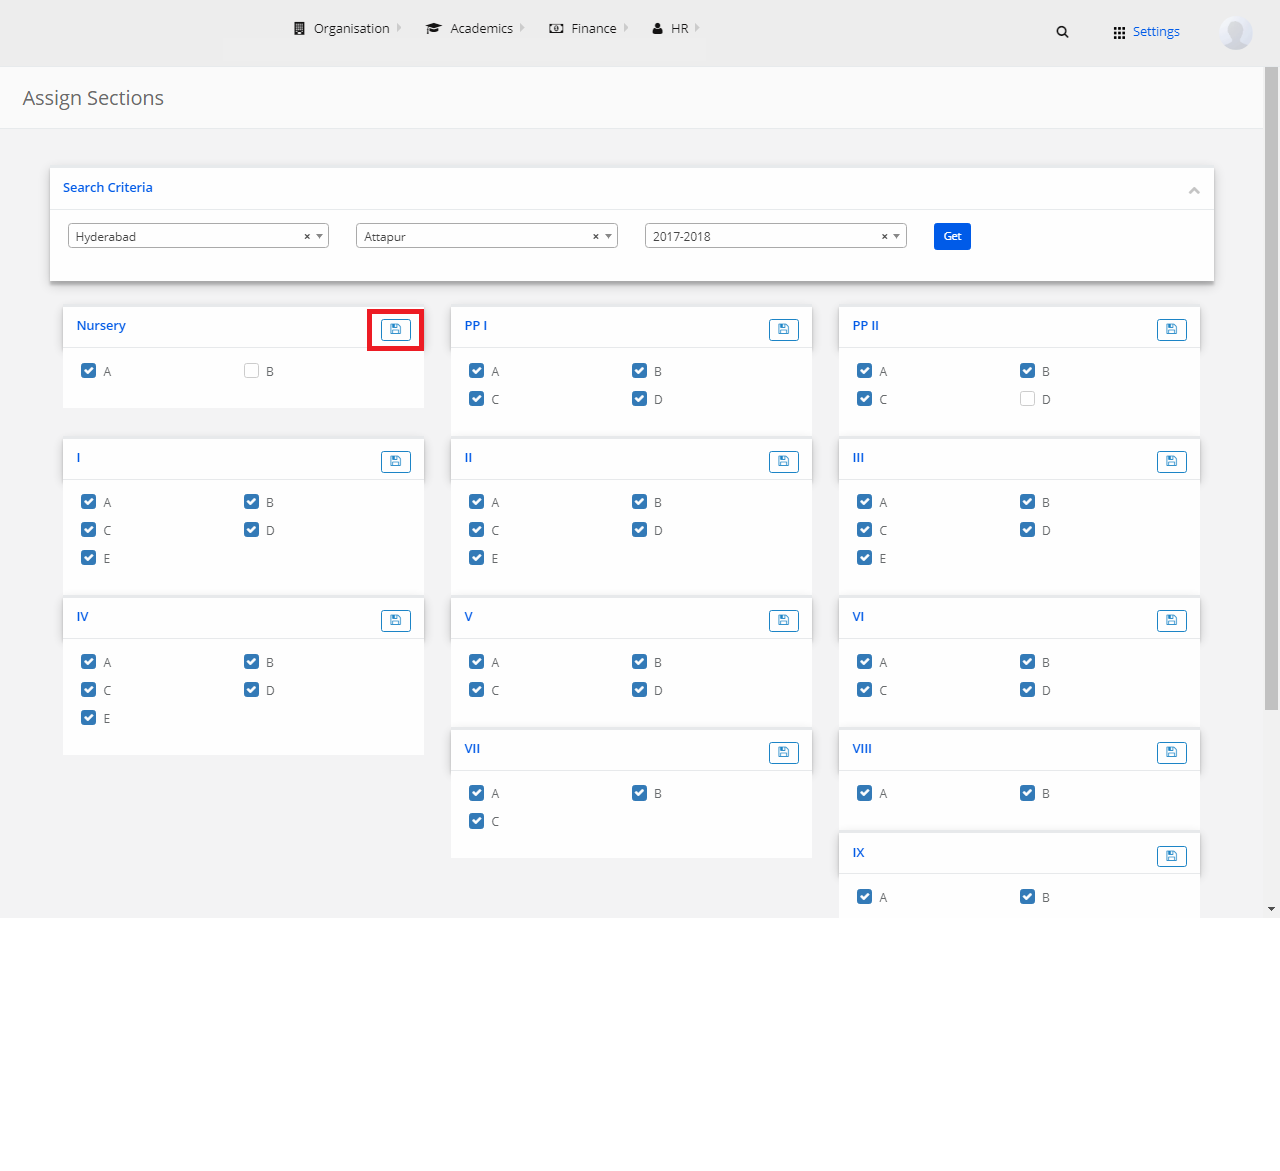
Step 3: Select any class, mark the checkbox(section) and click on the “Assign” button. The section is assigned.
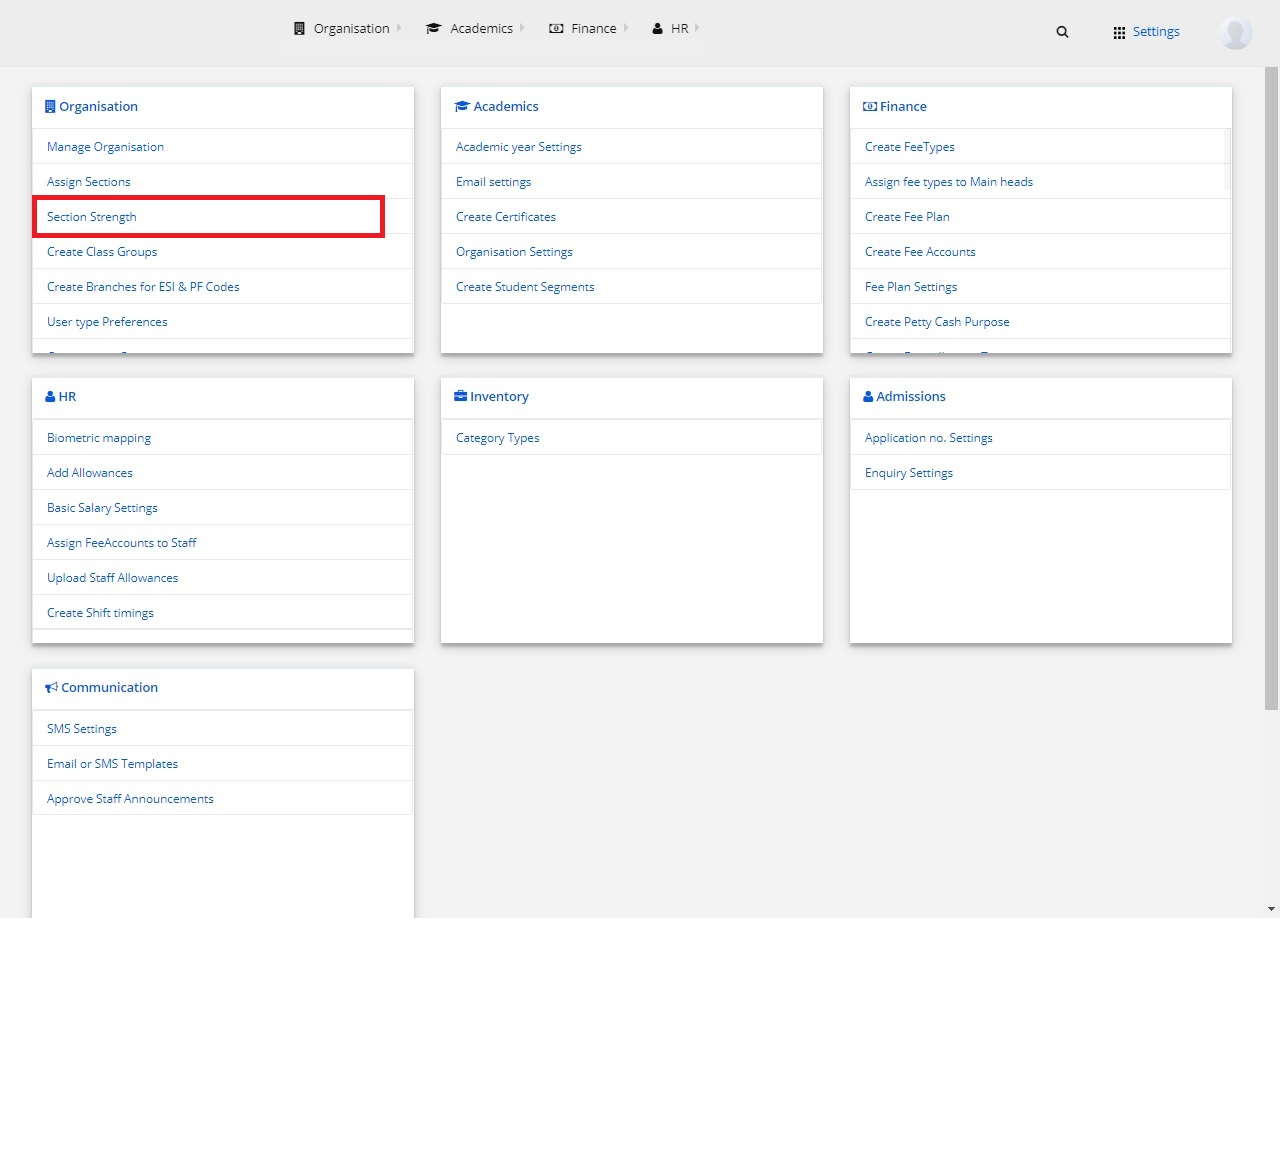
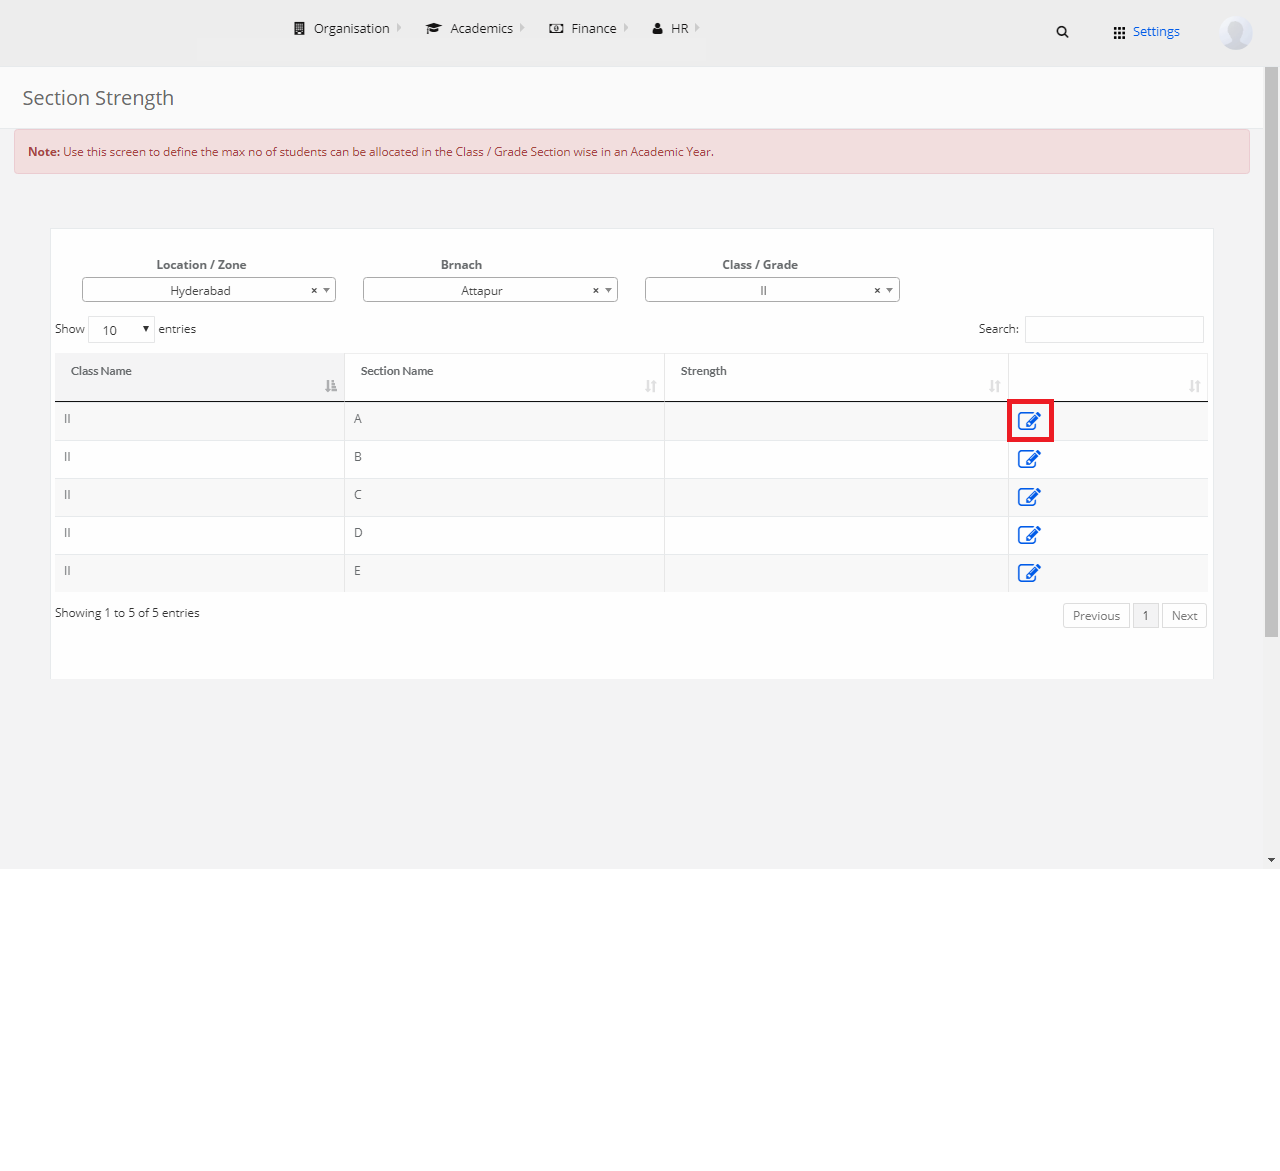
3) Section Strength
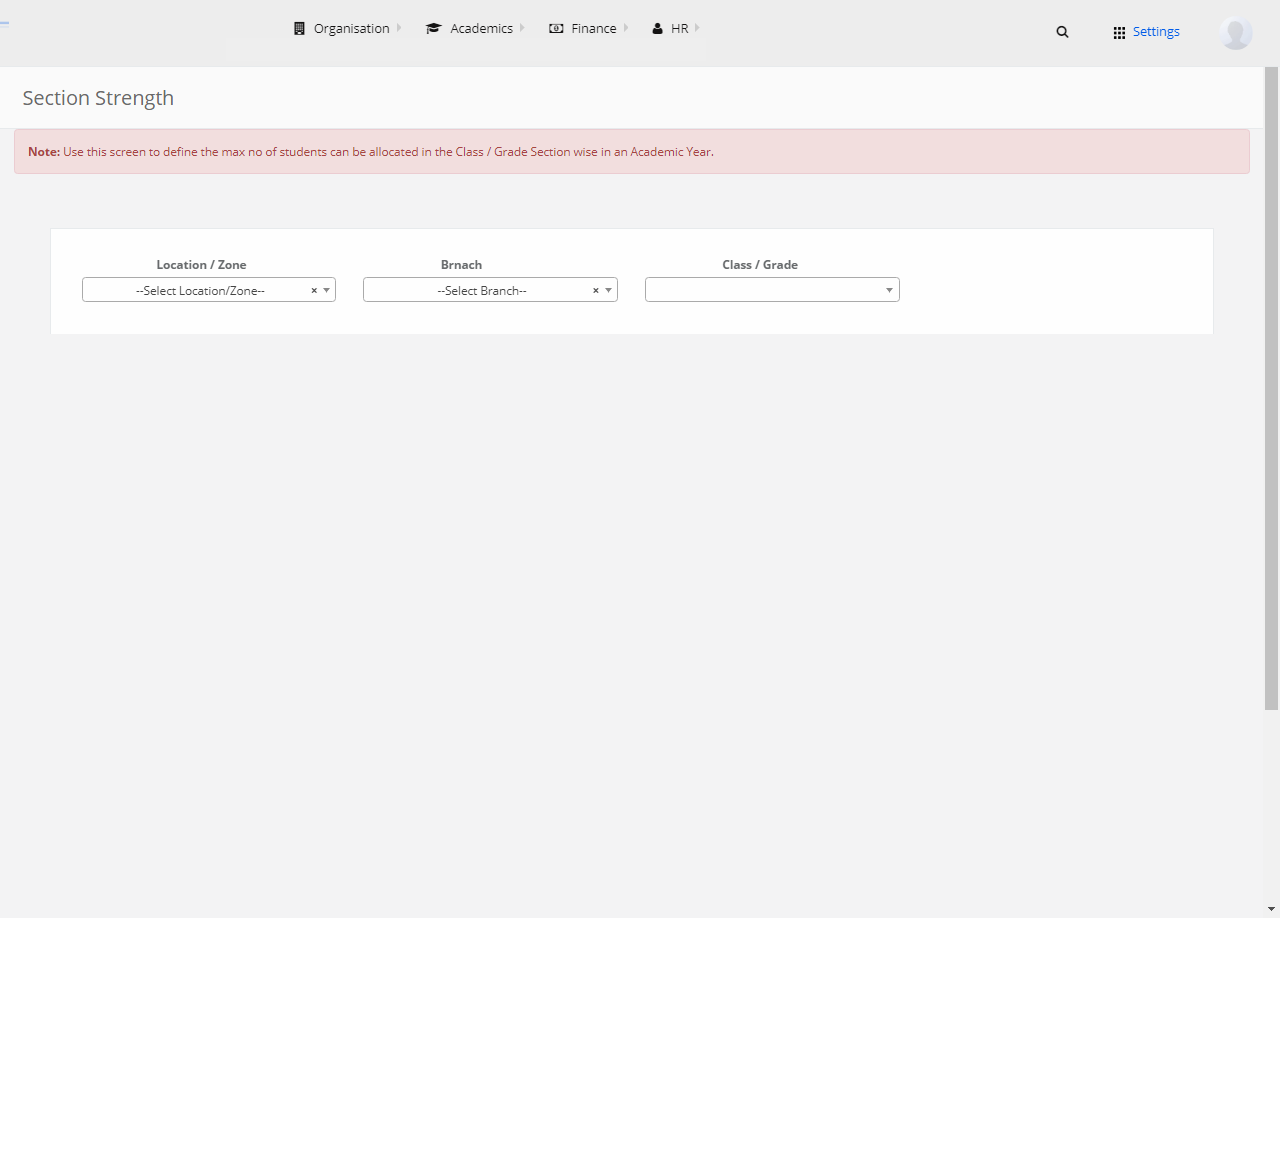
Step 1: Select Organization and click on “Section Strength”.
Step 2: Select Location, Branch, Class.
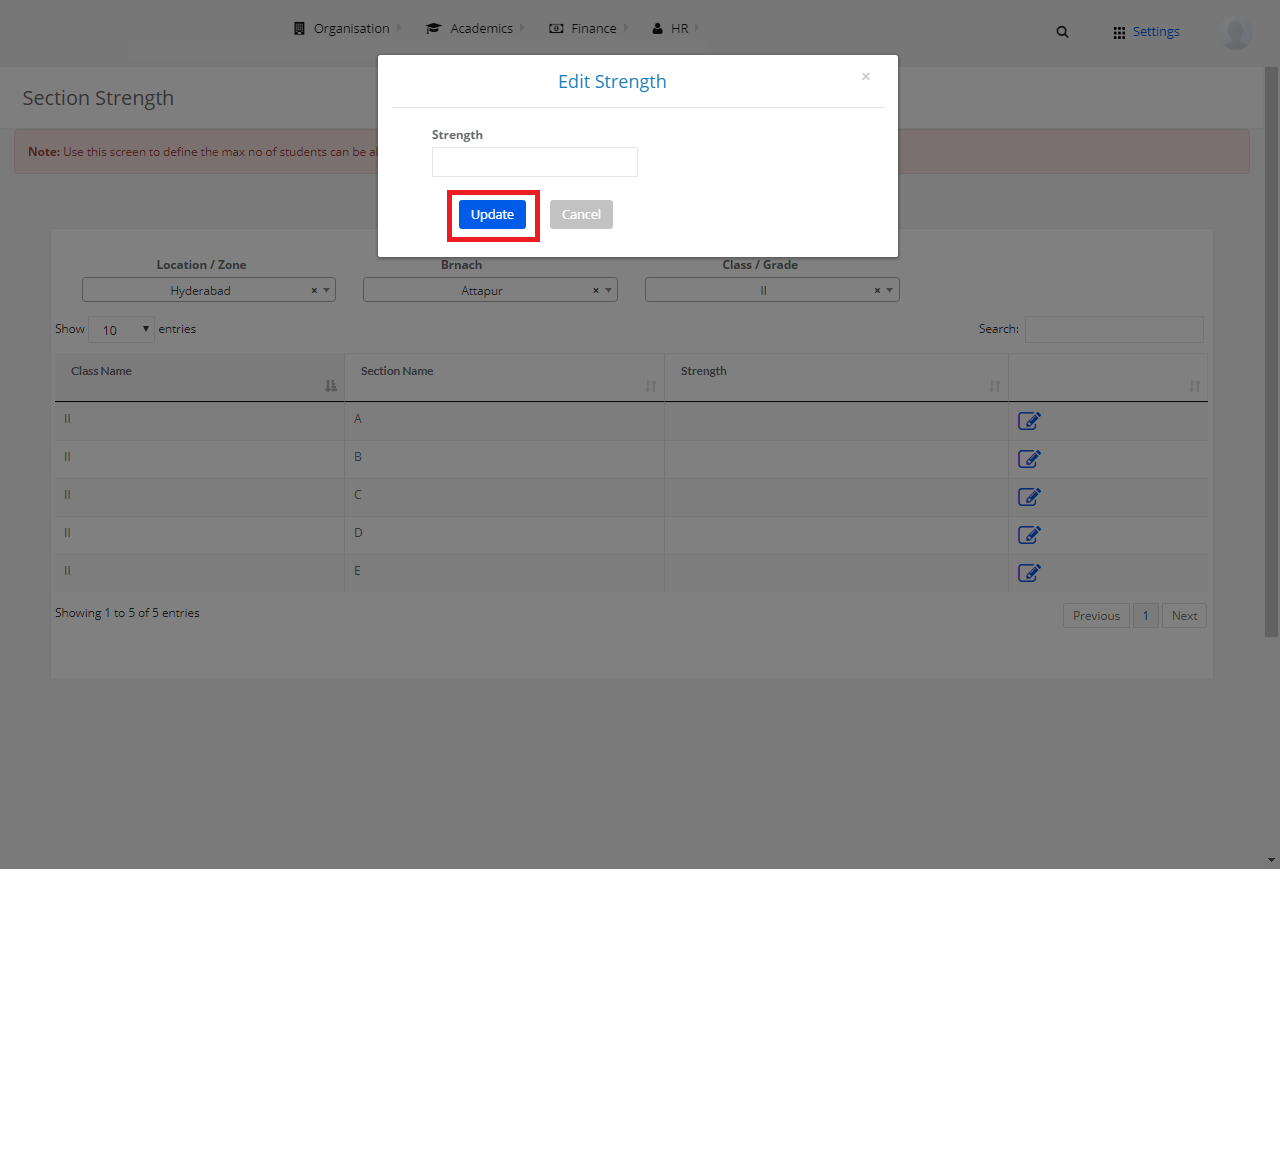
Step 3: Select any section and click on the “Edit” button.
Step 4: Add the strength and click on Update.
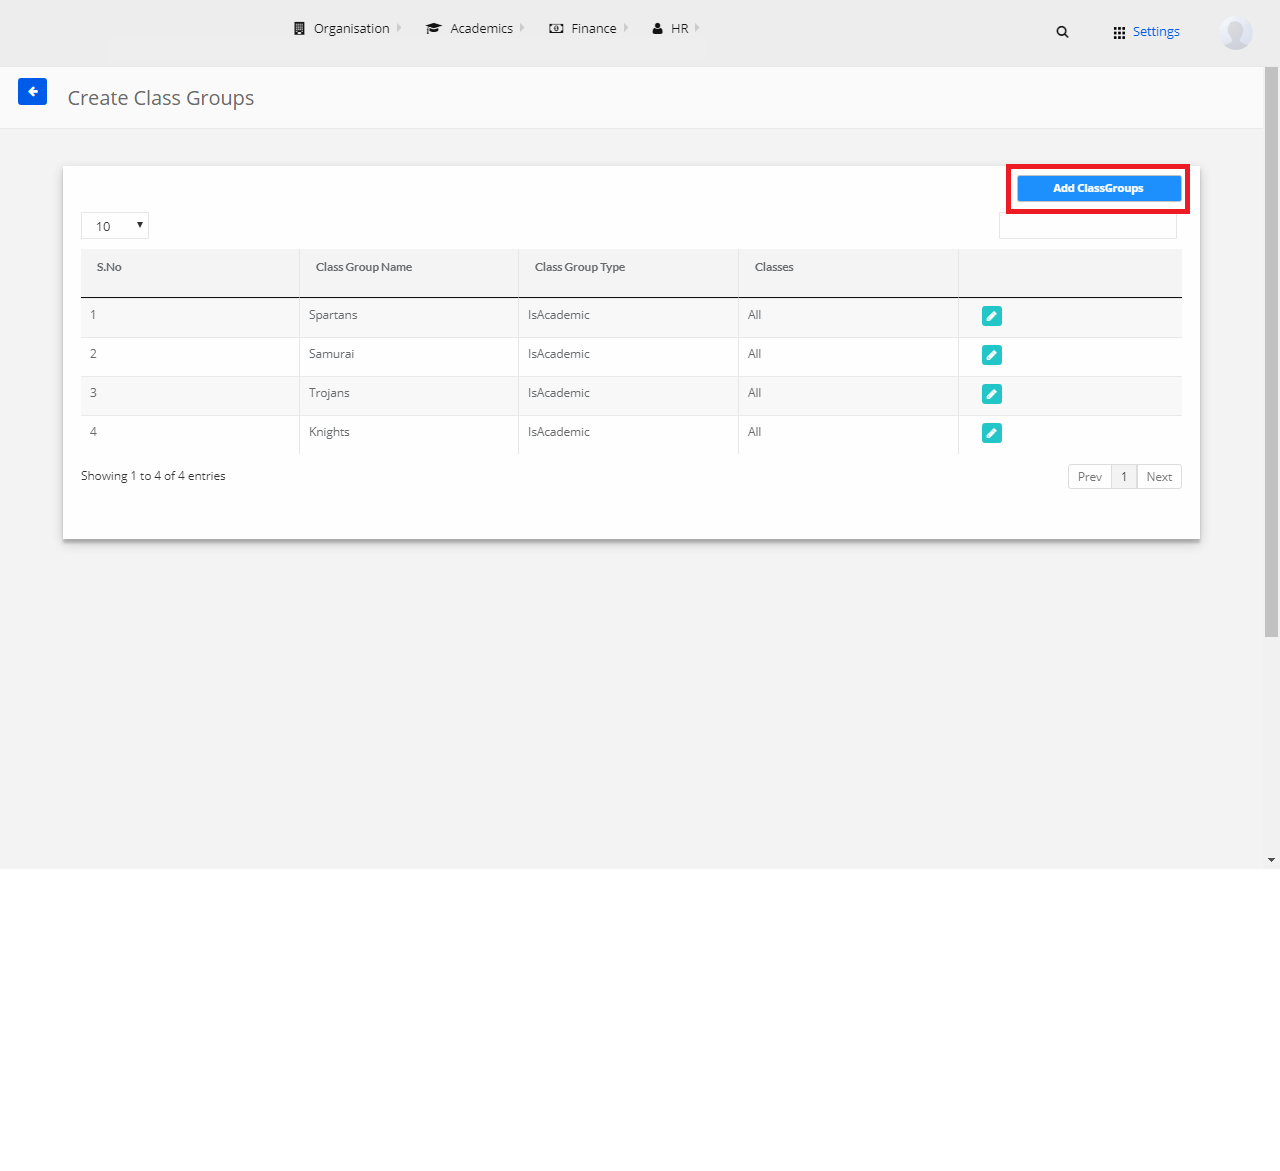
4) Create Class Groups
Step 1: Select Organization and click on “Create Class Groups”.

Step 2: Select any branch and click on “Create Class Groups”.

Step 3: Click on “Add Class Group”.
Step 4: Enter the required details and click on “Save”.

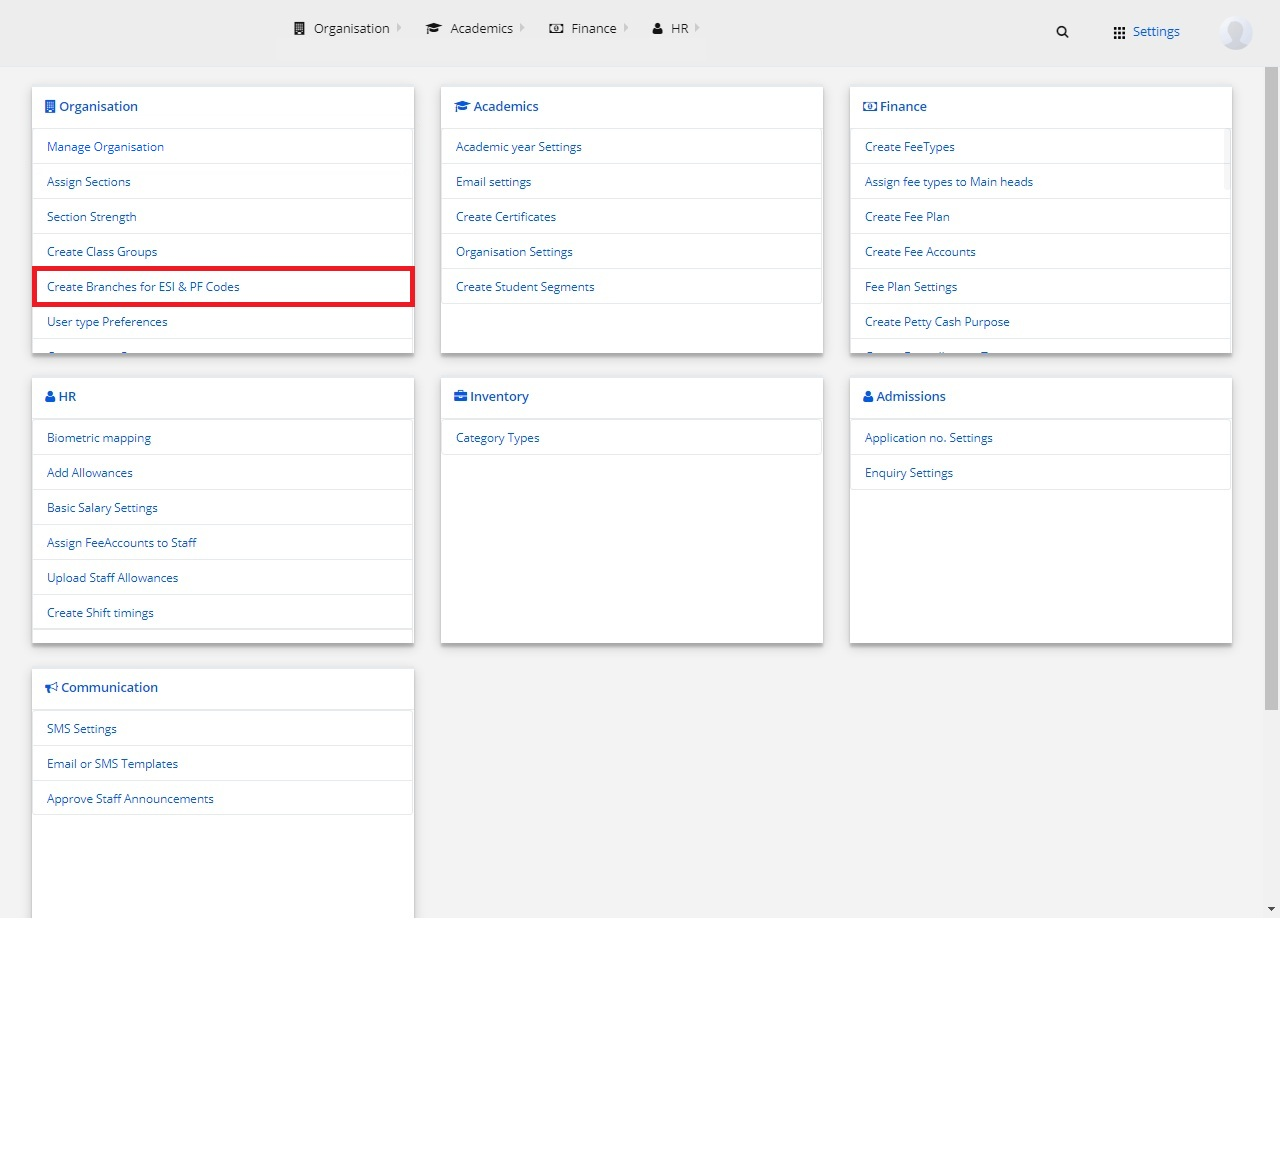
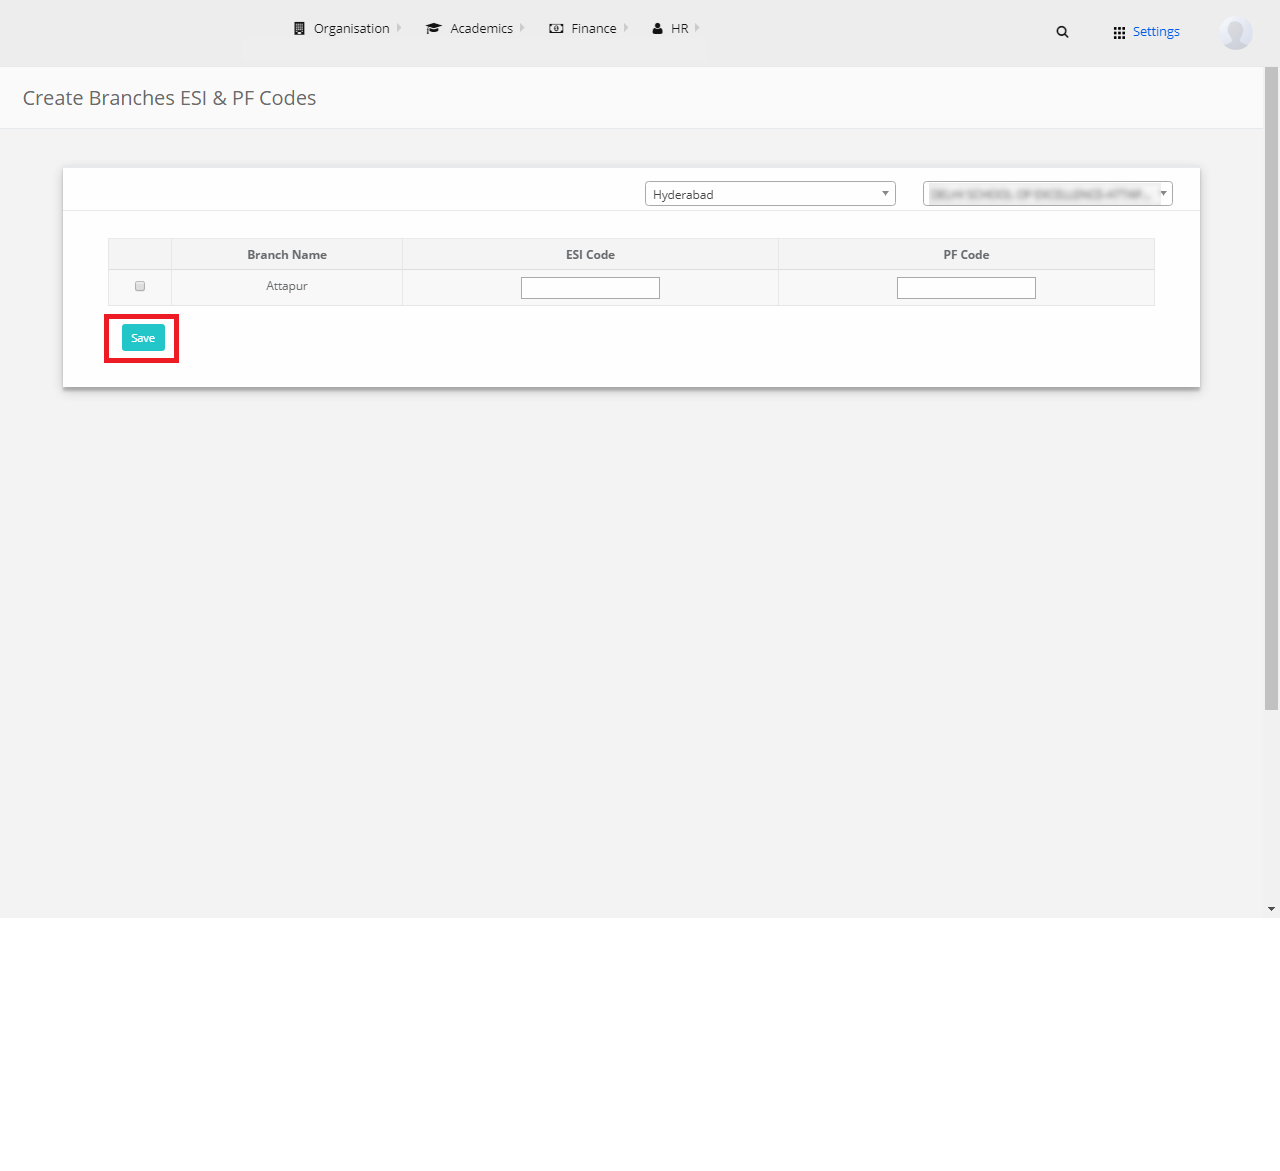
5) Create Branches for ESI & PF Codes
Step 1: Select Organization and click on “Create Branches for ESI & PF Codes”.
Step 2: Select Location, School Account.
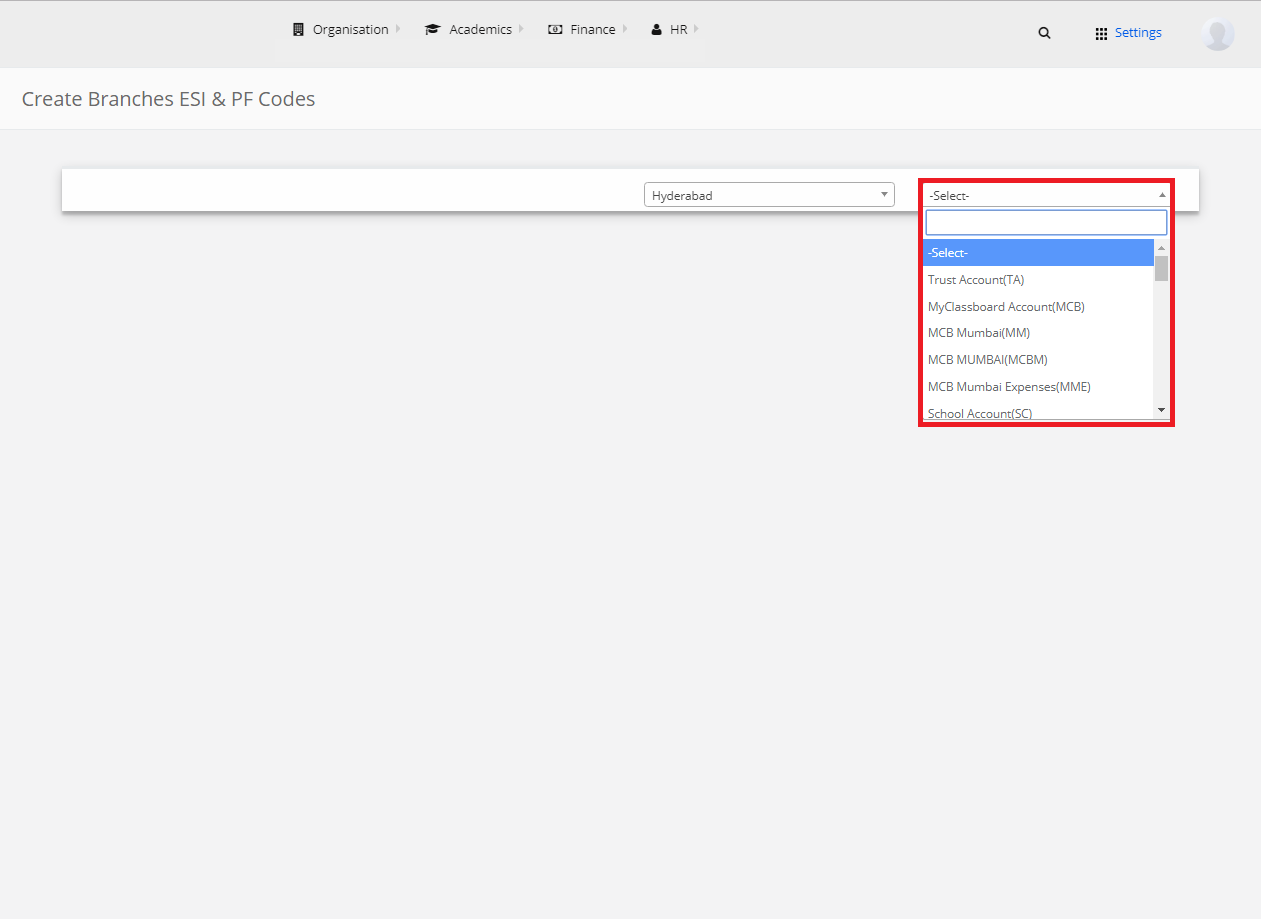
Step 3: Select the Branch Name, enter the ESI code, PF code and click on “Save”.
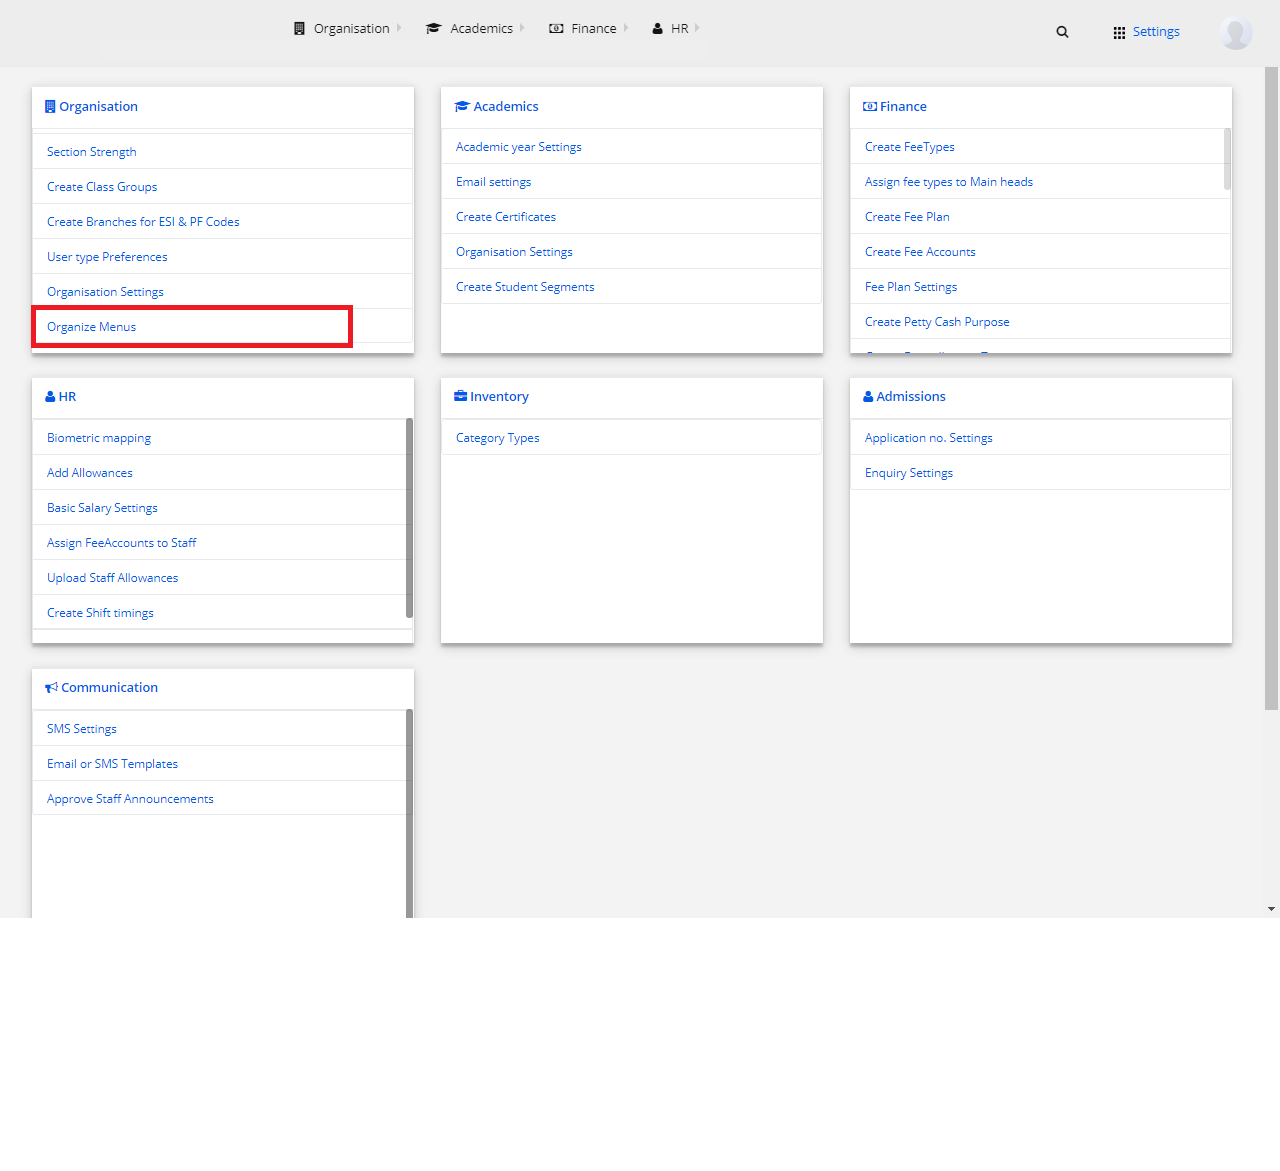
6) Organize Menus
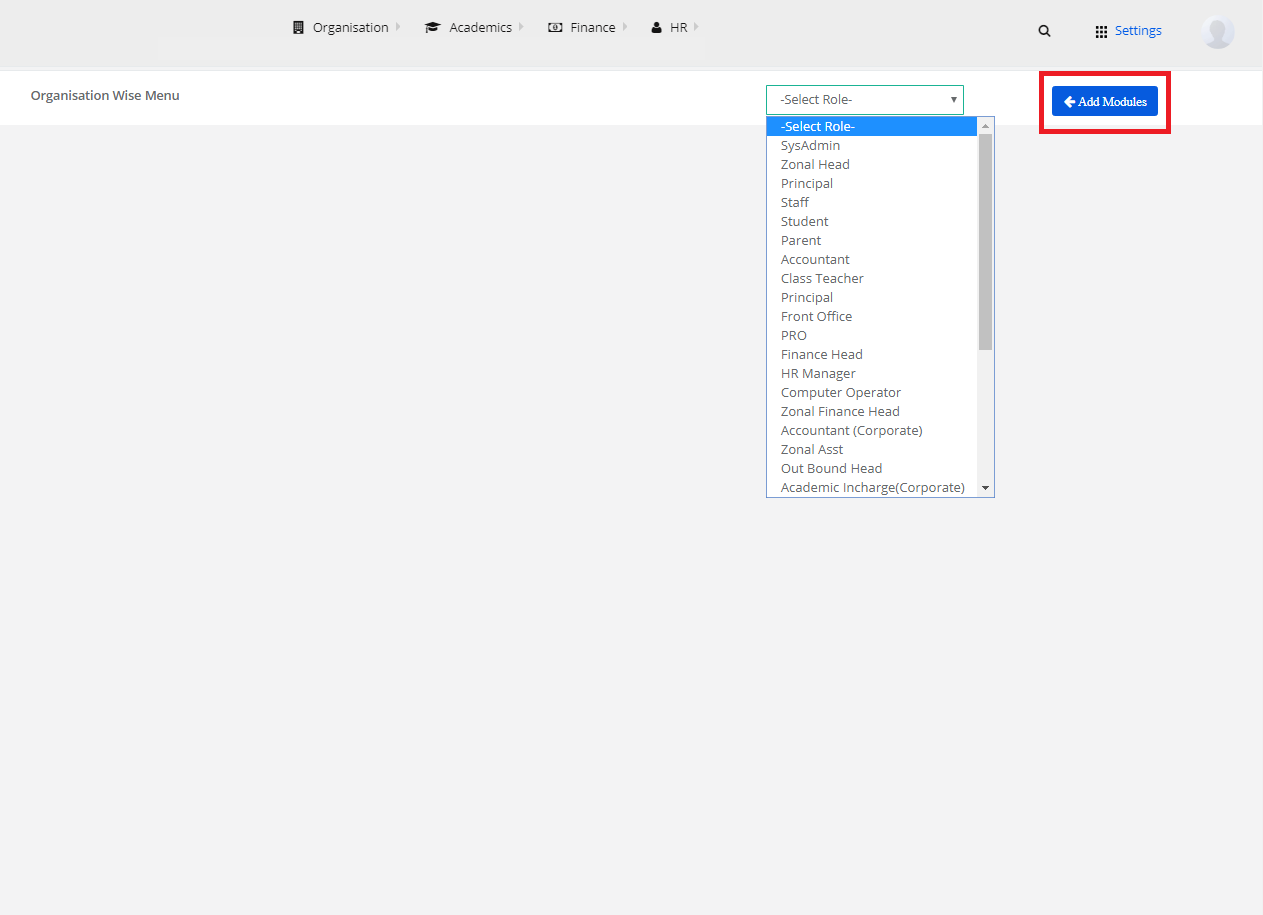
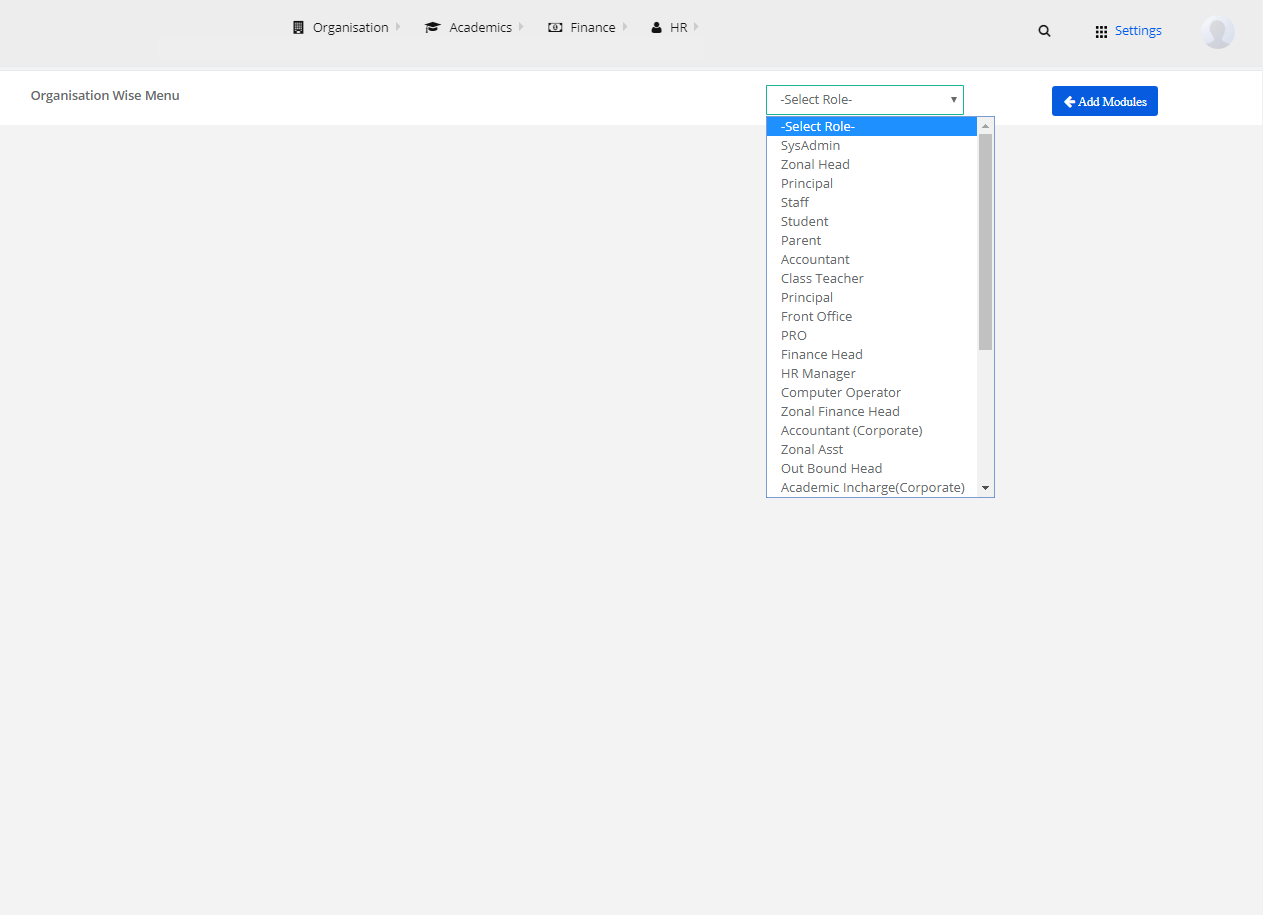
Step 1: Select Organization and click on “Organize Menus”.
To Assign Modules to Users
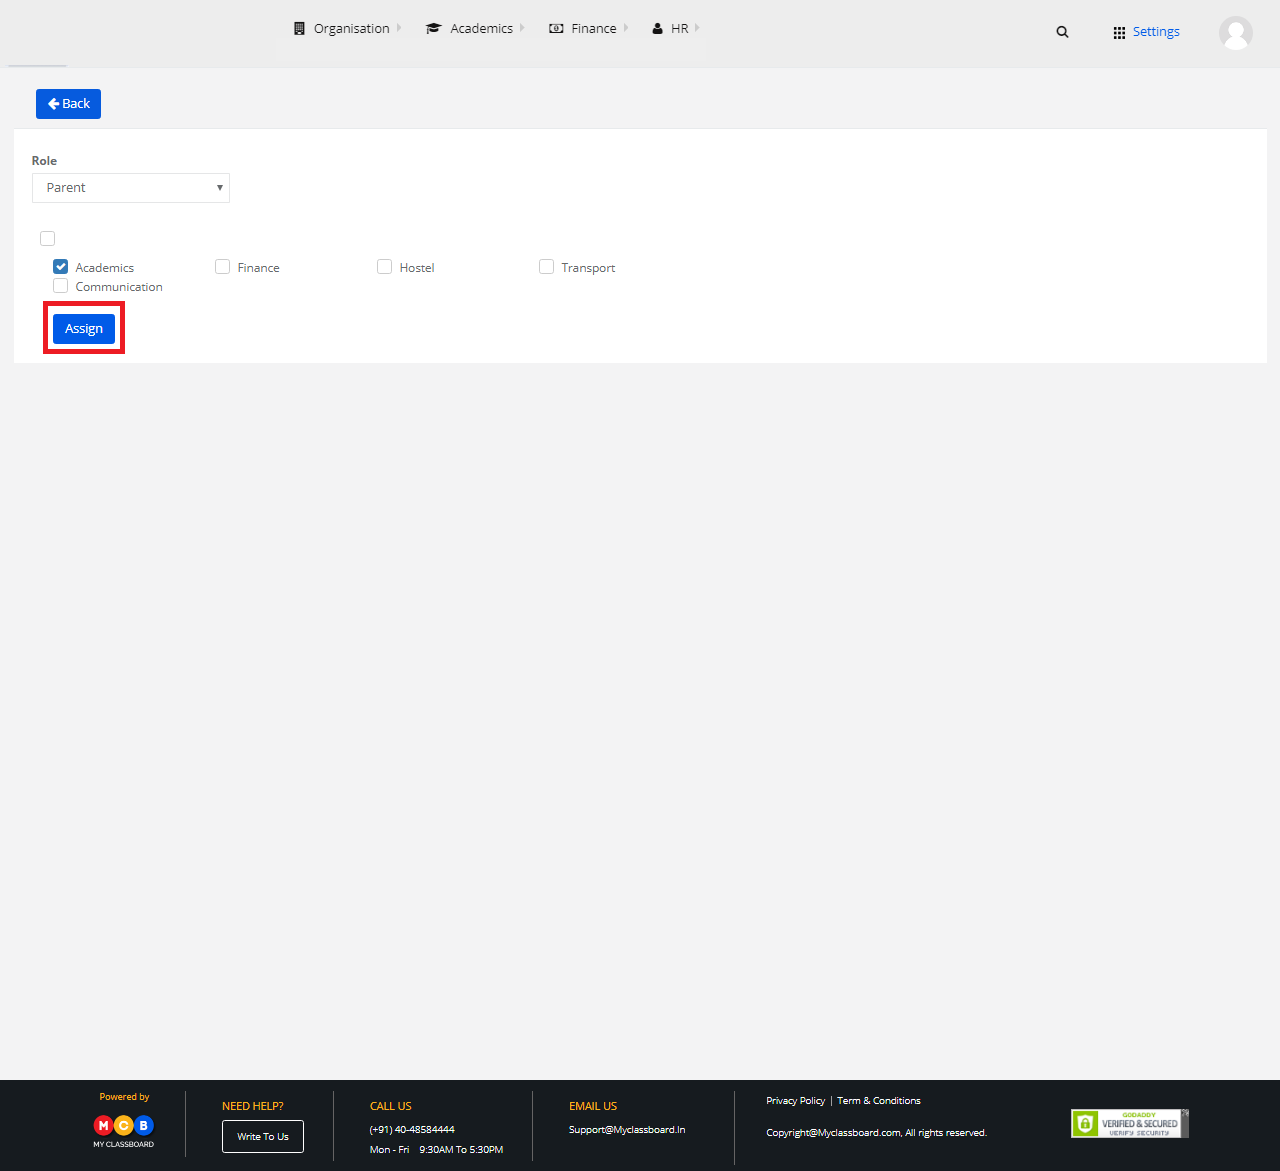
Step 2: Select “Role” from the drop-down and click on “Add Modules”.
Step 3: Select the modules to assign, by marking the checkbox. Upon marking, click on Assign.
The selected modules are assigned to the respective User.

To Unassign Modules to Users
Step 4: To Unassign Modules to Users, simply unmark the checkbox and click on “Assign”.
The selected modules are unassigned to the respective User.
To Assign Links
Step 5: Select any “Role” from the drop-down. A list of modules will be displayed on the left pane.
Step 6: Select any module from the list of options displayed on the left pane.
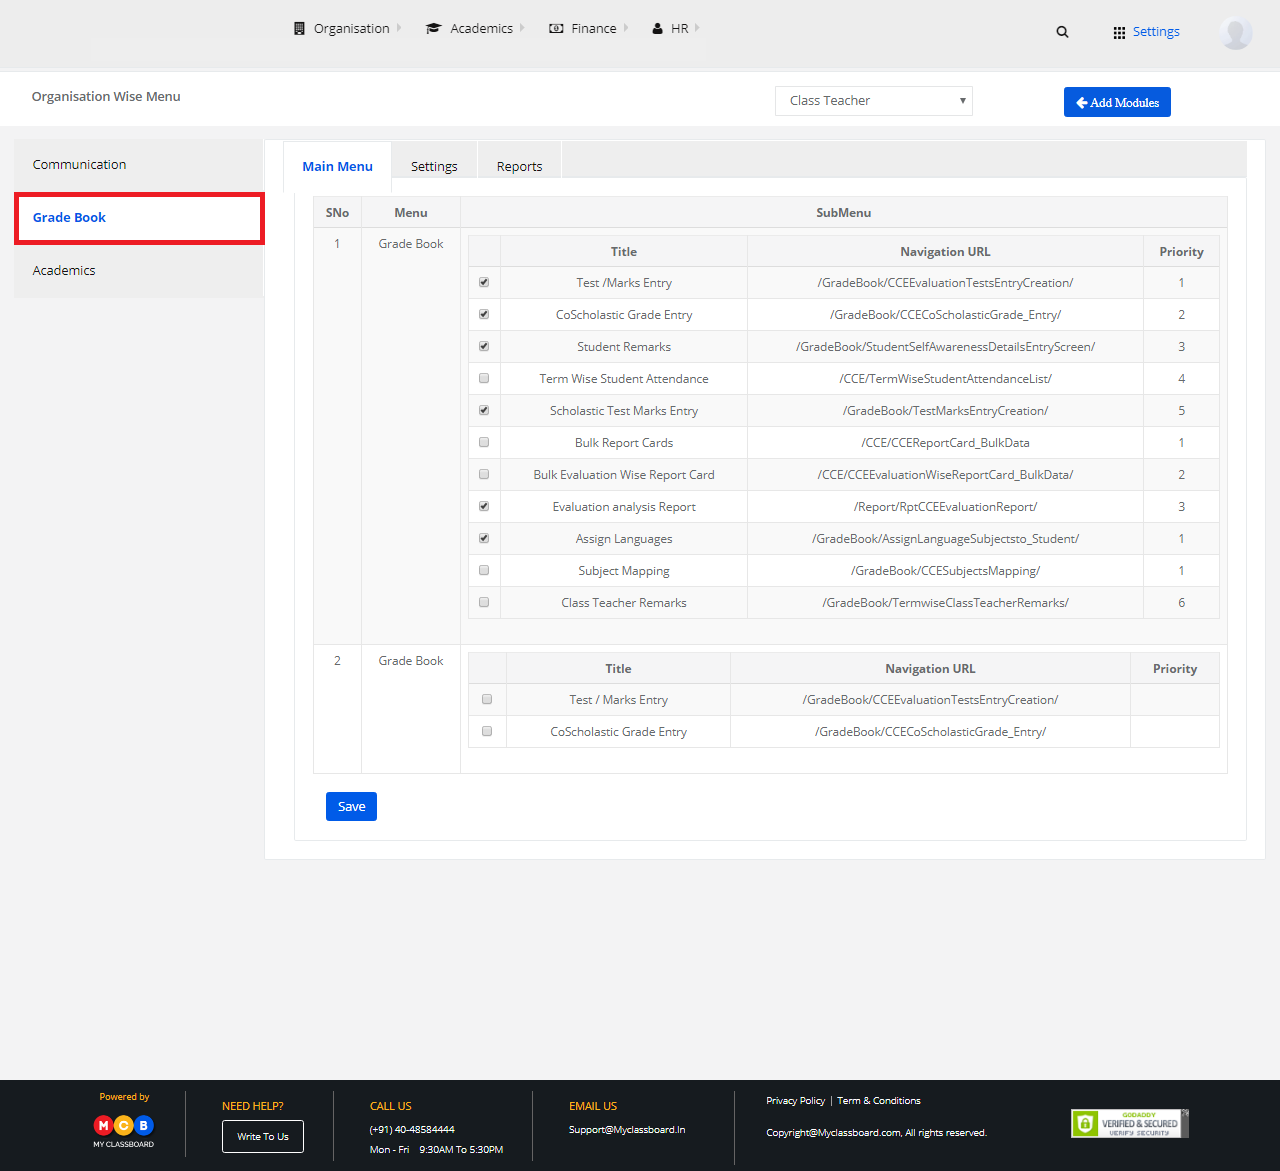
Step 7: From the displayed list, select the links to assign by marking the checkbox. Upon marking, click on Assign.

The respective links are assigned in that module.
To Unassign
Step 8: To Unassign links, simply unmark the checkbox and click on “Assign”.
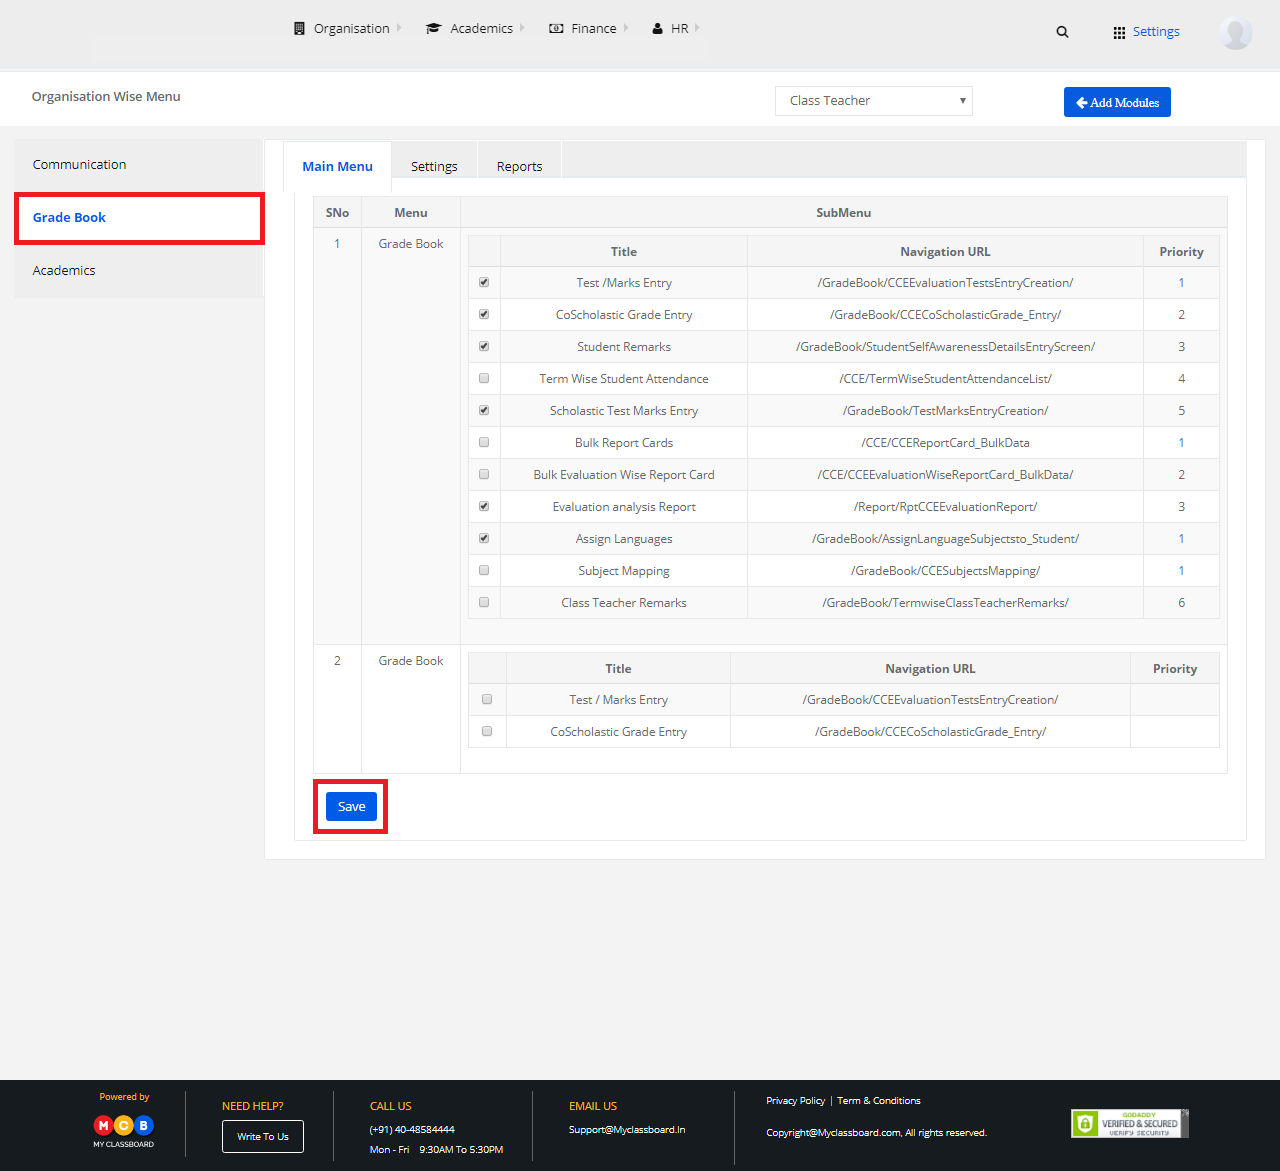
The selected links are unassigned in the respective module.
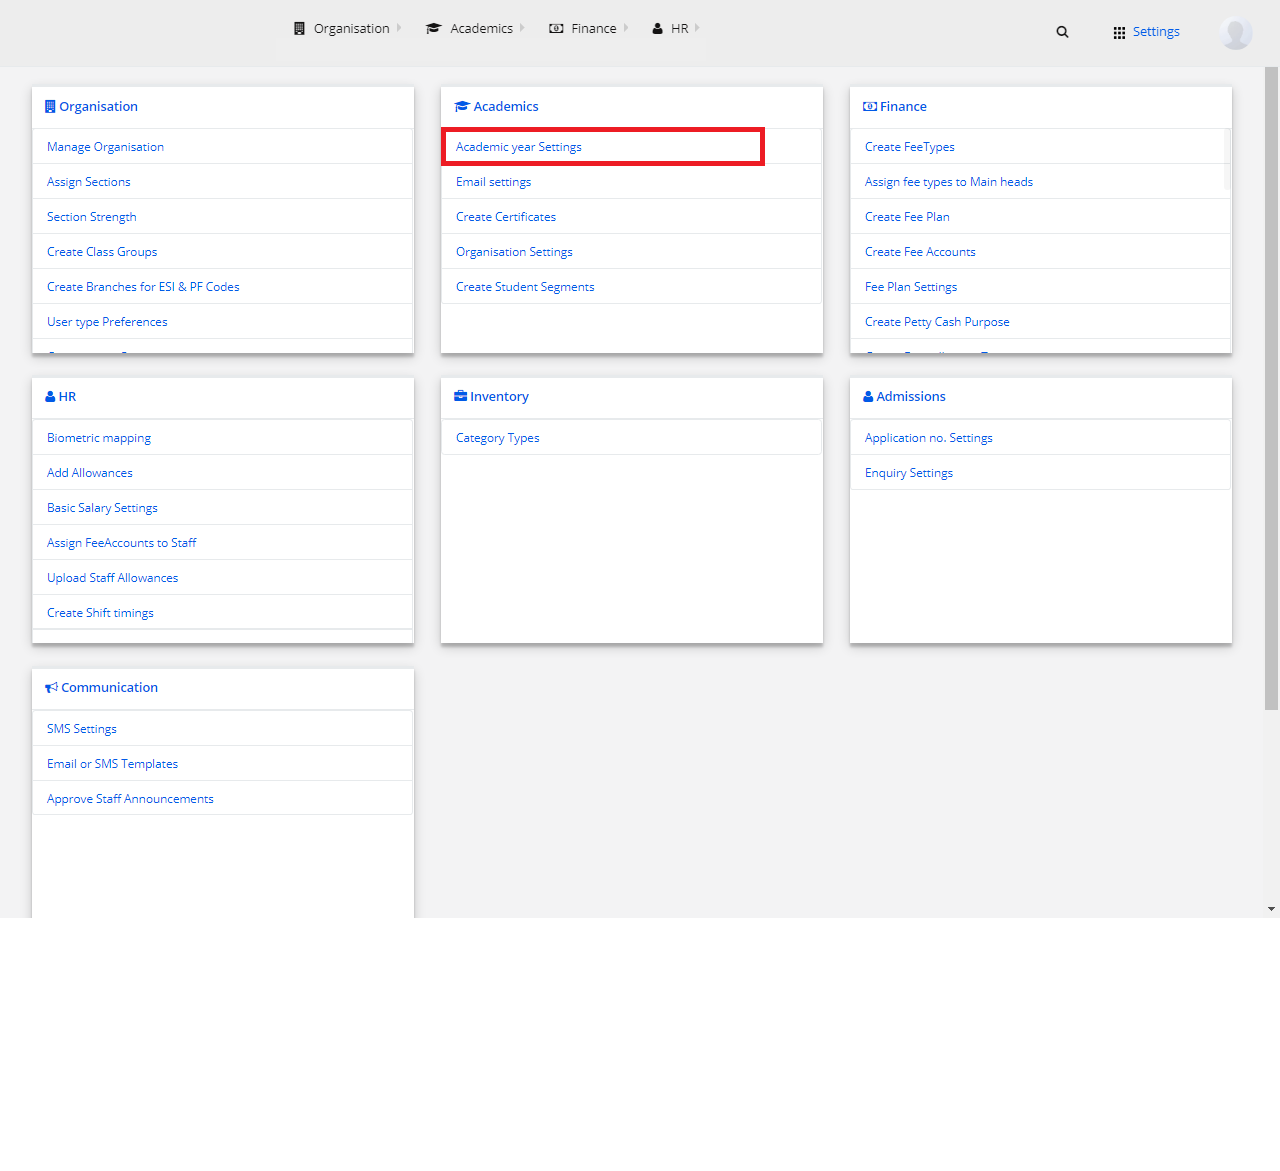
Stage 4: Academics
1) Academic year Settings
Step 1: Select Academics and click on “Academic year Settings”.
Change Academic Year
Step 2: To change current academic year, select “Change Academic Year”. Select the academic year from the drop-down and click on change.

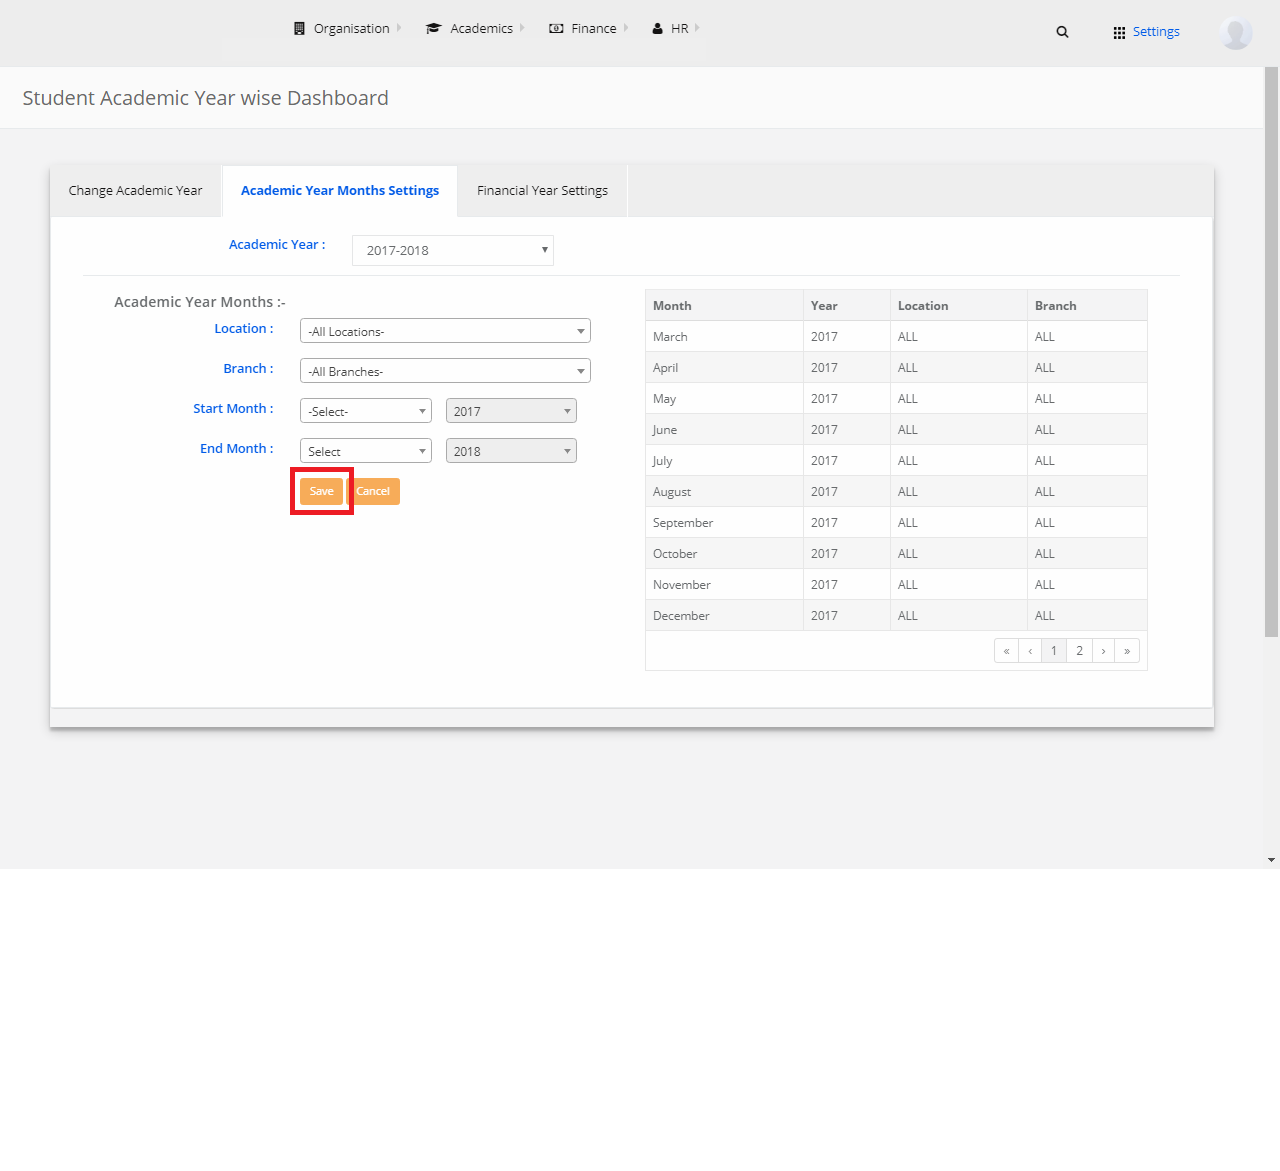
Academic Year Months Settings
Step 3: Select “Academic Year Months Settings” from the top and choose the academic year.

Step 4: Choose the required options and click on save.
Financial Year Settings
Step 5: Select “Financial Year Settings” from the top. Select Academic Year, Financial Year, Date and click on “Save”.

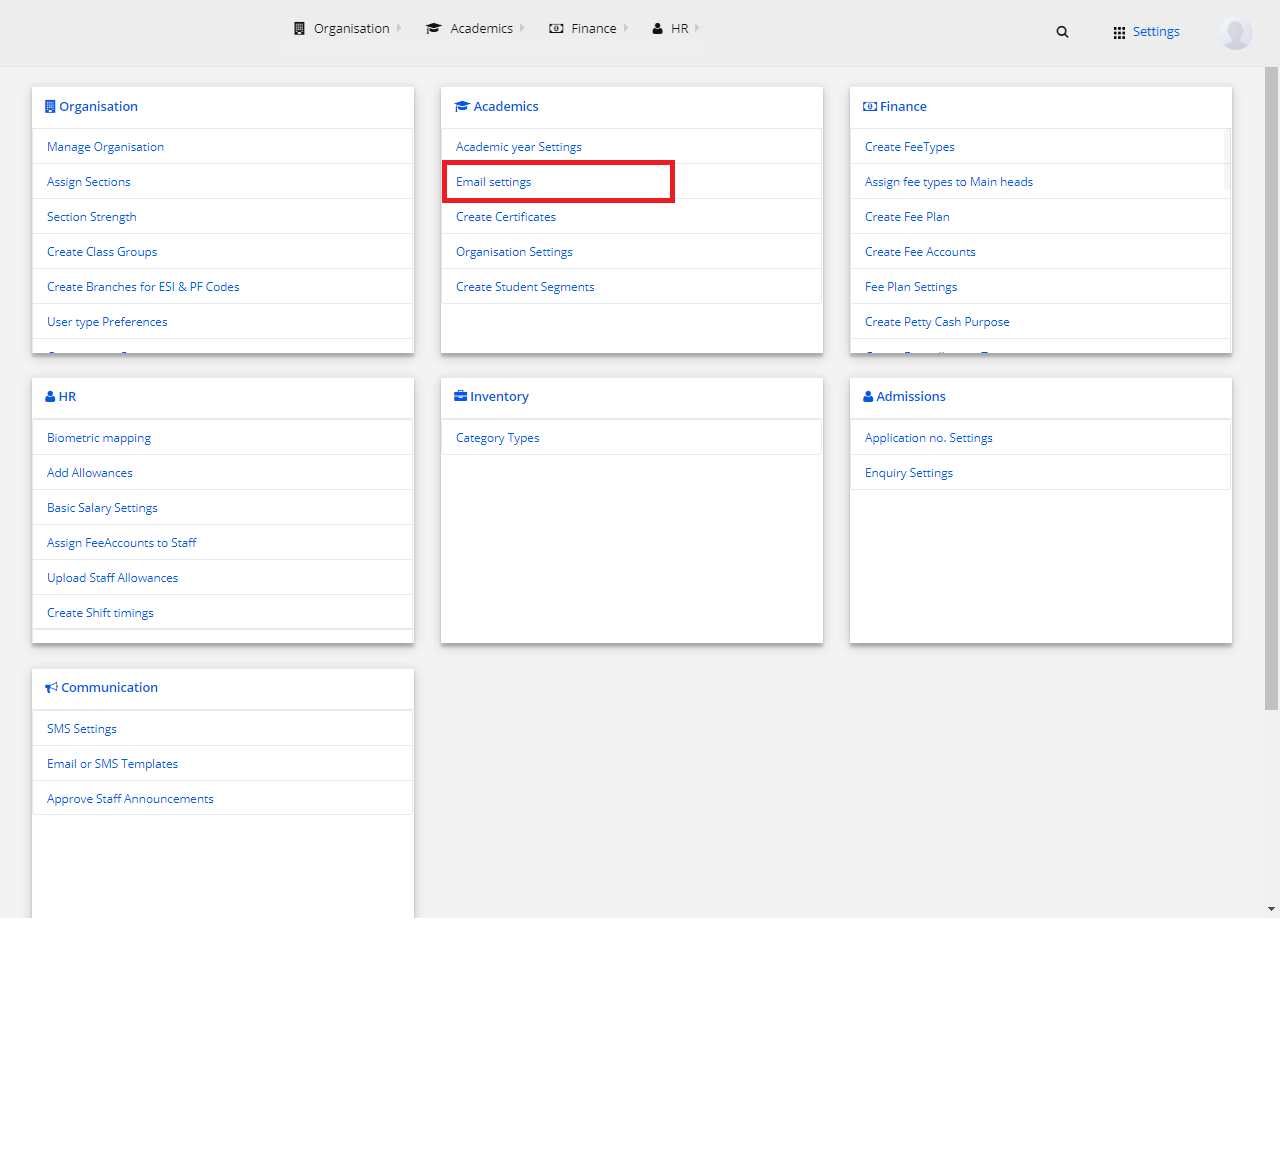
2) Email Settings
Step 1: Select Academics and click on “Email Settings”.
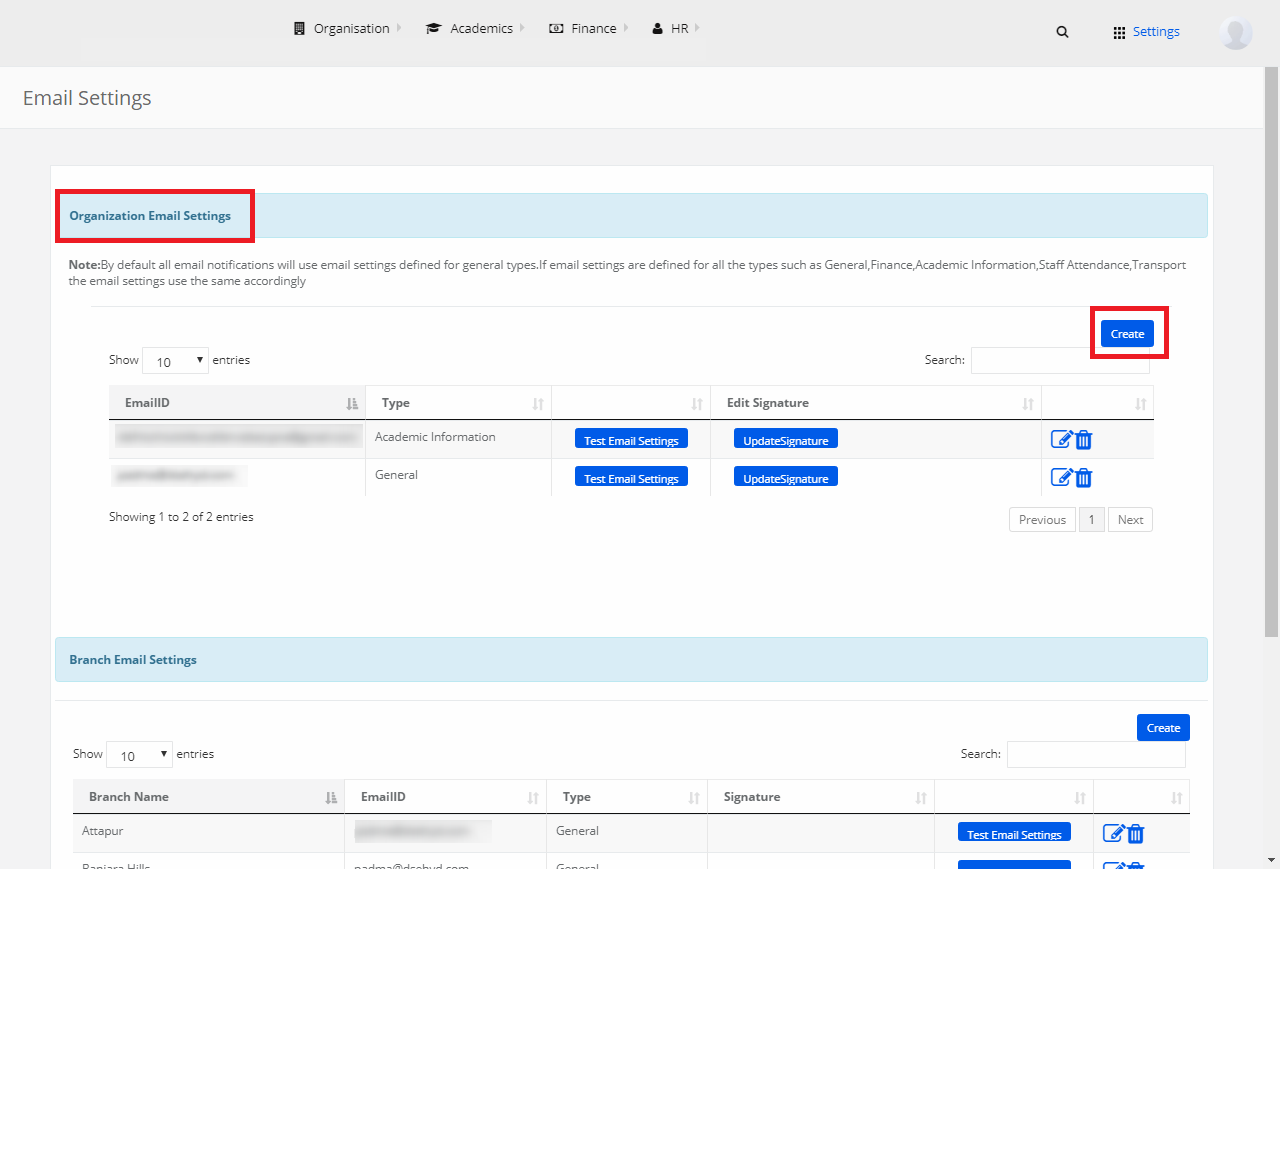
Organization Email Settings
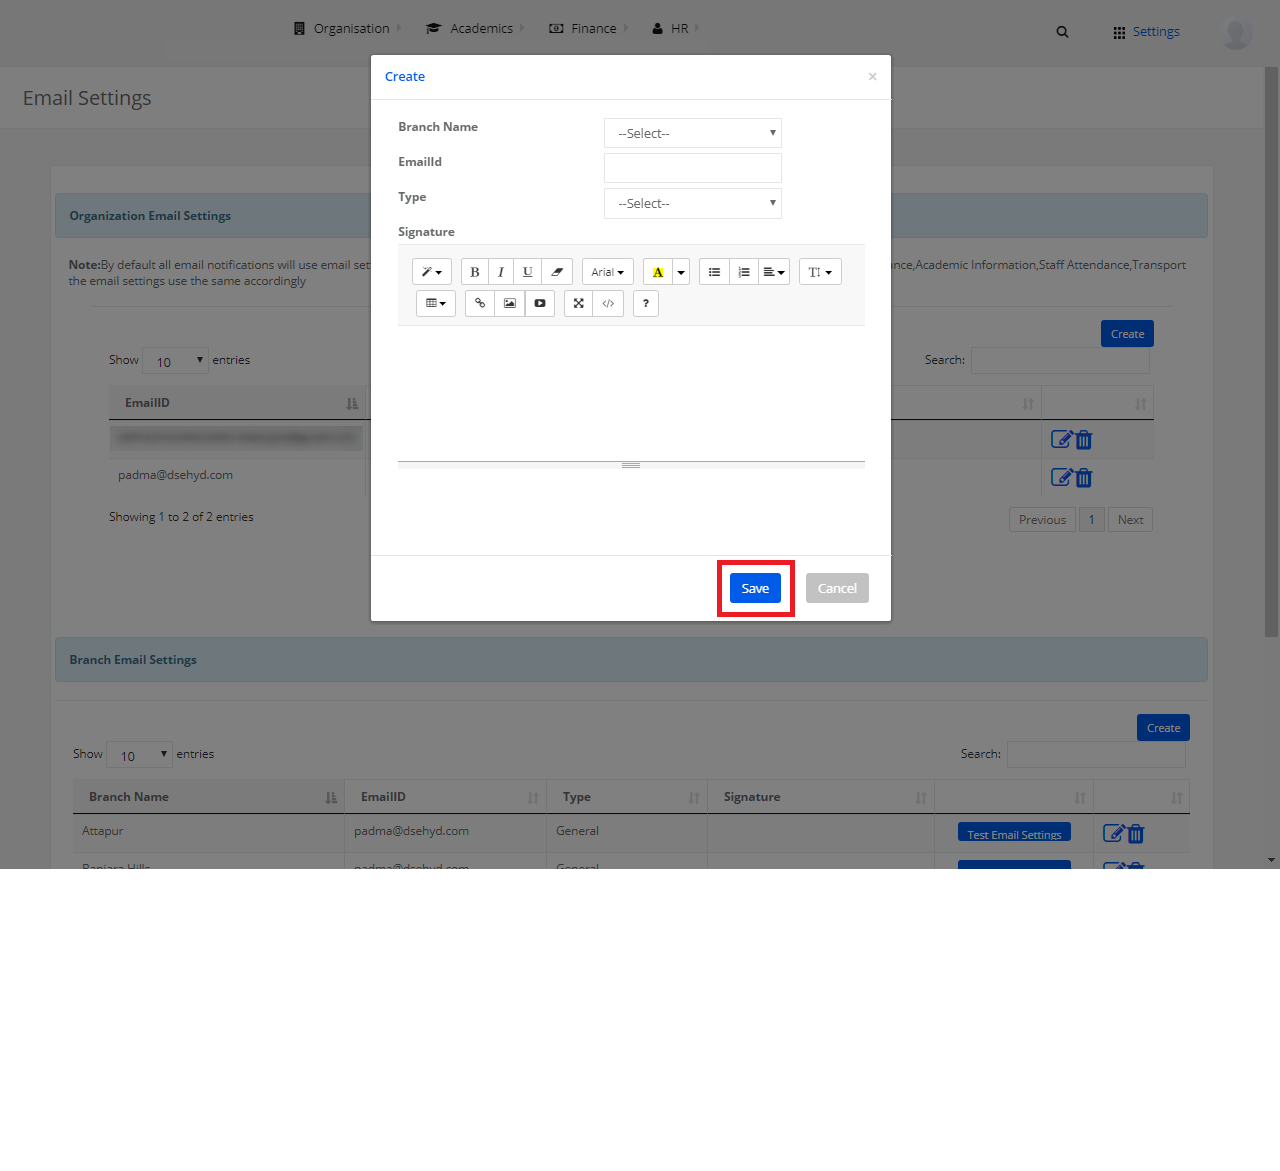
Step 2: Select Organization Email Settings and click on “Create”.
Step 3: Enter the email id, select type and click on “Save”.

Branch Email Settings
Step 4: Select Branch Email Settings and click on “Create”.

Step 5: Select required options, enter the email template and click on “Save”.
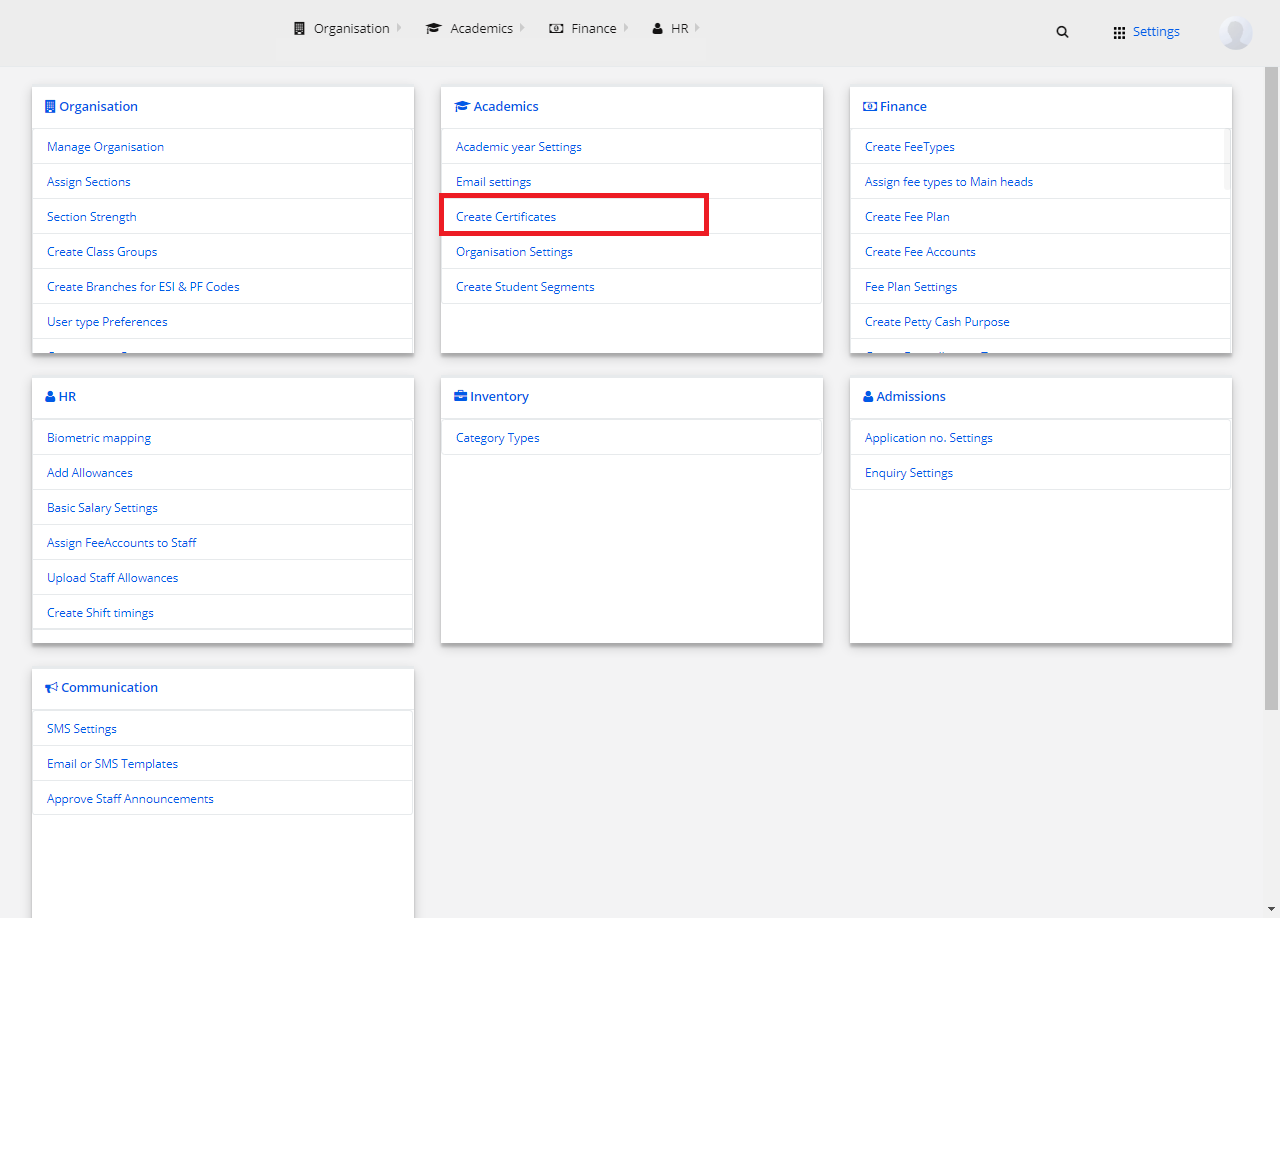
3) Create Certificates
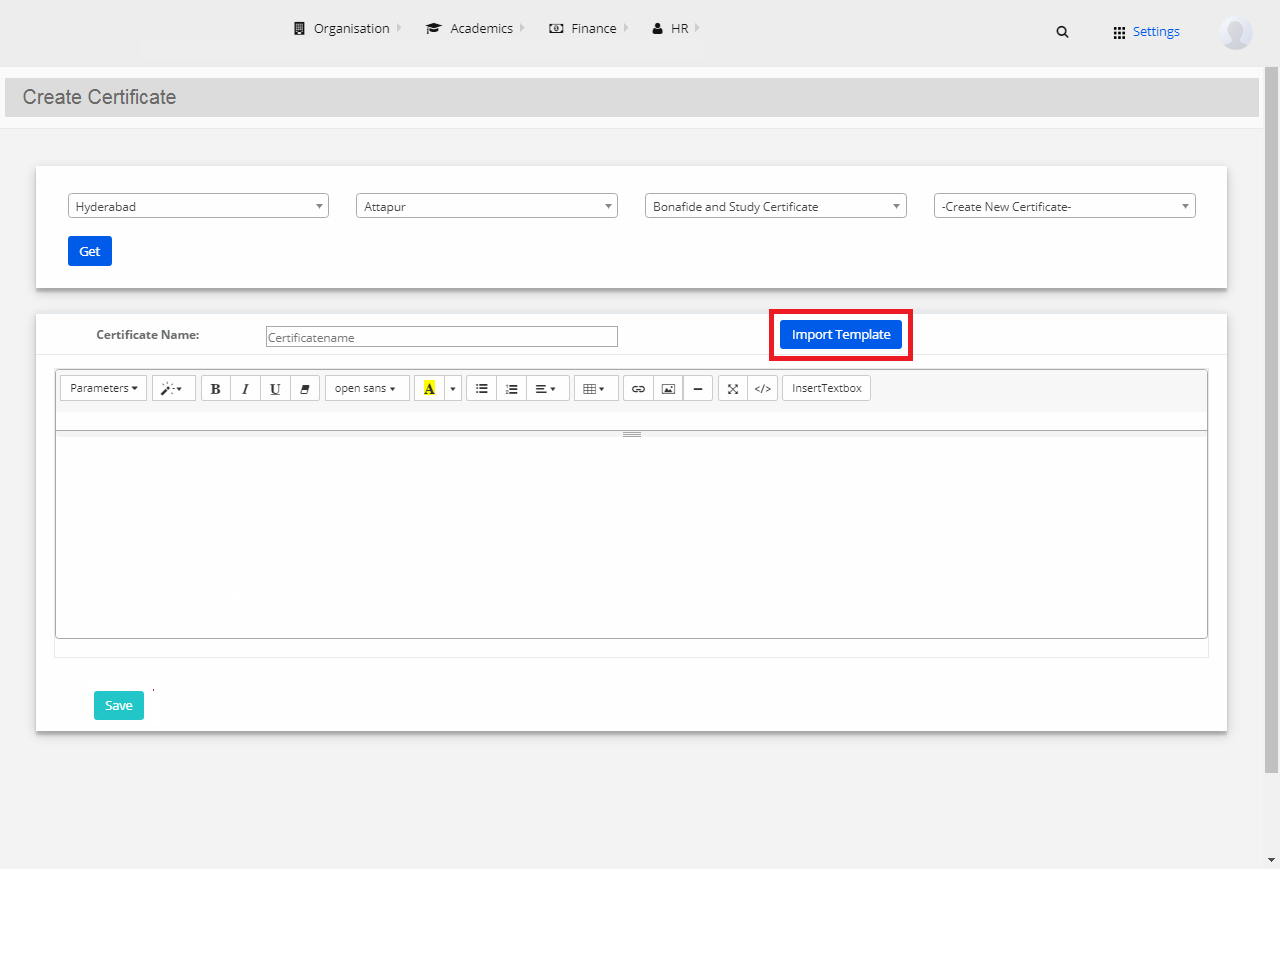
Step 1: Select Academics and click on “Create Certificates”.
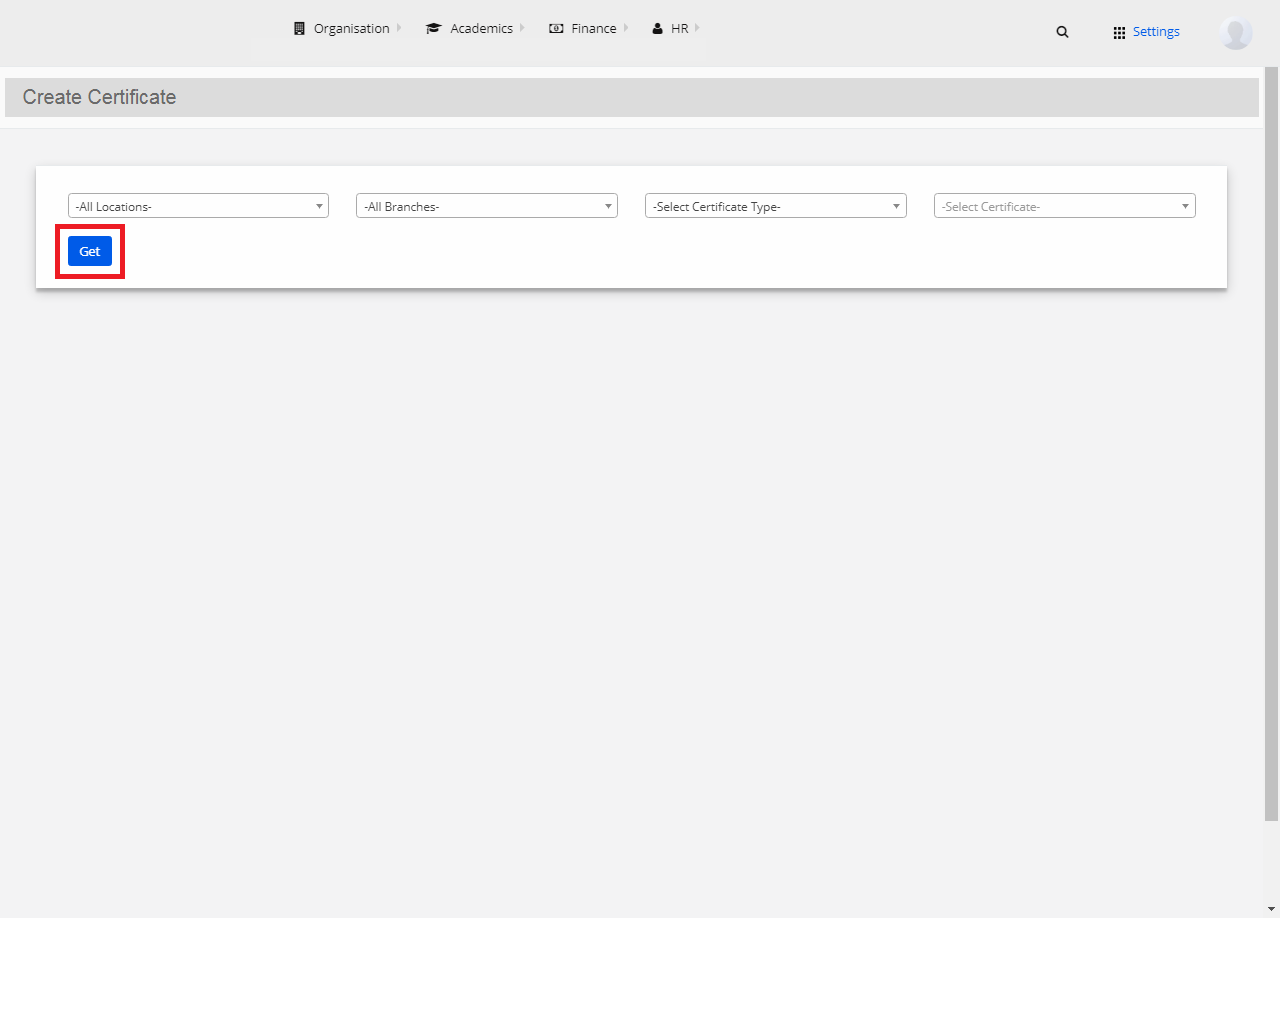
Step 2: Select the location, Branch, Certificate type as Transfer Certificate, create new certificate and click on “Get”.
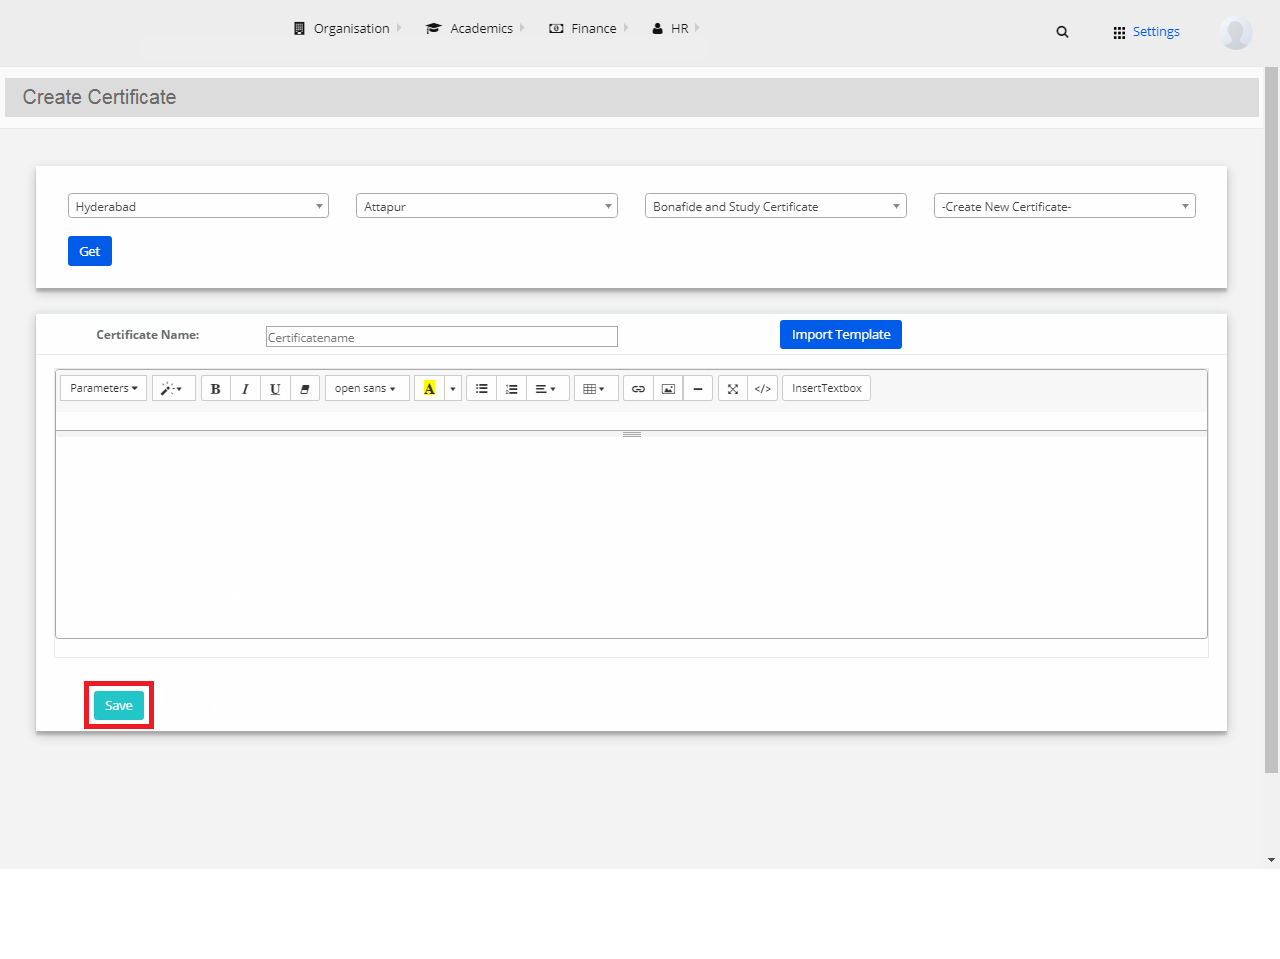
Step 3: Give Certificate Name and start creating the certificate with the tools (parameters) provided.

Step 4: After designing, click on “Save”. The Certificate is created and saved.
Step 5: If you want to import the template from the previous academic years, click on “Import Template”.
Step 6: Choose the template as per your requirements and select “Use this template”.
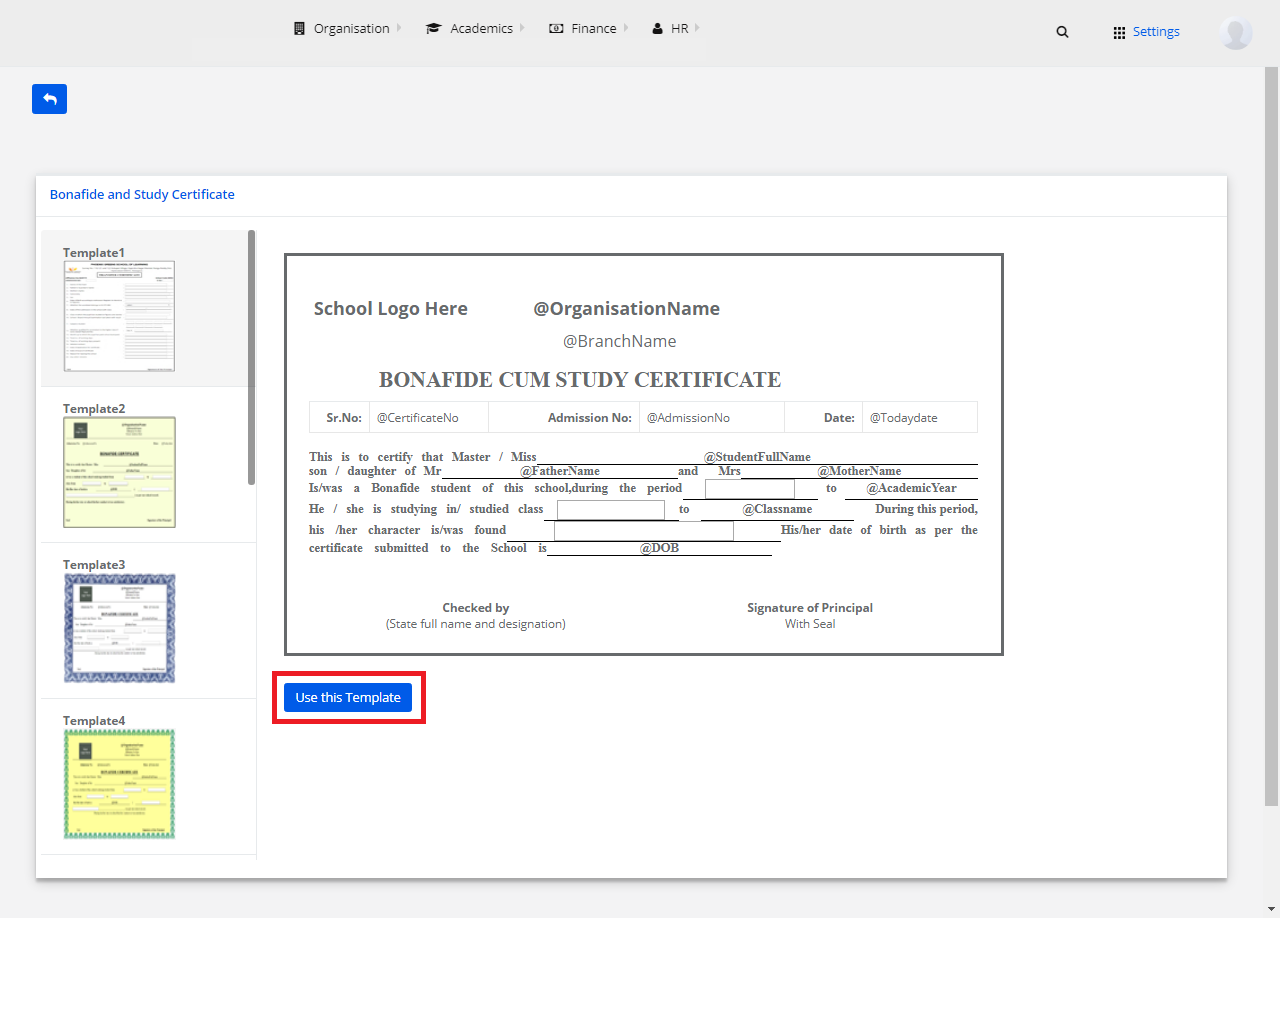
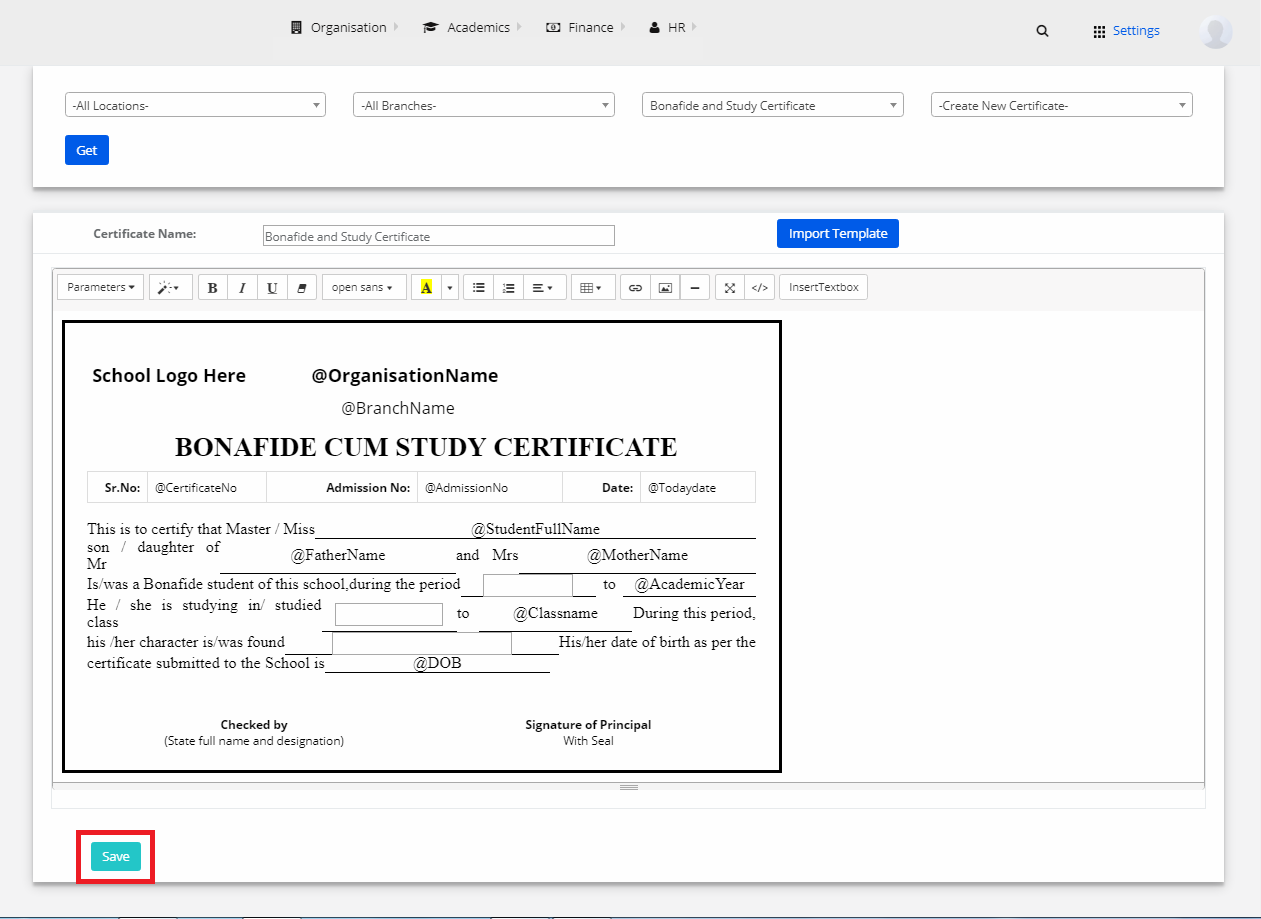
Step 7: The template is successfully imported. Edit the fields by choosing the required options from parameters tab, format the text and alignments from the tools available and click on Save.
4) Organisation Settings
Step 1: Select Academics and click on “Organisation Settings”.
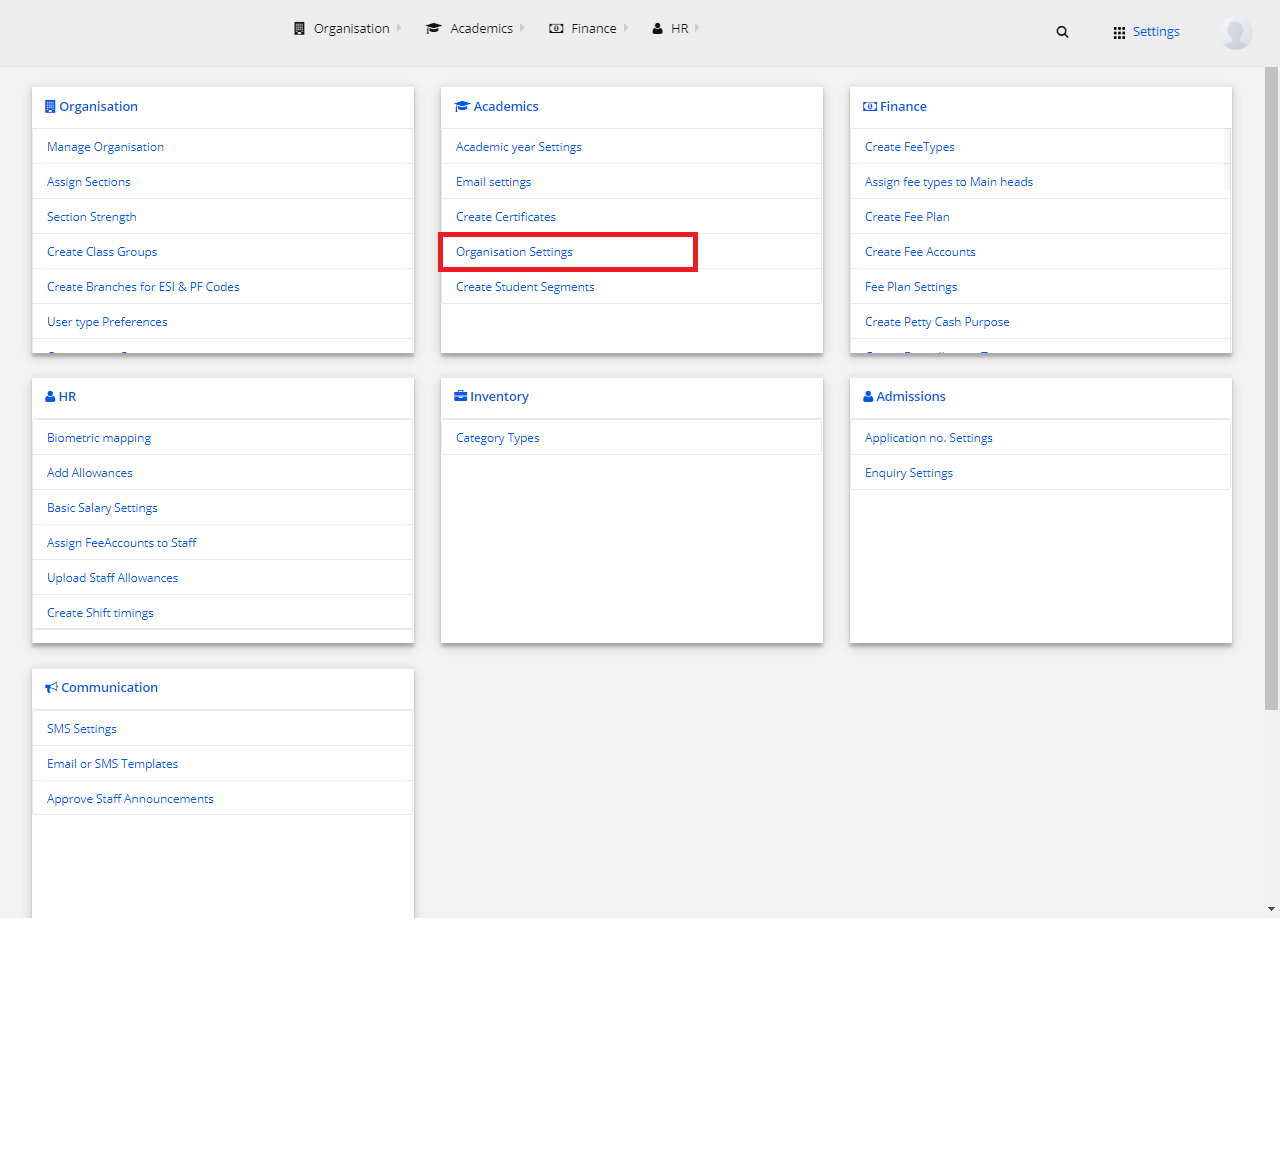
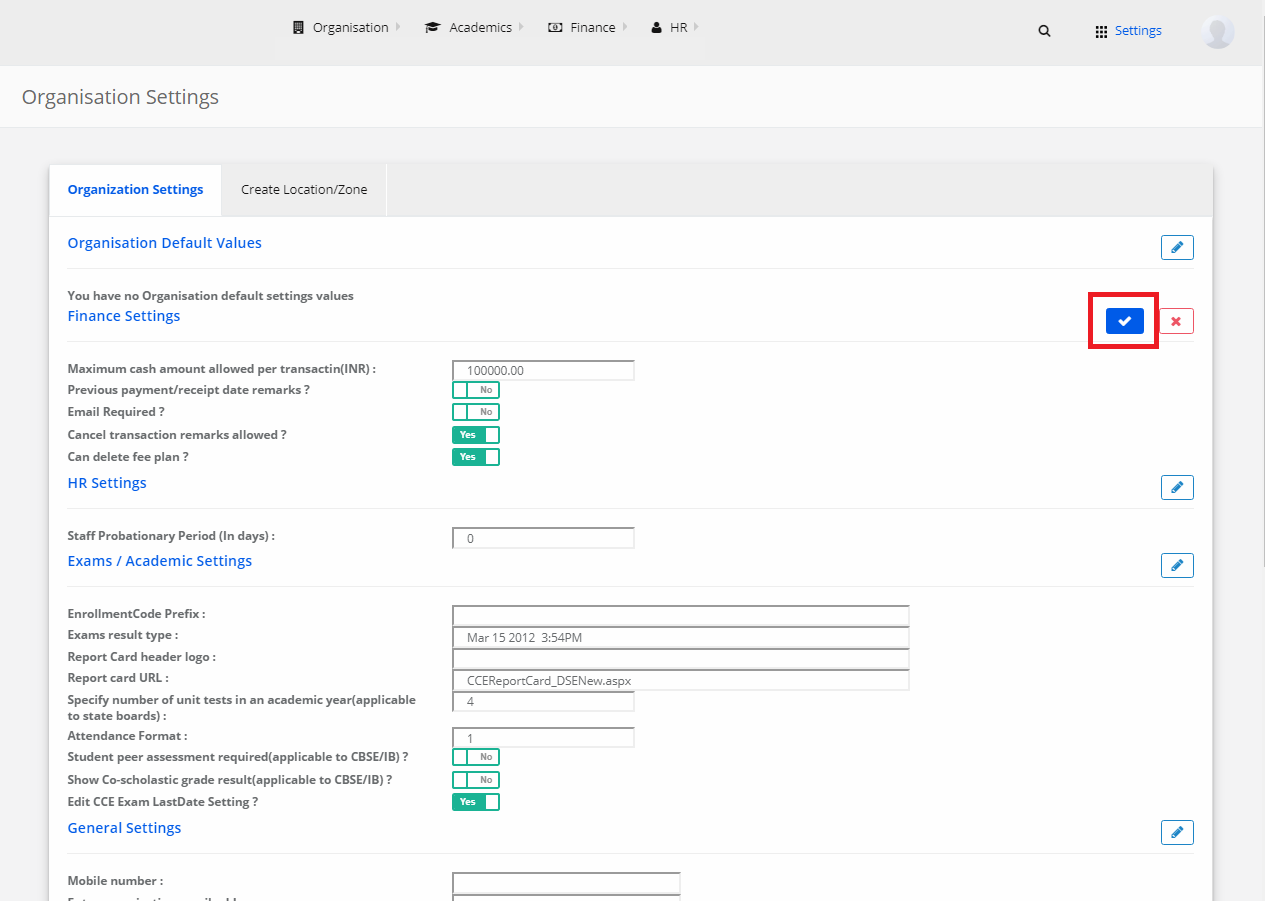
Step 2: Select Organisation Settings from the top bar. There is an “Edit” option for every section. Click on the Edit button.
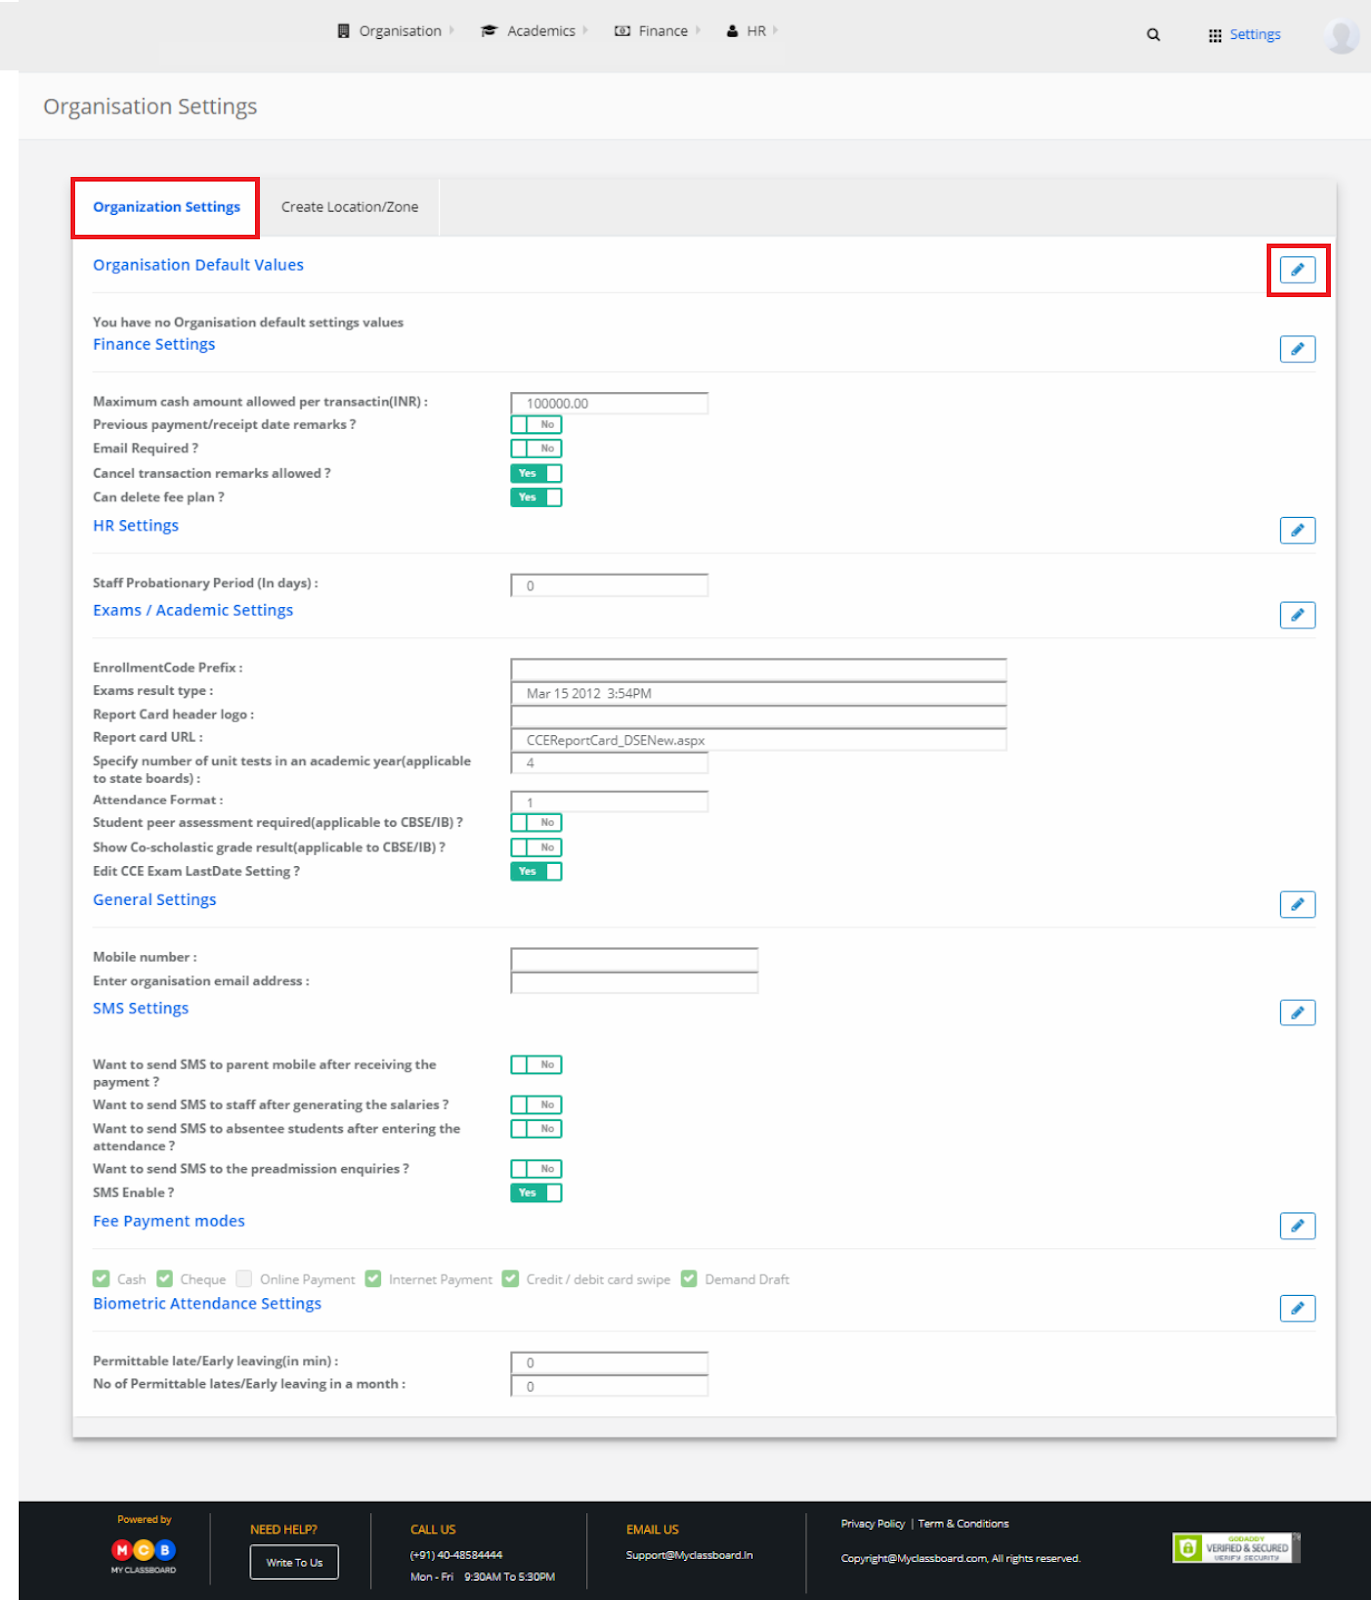
Step 3: Make the necessary changes and click on “Save” button.
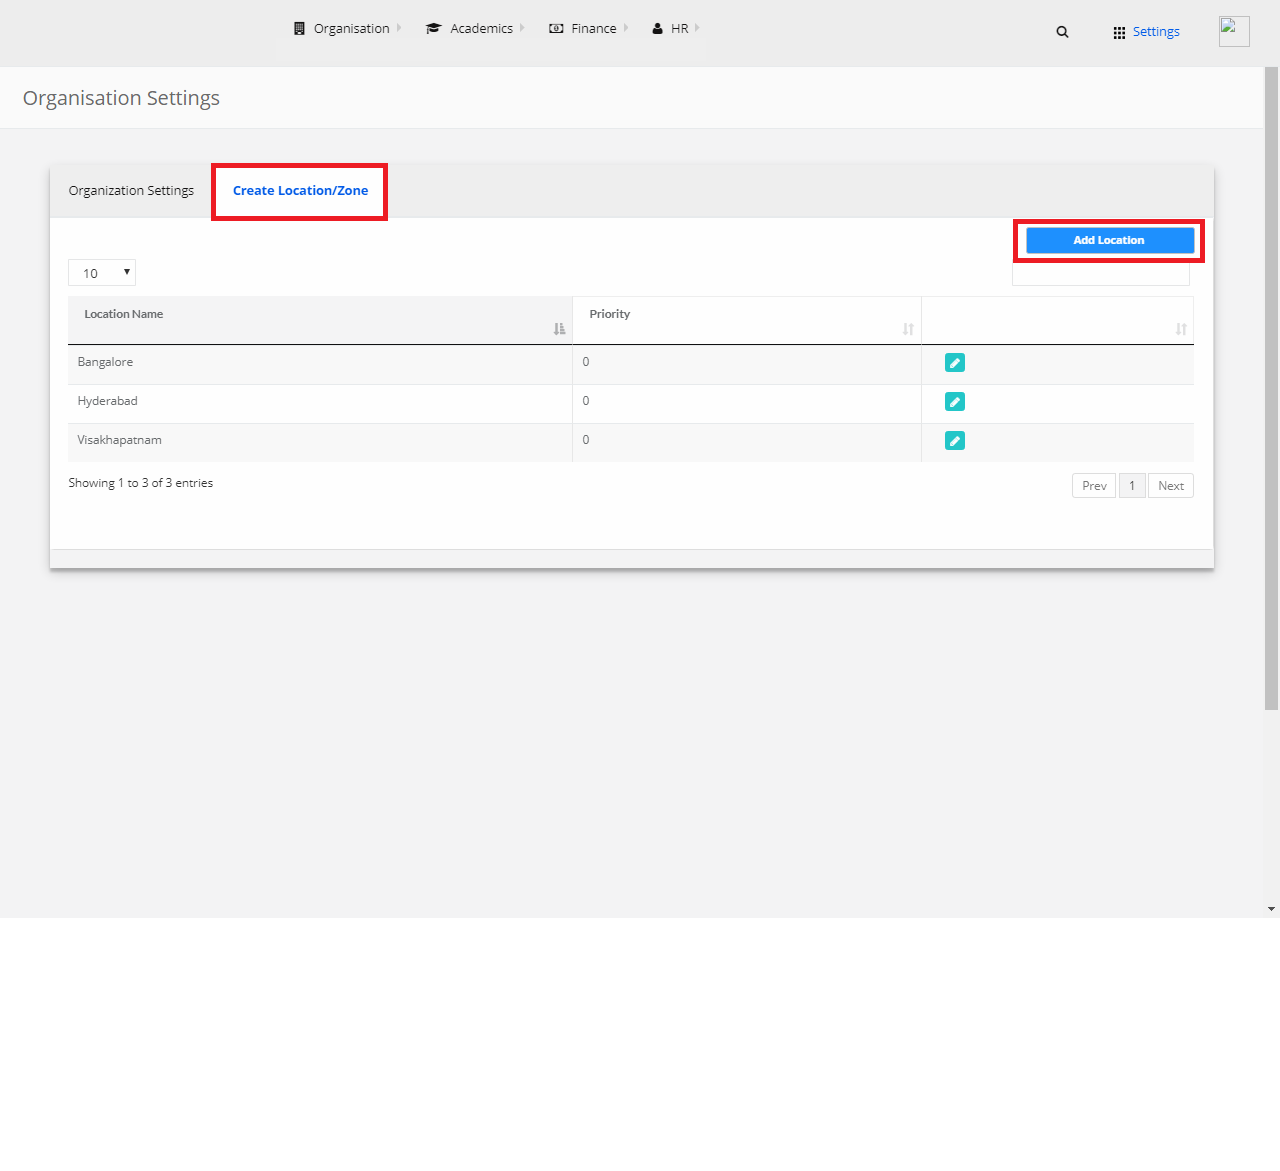
Create Location/Zone
Step 4: Select “Create Location/Zone” from the top bar. Click on “Add Location” to create a new location/zone.
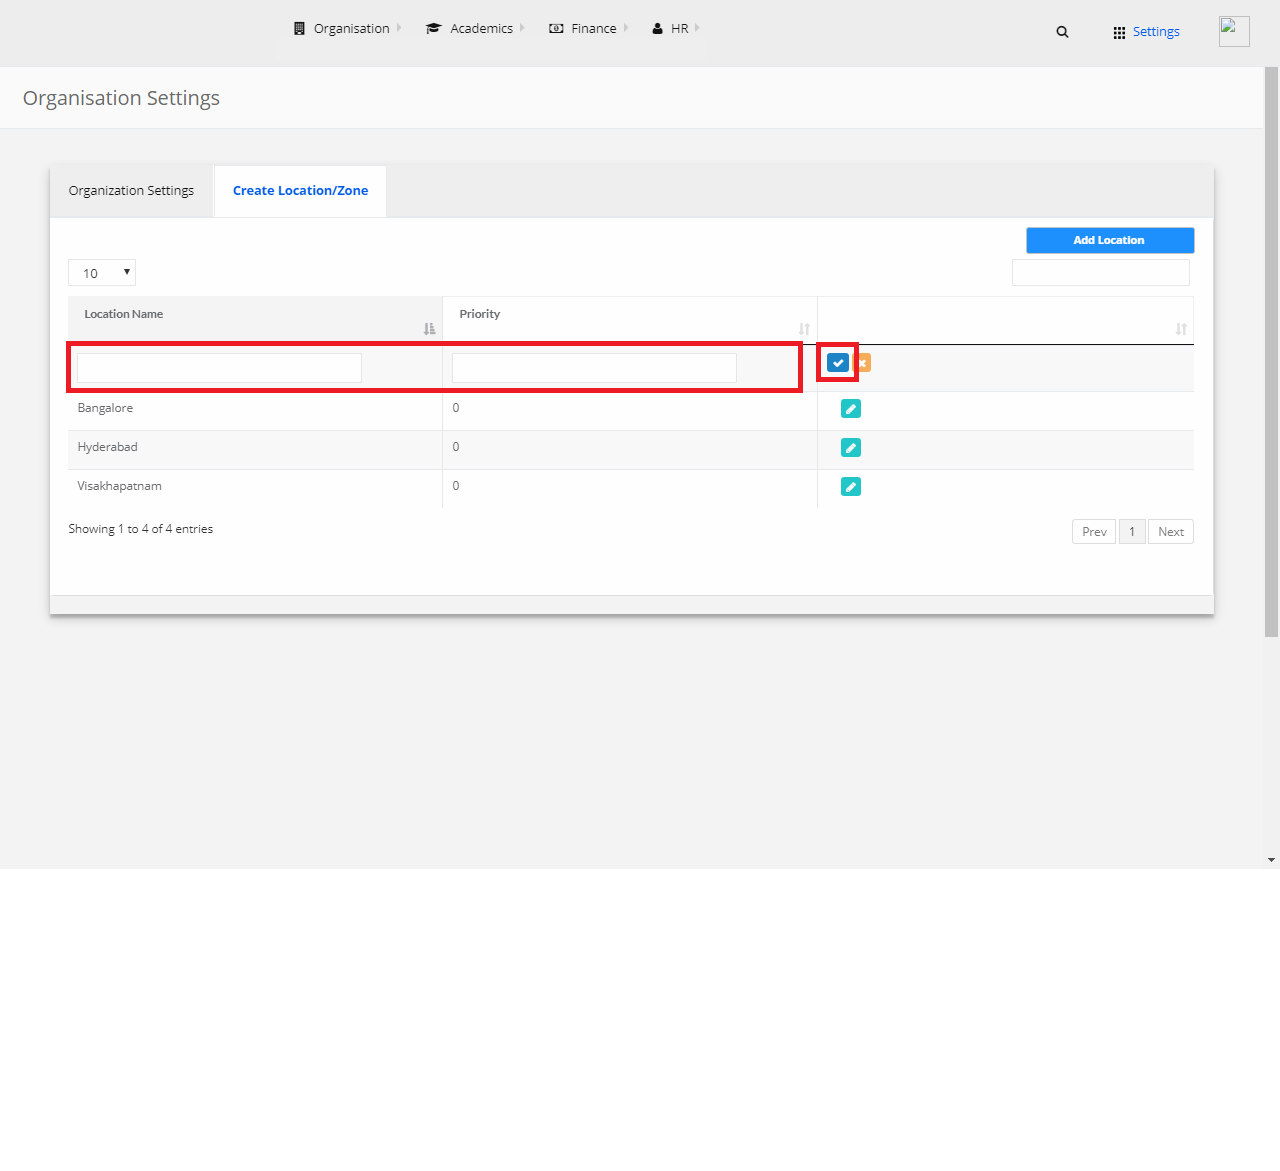
Step 5: Enter the Location Name, priority and click on “Save” button.
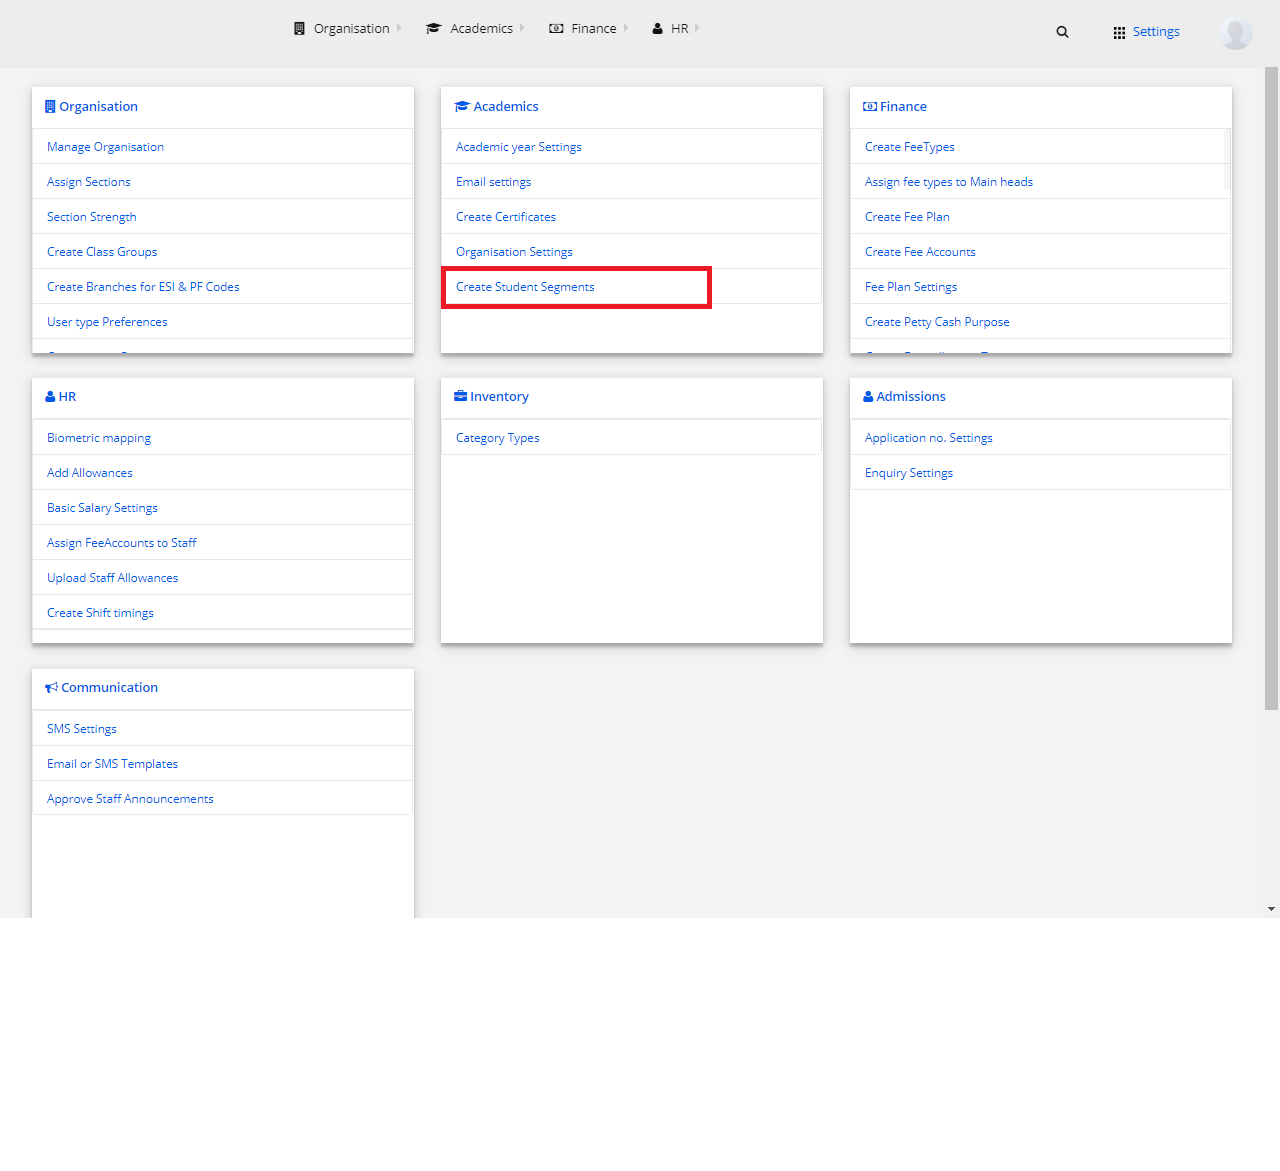
5) Create Student Segments
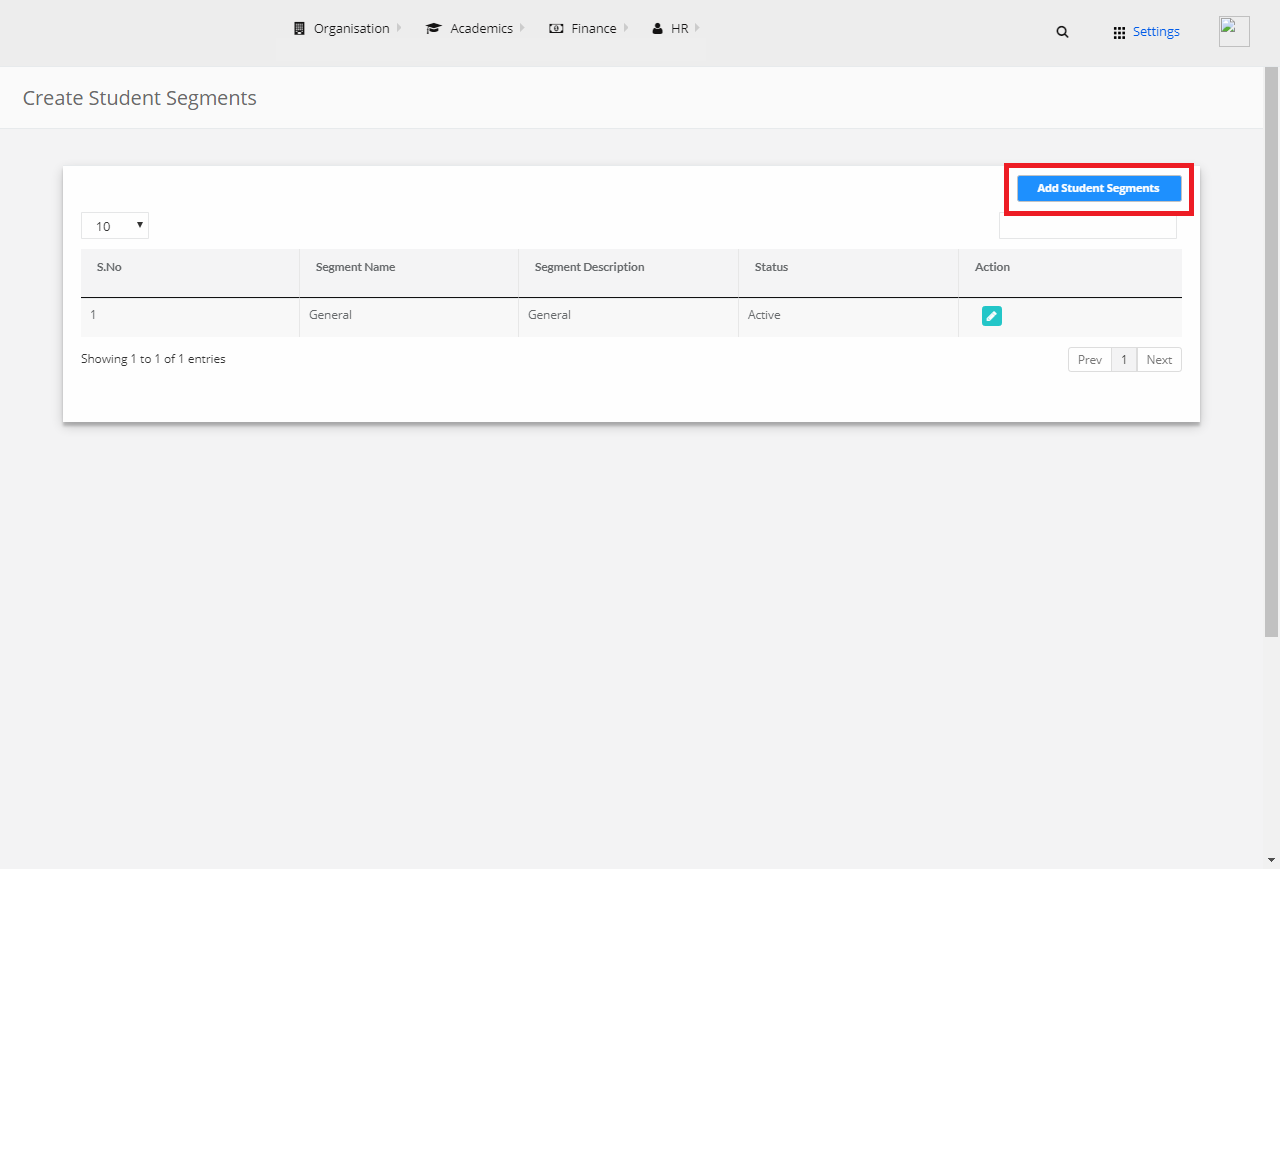
Step 1: Select Academics and click on “Create Student Segments”.
Step 2: Click on “Add Student Segments”.
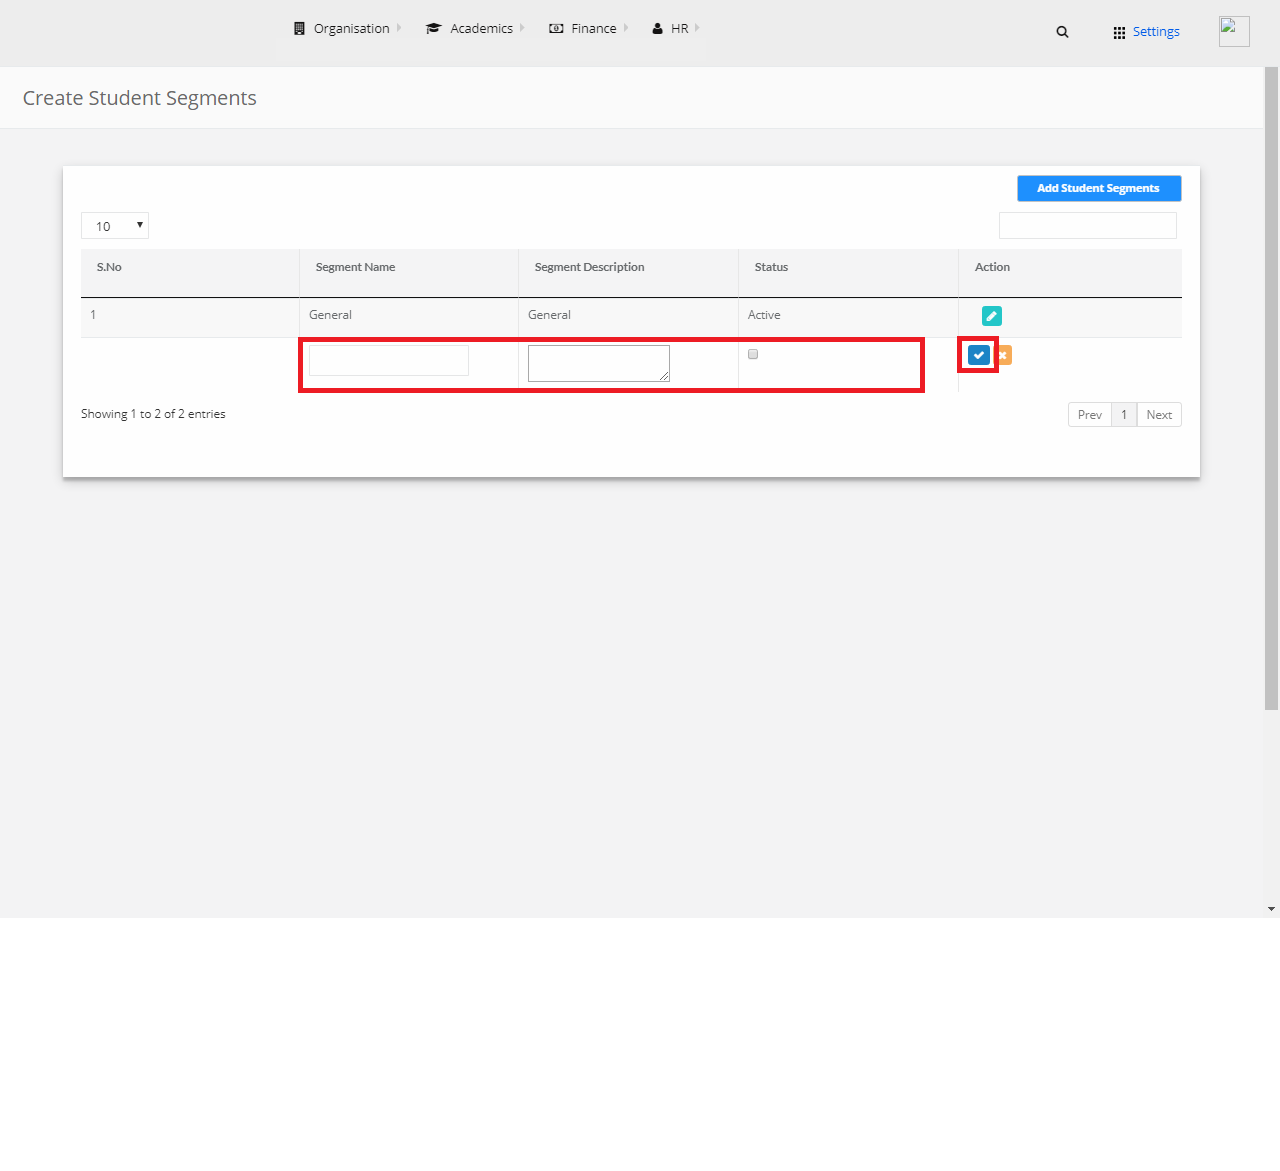
Step 3: Enter the segment name, segment description, select status and click on “Save” button.
Stage 5: Finance
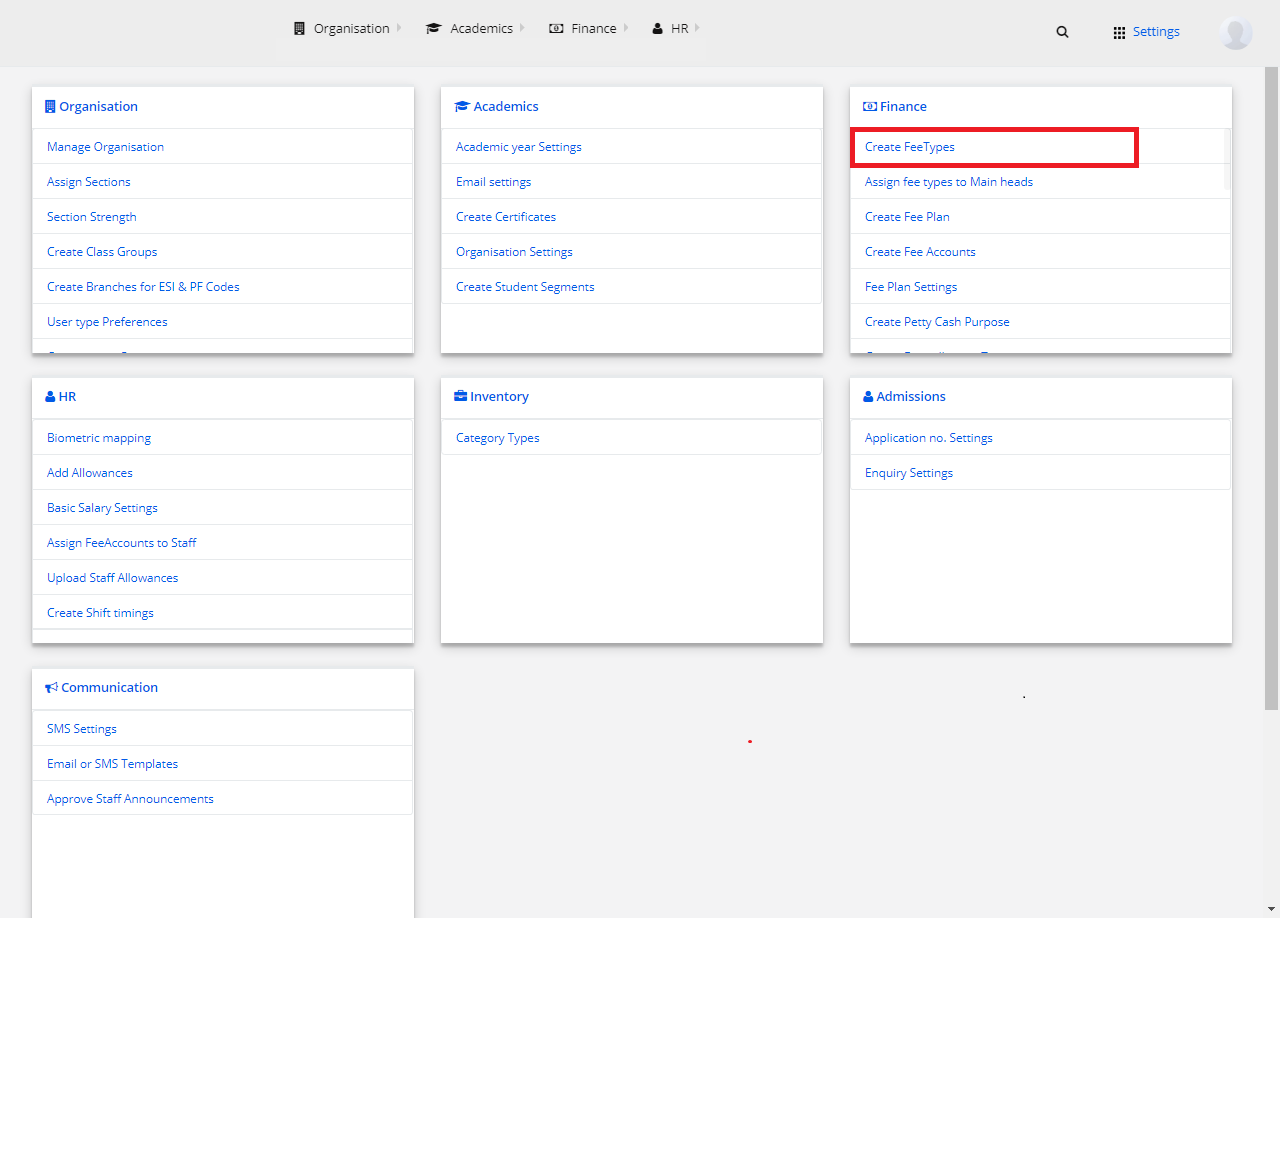
1) Create Fee Types
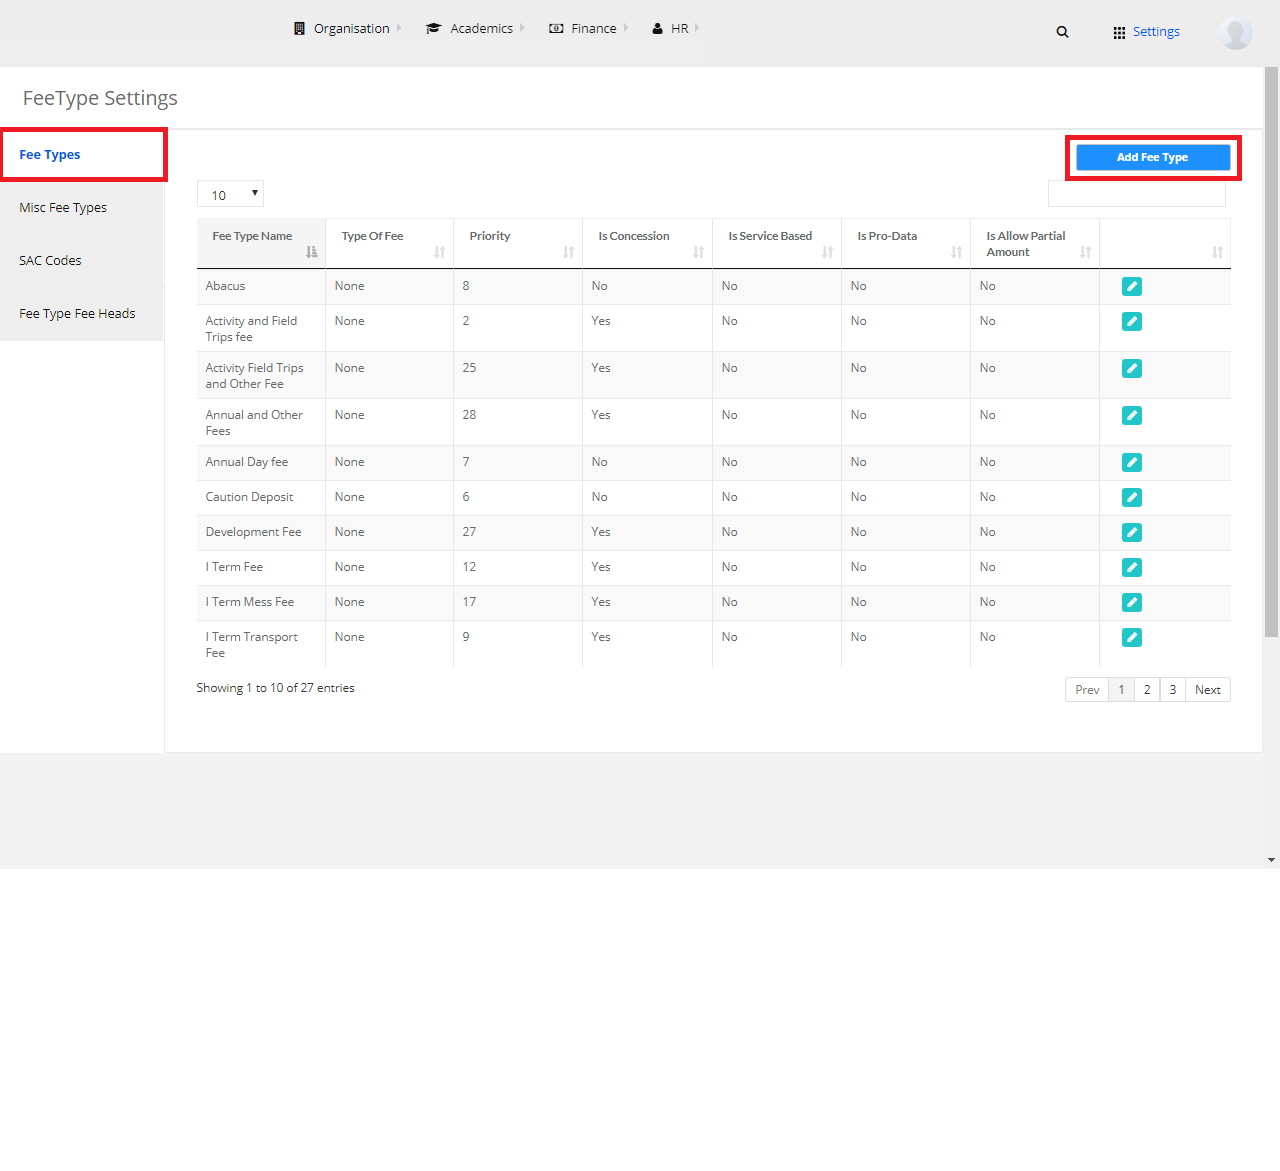
Step 1: Select Finance and click on “Create Fee Types”.
Fee Types
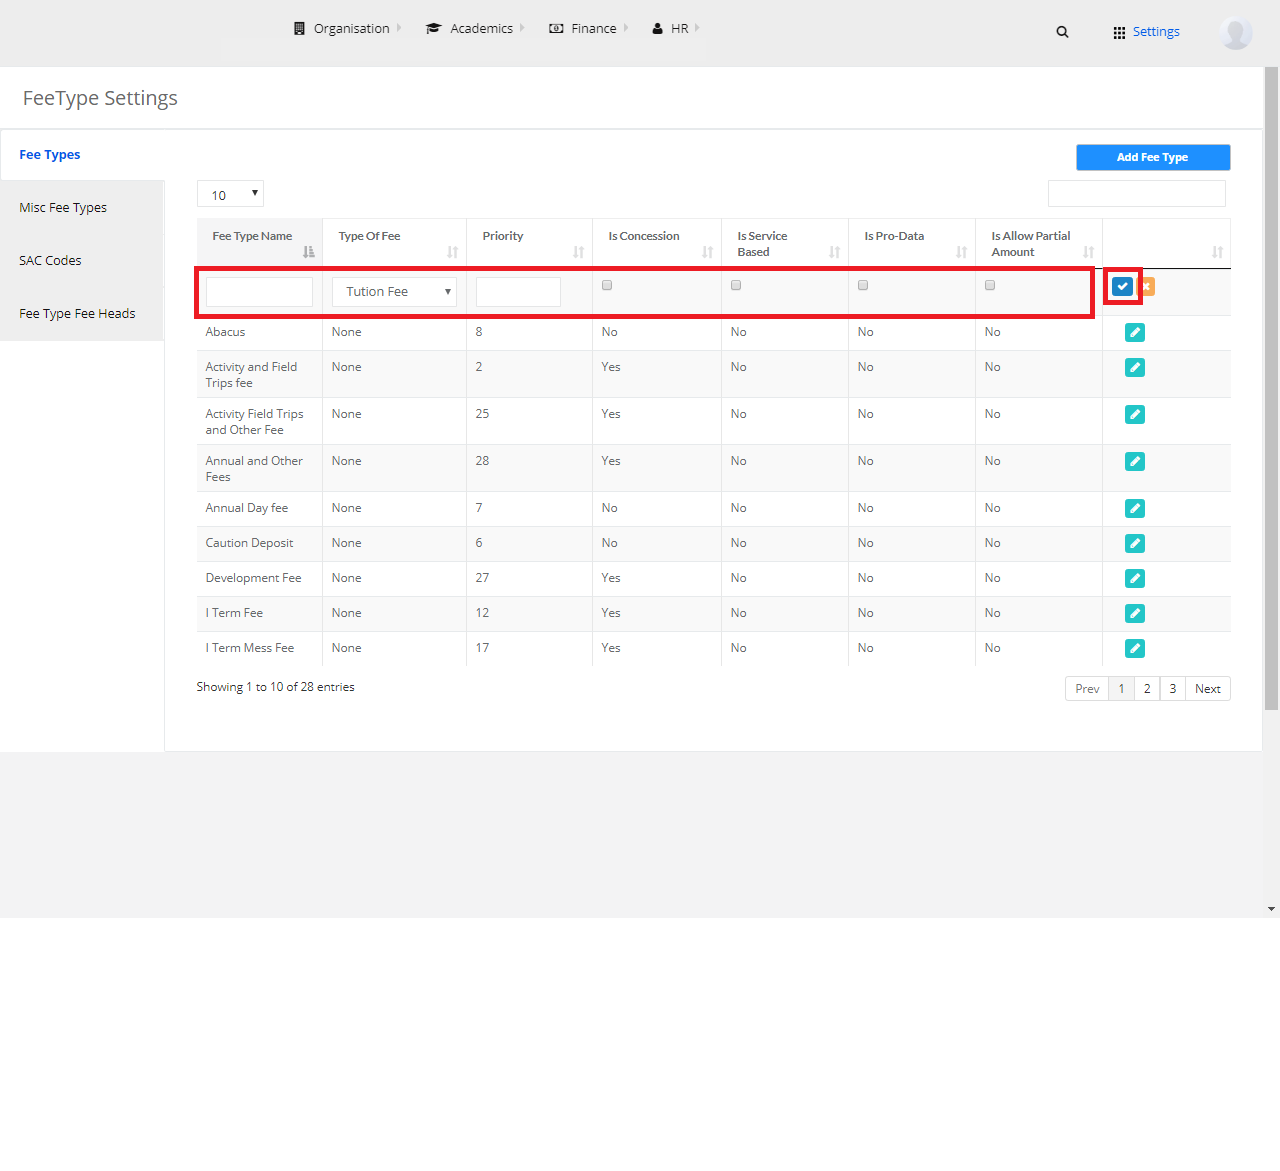
Step 2: Select “Fee Types” from the left pane and click on “Add Fee Type”.
Step 3: Add the necessary details and click on “Save Button”.
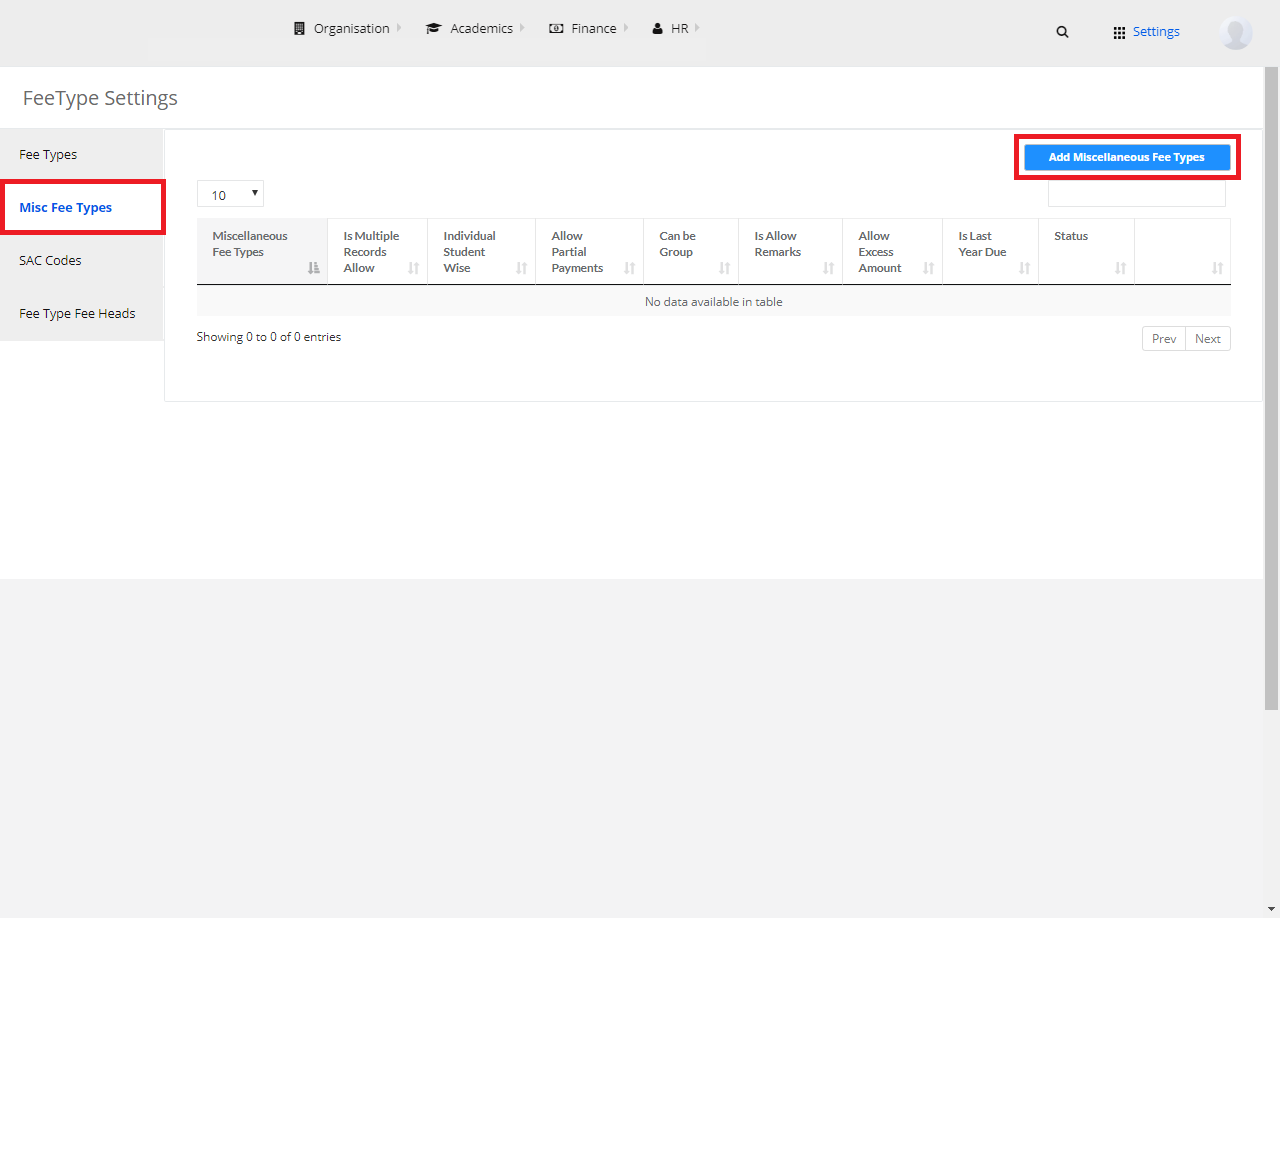
Misc Fee Types
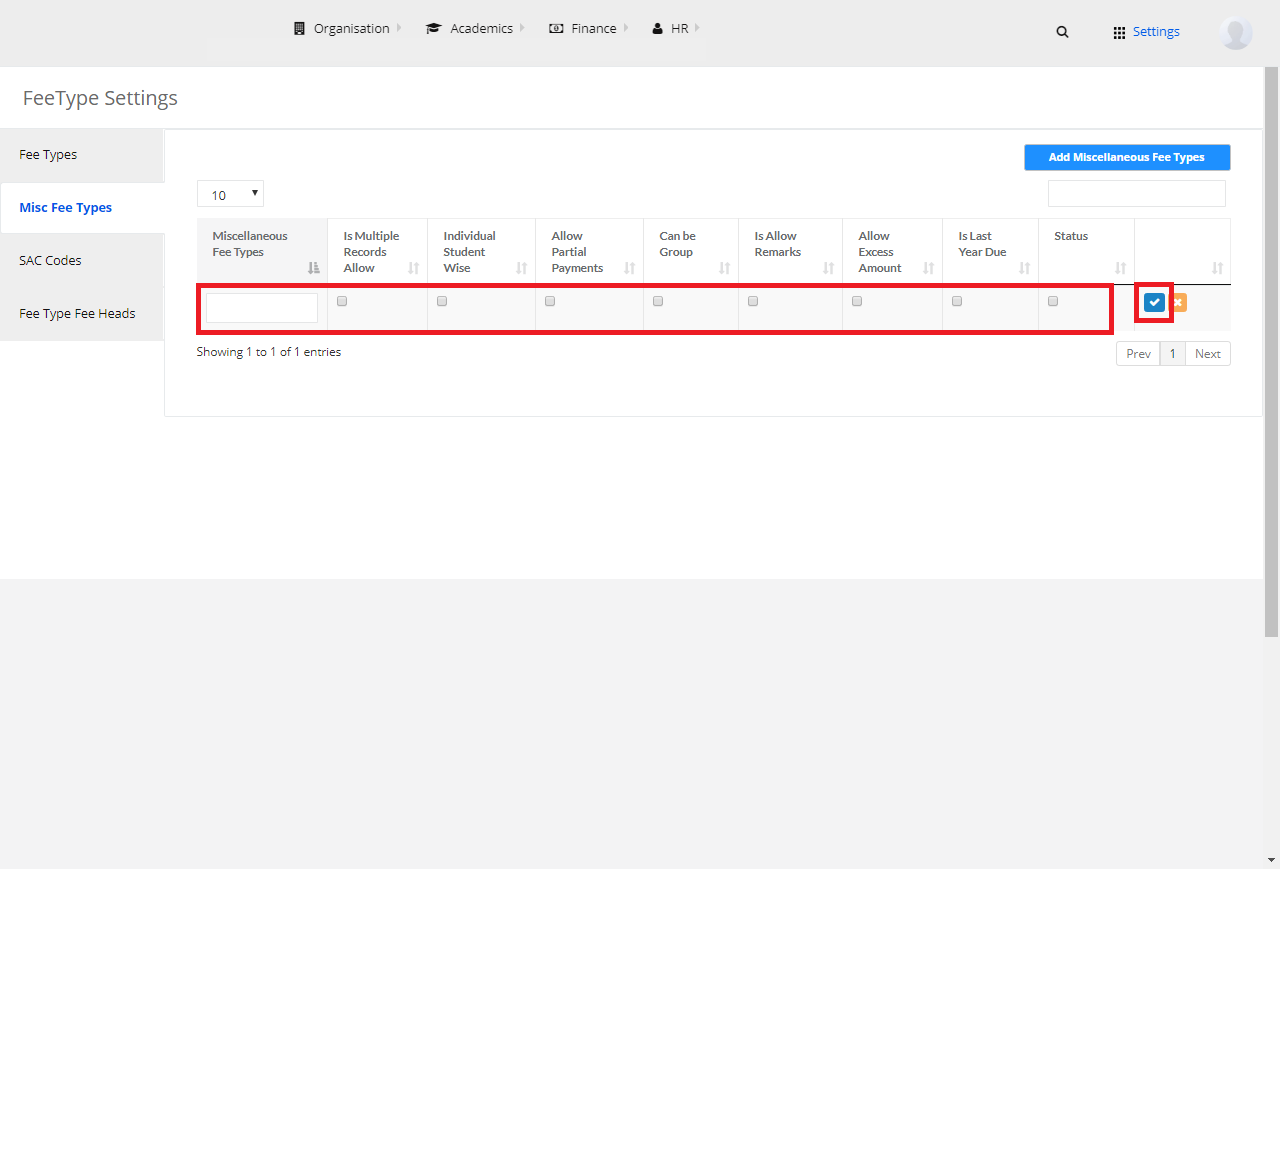
Step 4: Select “Misc Fee Types” from the left pane and click on “Add Miscellaneous Fee Types”.
Step 5: Add the necessary details and click on “Save Button”.
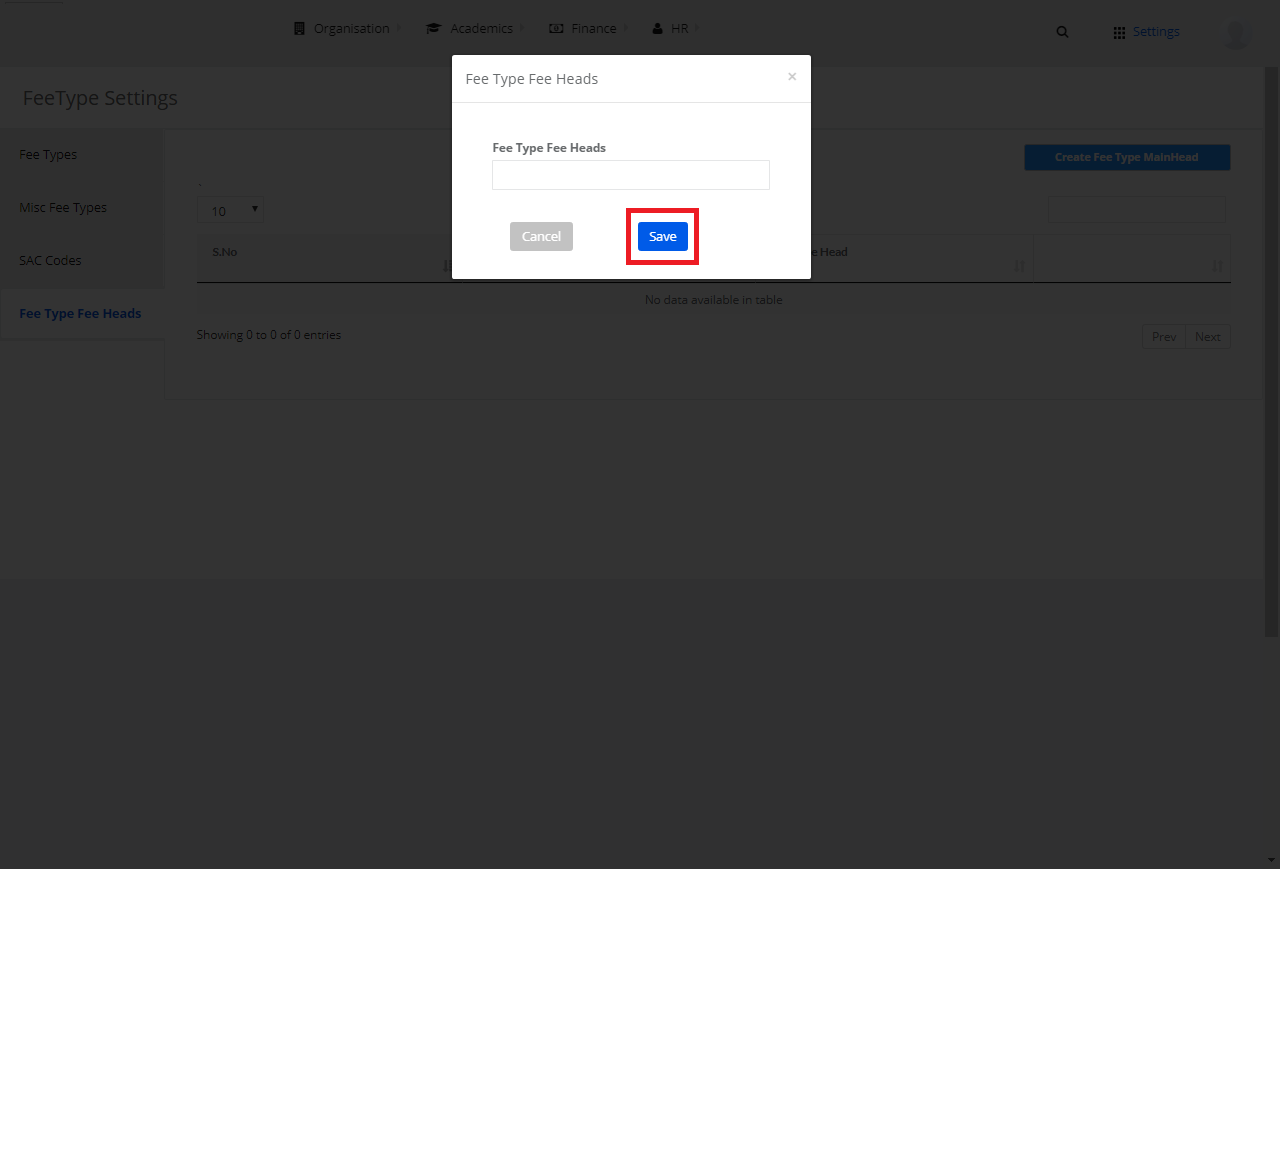
Fee Type Fee Heads
Step 6: Select “Fee Type Fee Heads” from the left pane and click on “Create Fee Type Main Head”.

Step 7: Enter the necessary details and click on “Save”.
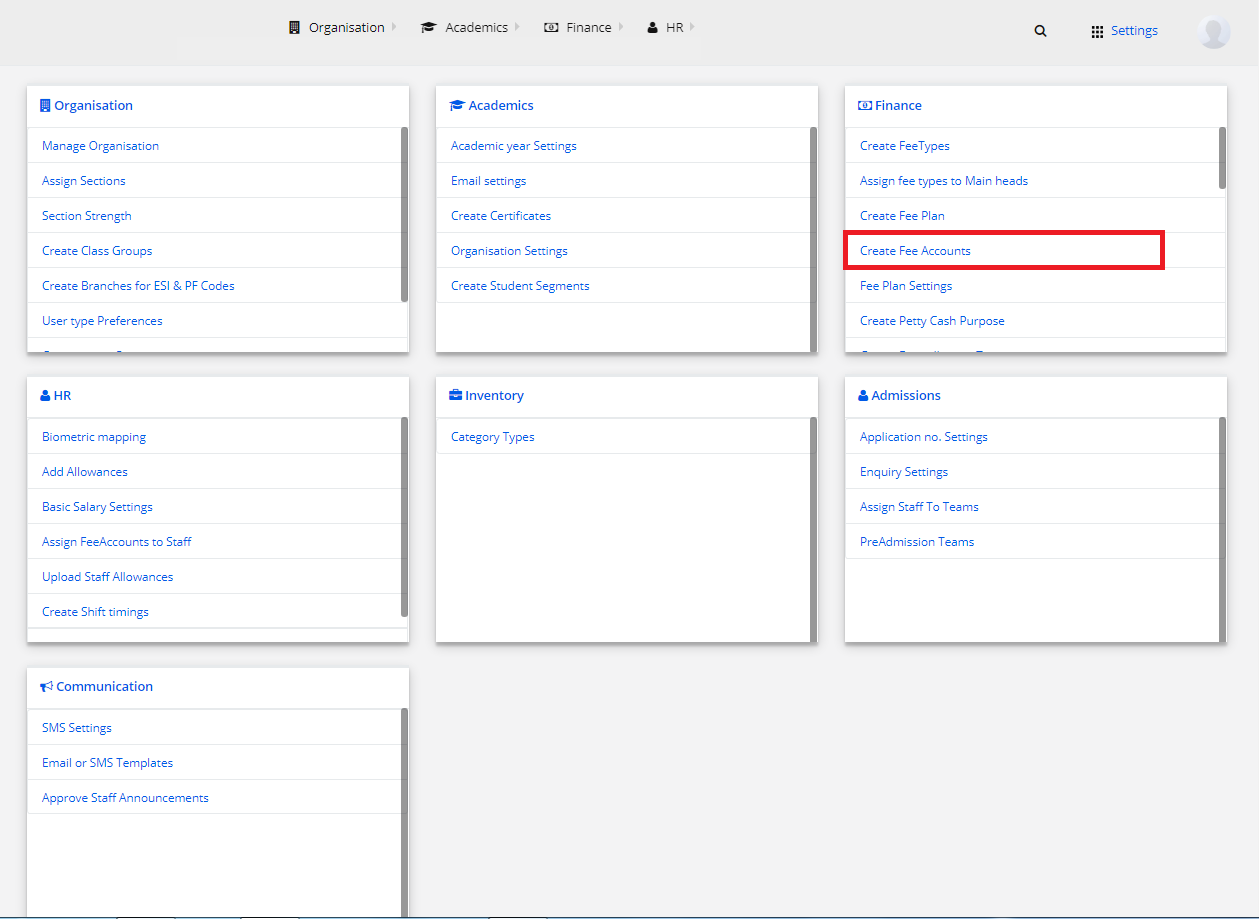
2) Create Fee Accounts
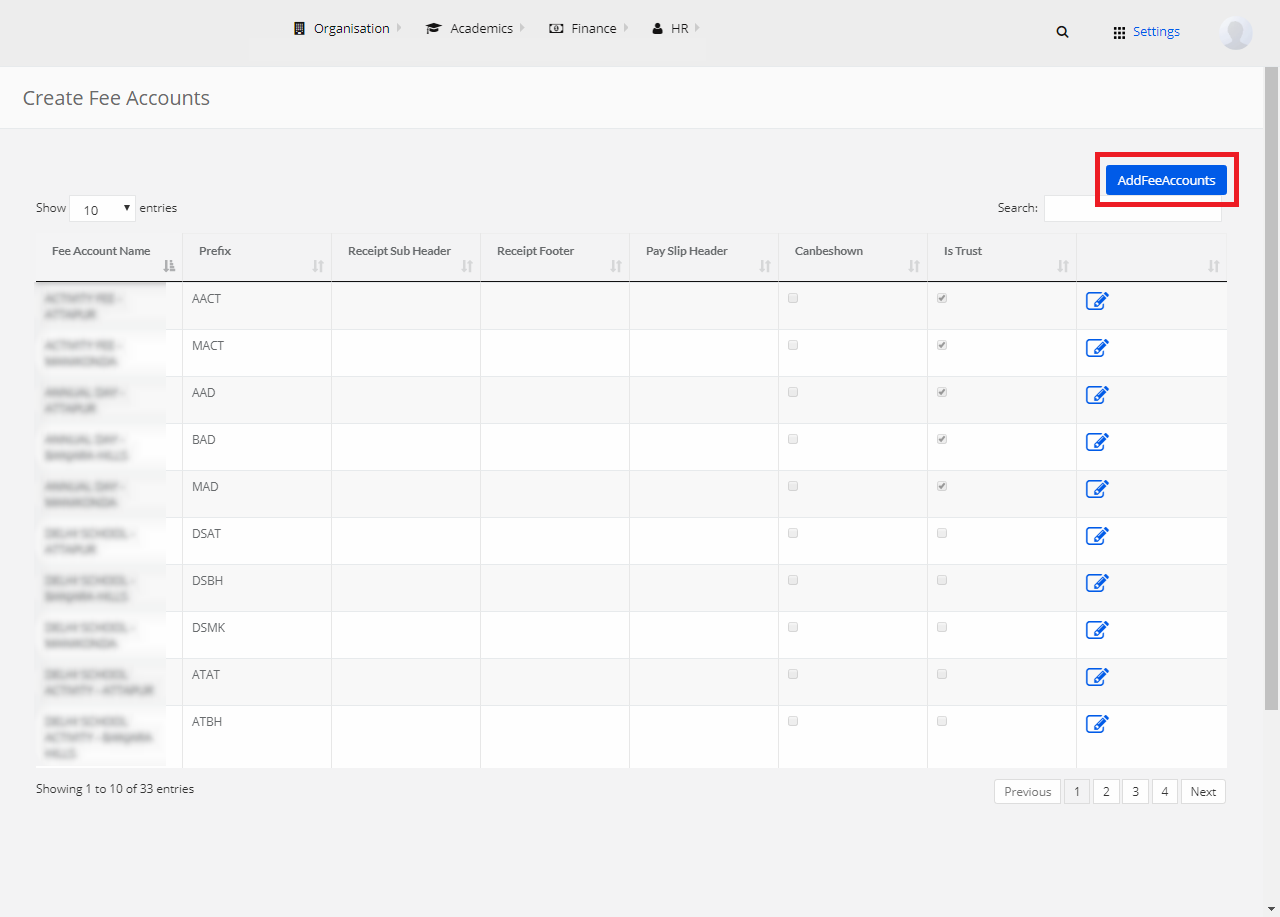
Step 1: Select Finance and click on “Create Fee Accounts”.
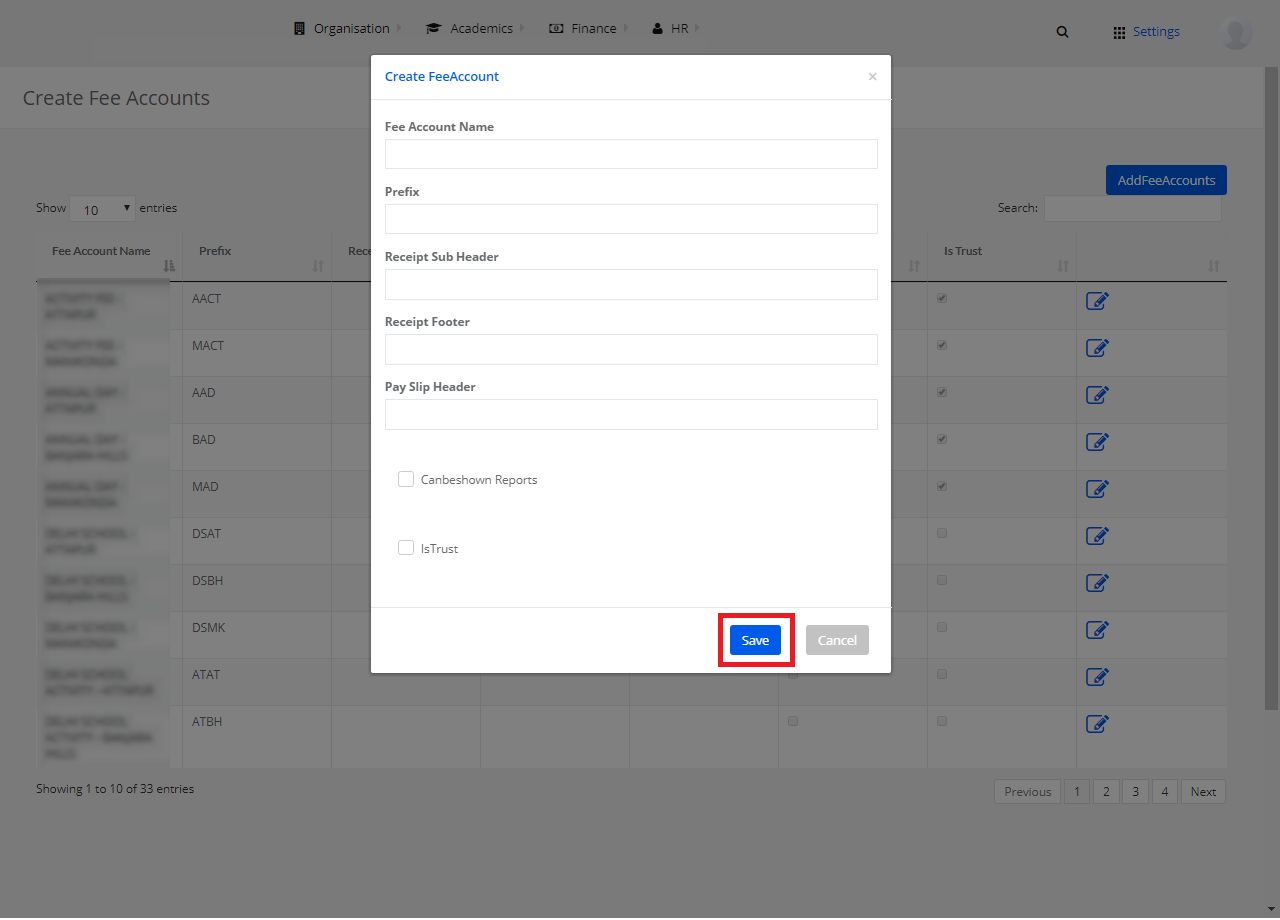
Step 2: Click on “Add Fee Accounts” to create a new fee account.
Step 3: Enter the required details here and click on “Save”. The new fee account is created.
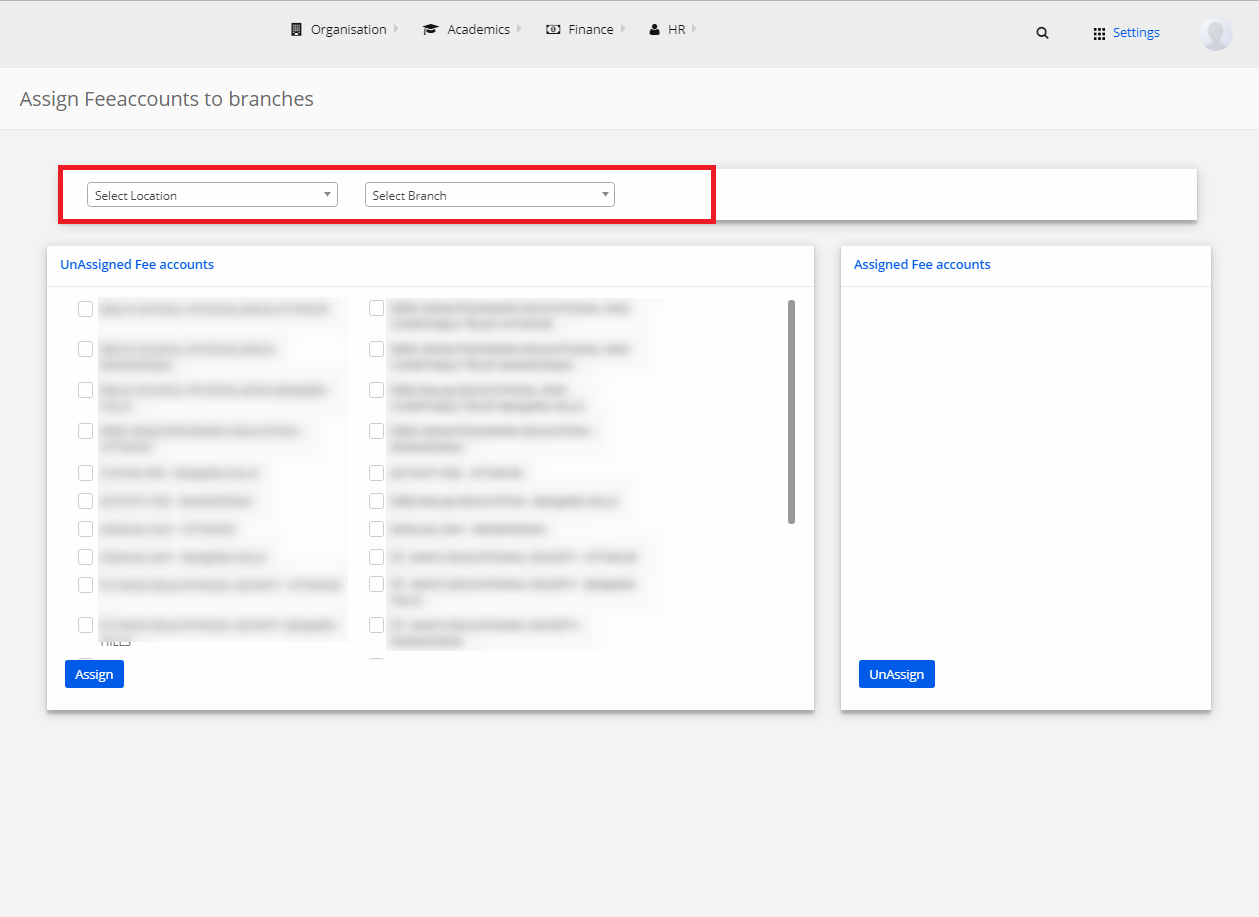
3) Fee accounts to Branches
Step 1: Select Finance and click on “Fee accounts to Branches”.
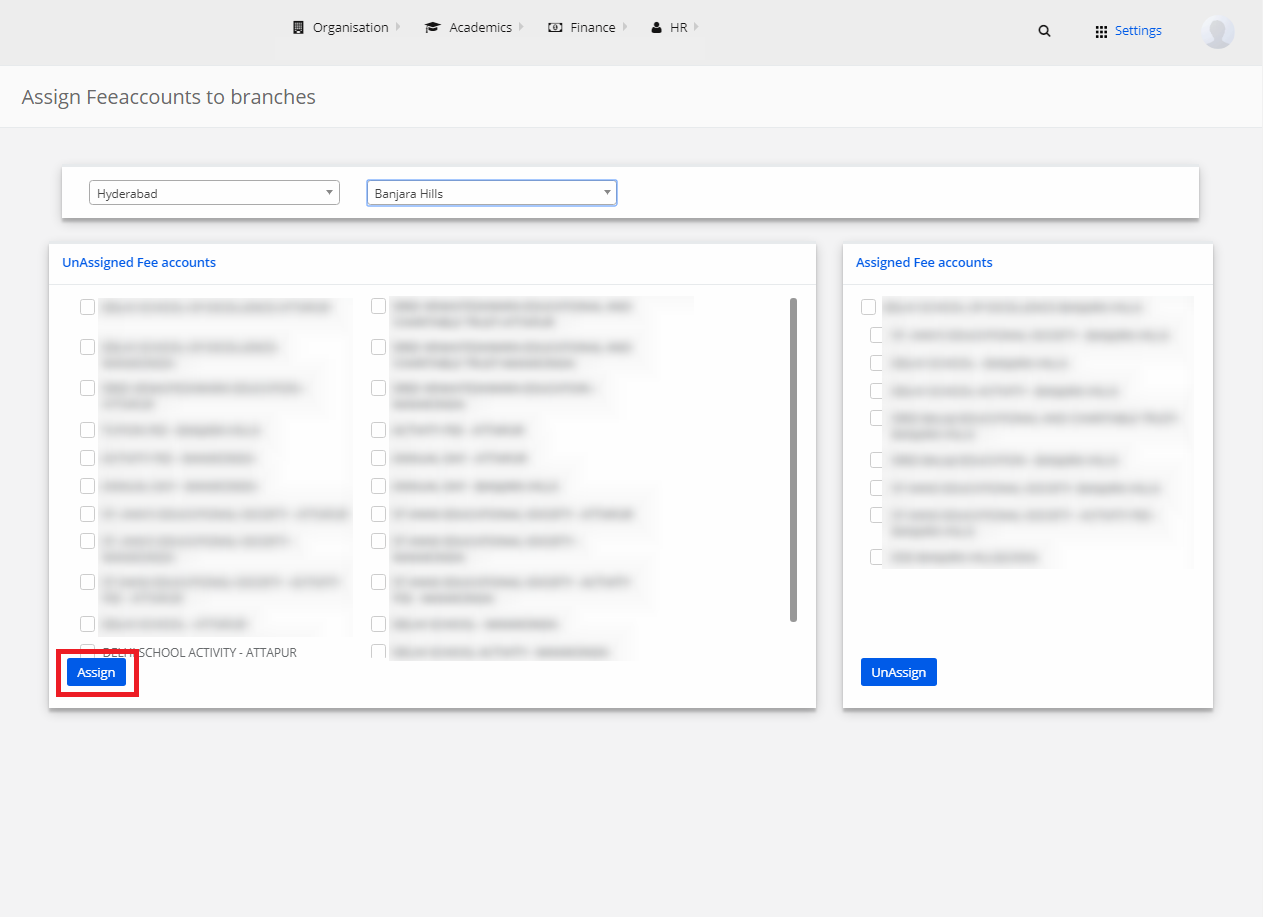
Step 2: Select Location, Branch.
Assign Fee Accounts
Step 3: Choose Unassigned Fee Accounts. Mark the checkbox against the fee accounts and click on “Save”. The fee account is assigned to the branch.
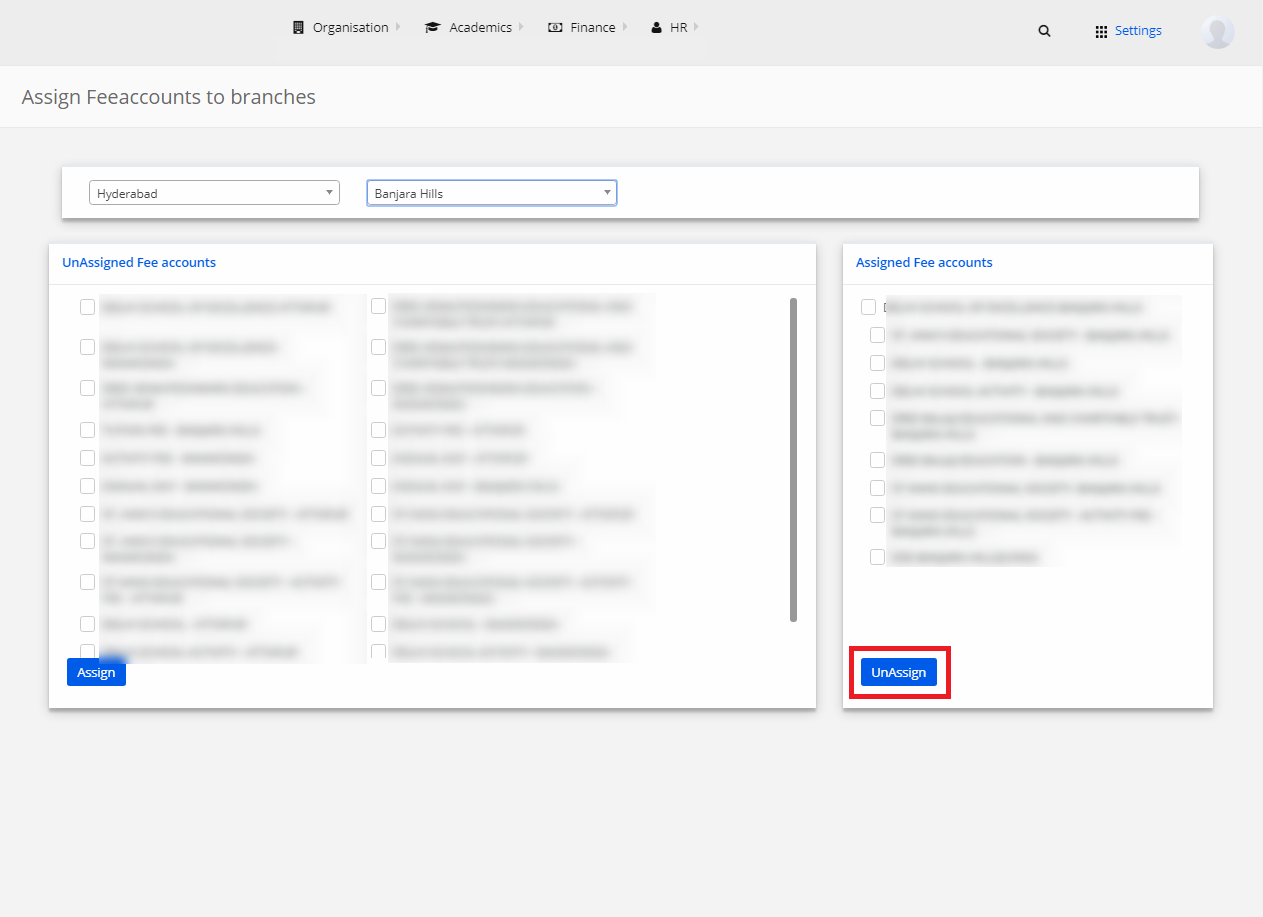
Unassign Fee Accounts
Step 4: Choose Assigned Fee Accounts. Mark the checkbox against the fee accounts and click on “Save”. The fee account is unassigned to the branch.
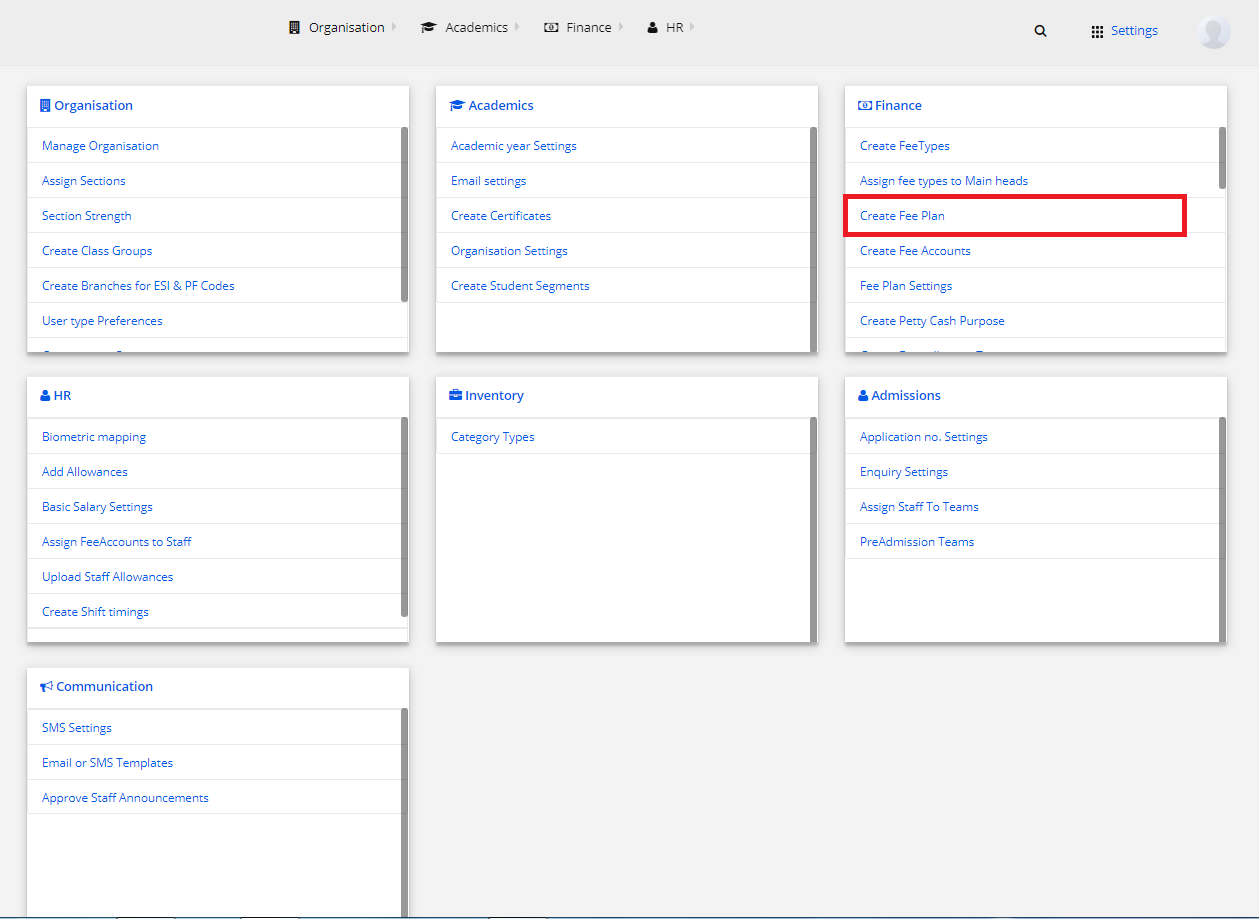
4) Create Fee Plan
Step 1: Select Finance and click on “Create Fee Plan”.
Step 2: Select Location, Branch and name a Fee Plan.
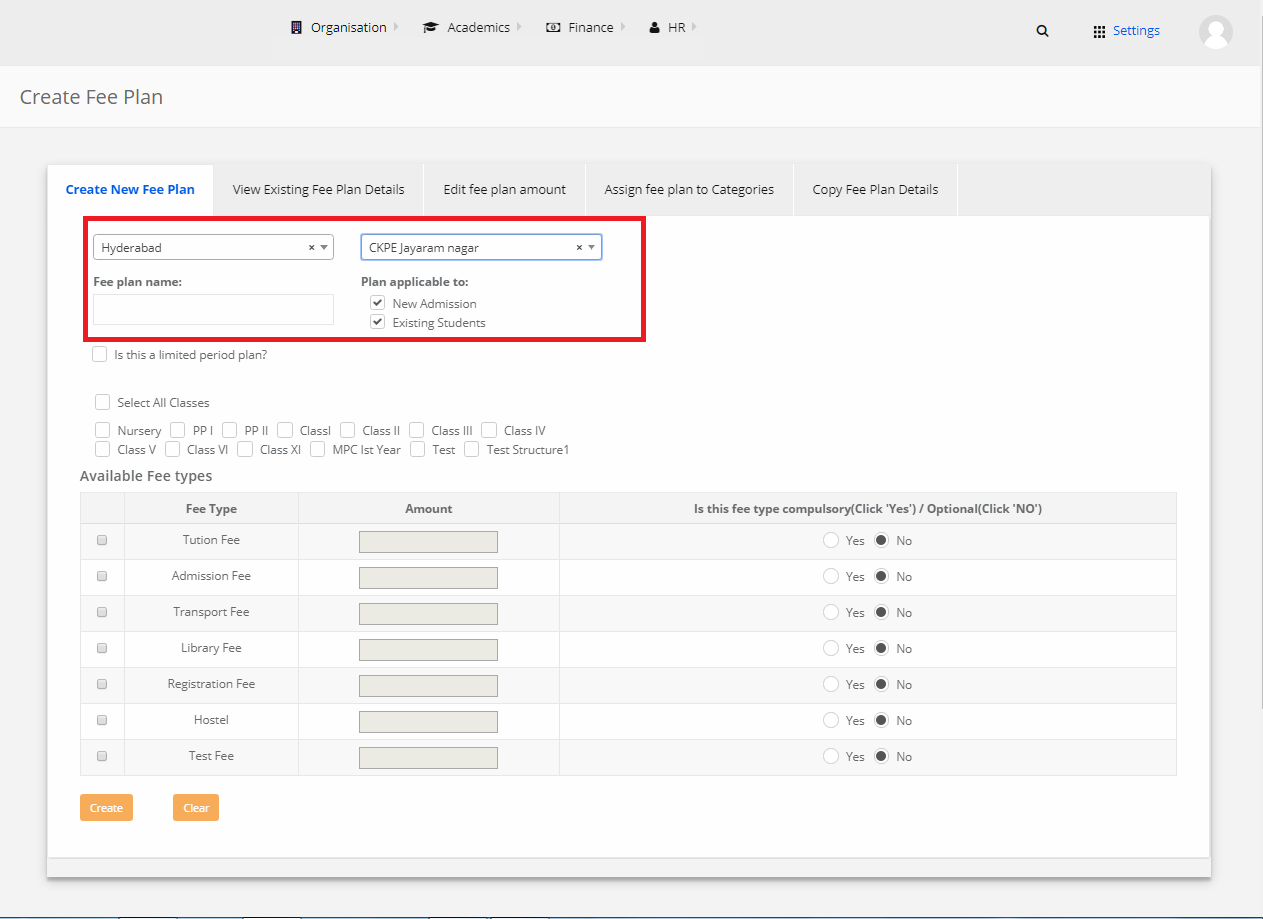
Step 3: Select Classes. Choose a fee type under which you want to create a fee plan. Enter the amount and click on “Create”.

Step 4: The new fee plan under the respective fee type is created.
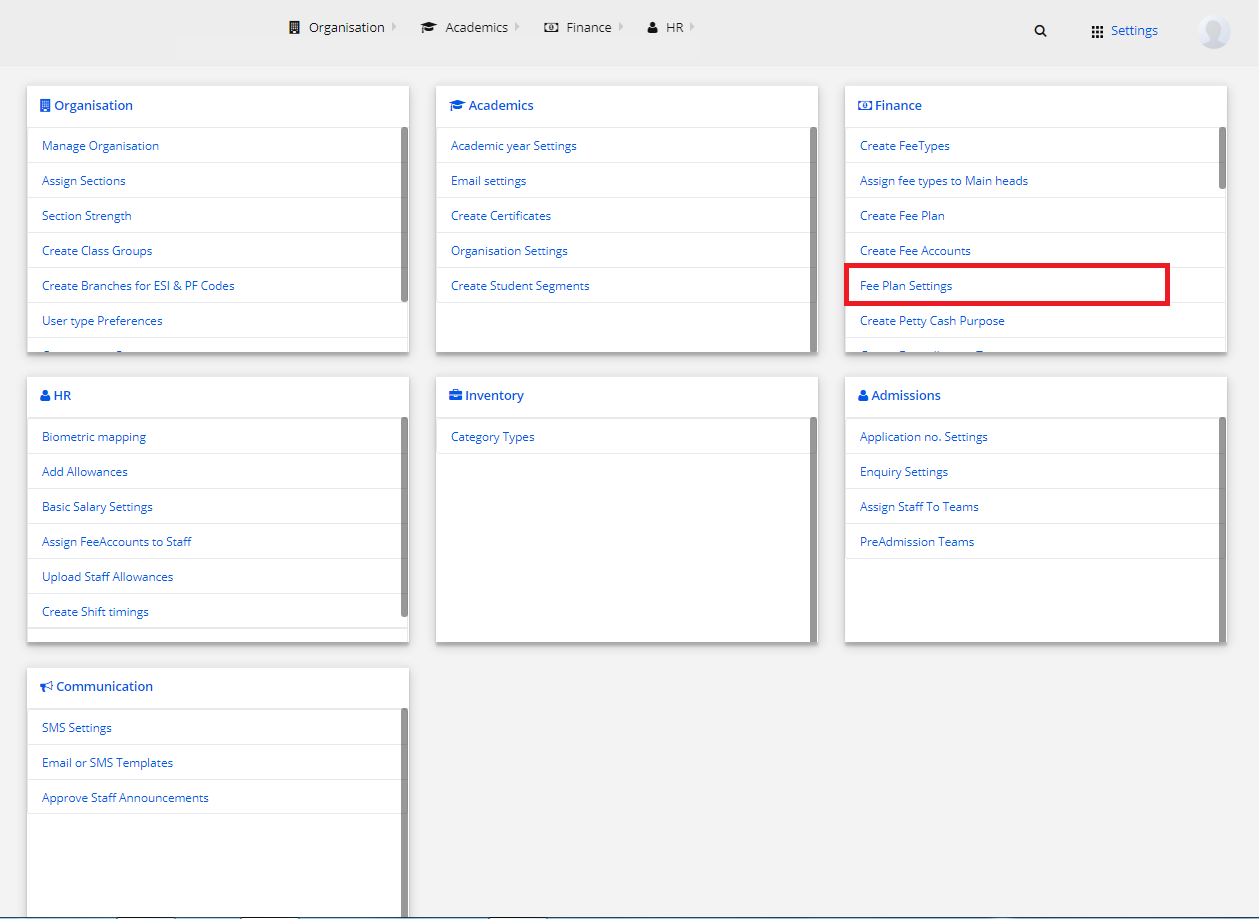
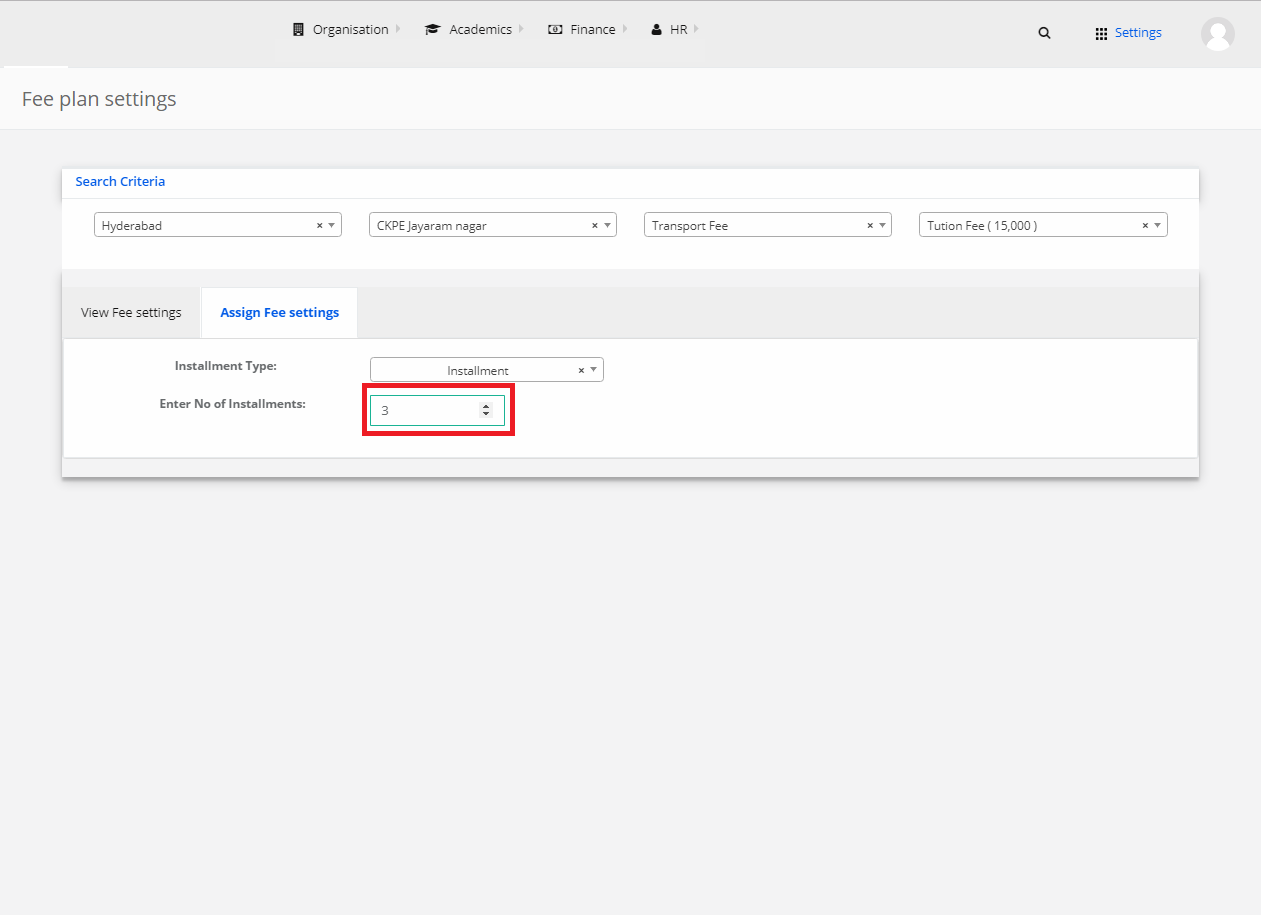
5) Fee Plan Settings
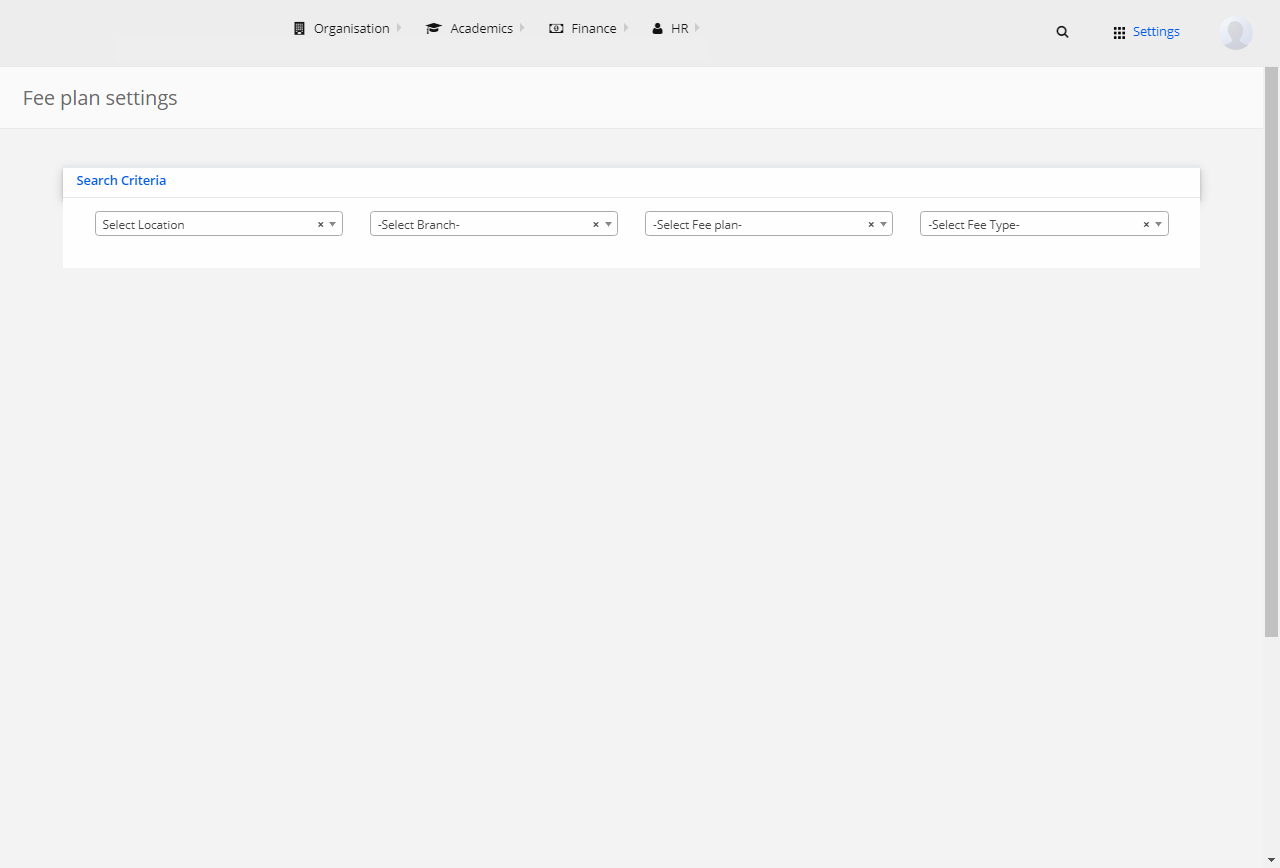
Step 1: Select Finance and click on “Fee Plan Settings”.
Step 2: Select Location, Branch, Fee Plan, Fee Type.
Step 3: Select “Assign Fee Settings”. Choose the installment type options from the dropdown.

Step 4: If Installment, enter the no. of installments.
Step 5: Enter the effective date for each installment, select “Fee Account” for it and click on “Create”.
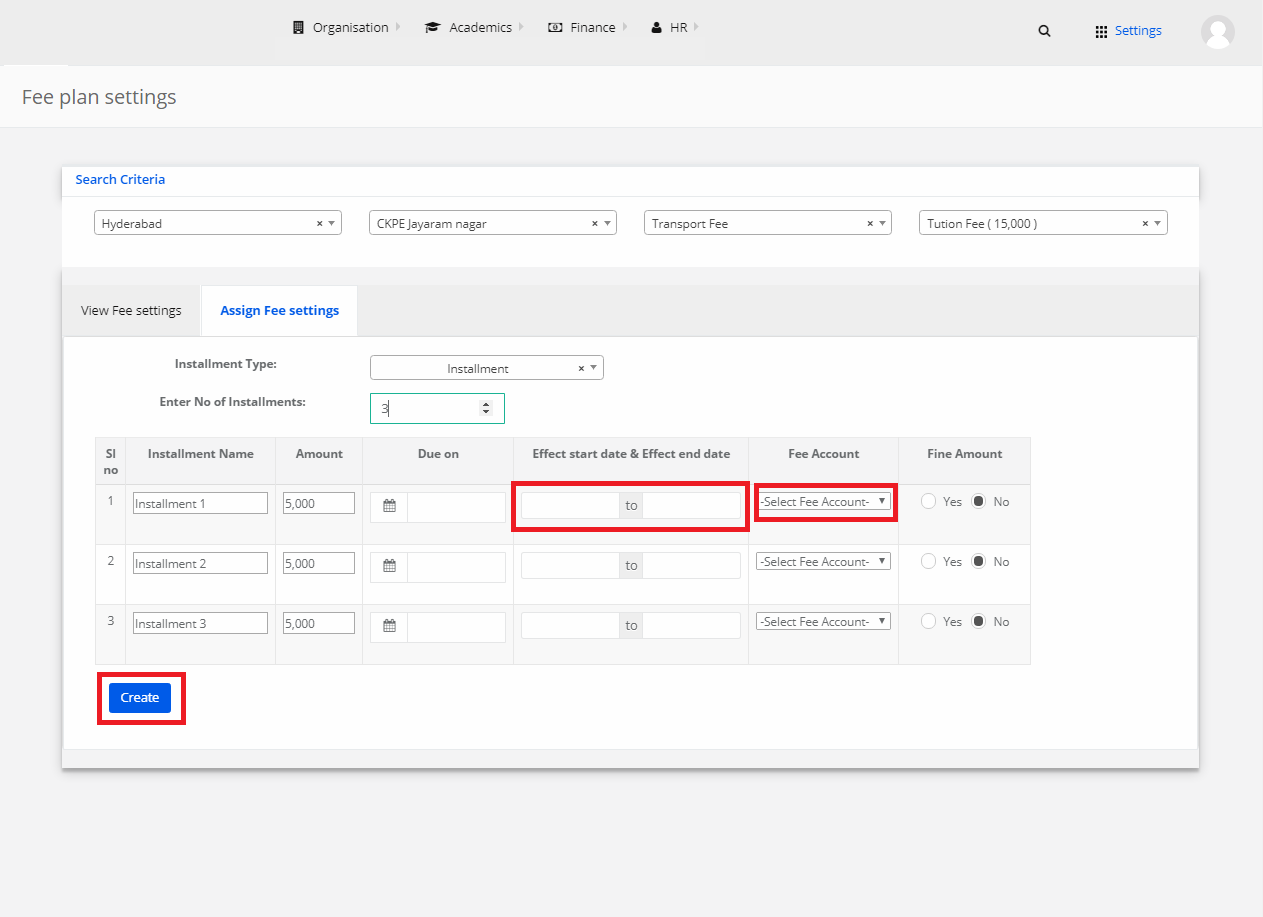
Step 6: The fee settings is assigned successfully.
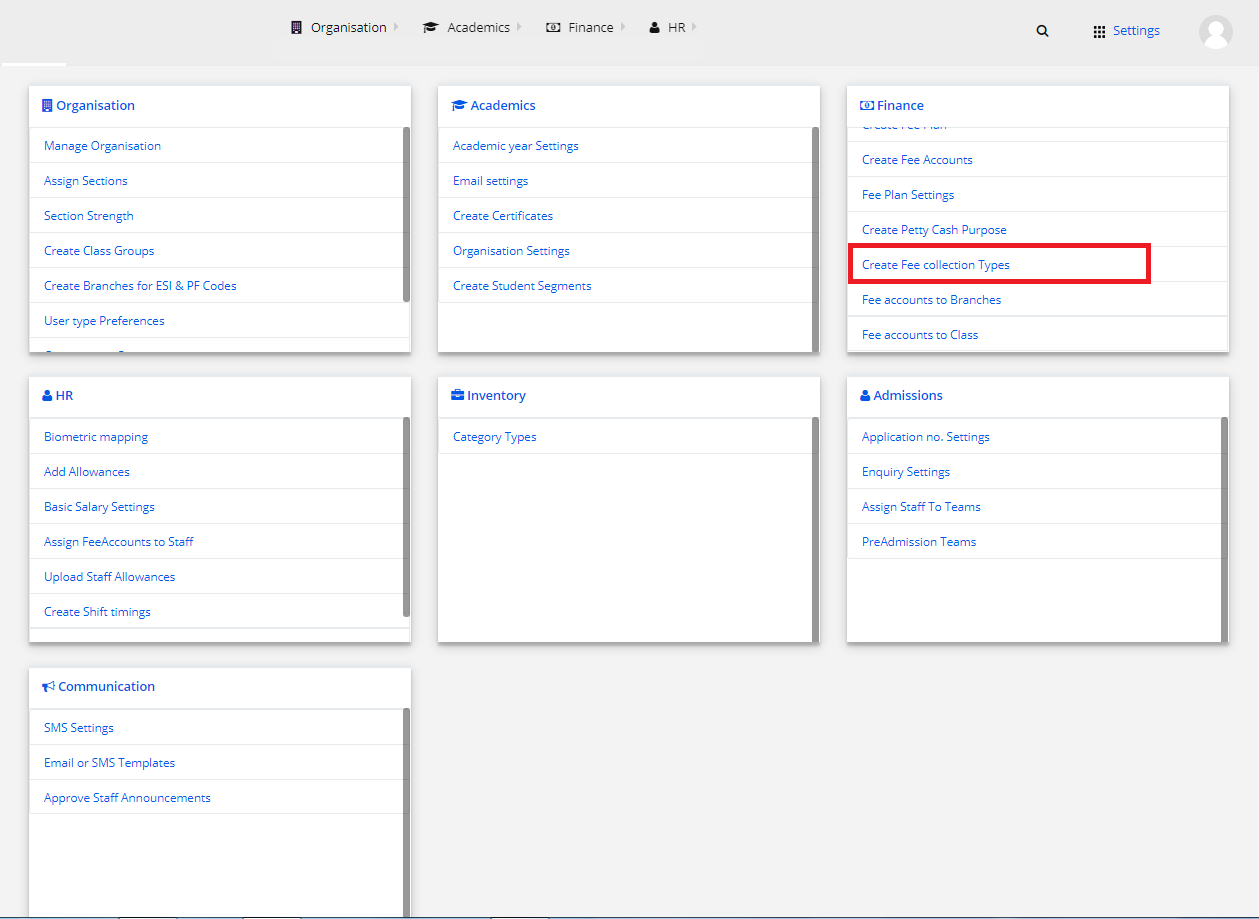
6) Create Fee collection Types
Step 1: Select Finance and click on “Create Fee collection Types”.
Step 2: Select “Create Fee Collection Type”.
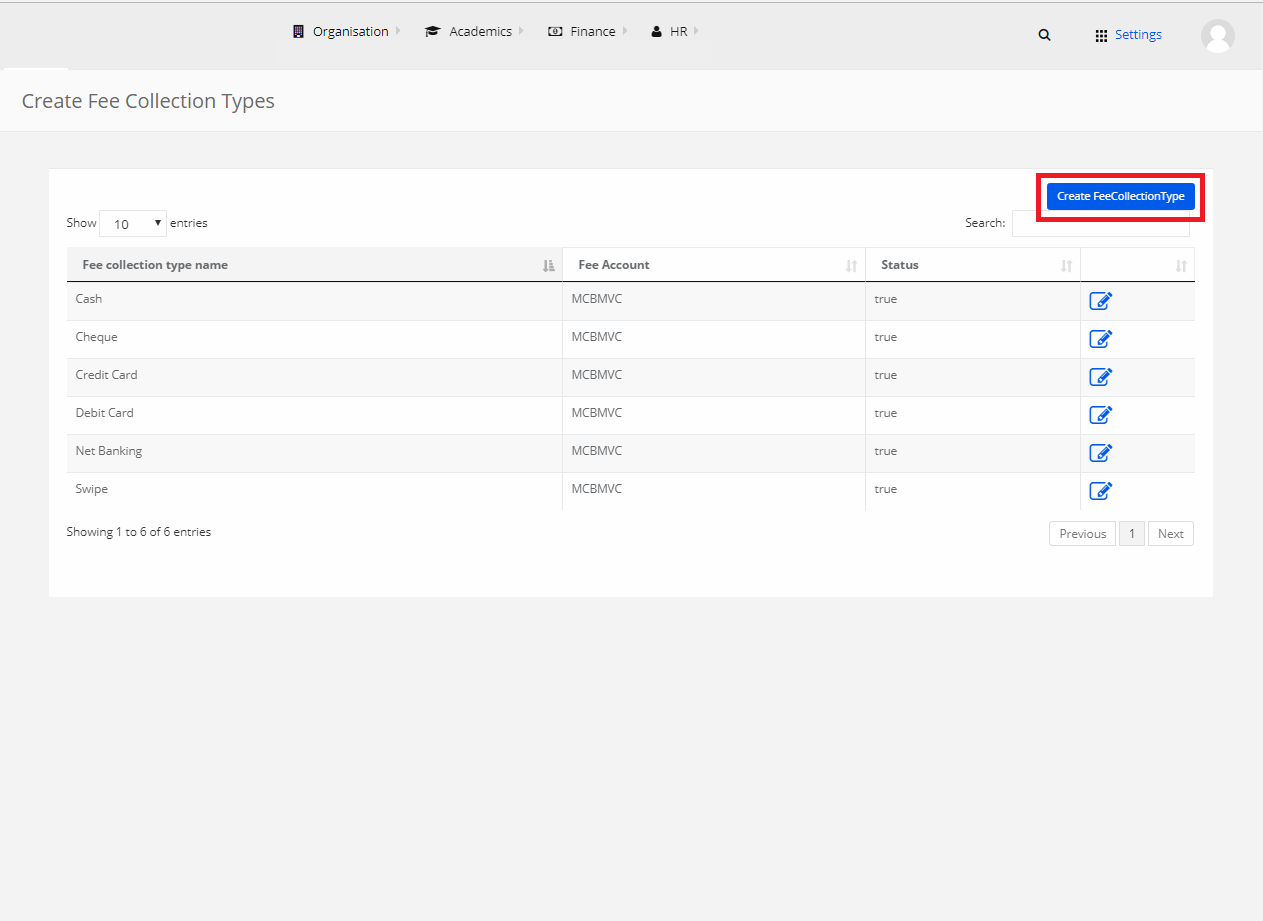
Step 3: Name the fee collection type, select the Fee Account, status and click on “Save”.
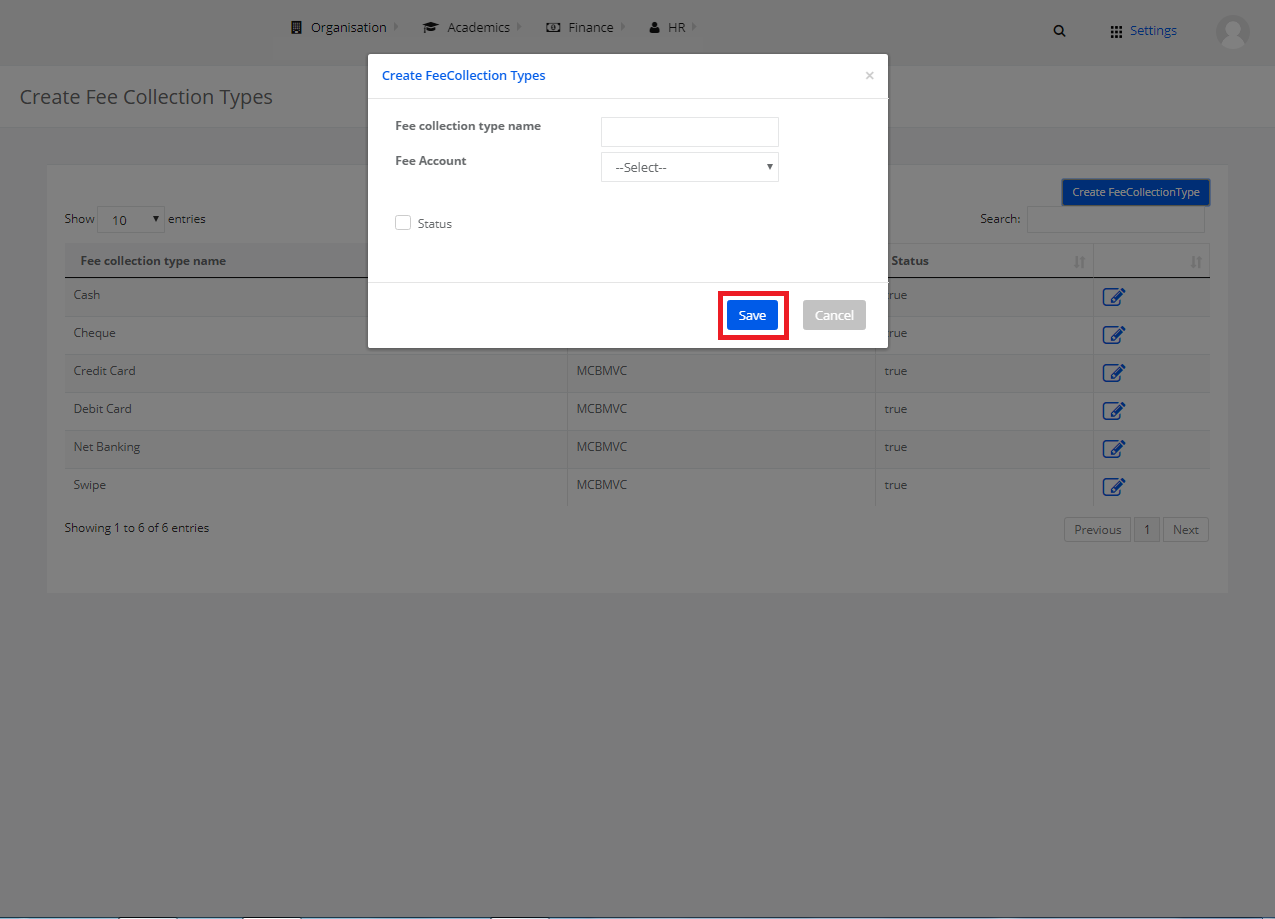
Step 4: The new Fee Collection Type is created successfully.
7) Fee accounts to Class
Step 1: Select Finance and click on “Fee accounts to Class”.

Step 2: Select “Assign Class to Fee Accounts”.
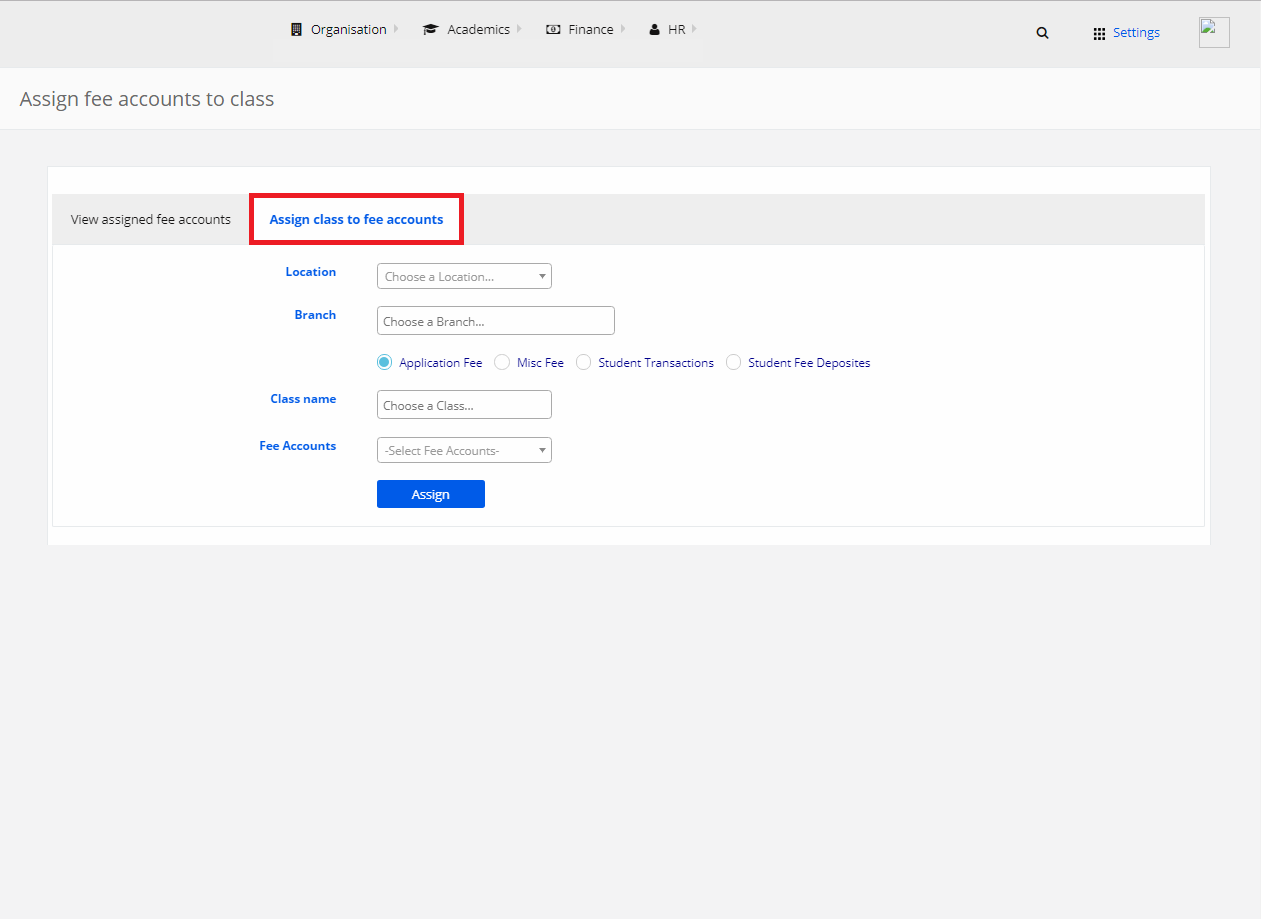
Step 3: Choose the required options like location, branch, fee, class name, fee account and click on “Assign”.

Step 4: The fee account is successfully assigned to the class.
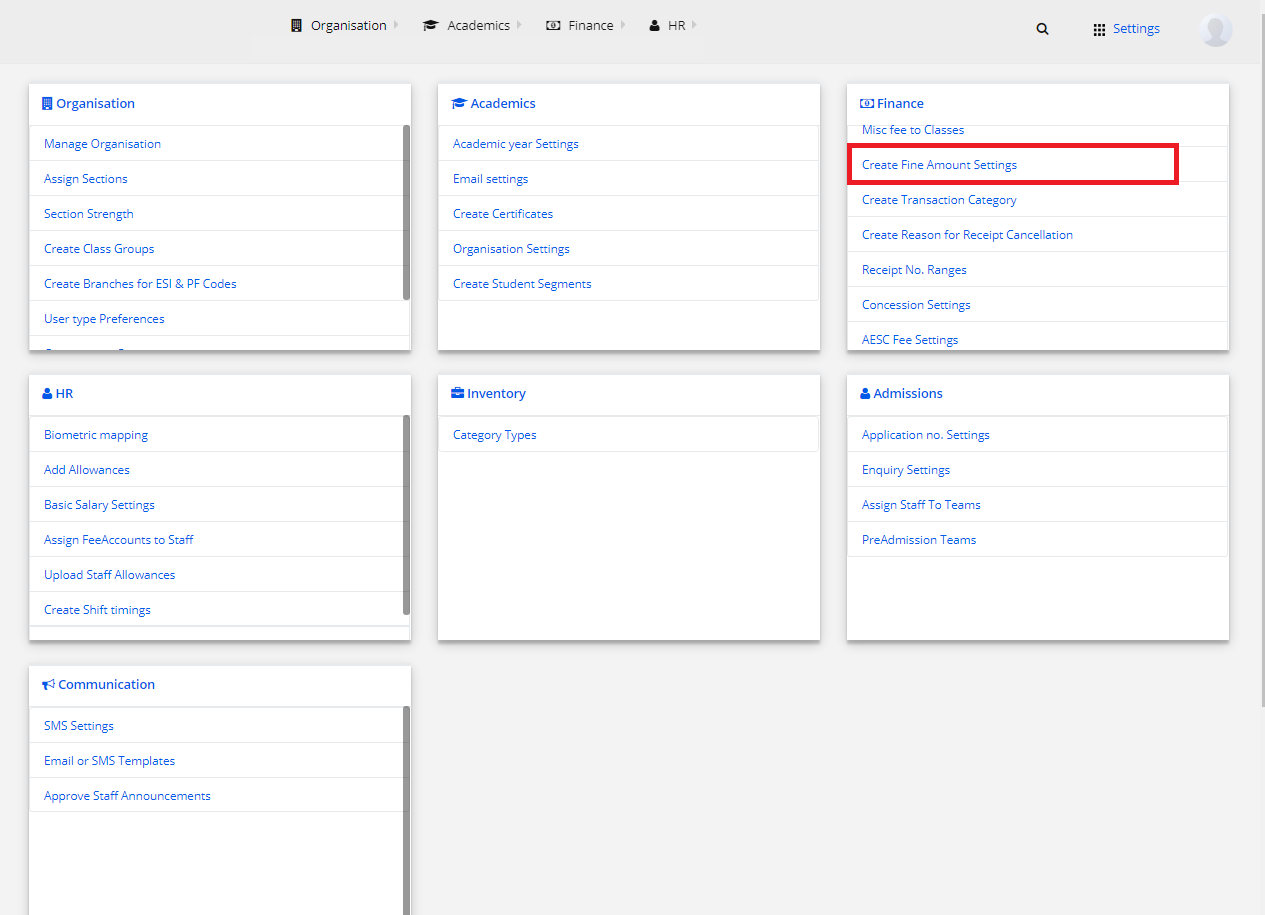
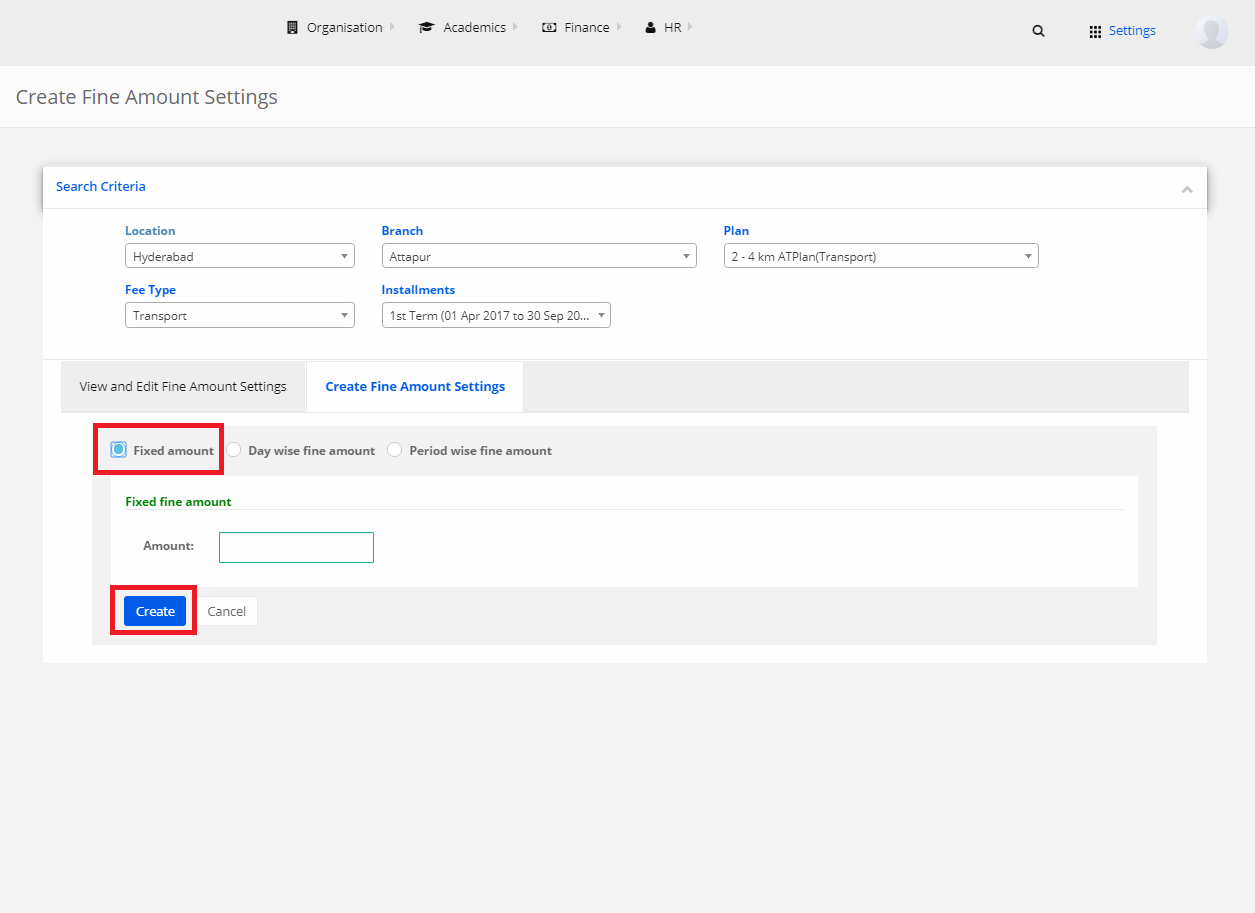
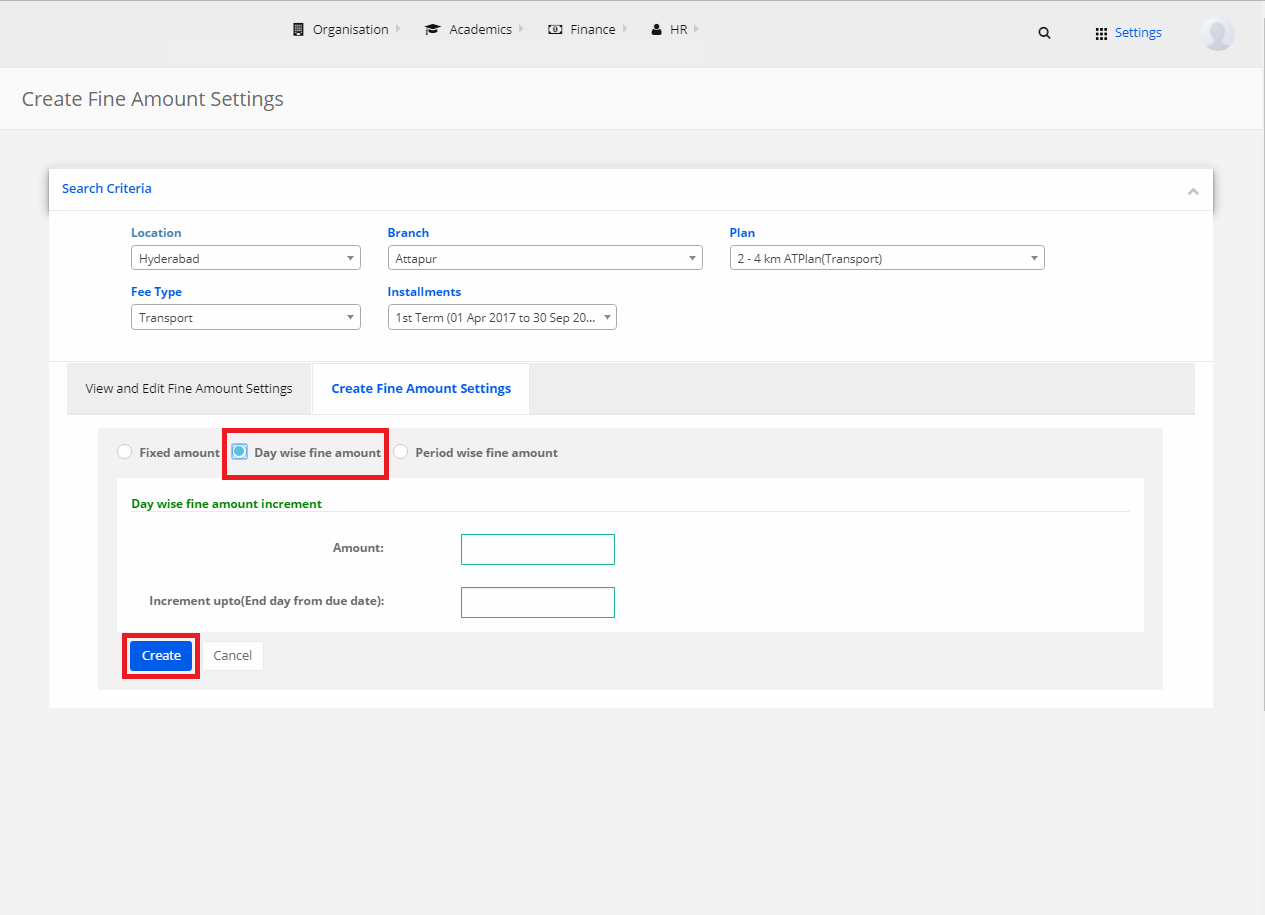
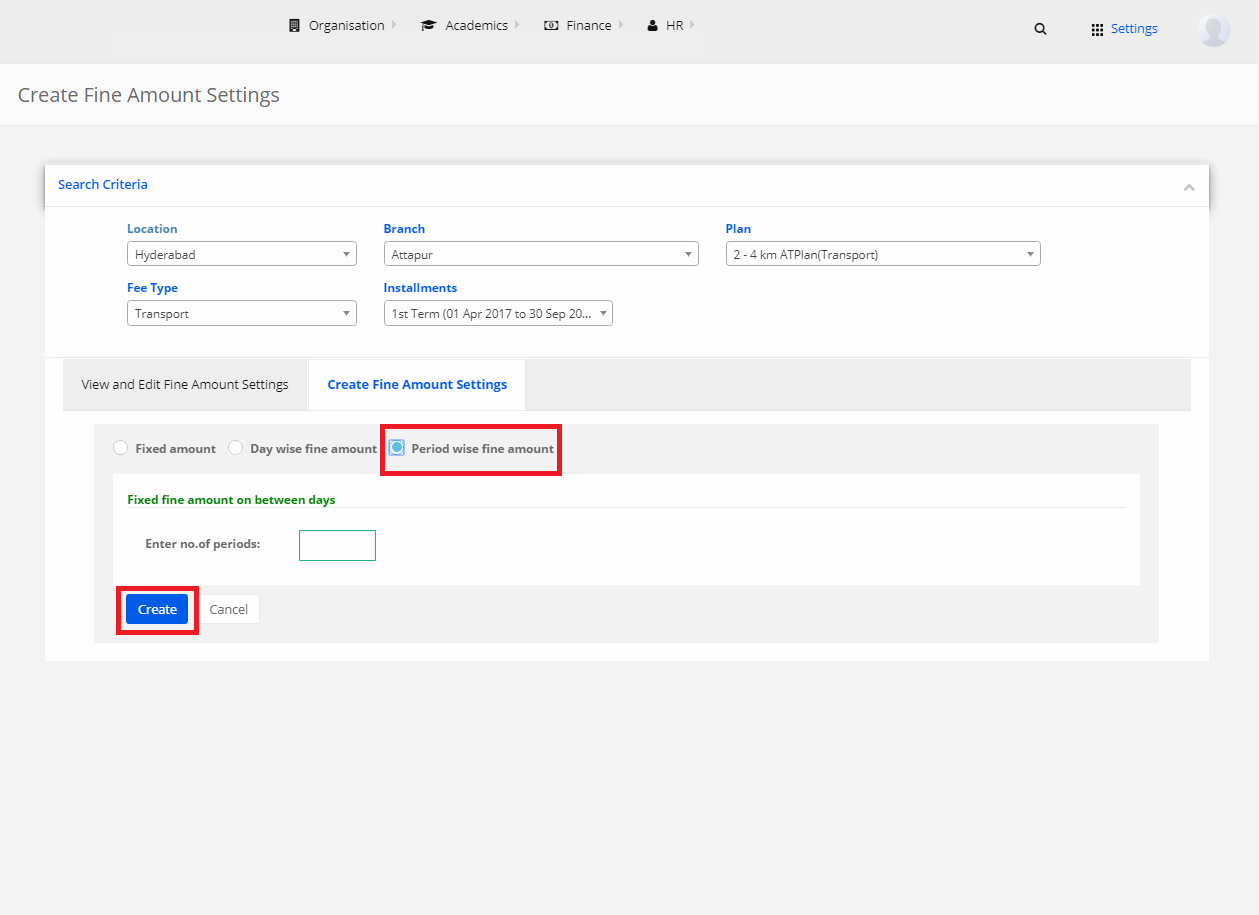
8) Create Fine Amount Settings
Step 1: Select Finance and click on “Create Fine Amount Settings”.
Step 2: Select Location, Branch, Plan, Fee Type and Installments.

Step 3: Select “Create Fine Amount Settings”.
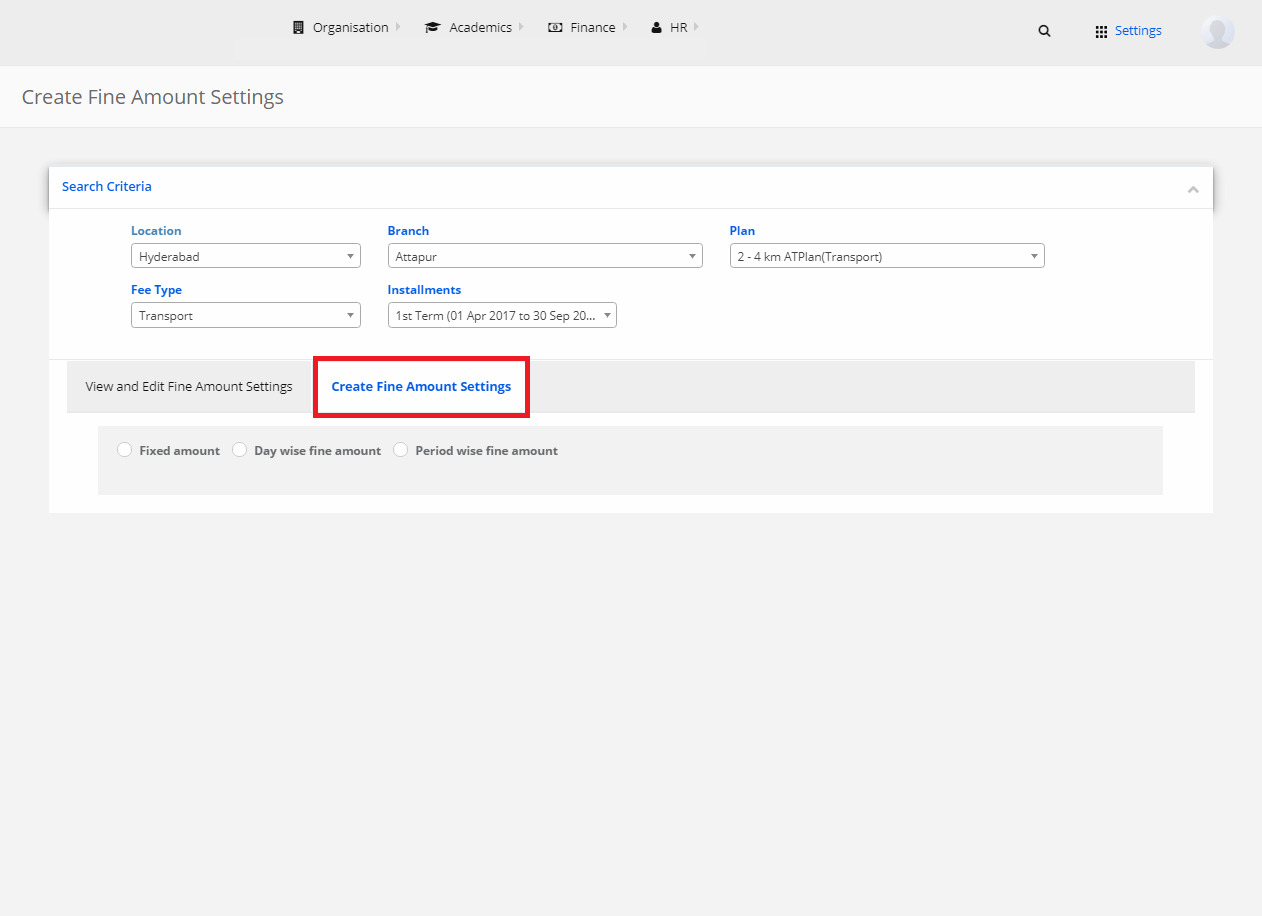
Fixed Amount
Step 4: Select “Fixed Amount”, enter the amount and click on “Create”.
Day wise fine amount
Step 5: Select “Day wise fine amount”, enter the amount, date and click on “Create”.
Period wise fine amount
Step 6: Select “Period wise fine amount”, enter the periods and click on “Create”.
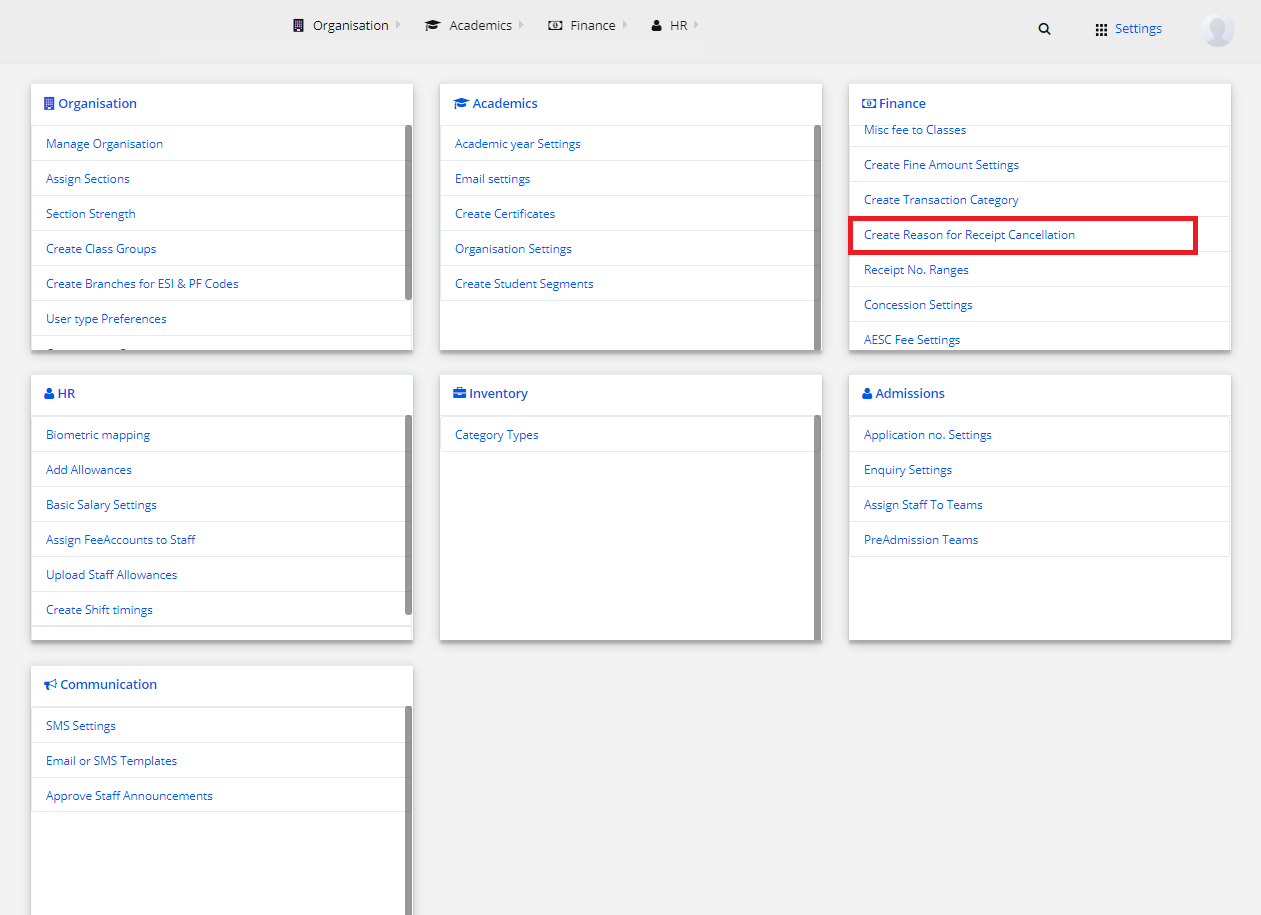
9) Create Reason for Receipt Cancellation
Step 1: Select Finance and click on “Create Reason for Receipt Cancellation”.
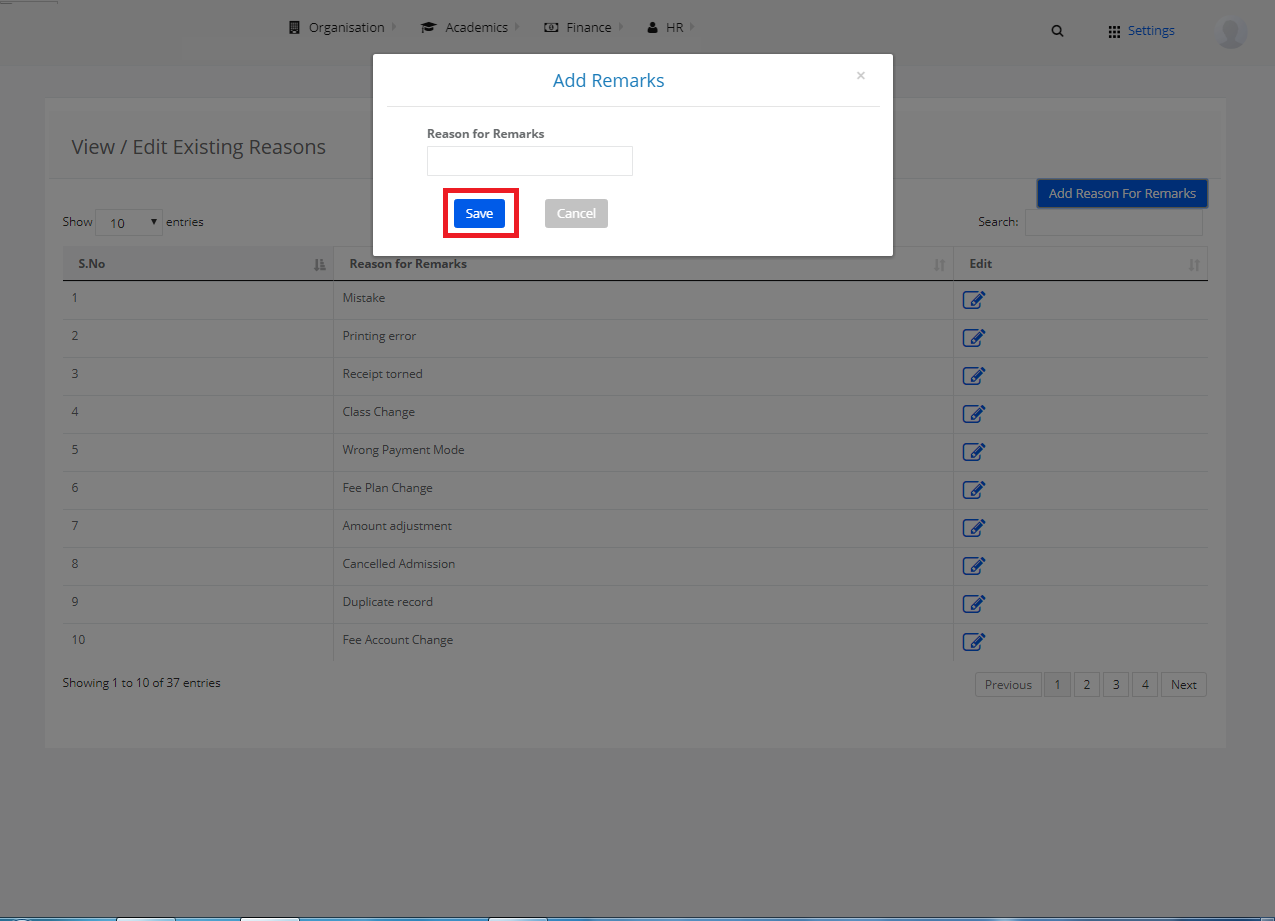
Step 2: Click on “Add Reason For Remarks”.
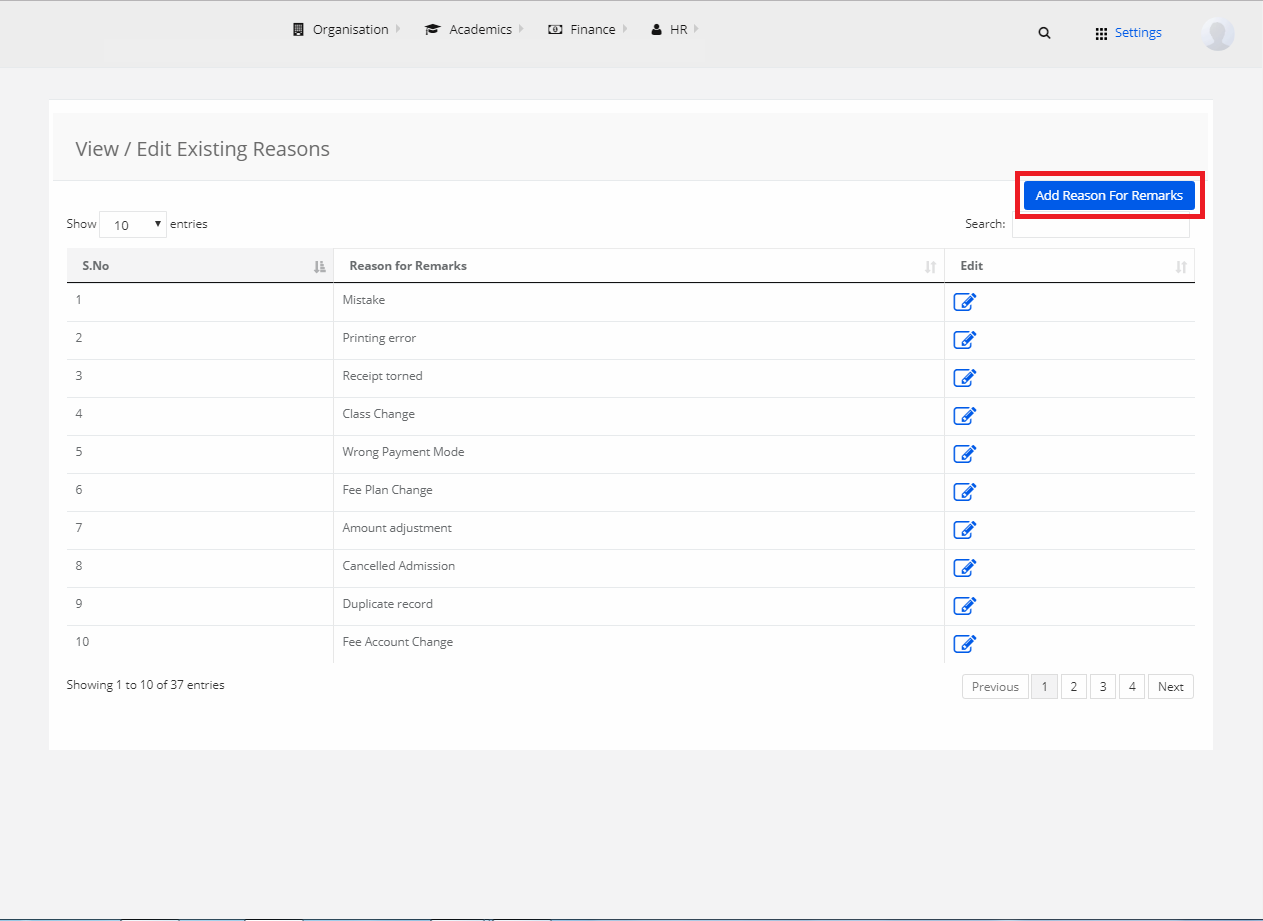
Step 3: Enter the reason for remarks and click on “Save”.
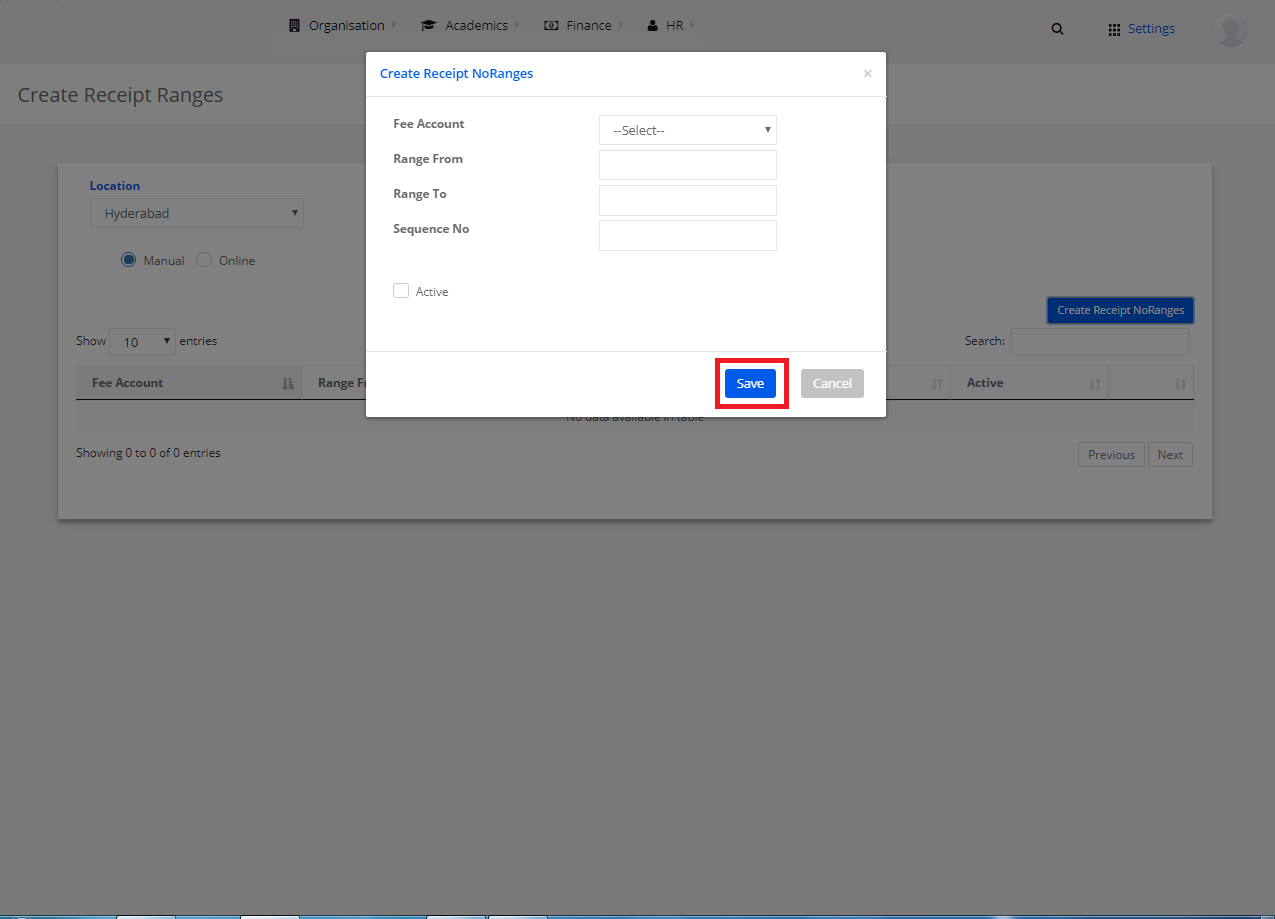
10) Receipt No. Ranges
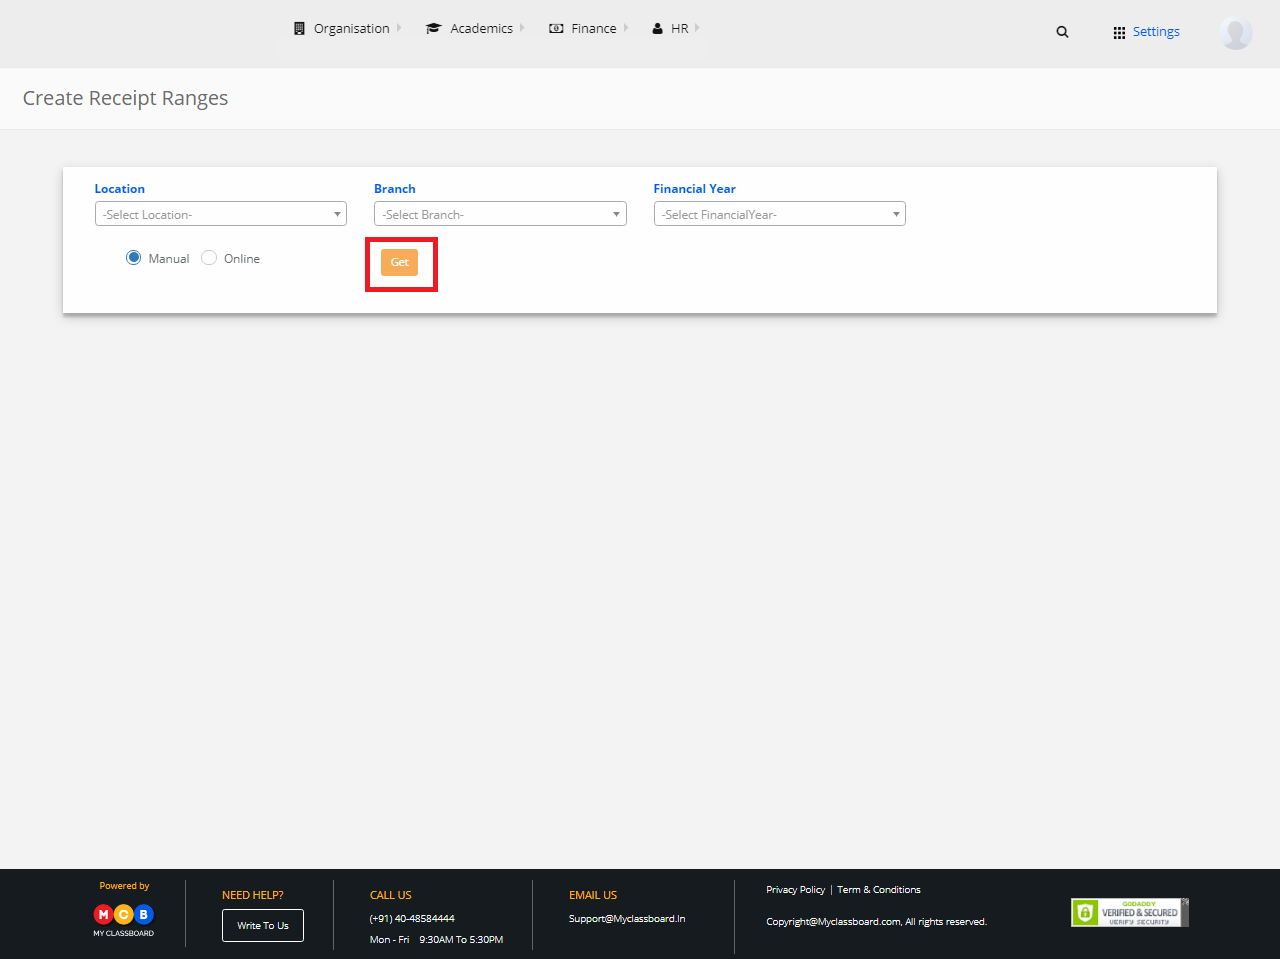
Step 1: Select Finance and click on “Receipt No. Ranges”.

Step 2: Select Location, Branch, Financial Year, choose “Manual/Online” option and click on “Get”.
Step 3: Click on “Create Receipt No. Ranges”.
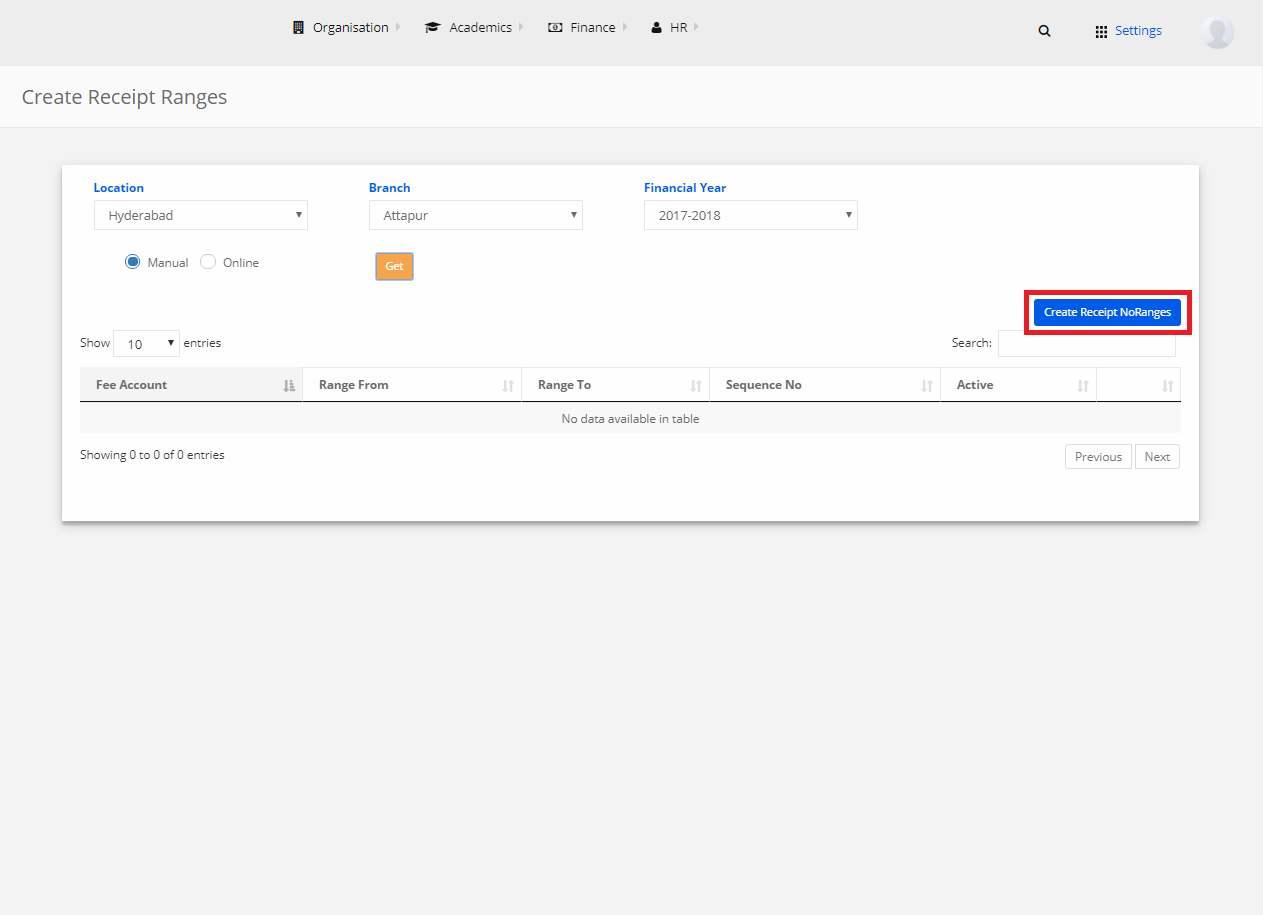
Step 4: Add a new record by selecting Fee Account, Range From and To details and other information as required. After entering the required details, click on “Save” to create the “Receipt Range”.
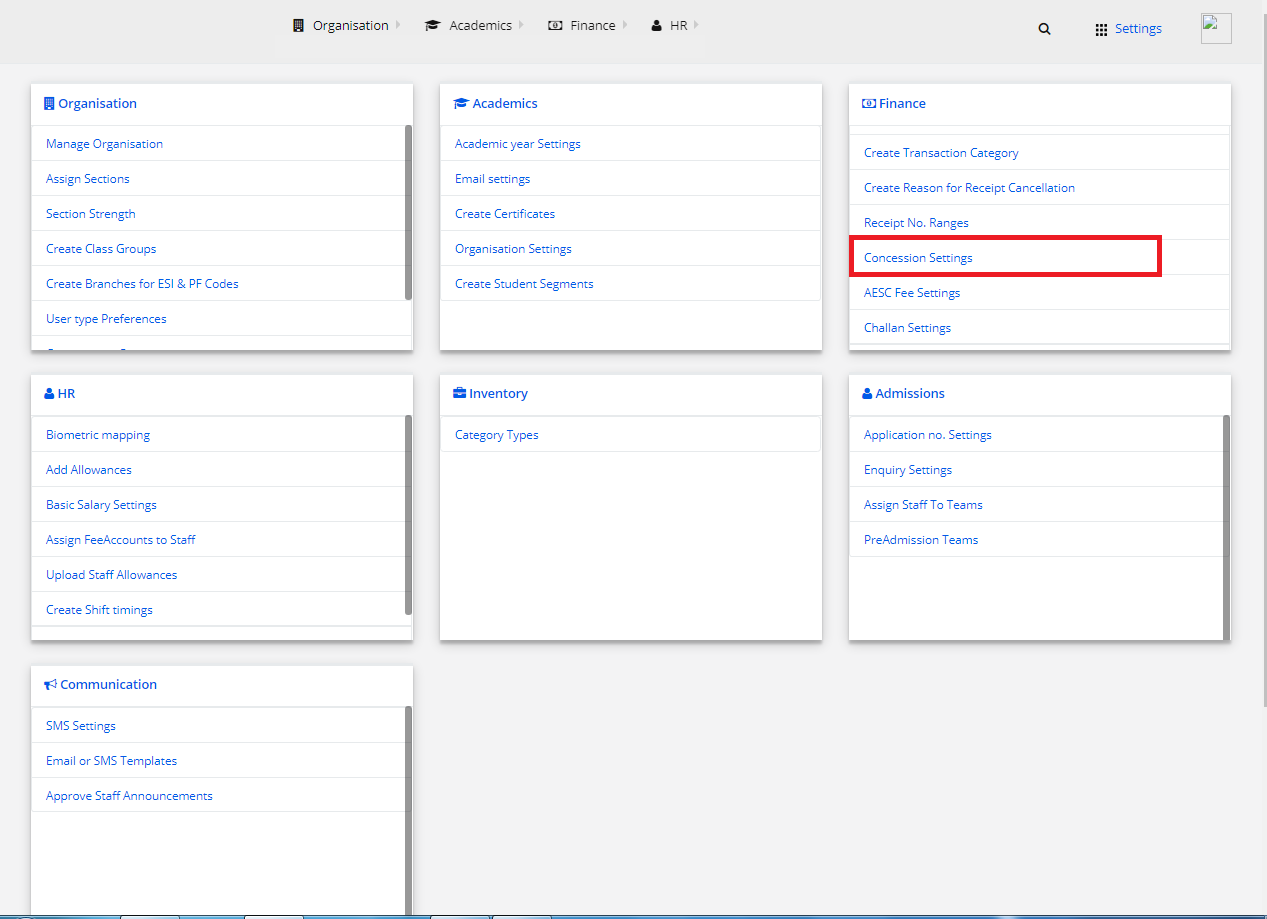
11) Concession Settings
Step 1: Select “Finance” and click on “Concession Settings”.
Step 2: Click on “Create Concession Settings” to add required fields like Concession name, Percentage and other necessary details.
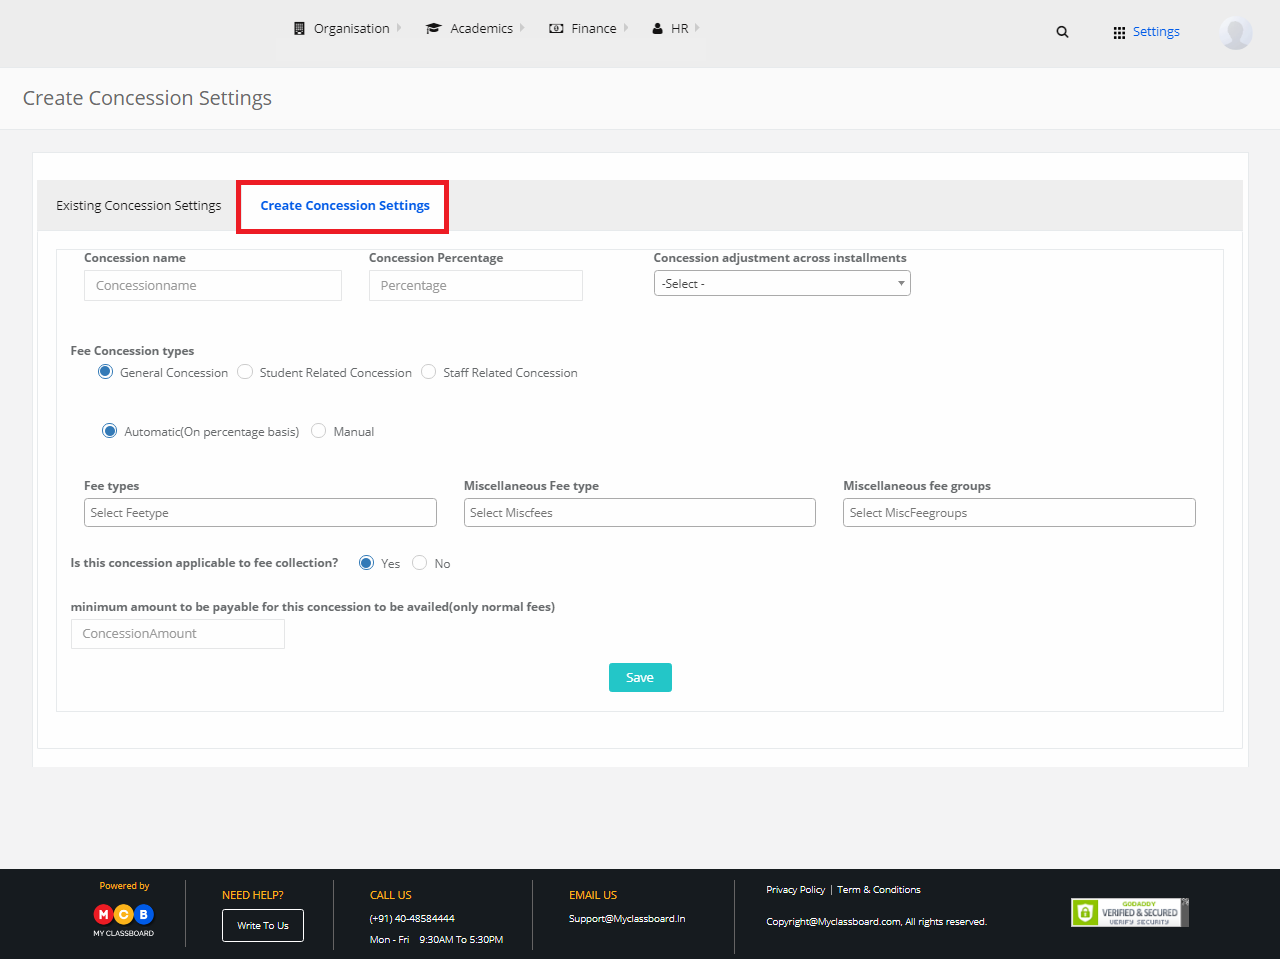
Step 3: After adding the required information, click on “Save”.
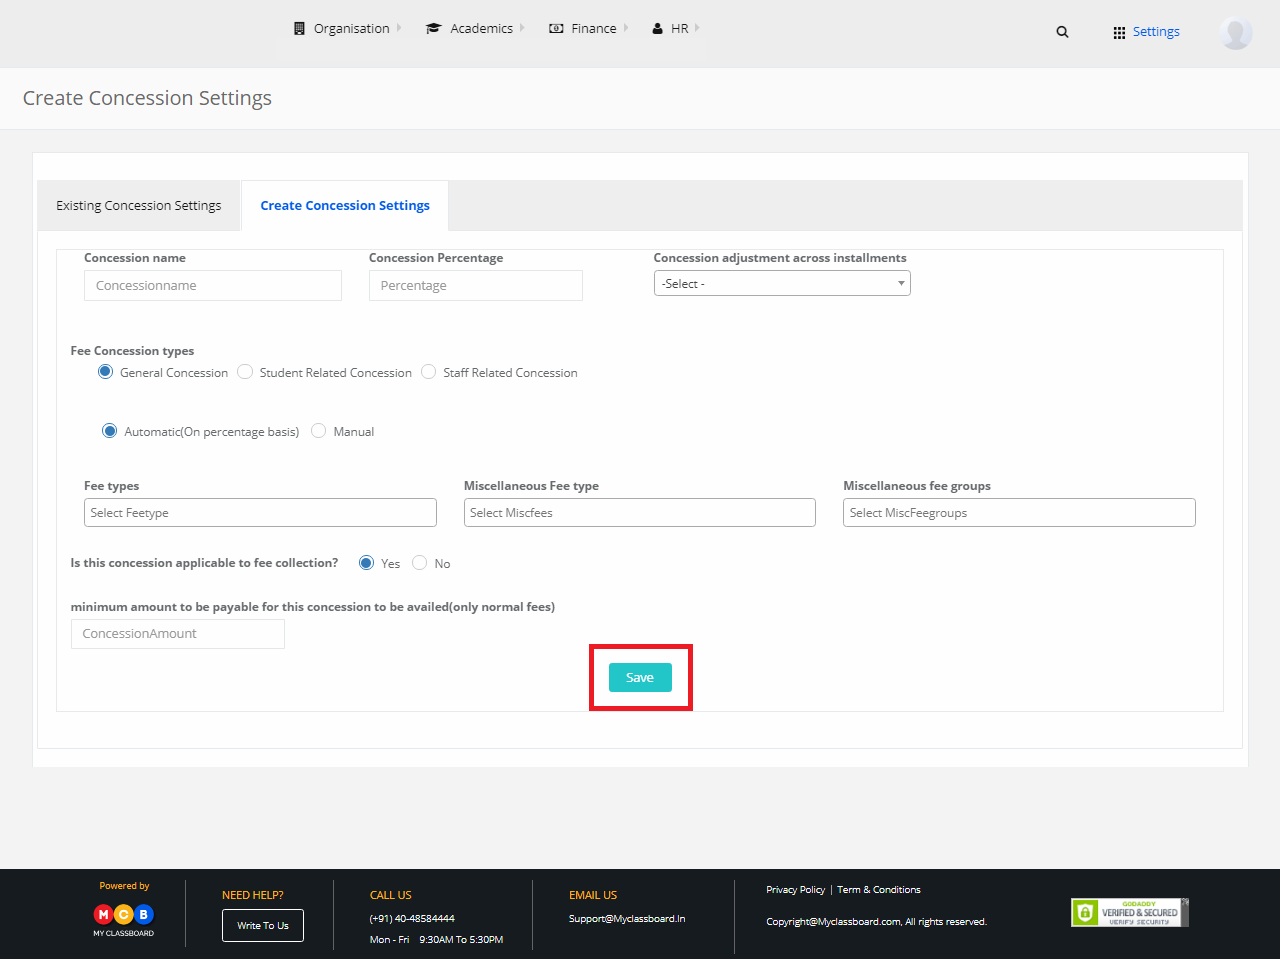
Step 4: The Concession Settings are created successfully.
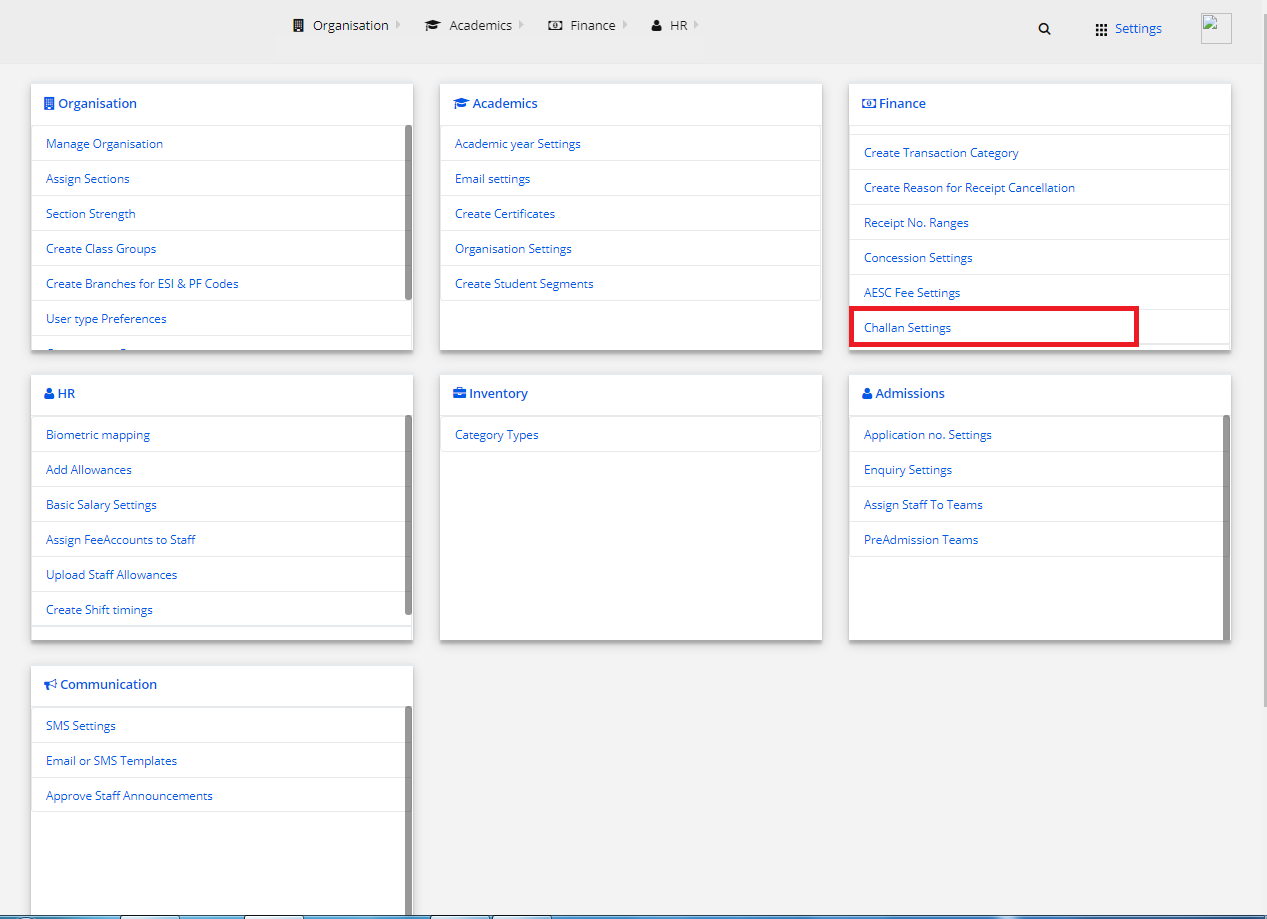
12) Challan Settings
Step 1: Select Finance and click on “Challan Settings”.
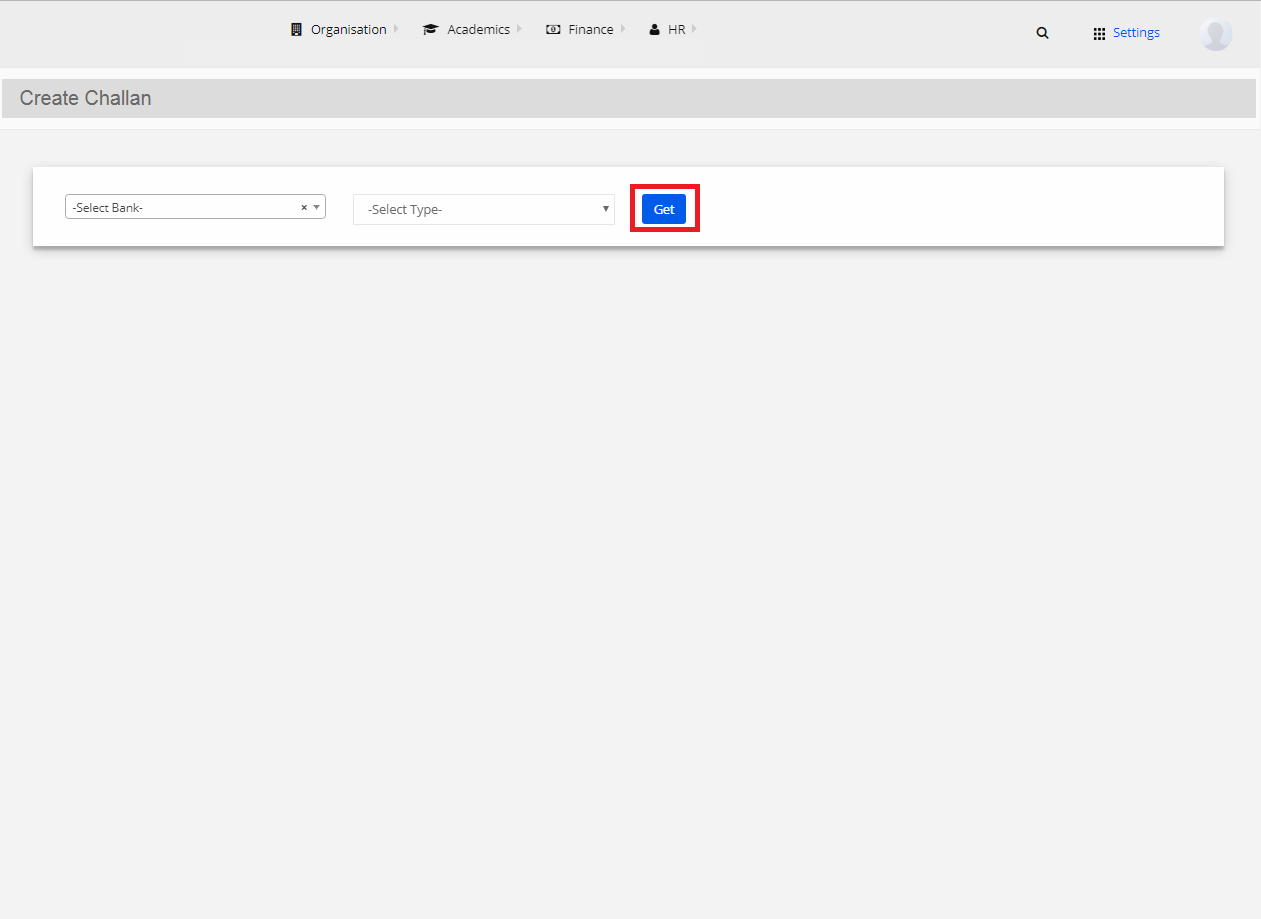
Step 2: Select Bank, Type (Challan/Invoice) and click on “Get”.
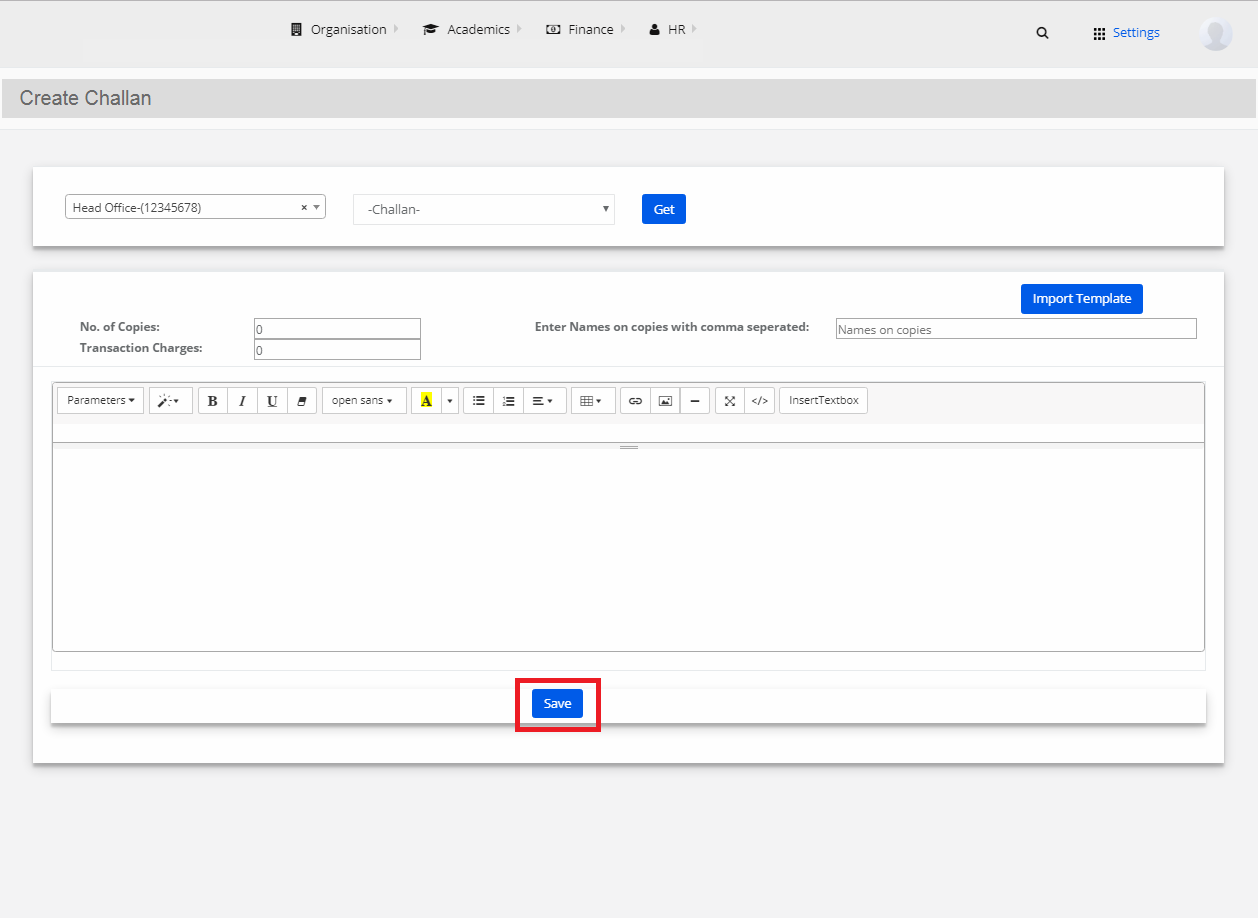
Step 3: Choose your parameters to be included in the challan by clicking on the “Parameters” button and create a challan in your desired format.

Step 4: After designing, click on “Save”. The Challan is generated and saved.
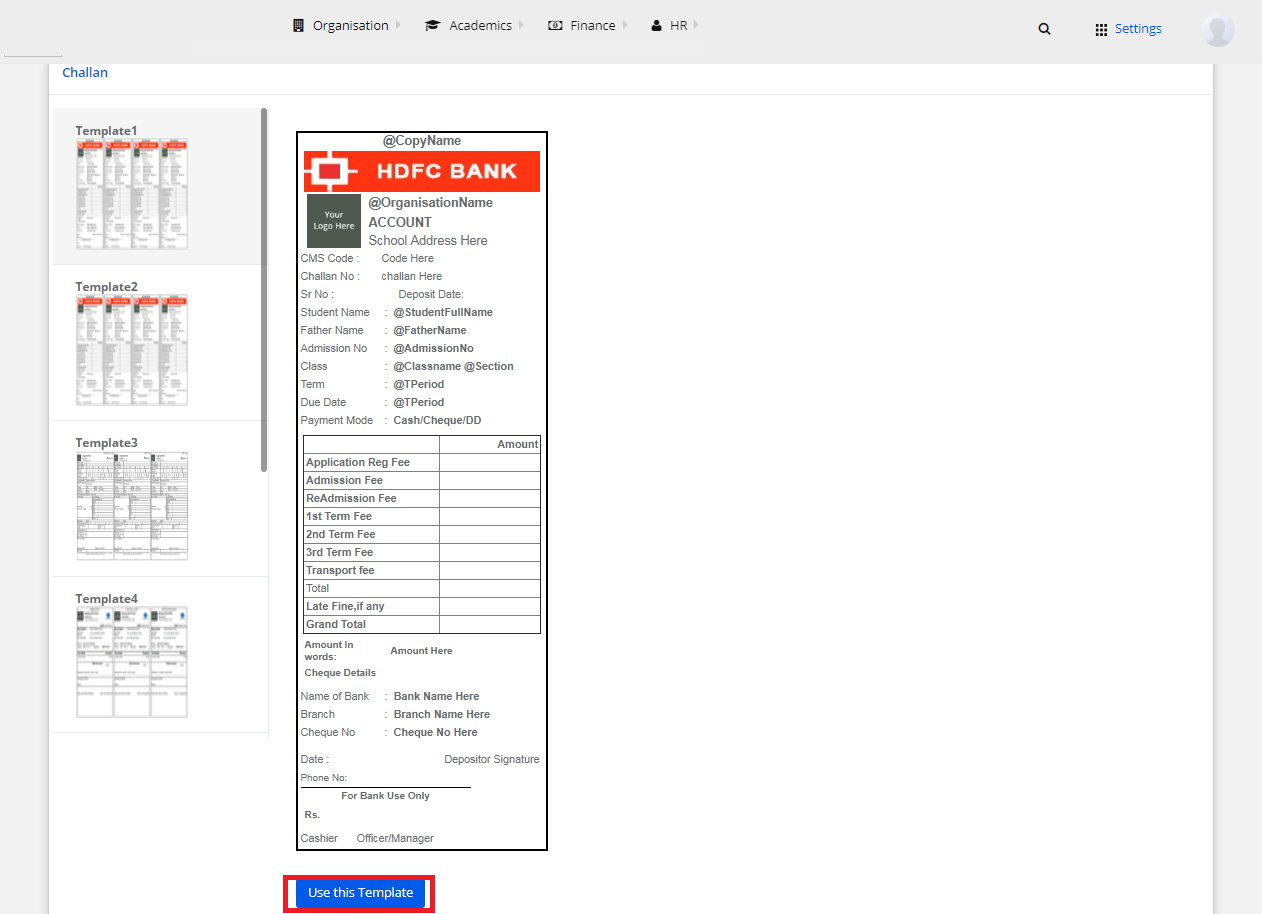
Step 5: If you want to import the template from the previous academic years, click on “Import Template”.
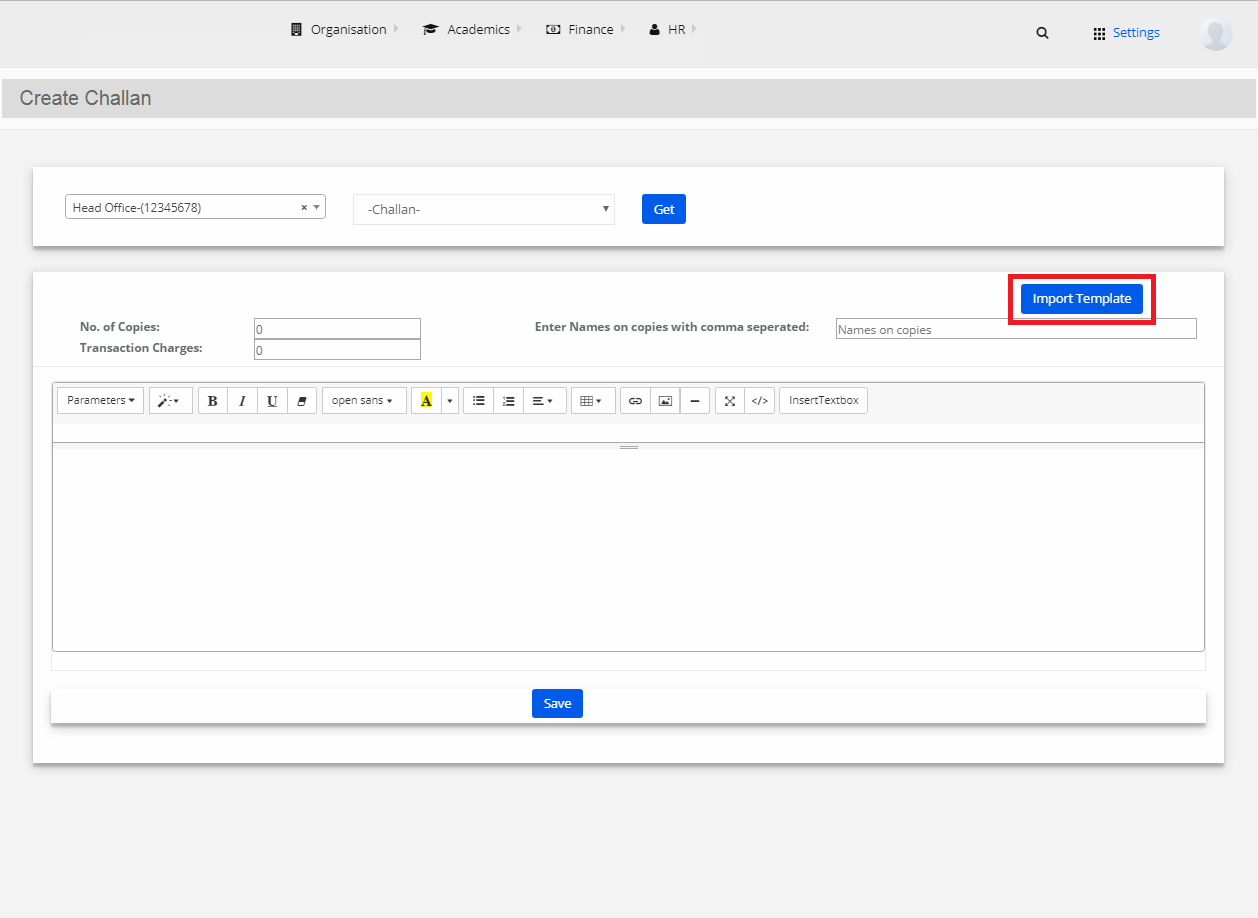
Step 6: Choose your required template and select “Use this template”.
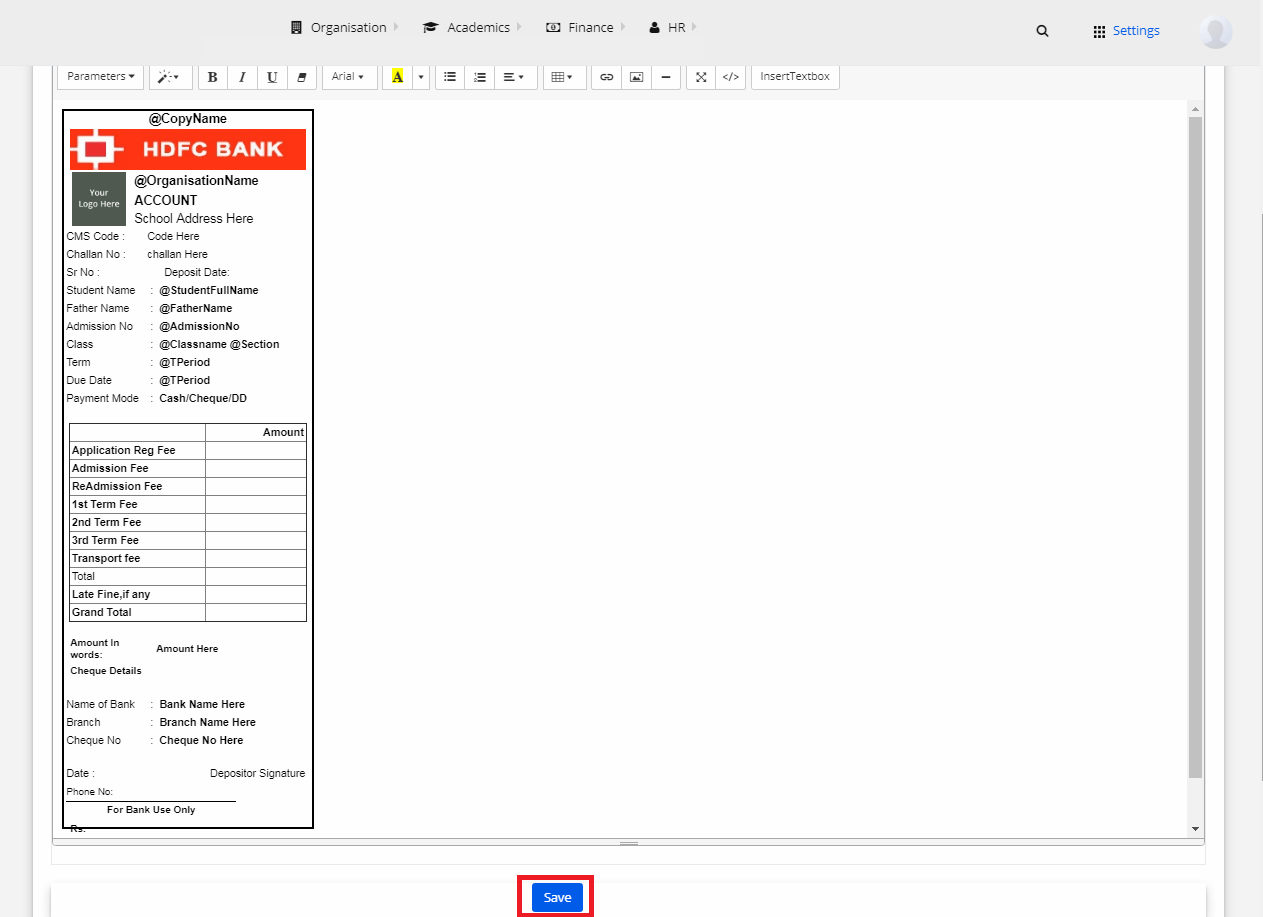
Step 7: The template is successfully imported. Click on save.
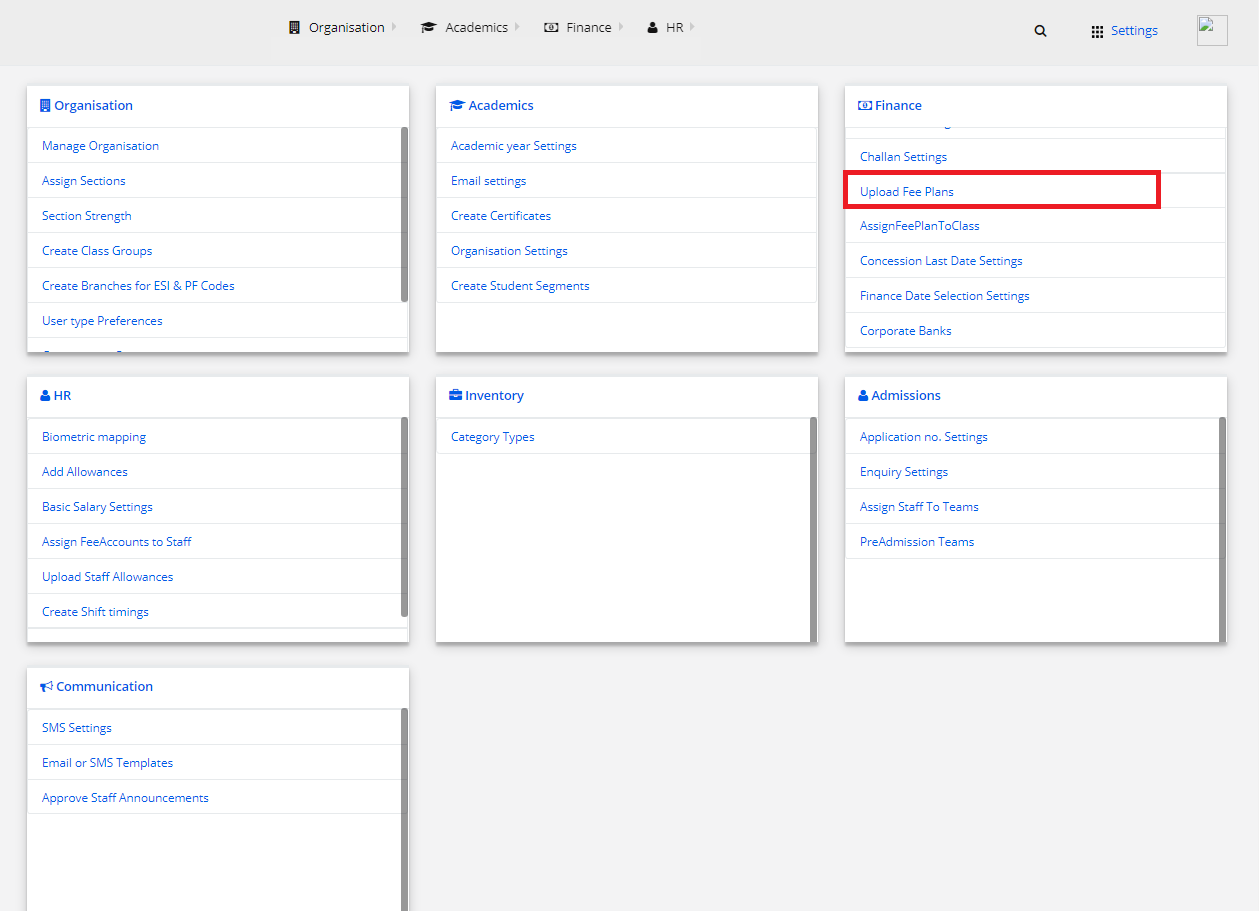
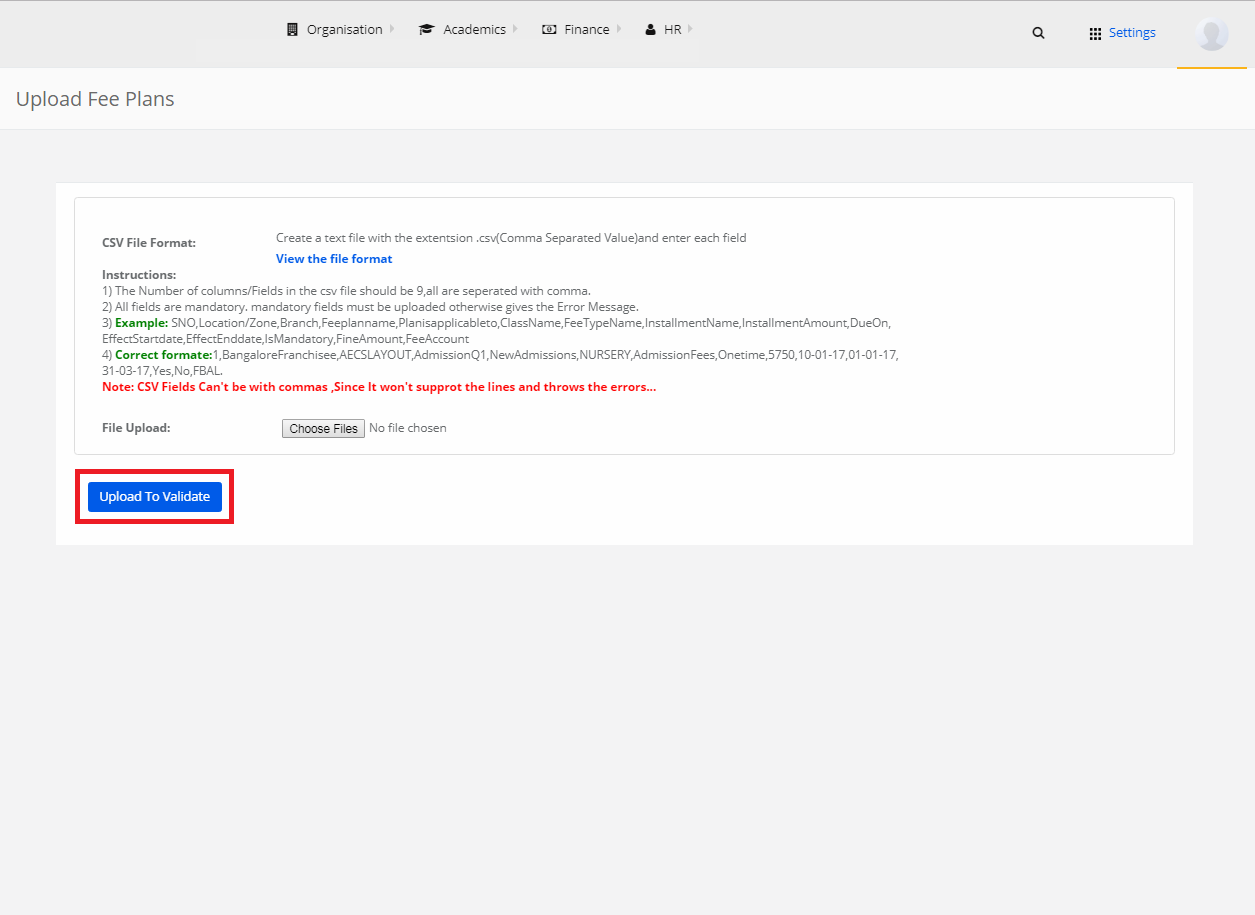
13) Upload Fee Plans
Step 1: Select Finance and click on “Upload Fee Plans”.
Step 2: Choose a “.CSV” file containing the fee plans to upload.
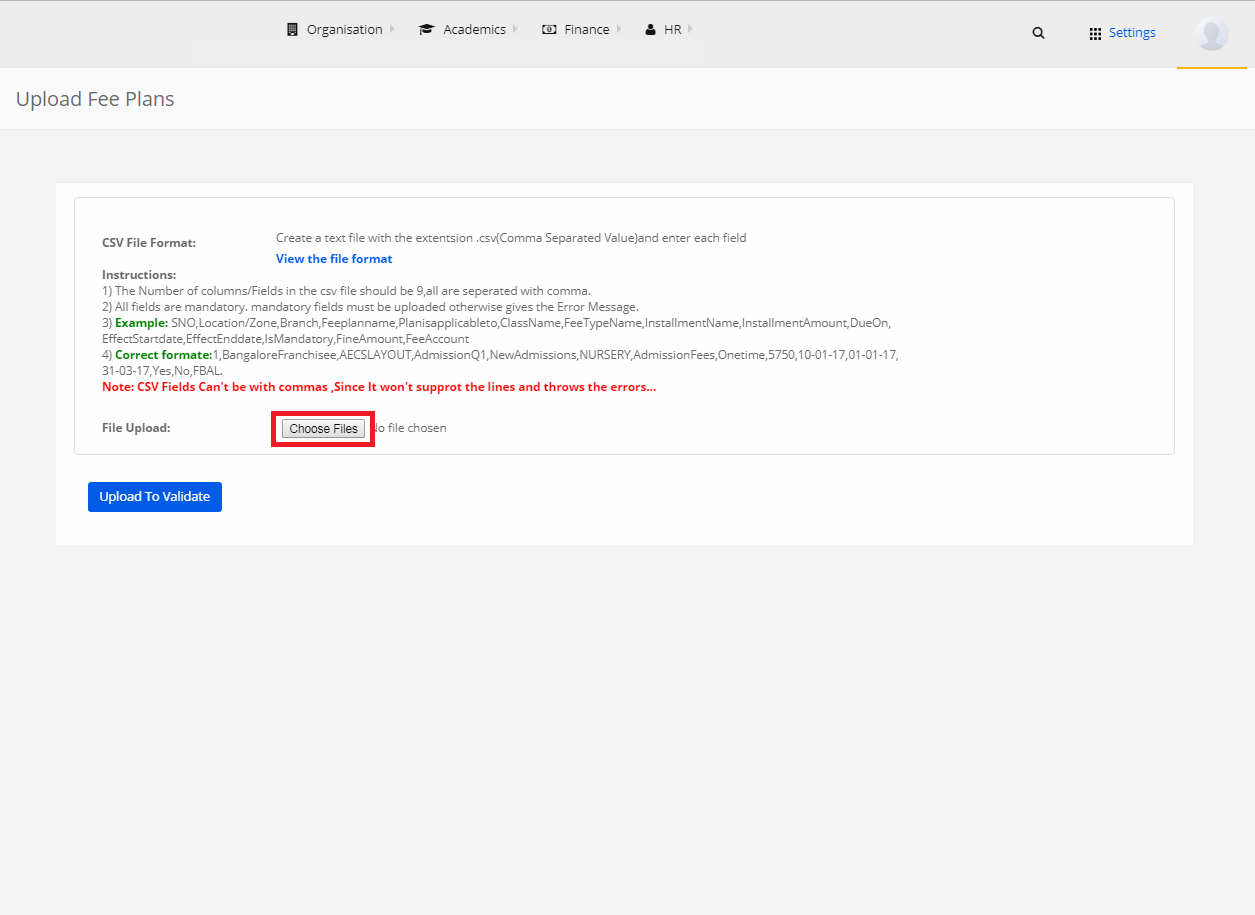
Step 3: Click on “Upload to Validate”. The file is uploaded successfully.
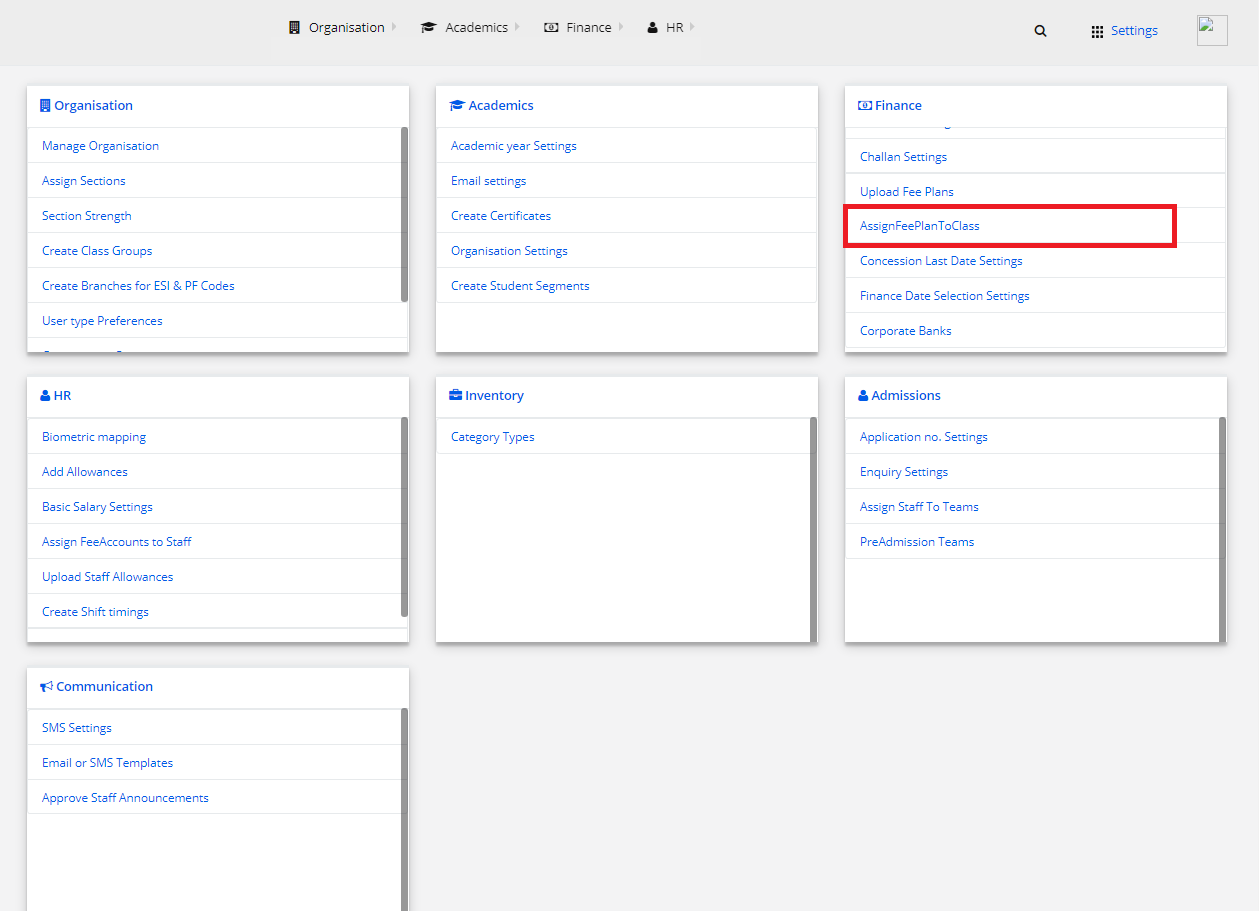
14) Assign Fee Plan To Class
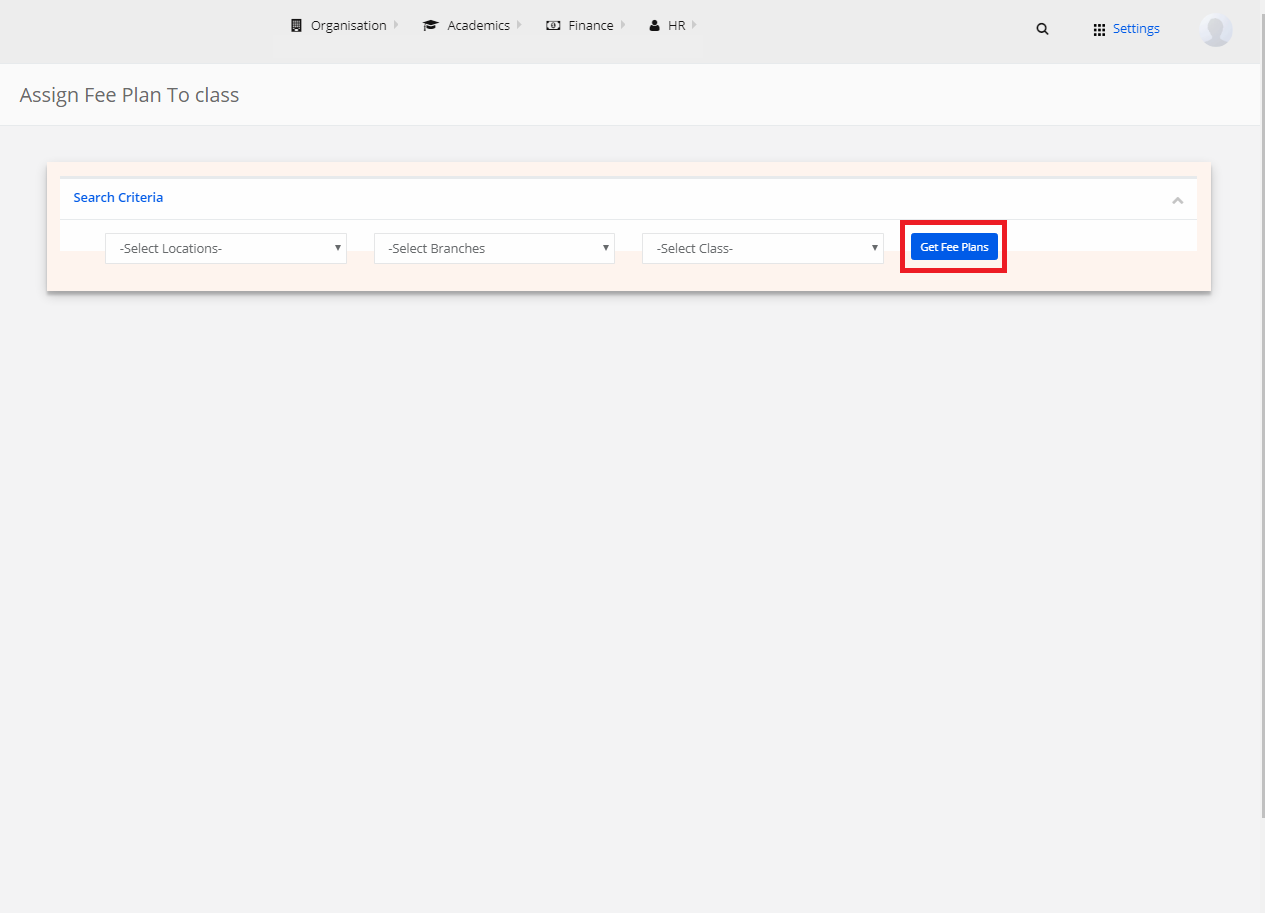
Step 1: Select Finance and click on “Assign Fee Plan To Class”.
Step 2: Select Location, Branch, Class and click on “Get Fee Plans”.
Step 3: Choose Unassigned Fee Plans and select fee plans under it. Upon selection, click on “Assign”.
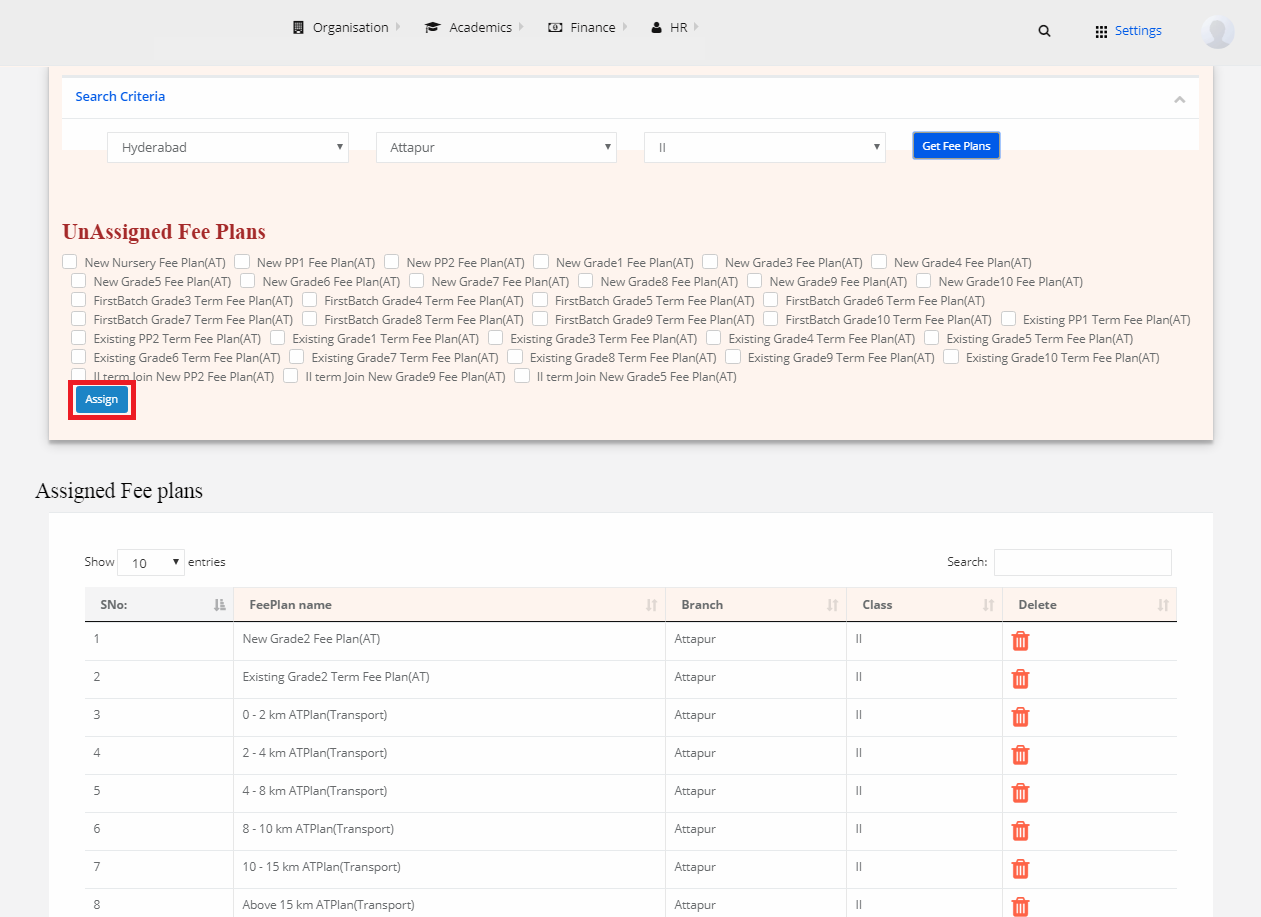
Step 4: The Fee Plans are successfully assigned to the respective class.
Concession Last Date Settings
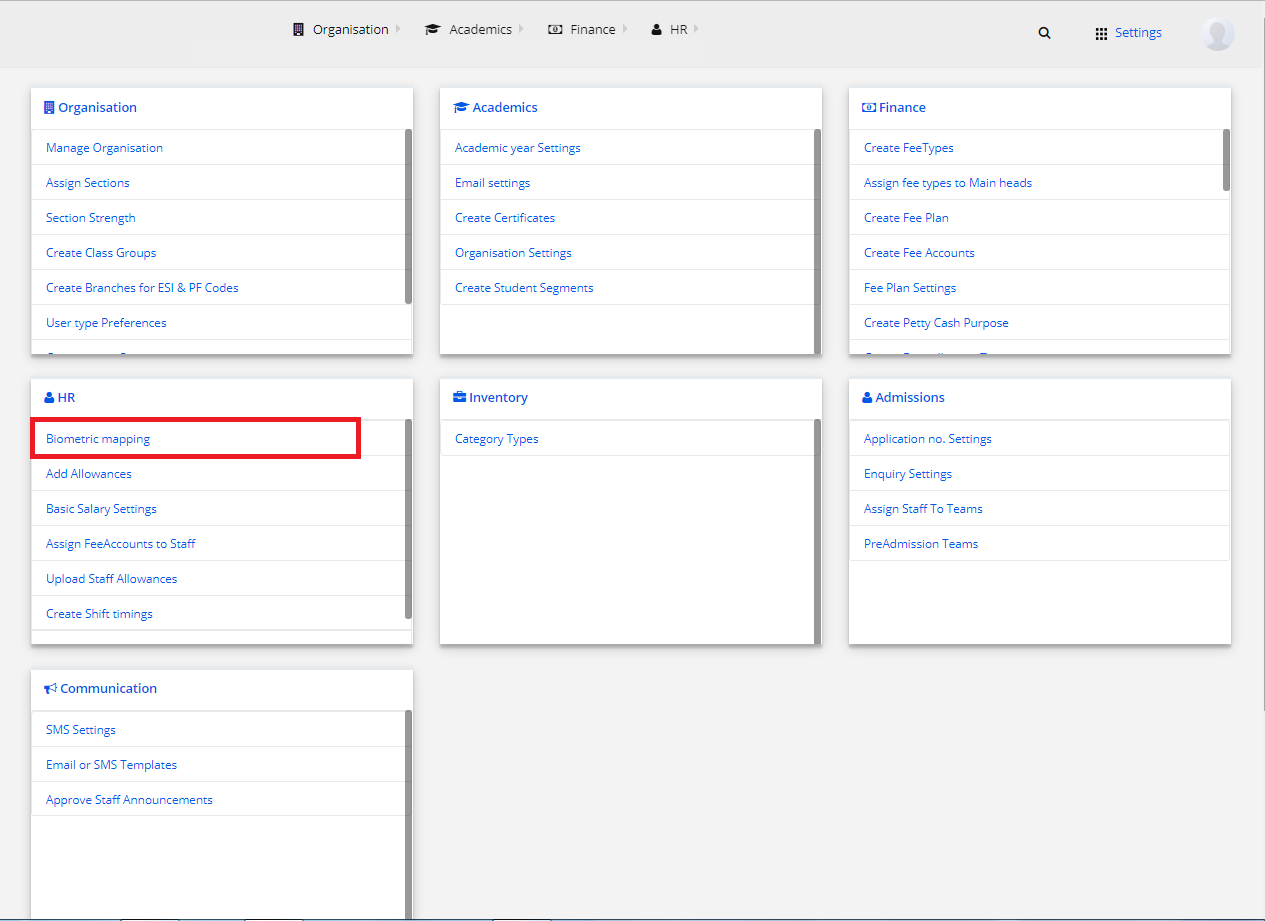
Stage 6: HR
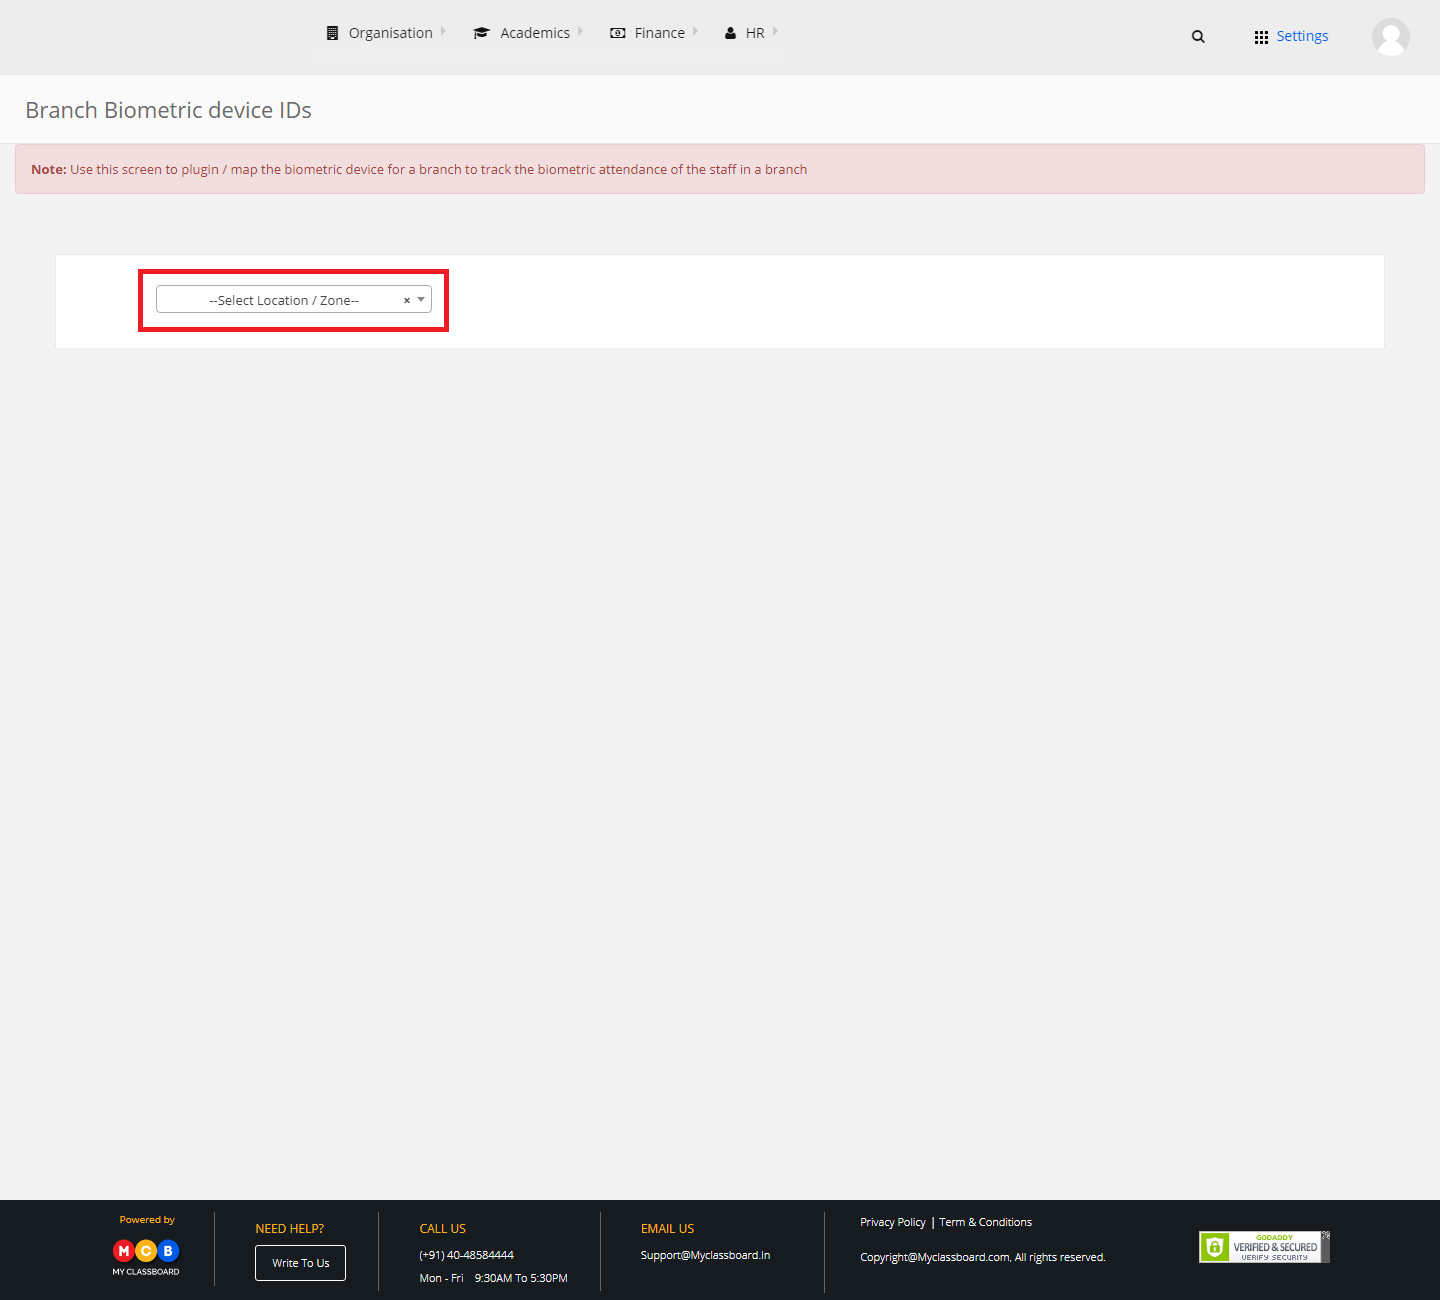
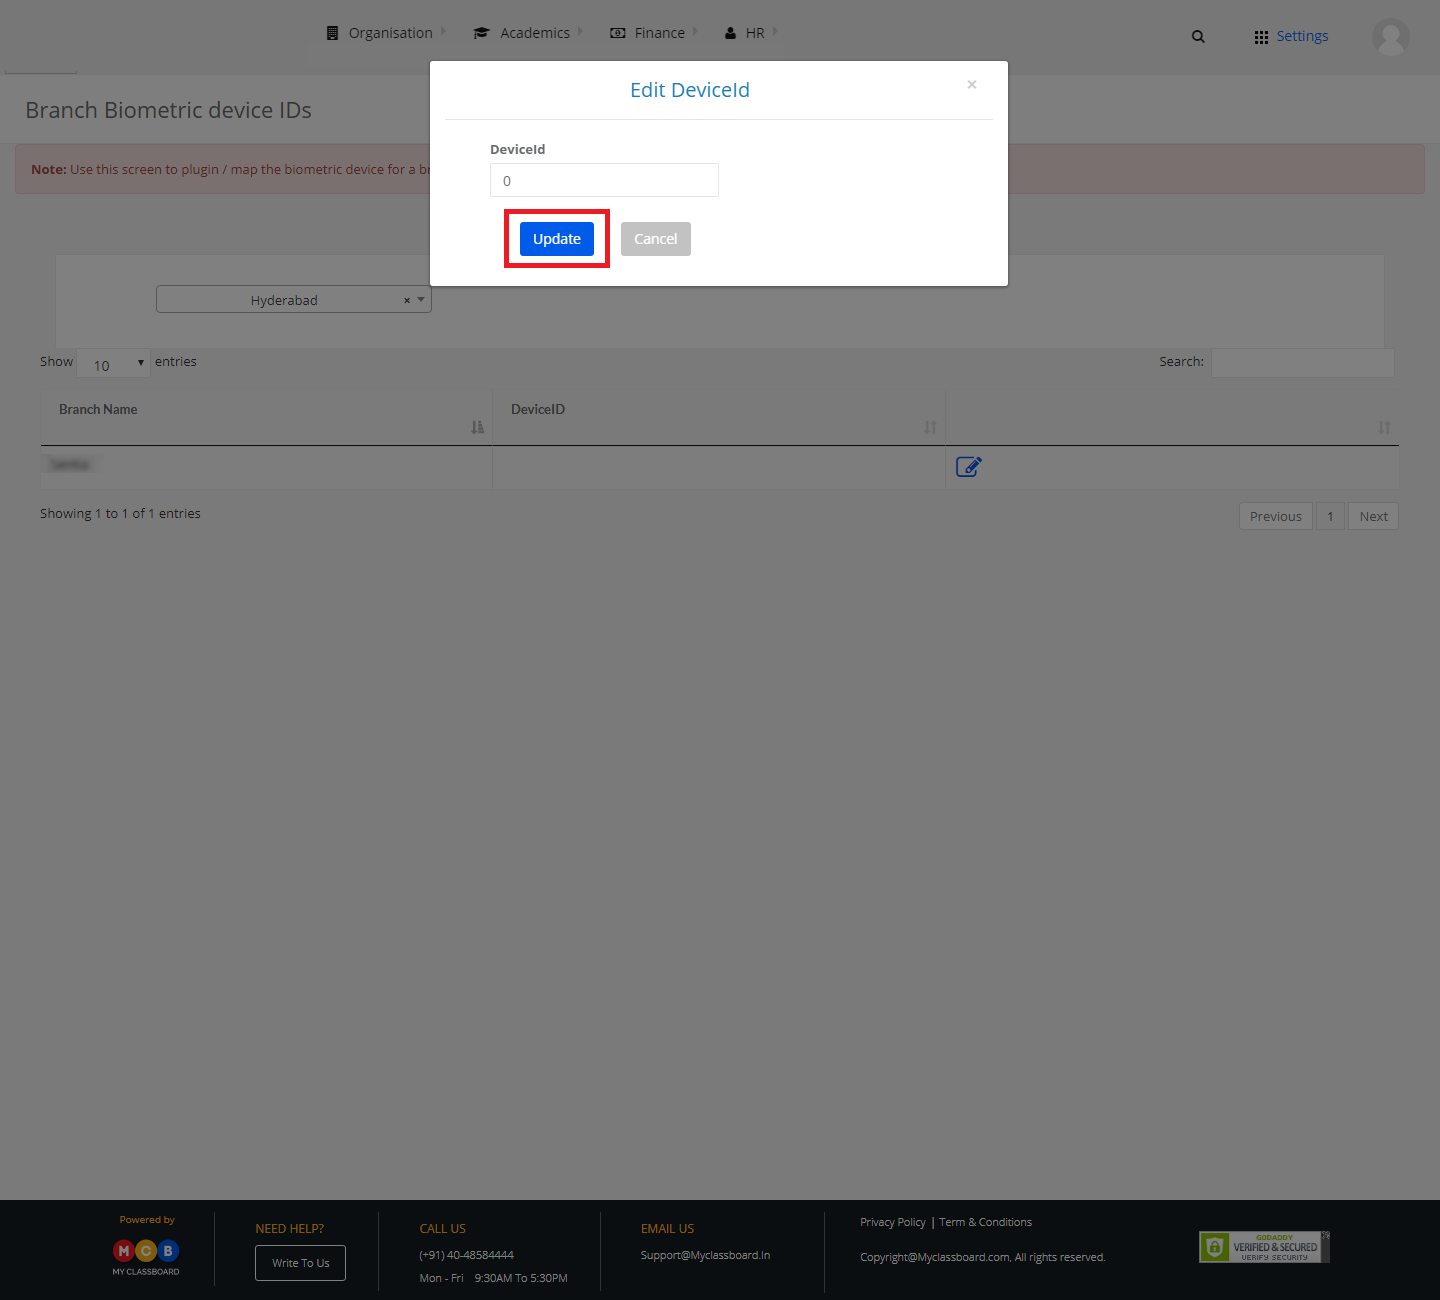
1) Biometric Mapping
Step 1: Select HR and click on “Biometric Mapping”.
Step 2: Select Location/Zone.
Step 3: Select any branch and click on the “Edit” button beside.

Step 4: Enter the Biometric Device ID and click on “Update”.
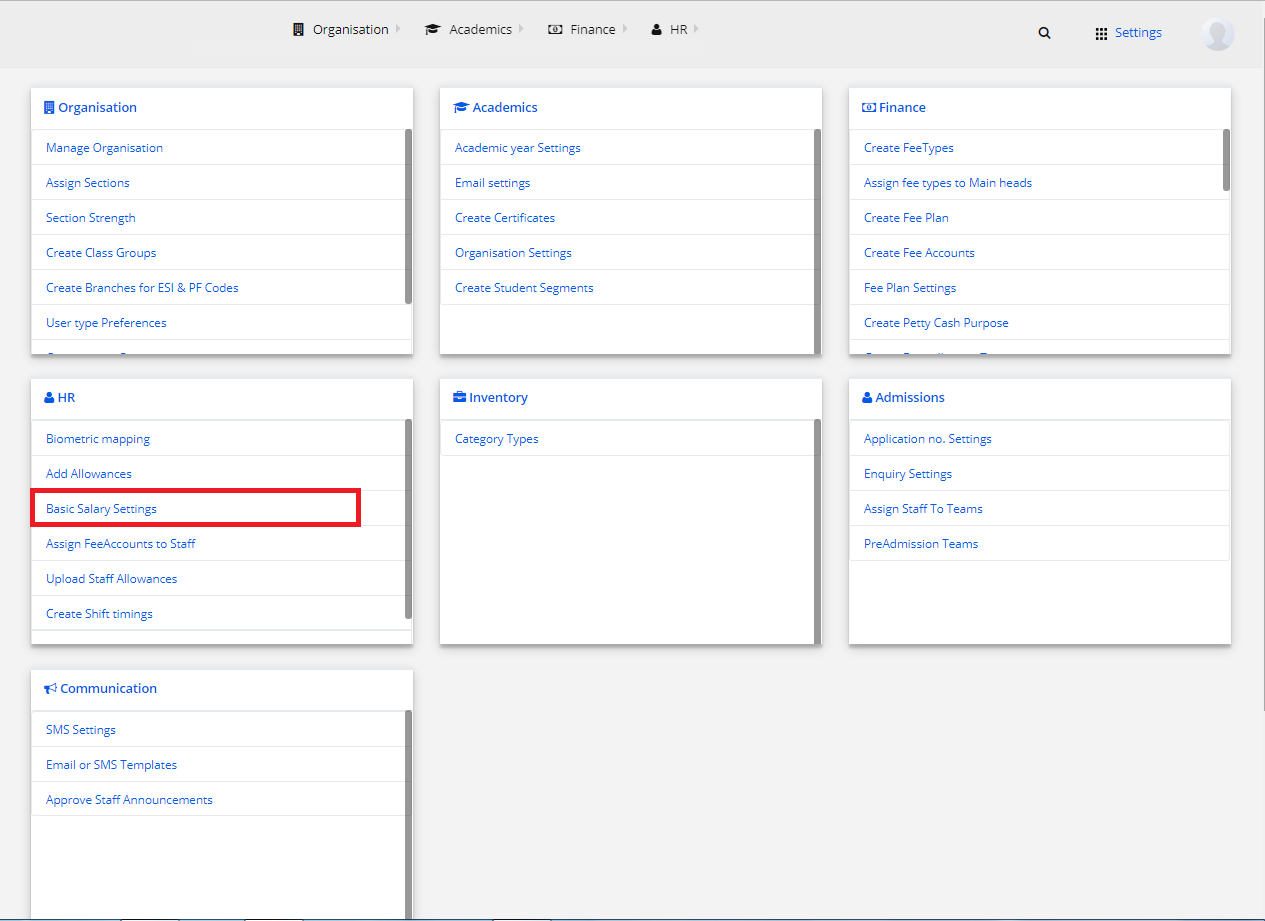
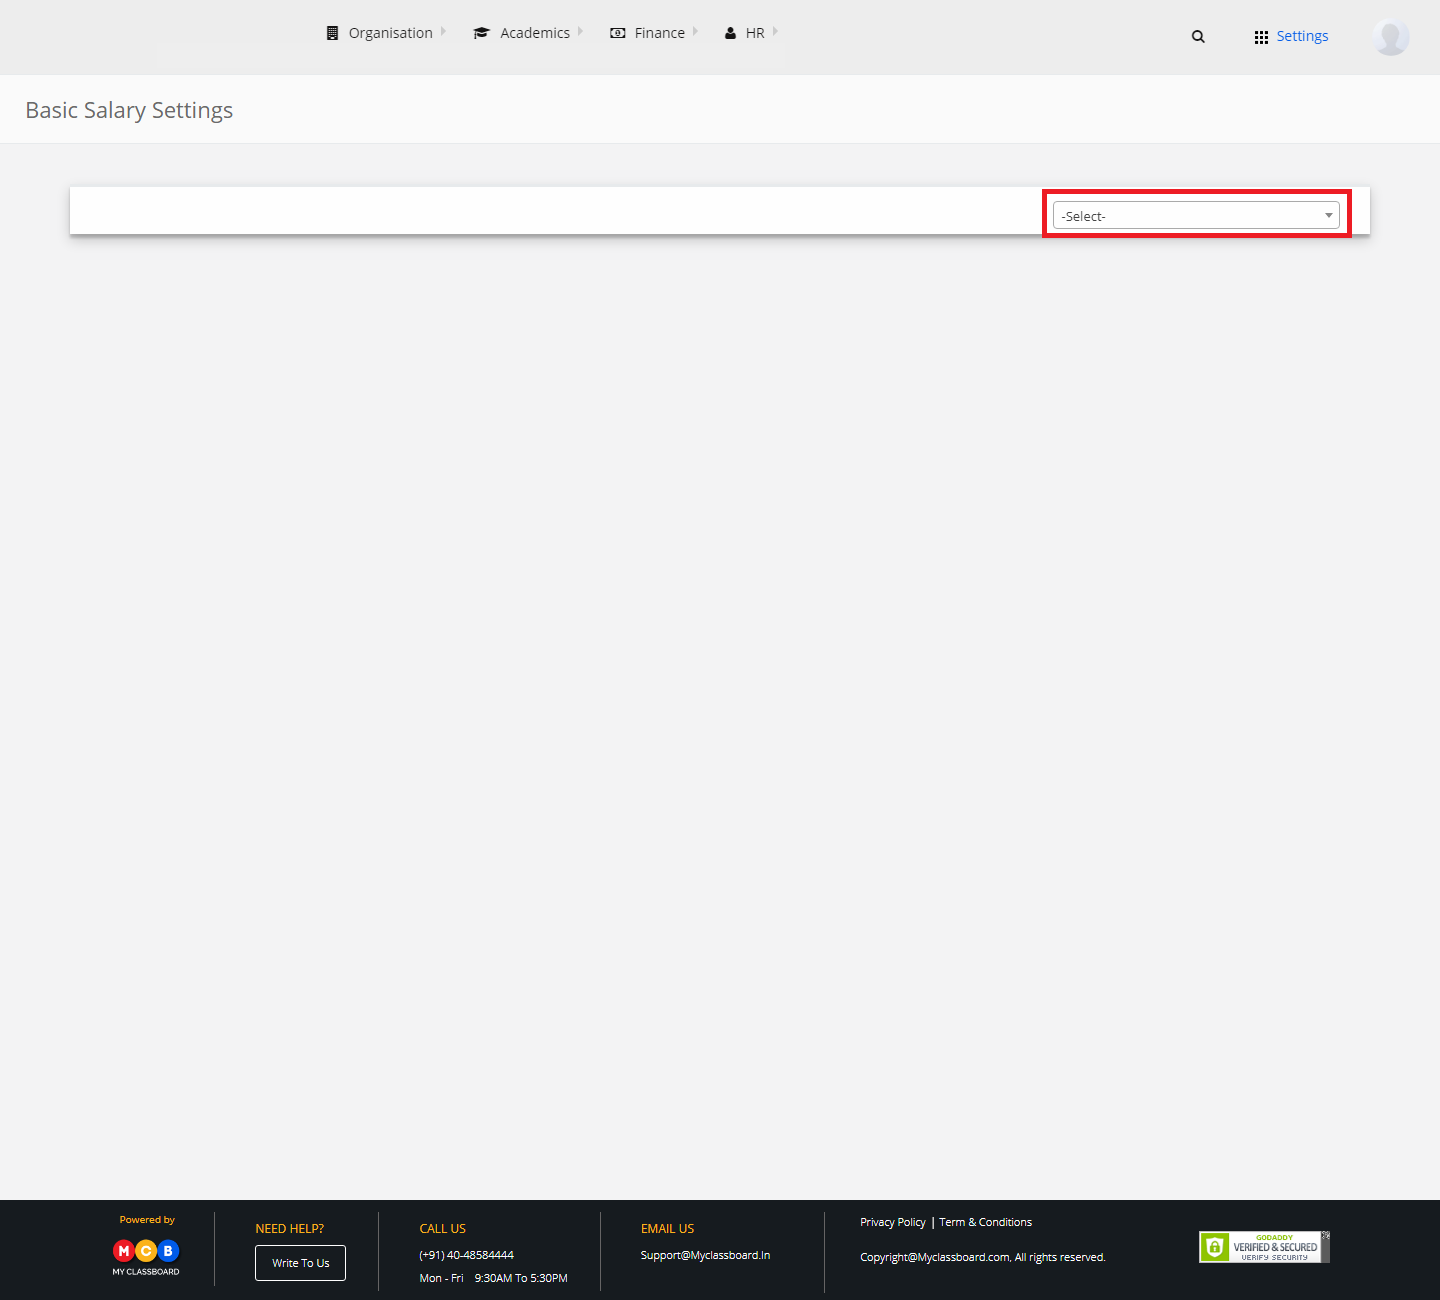
2) Basic Salary Settings
Step 1: Select HR and click on “Basic Salary Settings”.
Step 2: Select Location.
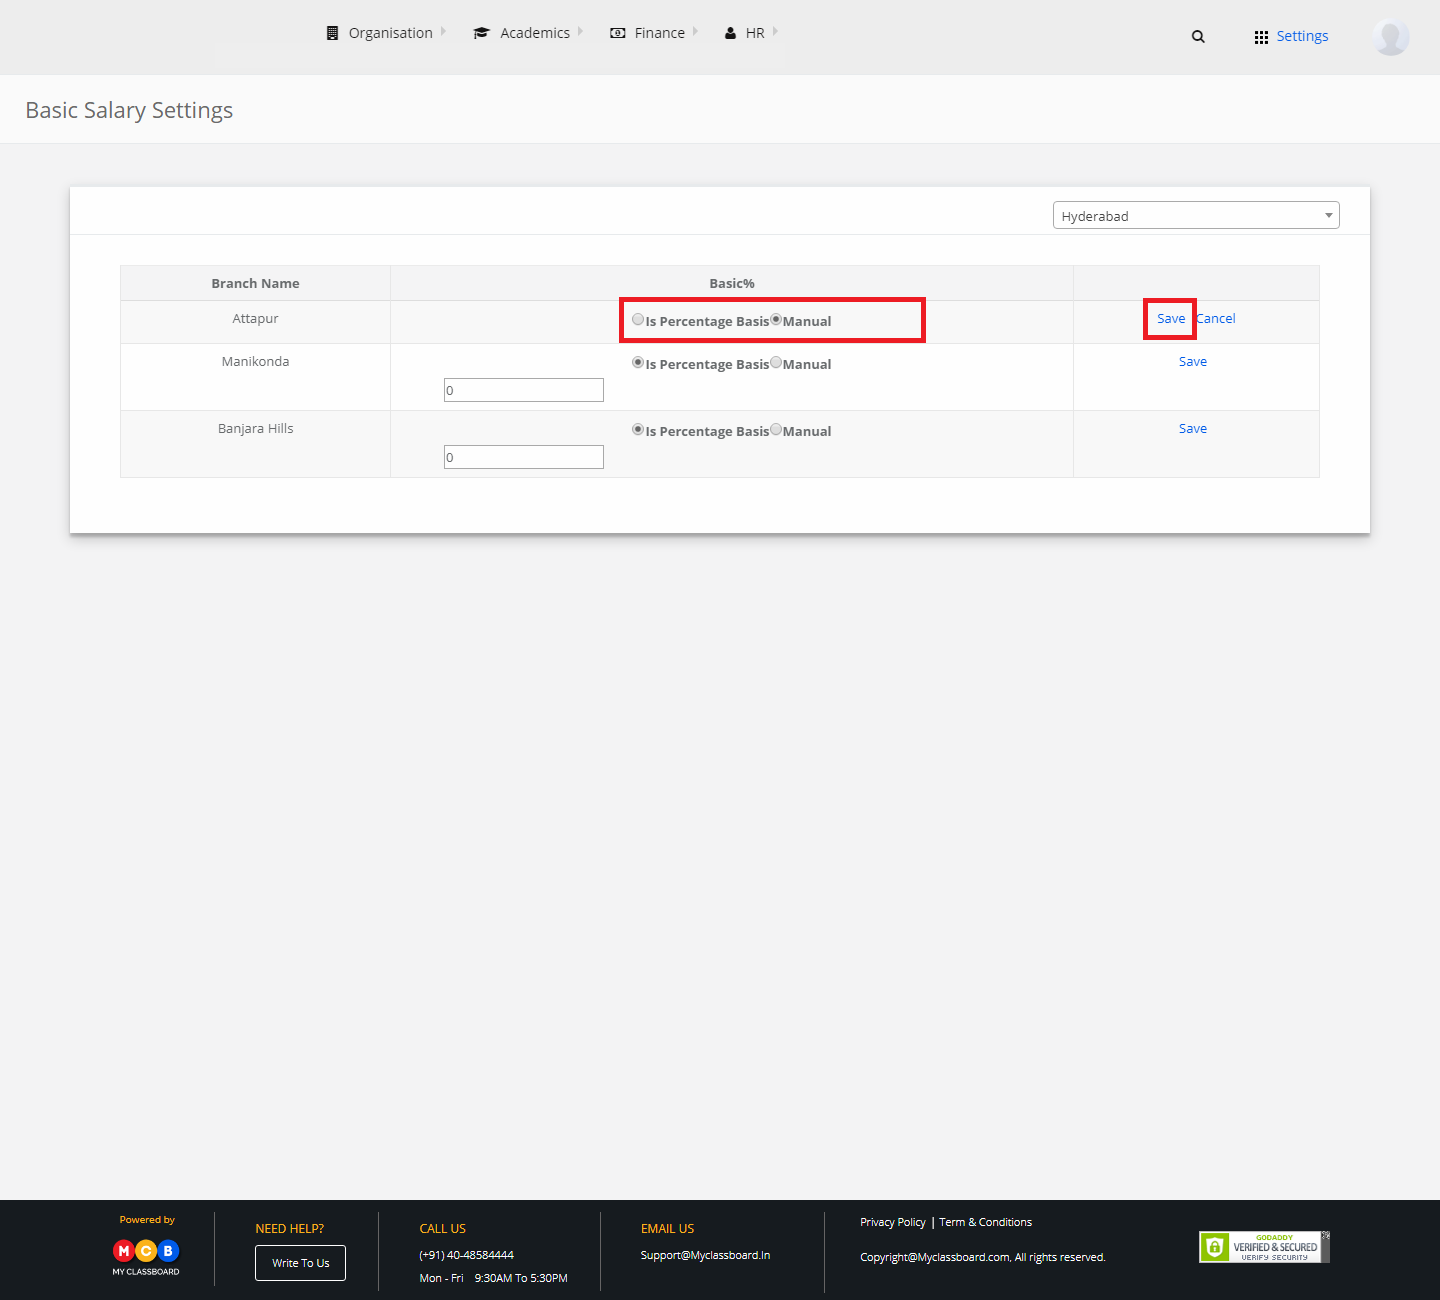
Step 3: Select any branch. Choose Percentage Basis/Manual. If Percentage, enter the percent and click on Save.

Step 4: If Manual, select Manual and click on Save.
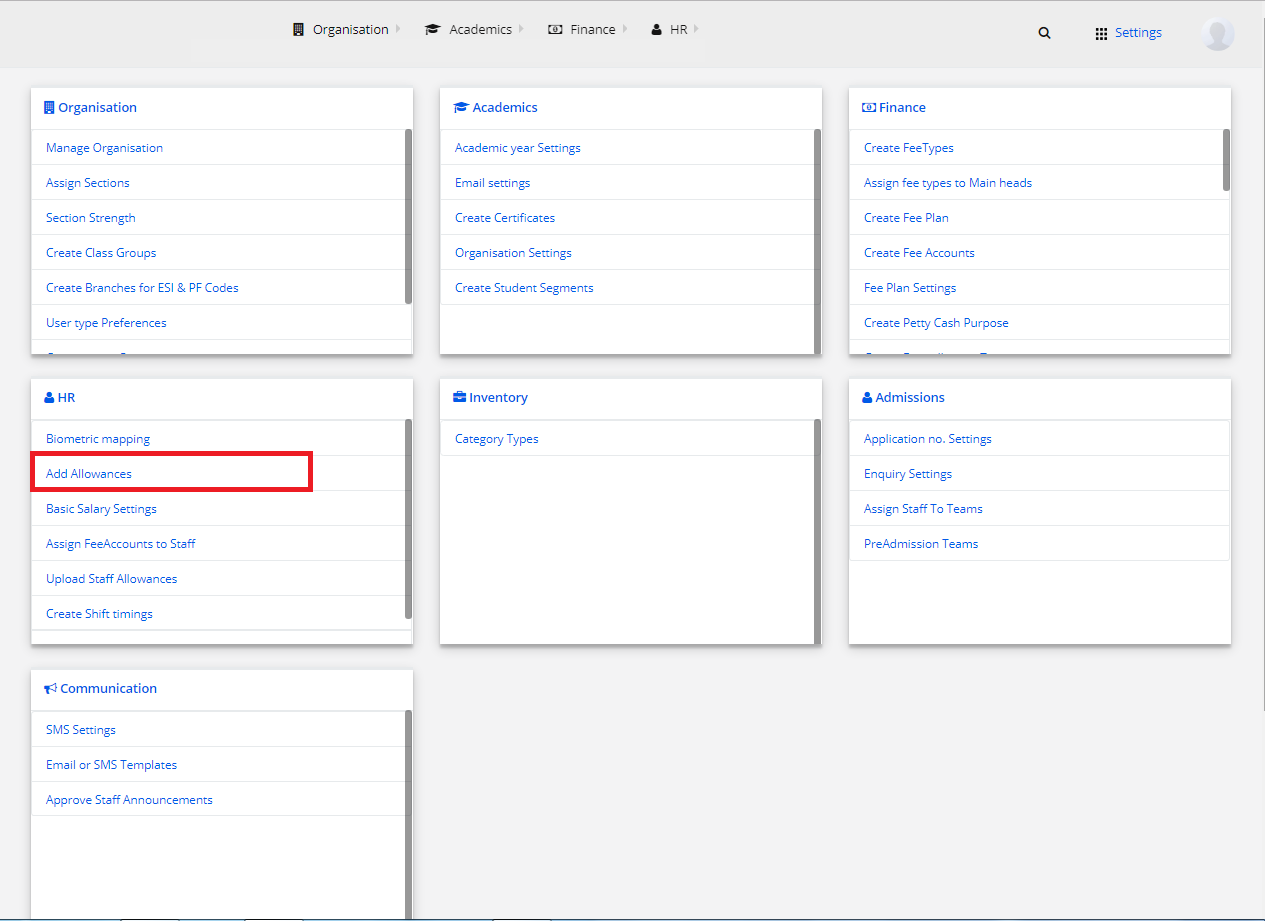
3) Add Allowances
Step 1: Select HR and click on “Add Allowances”.
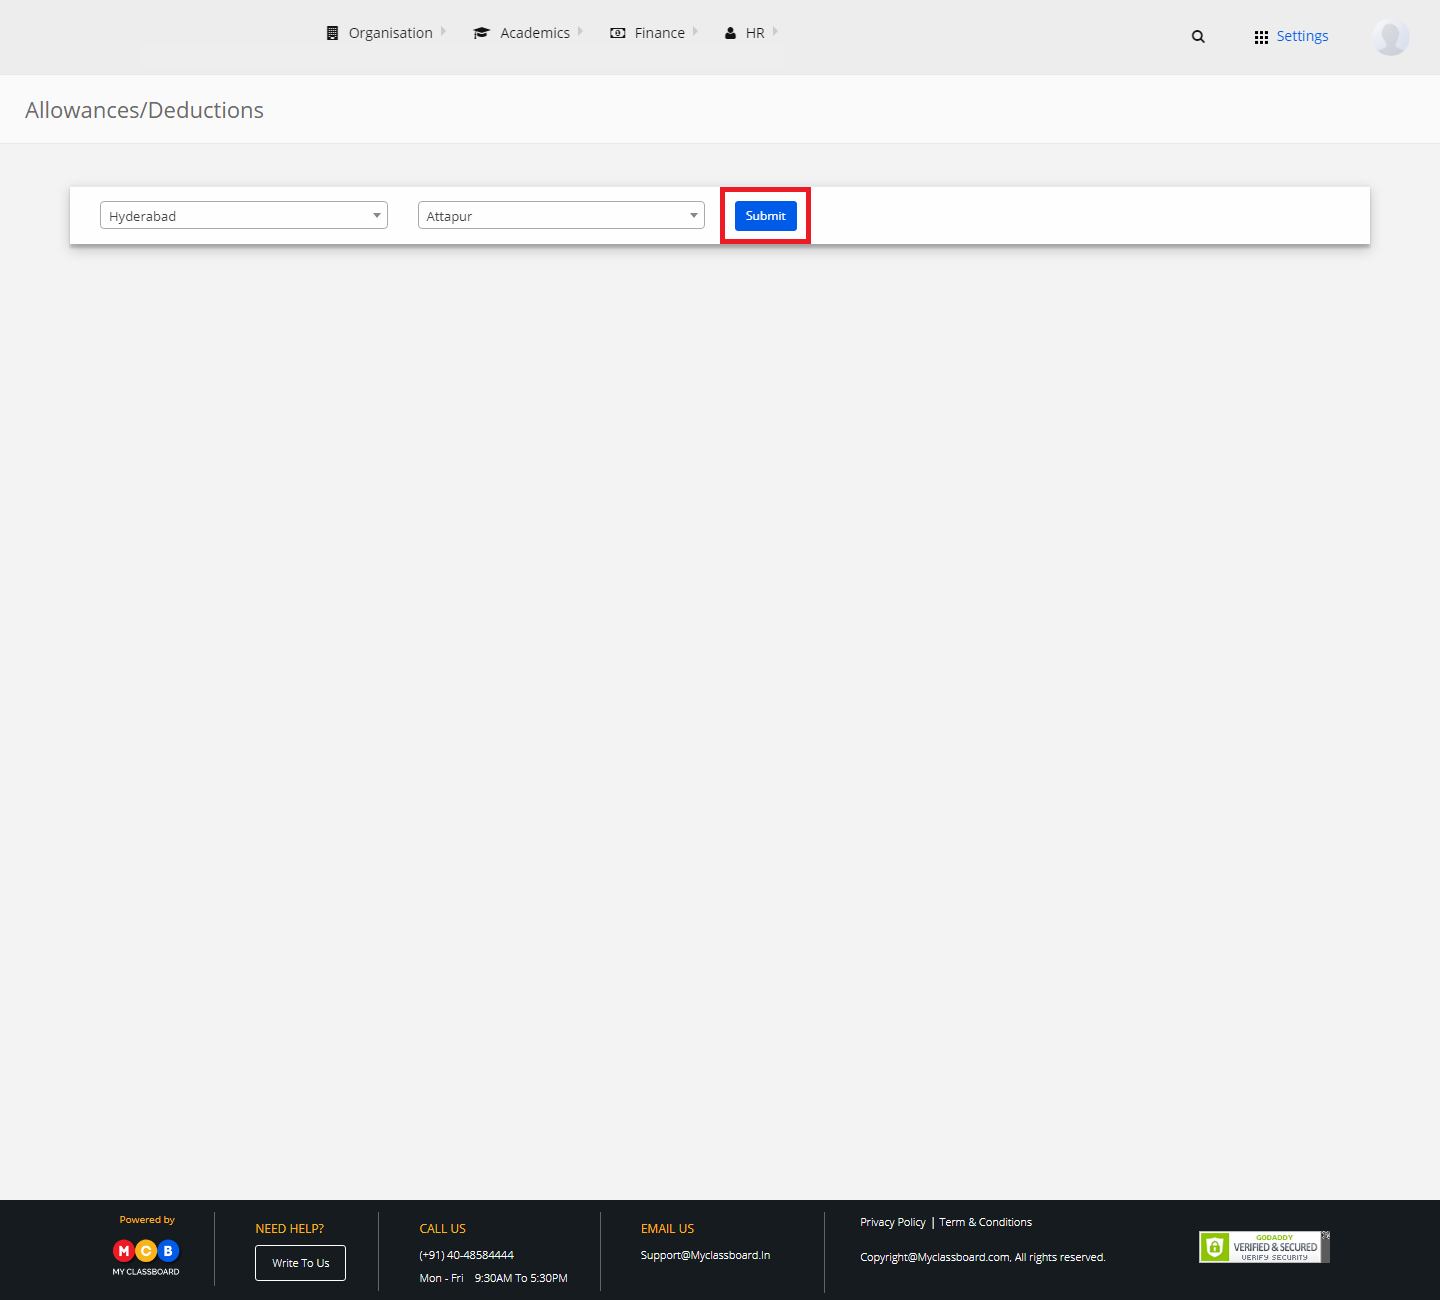
Step 2: Select Location, Branch and click on “Submit”.
Step 3: Click on “Create Allowance/Deductions”.
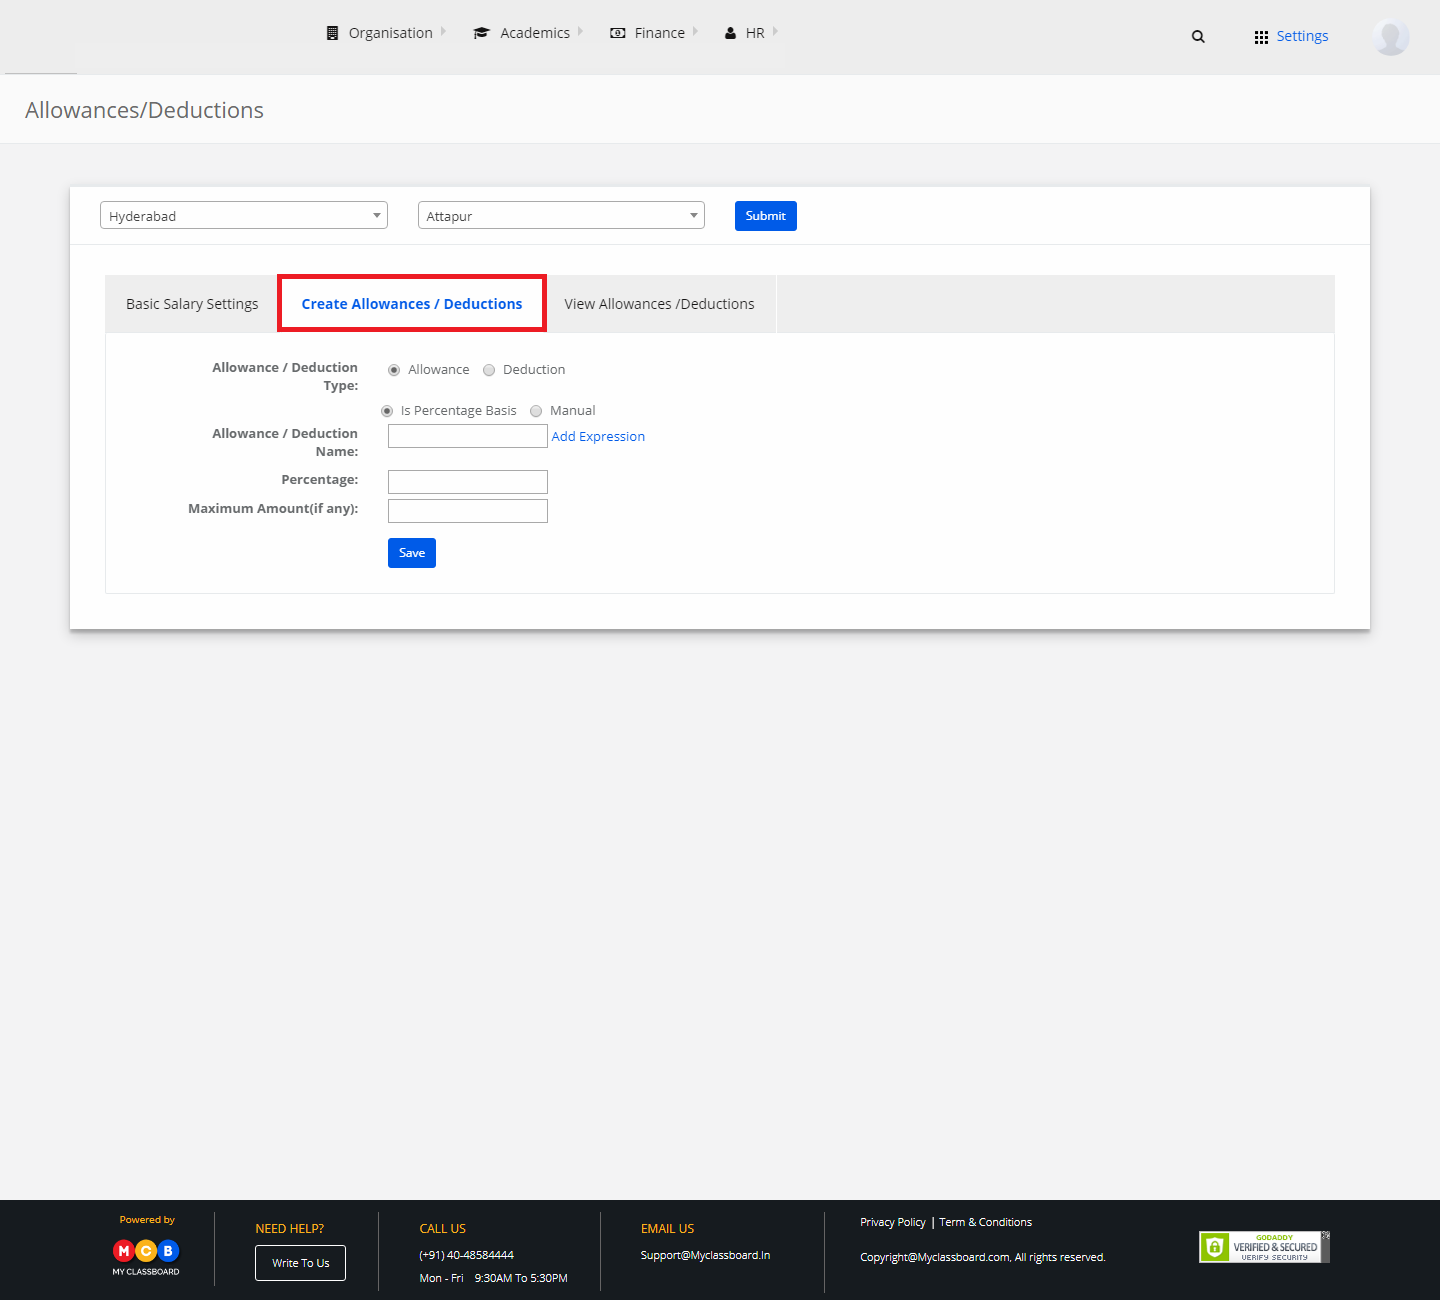
Step 4: Choose the required options here to calculate the Allowance/Deductions. After giving the appropriate info, click on “Save”.
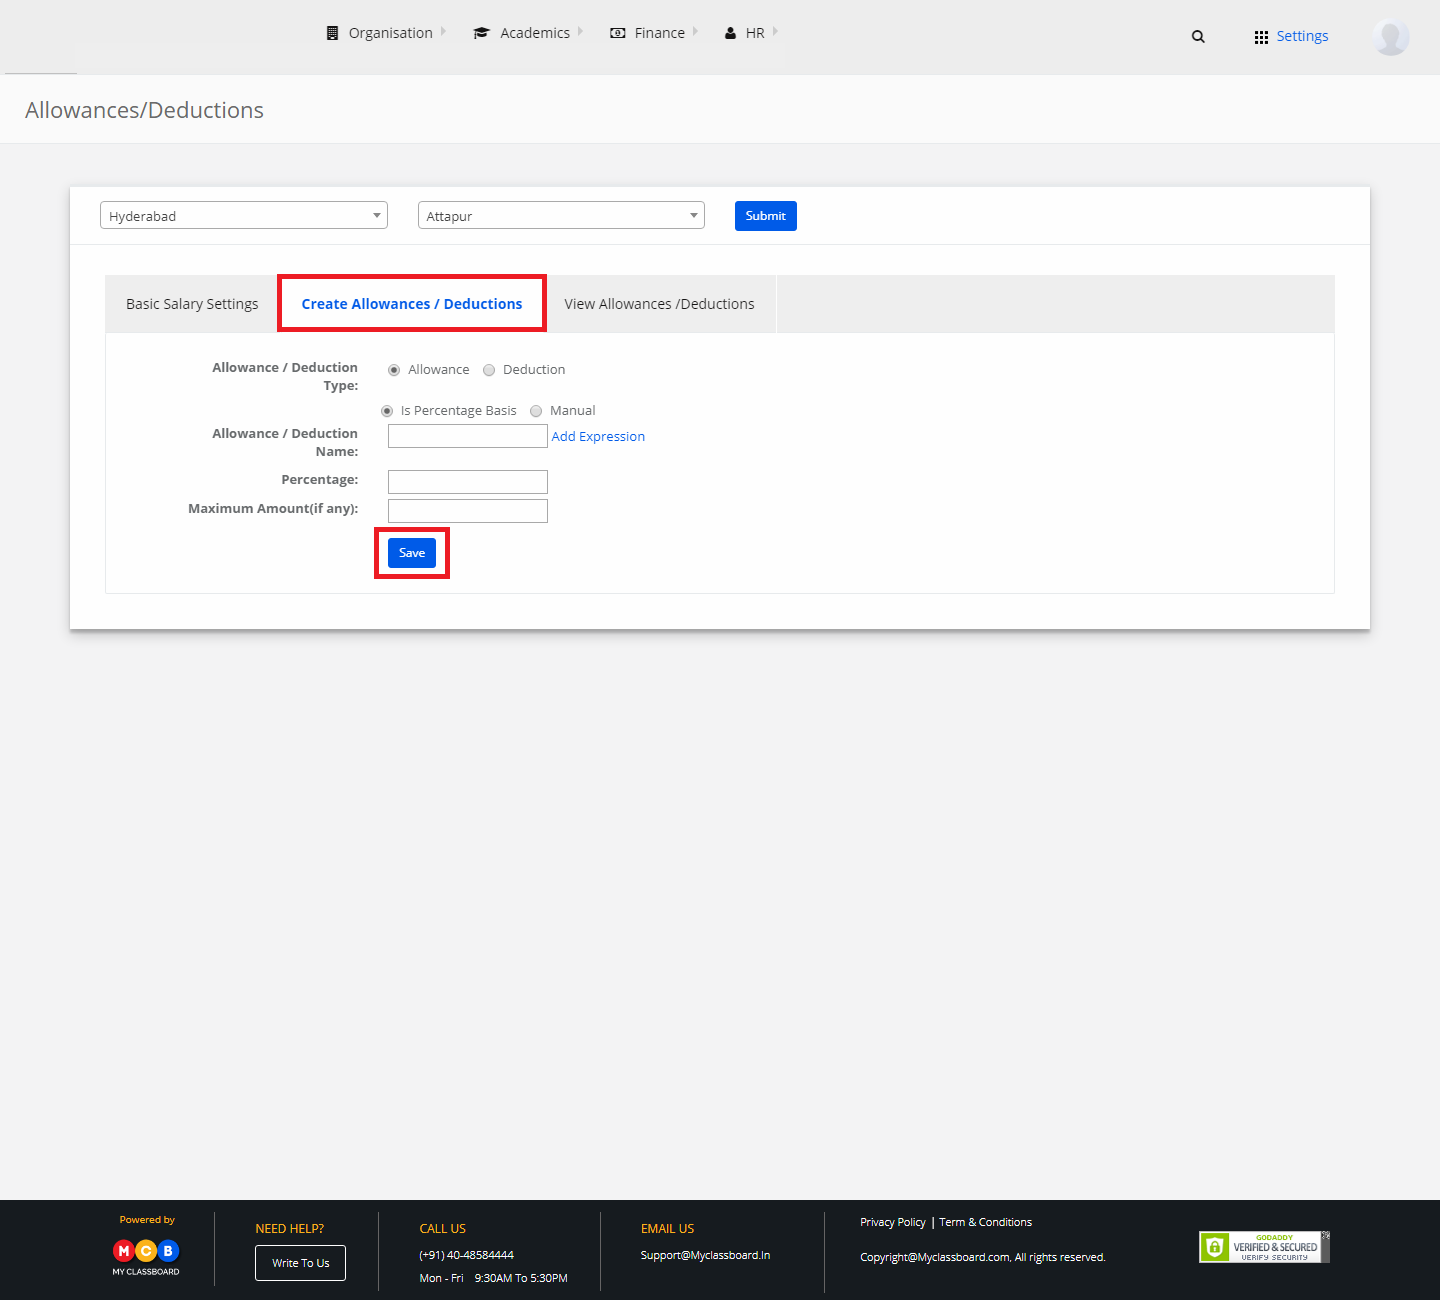
Step 5: The Allowances/Deductions to be calculated are successfully added.
4) Assign Fee Accounts to staff
Step 1: Choose HR and click on “Assign Fee Accounts to staff”.
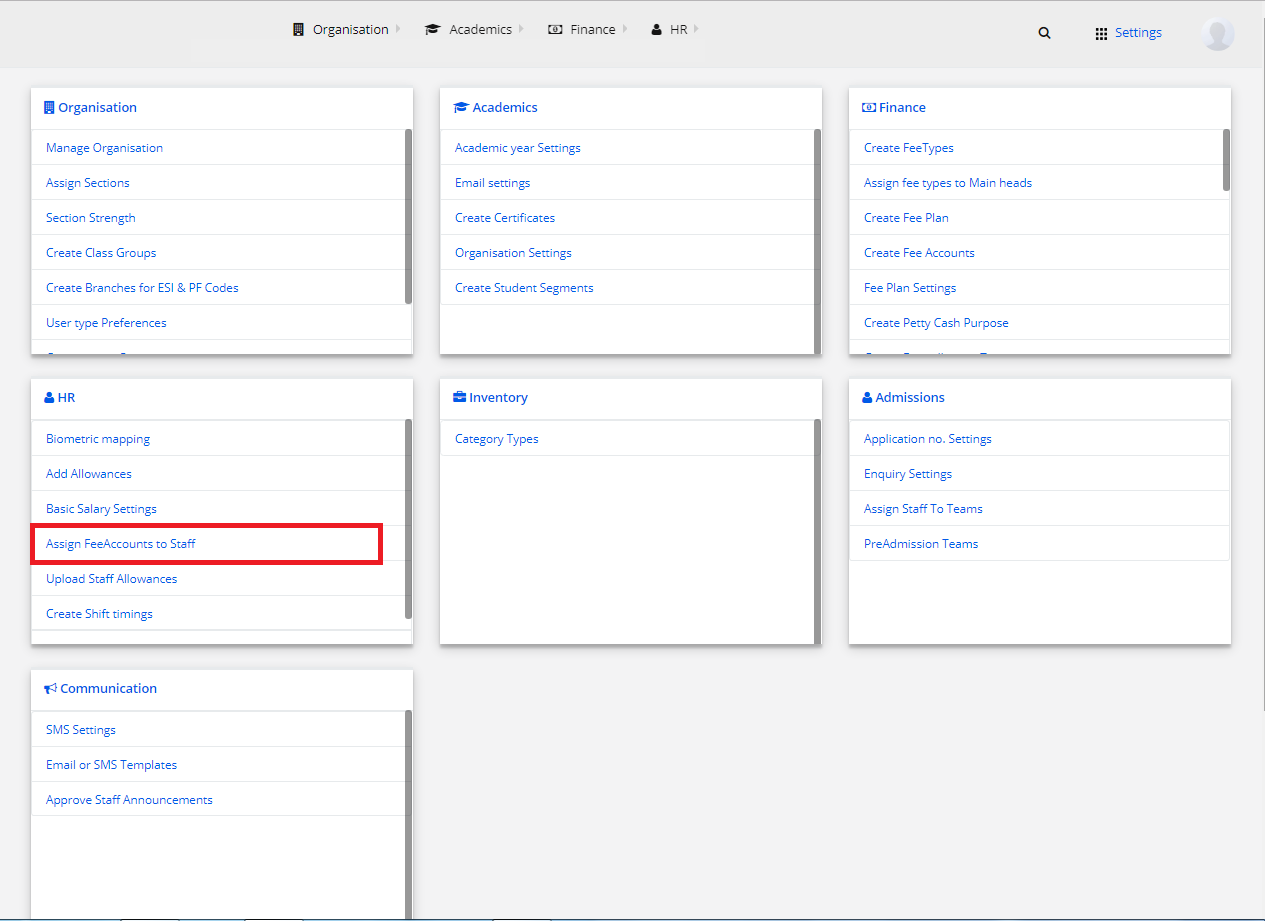
Step 2: Select Location, Branch.
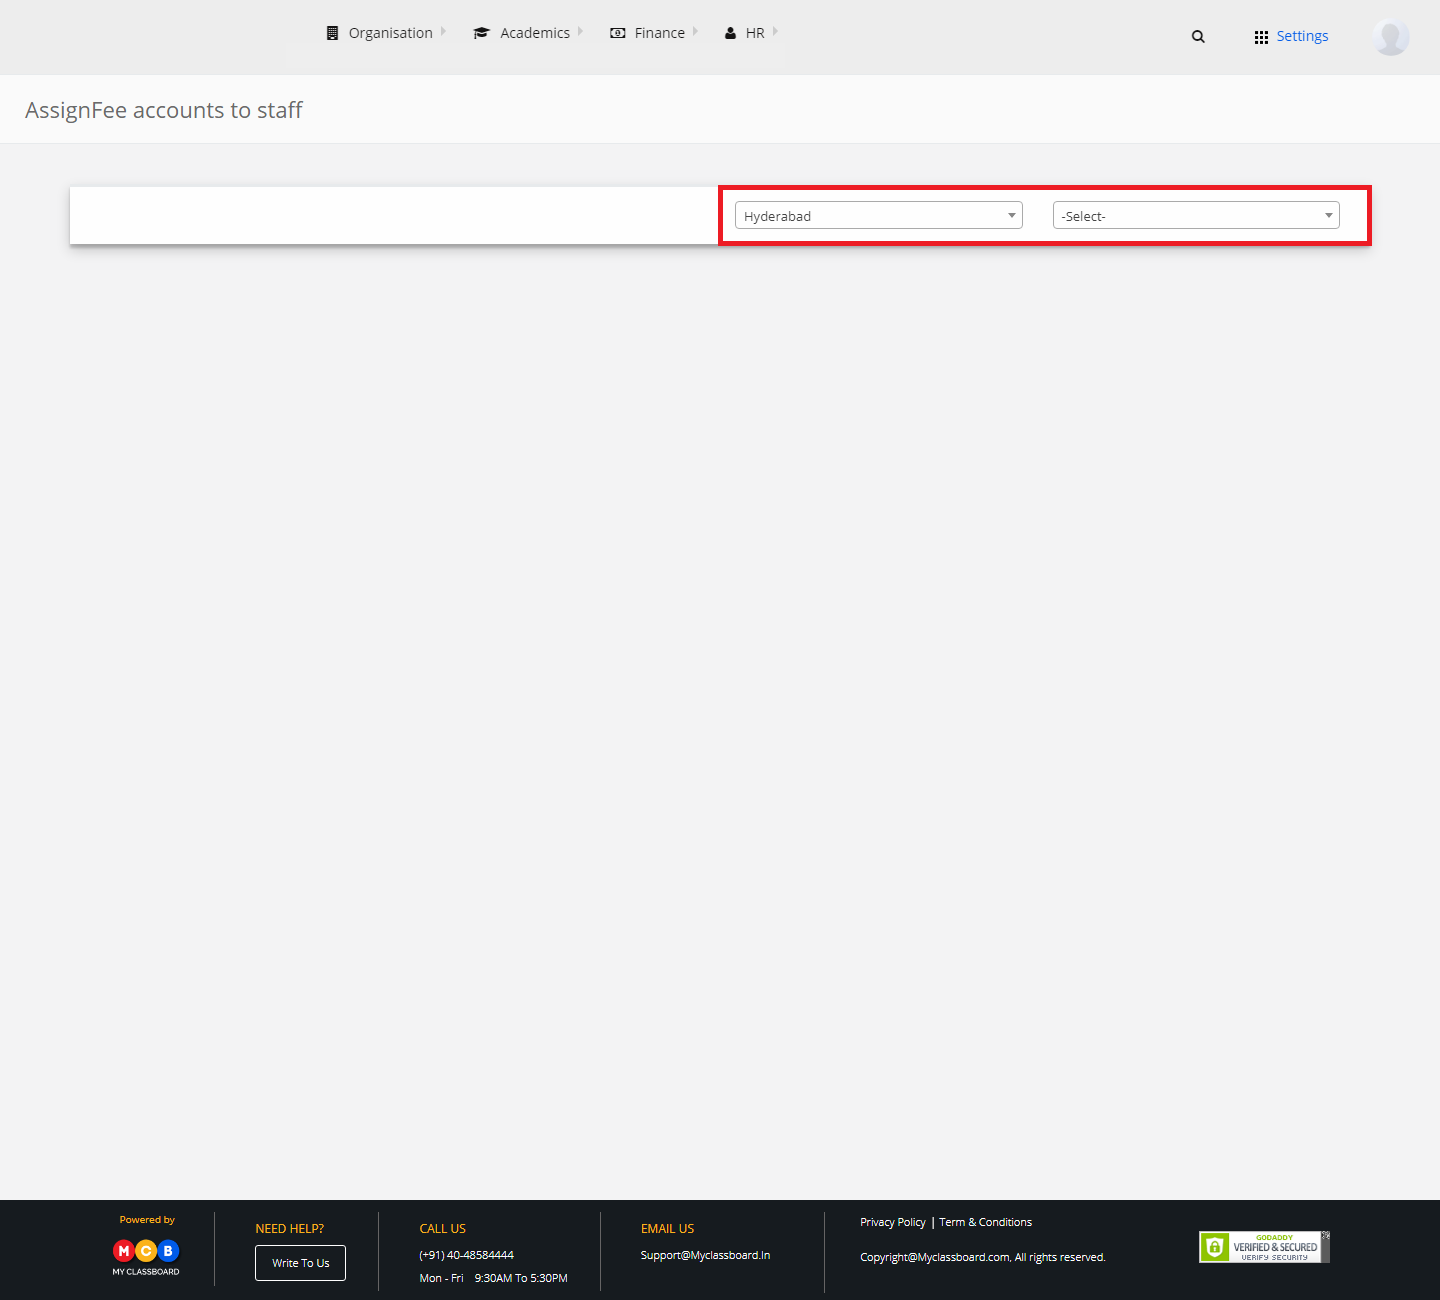
Step 3: Select the “Fee Account” from the drop-down for each staff. Upon selection, click on “Assign”.
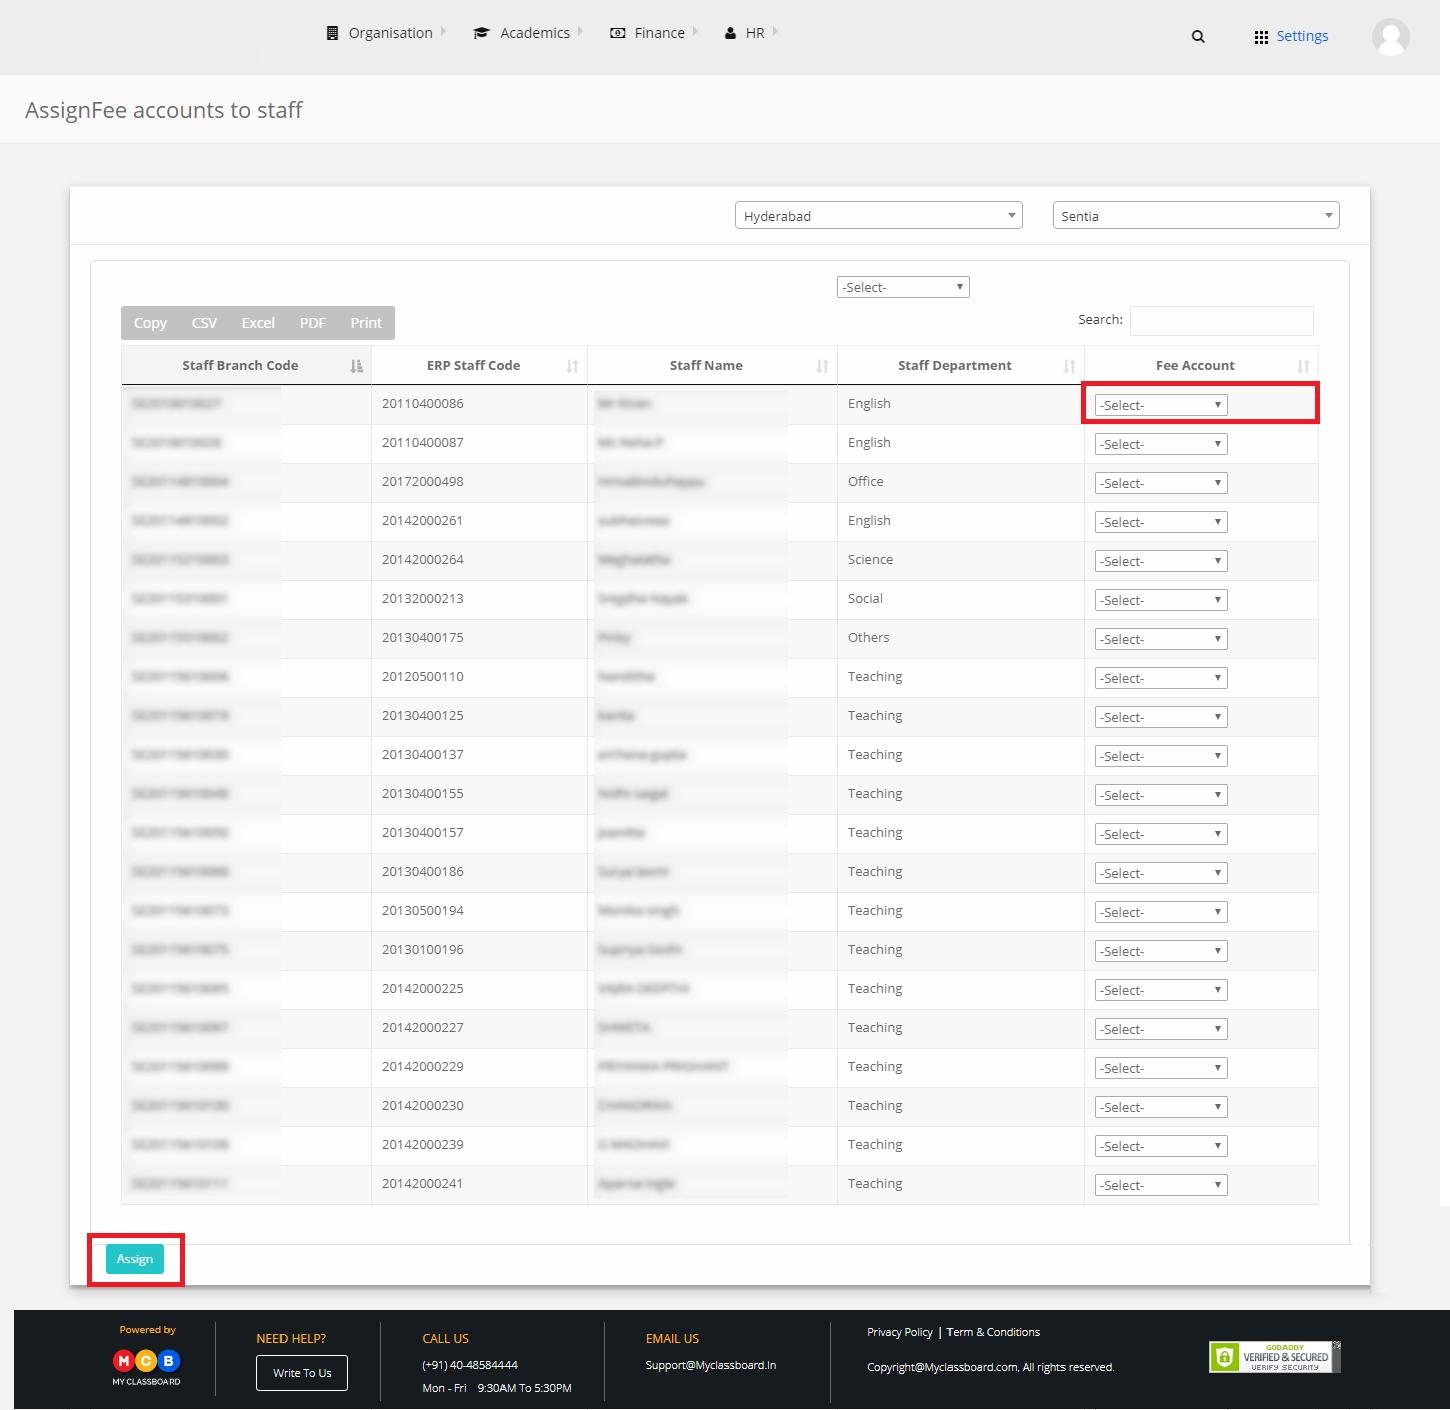
Step 4: The fee accounts are successfully assigned to the staff.
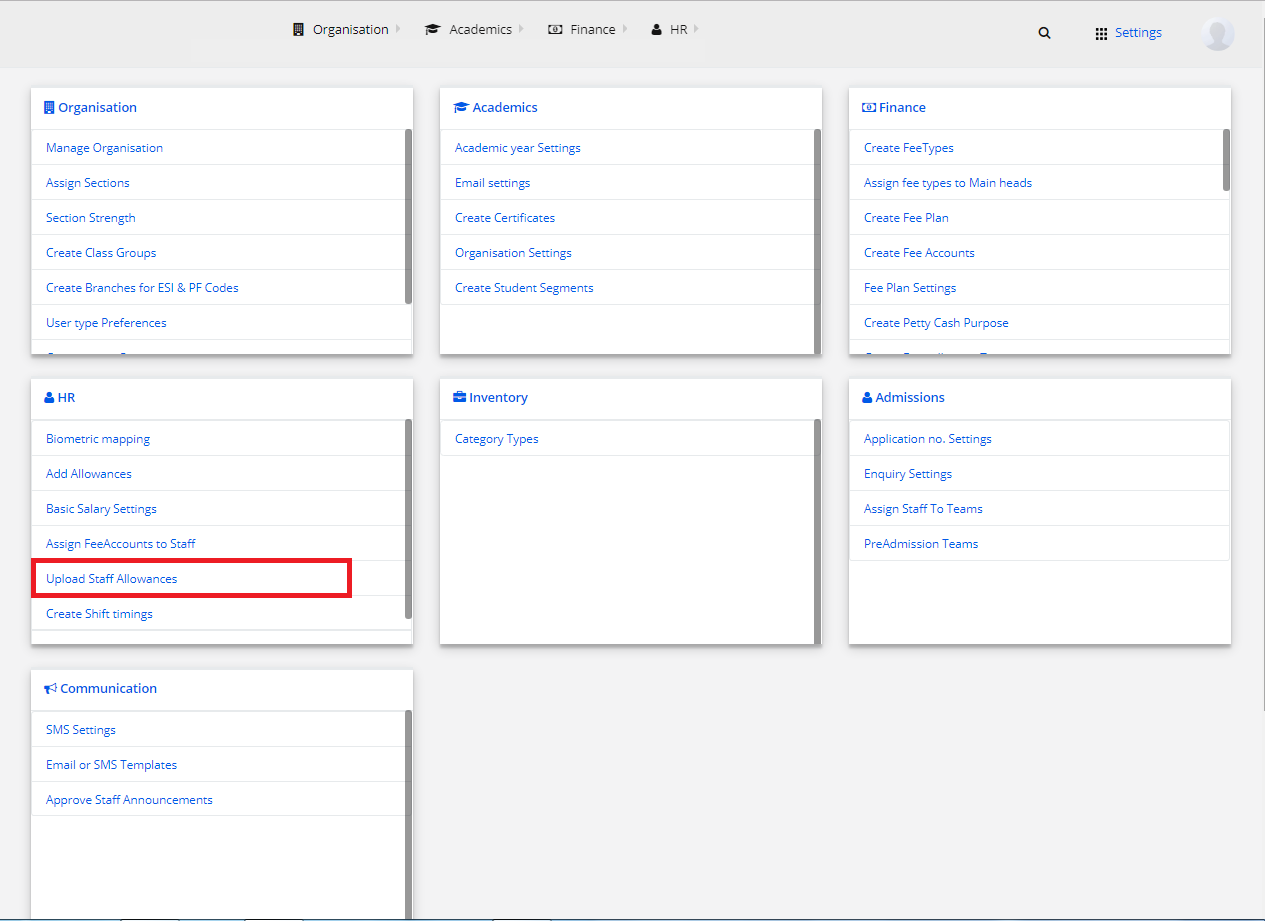
5) Upload Staff Allowances
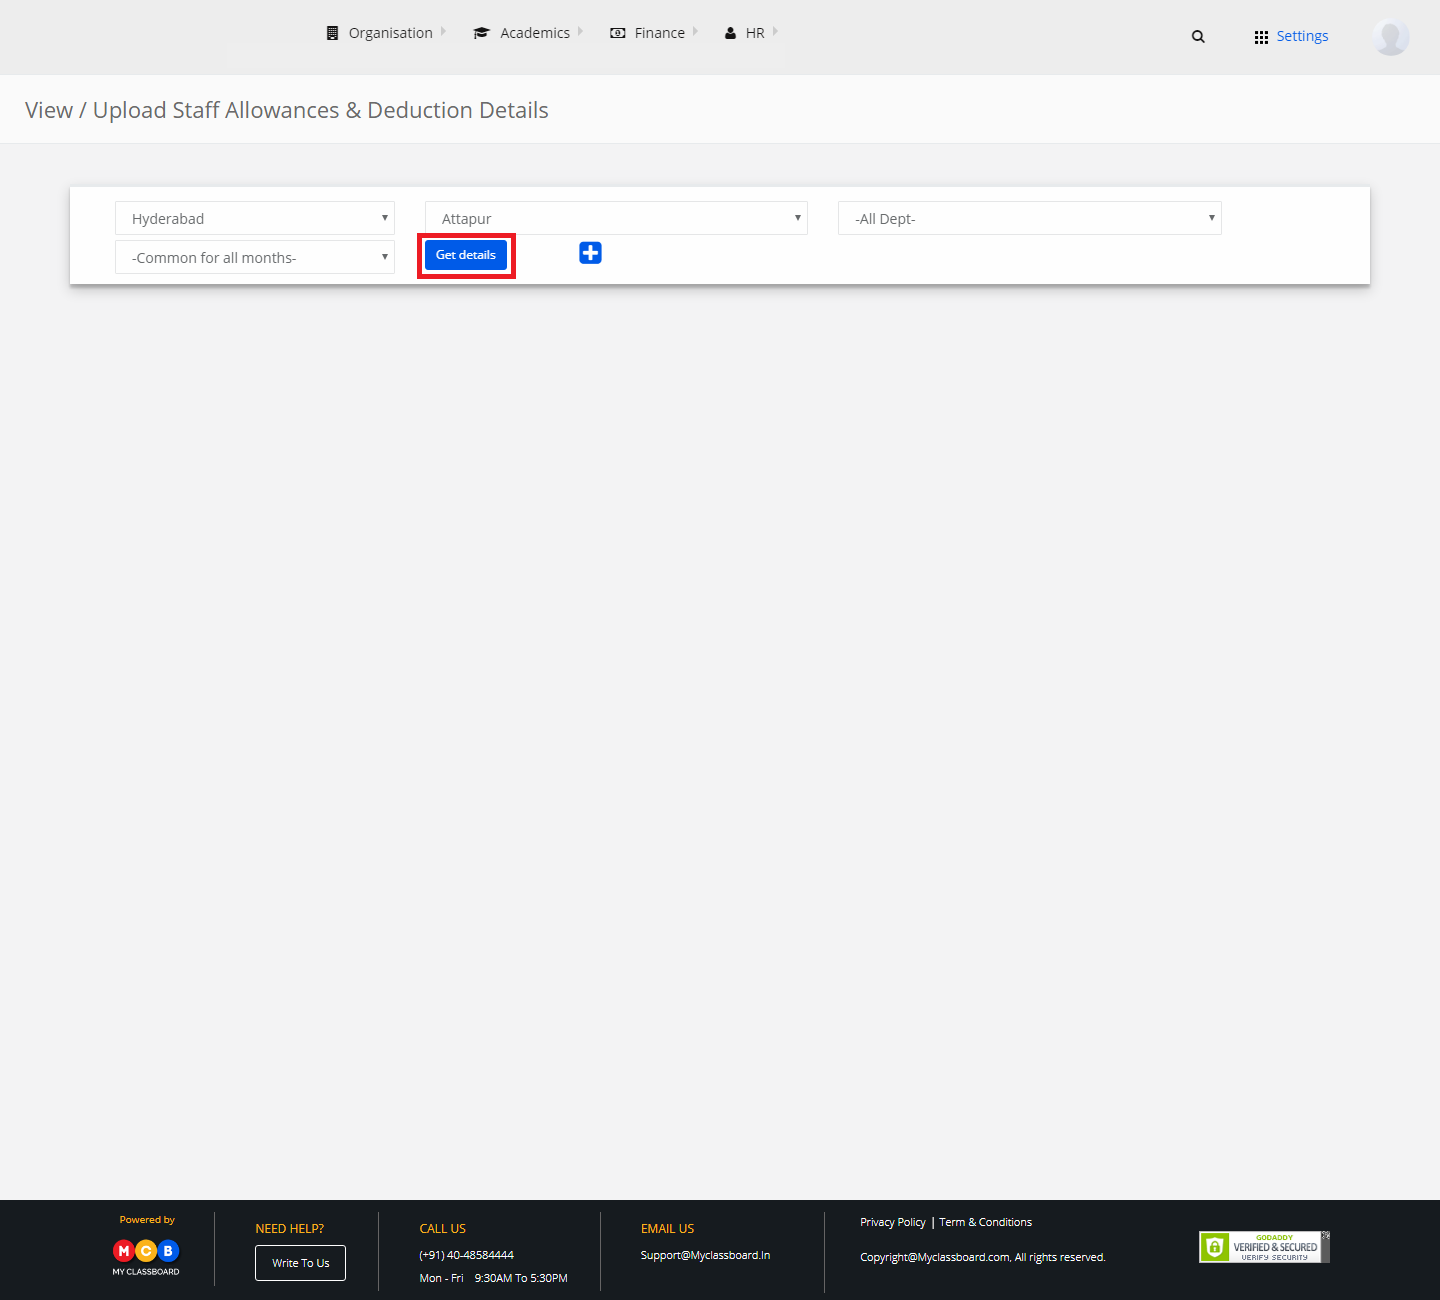
Step 1: Choose HR and click on “Upload Staff Allowances”.
Step 2: Select Location, Branch, Department and click on “Get Details”.
Step 3: Select “Upload staff allowance/deduction amount”. Choose a .CSV file containing the staff allowances and upload.
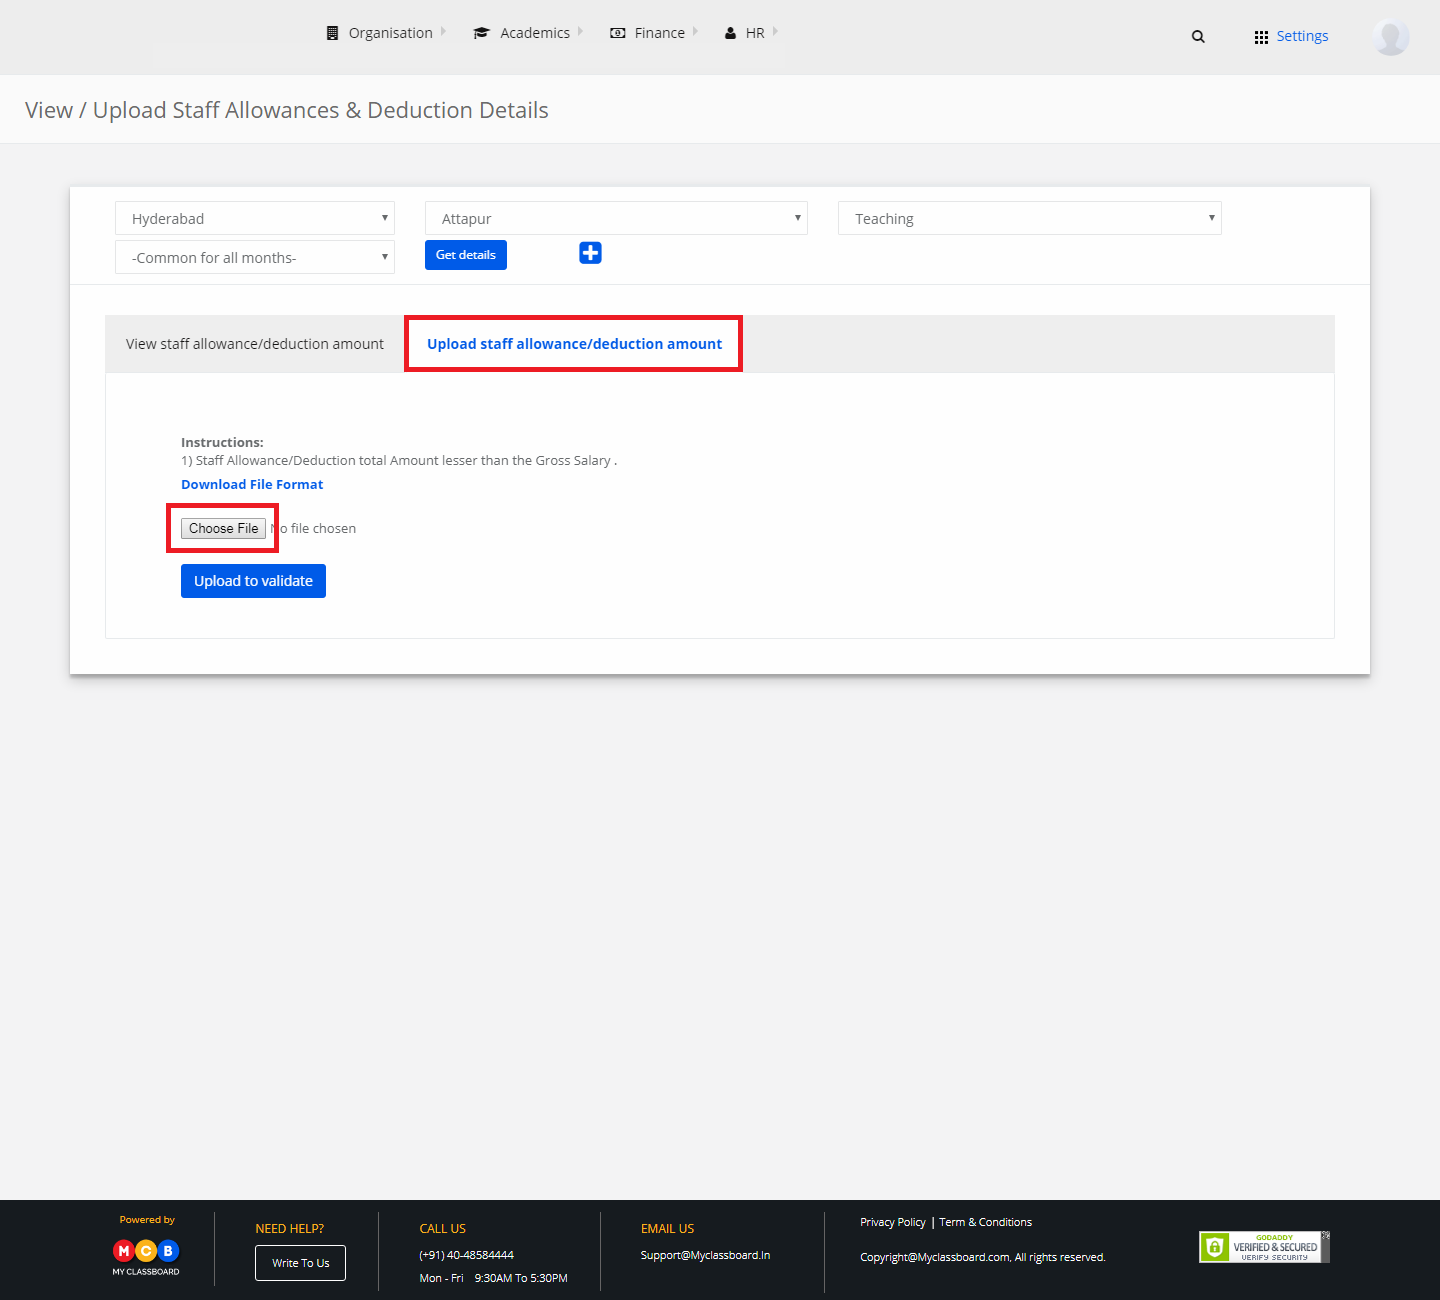
Step 4: Click on “Upload to Validate”. The file is uploaded successfully.

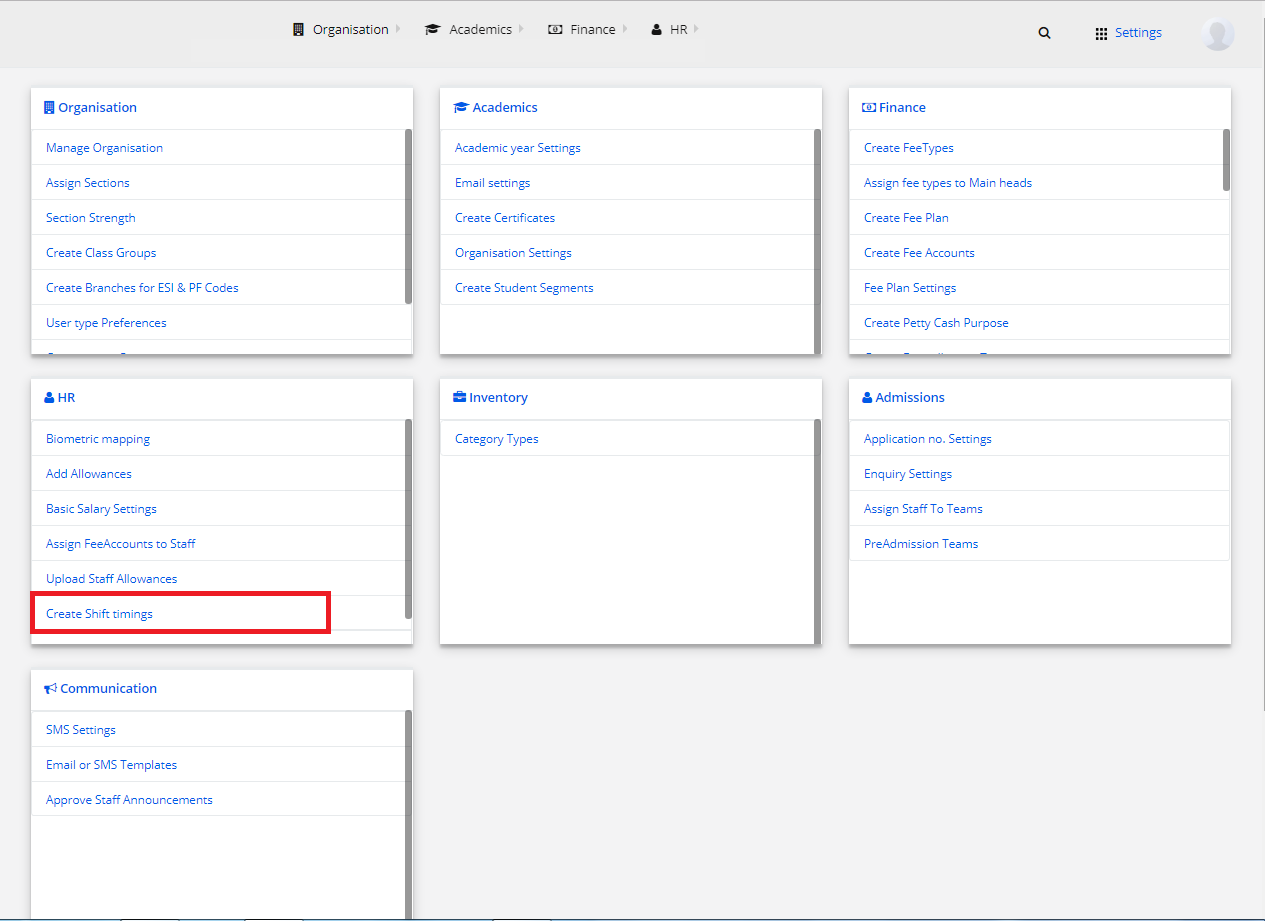
6) Create Shift Timings
Step 1: Choose HR and click on “Create Shift Timings”.
Step 2: Click on “Create Attendance Shift”.
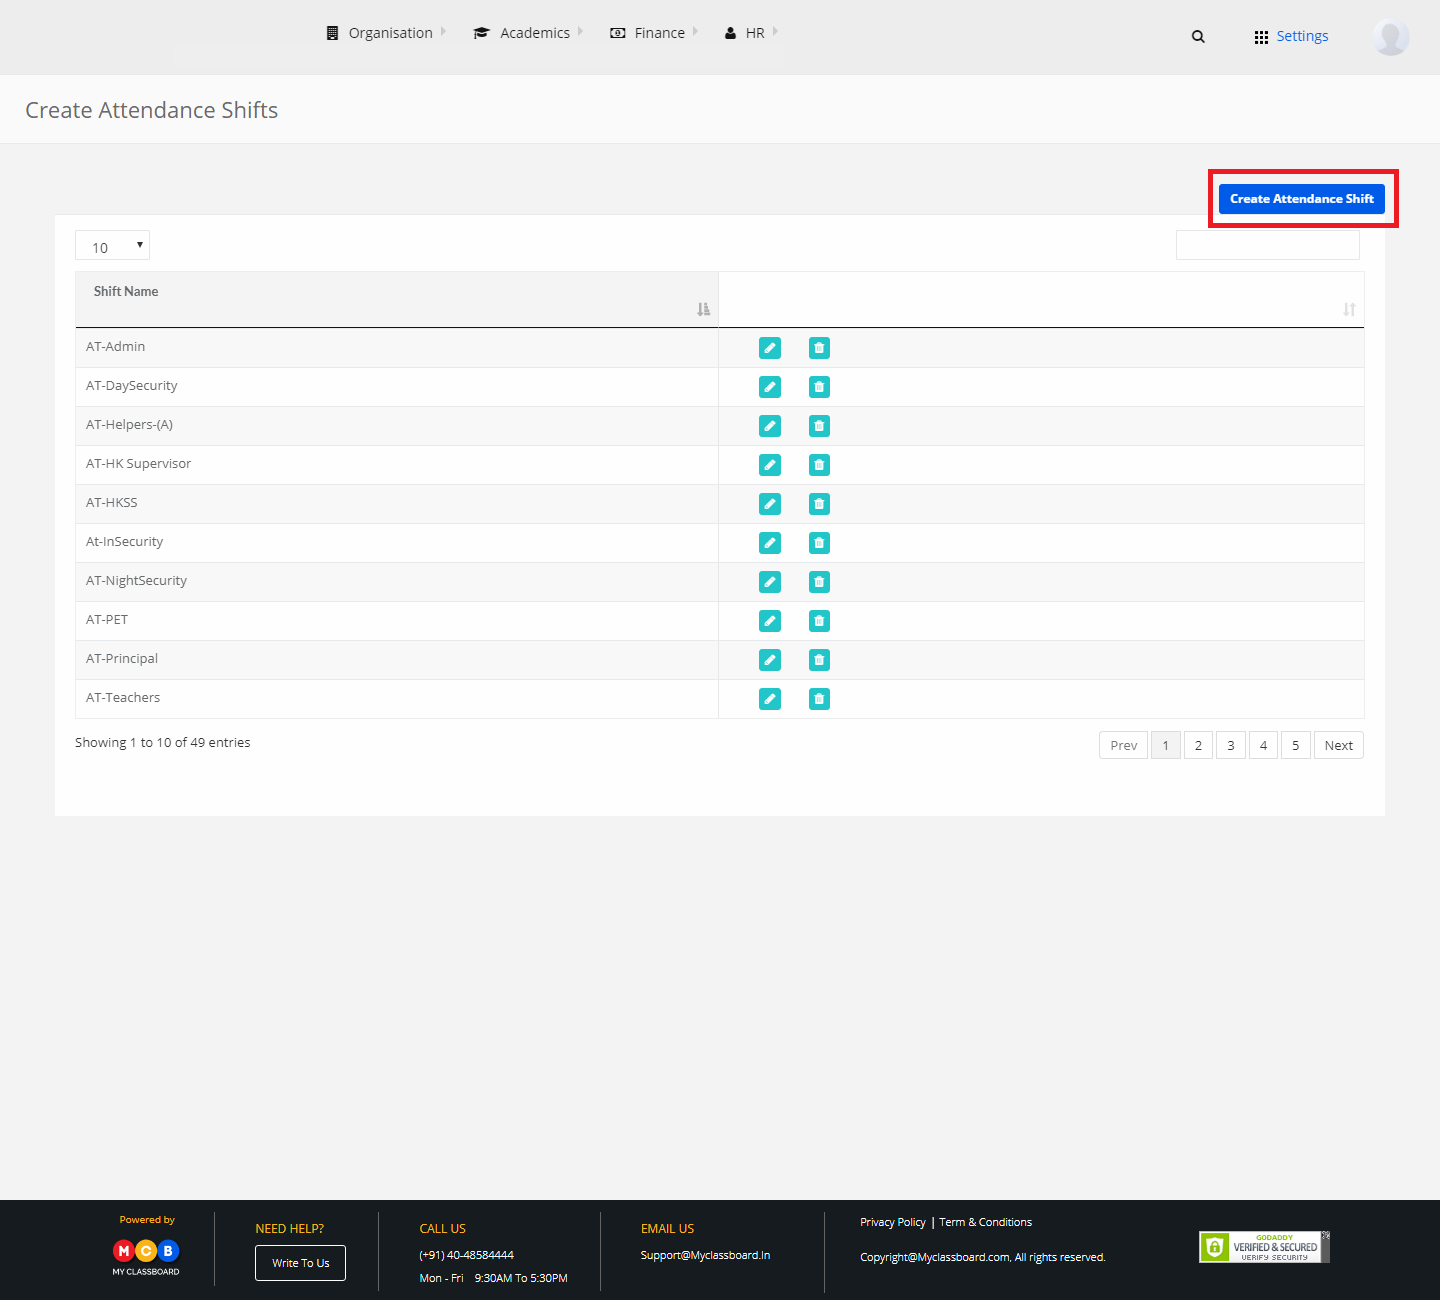
Step 3: Name a Shift and click on “Save” button. The Staff Attendance Shift is created successfully.

Stage 7: Admissions
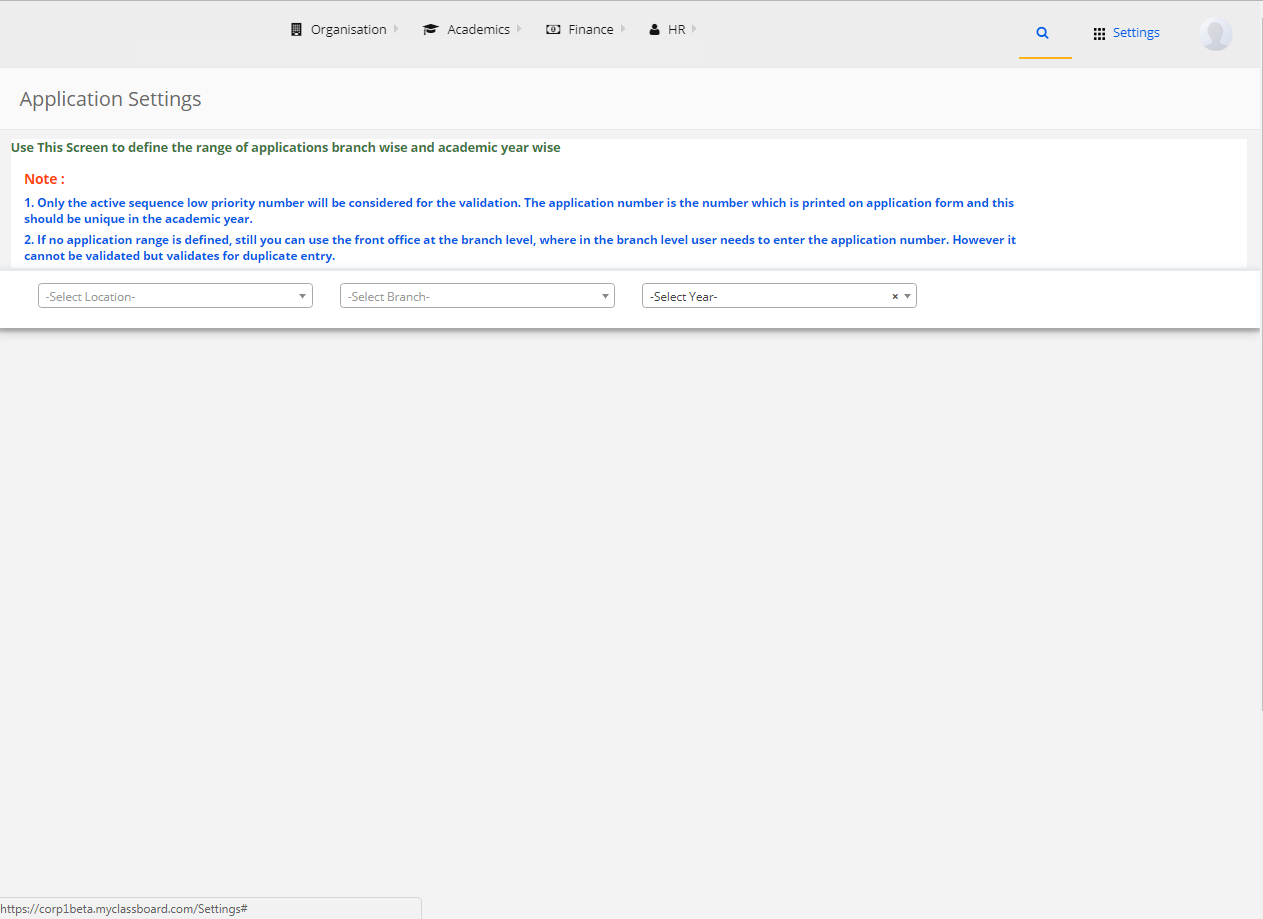
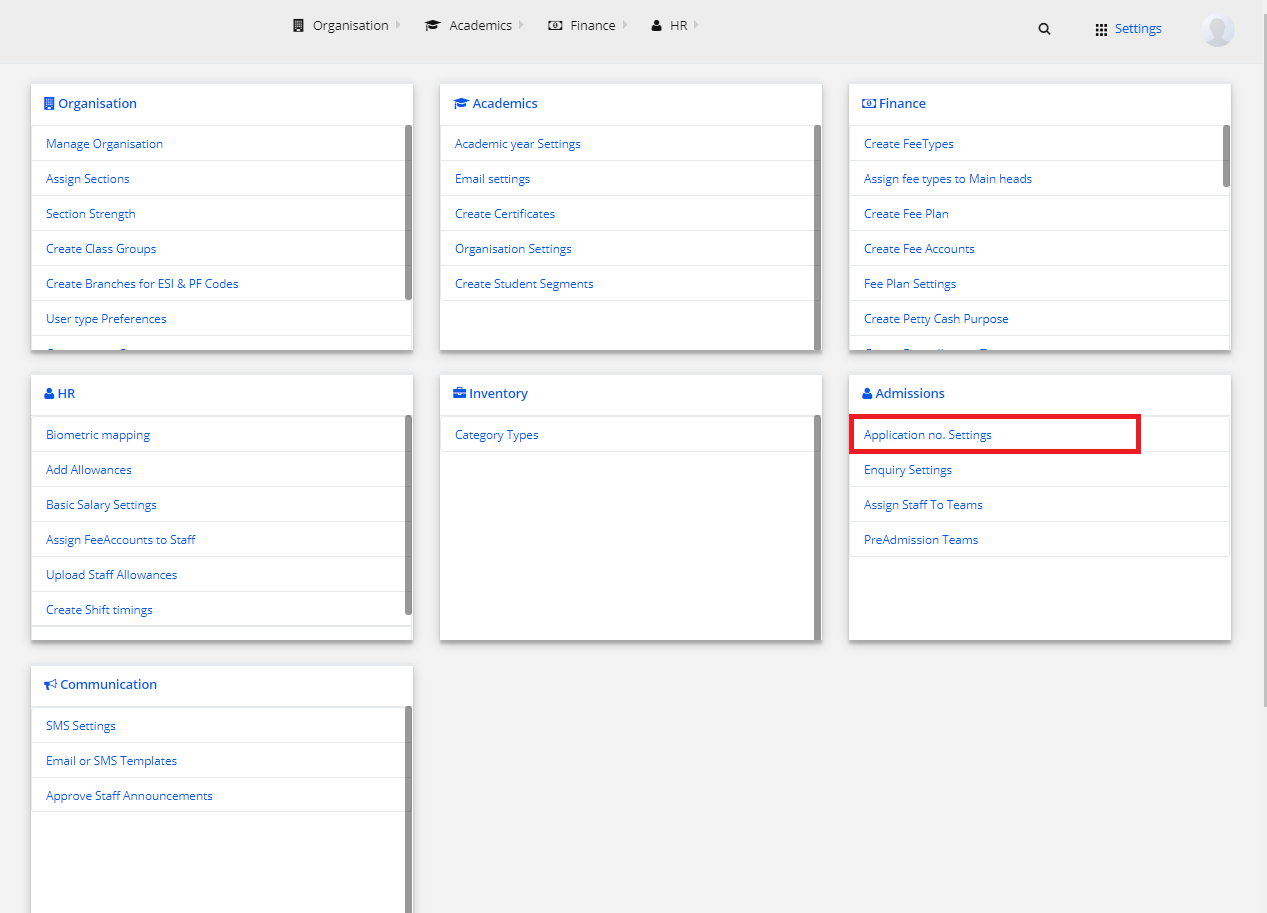
1) Application Settings
Step 1: Select Admissions and click on “Application Settings”.

Step 2: Select Location, Branch, Year.
Step 3: Click on “Create”.

Step 4: Enter the required details and click on “Save”. The application settings is created.
2) Enquiry Settings
Step 1: Select Admissions and click on “Enquiry Settings”.
Add List of Enquiry Sources
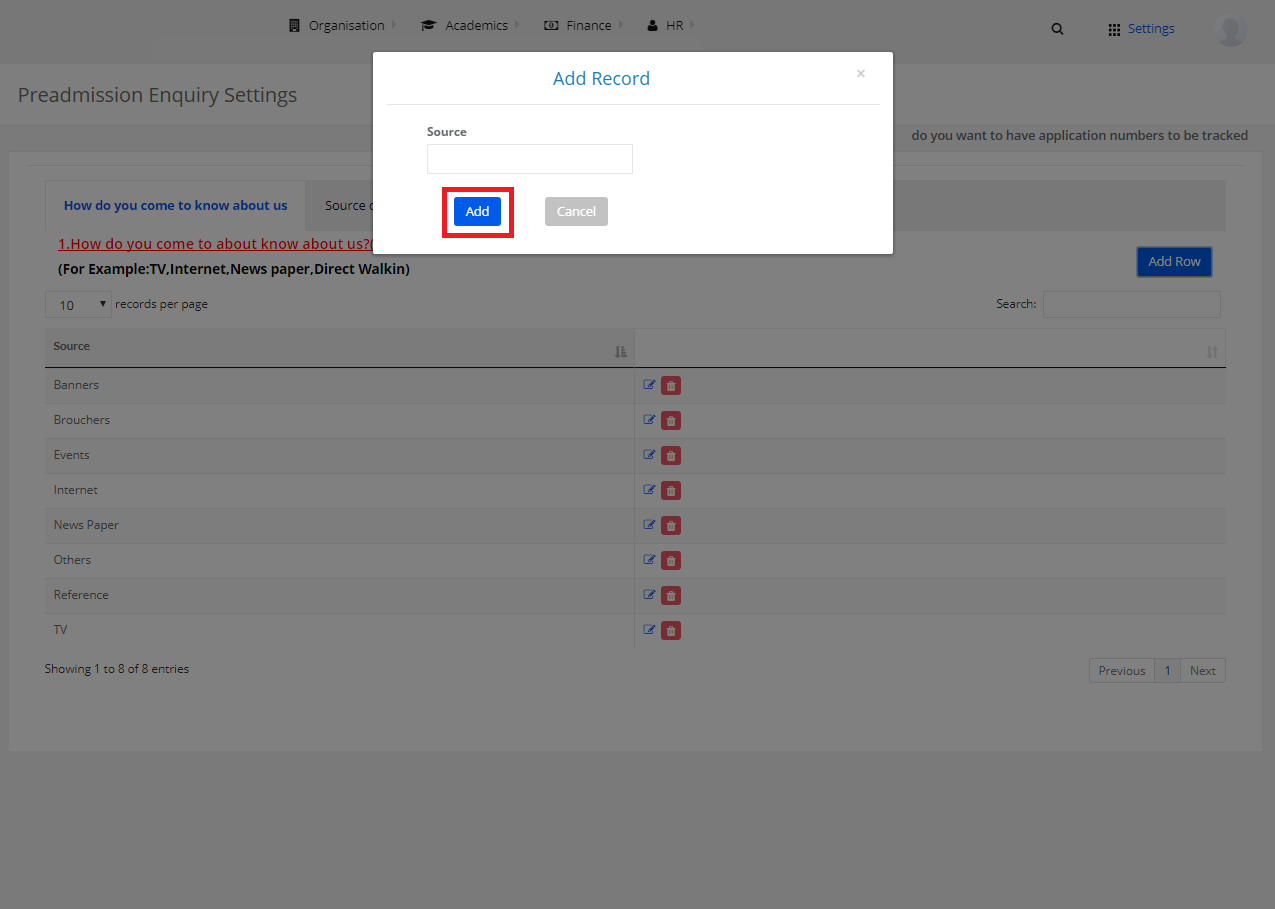
Step 2: Choose “How do you come to know about us” to add list of enquiry sources. Select “Add Row”.
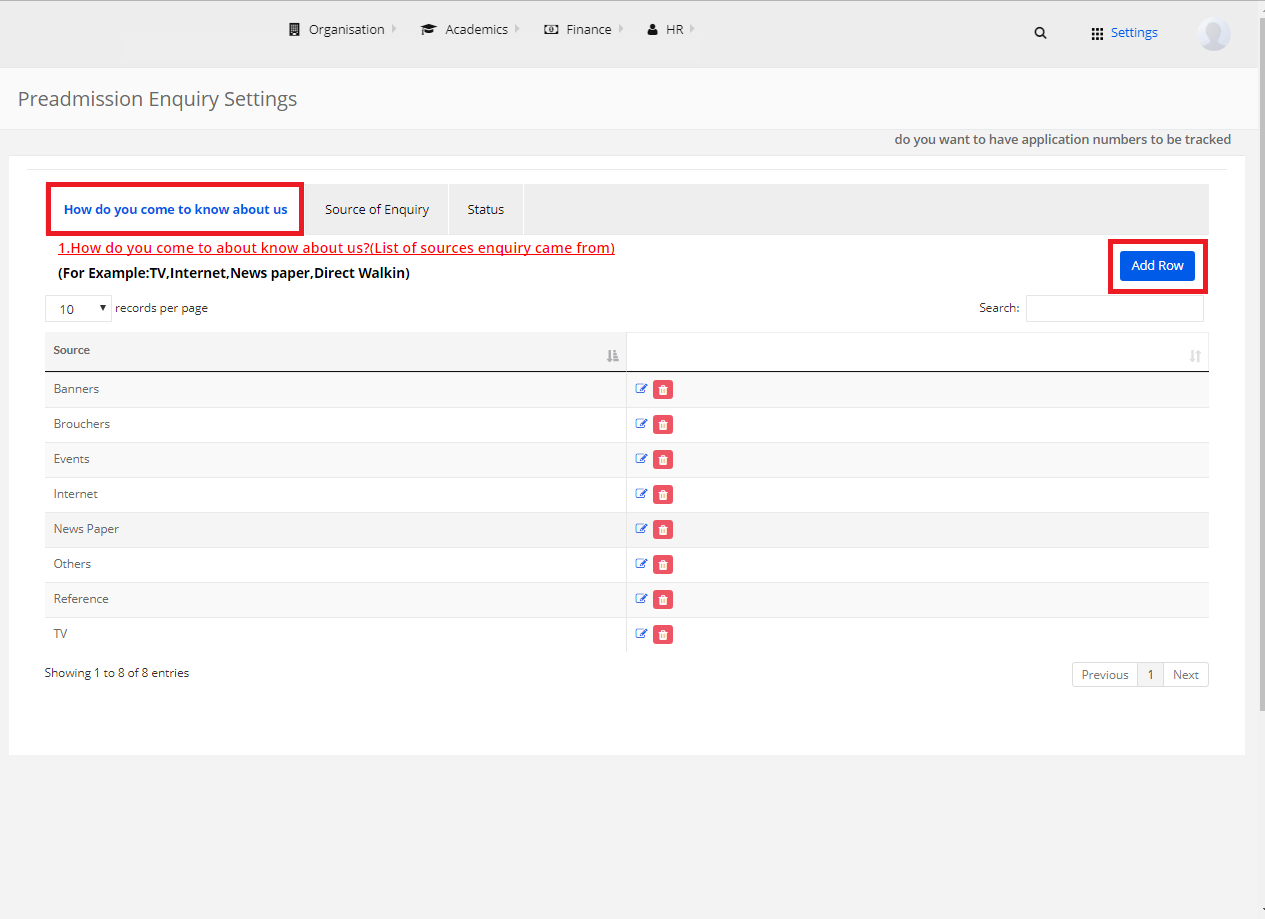
Step 3: Enter the source and click on “Add”. The enquiry source is successfully added to the list.
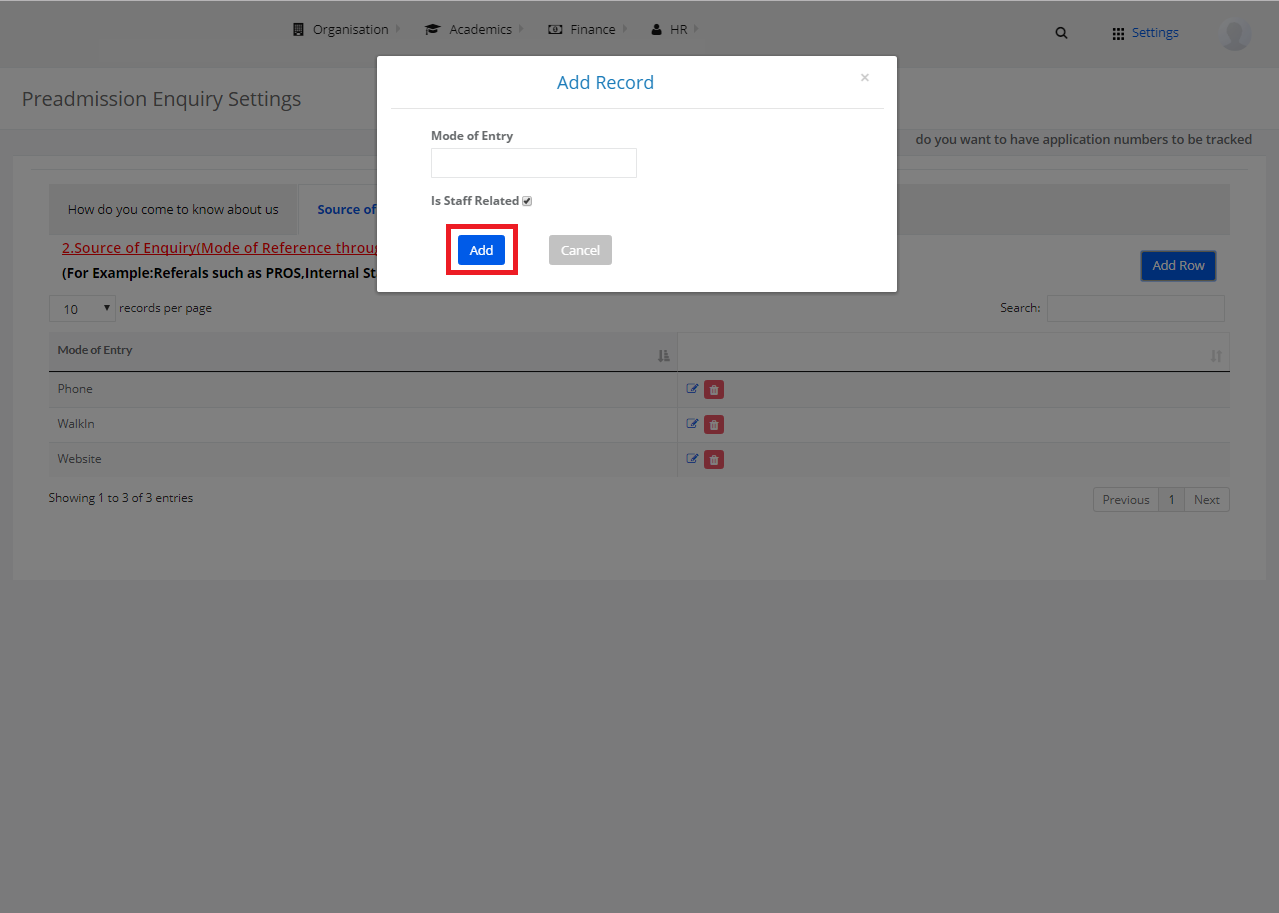
Source of Enquiry(Mode of Reference through which enquiry came from)
Step 4: Choose “Source of Enquiry” to add Mode of Reference through which an enquiry came. Select “Add Row”.

Step 5: Enter the Mode of Enquiry and click on Add. The new Mode of Enquiry is successfully added to the list.
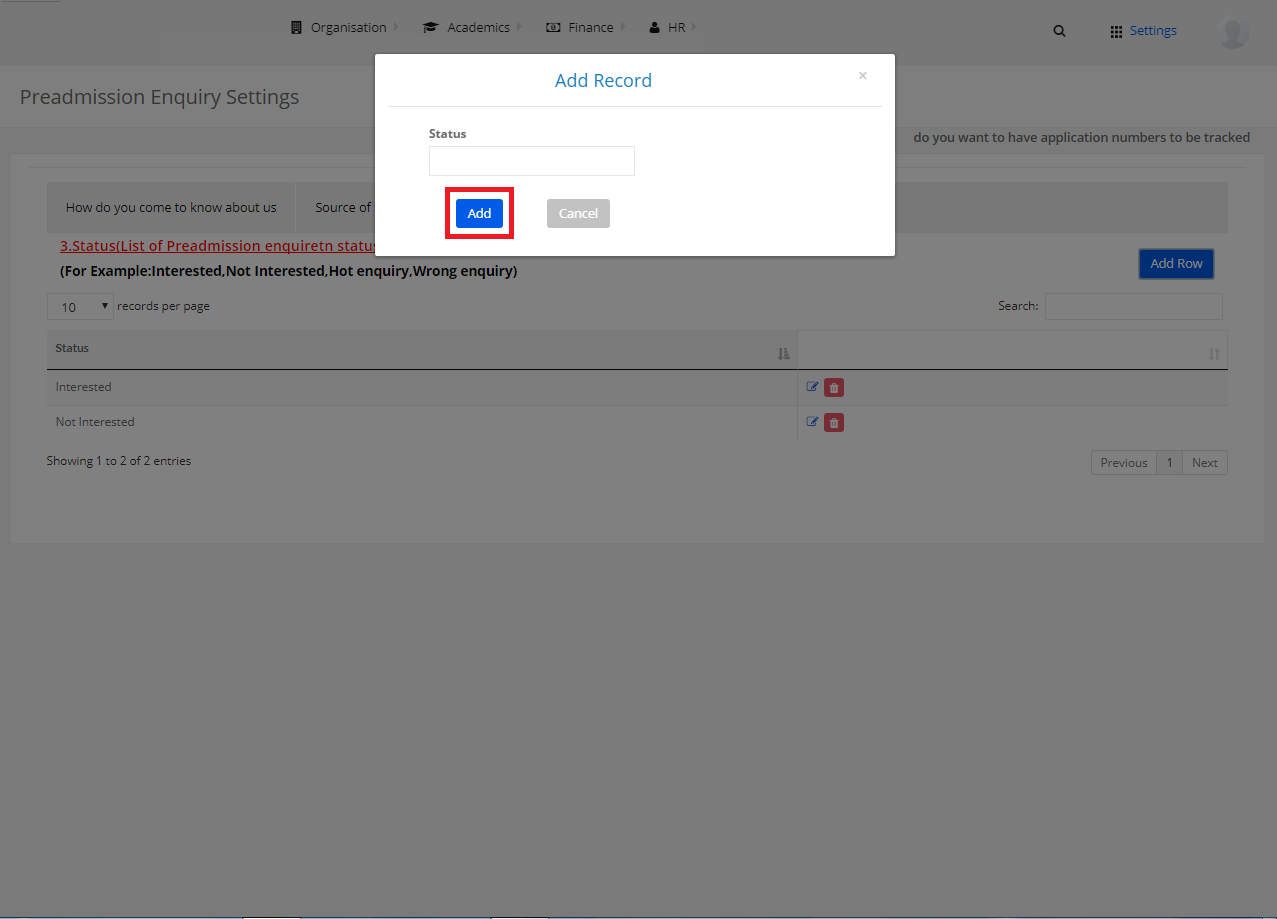
Status
Step 6: Choose “Status” and click on “Add Row”.
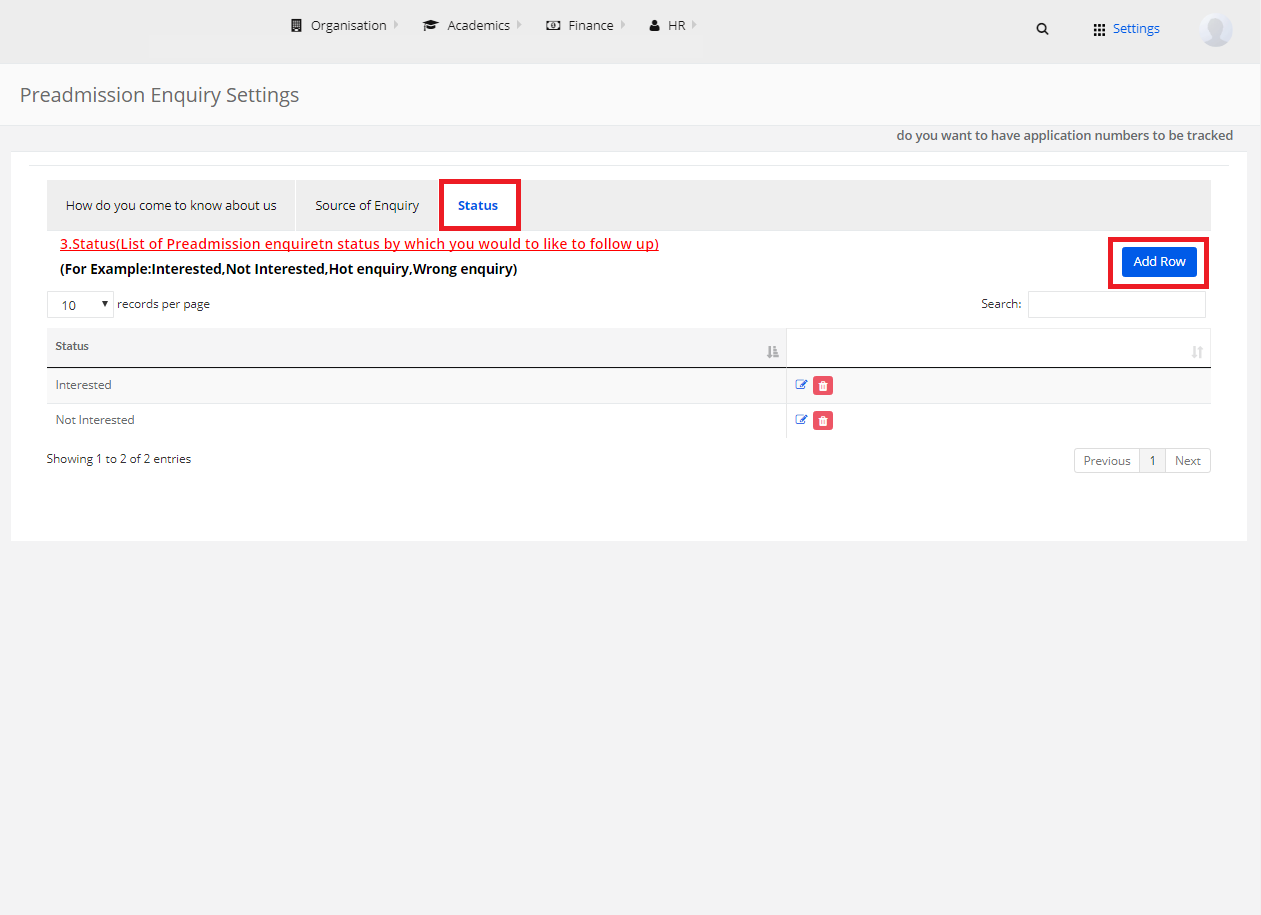
Step 7: Enter the status and click on Add. A new status is successfully added to the list.
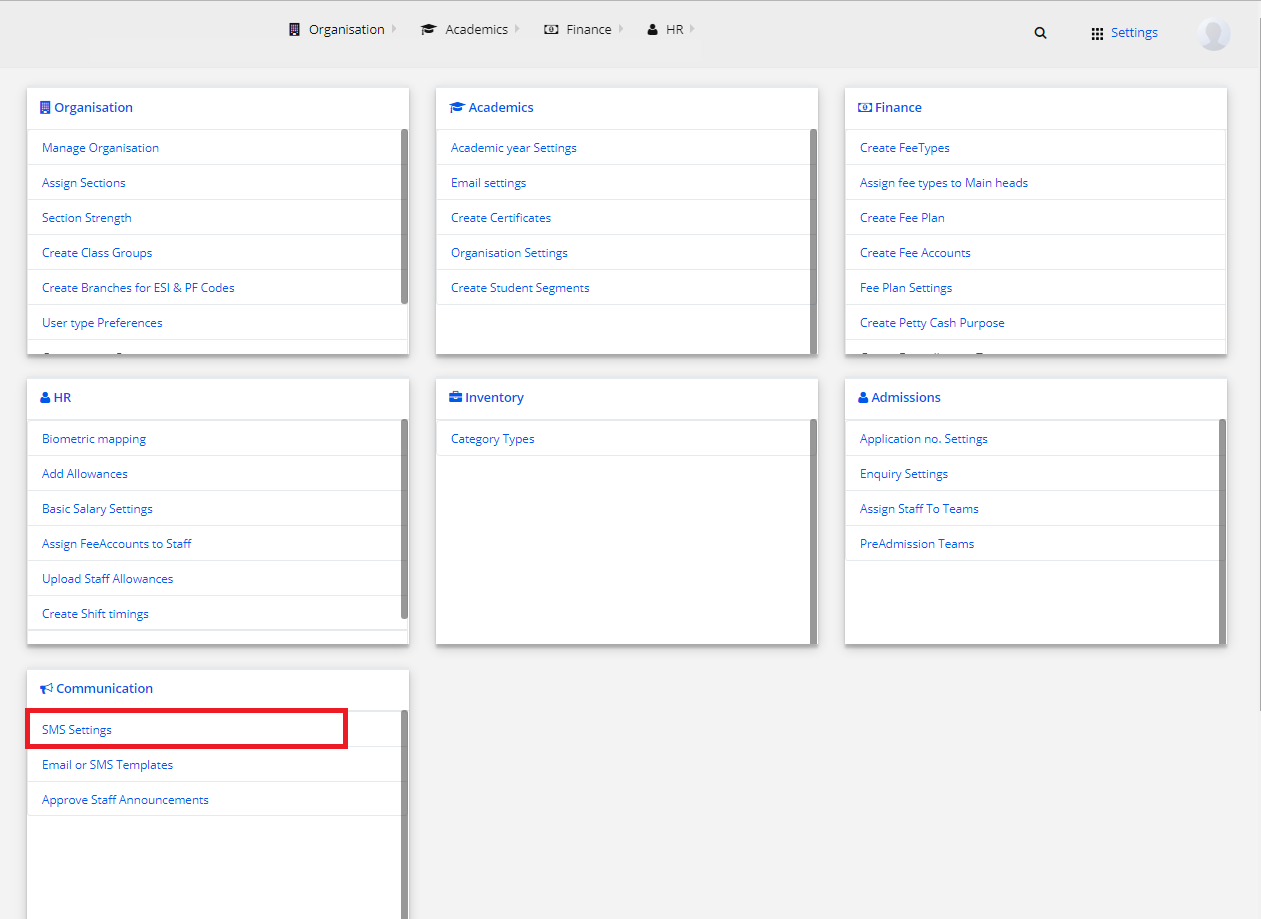
Stage 8: Communication
1) SMS Settings
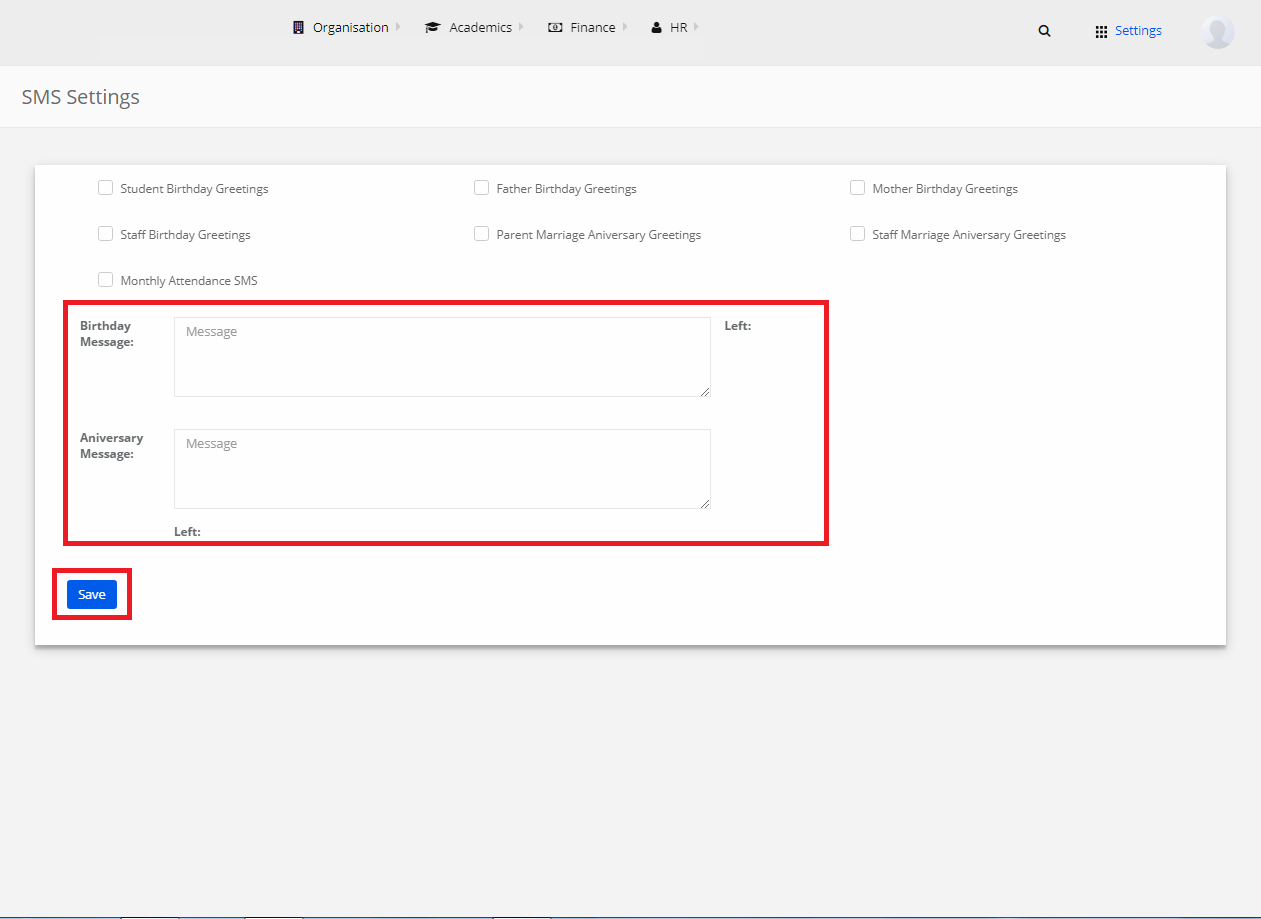
Step 1: Select Communication and click on “SMS Settings”.
Step 2: Select any of the occasions from the given list.

Step 3: If it’s a Birthday/Anniversary greeting, enter the Birthday/Anniversary message respectively and click on Save. The greetings SMS template is created.
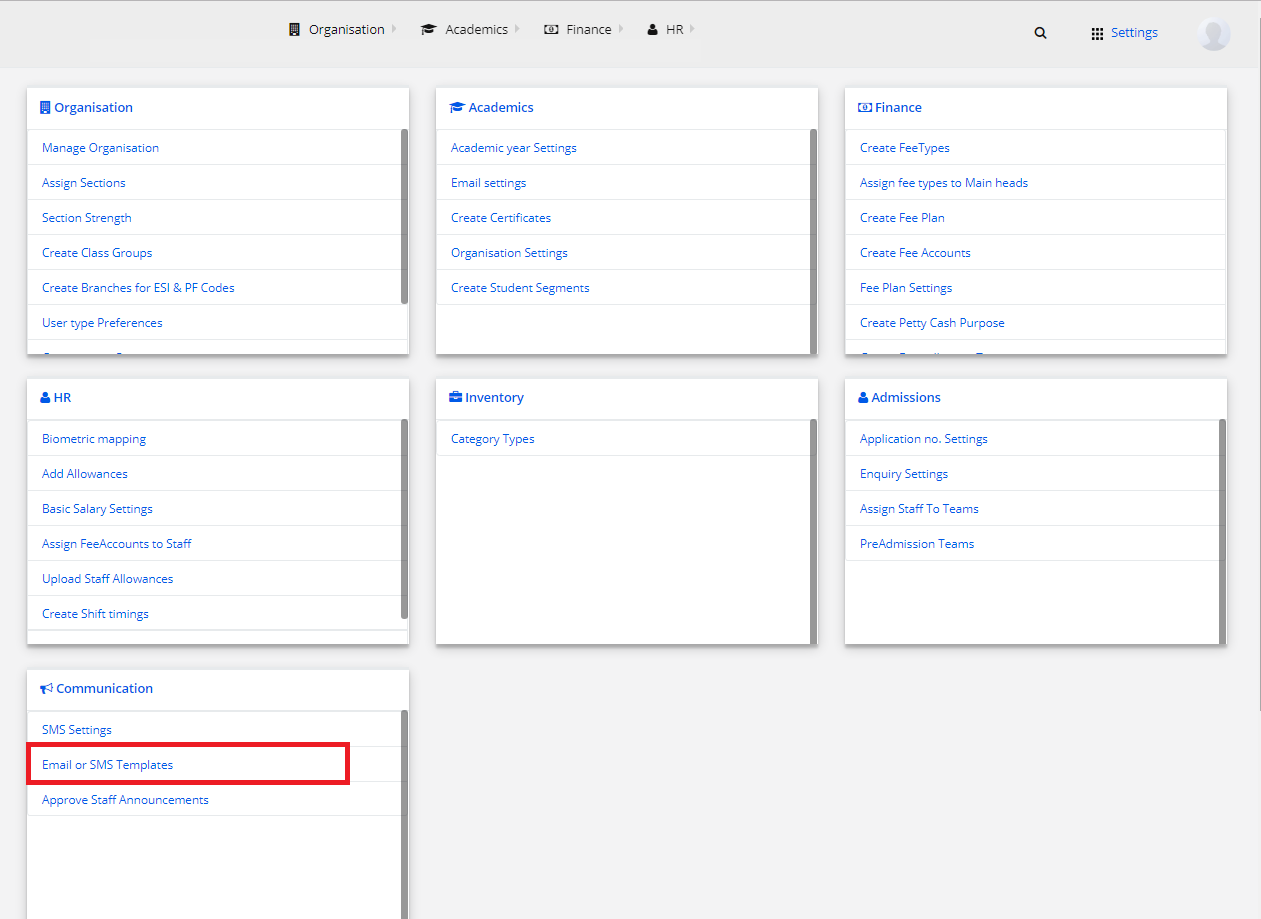
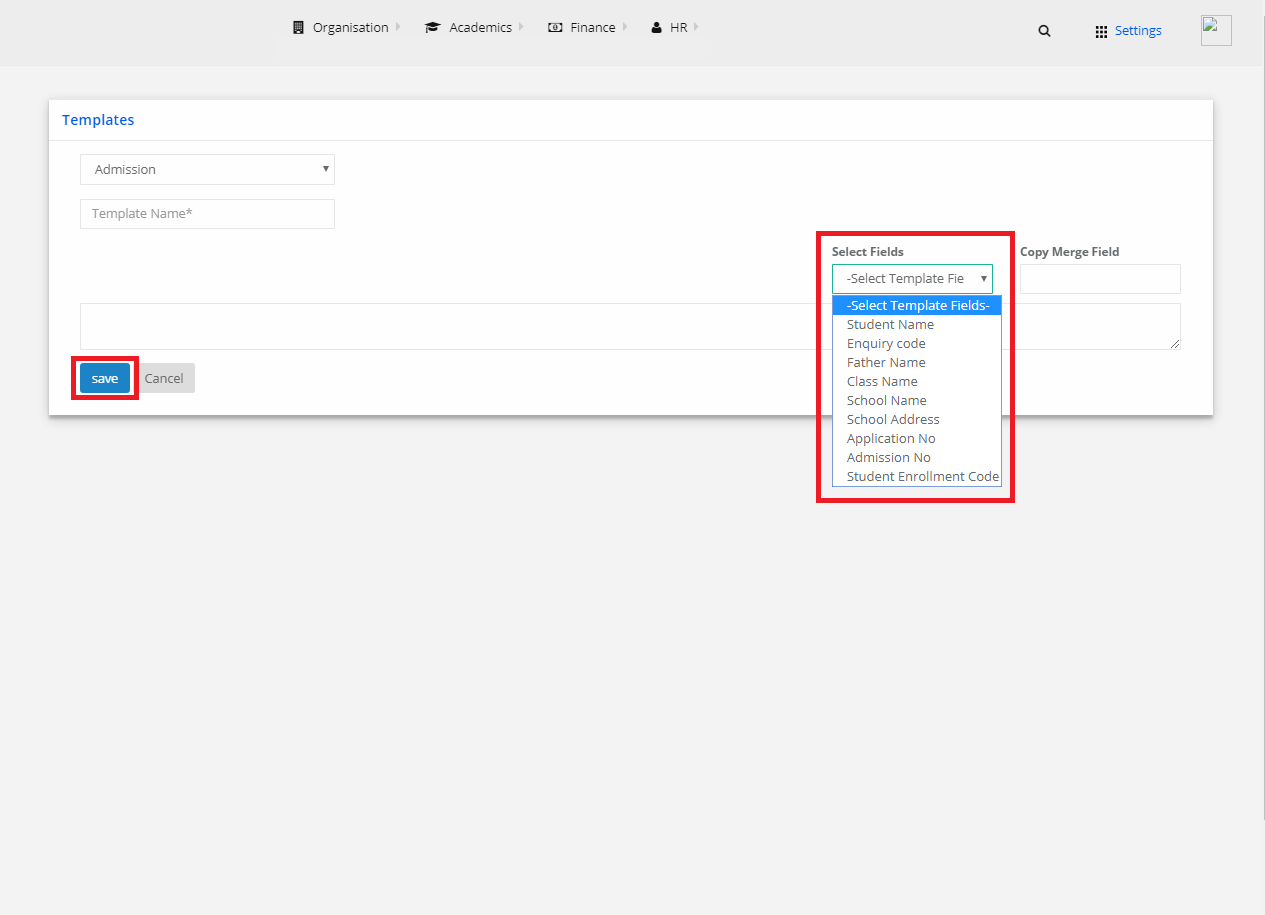
2) Email or SMS Templates
Step 1: Select Communication and click on “Email or SMS Templates”.
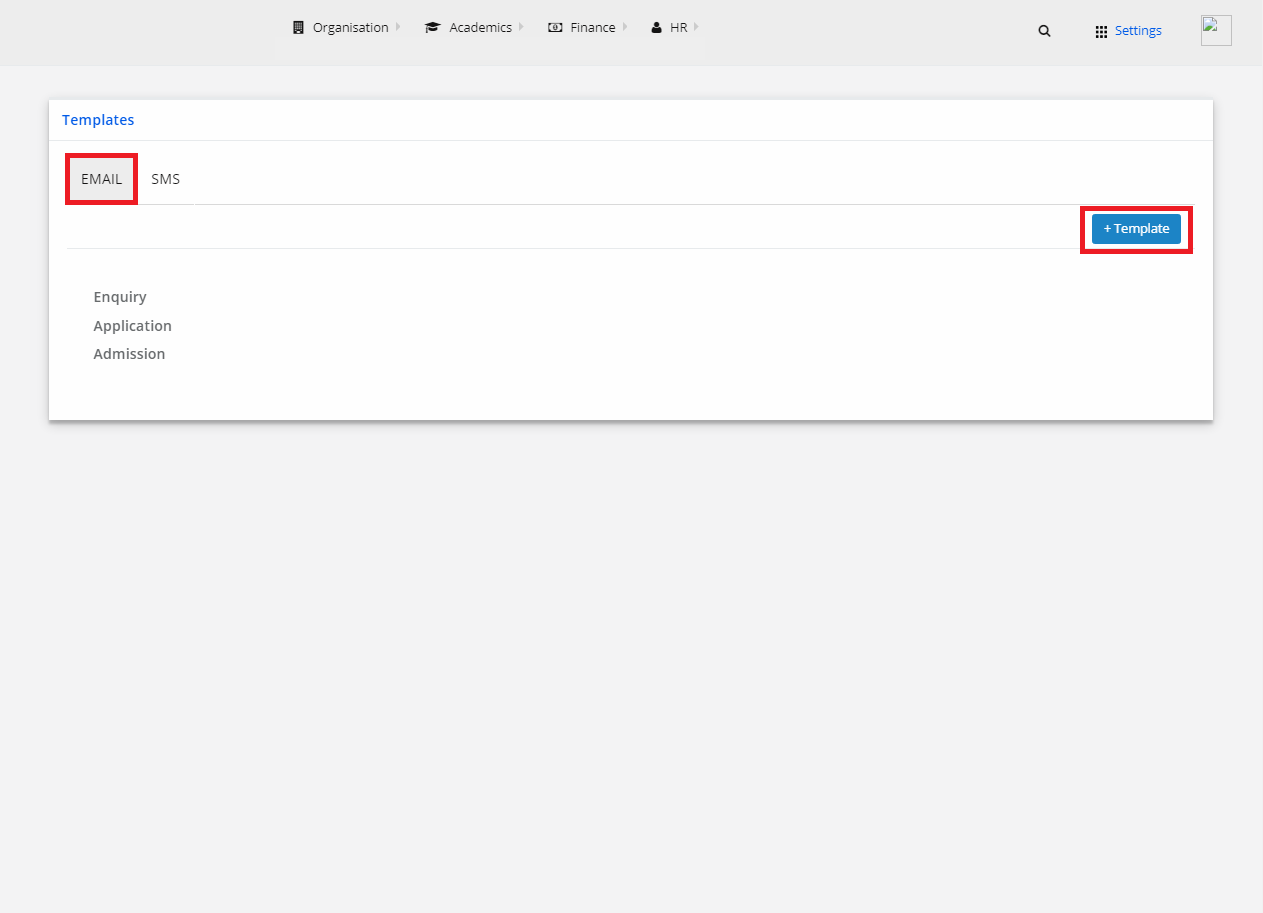
Email Template
Step 2: Select “Email” and click on “+Template”.
Step 3: Select Form Type (Enquiry, Application, Admission) and give a template name.
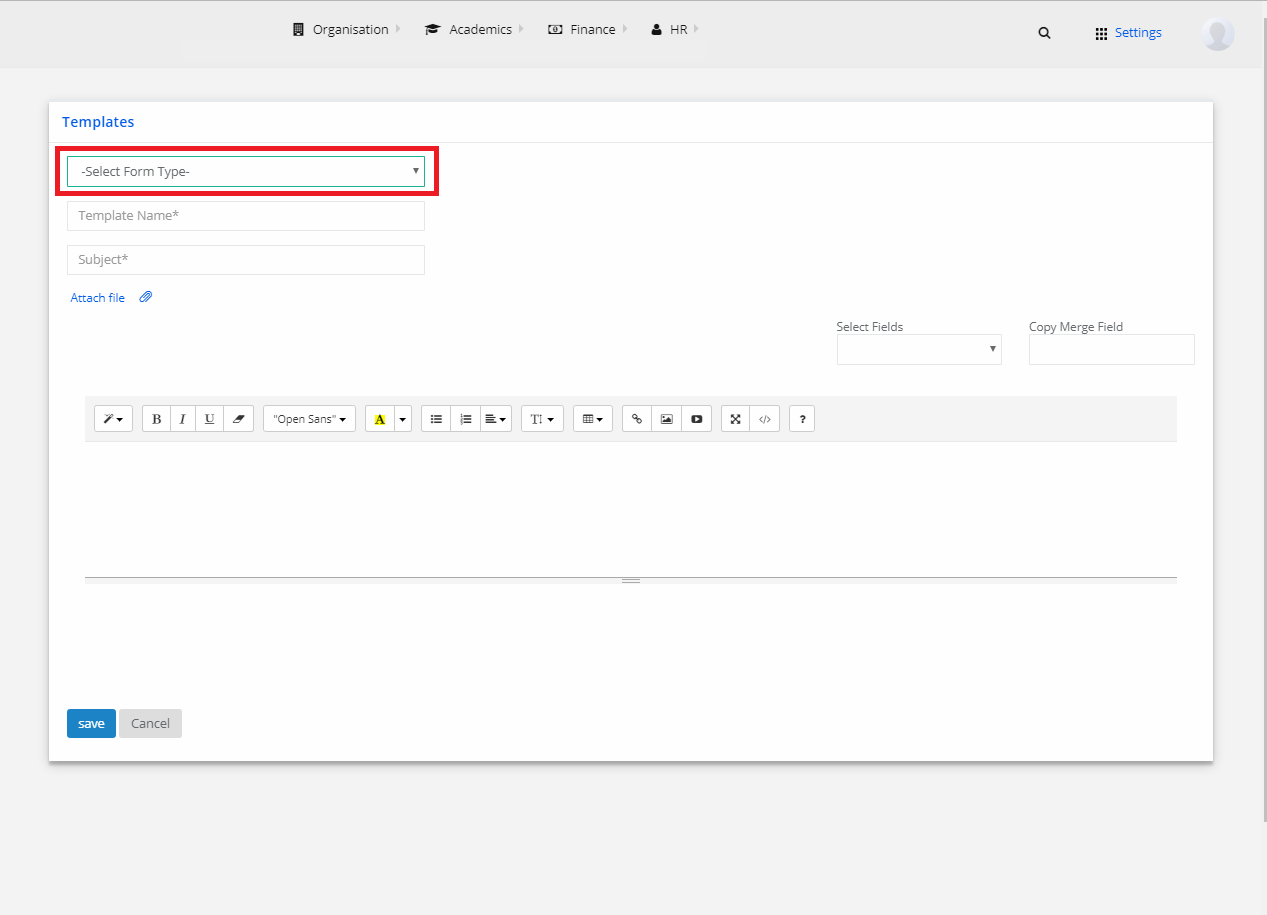
Step 4: Select the required fields you want to include in the template, enter the message and click on “Save”. The Email template for that respective Form Type is created.

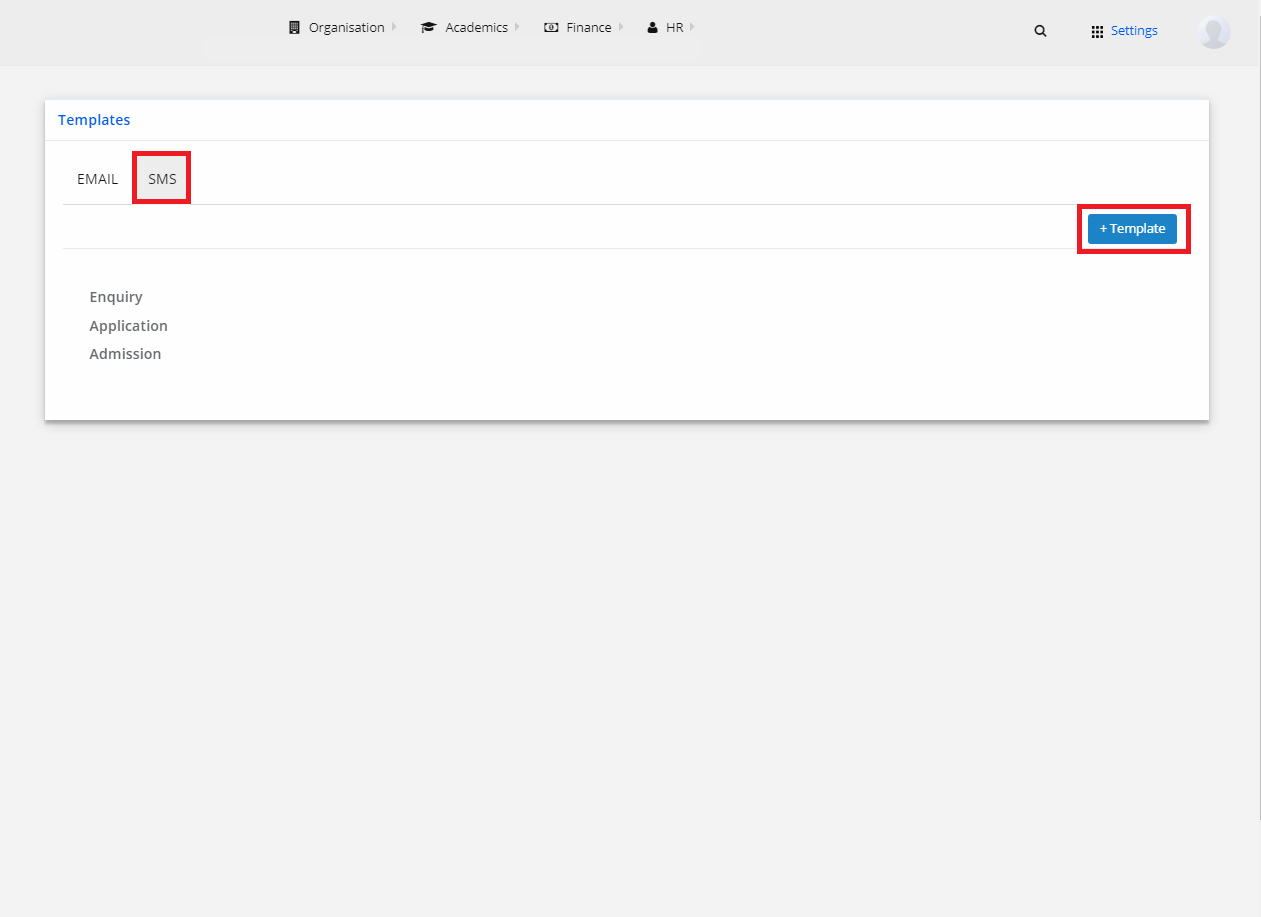
SMS Template
Step 5: Select “SMS” and click on “+Template”.
Step 6: Select Form Type (Enquiry, Application, Admission) and give a template name.

Step 7: Select the required fields you want to include in the template, enter the message and click on “Save”.
The SMS template for that respective Form Type is created.