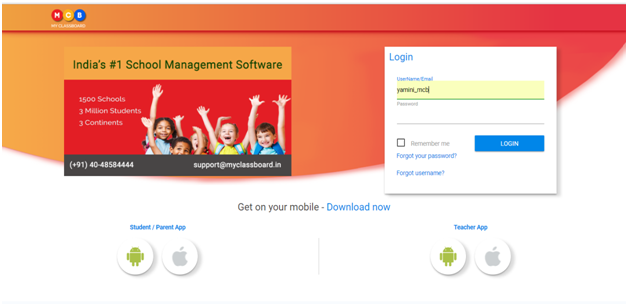
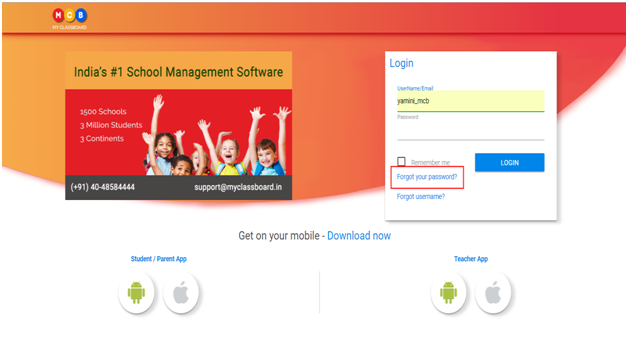
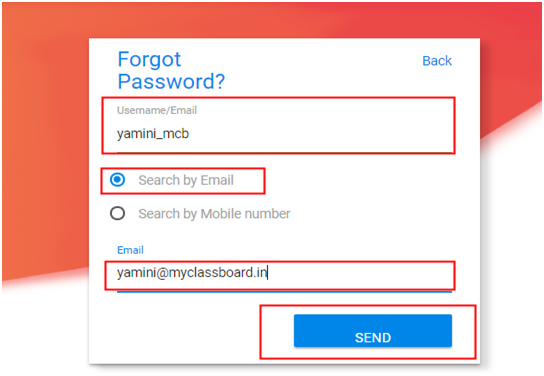
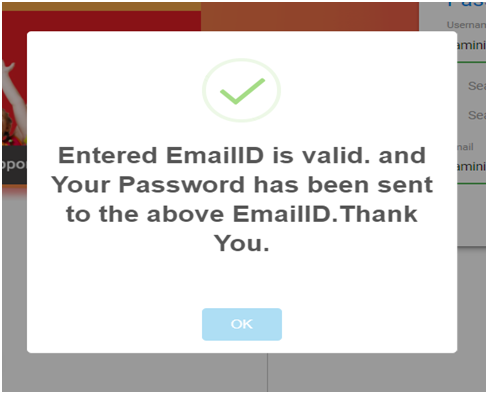
To log into the portal kindly enter the respective URL.
Stage 1: Login to MCB with Principal or MD Login Credentials.
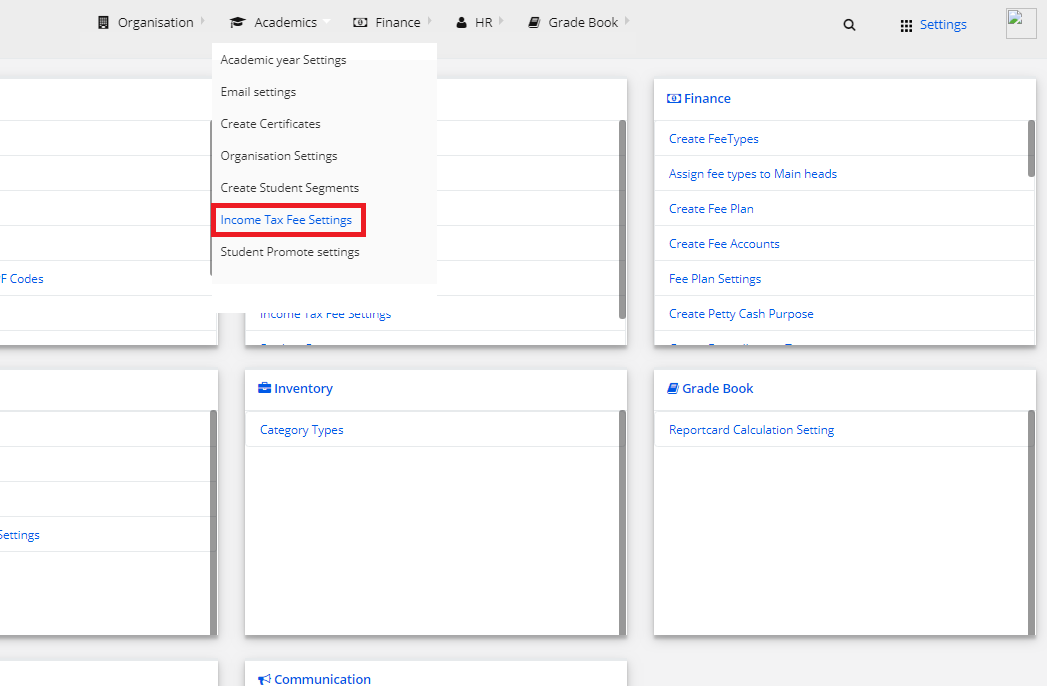
Stage 2: Academics
Stage 3: Finance
Stage 4: HR
Stage 5: Transport
Stage 6: Gradebook
Stage 7: Communication
Stage 8: Admissions
Stage 9: Reports
Stage 2: Academics
Step 1: Select “Academics” on the top bar of the dashboard. You will be directed to the Academics page.
Level 1: Enrollments
1) Fast Enrollment
Step 1: Select Enrollments on the top bar and choose “Fast Enrollments”.
Step 2: Select “Active”, “Class”, “Section “ to get the class list.
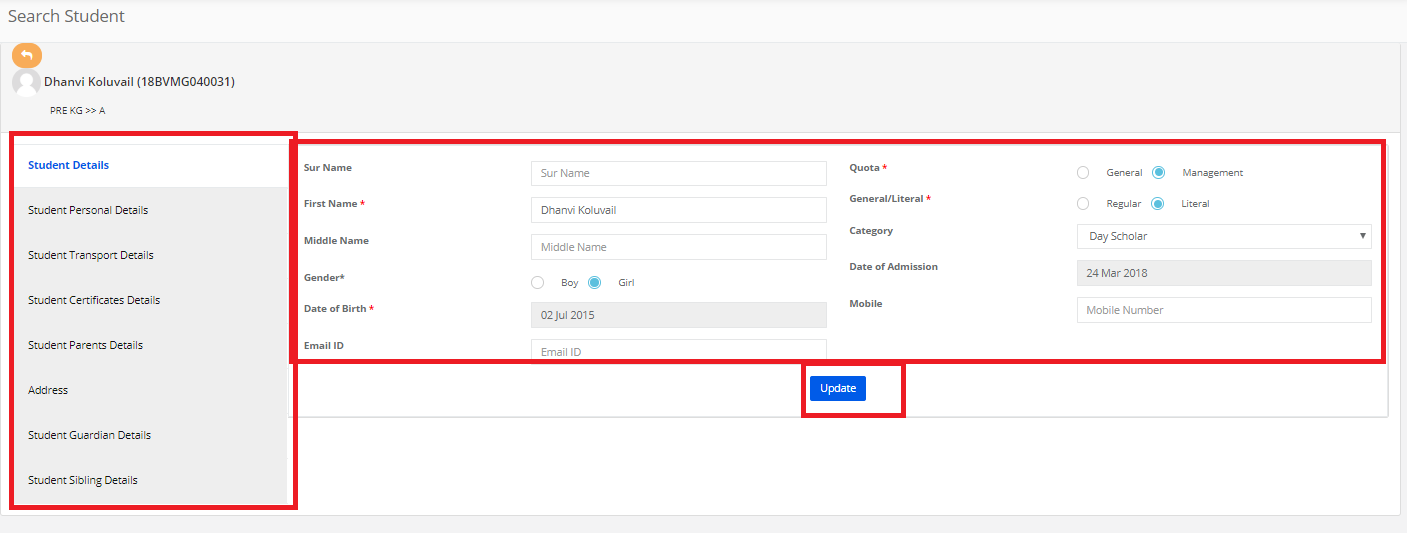
Step 3: Select the student and click on “Edit” option.
Step 4: Update the student details here and click on Next.
Step 5: Update the personal details here and click on Next.
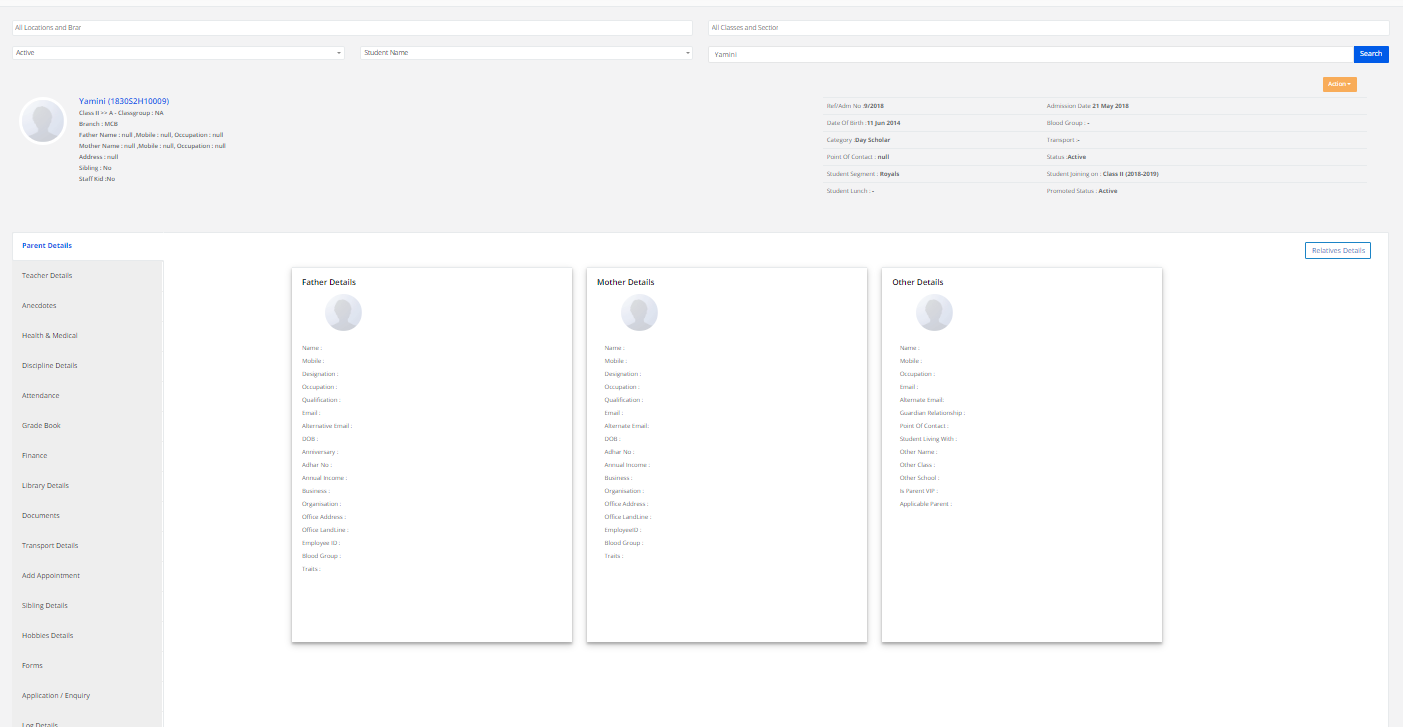
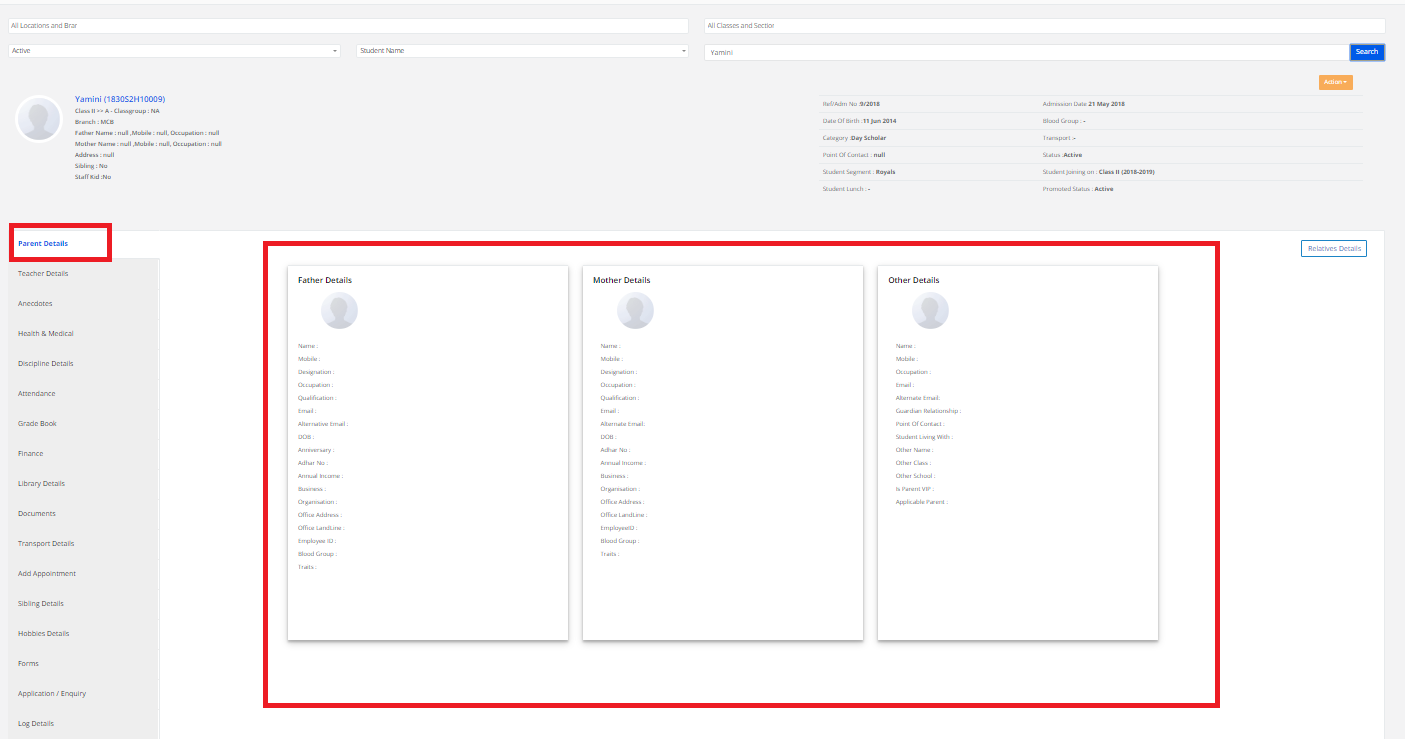
Step 6: Update the student parent details here and click on Next.
Step 7: Update the sibling & guardian details here and click on Next.
Step 8: Update the address details here and click on Next.
Step 9: Update the student certificates details here and click on Finish.
2) Promote Students
Step 1: Select Enrollments and choose “Promoting Students” under it.
Step 2: Select Class and Section to get the students’ list.
Step 3: Select students, Promoting details and click on “Promote”.
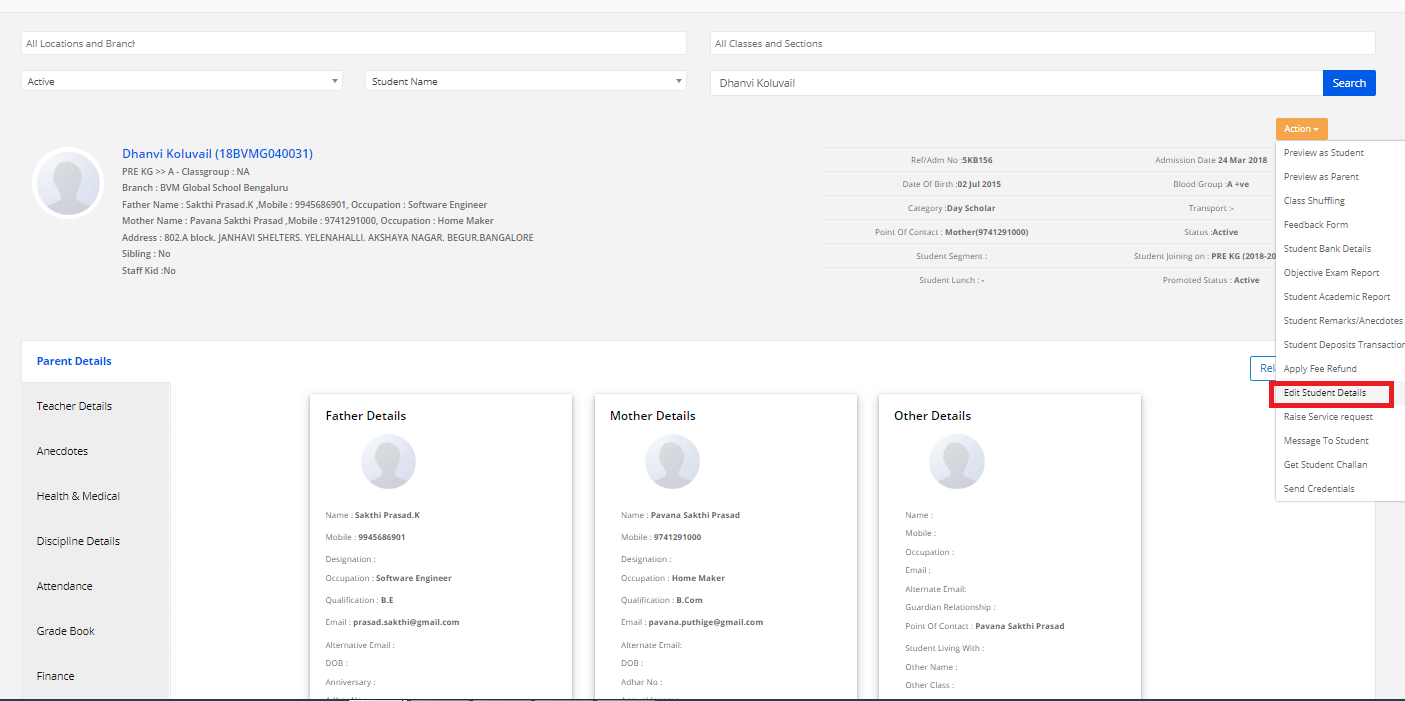
3) Update Student Details
Step 1: Select Enrollments and choose “Update Student Details”.
Step 2: Select Class on the right corner and click on “Get”.
Step 3: To update Reference Code, select “Reference Code” on the left pane. Select the student, enter the “Reference Code” and click on “Save” button.
Step 4: To update Student Roll Number, select “Student Roll Number” on the left pane. Select the student, enter the Roll Number and click on “Submit” button.
Step 5: To update Parents Mobile Number, select “Parents Mobile Number” on the left pane. Select any student, enter the Mobile Number and click on “Save” button.
Step 6: To update Student’s Place Of Birth, select “Student Place Of Birth” on the left pane. Select the student, enter the details and click on “Save” button.
Step 7: To update the details in bulk, select “Browse(.csv only)” to choose the file and click on “Validate and Upload” to upload the chosen file.
Step 8: To update student’s current address, select “Student Current Address” on the left pane. Select the student, enter the details and click on “Save” button.
Step 9: To update the details in bulk, select “Browse(.csv only)” to choose the file and click on “Validate and Upload” to upload the chosen file.
Step 10: To update Religion/Nationality/Caste/Sub caste, select “Religion/Nationality/Caste/Subcaste” on the left pane. Select the student, enter the details and click on “Save” button.
Step 11: To update Previous Education, select “Previous Education” on the left pane. Select any student, enter the details and click on “Save” button.
Step 12: To update the details in bulk, select “Browse(.csv only)” to choose the file and click on “Validate and Upload” to upload the chosen file.
Step 13: To update Aadhar/Passport Data, select “Aadhar/Passport Data” on the left pane. Select the student, enter the details and click on “Save” button.
Step 14: To update the details in bulk, select “Browse(.csv only)” to choose the file and click on “Validate and Upload” to upload the chosen file.
Step 15: To update Aadhar details of parents, select “Parents Aadhar” on the left pane. Select any student, enter the details and click on “Save” button.
Step 16: To update the details in bulk, select “Browse(.csv only)” to choose the file and click on “Validate and Upload” to upload the chosen file.
Step 17: To update the Parents Income, select “Parents Income” on the left pane. Select the student, enter the details and click on “Save” button.
Step 18: To update the details in bulk, select “Browse(.csv only)” to choose the file and click on “Validate and Upload” to upload the chosen file.
Step 19: To update Parents Qualifications and Occupations, select “Parents Qualifications/Occupations” on the left pane. Select any student, enter the details and click on “Save” button.
Step 20: To update the details in bulk, select “Browse(.csv only)” to choose the file and click on “Validate and Upload” to upload the chosen file.
Step 21: To update the Blood Group details, select “Blood Groups” on the left pane. Select the student, enter the details and click on “Save” button.
Step 22: To update Parents DOB/Marriage Anniversary details, select “Parents DOB/Marriage Anniversary” on the left pane. Select any student, enter the details and click on “Save” button.
Step 23: To update the details in bulk, select “Browse(.csv only)” to choose the file and click on “Validate and Upload” to upload the chosen file.
Step 24: To update Parents Office Details, select “Parents Office Details” on the left pane. Select the student, enter the details and click on “Save” button.
Step 25: To update the details in bulk, select “Browse(.csv only)” to choose the file and click on “Validate and Upload” to upload the chosen file.
Step 26: To update Student Relatives Details, select “Student Relatives Details” on the left pane. Select any student, enter the details and click on “Save” button.
Step 27: To update the details in bulk, select “Browse(.csv only)” to choose the file and click on “Validate and Upload” to upload the chosen file.
Step 28: To update Sibling Details, select “Sibling Details” on the left pane. Select the student, enter the details and click on “Save” button.
Step 29: To update the details in bulk, select “Browse(.csv only)” to choose the file and click on “Validate and Upload” to upload the chosen file.
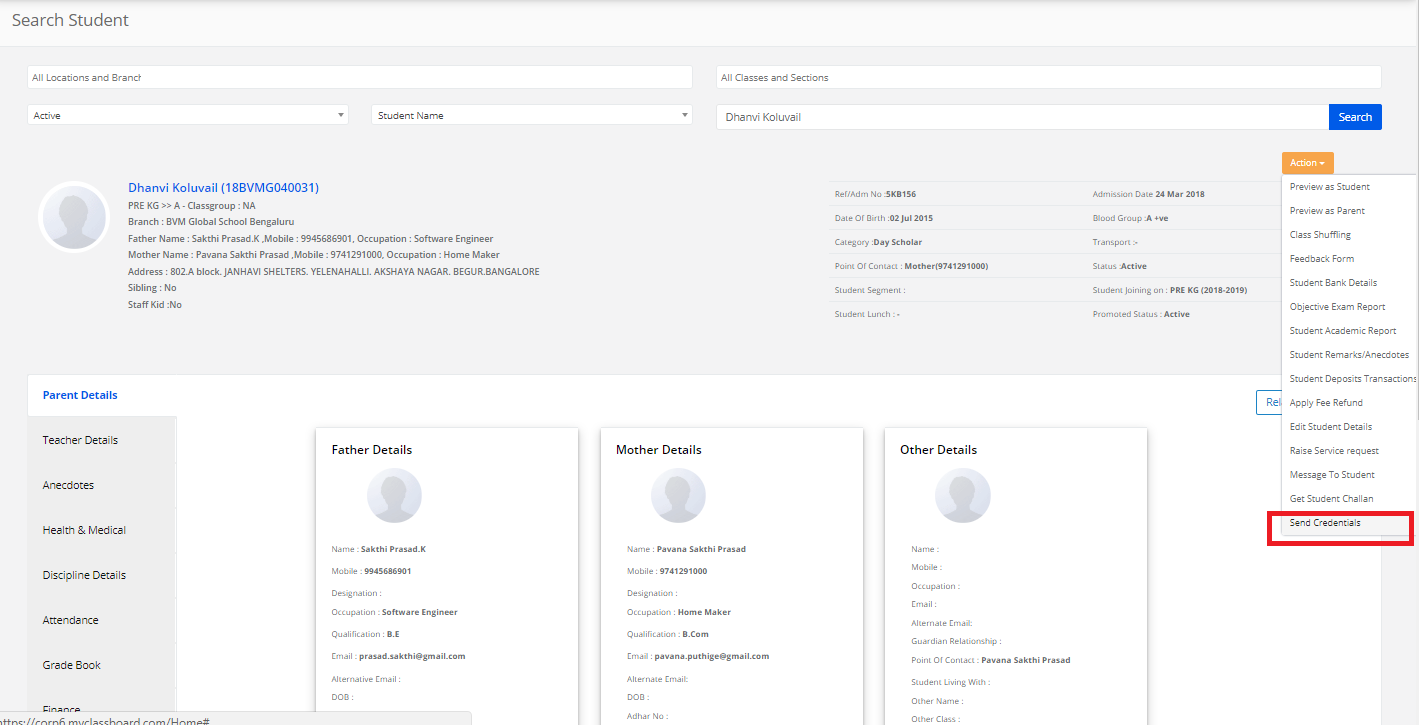
Step 30: To upload Parent Photos, select “Parent Photos” on the left pane. Select any student and click on the Parent Photo icon.
Step 31: Click on “Browse” to upload the photo and then click on “Save”.
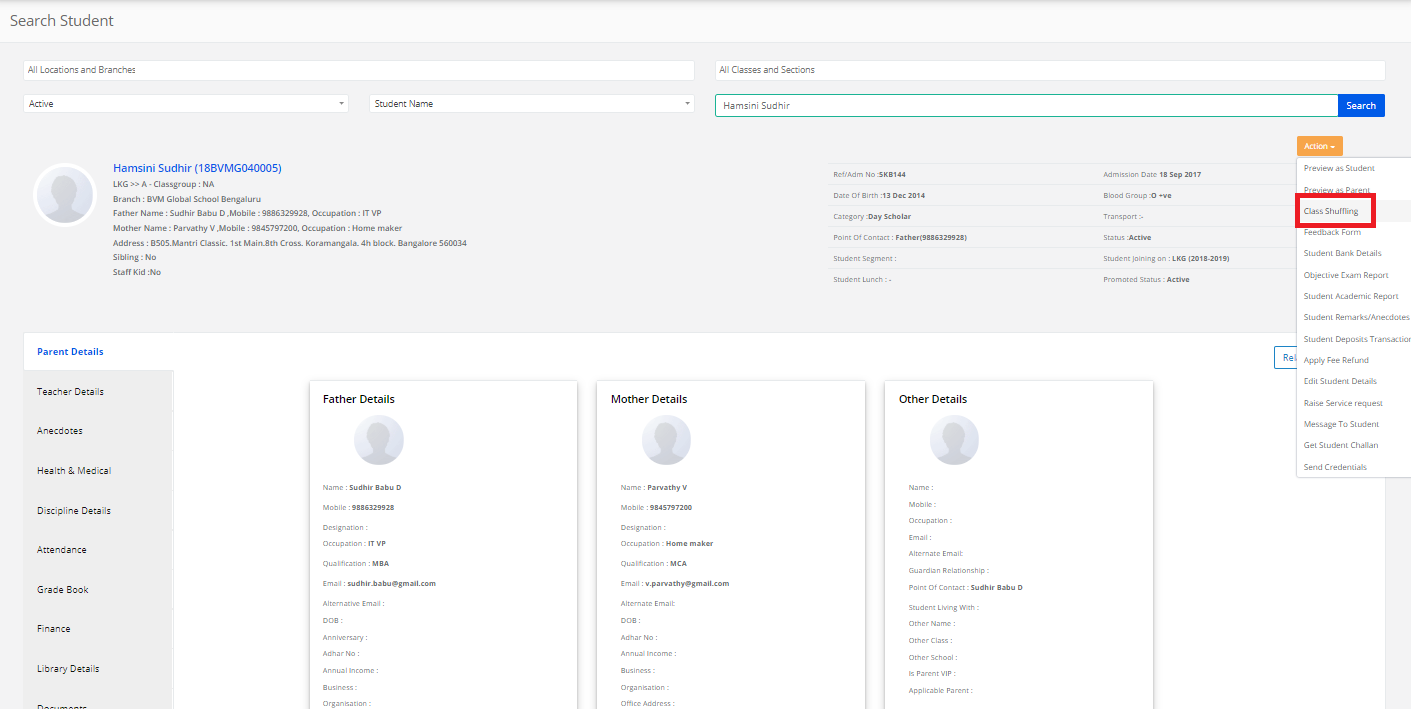
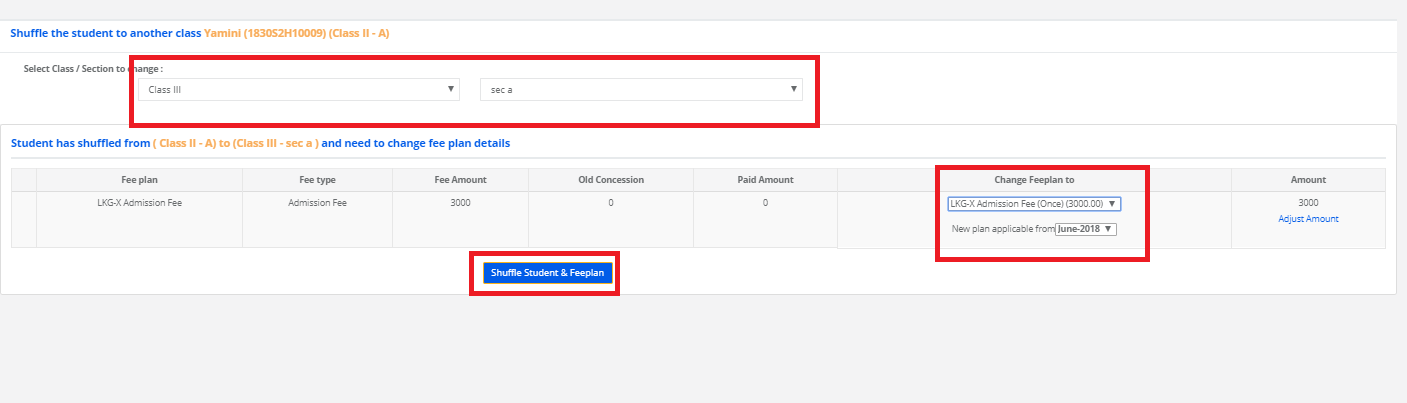
4) Student Shuffling
Step 1: Select Enrollments and choose “Student shuffling”.
Step 2: Select Class and Section to get the students’ list.
Step 3: Select students by clicking the checkbox and select section to change(shuffle) the section.
Step 4: The students shuffling between the sections is updated successfully.
5) Upload Student Details
Step 1: Select Enrollments and choose “Upload Student Details”.
Step 2: Upload a “.CSV file” containing the student details by clicking the “Choose File” option.
Level 2: Timetable
1) Timetable Structure
Step 1: Select Timetable and choose “Timetable Structure”.
- a) Create Timetable Structure
Step 2: Select “Timetable Structure” on the left pane and click on “Add”.
Step 3: Name the timetable structure, enter the required details and click on “Save”.
Step 4: To view the timetable structures, select any structure and click on “View”.
Step 5: The details of the timetable structure are displayed.
- b) Schedule Timetable – Create/View Timetable for Classes
Step 1: Select “Schedule Timetable” on the left pane. Select any class and click on “Assign Timetable”.
Step 2: Select Timetable structure and click on “Generate Periods”.
Step 3: To view the timetable for classes, select any class and click on “View Timetable”.
Step 4: Select subjects and click on “Save”.
2) Timetable Management – Assign Teachers/Subjects/Coordinators
Step 1: Select Timetable on the top bar and click on “Timetable Management”.
- a) Assign Class Teacher
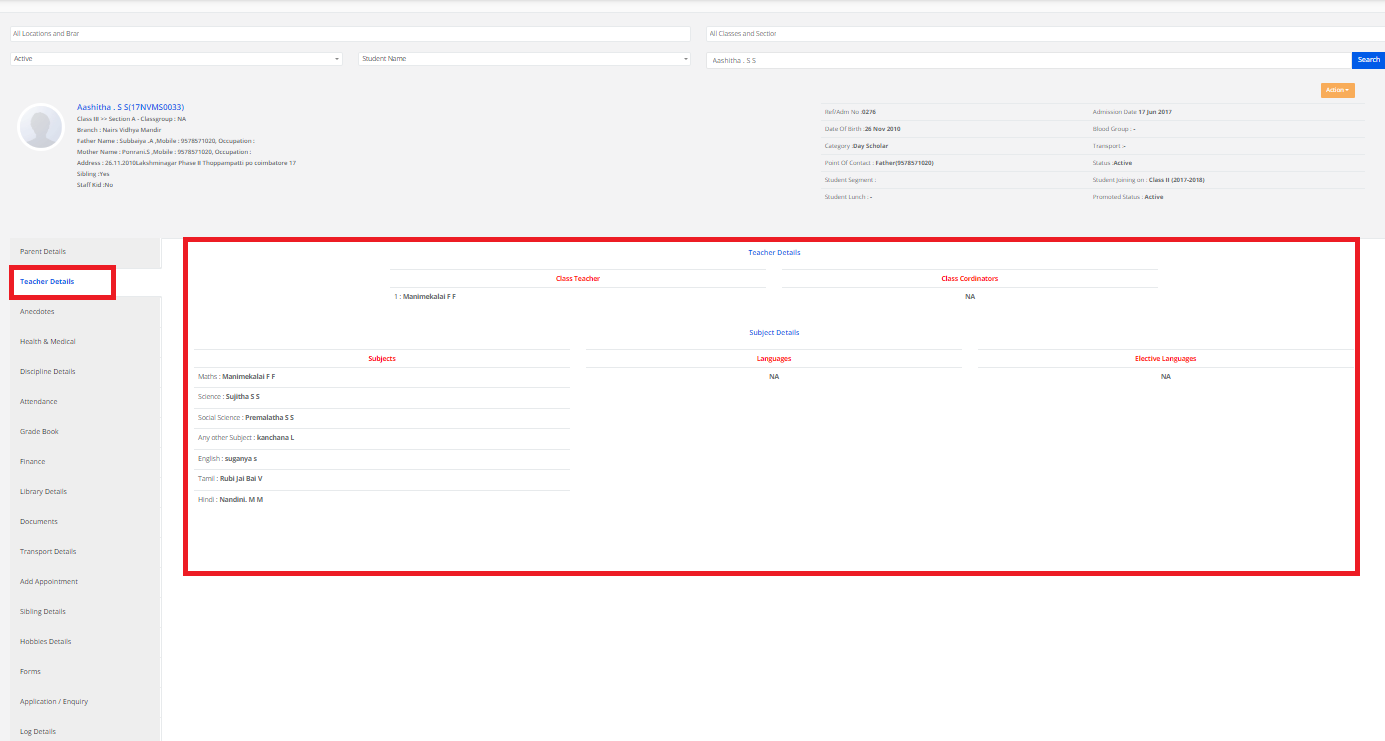
Step 2: Select “Class Teacher” from the left pane. Select a class name and click on “Add Class Teacher.”
Step 3: Enter the staff name and click on “Select”. The staff is assigned to the respective class.
- b) Assign Subject Teacher
Step 4: Select “Subject Teacher” from the left pane. Select class, section, subject and click on “Assign”.
Step 5: Enter the staff name and click on “Select”. The staff is assigned to the respective subject.
- c) Assign Co-ordinator
Step 6: Select “Co-ordinator” from the left pane. Select a class and click on “Assign”.
Step 7: Enter the staff name and click on “Select”. The staff is assigned as Co-ordinator to the respective class.
Level 3: Attendance
1) Attendance Timings
Step 1: Select Attendance on the top bar and click on “Attendance Timings”.
- a) Create Timings
Step 2: Select Attendance Timing Structure and click on “Create”.
Step 3: Enter the required details and click on “Save”.
- b) Edit Timings
Step 4: Select any attendance timing structure and click on “Edit” option available.
Step 5: Make the necessary changes and click on “Update”.
2) Give Attendance
Step 1: Select Attendance on the top bar and click on “Give Attendance”.
Step 2: Select Class, Section, Date and click on “Get Students”.
Step 3: List of the students for morning and afternoon sessions is displayed here.
Step 4: To mark attendance, click on the checkbox for morning/afternoon sessions respectively.
Step 5: When marking absent to any student, there is a “Remarks” tab under the checkbox to enter remarks.
Step 6: After marking the attendance, click on “Save Attendance”.
- a) To Edit Attendance
To edit the attendance for morning/afternoon sessions, click on the “Edit” option available.
Step 6: Select the checkbox against the students and click on update. The changes are updated successfully.
- b) Absentee SMS – Send SMS to Absent Students
Step 1: Click on “Absentee SMS” to send SMS to absent students.
Step 2: Select “All” to send SMS to all students and then click on “Send SMS”. The SMS is sent successfully.
- c) View or Generate Attendance Report
Step 1: Click on “Attendance Report” to view the attendance report.
Step 2: Select the period for attendance reports like Today, Last 7 Days, Last 30 Days, Date Range. (In date Range – select From Date and To Date).
Step 3: After choosing the required option, click on “Show Report”.
Step 4: The report is displayed. You may export the same to excel by clicking on the “Export Excel” option.
3) Upload Student Absentees – Bulk Upload
Step 1: Select “Attendance” on the top bar and choose “Upload Student Absentees”.
Step 2: Select Class, section, other details and click on “Get”.
Step 3: To upload absentees, click on “Do you want to upload Absentees”.
Step 4: To upload a “.CSV” file format, click on “Choose file” and then “Upload File”.
4) Send SMS to Absent students
Step 1: Select “Attendance” on the top bar and choose “Send SMS to Absent students”.
Step 2: Select Class, Timings, Date and click on “Get Students”.
Step 3: Select “All” checkbox to send SMS to all students and then click on “Send SMS”.
The SMS is sent successfully.
5) Update Monthly Attendance
Step 1: Select Attendance on the top bar and click on “Monthly Attendance
Step 2: Select Class & Section, Month and click on “Get”.
Step 3: Update the no. of working days and present days. Upon updating, click on “Save Attendance”.
Level 4: Reports
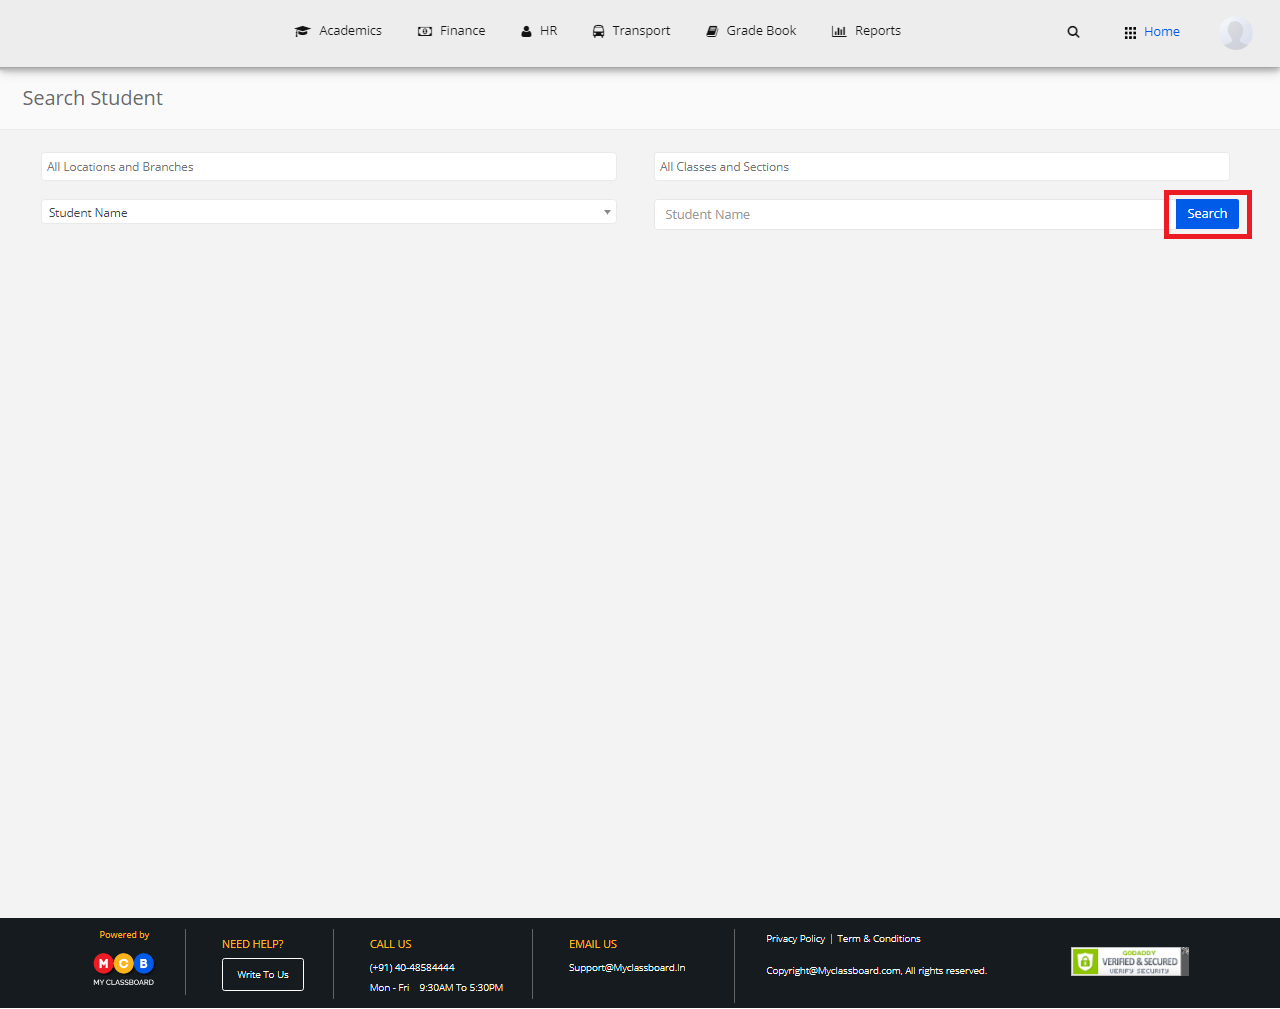
1) Student Contact Details
Step 1: Select “Reports” on the top bar and choose “Student Contact Details”.
Step 2: Select a class section and click on “Show Report”. The report is generated.
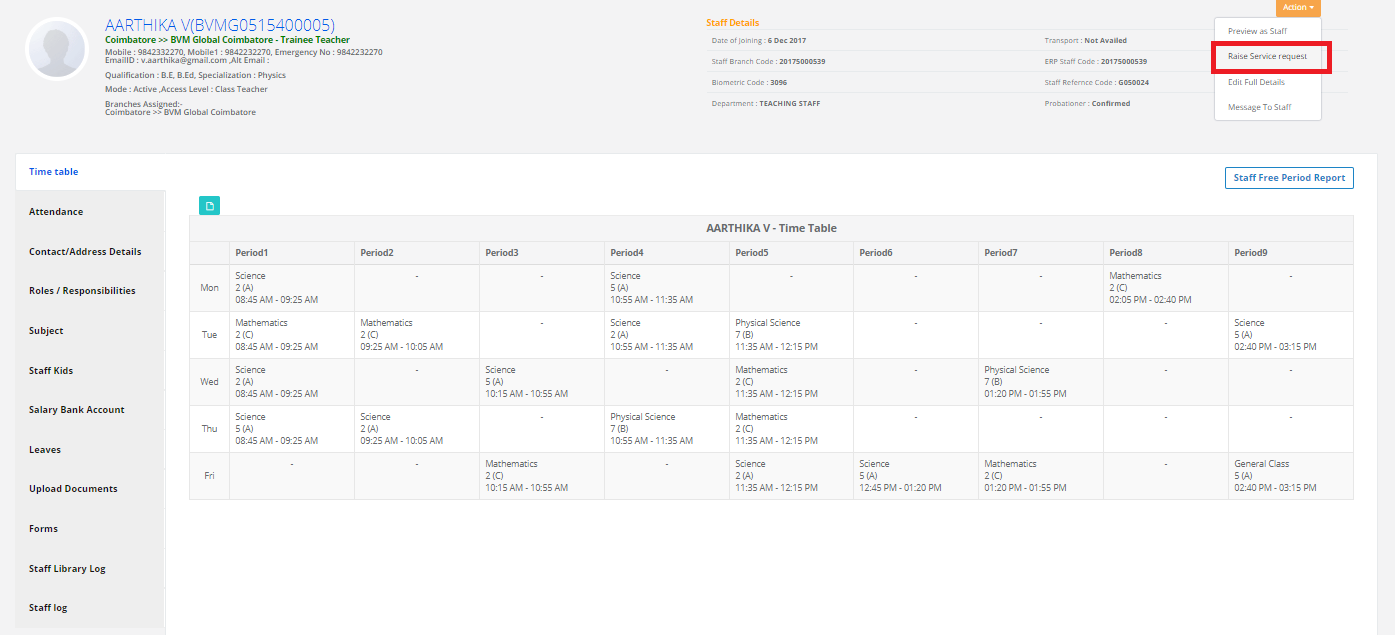
2) Staff DashBoard
Step 1: Select “Reports” on the top bar and choose “Staff DashBoard”.
Step 2: Select Branch, Academic year and click on “View Staff”. The report is generated.
3) Student Attendance
Step 1: Select “Reports” on the top bar and choose “Student Attendance”.
Step 2: Select a date range from the drop-down and click on “Show Report”. The report is generated.
4) Age wise Student strength
Step 1: Select “Reports” on the top bar and choose “Age wise Student strength”.
Step 2: Select the date and click on “Show Report”.
Step 3: The report is generated.
5) Sibling Report
Step 1: Select “Reports” on the top bar and choose “Sibling Report”.
Step 2: The report is generated.
6) Monthly Attendance Report
Step 1: Select “Reports” on the top bar and choose “Monthly Attendance Report”.
Step 2: Select the required options and click on “Get”. The report is generated.
7) Month-wise Student strength
Step 1: Select “Reports” on the top bar and choose “Month wise Student strength”.
Step 2: Select the required options and click on “Show Report”.The report is generated.
8) Download Hall Tickets
Step 1: Select “Reports” on the top bar and choose Download Hall Tickets”.
Step 2: Select the required options and click on “Get Test”.The report is generated. Click on “Get Hall tickets” to get a list of the hall tickets.
9) Student Biometric Attendance
Step 1: Select “Reports” on the top bar and choose “Student Biometric Attendance”.
Step 2: Select the required options and click on “Get students”.The report is generated.
10) Inactive Students
Step 1: Select “Reports” on the top bar and choose “Inactive Students”.
Step 2: Select the required options and click on “Get”.The report is generated.
11) Admission Details Report
Step 1: Select “Reports” on the top bar and choose “Admission Details Report”.
Step 2: Select the required options and click on “Show Report”.The report is generated.
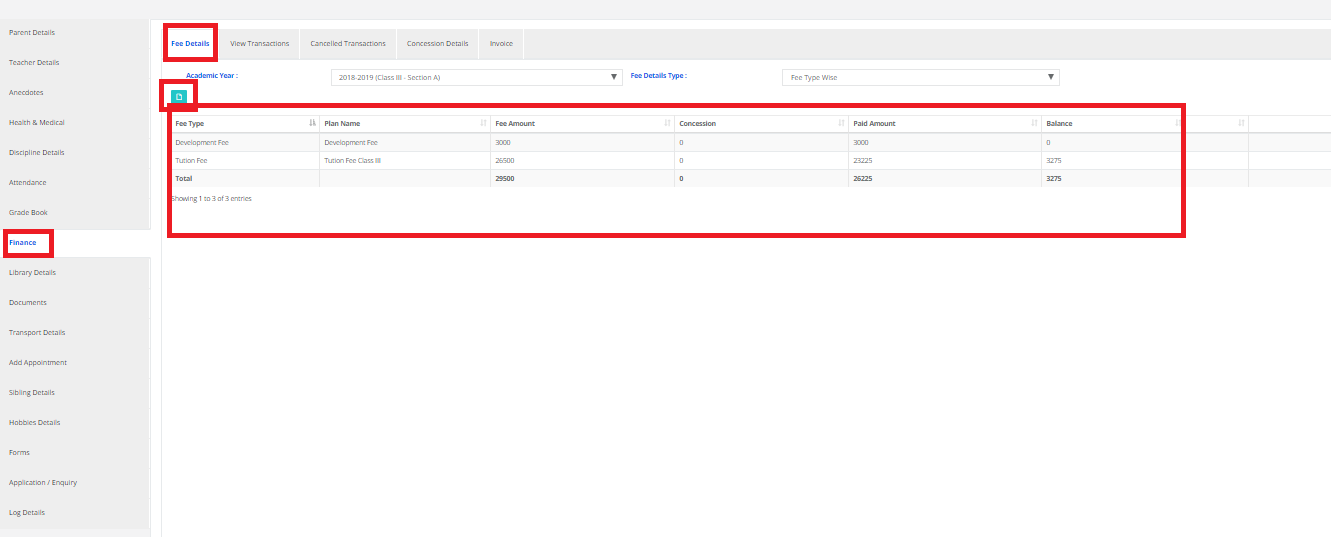
�Stage 3: Finance
Step 1: Select “Finance” on the top bar of the dashboard. You will be directed to the Finance page.
Level 1: Fee Management
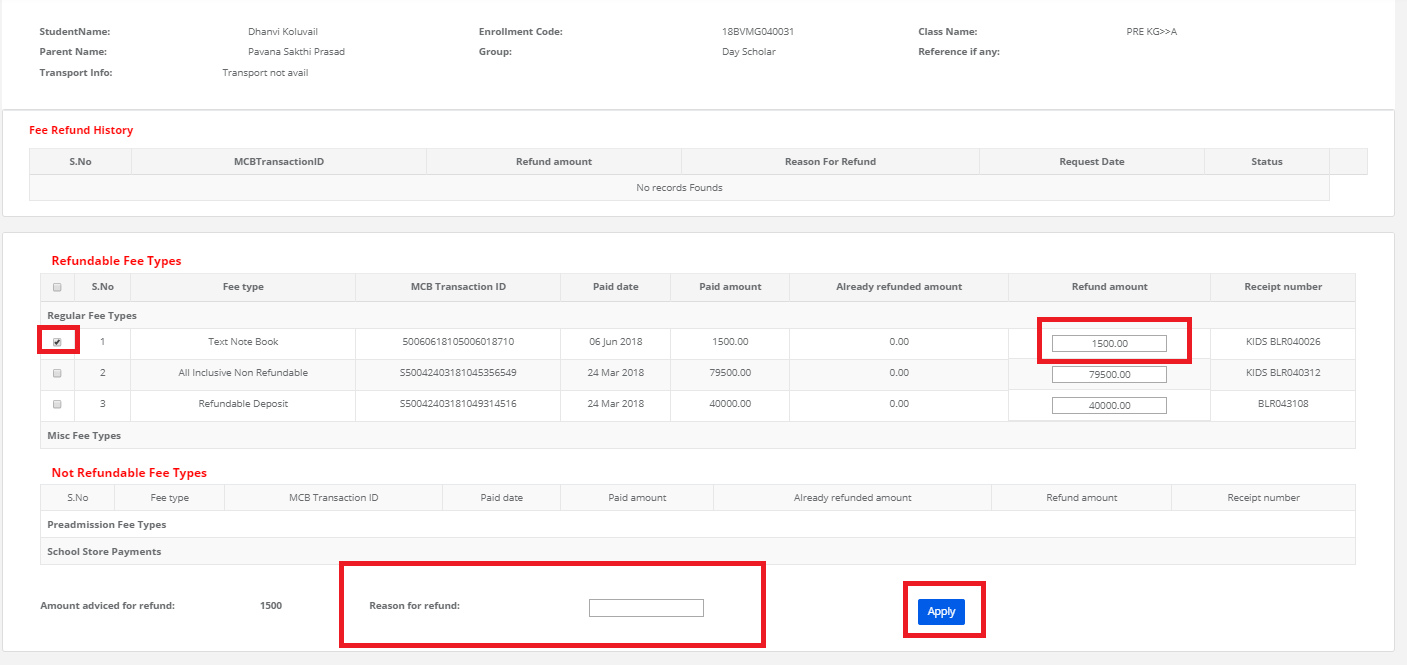
- a) Fine Management – Remove Late Fee
Step 1: Select “Fee Management” on the top bar and choose “Fine Management”.
Step 2: Select Branch, Fee Type and click on “Show Report”.
Step 3: Select any student and click on the “Edit” option beside.
Step 4: To disable the amount, select “Disable”, enter the reason and click on “Save”. The amount is disabled successfully.
Step 5: To give a fixed amount to the fine, click on “Fixed Amount”, enter the fixed fine amount, reason and click on “Save”. A fixed fine amount is given to the student.
Step 6: To postpone the due date, click on “Postpone Due Date”, select a due date, enter the reason and click on “Save”.
Level 2: Collections
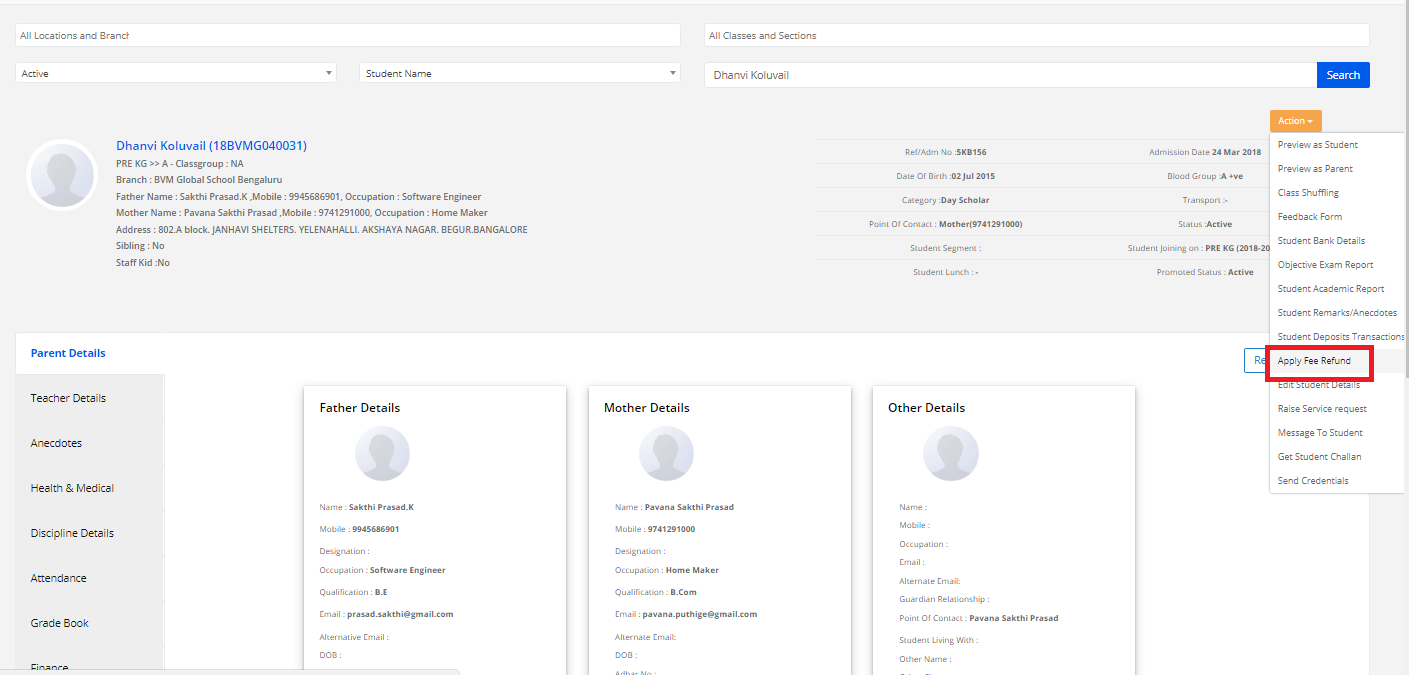
1) Make Payment
- a) Make Payment – Accept Fee Payments (Collect Fees)
Step 1: Select “Collections” on the top bar and choose “Make Payment”.
Step 2: Search for the student here by entering the required criteria.
Step 3: Select “Make Payment” in the left pane of the page and click on “Fee Details”. Mark the checkbox against the fee type and click on next.
Step 4: Select the mode of payment, enter the details and click on “Save and Continue” to generate the receipt details.
Step 5: Click on “Print Receipt” option to take a printout of the generated fee receipt.
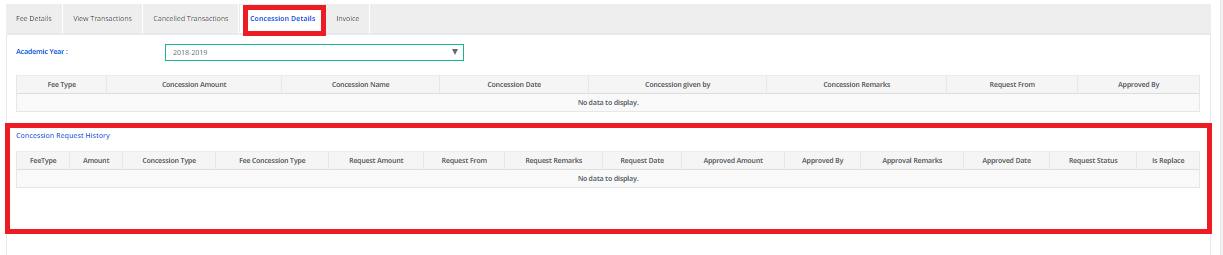
- b) Fee Details – Assign/Unassign Concession
Step 1: Select “Fee Details” in the left pane. Select any fee type and click on “Request For Concession”.
Step 2: Select “Concession Type”, enter “Remarks” and click on “Save”.
Step 3: The concession is sent for approval.
The concession is approved at the MD level.
To un-assign Concession:
Step 4: Select any fee type and click on “Unassign”.
The concession is unassigned successfully.
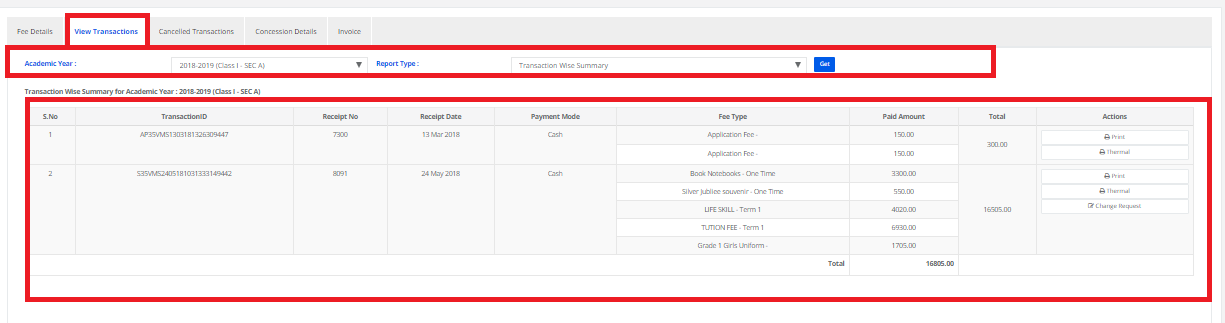
- c) View Transactions – Process Change Request
Step 1: Select “View Transactions” in the left pane. Choose any transaction and click on “Change Request” option.
Step 2: The change request can be made for Date, Amount and Receipt Number.
Step 3: Click on any of the above-mentioned options, make the necessary changes and click on “Save”.
The change request is processed successfully.
- d) Cheque Payment – Edit Cheque Details & Entry for Cheque Bounce
Edit Cheque Details
Step 1: Select “Cheque Payment” in the left pane. Choose any payment and click on the “Cheque Edit” option.
Step 2: To edit cheque details, click on “Edit Cheque Details” and select “Edit”.
Step 3: Make the necessary changes and click on “Update” button.
Step 4: To edit cheque amount, click on “Edit Cheque Amount”, enter the amount to be changed, enter “Remarks” and click on “Update”.
Entry for Cheque Bounce
Step 1: Select “Cheque Payment”. Select any payment and click on the “Cheque Bounce” option.
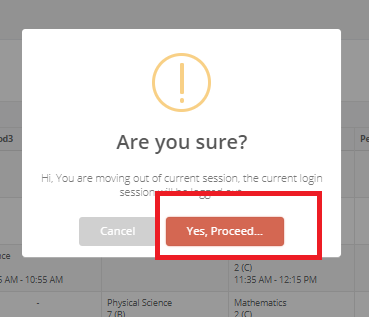
Step 2: Click on “Bounce” and select “Yes, Proceed” option in the dialogue box that appears.
Step 3: Select “Bounce Date”, “Cheque Bounce Reason” and click on “Save Data”.
Step 4: The cheque bounce is done successfully and the same is reflected on the screen.
- e) Fee Management – Change Fee Plan/Assign Fee Plan
Change Fee Plan
Step 1: Select “Fee Management”. Mark the check box against any fee plan, select fee plan under “Change Fee Plan to” and then click on “Change”.
Step 2: The Fee Plan is changed successfully and the changed fee plan is reflected on the screen.
Assign Fee Plan
Step 1: Select any Fee Type, select Fee Plan and click on “Assign”.
Step 2: The fee plan is assigned to that respective fee type.
- f) Transport Fee Management
Step 1: Select Transport Fee Management in the left pane.
Step 2: To change “Route Details”, click on “Edit” button. Make necessary changes and click on “Change”.
Step 3: To change “Slab Details”, click on the “Edit” button. Make the required changes and click on “Change”.
- g) Late Fee Management
Step 1: Select “Late Fee Management” in the left pane. Choose any payment and click on the “Edit”.
Step 2: To disable the amount, select “Disable”, enter the reason and click on “Save”. The amount is disabled successfully.
Step 3: To give a fixed amount to the fine, click on “Fixed Amount”, enter the fixed fine amount, reason and click on “Save”.
A fixed fine amount is given to the student.
Step 4: To postpone the due date, click on “Postpone Due Date”, select a due date, enter the reason and click on “Save”.
- h) Cancelled Transactions – Generate Receipt
Step 1: Select “Cancelled Transactions” in the left pane. Choose any payment and click on the “Print” option.
Step 2: The canceled transaction’s receipt is generated.
- i) Invoice/Challan
Step 1: Select “Invoice/Challan” in the left pane. Select “Term” and click on “Get Invoice”.
Step 2: Take a print out of the challan by clicking on the “Print option”.
- j) Fee Ledger
Step 1: To view fee ledger details, click on “Fee Ledger”.
Step 2: You can export the report to “Excel” or print the report by clicking on the options.
- k) Fee Reminder Slip
Step 1: Select “Fee Reminder Slip” in the left pane.
Step 2: Select Term, Fee Reminder Type and click on “Get Reminder Slip”.
Step 3: Click on “Send Mail” or “Send SMS” to send reminders.
- l) Cheque Bounce Charges
Step 1: Select “Cheque Bounce Charges” in the left pane. Select the entry and click on “Delete” option.
Step 2: Select the reason and click on “Save”.
The cheque bounce charges are removed successfully.
2) Inventory Item Sales
Step 1: Select “Collections” on the top bar and choose “Inventory Item Sales”.
Step 2: Select the required options in the search criteria and click on “Search”.
Step 3: The miscellaneous payments record of the student is displayed. Select any miscellaneous payment from the “Kits List”. Upon selection, click on “Add Cart”.
Step 4: Increase or decrease the quantity of the items as per your requirement and click on “Pay Now”.
Step 5: Select the mode of payment, enter the required details and click on “Save and Continue”.
Step 6: The receipt for the inventory item sale is generated. Take a print copy of the same by clicking on the “Print Receipt” option.
Step 7: To view the previous transactions made by the student pertaining to inventory sales, click on the “Past Transactions” option.
Step 8: The past transactions report of the student is displayed.
3) Bank Reconciliation
Step 1: Select “Collections” on the top bar and choose “Bank Reconciliation”.
Step 2: Select the required options and click on “Get”.
Step 3: Select Cash Deposit/Cheque Deposit, mark the check box, enter the amount and click on “Save”.
4) Payment Search – Search receipt number
Step 1: Select “Collections” on the top bar and choose “Payment Search”.
Step 2: Select Branch. In the drop down choose receipt number and enter the receipt number. After entering, click on search.
Step 3: The receipt and the transaction details related to that receipt number is displayed. You may print the receipt by clicking on the print option.
5) Search Cheque – Cheque Bounce Entry
Step 1: Select “Collections” on the top bar and choose “Search Cheque”.
Step 2: Select Bank, enter cheque no and click on “Search”.
Step 3: Click on “Bounce”.
Step 4: Select “Yes, Proceed” option in the dialogue box that appears.
Step 5: Select “Bounce Date”, “Cheque Bounce Reason” and click on “Save Data”.
Step 6: The cheque bounce is done successfully and the same is reflected on the screen.
6) Money Spent
Step 1: Select “Collections” on the top bar and choose “Money Spent”.
Step 2: Enter the spent amount and click on “Next”.
Step 3: Enter the required details and click on “Save and Continue”.
Step 4: A receipt for the money spent is generated. You can take a print of the same by clicking on the “Print Receipt” option.
7) Money Received
Step 1: Select “Collections” on the top bar and choose “Money Received”.
Step 2: Select Bank on the right corner.
Step 3: Select the Purpose, enter the Amount, Narration and click on “Save”.
Step 4: To view bank deposits, click on “View bank deposits”.
Step 5: To view withdrawl details, click on “View withdraw details.”
8) Fee Collection Details
Step 1: Select “Collections” on the top bar and choose “Fee Collection Details”.
Step 2: Select the Fee Collection Type, enter the amount and click on “Next”.
Step 3: Enter the Description and click on “Next”.
Step 4: Select the mode of payment, enter the required details and click on “Save and Continue”.
Step 5: The receipt for the collection details is generated. You can take a print of the same by clicking on the “Print Receipt” option.
Step 6: To view other collection details, click on “Other Collection Details”.
Step 7: To view cancelled fee collection details, click on “View Cancelled Fee Collection Details”.
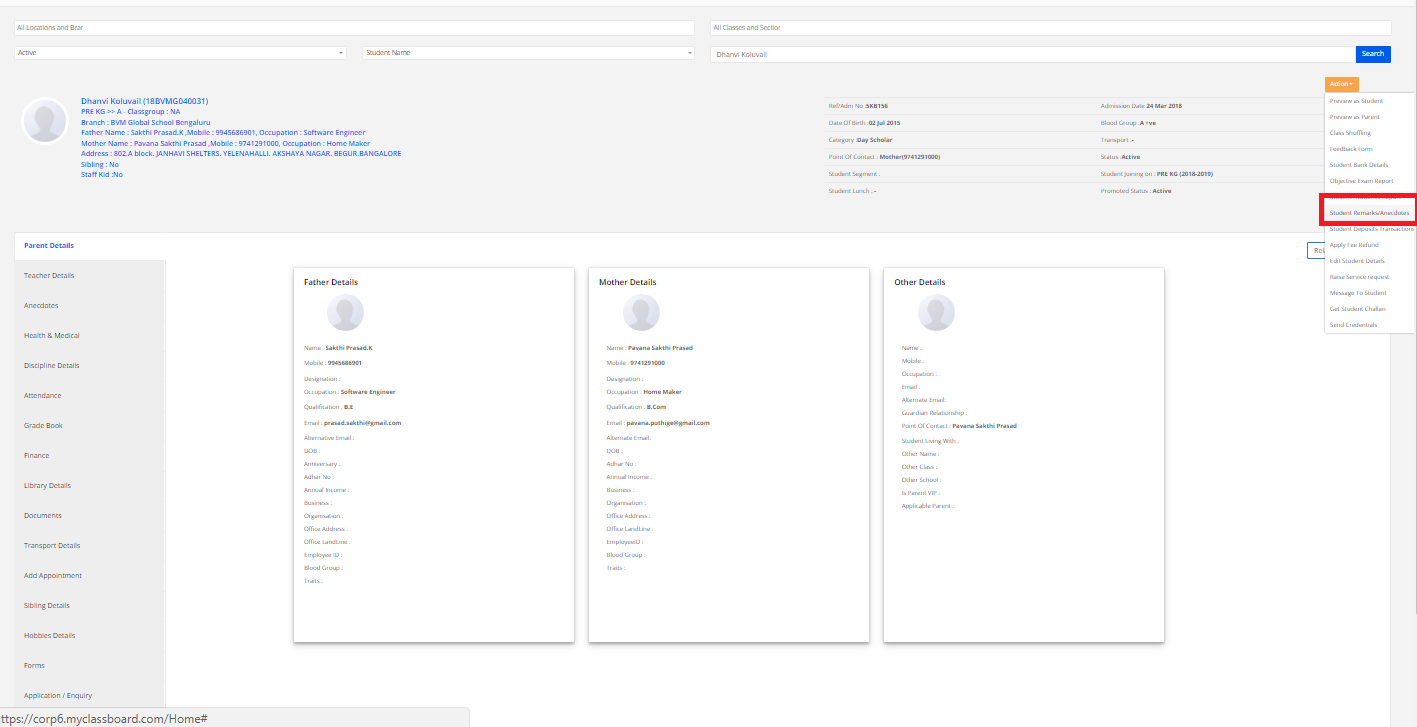
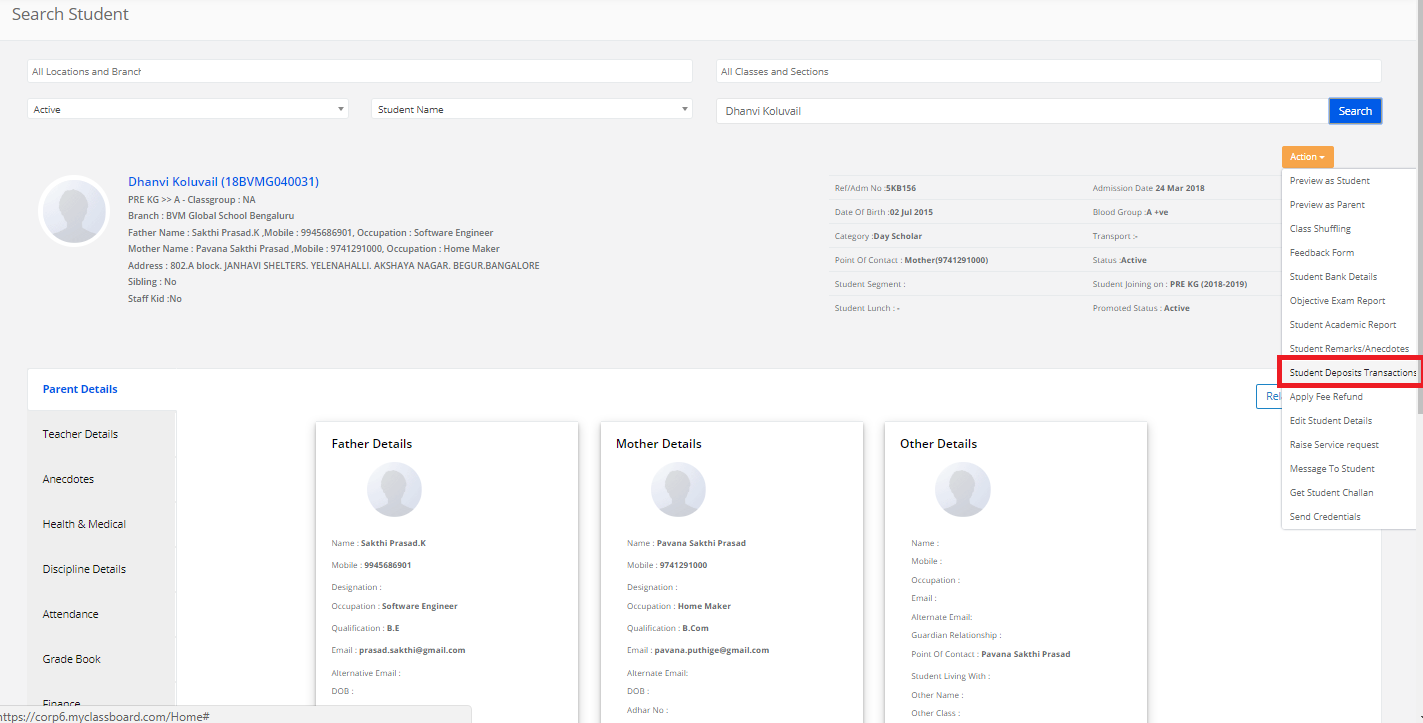
9) Student Transactions
Step 1: Select “Collections” on the top bar and choose “Student Transactions”.
Step 2: Select the required options in the search criteria and click on “Search”.
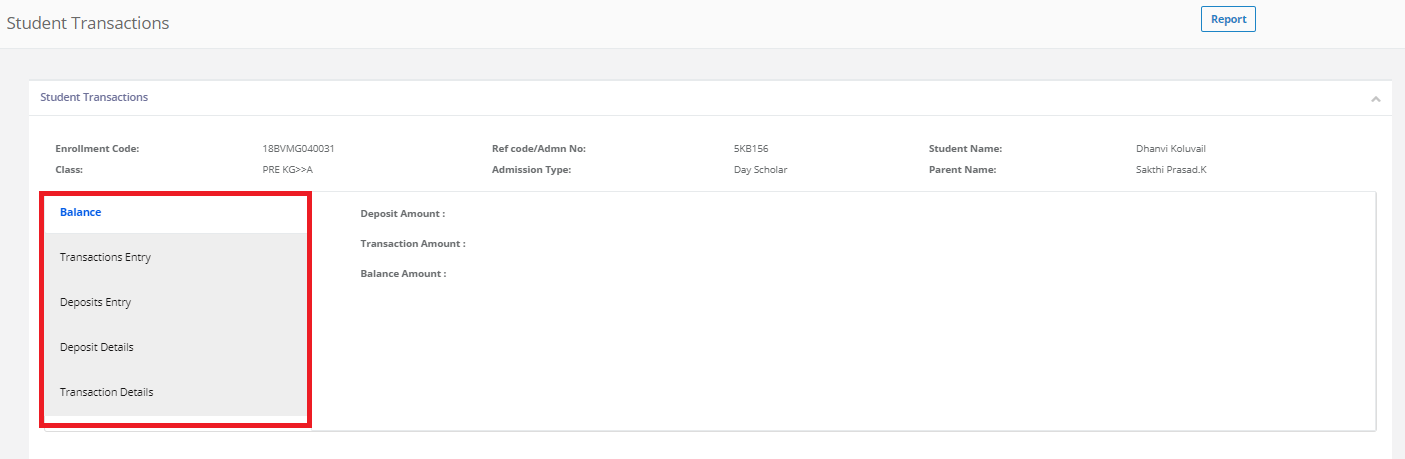
Deposits
Step 3: The student transactions are displayed in this page. To make a deposit, select “Deposit Details” and click on “Make Deposit”.
Step 4: Select any Category, enter the amount and click on “Next”.
Step 5: Select the mode of payment, enter the required details and click on “Save and Continue”.
Step 6: The receipt for the deposit made is generated. Take a print copy of the same by clicking on the “Print Receipt” option.
Step 7: To view the previous deposit details, select “Deposit Details”.
Transactions
Step 8: To make transactions, select “Transaction Details” and click on “Make Transaction”.
Step 9: Select any Category. The balance amount is shown. Enter the amount for transaction, Description and click on “Save”.
Step 10: To view the previous transaction details, select “Transaction Details” and the date range. The past transactions made by the student are displayed.
10) Upload Fee Payment Details
Step 1: Select “Collections” on the top bar and choose “Upload Fee Payment Details”.
Step 2: Select the required options and click on “Choose File”.
Step 3: Upon choosing a CSV File Format, click on “Validate to upload”.
11) Cheque Payment Entry
Step 1: Select “Collections” on the top bar and choose “Cheque Payment Entry”.
Step 2: Select the required options in the search criteria and click on “Search”.
Step 3: Select “Make Payment” in the left pane of the page and click on “Fee Details”. Mark the checkbox against the fee details and click on next.
Step 4: Select the mode of payment as “Cheque”, enter the details and click on “Save and Continue” to generate the receipt details.
Step 5: Click on “Print” option to take a printout of the generated fee receipt.
Level 3: Collection Reports
1) Fee Invoice Register
Step 1: Select “Collection Reports” on the top bar and choose “Fee Invoice Register”.
Step 2: Select the required options and click on “Show Report”.
Step 3: The Fee Invoice Register report is generated. You can export them to excel or print the report directly.
2) Fee Day Sheet – Generate Daily Fee Collections Report
Step 1: Select “Collection Reports” on the top bar and choose “Fee Day Sheet”.
Step 2: Enter the required details like Branch, Fee Accounts, Date, Payment Modes and click on “Show Report”.
Step 3: The Fee Day Sheet Report is generated. You can export them to excel or print the report directly.
Step 4: Select “Fee Typewise” from the top right corner dropdown and select the Branch, Dates and other details and click on “Get”.
Step 5: The Fee Typewise Report is generated. You can export them to excel or print the report directly.
Step 6: Select “Paymentmode Wise” from the top right corner dropdown and select the Branch, Dates and other details and click on “Get”.
Step 7: The Paymentmode Wise report is generated. You can export them to excel or print the report directly.
3) Bank Submission Form
Step 1: Select “Collection Reports” on the top bar and click on “Bank Submission Form”.
Step 4: Choose the options here like Branch, Bank, Date, Class and Payment Mode. After choosing the required options, click on Show Report.
Step 5: You’ll get the list of Bank Deposit Slips.
4) Online Payments – Online Payments Settlement Report
Step 1: Select “Collection Reports” on the top bar and choose “Online Payments”.
Step 2: Select “Settlement Report” on the top right corner.
Step 3: Select Branch, Bank name, Date, Online Payment Date Range and click on “Show Report”.
Step 4: The online payments settlement report is generated.
5) Fee Payment Search
Step 1: Select “Collection Reports” on the top bar and choose “Fee Payment Search”.
Step 2: Select the required options and click on “Get”.
Step 3: The fee receipt number details report is displayed.
6) Fee Head Wise Student List – Individual fee details of selected Class’ Students
Step 1: Select “Collection Reports” on the top bar and choose “Fee Head wise Student List”.
Step 2: Select the required options and click on “Show report”.
Step 3: The Individual fee details report of selected Class Students is displayed.
7) Dishonoured Cheques – Generate Dishonored Cheque Report
Step 1: Select “Collection Reports” on the top bar and choose “Dishonoured Cheques”.
Step 2: Choose the required options here like Branch, Date, Fee Accounts, Cheque Status (All, Repaid, Unpaid) and click on “Get”.
Step 3: If you want to generate a Dishonored Cheque Report as per the transaction date, select the option as “As per Transaction Date”.
Step 4: You may print the report directly or export into Excel, by clicking on the options.
Step 5: If you want to generate a Dishonored Cheque Report as per the Cheque bounce date, select the option as “As per Cheque Bounce Date”.
Step 6: You may print the report directly or export into Excel, by clicking on the options.
8) Month Wise Fee Reports
Step 1: Select “Collection Reports” on the top bar and choose “Month Wise Fee Reports”.
Step 2: Select “Month Wise Consolidated Due Report”, choose required options and click on “Show Report”.
Step 3: The Month Wise Consolidated Due Report is generated.
9) Cheque Statement – Generate a report on Cheque Statement
Step 1: Select “Collection Reports” on the top bar and choose “Cheque Statement”.
Step 2: Choose the required options here like Branch, Fee Accounts, Date, Bank and other options and click on “Show Report”.
Step 3: If you want to generate a Cheque statement report of deposited cheques, select the option as “Deposited cheques”.
Step 4: There is a drop-down using which you can include the required fields in the report. You may export the same to Excel, by clicking on the “Excel” option.
Step 5: If you want to generate a Cheque statement report of bounced cheques, select the option as “Bounced cheques”.
Step 6: There is a drop-down using which you can include the required fields in the report. You may export the same to Excel, by clicking on the “Excel” option.
Step 7: If you want to generate a Cheque statement report of both deposited & bounced cheques, select the option as “All cheques(including bounced cheques)”.
Step 8: There is a drop-down using which you can include the required fields in the report. You may export the same to Excel, by clicking on the “Excel” option.
10) Fee Balance Details – Fee Balance Report
Step 1: Select “Collection Reports” on the top bar and choose “Fee Balance Details”.
Step 2: Choose the required options and click on “Show report”.
Step 3: The Fee Balance Report is displayed.
11) Fee Transaction Summary – Generate Fee Transaction summary Report
Step 1: Select “Collection Reports” on the top bar and choose “Fee Transaction Summary”.
Step 3: Enter the required details like Branch, Fee Accounts, Date, etc. Select the cheque status as “Deposited Cheques” and click on “Show Report”.
Step 4: The report is generated. You can export the same into excel or print the report directly.
Step 5: Select the cheque status as “All Cheques” and click on “Show Report”.
Step 6: The report is generated. You can export the same into excel or print the report directly.
12) Fee Ledger Report
Step 1: Select “Collection Reports” on the top bar and choose “Fee Ledger Report”.
Step 2: Choose the required options and click on “Show report”.
Step 3: The Fee Ledger Report for the selected Class is displayed.
Level 4: Due Reports
1) Class Wise Due Report
Step 1: Select “Due Reports” on the top bar and click on “Class Wise Due Report”.
Step 2: The report is generated. You may print or export the same to “Excel” by clicking on the options.
2) Total Paid and Due Report
Step 1: Select “Due Reports” on the top bar and click on “Total Paid and Due Report”.
Step 2: Select the required fields and click on “Show Report” to generate a report.
Step 3: To generate a Fee Type wise Report, select “Fee Type Wise” and click on “Show Report”.
Step 4: The Fee Type Wise paid and due report is generated. You may print or export the same to “Excel” by clicking on the options.
Step 5: To generate an Installment Type wise Report, select “Installment Type Wise” and click on “Show Report”.
Step 6: The selected paid and due report is generated. You may print or export the same to “Excel” by clicking on the options.
Step 7: To generate a Fee Type wise & Installment Type Wise Report, select “Fee Type & Installment” and click on “Show Report”.
Step 8: The selected report is generated. You may print or export the same to “Excel” by clicking on the options.
3) Month Wise Fee Due Report
Step 1: Select “Due Reports” on the top bar and click on “Month Wise Fee Due Report”.
Step 2: Select the required fields and click on “Get Report”.
Step 3: The selected report is generated. You may print or export the same to “Excel” by clicking on the options.
5) Fee Reminder Slip
Step 1: Select “Due Reports” on the top bar and click on “Fee Reminder Slip”.
Step 2: Select the required fields and click on “Get Reminder Slips”.
Step 3: Click on “Send Mail” or “Send SMS” to send reminders.
6) Month Wise Consolidated Report
Step 1: Select “Due Reports” on the top bar and click on “Month Wise Consolidated Report”.
Step 2: Select the required fields and click on “Show Report”.
Step 3: The month wise consolidated fee report is generated.
Level 5: Approvals
1) Approve Concession Request
Step 1: Select “Approvals” on the top bar and choose “Approve Concession requests”.
Step 2: Select any branch and click on Pending requests.
Step 3: Select the student and click on “Approve/Reject”.
Step 4: Enter the remarks and click on “Approve”.
Step 5: The concession request is successfully approved.
2) Approve Unassign Fee Requests
Step 1: Select “Approvals” and choose “Approve Unassign Fee requests”.
Step 2: Select the student and click on “Approve/Reject”.
Step 3: Enter the remarks and click on “Approve”.
Step 5: The fee type is unassigned to that respective student.
Level 6: Reports
1) Branch Fee Ledger
Step 1: Select “Reports” on the top bar and choose “Branch Fee Ledger”.
Step 2: Select Branch, Date, Fee Account, Payment Mode and click on “Show Report”.
Step 3: The Branch Fee Ledger report is generated.
2) Tally Report
Step 1: Select “Reports” on the top bar and choose “Tally Report”.
Step 2: Select the Dates, Report Type, Fee Account and click on “Show Report”.
Step 3: The Tally Report is generated.
3) Student Fee Receipts Date Wise
Step 1: Select “Reports” on the top bar and choose “Student Fee Receipts Date Wise”.
Step 2: Select Dates, Fee Account, Payment Modes and click on “Show Report”.
Step 3: The report is generated.
4) Student Fee Dues Tally Report
Step 1: Select “Reports” on the top bar and choose “Student Fee Dues Tally Report”.
Step 2: Select Branch and click on “Show Report”.
Step 3: The report is generated.
5) Cancelled Fee Payment
Step 1: Select “Reports” on the top bar and choose “Cancelled Fee Payment”.
Step 2: Select Branch, Date Range, Report Type and click on “Show Report”.
Step 3: The Cancelled Fee Payment report is generated.
6) CASHIER REPORT – 1
Step 1: Select “Reports” on the top bar and choose “CASHIER REPORT – 1”.
Step 2: Select Date, Fee Account and click on “Show Report”.
Step 3: The report is generated.
7) CASHIER REPORT – 2
Step 1: Select “Reports” on the top bar and choose “CASHIER REPORT – 2”.
Step 2: Select Date, Fee Account and click on “Show Report”.
Step 3: The report is generated.
8) Stationery Order List
Step 1: Select “Reports” on the top bar and choose “Stationery Order List”.
Step 2: Select Date, and click on “Show Report”.
Step 3: The report is generated.
9) Concession Details
Step 1: Select “Reports” on the top bar and choose “Concession Details”.
Step 2: Select Report Type (Fee Type/Grade Wise). The Concession Details report is generated.
10) Month Wise Concession
Step 1: Select “Reports” on the top bar and choose “Month Wise Concession”.
Step 2: Select Location, Branch, Month and other required options and click on “Show Report”.
Step 3: The Month Wise Concession report of students is displayed.
11) Total Paid and Due Fee Report Ledger
Step 1: Select “Reports” on the top bar and choose “Total Paid and Due Fee Report Ledger”.
Step 2: Select the required options and click on “Show Report”.
Step 3: The report is displayed.
Stage 4: HR
Step 1: Select “HR” on the top bar of the dashboard. You will be directed to the HR page.
Level 1: Staff Attendance
1) Assign Staffs to Shifts
Step 1: Select “Staff Attendance” on the top bar and choose “Assign Staffs to Shifts”.
Step 2: Select Zone, Department, Not Assigned Staff and click on “Get Staff List”.
Step 3: A list of staff who are not assigned is displayed here.
Step 4: Choose any staff type and select any day. Now select the Shift, click on check box above it and click on Save.
Step 5: The attendance shift is assigned to that particular staff for that particular day.
2) Staff Attendance Sessions
Step 1: Select “Staff Attendance” on the top bar and choose “Staff Attendance Sessions”.
Step 2: Click on “+” symbol showing create attendance shift.
Step 3: Click on “Add new row”, name the shift and click on “submit”.
Step 4: In the newly created attendance shift, enter the details here like Session Name, Session Start time, Start Allowed Time, etc., and click on “Save” button.
Step 5: The Staff Attendance sessions are created successfully.
3) Staff Monthly Attendance
Step 1: Select “Staff Attendance” on the top bar and choose “Staff Monthly Attendance”.
Step 2: Select Branch, Department, Month and click on “Get Attendance”.
Step 3: Select any staff, enter the details and click on “Save Attendance”.
Level 2: Staff Leaves
1) Create Leave Type
Step 1: Select “Staff Leaves” on the top bar and choose “Create Leave Type”.
Step 2: Click on “Add Leave Type” to add a new Leave type.
Step 3:Name the leave, choose the month and select the options whether the leave type is a carry forward and linked to LOP and click on “Save” button.
Step 4: The Leave type is created successfully.
To Edit the Leave Type
Step 5: Select any row and click on the “Edit” option.
Step 6: Make the necessary changes and click on”Save”. The changes are updated successfully.
Add leaves to the same Leave Type
Step 7: To add more leaves to the same Leave Type, click on “Add Leaves”.
Step 8: Select the “Edit” button, enter the maximum no. of leaves and click on “Save”.
2) Staff Leave Category
Step 1: Select “Staff Leaves” on the top bar and choose “Staff Leave Category”.
Step 2: Select any category and click on the no. of leaves against the chosen category.
Step 3: Click on the “Edit” option above.
Step 4: Enter the no. of leaves per month. After entering, click on “Save” option.
3) Staff Holidays
Step 1: Select “Staff Leaves” on the top bar and choose “Staff Holidays”.
Step 2: Click on “Add New Holiday” to add a new holiday to the list.
Step 3: Select Location, Branch, Category, Department, From and To Date, Description. After giving the appropriate information, click on “Save”.
Step 4: A new holiday is created and added to the list.
4) Update Staff monthly leaves
Step 1: Select “Staff Leaves” on the top bar and choose “Update Staff monthly leaves”.
Step 2: Select Location, Branch, Leave Type, Category, Department, Month and click on “Get”.
Step 3: Select any entry, enter the no. of leaves taken and click on “Add Leaves”.
Level 3: Staff Details
1) Create Staff Details
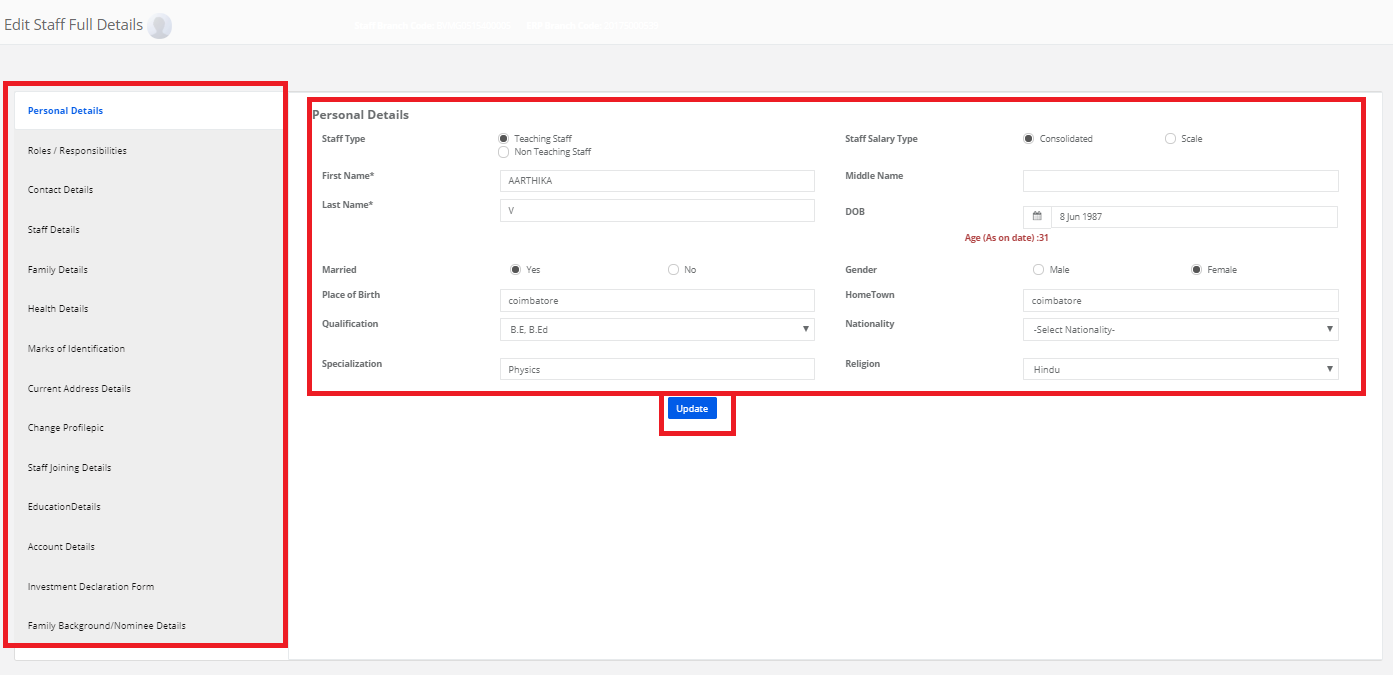
Step 1: Select “Staff Details” on the top bar and choose “Create Staff Details”.
Step 2: Select “Add Staff”.
Step 3: Enter all the adequate details of the staff here and click on “Save” button.
The Staff information is successfully added.
Upload Staff Details
Step 1: Go back to the “Create Staff Details” page. Select “Upload Staff”.
Step 2: Select Staff Type, Department and click on “Choose File” to upload a CSV File Format. Upon choosing, click on Validate to Upload.
The staff details are uploaded.
To Add/Create a New Staff Department:
Step 1: Go back to the “Create Staff Details” page. Select “Manage Department”.
Step 2: Click on “Add Department” to create a new staff department.
Step 3: Enter the required details here and click on “Save” button.
Step 4: The new staff department is added successfully.
To Add/Create a New Designation:
Step 1: Go back to the “Create Staff Details” page. Select “Manage Designation”.
Step 2: Click on “Add Designation” to create a new designation to the staff.
Step 3: Enter the required details here and click on “Save” button.
Step 4: The new designation is added successfully.
To Add/Create New Responsibilities:
Step 1: Go back to the “Create Staff Details” page. Select Branch and click on “Manage Responsibilities”.
Step 2: Click on “Add Responsibilities” to create new responsibilities.
Step 3: Enter the required details here and click on “Save” button.
Step 4: The new responsibilities are added successfully.
Level 4: Reports
1) Staff Attendance
Step 1: Select “Reports” on the top bar and choose “Staff Attendance”.
Step 2: Select any date and click on “Get Attendance”.
Step 3: The attendance details of the entire school staff are displayed here.
Step 4: A graphical representation of the same is displayed in the same page.
2) Staff Details Report
Step 1: Select “Reports” on the top bar and choose “Staff Details Report”.
Step 2: Select the type of Staff Report by choosing any of the options like Personal Details or Bank Details or Salary Details.
Step 3: Select other the required options, click on “Show Report”.
Step 4: The entire details of the staff are displayed here. You can export the same to excel.
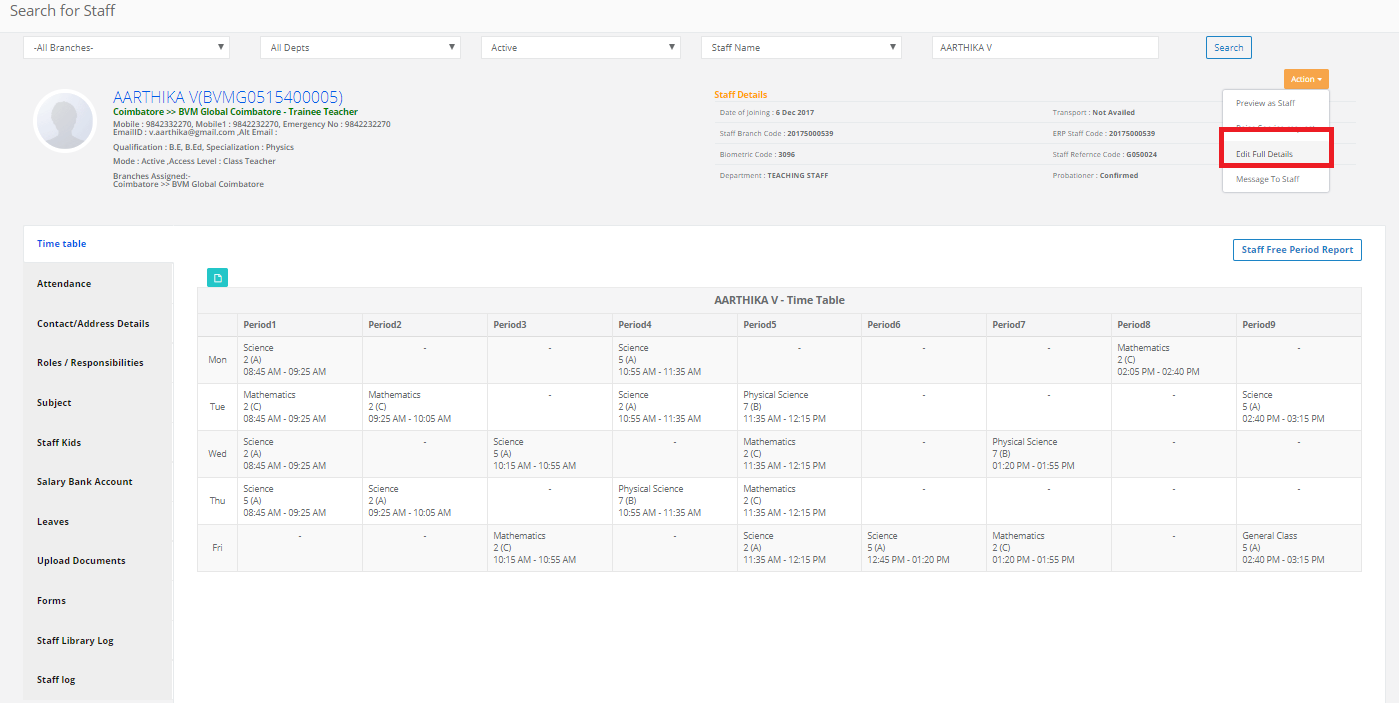
3) Staff Resignation Approvals
Step 1: Select “Reports” on the top bar and choose “Staff Resignation Approvals”.
Step 2: The list is displayed. Select any staff and click on “View Details”.
Step 3: Select “Accept/Reject” to approve or unapprove the resignation.
4) Inactive Staff Details
Step 1: Select “Reports” on the top bar and choose “Inactive Staff Details”.
Step 2: Select the date range and click on “Show Report”.
Step 3: The report is displayed. You may print the report or export the same to excel by choosing the options.
5) Late Comers – Early Leaving
Step 1: Select “Reports” on the top bar and choose “Late Comers – Early Leaving”.
Step 2: Select the Report Name, Attendance Date and click on “Show report”.
Step 3: The report is displayed.
Stage 5: Transport
Step 1: Select “Transport” on the top bar of the dashboard. You will be directed to the Transport page.
Level 1: Transport
1) Create Bus Routes
Step 1: Select “Transport” on the top bar and choose “Create Bus Route”.
Step 2: Enter the required details here like Route Name, Bus No, Driver Name, Driver Mobile Number etc.
Step 3: After entering all the necessary information click on “Submit” button. The bus routes are created successfully.
Create stops:
Step 4: After the bus route is created, click on the “Vehicle icon” to add stops for that respective route.
Step 5: Add the Stop No., Place, Nearest Landmark, Pickup and Drop time and click on save.
Step 6: You can add as many stops as required for that bus route.
Edit bus routes:
Step 7: Click on the edit option available for every record of bus route.
Step 8: Make the necessary changes and click on “Save” button. The changes are updated successfully.
2) Vehicle Details
Step 1: Select “Transport” on the top bar and choose “Vehicle Details”.
Step 2: Click on “+ Vehicle Details” to add the details of a new vehicle.
Step 3: Enter the Vehicle details like Vehicle registration no., model, purchase date, etc., route permit details and Registration book details here.
Step 4: After entering all the required information click on “Submit” button. The vehicle information is successfully added.
To Edit vehicle details:
Step 5: Click on the edit option available for every record of vehicle details that are created.
Step 6: Make the necessary changes and click on “Submit” button. The changes are updated successfully.
3) Upload Bus Routes to Students
Step 1: Select “Transport” on the top bar and choose “Upload Bus Routes to Students”.
Step 2: Select the required options like Type, Fee Plan. Select “Choose File” and click on “Submit” to upload the bus details in a “.CSV File Format”.
4) Upload Route Details
Step 1: Select “Transport” on the top bar and choose “Upload Route Details”.
Step 2: Select “Choose File” and click on “Upload to Validate” to upload the route details in a “.CSV File Format”.
5) Upload Stop Details
Step 1: Select “Transport” on the top bar and choose “Upload Stop Details”.
Step 2: Select “Route”, “Choose File” and click on “Upload to Validate” to upload the stop details in a “.CSV File Format”.
6) Assign Bus Route to Students
Step 1: Select “Transport” on the top bar and choose “Assign Bus Route to Students”.
Step 2: Select Bus route and click on “Get”.
Step 3: Click on “Add Student”.
Step 4: Enter the student name, class/section, Pick up, Drop and click on the “Save” button. The respective route is assigned to the student.
Level 2: Reports
1) Class Wise Transport Details
Step 1: Select Reports on the top bar and click on “Class Wise Transport Details”.
Step 2: The detailed list of the students availing transport service class wise is generated.
2) Slab Wise Students List
Step 1: Select Reports on the top bar and click on “Slab wise students list”.
Step 2: The report is generated.
3) Transport Fee Details
Step 1: Select Reports on the top bar and click on “Transport Fee Details”.
Step 2: The report is generated.
4) Transport report in detail
Step 1: Select Reports on the top bar and click on “Transport report in detail”.
Step 2: Select the required options and click on “Show Report”.
Step 3: The report is generated.
5) Transport availing Siblings
Step 1: Select Reports on the top bar and click on “Transport availing Siblings”.
Step 2: The report is generated.
6) Transport Month wise report
Step 1: Select Reports on the top bar and click on “Transport Month wise report”.
Step 2: Select Branch, Status, Report Type and click on “Get”.
Step 3: The report is generated.
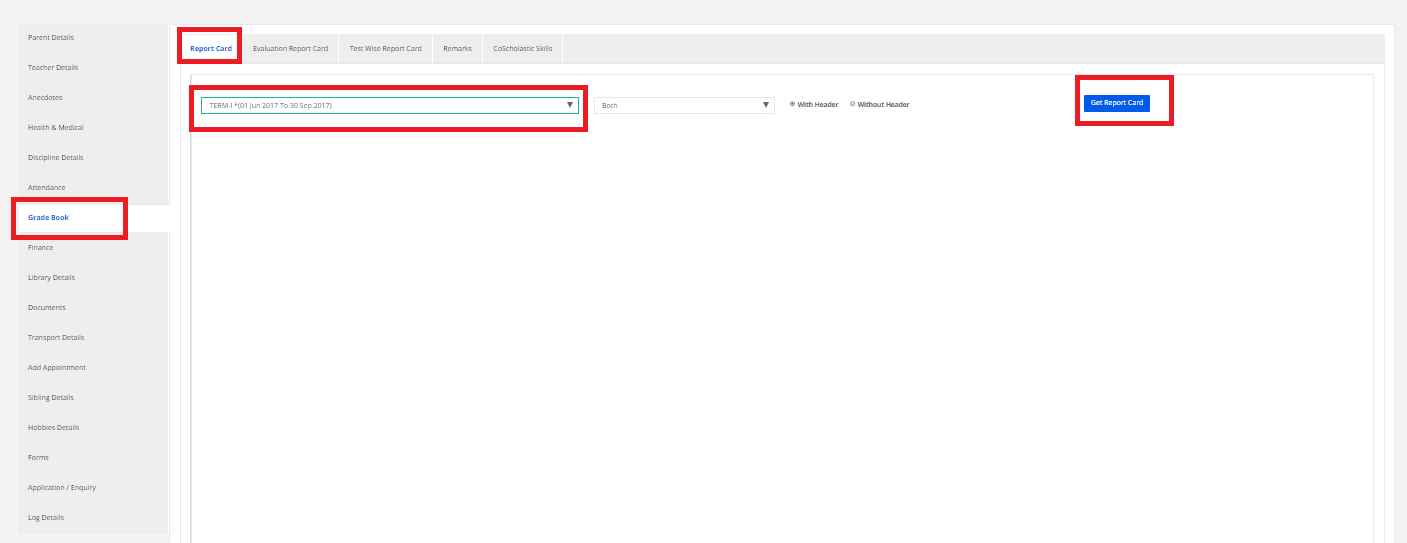
Stage 6: Gradebook
Step 1: Select “Gradebook” on the top bar of the dashboard. You will be directed to the Gradebook page.
Level 1: Gradebook
1) Evaluation Percentages
Step 1: Select “Gradebook” on the top bar and choose “Evaluation Percentages”.
Step 2: Select Structure, Class. Add or enter evaluation percentage as per the school requirements and click on “Save”.
2) Test Creation
Step 1: Select “Gradebook” on the top bar and choose “Test Creation”.
Step 2: Select Scholastic/Co-Scholastic ——> Select Class, Section, Subject, Term, Evaluations and click on “Get Tests”.
Step 3: Click on “Add” symbol and you’ll be directed to a “Test Creation Page”.
Step 4: Entering the required details here and click on “Save”. The Test is created successfully.
3) Scholastic Test Marks Entry
Step 1: Select “Gradebook” on the top bar and choose “Scholastic Test Marks Entry”
Step 2: Select Class, Section, Term, Evaluation and Subject. Upon selection, click on “Search”.
Step 3: Select any Test, click on “Enter Marks” and select “Click Here To Get Student List To Enter Marks Manually”, to enter marks manually
Step 4: Enter the marks of students individually here and click on “Update Marks”.
4) Co-Scholastic Grade entry
Step 1: Select “Gradebook” on the top bar and choose “Co Scholastic Grade entry”.
Step 2: Select Class, Term, Co-Scholastic Part, Co-Scholastic Skill-wise, Test and click on “Search”.
Step 3: Select Student, enter the grade individually and click on Save.
5) Assign Co Scholastic skills
Step 1: Select “Gradebook” on the top bar and choose “Assign Co Scholastic skills”
Step 2: Select Class, Co-Scholastic Part, Term and click on “Search”.
Step 3: To Assign, Select student —-> Select Skills(Mark the checkbox) and click on Save.
6) Upload Co Scholastic Grades
Step 1: Select “Gradebook” on the top bar and choose “Upload Co Scholastic Grades”.
Step 2: Select the required options like Class, Term, Co Scholastic Part, Assessment, Co Scholastic Master Skill and click on “Get”.
Step 3: Select at least one Co-Scholastic SubSkill under the Co-Scholastics Skill and click on “Proceed to get file format”.
Step 4: Click on “Download File Format” to download the sample file, enter the details to upload and finally select “Choose Files” to upload CCE Co Scholastic SubSkill Grades.
7) Assign Languages
Step 1: Select “Gradebook” on the top bar and choose “Assign Languages”.
Step 2: Select Class and click on “Get Language Subjects”.
Step 3: Choose any Language and click on “Assign/Unassign Subjects(Manually)”.
Step 4: Select the students by marking the checkbox and click on “Assign/Unassign Subjects to Students”.
8) Co-Scholastic skills to Teacher
Step 1: Select “Gradebook” on the top bar and choose “Co Scholastic skills to Teacher”.
Step 2: Select Class, Section, Co Scholastic skill and click on “Get”.
Step 3: Select any Skill and click on “Assign”.
Step 4: Select the staff name and click on “Assign”.
9) Subject wise remarks
Step 1: Select “Gradebook” on the top bar and choose “Subject-wise remarks”
Step 2: Select Class, Term, Evaluation, Subject and click on “Get Student Remarks”.
Step 3: Select Student, enter the remarks individually and click on Save.
10) Student Remarks
Step 1: Select “Gradebook” on the top bar and choose “Student Remarks”.
Step 2: Select Class, Section, Term, Evaluation, Subject, Custom/Common message and click on “Get Students”.
Step 3: Select “Create/View Remark Details”. Now select any Student, enter the remarks individually and click on Save.
Step 4: If you want to upload the remarks in bulk, simply select “Upload Remark Details”. Click on “Choose File” to upload a “.csv” file format ——> “Validate to Upload”.
11) Class Teacher Remarks
Step 1: Select “Gradebook” on the top bar and choose “Class Teacher Remarks”.
Step 2: Select Class, Section, Term, Evaluation, Subject, Custom/Common message and click on “Get Students”.
Step 3: Select “Create/View Remark Details”. Now select any Student, enter the remarks individually and click on Save.
Step 4: If you want to upload the remarks in bulk, simply select “Upload Remark Details”. Click on “Choose File” to upload a “.csv” file format ——> “Validate to Upload”.
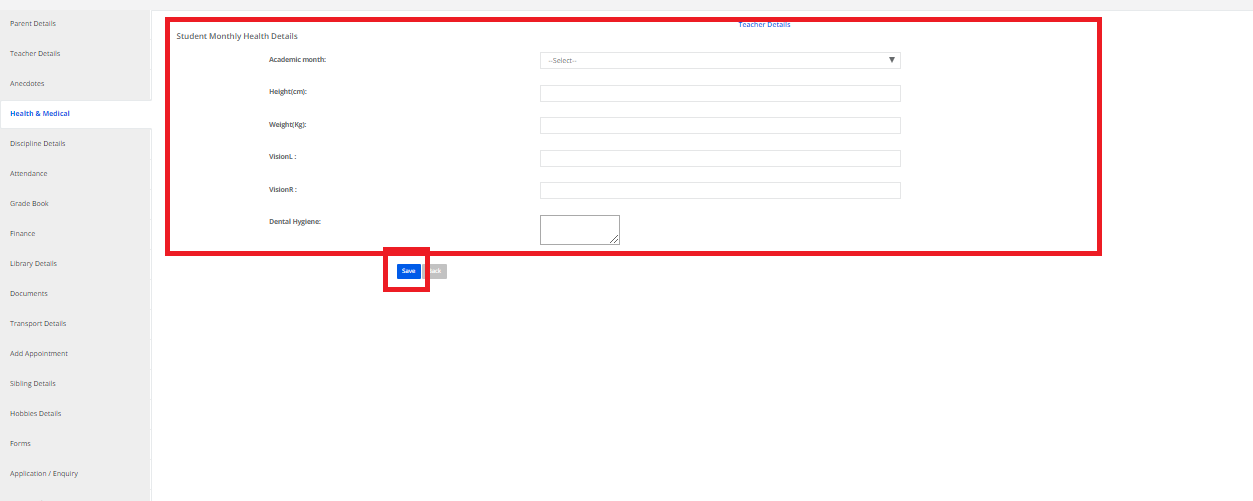
12) Student Health Details
Step 1: Select “Gradebook” on the top bar and choose “Student Health Details”.
Step 2: Select Class, Term, and other required options and click on “Get Students”.
Step 3: Select Student, enter the health details individually and click on Save.
Level 2: Reports
1) Evaluation Report
Step 1: Select “Reports” on the top bar and click on “Evaluation Report”.
Step 2: Select the required options and click on “Show Report”.
Step 3: You may export the same to excel by clicking the “Excel” option.
Step 4: To get a Subject wise Evaluation report, choose “Subject Wise Analysis” option.
2) Exams Marks Report
Step 1: Select “Reports” on the top bar and click on “Exams Marks Report”.
Step 2: Select the required options and click on “Get”.
Step 3: You may export the same to excel or print by clicking the options.
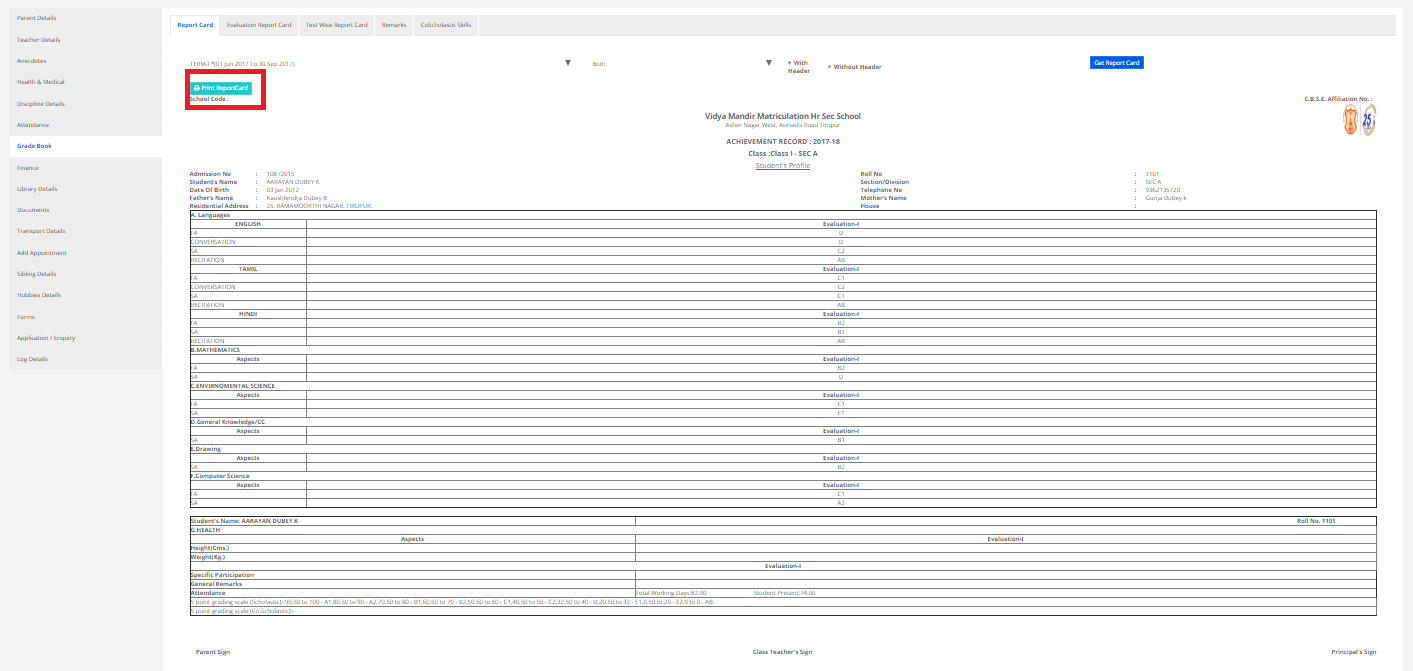
3) Bulk Report Cards
Step 1: Select “Reports” on the top bar and click on “Bulk Report Cards”.
Step 2: Select the required options and click on “Get Report Card”.
Step 3: Click on “Print Report Card” to print the report cards.
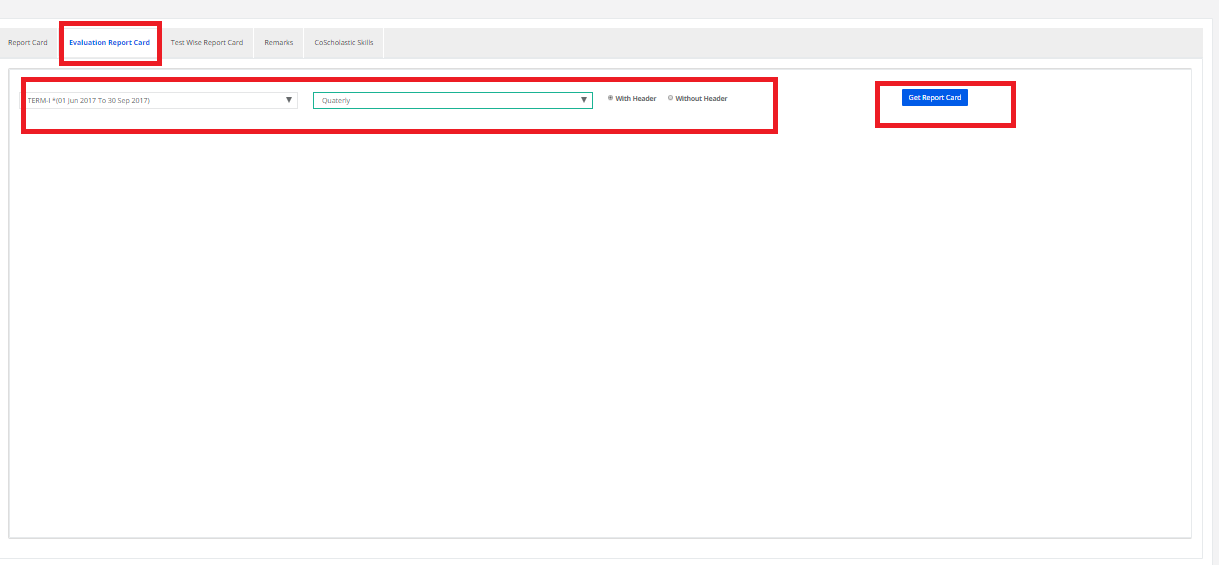
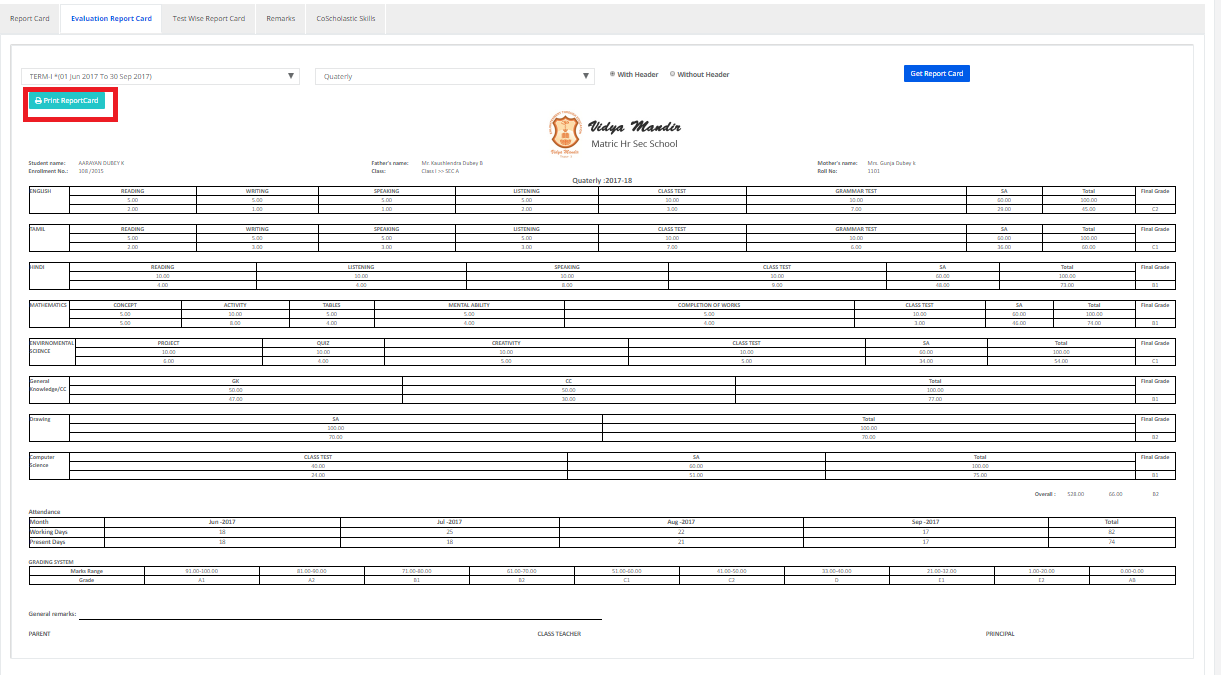
4) Bulk Evaluation Wise Report Cards
Step 1: Select “Reports” on the top bar and click on “Bulk Evaluation Wise Report Cards”.
Step 2: Select the required options and click on “Get Report Card”.
Step 3: Click on “Print Report Card” to print the report cards.
5) Term Wise Analysis Report
Step 1: Select “Reports” on the top bar and click on “Term Wise Analysis Report”.
Step 2: Select the required options and click on “Show Report”.
Step 3: Click on “Print” option to print the same.
Stage 7: Communication
Step 1: Select “Home” on the right-hand top corner of the home page.
Step 2: Select Communication. You’ll be directed to the “Communication” page.
Level 1: SMS
1) Send SMS
Step 1: Select “SMS” on the top bar and select “Send SMS”.
Step 2: Click on “Send Special Information” and choose your required options here to continue.
Step 3: Enter the message here and click on “Preview and Send SMS”.
Step 4: If you choose to send SMS to a target audience, select “For Selected Students Only” option.
Step 5: Select the check box against students, enter message and click on “Preview and Send SMS”.
Step 6: The SMS is sent to the selected students.
2) Send Fee Due SMS
Step 1: Select “Send SMS” on the top bar and click on “Send Fee Due SMS”.
Step 2: Click on “Send Fee Due SMS” from the left pane and choose your required options here to continue.
Step 3: Select the check box against the students and click on “Preview and Send SMS”.
3) Send Marks to Students
Step 1: Select “SMS” on the top bar and select “Send Marks to Students”.
Step 2: Choose your required options here and click on “Send SMS”.
The SMS is sent.
Level 2: Email
1) Send Email – To Students/Parents
Step 1: Select “Email” on the top bar and click on “Send Email”.
Step 2: Select the required options, draft a mail and click on “Send Mail”.
Step 3: To add an attachment, click on “Choose Files” and then click on “Send Mail”.
2) Send Email to Staff
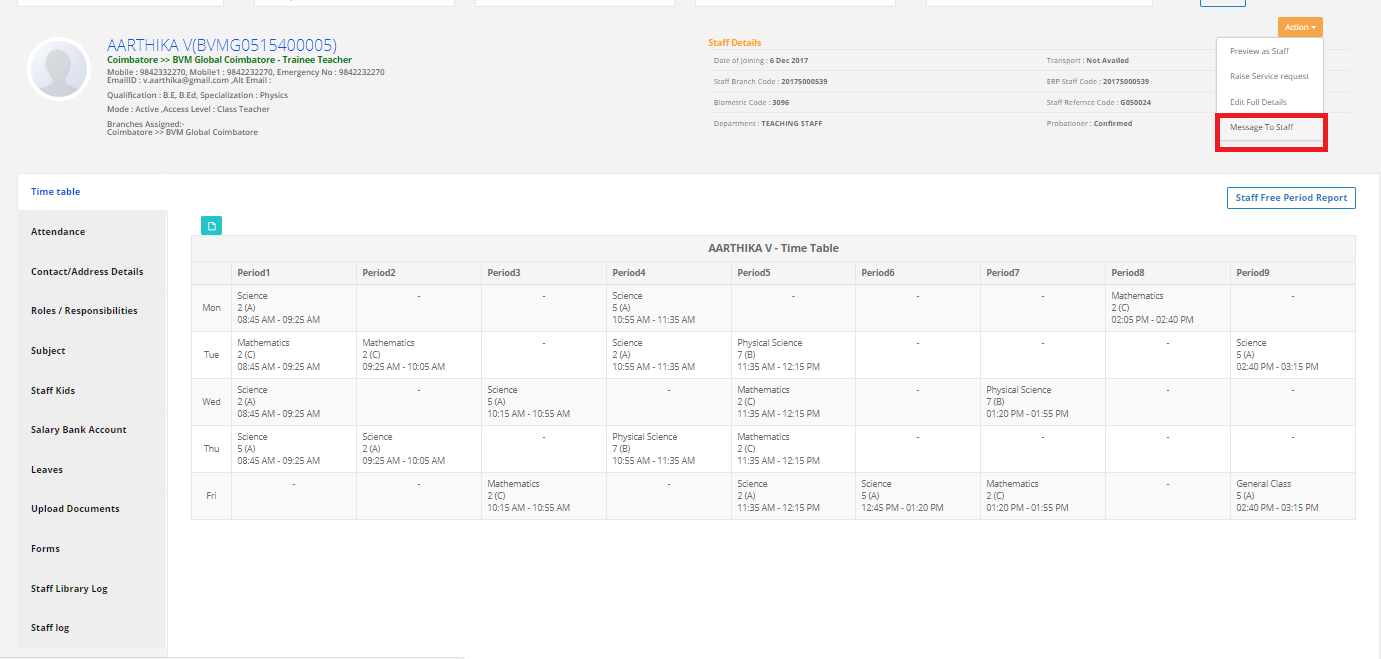
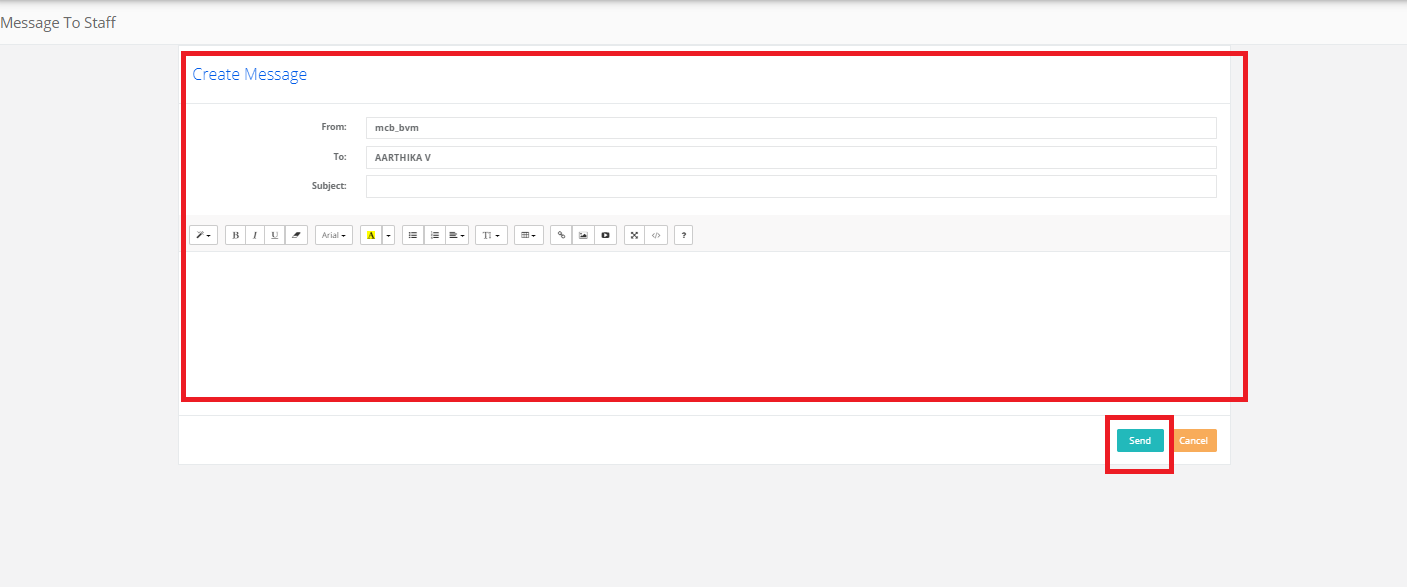
Step 1: Click on “Email” on the top bar and select “Send Email to Staff”.
Step 2: Select the required options, draft a mail and click on “Send Mail”.
Step 3: To add an attachment, click on “Choose Files” and then click on “Send Mail”.
Level 3: Others
1) Photo Gallery
Step 1: Select “Others” on the top bar and click on “Photo Gallery”.
Step 2: Click on the “+ Photo Gallery” Symbol to upload photos to the gallery.
Step 3: Select the required options and click on “Upload Images”.
Step 4: After uploading click on “Save”.
2) Announcement
Step 1: Select “Others” on the top bar and click on “Announcements”.
Step 2: Click on “+” symbol showing “Create Announcements” and enter the required details.
Step 3: You can also select the users here by choosing any of the options like “All users or Staff or Parents/Students”.
Step 4: Enter the information and Click on “Save”. The announcement is created and shared.
Add attachments
Step 5: If you want to share any documents in the Announcements, the same can be done by simply clicking the “Choose Files” option. Upload attachments, documents, pdf files, word files etc to post and click “Save”. The attachments are posted in the Announcement.
Delete an Announcement
Step 1: Go back to “Announcements” page. To delete, select an announcement that was created by you and click on the “Delete” option shown in the right.
The Announcement is deleted successfully.
Note: You can only delete those announcements created by you.
3) Event Calendar
Step 1: Select “Others” on the top bar and click on “Event Calendar”.
Step 2: Select “Create Event” on the top right corner of the page.
Step 3: Select a date to add a new event. Add the event title, Select if is a holiday, Event type(To add event type, select “Create event” —> Add event —> Save).
Step 4: After entering all the details, click on “Save”. Your event is created and added to the Calendar.
4) Student Diary
Step 1: Select “Others” on the top bar and click on “Student Diary”.
Step 2: Select the required options and click on “Show”.
Step 3: Select Subject Wise Diary, choose a subject and enter the classwork/homework and click on “Add Record”.
Step 4: To add an attachment, click on “Choose Files” and then click on “Add Record”.
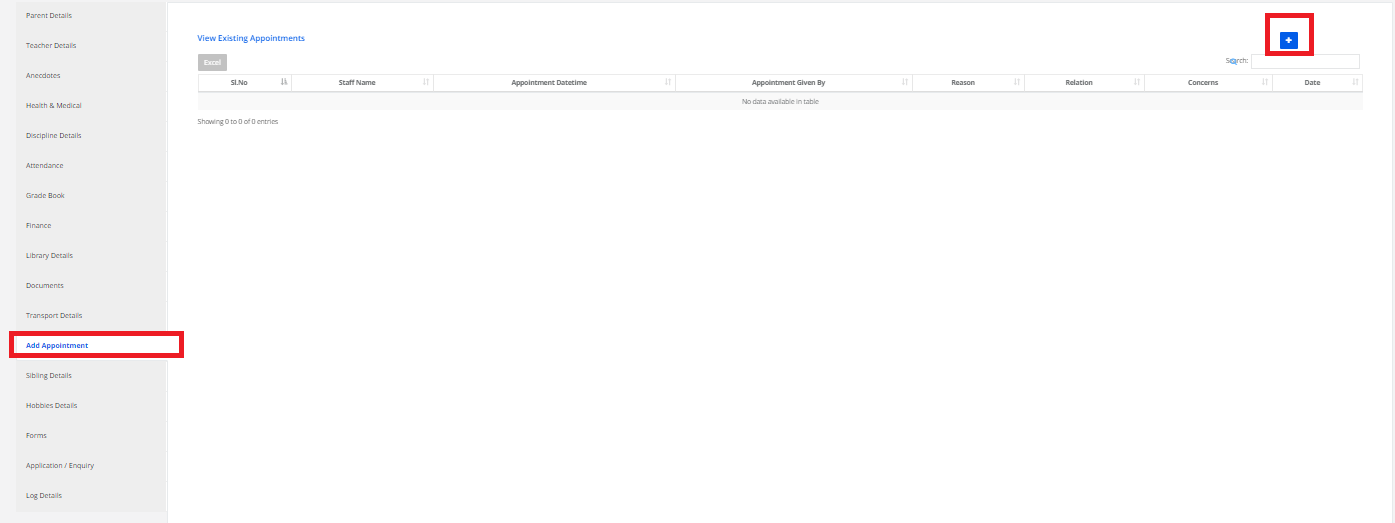
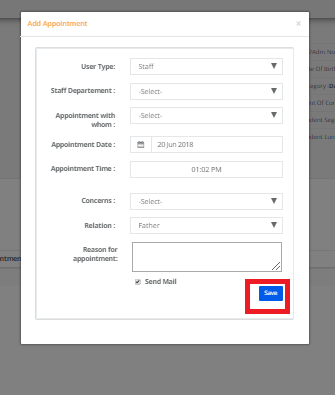
5) Give Assignments
Step 1: Select “Others” on the top bar and click on “Give Assignments” under it.
Step 2: Select the required options and click on “+ Assignment”.
Step 3: Enter the necessary information and click on “Save”.
Step 4: To add an attachment, click on “Choose Files” and then click on “Save”.
Level 4: Reports
1) Message Report
Step 1: Select “Reports” on the top bar and click on “Message Report”.
Step 2: Choose your Date Range here and click on “Get”.
Step 3: The messages report is generated.
2) Assignment Report
Step 1: Select “Reports” on the top bar and click on “Assignment Report”.
Step 2: Choose your required options here and click on “Get”.
Step 3: The Assignments report is generated. A graphical representation of the same is also displayed.
3) Announcement Details Report
Step 1: Select “Reports” on the top bar and click on “Announcement Details Report”.
Step 2: Choose your required options here and click on “Get”.
Step 3: The Announcement Details Report is generated. A graphical representation of the same is also displayed.
4) SMS Delivery Report
Step 1: Select “Reports” on the top bar and click on “SMS Delivery Report”.
Step 2: Choose your required options here and click on “Show Report”.
Step 3: The SMS Delivery report is generated which can be printed by clicking on “Print” option.
Stage 8: Admissions
Step 1: Select “Home” on the top right corner of the dashboard.
Level 1: Front Office
1) Admission Form
Step 1: Select “Front Office” on the top bar and choose “Admission Form”.
Step 2: Choose the options from the search criteria. Select “Direct Admission”.
Step 3: Keep entering the details of the student in every page as displayed (Student Details, Previous School & Other Details, Student Parent Details, Address Details, Finish) and click “Next” till all the data is included.
2) Enquiry Form
Step 1: Select “Front Office” on the top bar and choose “Enquiry Form”.
Step 2: Click on “Create New” to add a new Enquiry Form.
Step 3: Keep entering the details of the student in every page as displayed (Personal Details, Parent Details, Address Details, Others) and click “Next” till all the data is included.
3) Application Form
Step 1: Select “Front Office” on the top bar and choose “Application Form”.
Step 2: Click on “Create New” to add a new Application Form.
Step 3: Keep entering the details of the student in every page as displayed (Personal Details, Parent Details, Address & Other Details, Fee Details, Payment Details) and click “Next” till all the data is included.
Level 2: Reports
1) Student Dashboard
Step 1: Select “Reports” on the top bar and click on “Student Dashboard”.
Step 2: Select analysis report options from the drop-down.
Step 3: The required report is generated.
2) Residential Wise DashBoard
Step 1: Select “Reports” on the top bar and click on “Residential Wise DashBoard”.
Step 2: The report is generated.
3) Quota Wise DashBoard
Step 1: Select “Reports” on the top bar and click on “Quota Wise DashBoard”.
Step 2: Select required options and click on “Show Report”.
Step 3: The report is generated.
4) Pre-admission Details
Step 1: Select “Reports” on the top bar and click on “Pre-admission Details”.
Step 2: Select the report type to generate the Pre-admission Details report.
5) Admission Review
Step 1: Select “Reports” on the top bar and click on “Admission Review”.
Step 2: Select required options and click on “Show Report”.
Step 3: The Admission Review report is displayed.
6) Day Wise DashBoard
Step 1: Select “Reports” on the top bar and click on “Day Wise DashBoard”.
Step 2: Select Days and click on Get to generate the report.
7) Pre-Admission Details By Dates
Step 1: Select “Reports” on the top bar and click on “Pre-Admission Details By Dates”.
Step 2: Select Dates and click on “Get”.
Step 3: The required report is generated.
8) Registration Review
Step 1: Select “Reports” on the top bar and click on “Registration Review”.
Step 2: Select the report type and click on “Show Report”.
Step 3: The Registration Review report is displayed.
9) Registration Summary
Step 1: Select “Reports” on the top bar and click on “Registration Summary”.
Step 2: Select the required options and click on “Show Report”.
Step 3: The Registration summary report is generated.
Stage 9: Reports
Step 1: Select “Reports” on the top bar of the dashboard. You’ll be directed to the Reports page.
Level 1: Academics
1) Student Contact Details
Step 1: Select Academics on the top bar and click “Student Contact Details” under it.
Step 2: Select Status, Class, Section and click on “Show Report”.
Step 3: The student contact details report is generated.
2) Staff DashBoard
Step 1: Select Academics on the top bar and click “Staff DashBoard” under it.
Step 2: Select Branch, Year and click on “View Staff”.
Step 3: The staff report is generated.
3) Student Attendance
Step 1: Select Academics on the top bar and click “Student Attendance” under it.
Step 2: Select the Date Range and click on “Show Report”.
Step 3: The student attendance report is generated. You can export the same to excel.
5) Age wise Student strength
Step 1: Select Academics on the top bar and click “Age wise Student strength” under it.
Step 2: Select Date and click on “Show Report”.
Step 3: A list of Age wise student count is generated. You can export the same to excel.
5) Sibling Report
Step 1: Select Academics on the top bar and click “Sibling Report” under it.
Step 2: The Siblings report is displayed.
6) Monthly Attendance Report
Step 1: Select Academics and click “Monthly Attendance Report” under it.
Step 2: Select Branch, Class & Section, Month and click on “Get”.
Step 3: The monthly student attendance report is generated.
7) Month wise Student strength
Step 1: Select Academics and click “Month wise Student strength” under it.
Step 2: Select Branch, Class, Student status and click on “Show Report”.
Step 3: The Month wise Student strength report is displayed.
8) Download Hall Tickets
Step 1: Select Academics and click “Download Hall Tickets” under it.
Step 2: Select Class, Section, Term, Evaluation, Hallticket Format and click on “Get Test”.
Step 3: Select the required tests and click on “Get Hall Tickets”.
Step 4: Print the hall tickets by clicking on the print option.
9) Inactive Students
Step 1: Select Academics and click “Inactive Students” under it.
Step 2: Select the required options and click on “Get”.
Step 3: The list of Inactive Students is displayed.
10) Admission Details Report
Step 1: Select Academics and click “Admission Details Report” under it.
Step 2: Select the required details and click on “Show Report”.
Step 3: The admission details report is displayed.
Level 2: Finance
1) Branch Fee Ledger
Step 1: Select Finance and click “Branch Fee Ledger” under it.
Step 2: Choose the required options and click on “Show Report”.
Step 3: The Branch Fee Ledger report is generated.
2) Tally Report
Step 1: Select Finance and click “Tally Report” under it.
Step 2: Select the Dates, Report Type, Fee Account and click on “Show Report”.
Step 3: The Tally Report is generated.
3) Student Fee Receipts Date Wise
Step 1: Select Finance and click “Student Fee Receipts Date Wise” under it.
Step 2: Select Dates, Fee Account, Payment Modes and click on “Show Report”.
Step 3: The report is generated.
4) Student Fee Dues Tally Report
Step 1: Select Finance and click “Student Fee Dues Tally Report” under it.
Step 2: Select Branch, Date and click on “Show Report”.
Step 3: The report is generated.
5) Cancelled Fee Payment
Step 1: Select Finance and click “Cancelled Fee Payment” under it.
Step 2: Select Branch, Date Range, Report Type and click on “Show Report”.
Step 3: The Cancelled Fee Payment report is generated.
6) CASHIER REPORT- 1
Step 1: Select Finance and click “CASHIER REPORT- 1” under it.
Step 2: Select Date, Fee Account and click on “Show Report”.
Step 3: The report is generated.
6) CASHIER REPORT- 2
Step 1: Select Finance and click “CASHIER REPORT- 2” under it.
Step 2: Select Date, Fee Account and click on “Show Report”.
Step 3: The report is generated.
7) Stationery Order List
Step 1: Select Finance and click “Stationery Order List” under it.
Step 2: Select Branch, Date and click on “Show Report”.
Step 3: The report is generated.
8) Concession details
Step 1: Select Finance and click “Concession details” under it.
Step 2: Select the concession type and click on it.
Step 3: The report is generated.
9) Month wise Concession
Step 1: Select Finance and click “Month wise Concession” under it.
Step 2: Select the required options and click on “Show Report”.
Step 3: The report is generated.
10) Total paid and due Report Fee Ledger
Step 1: Select Finance and click “Total paid and due Report Fee Ledger” under it.
Step 2: Select required options and click on “Show Report”.
Step 3: The report is generated.
11) Misc. Fee Collection Details
Step 1: Select Finance and click “Misc. Fee Collection Details” under it.
Step 2: Select Branch and click on “Show Report”.
Step 3: The report is generated.
Level 3: HR
1) Staff Salary Details
Step 1: Select HR and click “Staff Salary Details” under it.
Step 2: Select Location, Branch, year and click on “Get”.
2) Individual Salaries
Step 1: Select HR and choose “Individual Salaries” under it.
Step 2: Select Department and click on “Get”.
Step 3: The salaries of the staff for that respective department is displayed.
3) Staff Attendance
Step 1: Select HR and choose “Staff Attendance” under it.
Step 2: Select Date and click on “Get Attendance”. The report is generated.
4) Staff Biometric Attendance
Step 1: Select HR and choose “Staff Biometric Attendance” under it.
Step 2: Select Shift, Staff Department, Attendance Date and click on “Show Report”.
Step 3: The report is displayed.
5) Staff Details Report
Step 1: Select HR and choose “Staff Details Report” under it.
Step 2: Select Location, Branch, Department. You can also select the type of Staff Report by choosing any of the options like Personal Details or Bank Details or Salary Details.
Step 3: After choosing the required options, click on “Show Report”.
Step 4: The entire details of the staff are displayed here with a download option.
6) Staff Resignation Approvals
Step 1: Select HR and choose “Staff Resignation Approvals” under it.
Step 2: Select any staff and click on “View Details”.
Step 3: The details of the staff are displayed. Approve or unapprove the resignation by clicking on “Approve/Reject” button.
7) Inactive Staff Details
Step 1: Select HR and choose “Inactive Staff Details” under it.
Step 2: Select the Dates and click on “Show Report”.
Step 3: The details of inactive staff between the selected period is displayed.
8) Staff Joining Details Report
Step 1: Select HR and choose “Staff Joining Details Report” under it.
Step 2: Select Location, Branch, Date Range and click on “Show report”.
Step 3: The report is generated.
9) Late Comers – Early Leaving
Step 1: Select HR and choose “Late Comers – Early Leaving” under it.
Step 2: Select the Report Name, Attendance Date and click on “Show report”.
Step 3: The report is displayed.
Level 4: Transport
1) Class Wise Transport Details
Step 1: Select “Transport” on the top bar and choose “Class Wise Transport Details” under it.
Step 2: The report is displayed.
2) Slab wise students list
Step 1: Select Transport on the top bar and click on “Slab wise students list”.
Step 2: The detailed list of the students availing transport service Slab wise is generated.
3) Transport Fee Details
Step 1: Select Transport on the top bar and click on “Transport Fee Details”.
Step 2: The transport fee details report is generated. A graphical representation of the same is also displayed.
4) Transport report in detail
Step 1: Select Transport on the top bar and click on “Transport report in detail”.
Step 2: Select the required options and click on “Show Report”.
Step 3: A detailed transport report is generated.
5) Transport availing Siblings
Step 1: Select Transport on the top bar and click on “Transport availing Siblings”.
Step 2: A detailed report of the siblings availing the transport service is generated.
6) Transport Month wise report
Step 1: Select Transport on the top bar and click on “Transport Month wise report”.
Step 2: Select Branch, Status, Report Type and click on “Get”.
Step 3: The month wise transport details report is generated.
7) Route and Month wise Details
Step 1: Select Transport on the top bar and click on “Route and Month wise Details”.
Step 2: Select Branch, Installments, Students and click on “Show Report”.
Step 3: The month wise transport details report is generated.
Level 5: Grade Book
1) Evaluation Report
Step 1: Select “Gradebook” on the top bar and click on “Evaluation Report”.
Step 2: Select the required options and click on “Show Report”.
Step 3: You may export the same to excel by clicking the “Excel” option.
Step 4: To get a Subject wise Evaluation report, choose “Subject Wise Analysis” option.
2) Exam Marks Report
Step 1: Click on “Gradebook” on the top bar and select “Exam Marks Report”.
Step 2: Select the required options and click on “Get”.
Step 3: The report card is generated. You may print the report card or export the same to Excel.
3) Bulk Report Cards
Step 1: Select “Gradebook” on the top bar and click on “Bulk Report Cards”.
Step 2: Select the required options and click on “Get Report Card”.
Step 3: Click on “Print Report Card” to print the report cards.
4) Bulk Evaluation Wise Report Cards
Step 1: Select “Gradebook” on the top bar and click on “Bulk Evaluation Wise Report Cards”.
Step 2: Select the required options and click on “Get Report Card”.
Step 3: Click on “Print Report Card” to print the report cards.
5) Term Wise Analysis Report
Step 1: Select “Reports” on the top bar and click on “Term Wise Analysis Report”.
Step 2: Select the required options and click on “Show Report”.
Step 3: Click on “Print” option to print the same.
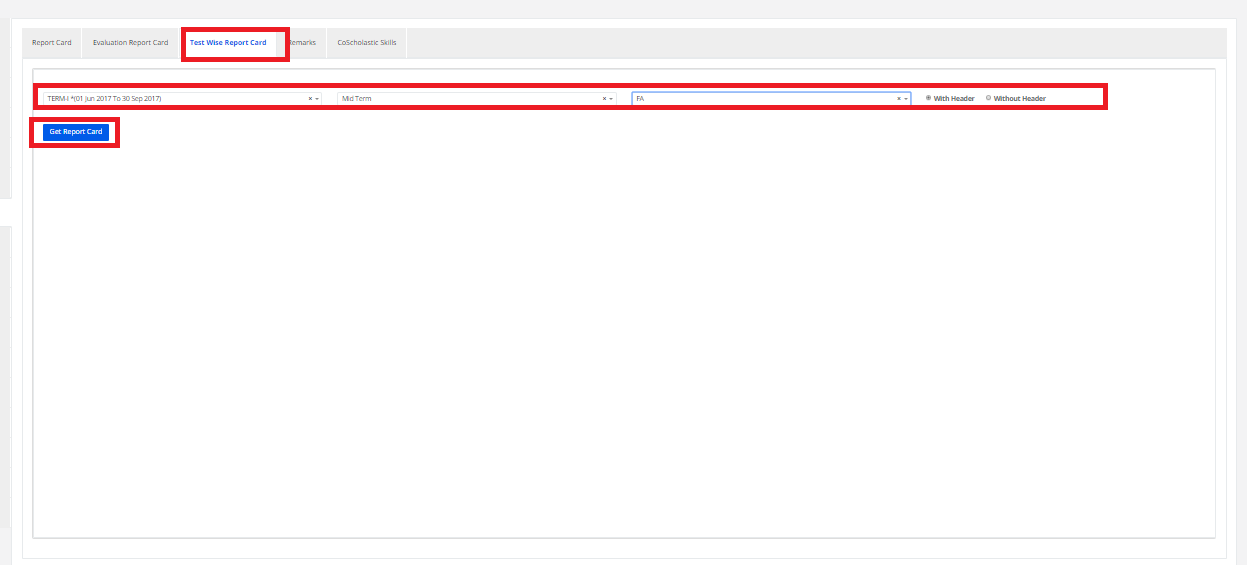
6) Test Wise Analysis Report
Step 1: Select “Reports” on the top bar and click on “Test Wise Analysis Report.
Step 2: Select the required options and click on “Get”.
Step 3: Click on “Print” option to print the same.
Level 6: Admissions
1) Residential Wise DashBoard
Step 1: Select “Admissions” and click on “Residential Wise DashBoard”.
Sep 2: The Residential Wise DashBoard is displayed.
2) Quota Wise DashBoard
Step 1: Select “Admissions” and click on “Quota Wise DashBoard”.
Step 2: Choose required options and click on “Show Report”.
Step 3: The report is generated.
3) Pre-admission Details
Step 1: Select “Admissions” and click on “Pre-admission Details”.
Step 2: Select the report type to generate the report.
4) Admission Review
Step 1: Select “Admissions” and click on “Admission Review”.
Step 2: Choose required options and click on “Show Report”.
Step 3: The report is generated.
5) Day Wise DashBoard
Step 1: Select “Admissions” and choose “Day Wise DashBoard”.
Step 2: Choose the search criteria to generate the report.
6) Pre Admission Details By Dates
Step 1: Select Admissions and click on “Pre Admission Details By Dates”.
Step 2: Select the dates and click on “Get”.
Step 3: The report is generated.
7) Registration Review
Step 1: Select “Admissions” and choose “Registration Review”.
Step 2: Select report type and click on “Show Report”.
Step 3: The Registration Review report is generated.
8) Registration Summary
Step 1: Select “Admissions” and choose “Registration Summary”.
Step 2: Select the required options and click on “Show Report”.
Step 3: The Registration Summary report is generated.
Level 7: Communication
1) Message Report
Step 1: Select “Communication” and choose “Message Report”.
Step 2: Select the dates and click on “Get”.
Step 3: The message report is displayed.
2) Assignment Report
Step 1: Select “Communication” and choose “Message Report”.
Step 2: Choose required options and click on “Get”.
Step 3: The Assignment report is displayed. A graphical representation of the same is also shown.
3) Announcement Details Report
Step 1: Select “Communication” and choose “Announcement Details Report”.
Step 2: Select dates and click on “Get”.
Step 3: The Announcement Details is displayed. A graphical representation of the same is also shown.
4) SMS Delivery Report
Step 1: Select “Communication” and choose “SMS Delivery Report”.
Step 2: Select Dates, SMS Type and click on “Show Report”.
Step 3: The SMS Delivery Report is generated.
Level 8: Others
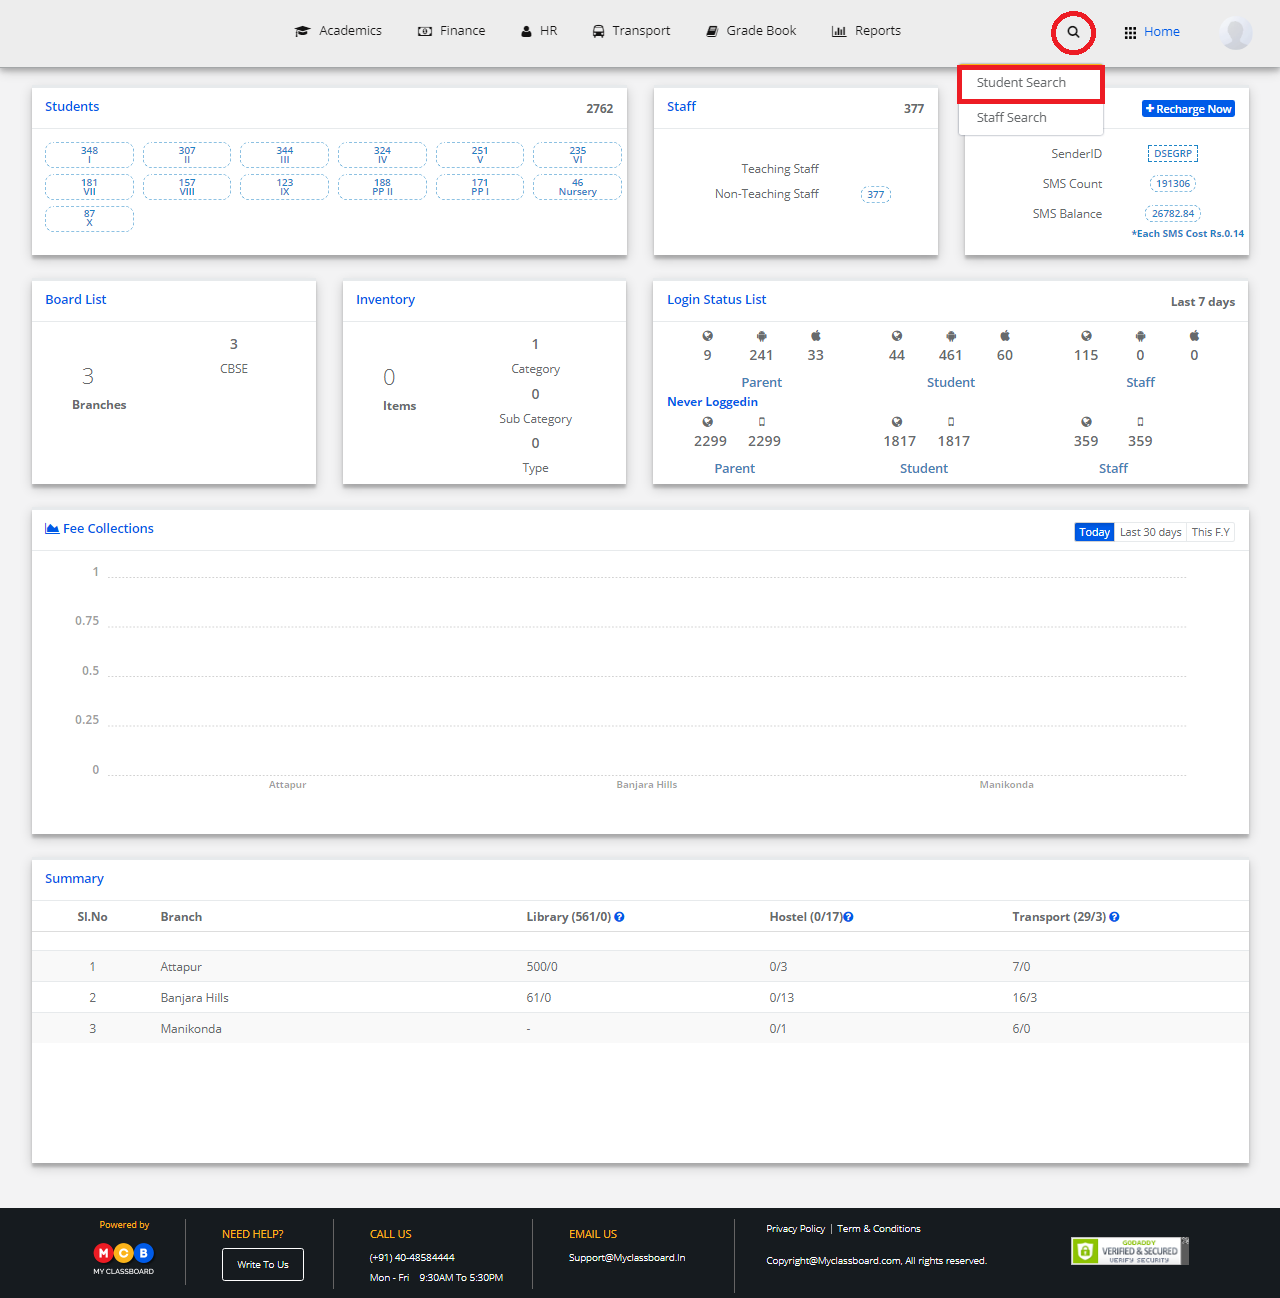
1) User Login Analysis
Step 1: Select “Others” and click on “User Login Analysis”.
Step 2: Select the dates and click on “Show”.
Step 3: The User Login Analysis report is generated.