How can a Teacher Evaluate an Assignment & Give Marks from Raveendra Choudary
How can Students submit online assignment?
How a Student Can Submit an Online Assignment from Raveendra Choudary
Students can submit the assignment from the web portal and mobile app.
Step 1: Log in to the MCB Web portal with the student login credentials. Click on the Assignment option on the menu.
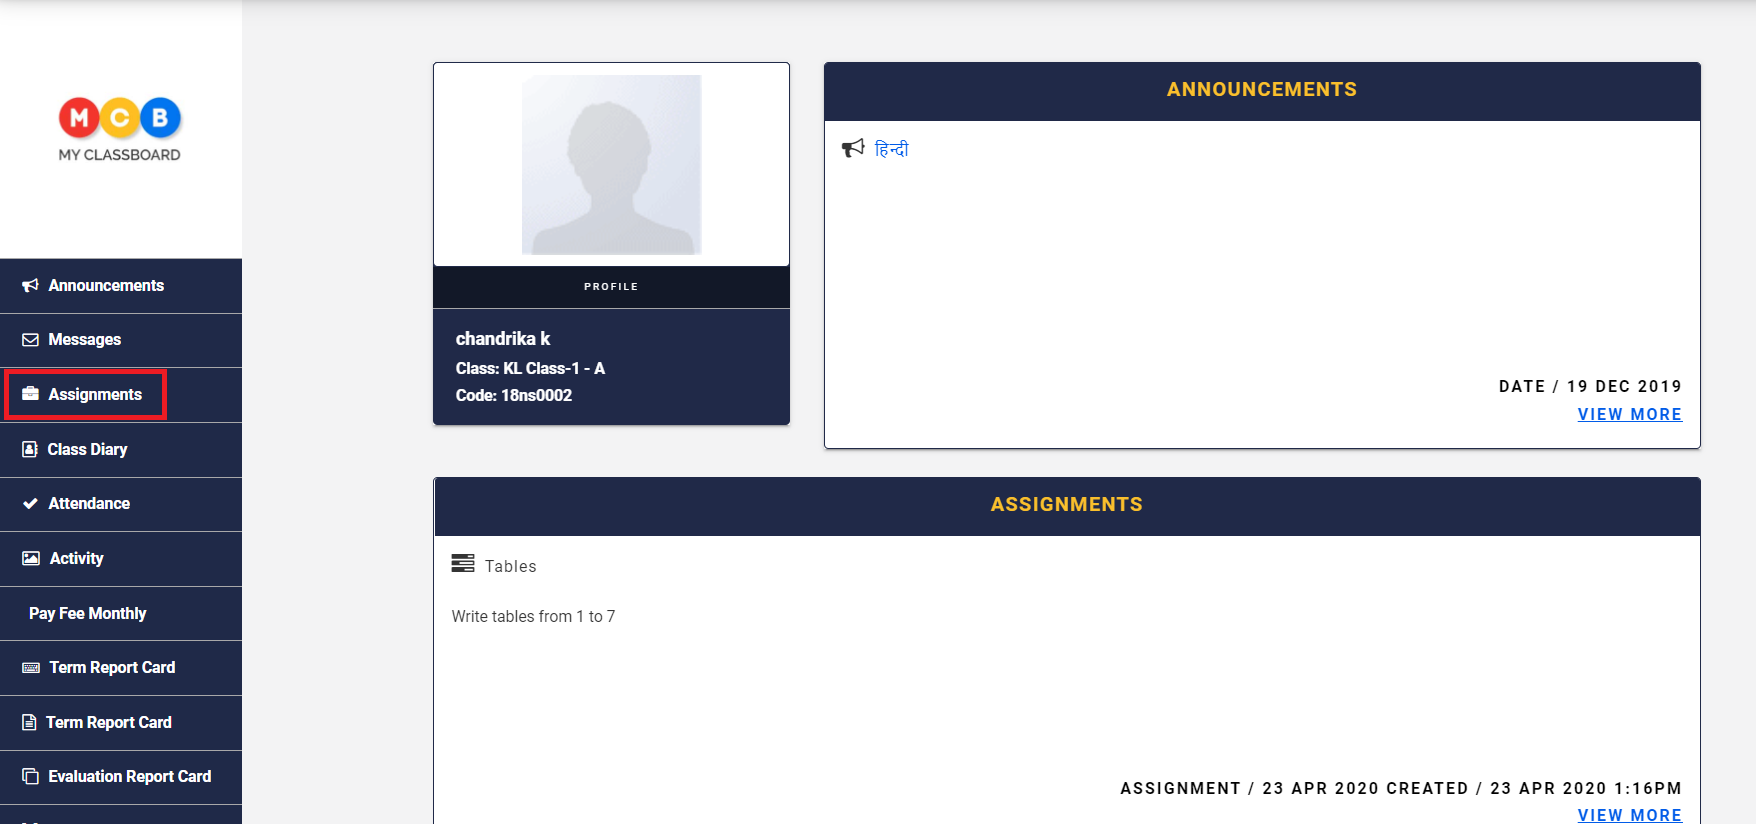
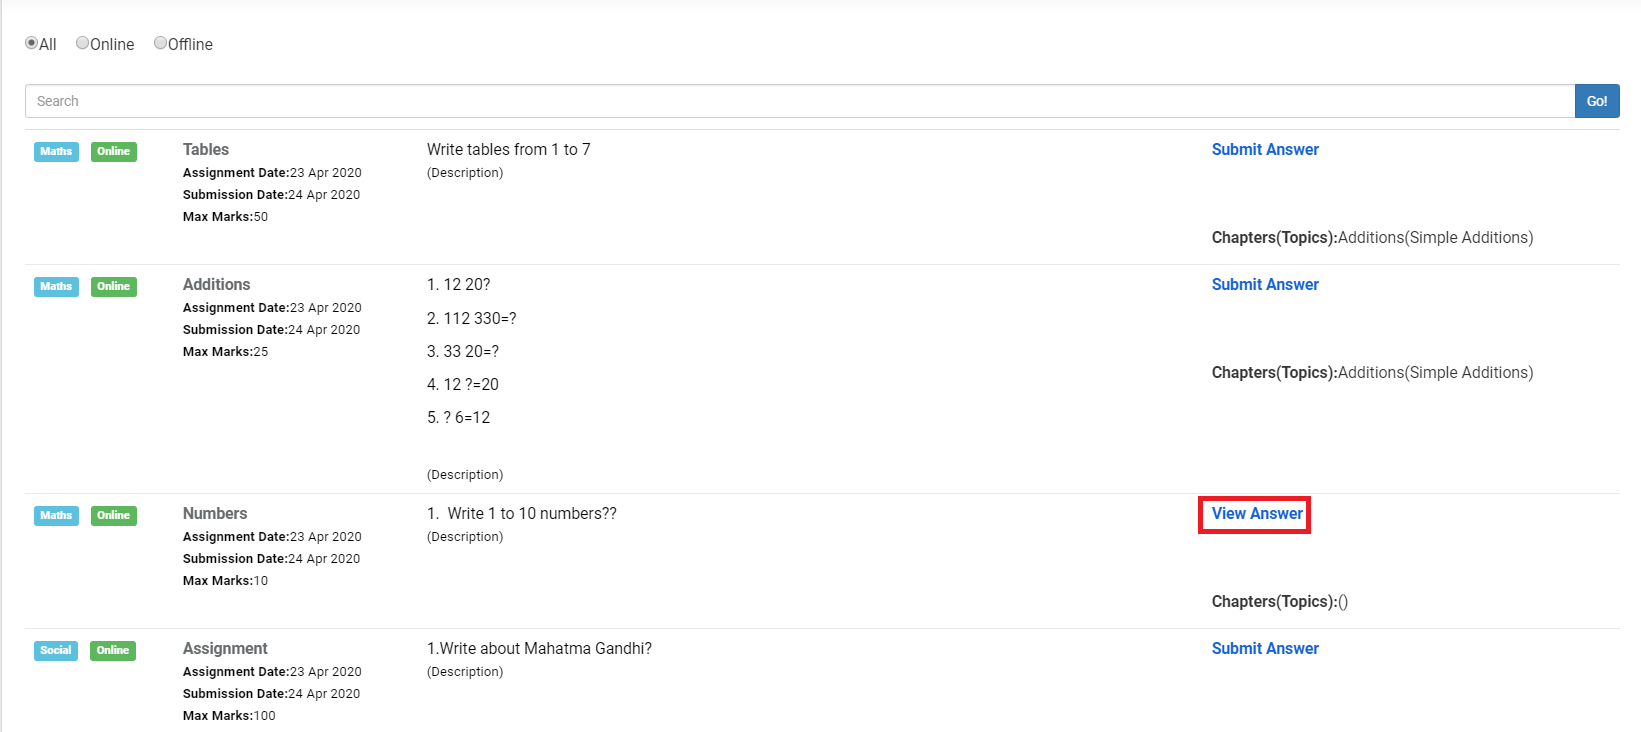
Step 2: It will list all types of assignments by default. You may filter online by clicking on the online radio button. To submit the answer, click on the Submit Answer option against the exam.

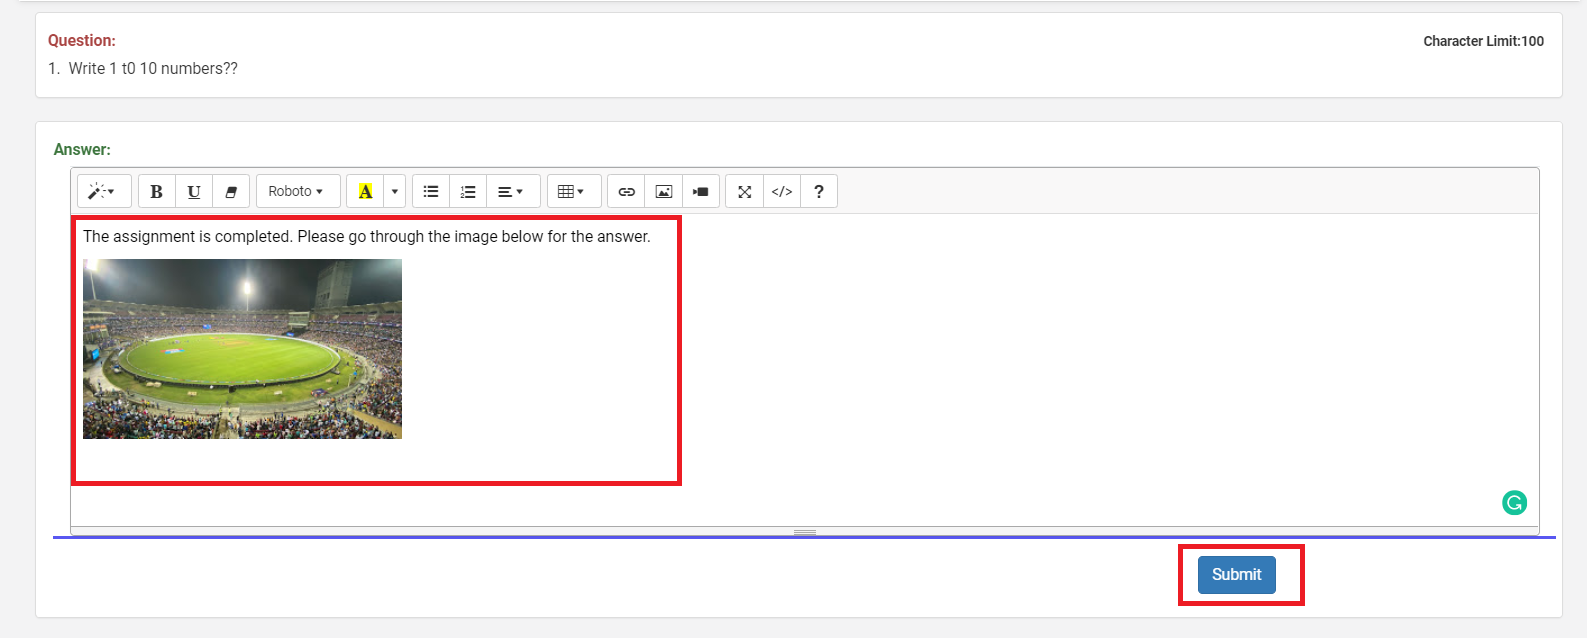
Step 3: Write the answer and click on Submit. You can answer in the form of text, insert the image, link, etc.
Step 4: Click on View Answer against the submitted Assignment to revisit the answer.
How can students attempt online exam?
How To Submit Online Exams – MCB Parent App & Web Portal from Raveendra Choudary
Students can attempt online exam from the web portal and mobile app.
Step 1: Log in to the MCB web portal with student login credentials. Click on Online exam option on the menu
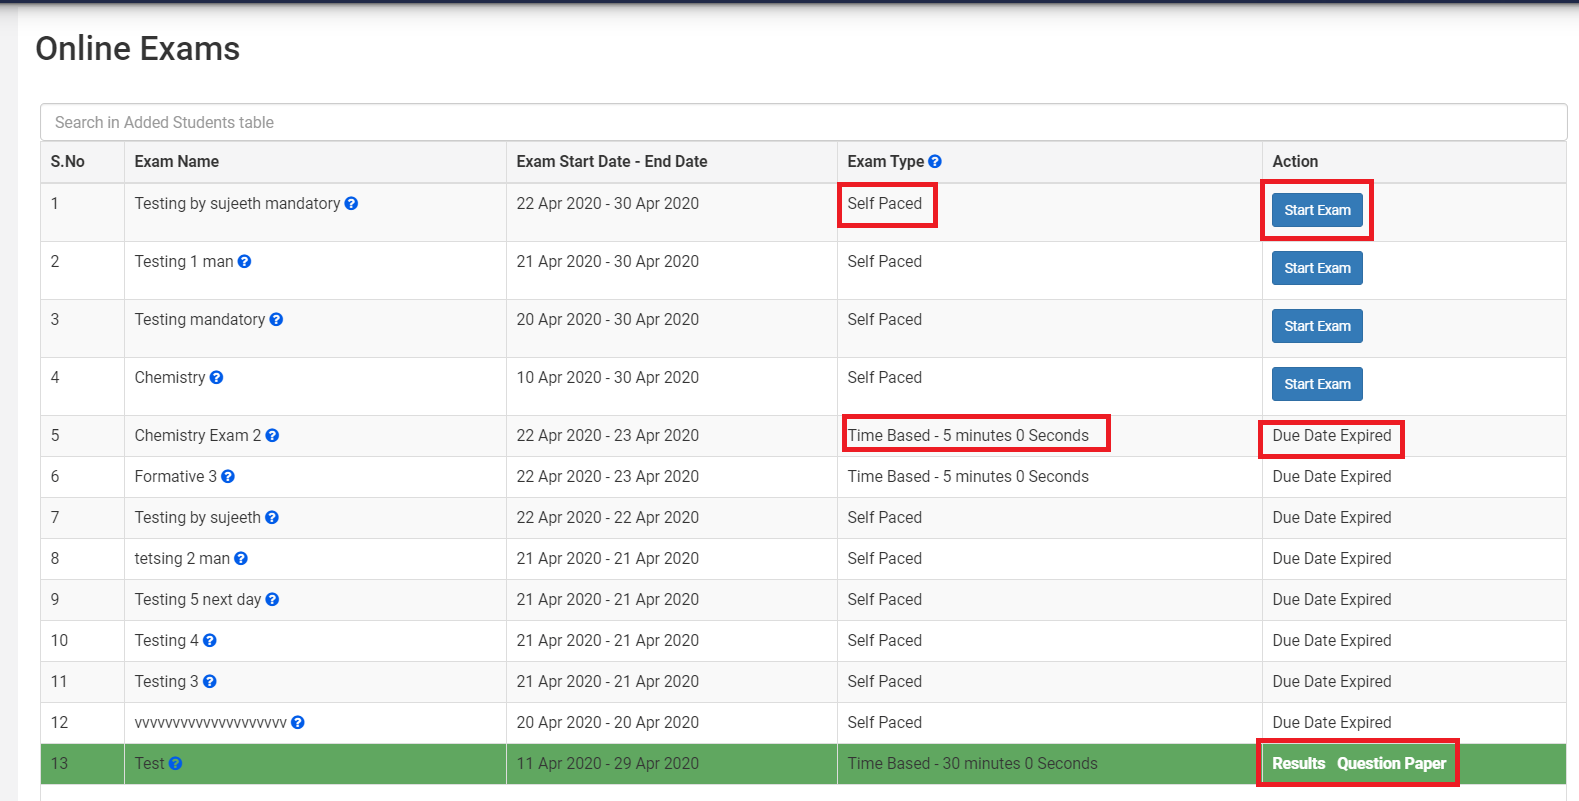
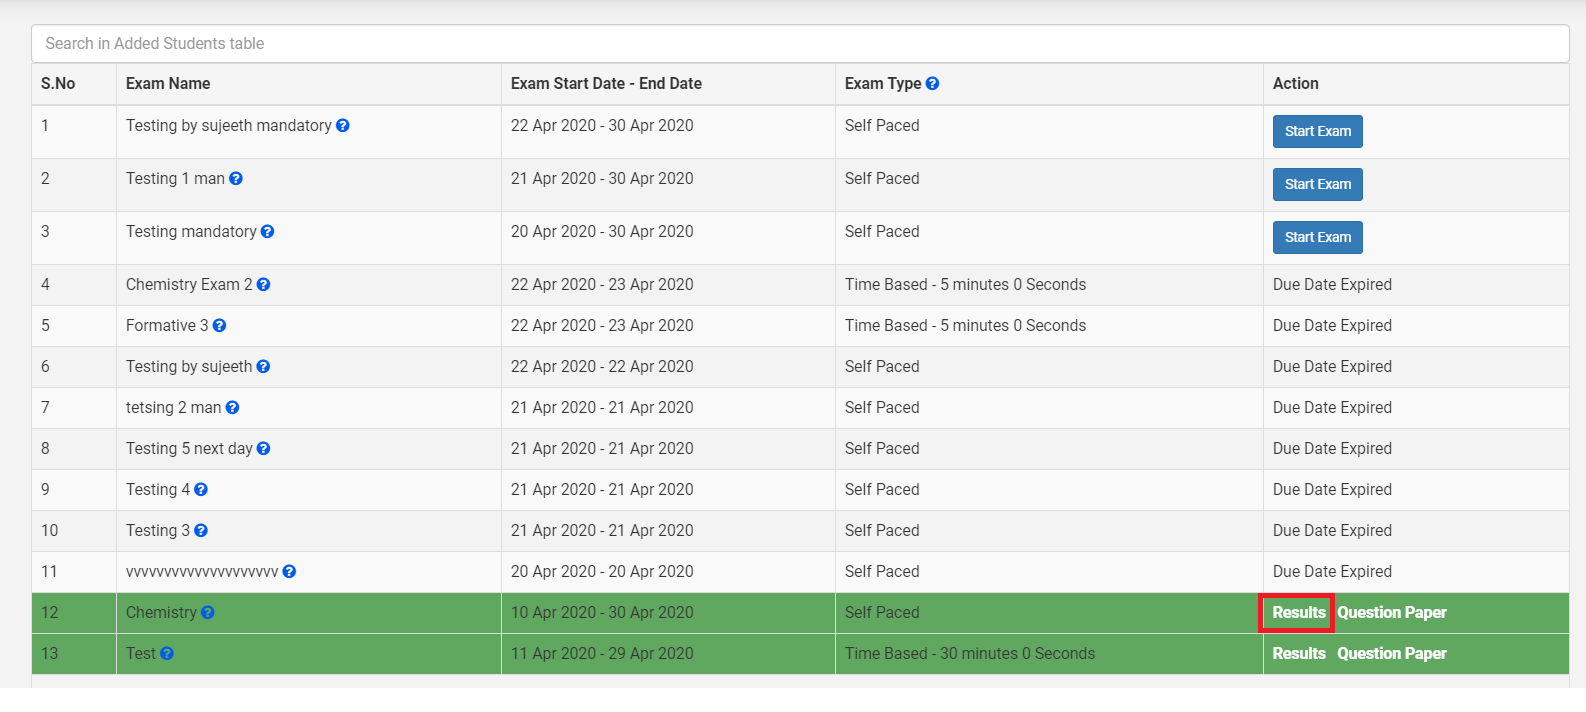
Step 2: It will list the exams that are available with the below status.
Start exam: This indicates that the exam needs to be attempted.
Due Date Expired: The due date of the exam has been crossed. Hence, it cannot be attempted.
View Results: It indicates that the exam is attempted and the results are ready.
View Question Paper: It indicates that the exam is attempted and can view the question paper.
The Exam type can be of two types.
- Self-paced: Indicates that the exam can be attempted at student’s own pace
- Time-based: Exam needs to be completed within the given time.
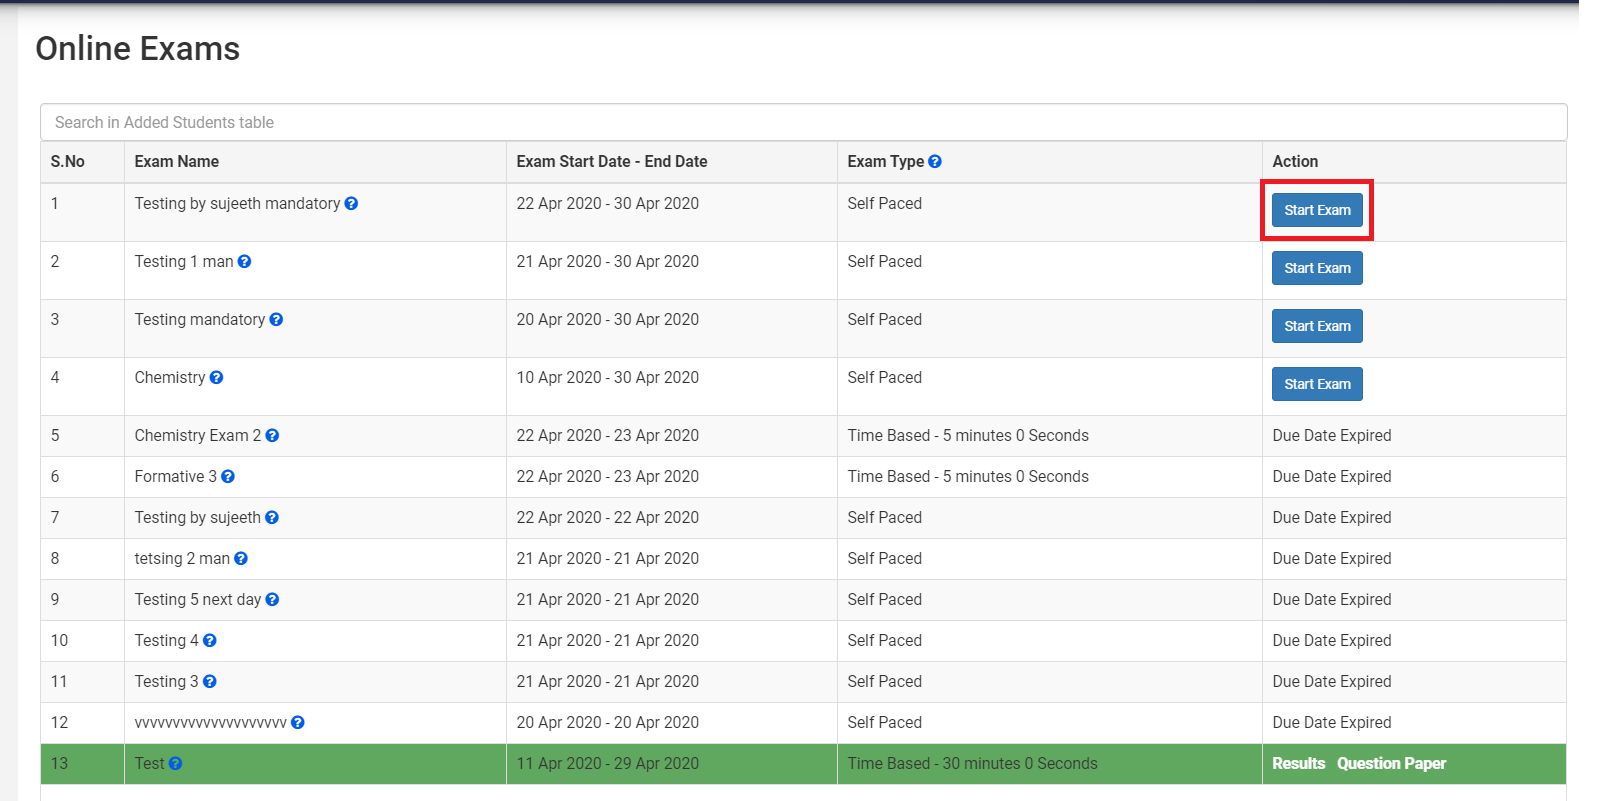
Step 3: To attempt the exam, click on the Start button against the exam.
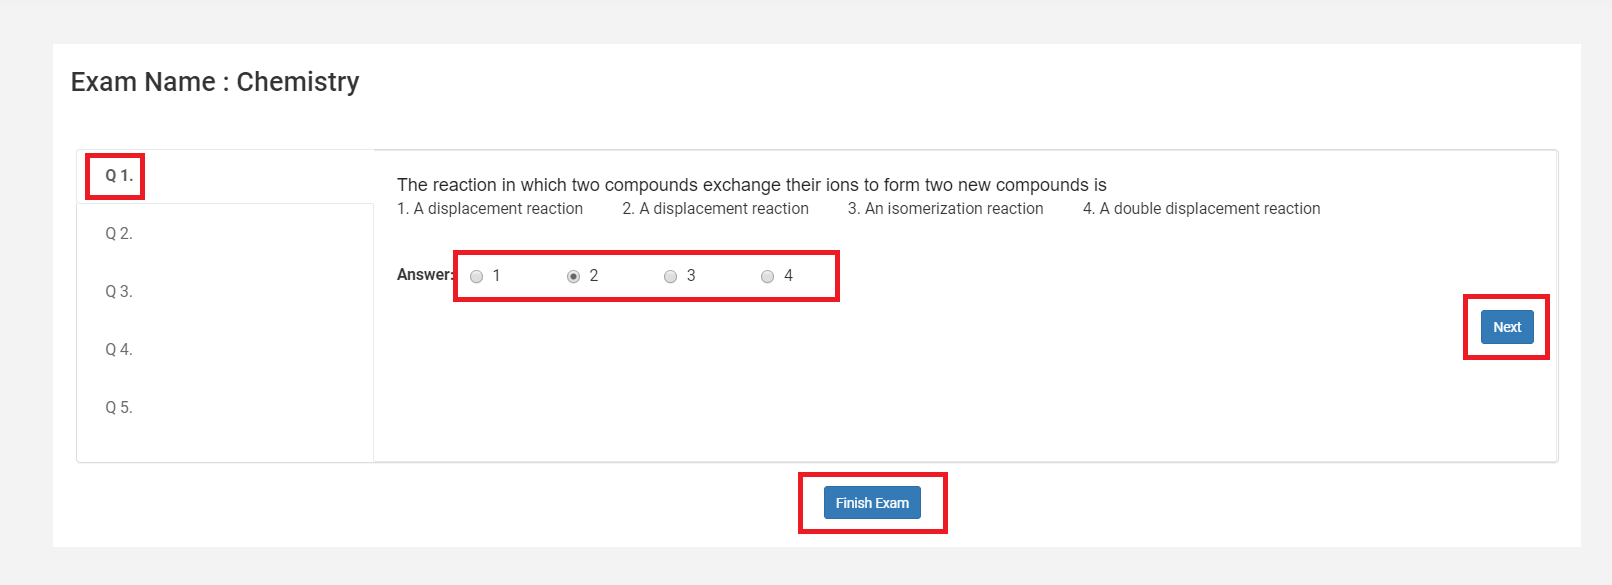
Step 4: Click on the first question, choose the correct answer, and click on Next. Please note, instead of clicking next, you can click on the question number to view or answer the question. Answering the questions in a sequence is not mandatory.
Once all the questions are answered, pls click on the Finish button to submit the exam.
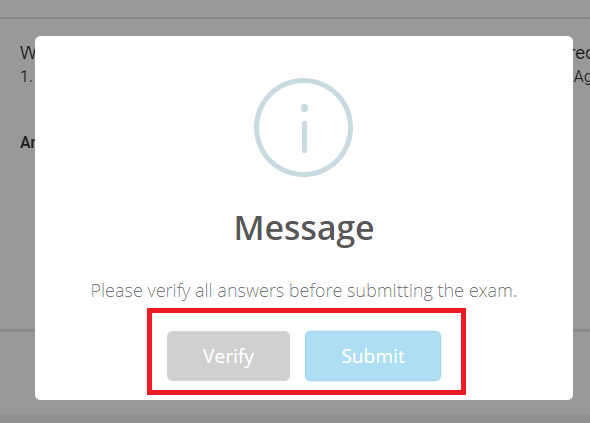
Step 5: Click on verify to revisit the questions and answers marked. Click on the Submit button to confirm the exam submission.
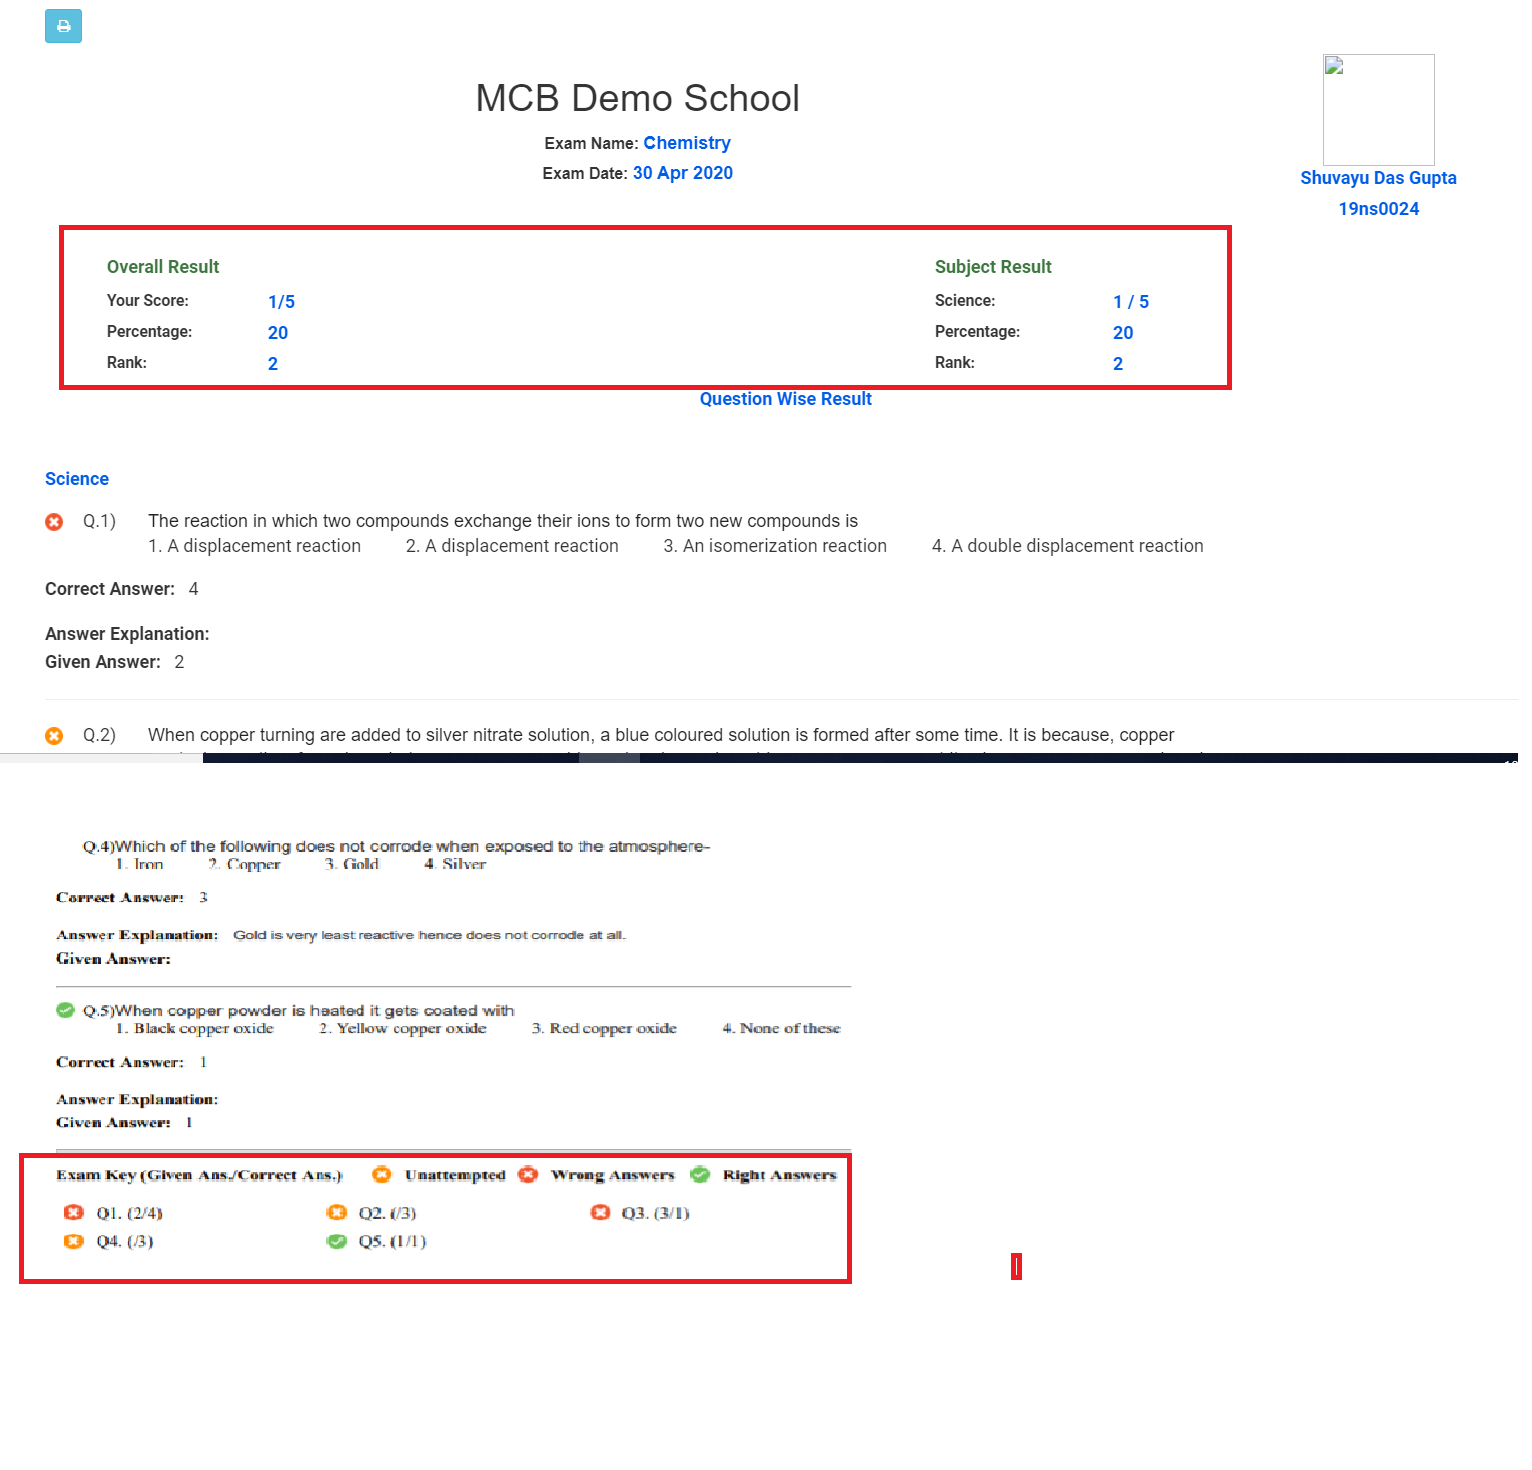
Step 6: If a school chooses to publish the result instantly, the result is visible soon after the student submits the exam. The result includes overall performance along with question wise analysis. Click on the Print icon to print the result of the exam.
Exam key section will you how many questions are correct, wrong, and unattempted.
Please note the color indication as
Correct answer: Green
Wrong Answer: Red
Un Attempted: Orange
Step 7: The completed exams are shown with Green background. To view the result of a completed exam, Click on View Result option against the exam.
Step 8: Click on print icon print the result.

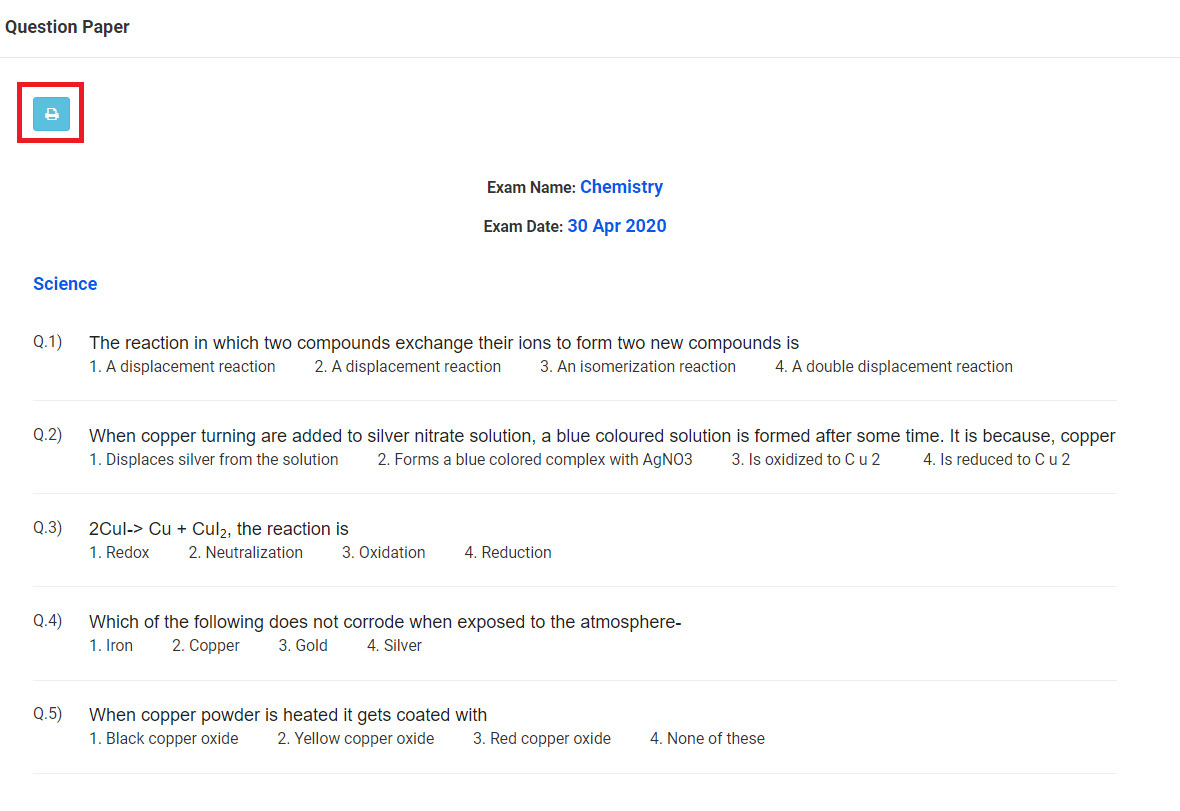
Step 9: To get the question paper of the completed exam without answers for practicing again, Click on the Question Paper option against the exam.
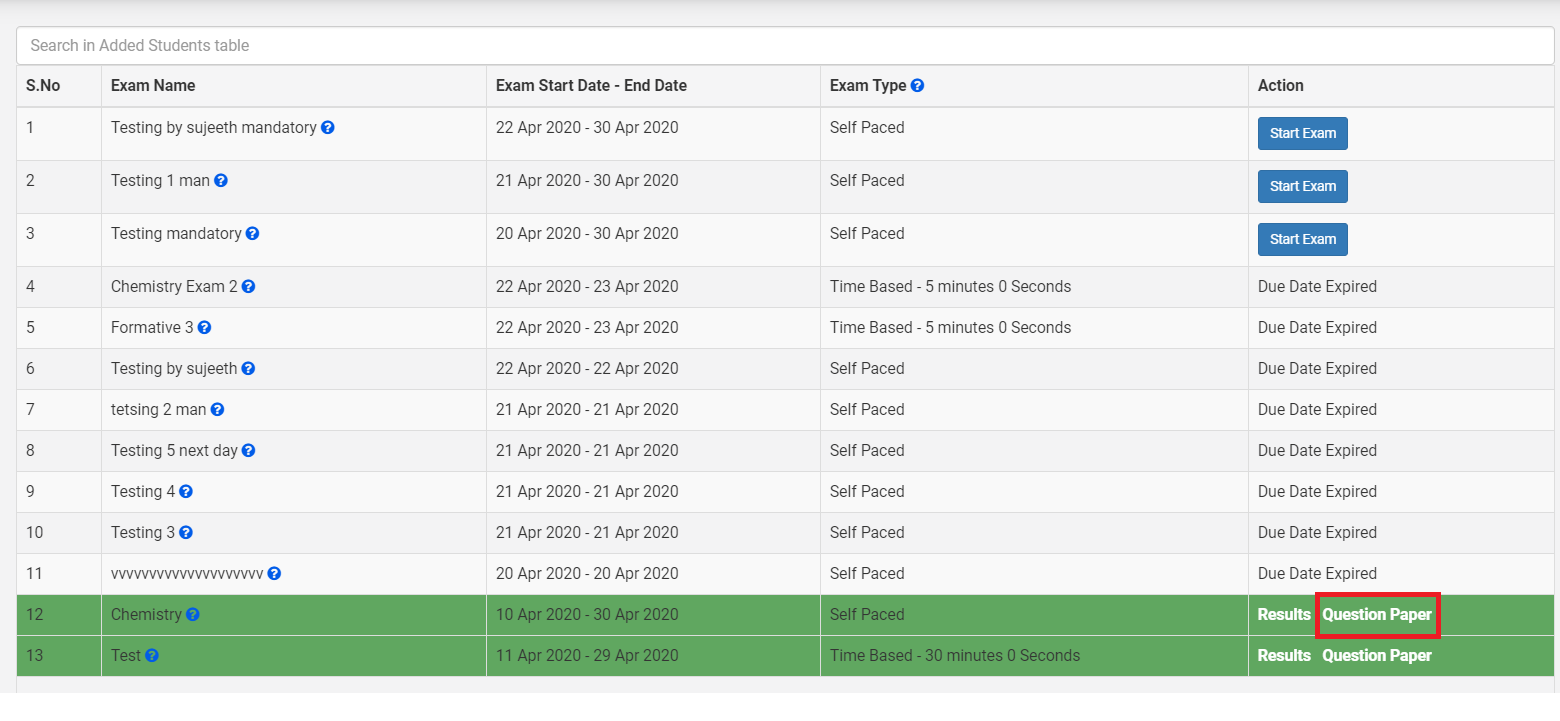
Step 10: You may print the question paper by clicking on the Print icon.
How to Upload a News Letter
A newsletter is an organized document that can be shared with parents as a letter of communication common to all branches or classes.
Ex: School Manual, Parent Handbook, Year-end Newsletter, etc.
The newsletter can be uploaded by System admin, principal, and coordinator.
To upload the newsletter from System admin login, pls follow the steps mentioned below.
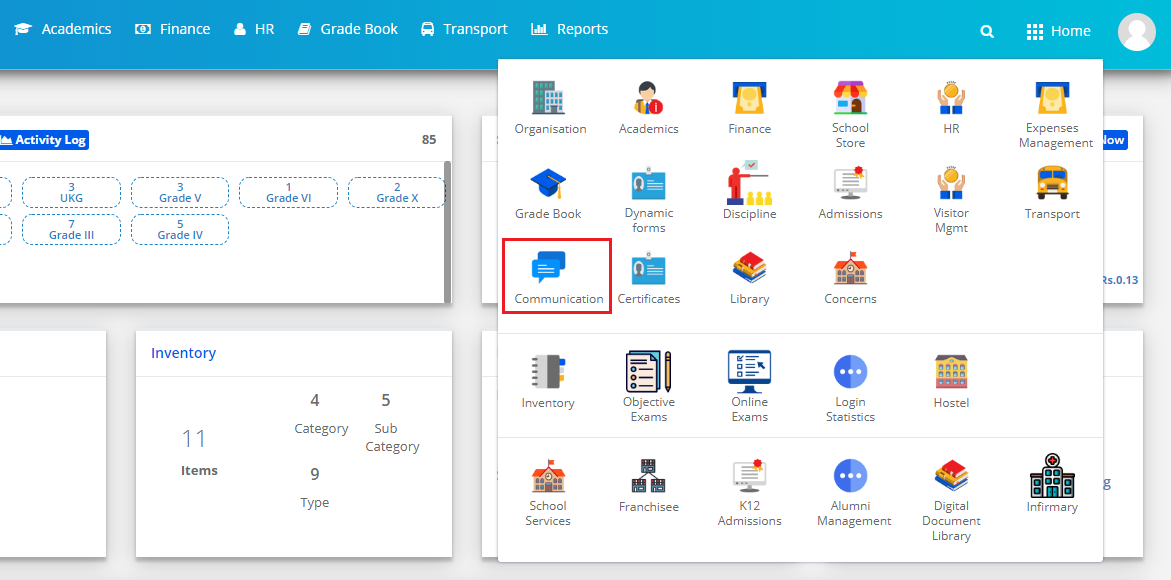
Step 1: Login with System Admin login credentials. Go to Organization Module.
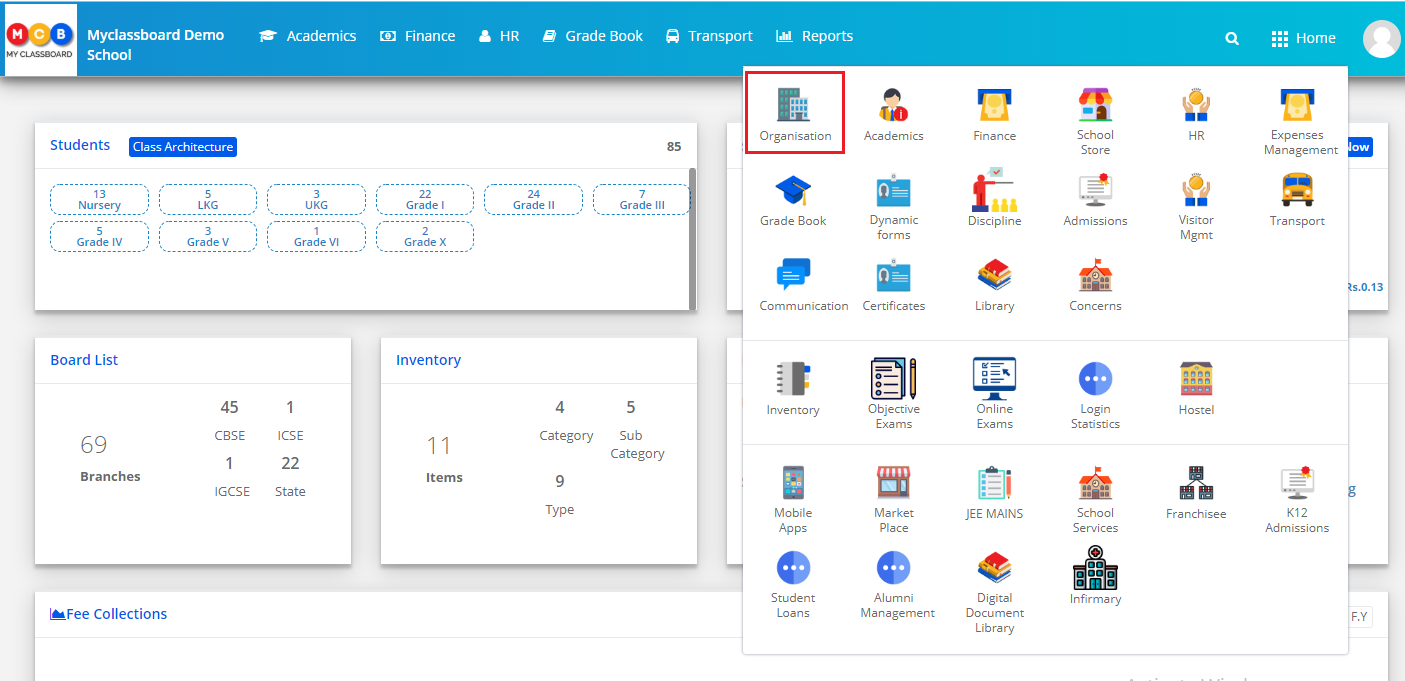
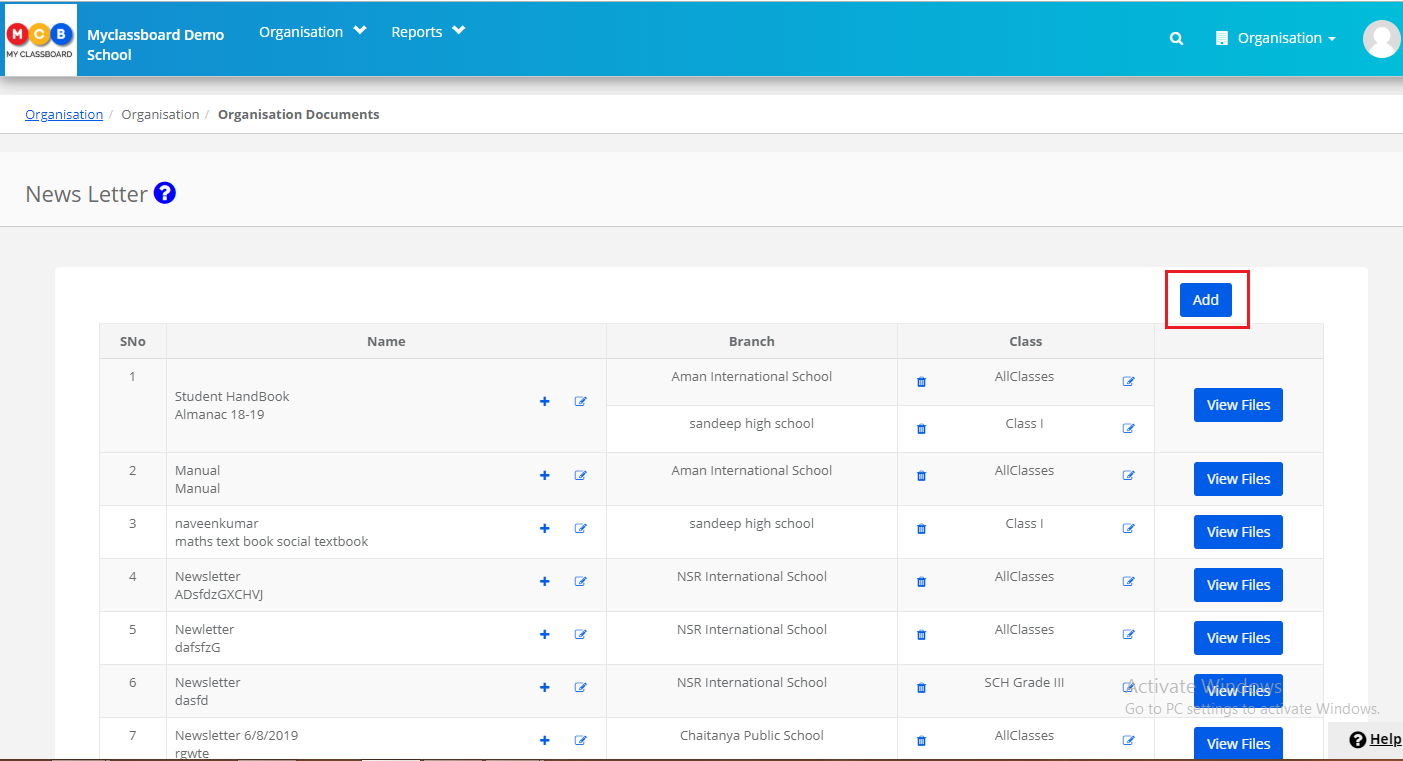
Step 2: Click on Organization Documents link under Organization Menu.

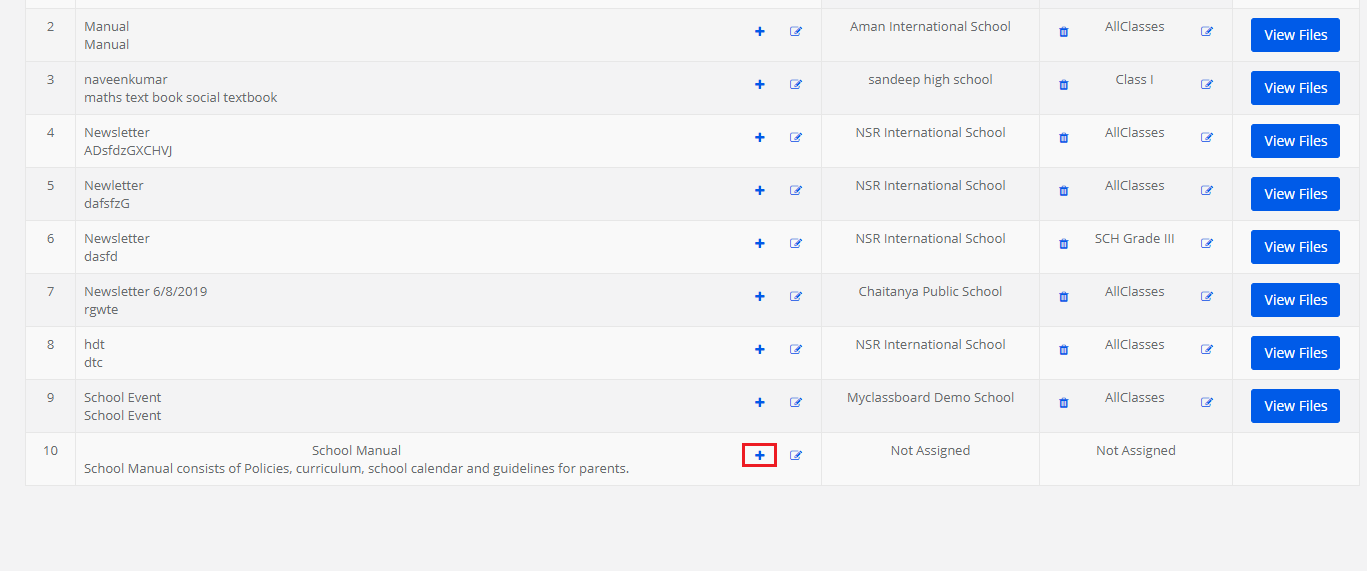
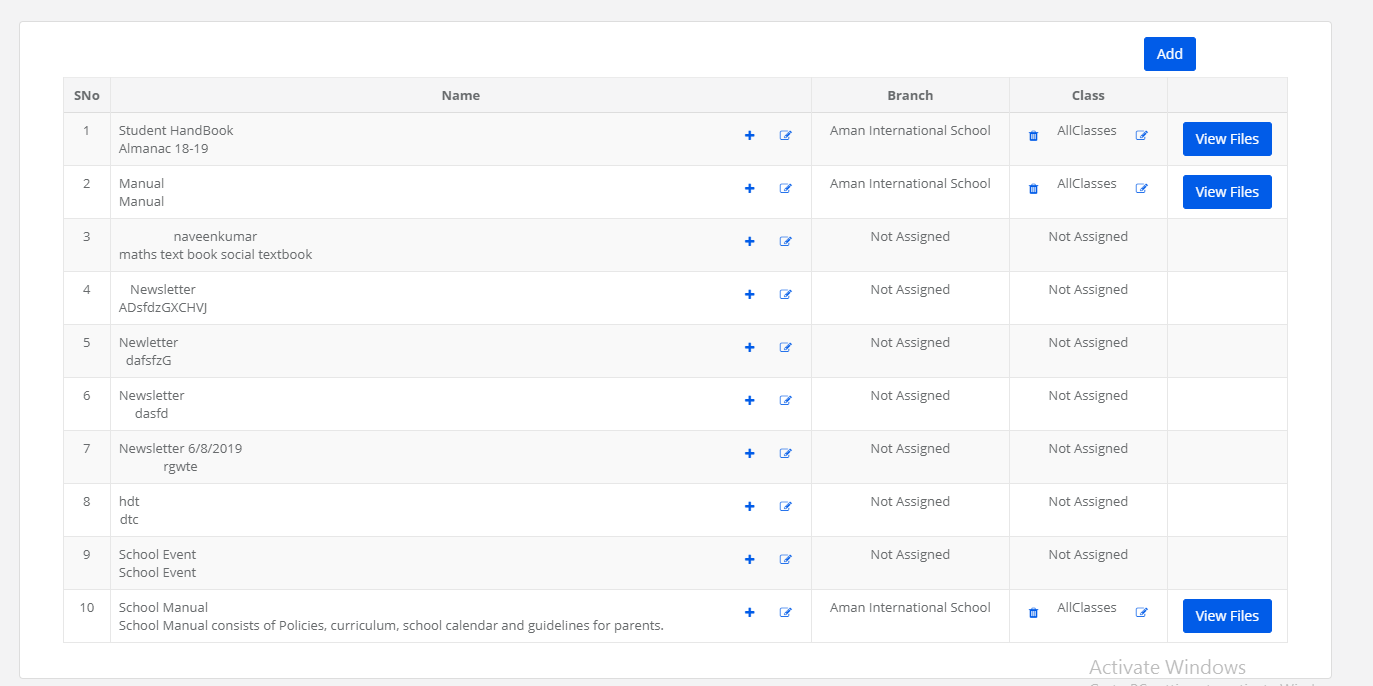
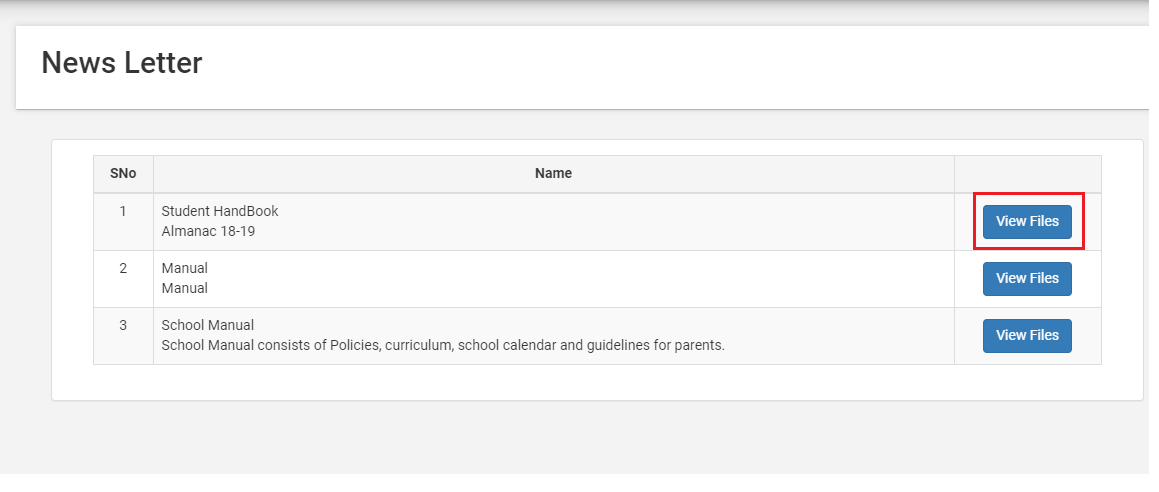
Step 3: It will list the documents uploaded already along with branches and classes assigned.
To add a new document, click on the Add button on the top right corner.
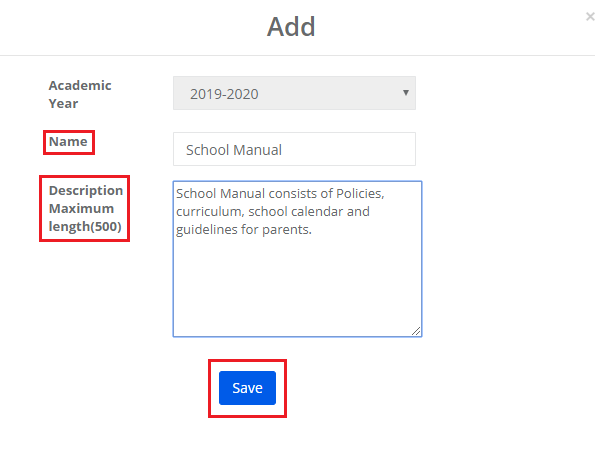
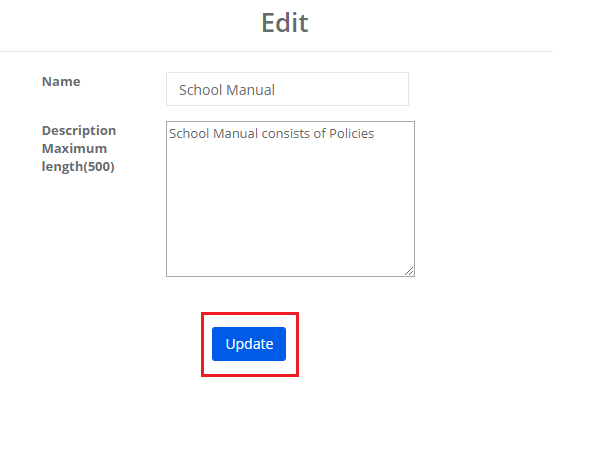
Step 4: Enter Name of the document, Description and Click on Save button.
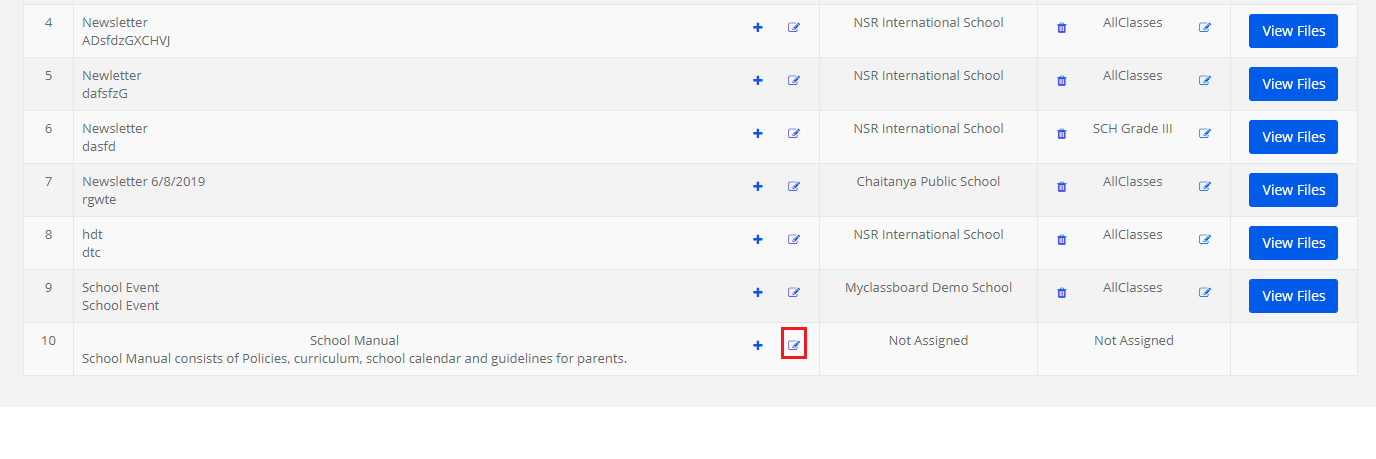
Step 5: To edit the document details, click on the edit icon.
Step 6: Make the necessary change and click on update to save the changes.
Step 7: To assign branches and classes to the newsletter to make sure who can view the newsletter in parent/student login, click on “+” sign.
Step 8: Choose All branches or a specific branch, All Classes or a specific class, status as Active and click on Save button.

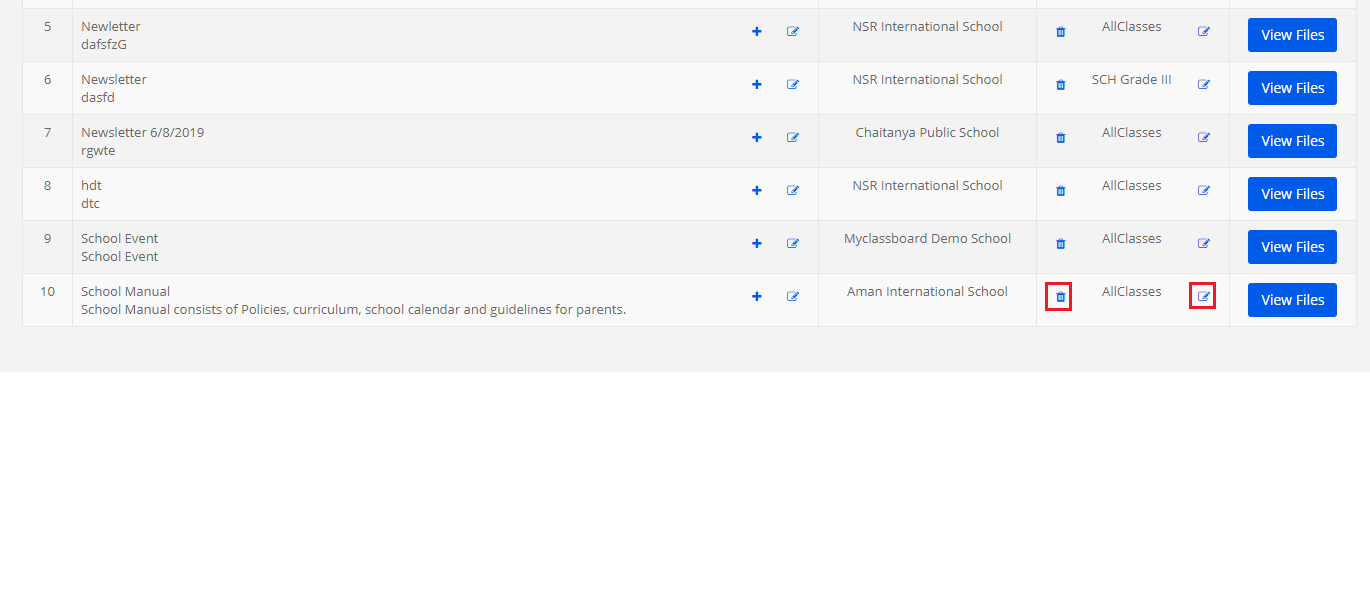
Step 9: To edit or delete classes, click on the respective icons and perform the action.
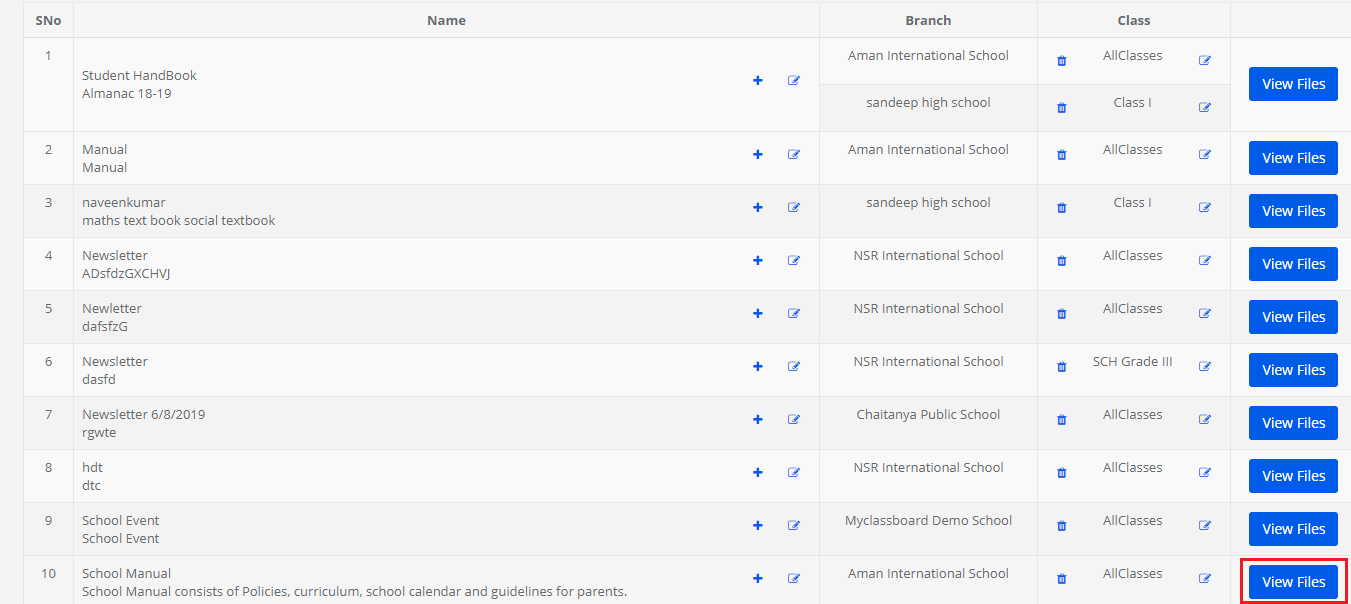
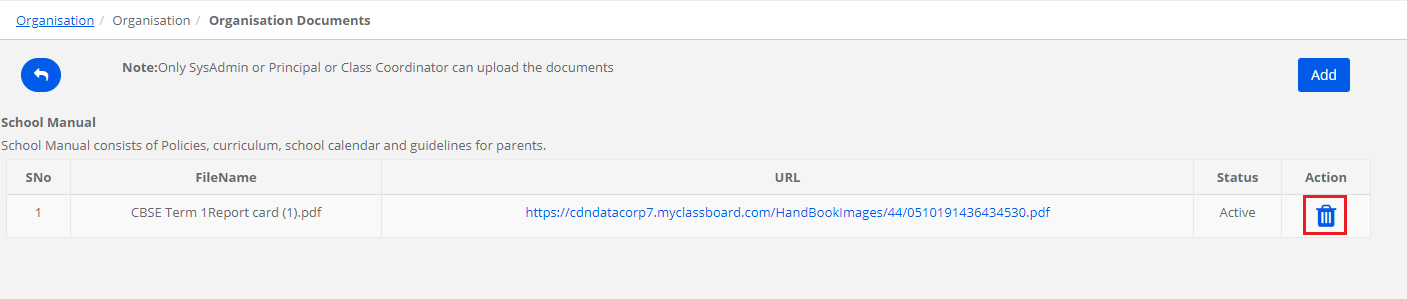
Step 10: To add files, click on View Files against the name. It will also let you view the files which are already available.
Step 11: Click on the Add button.

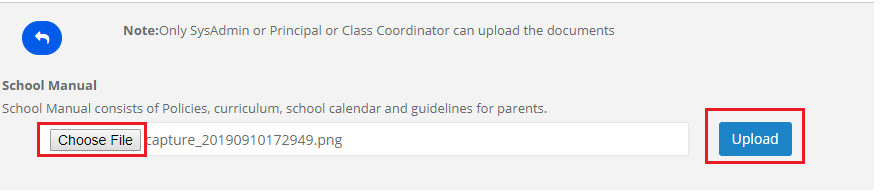
Step 12: Click on the Choose file button, choose the file which you would like to upload from your computer and click on the Upload Button.
Step 13: To Inactive the file, click on the delete icon against the file name. It will not permanently delete the file instead of file that will be inactivated.
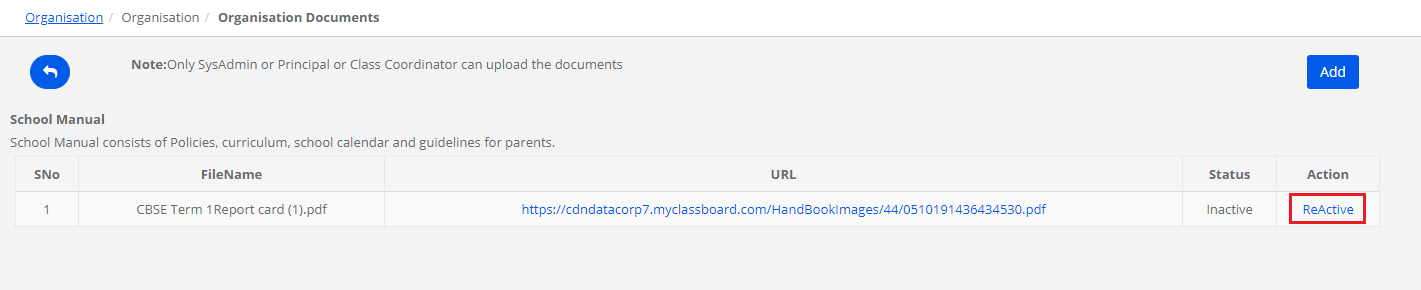
Step 14: To reactive, the file again, Click on the Reactive option against the file name.
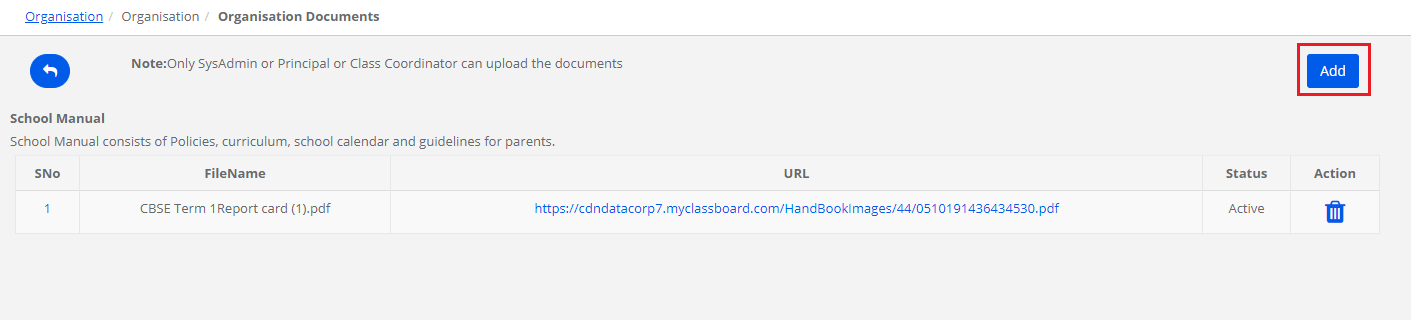
Step 15: To add one more file, Click on the Add button and repeat step 12.
To upload the newsletter from Principal or coordinator login, pls follow the steps mentioned below.
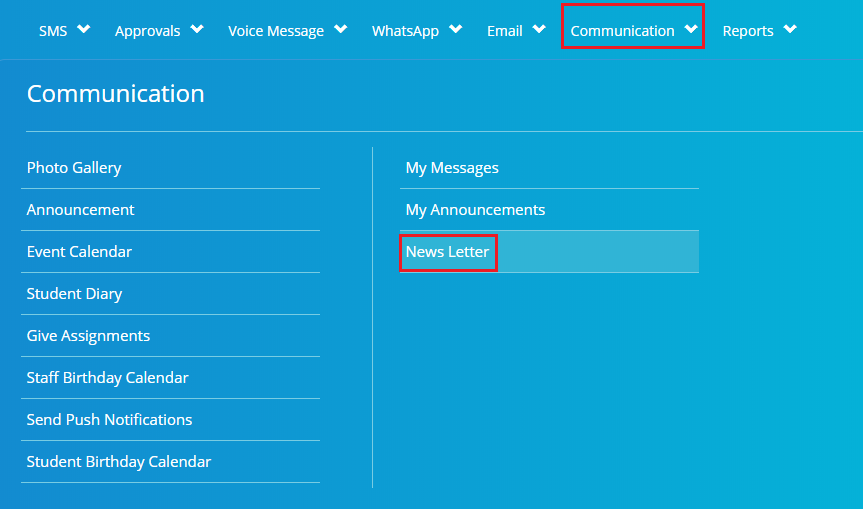
Step 16: Login with Principal or coordinator login and go to Communication Module.
Step 17: Click on the Newsletter option under Communication Menu.
Step 18: It will list all the documents available for the branch. To add files, edit or delete, Please, follow steps 3 to 15.
How can a parent view the newsletter in his/her login?
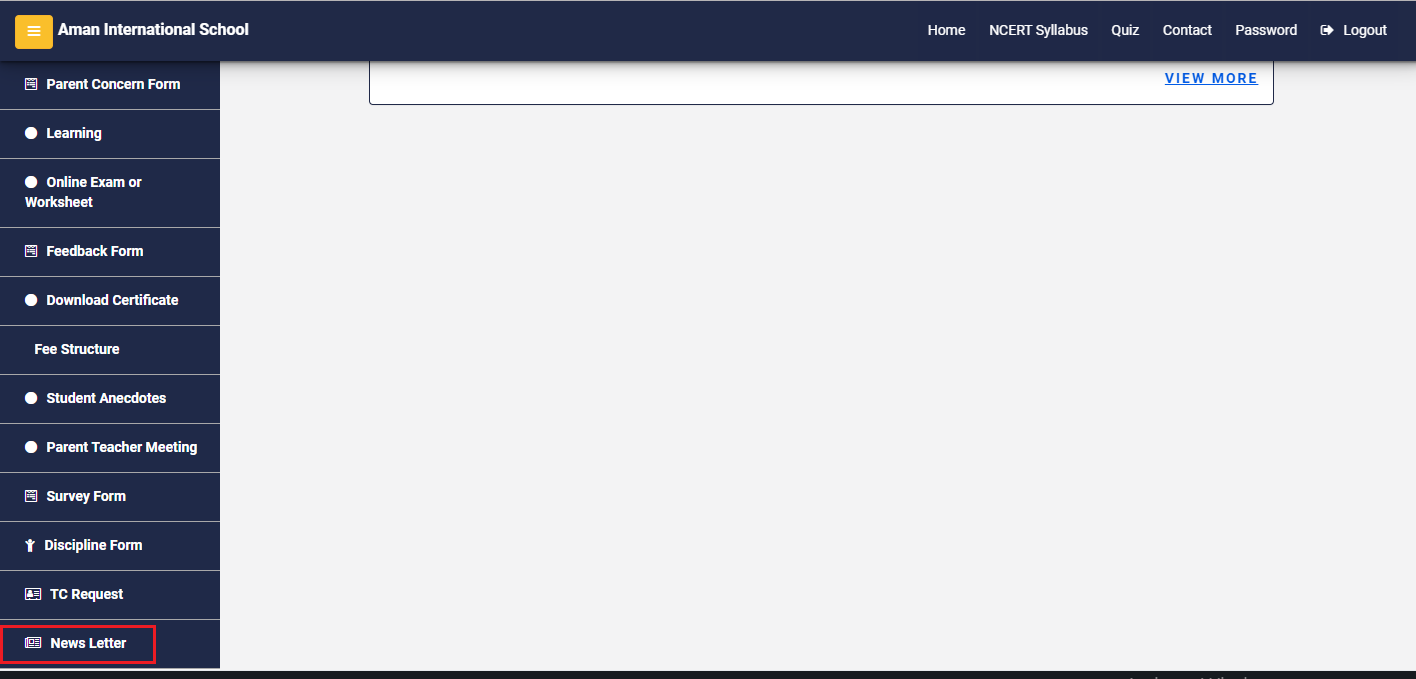
Step 19: Login to MCB with Parent Login Credentials. Click on the Newsletter menu.
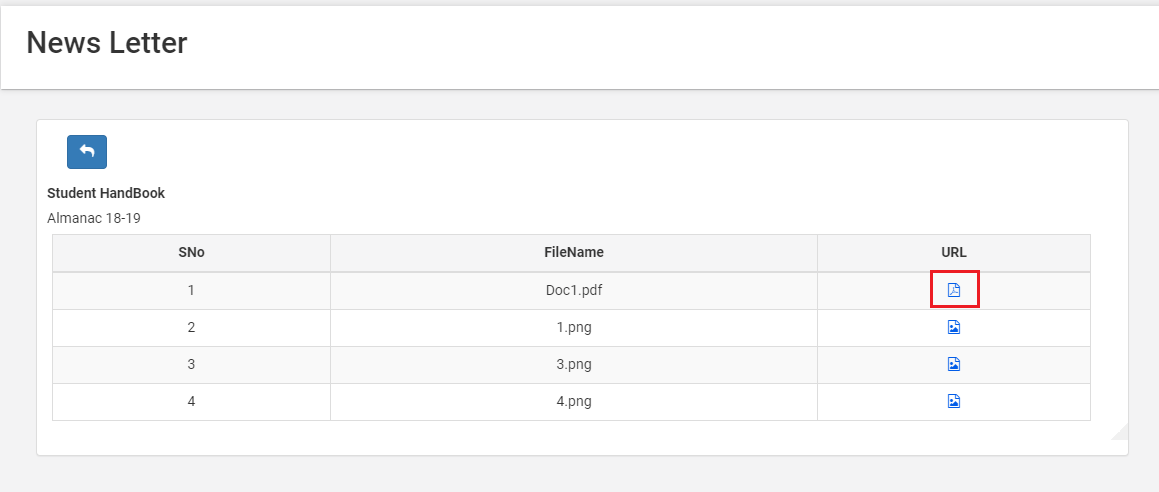
Step 20: Click on View files option to view the files.
Step 21: Click on the icon to view the file.
How can staff view their announcements ?
The announcement made to the staff can be viewed in their respective logins.
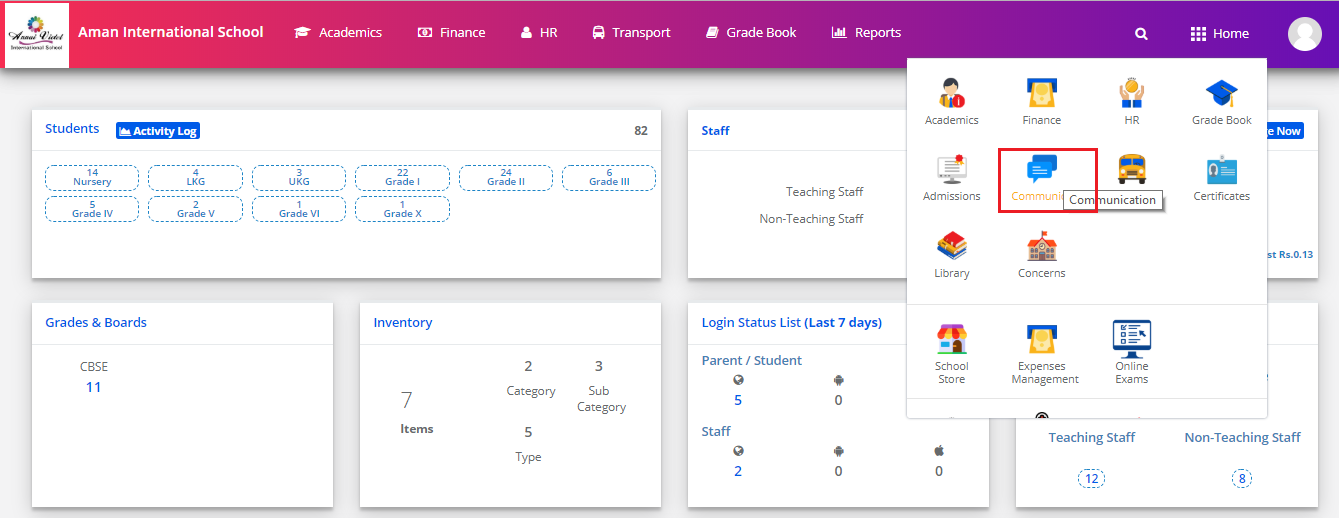
Step 1: Login to MCB and click on the Home button on the top right corner.

Step 2: Click on the Communication module. You will be directed to the communication module.
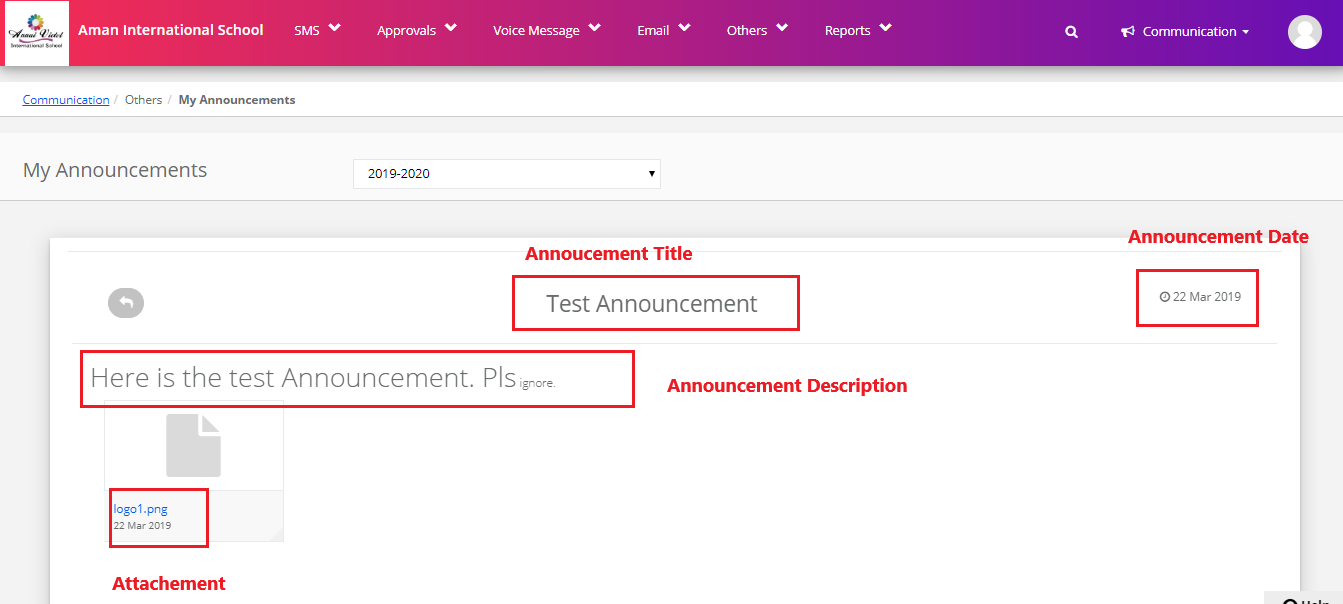
Step 3: Click on My Announcement option under Others menu.

Step 4: The announcements are listed showing the details of the user [who created], announcement title, attachment, and date on which the announcement is made.

Step 5: To view the announcement, click on the announcement title.

Step 6: Note the Announcement title, date, description, and attachment.
How to send Transport Notifications to mobile app?
Step 1: Login to MCB with System admin login credentials.
Step 2: Select “Home” on the right-hand top corner.
![]()
Step 3: Select Communication. You’ll be directed to the “Communication” page
![]()
Step 4: Choose “Send Transport Notifications” option under Communication Menu
![]()
Step 5: Choose Branch, Routes as single or Multiple, Bus Routes, Stop as per the requirement, Route type as PickUp, Drop or Both, user type as Parent, Student or Staff, and Classes and click on Get count button to get the list of students.
![]()
Step 6: If you would like to send notifications for selected students, select the checkbox at “For Selected Students only” and choose the students, enter a message. Click on Preview and Send notification.
![]()
Step 7: If you would like to send notifications for all students, unselect the checkbox at “For Selected Students only” and enter the message. Click on Preview and Send notification.
![]()