How to create Assessment?

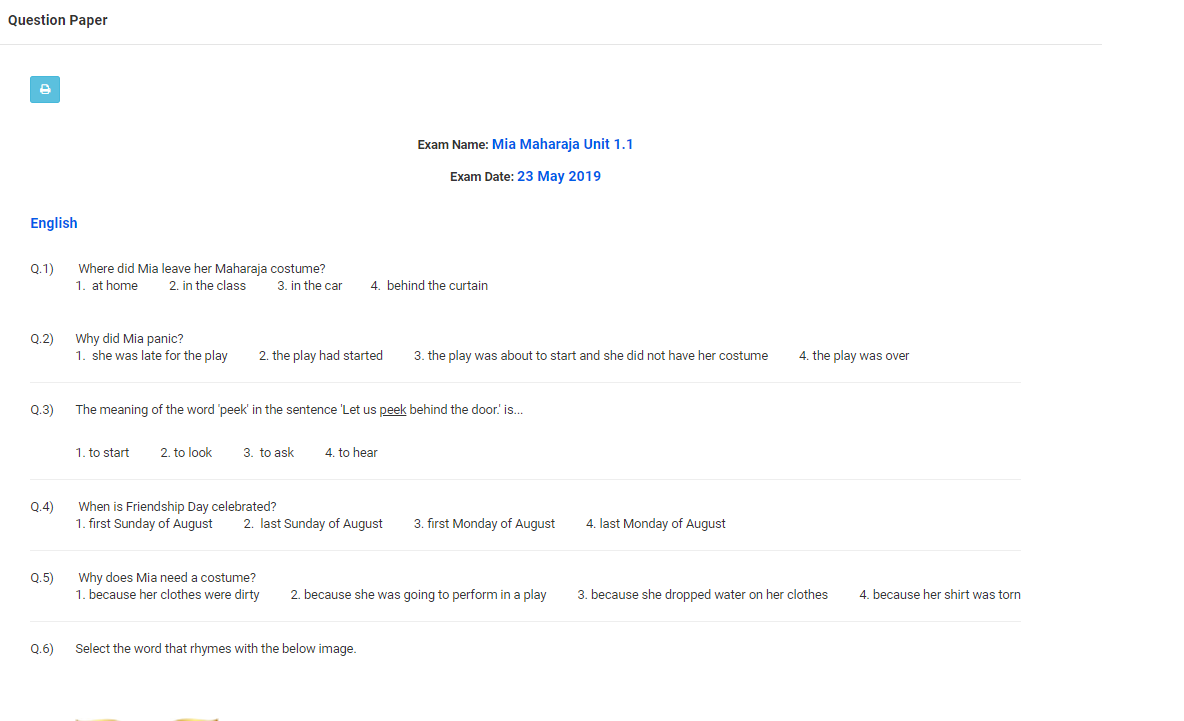
Creation of staff assessment and assessment level settings are to be created by the system admin.

To create the assessment form and grading scale, pls follow the steps below.

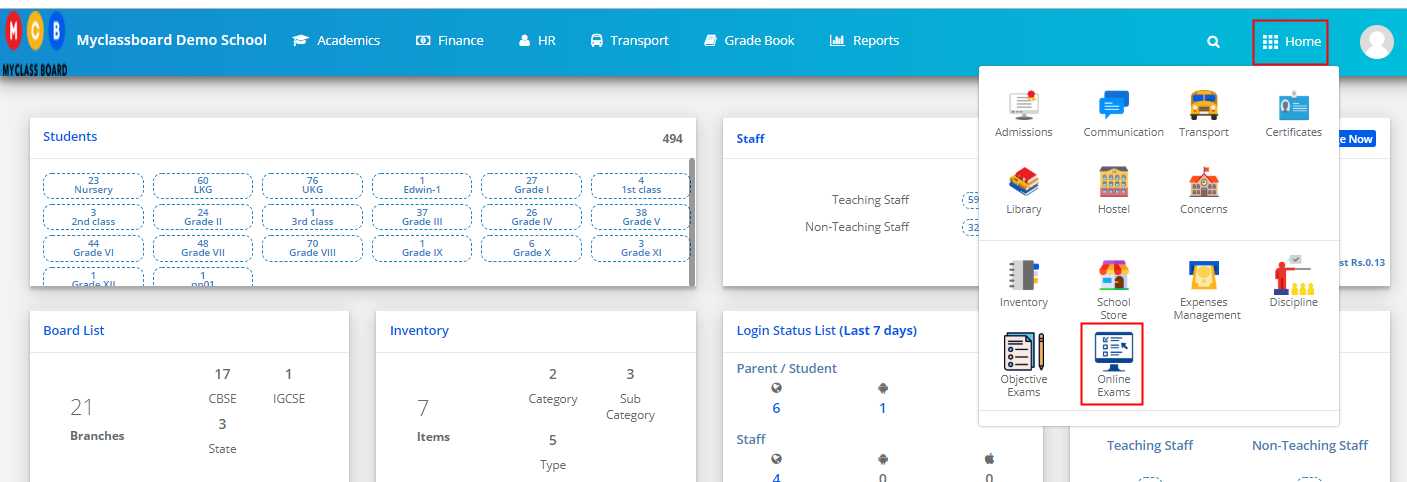
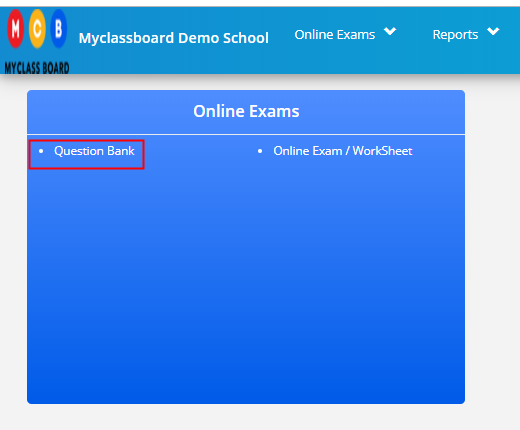
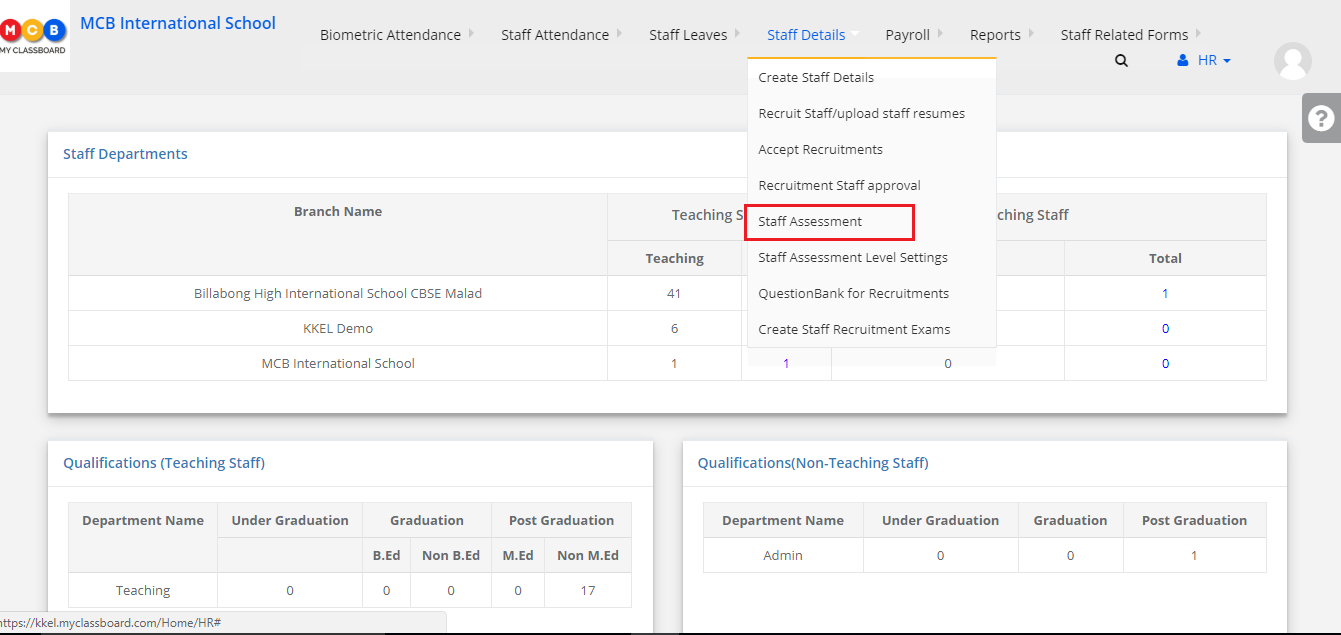
Step 1: Login to MCB with system admin level access and click on HR module on the menu bar. Choose Staff Assessment.

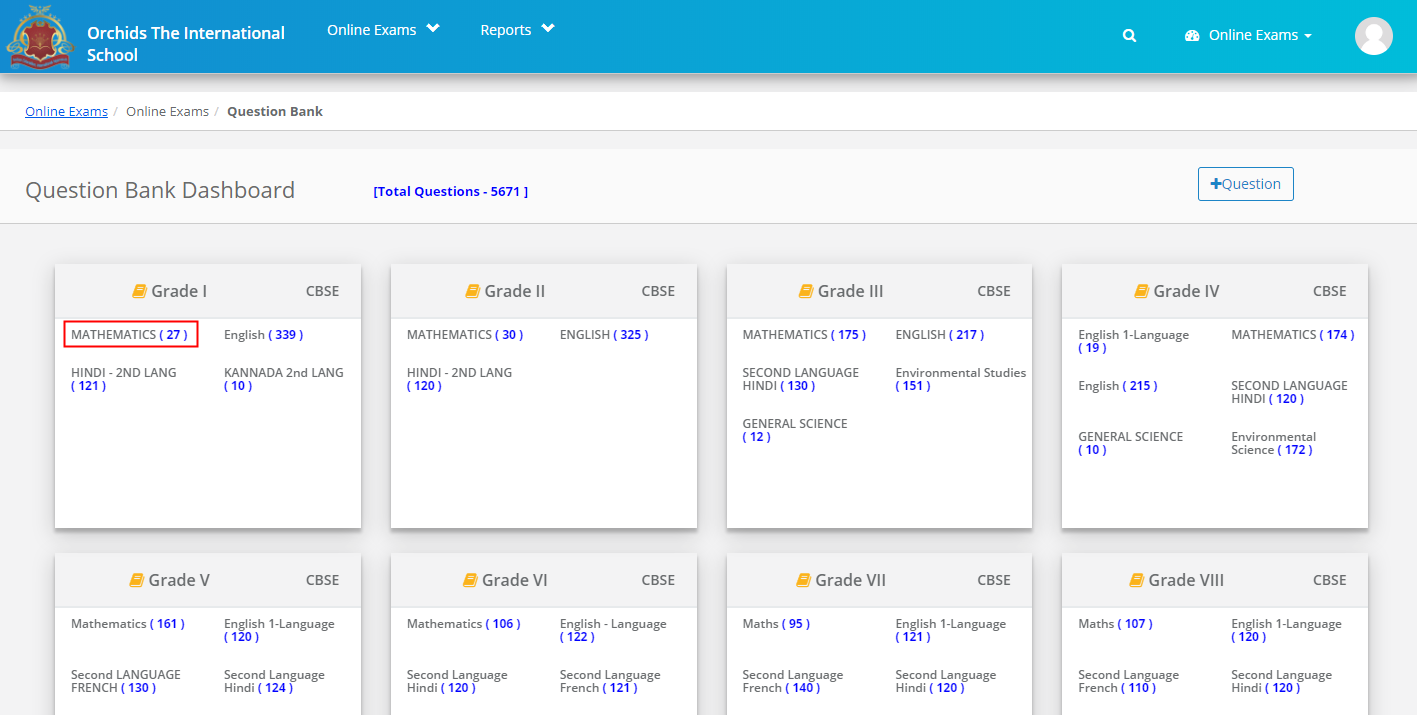
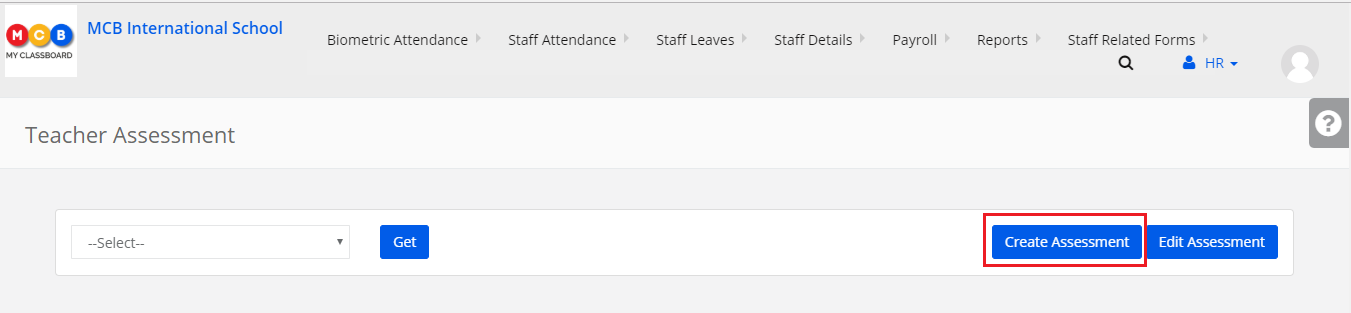
Step 2: To create an assessment, click on create assessment tab

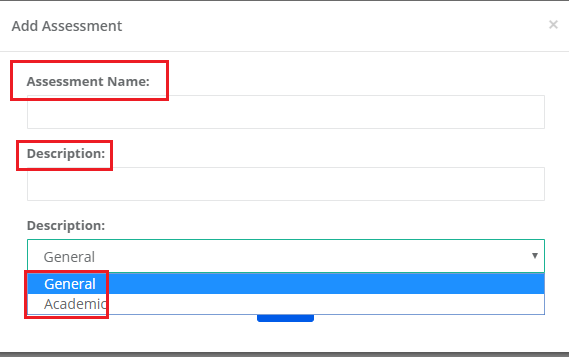
Step 3: Give Assessment Name, Description and choose type of form.

General: When staff performance has to be assessed in non-academic areas [not against the subject], the assessment form needs to be created in “General” type.

Academic: When staff performance has to be assessed against the subject that the teacher teaches, the assessment form needs to be created in “Academic” type. Click on save button.

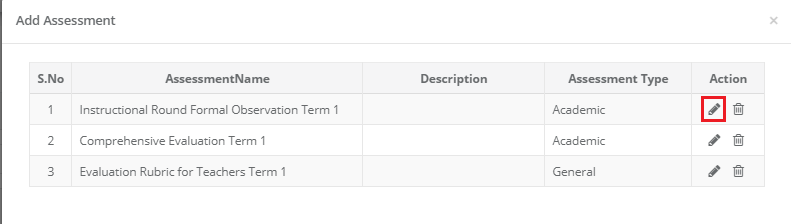
Step 4: To edit the assessment name, click on the edit icon

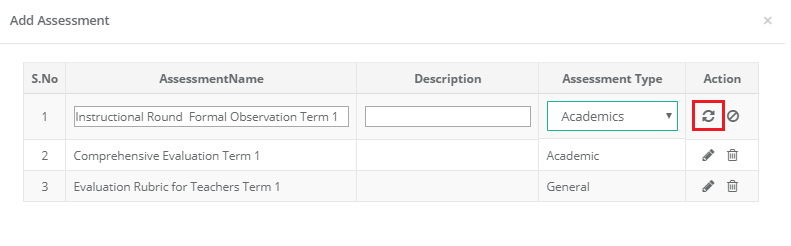
Step 5: Make the changes requires and click on save. [highlighted below].

Step 6: To delete the assessment, click on the delete icon. [Highlighted below].

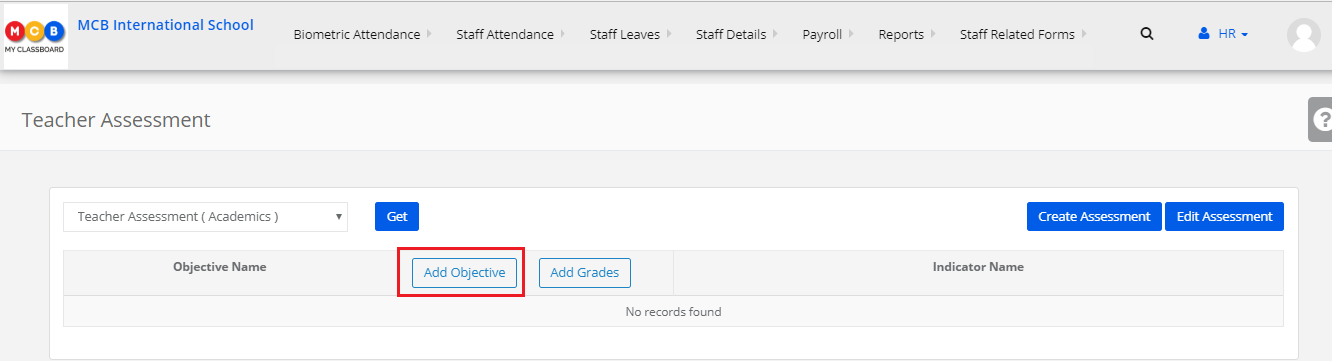
Step 7: To add the assessment objectives and indicators, choose the assessment name and click Get.

Step 8: Click on Add objective

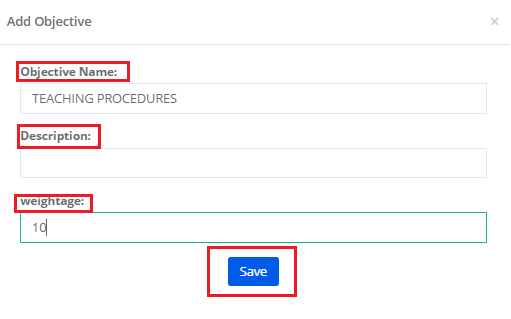
Step 9: Give Objective name, Description, and weightage. Click on Save button to save the objective.

Weightage: Weightage of the objective helps the school admin to analyze teacher’s performance in the category through assessment report.

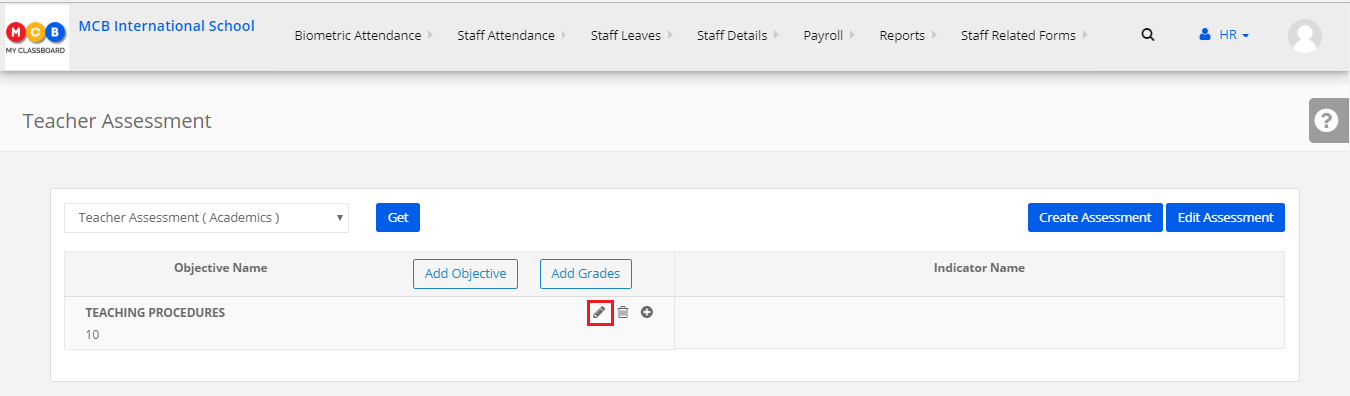
Step 10: To edit the objective name, click on edit icon [highlighted below]

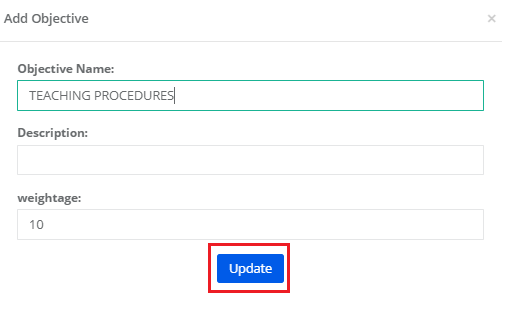
Step 11: Edit the details required and click on Update.

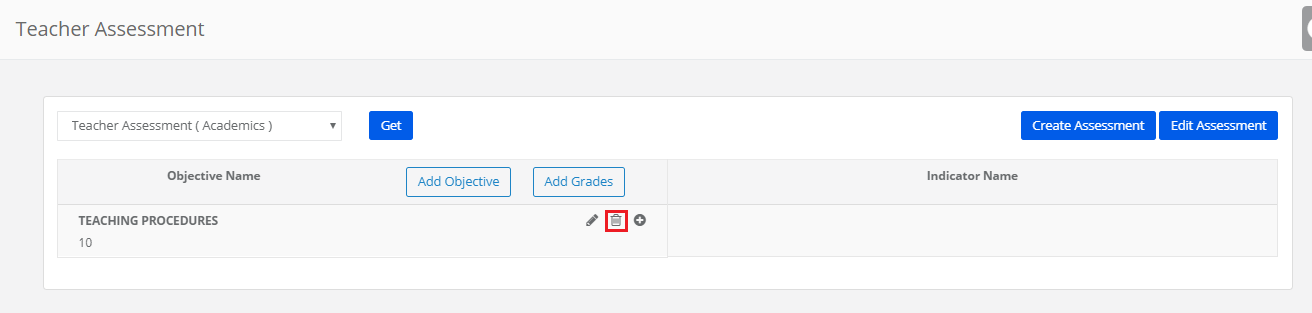
Step 12: To delete the Objective, click on delete icon [highlighted below]

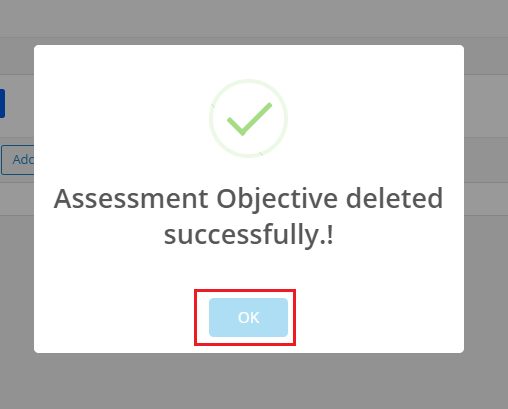
Step 13: Click OK to confirm the deletion.

Staff assessment area can be further elaborated by adding the indicators for the objective to assess the teacher at a micro level specifically.

To add an indicator for objective:

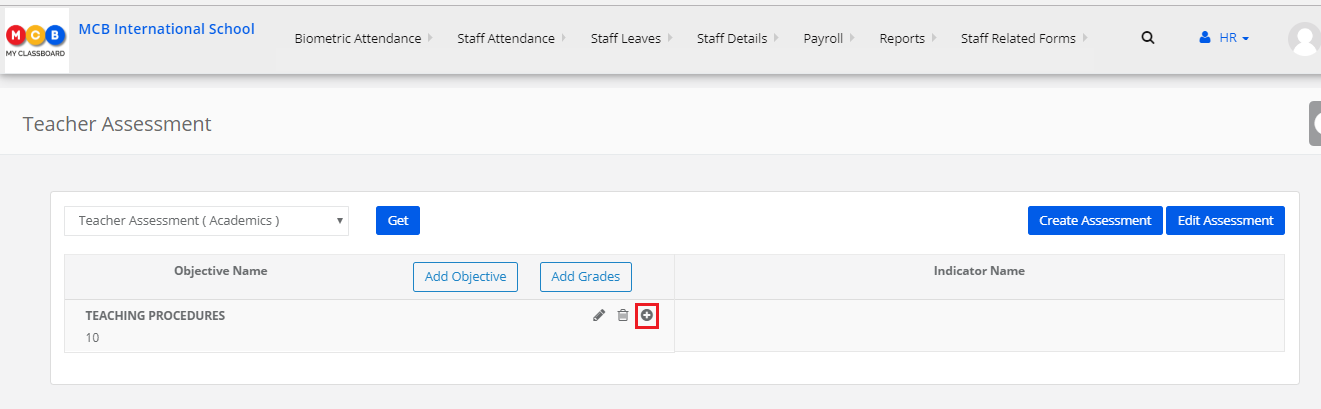
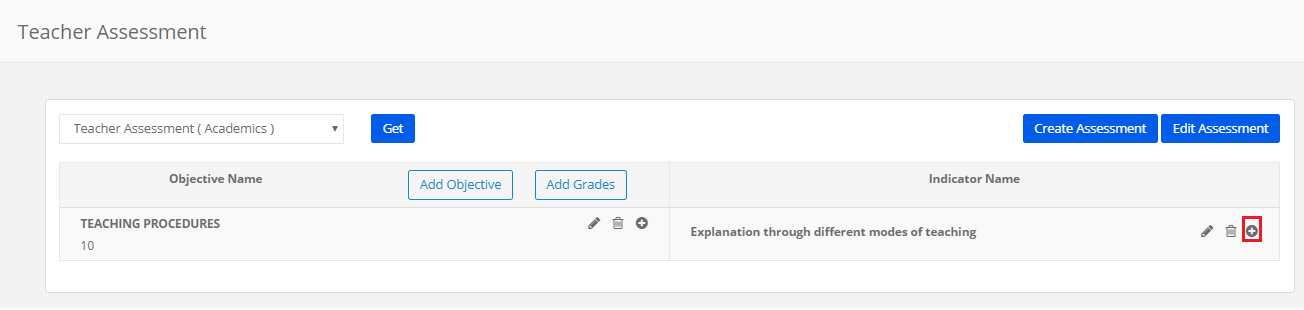
Step 14: Click on “+” sign to add the indicator.

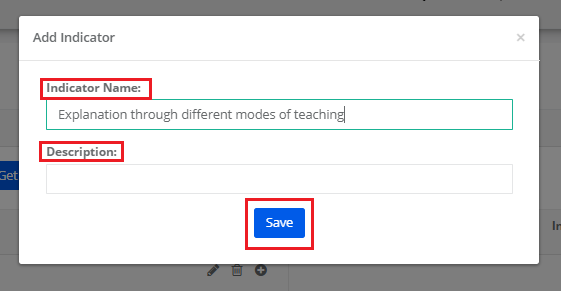
Step 15: Give Indicator Name, Description and click on Save

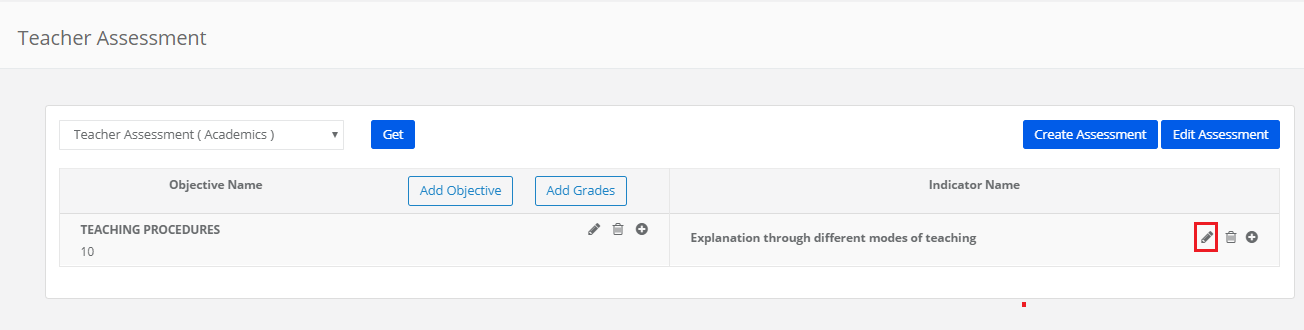
Step 16: To edit the indicator, click on edit icon [highlighted]

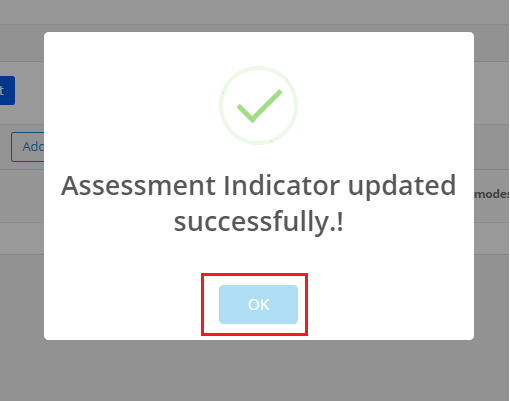
Step 17: Make changes in the required fields and click on update.

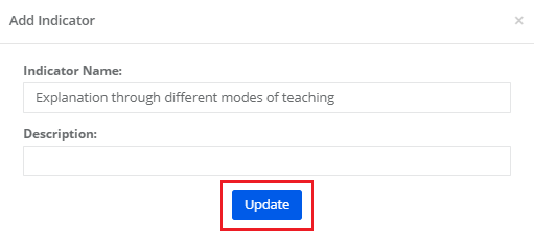
Step 18: Click ok to confirm the updation.

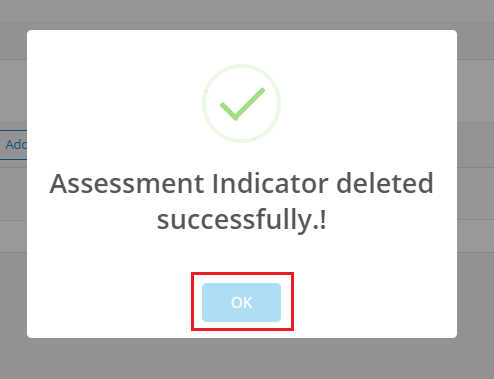
Step 19: Delete the indicator, click on delete icon [highlighted]

Step 20: Click OK to confirm the deletion

Creating Grading scale for the assessment:

School can grade the teachers against the objective or indicators.

Step 21: To assess against the objectives, create a grading scale at the link highlighted below

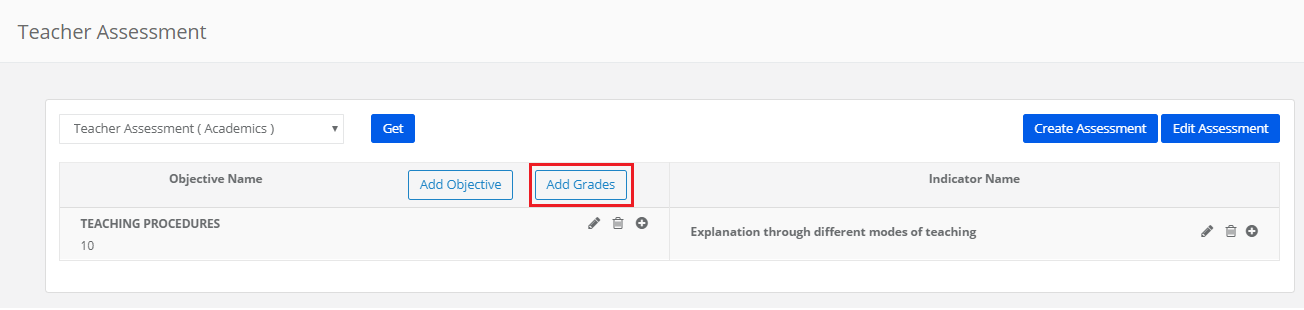
Step 22: To assess against the indicators, create a grading scale at the link highlighted below

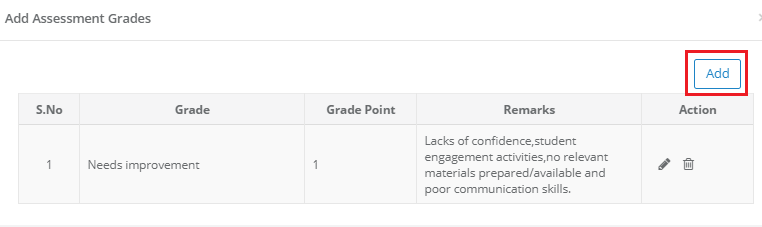
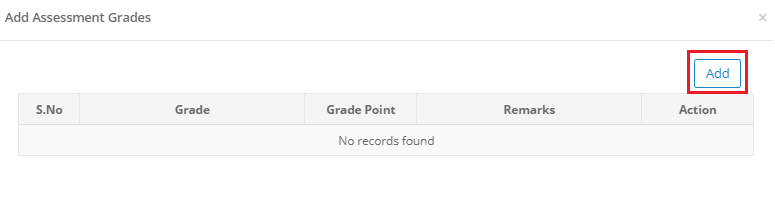
Step 23: To add grades, go to grades tab and click on Add

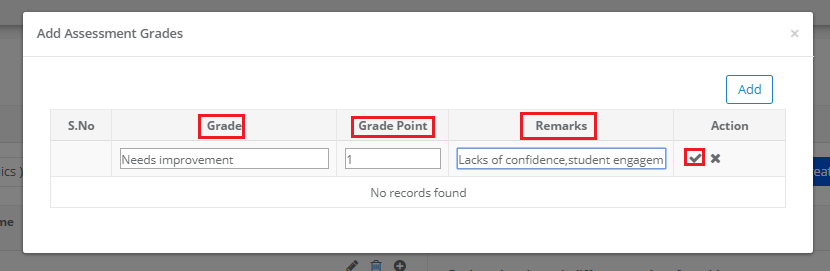
Step 24: Enter Grade, Grade Point, Remarks and click tick icon to save the grade
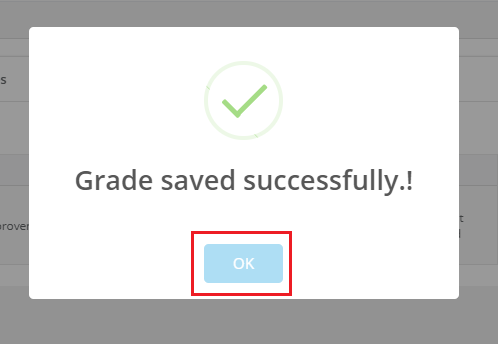
Step 25: Click OK

Step 26: Click on Add to add another grade to the scale and follow the procedure given at steps 24 & 25.

How to add BaseLine Analysis Entry?

Step 1: Login to MCB with Login Credentials.

Step 2: Select Academics on the dashboard and you will be directed to the Academics page.

Step 3: Click on “Learning” on the top bar and select “Assigning Exams to Students”.

Baseline Evaluation

Step 4: Select the Academic Year, Class & baseline category then click on Get, You will get the students details, Click on Edit & enter the marks to the students.

Note: In settings → Academics → Create Baseline Categories → Click on Add → Enter the name then Save.

Language Assigning

Step 5: Select the Academic Year, Class, Click on Student Wise Click on Get language Subjects, Assigned the Languages to students then click on Tick mark(saved).

Address

Step 6: Select the Academic Year, Class then click on Get. Students address will be displayed.

Transport

Step 7: Select the Academic Year, Class then click on Get. Students Transport details will be displayed.

Uniform Size:

Step 8: Select the Academic Year, Class then click on Get.

For the individual item sales; Item Name, Select the Size then click on Save Size.

Uniform Kits

Step 9: Select the Academic Year, Class then click on Get.

For Kits Item Sale, Select the Sizes Then click on Save Size.

Books Assigning

Step 10: Select the Academic Year, Class and student type then click on Get.

How to Assign Exams to Students?

Video Tutorial

How to Assign Exams to Students?

The online exam can be created from System admin login if it is common across all branches.
If there the exam is specific to the branch it can be created at a branch level.
Assigning exam to student option is available only at branch level.
The students who are assigned to the exam will get an option to attempt the exam.

To assign Exam to students:

Step 1: Login to MCB with Login Credentials and switch to branch level.

Step 2: Choose an online exam module by clicking on Home placed on the top right corner.

Step 3: Choose Assign Students to Exam option from the dashboard under Online Exams.

Step 4: Select the class, Section, Exam name and click on Get students.

Step 5: Click on Add Students tab and then Get Students to get the list of students.

Step 6: Choose the students whom you want to assign the exam to and click on Save Students.

By clicking on Students Added, you will get the Added students data to the exam.

Step 7: Then in Student Portal, Assigned Exam is reflected. By clicking on Start exam, Student will able to write the exam. Once the exam is completed by the student, Exam result report will be Displayed.

Step 8: Parent can export the report by clicking on the Excel icon placed on the top left corner of the report.

Step 9: Parent can also view the question paper alone once the student attempts the exam.

Step 10: Parent can print the question paper for future use by clicking on the print icon available on the top left corner.

How to add questions to Question Bank?

Video Tutorial

How to Add Questions to the Question Bank?

The questions can be added from system admin login or branch level login. They can be added against the Chapter or a specific topic of the chapter. Questions can be added from Learning and Question bank directly. The questions once added are made available across all academic years. These questions can be used in Online practice assessment and Online Exam/ Worksheet.

To add Questions to Question Bank.

Step 1: Login to MCB with Login Credentials.

Step 2: Switch to Online Exam module by clicking on Home which available next to the profile picture on the right corner.

Step 3: Click on Question bank option from the dashboard.

Step 4: It will take you to the question bank dashboard. It shows the count of questions available in the organization across the classes.
You can find the count of questions subject wise under each class.

Step 5: As we click on the count, it will list you the questions available for the subject from all chapters and topics.

Step 6: To edit any component of the question, click on the edit icon to change the question difficulty level, Chapter, Topic, question description, answer and answer explanation.

Step 7: For example, if you would like to change the level of the question, click on the edit and choose the required option from the drop-down. Click on the Update Question button. Please note that while you edit the level, the rest of the components remained frozen, not to allow the Edit for any.

As you choose the edit icon against the component, only that particular component is allowed to edit.

Step 8: To add a new question, Click on “+Question” option which is on the top right corner.

Step 9: Choose the question type as Single Answer Multiple Choice Question or Multiple Choice Answer Multiple Choice Question or Fill in the blanks.

Choose Class, Subject, Chapter and it’s topic, the Difficulty level of the question.

Choose Enter manually to key in the question.

Enter Question description and Enter the options

Choose the right answer among the options available

Enter Answer Explanation and Save Question option to save question or Cancel to revert.

Step 10: If questions are in picture format, you can upload them by choosing Upload Questions. Please make sure there are options available for the question in the picture since there is no option to enter options description.

Browse the file from your computer and choose it.

Choose the number of options given in the question and correct answer.

Enter Answer Explanation and Click on Save Question.

How to generate Online Exam Analysis Dashboard?

Video Tutorial

How to Generate Online Exam Analysis Dashboard?

Online Exam Dashboard Analysis can be generated from the System Admin level and Branch level.

When you generate the report at the system admin level, it will list the results of all branches against the exam.

When you generate the report at the branch level, it will list the results of the branch.

To generate the report, please follow the steps mentioned below.

Step 1: Login to MCB and Choose Online Exam module by clicking on the Home option.

Step 2: Choose Online Examination Analysis Dashboard option under the Reports menu.

Step 3: Choose Academic year for which you would like to generate the report. Choose To date if you wish to generate the report of all exams conducted till date in the selected academic year. You may choose a particular month to generate the report.

Step 4: It will display the dashboard showing a list of exams conducted under each class based on the selected period.

Please note that the report shows the details like Questions added to the exam, no of students assigned to the exam, no of students who attempted the students and not attempted the exam.

Step 5: When you click on the number under the Added Questions column, it will display the list of questions subject wise given in the exam.

Step 6: When we click on the count under not attempted students column, It will list the students who have not attempted the exam.

You are provided with SMS and Email option to send a reminder or information to the parents.

Step 7: To send SMS, Choose an SMS option and to whom you want to the sent message, select all students or specific students and draft the message in the message box. Click on Preview and Send button to send the SMS.

Step 8: To Send Email, Choose Email option, to whom you want to send an email and From Email. Enter the subject line and message in the description box, attach a file by browsing the file from your computer if any. Choose all students or specific students from the list displayed below and click on send.

Step 9: When you click on the number under the Attempted column, It will take you to the result analysis page.

Step 10: The lists the students with the marks, percentage, grade and Rank obtained for each subject.

When you click on the View grading scale, it will display the grades range based on which the grading is allotted to students.

When you click on the student enrollment code, it will show you a detailed report.

The report gives you the details like Overall Result covering all subjects, Subject wise result, the marked answer for each question along with the exam key.

You may print the report by clicking on the print icon placed on the top left corner.

When the due date for the exam is not crossed, you will be provided with the delete option to clear the result of the exam. So that, the student can reattempt the exam.

Step 11: The analysis dashboard also gives you the Grade wise and Question wise analysis.

Gradewise Analysis helps you understand grade wise student count.

Question wise Analysis helps you understand, how many students given a correct answer, the wrong answer and not attempted the question at all. Upon clicking on the count, it will show you the list of students respectively.

Step 12: You can export the complete Online Examination Analysis Dashboard to excel by clicking on the Excel icon placed on the top left corner.

How to create PTM Feedback?

Step 1: Login to MCB with Login Credentials.

Step 2: Select Academics on the dashboard and you will be directed to the Academics page.

Step 3: Click on “Enrollment” on the top bar and select “PTM Feedback”.

Step 4: Select the Class, Section & PTM click on Get. Click on [+] to enter all the details then save.

Step 5: This Feedback form will reflect in Parent Portal Also. Login MCB with parent Login Credentials. Click on Parent Teaching Meeting, Feedback form will be displayed in Parent Login.