How to publish term report card on parent portal and parent mobile app?

This feature helps you publish the term report card on parent portal [web] and Mobile App. Unless you make settings for publishing the report card with a date, the report card will not be visible for patents on the portal. By default the report cards are unpublished on parent portal to prevent the visibility of the marks for the parents as when the teacher updates the marks before the PTM or the day you wish to release the report cards. The settings can be made only at a branch level.

To use this feature, please follow the steps mentioned below.

Step 1: Login to MCB and Switch to branch level by clicking on Change access level on the right panel as you click on the user profile picture.

Step 2: Click on the user type against the branch name.

Step 3: Click on the Gradebook on the top menu bar.

Step 4: Choose Term Report Card Settings option under Grade Book menu.

Step 5: Choose Class, Term for which you wish to publish the report card and click on Get.

Step 6: Please find two options as Result Publish date and Report can be viewed on or after.

Result Publish Date: The date you set here is usually used to show it in the report cards at Result Date.
Report can be Viewed on or after: The report card is visible for the parent on or after the date you set here.

Step 7: To set the Result publish date, select all sections or specific section, choose date and Click on Save.

Step 8: To publish the report card, click on Edit.

Step 9: Choose Yes under Parent can view report card and choose the date and click on Update to save the settings or cancel to revert.

Step 10: To set the report card publish date and enabling report card on parent portal at a time, Select the section check box, choose the date for report card publish date to include in the report card and to enable the report card for parents, choose yes under Parent can view report card column and date under report can be viewed on or after column and click Save.

Step 11: To unpublish the report card on parent portal, Choose the class, term and click Get. Click on Edit to enable the edit mode.

Step 12: Choose No under Parent can view report card column and notice that the date disabled under report can be viewed on or after column and click Update to save the settings and cancel to revert.

How to enter Student Remarks?

Student Remarks can be entered for a term or for each evaluation available under the term. Remarks can be entered in different categories like General Remarks, My Goals, My Strengths, My Interests, Responsibilities, Specific participation, and Co-Scholastic Remarks. Based on the school’s requirement and reporting, remarks can be entered against the required category and show the same in the evaluation report card, term wise report card, and overall report card.

Remarks can be entered in two modes.
1. Predefined indicators for each grade against defined categories.
This feature is mainly used for the schools, who have a system of giving standard remarks against categories defined with a grade. The teacher will be selecting the grade and relevant indicator for a category. He/she will also have an option to write her own remarks against the category instead of selecting the predefined indicator.

Please note that when the grades and indicators are created for a remark type, remarks cannot be entered manually by all the branches for all classes without a grade and indicators. By default, the user has to enter a grade and choose the indicator.

2. Enter remarks manually without grade against the category.
This feature is used for the schools, who gives allows the teachers to write the remarks on their own without a grade or category.

Predefined indicators for each grade against defined categories:
To use this feature, we need to create the categories, grades, and Indicators at the organization level.

To create, please follow the steps mentioned below.

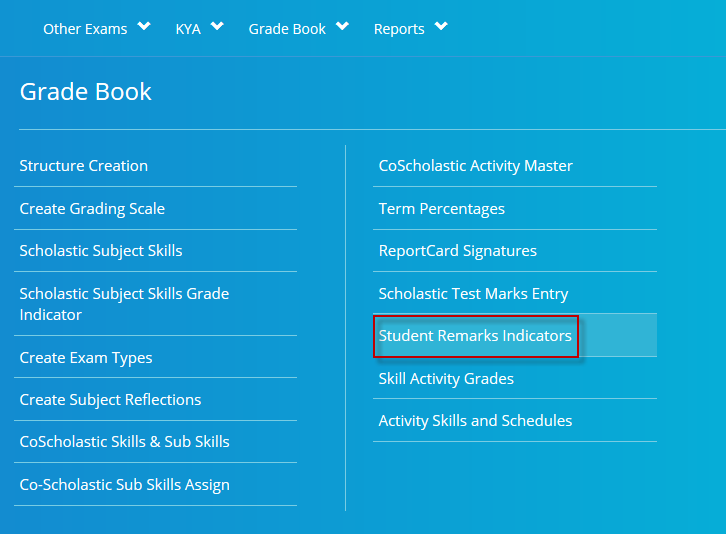
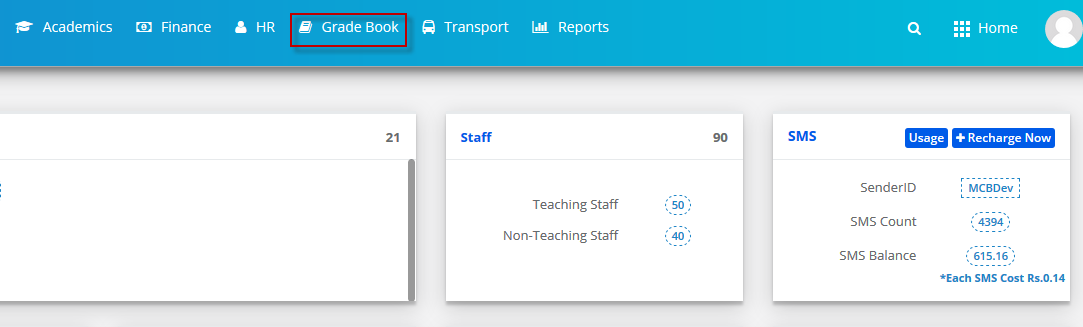
Step 1: Login to MCB with system admin login and click on Grade Book module.

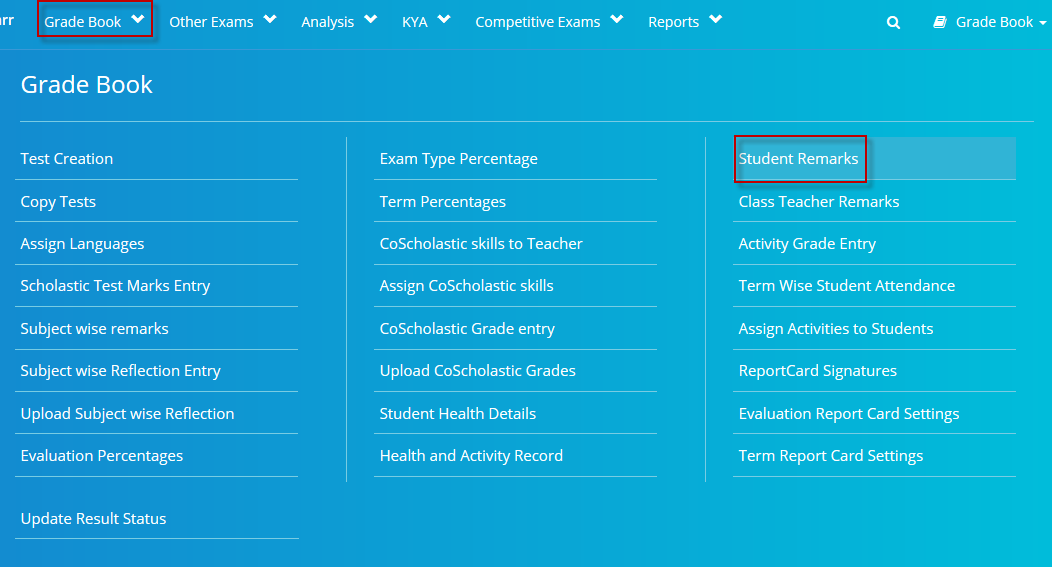
Step 2: Choose Student Remarks Indicators option under Grade Book menu.

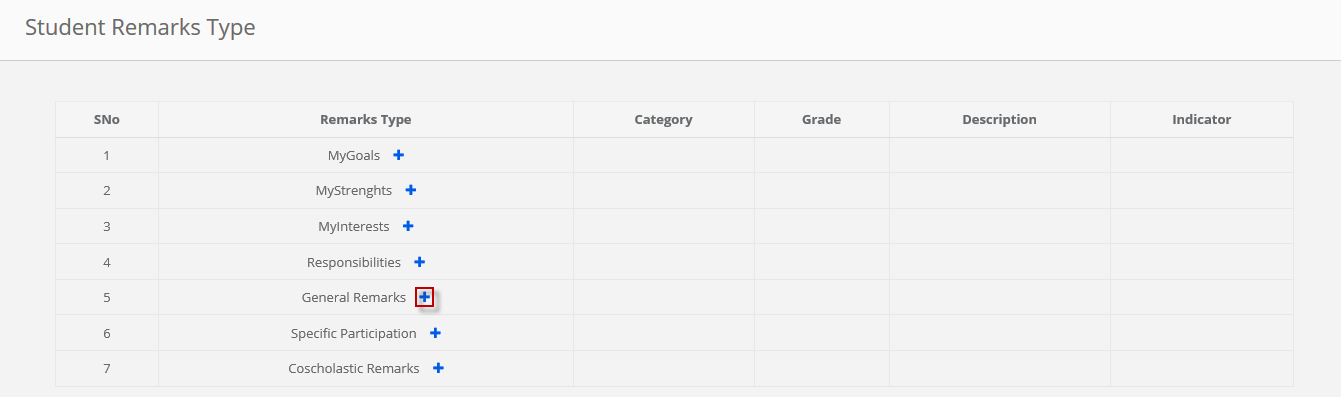
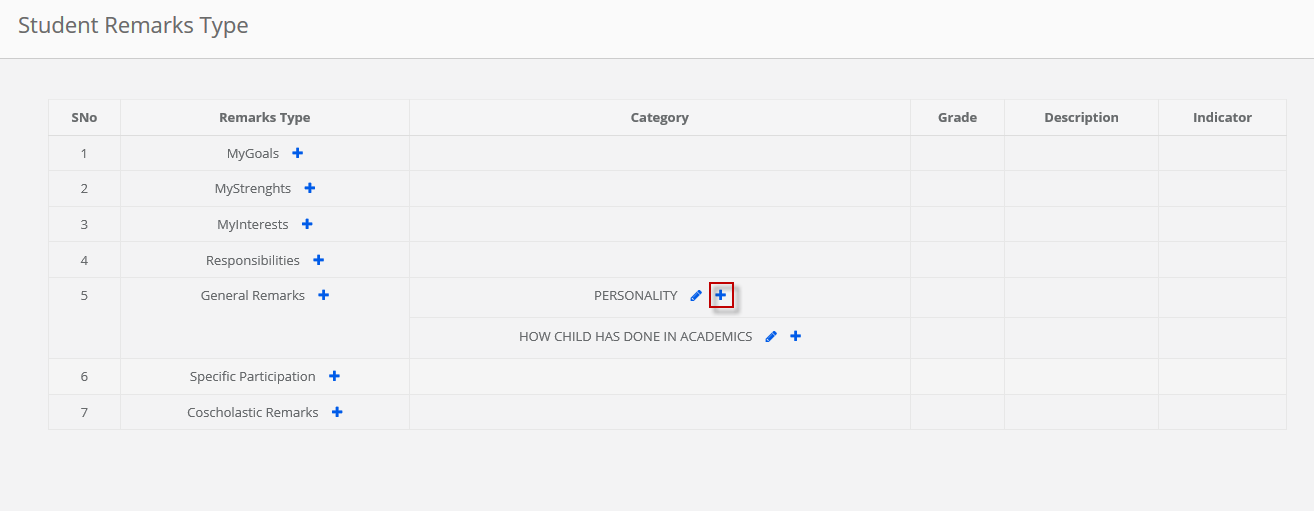
Step 3: Click on + sign against the Remarks Type, to create the categories.

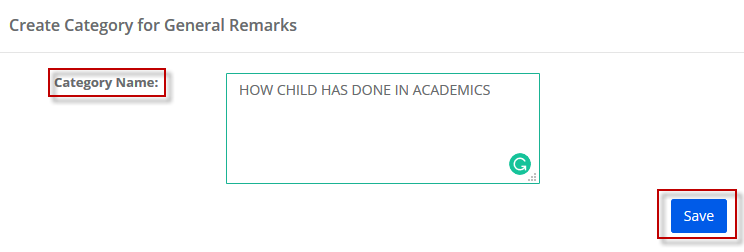
Step 4: Enter Category Name and Click on Save button.

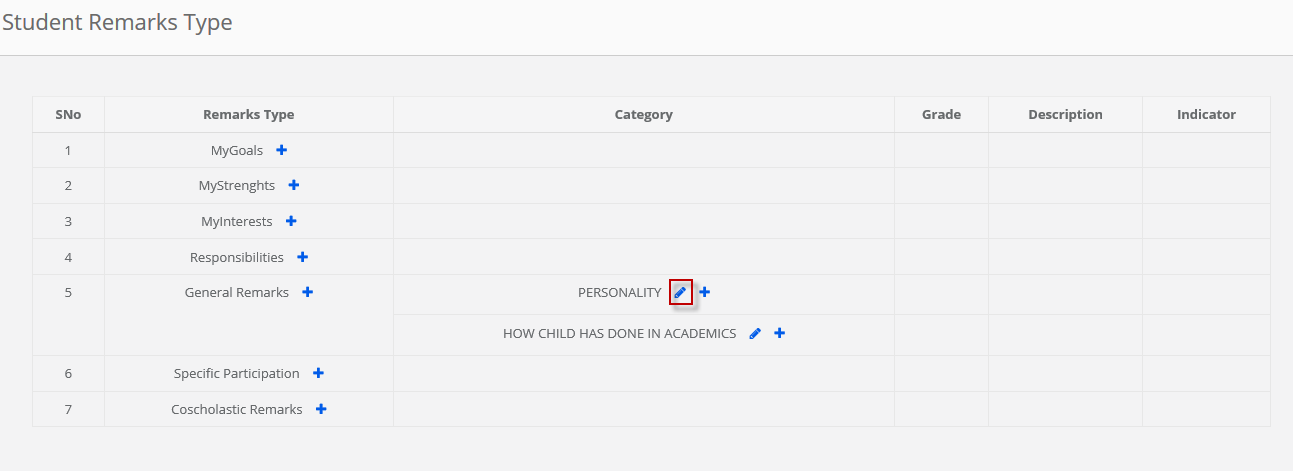
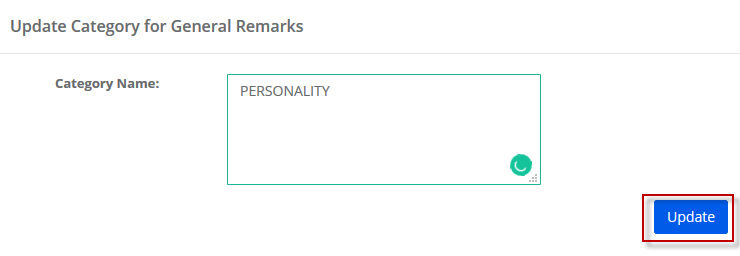
Step 5: To edit the Category name, Click on Edit icon against the name

Step 6: Make the necessary changes and click on the Update button.

Step 7: To create Grades for the category, click on Plus + sign against the category name.

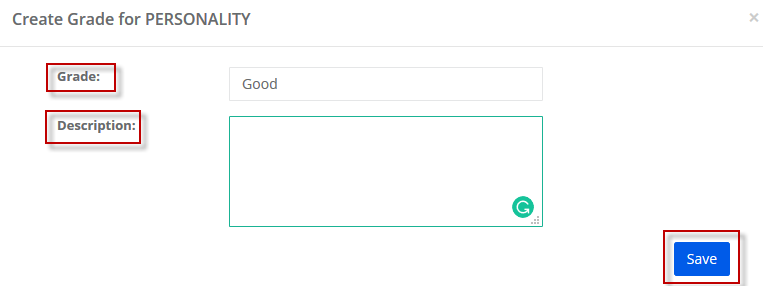
Step 8: Enter the Grade, Description and Click on Save button.

Step 9: To edit the grade, click on the edit icon.

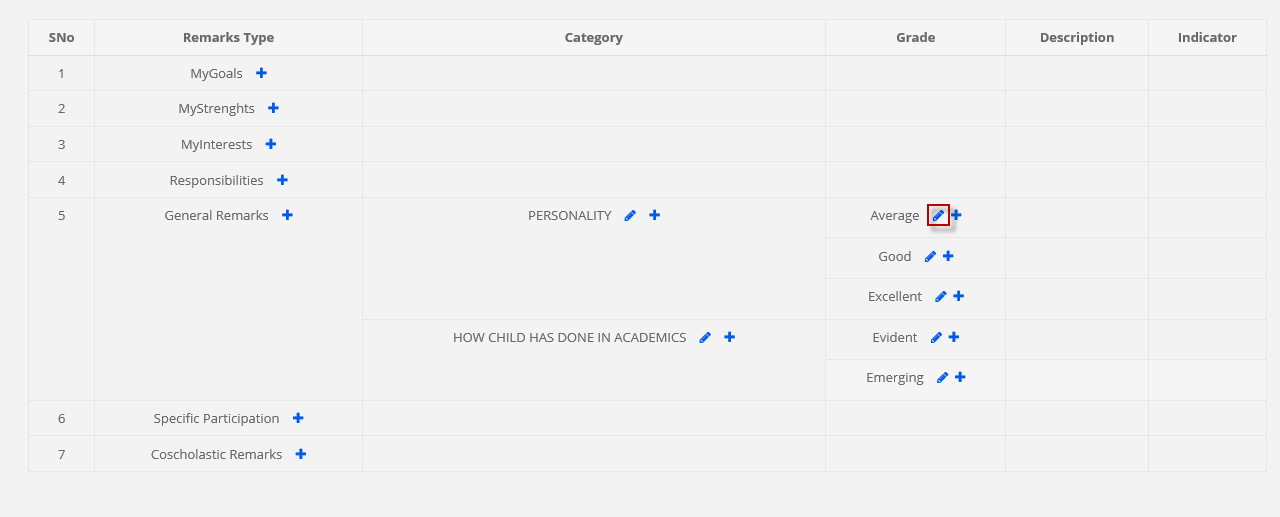
Step 10: Make the necessary changes and click on Update.

Step 11: To create Grade indicators, Click on Plus + sign against the grade.

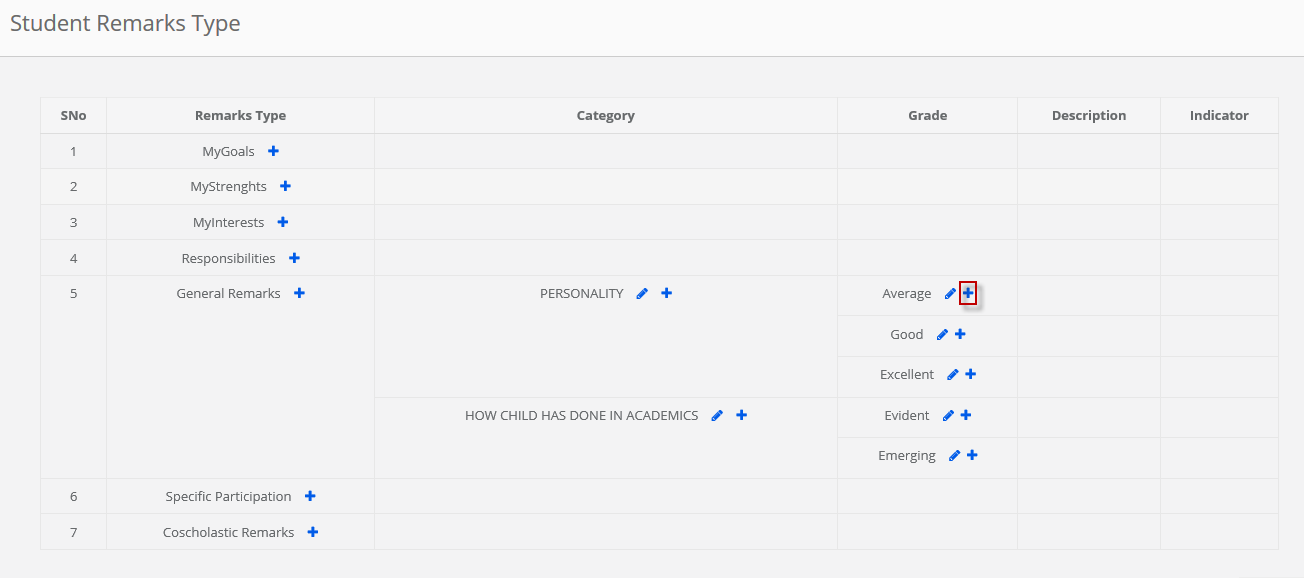
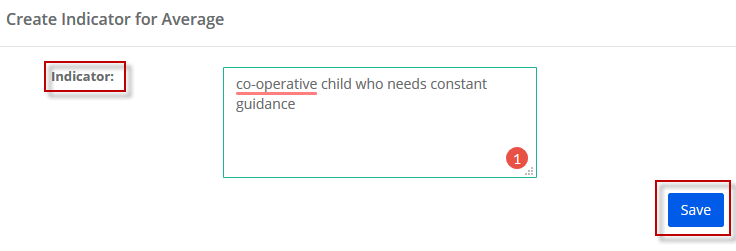
Step 12: Enter the Indicator and click on Save.

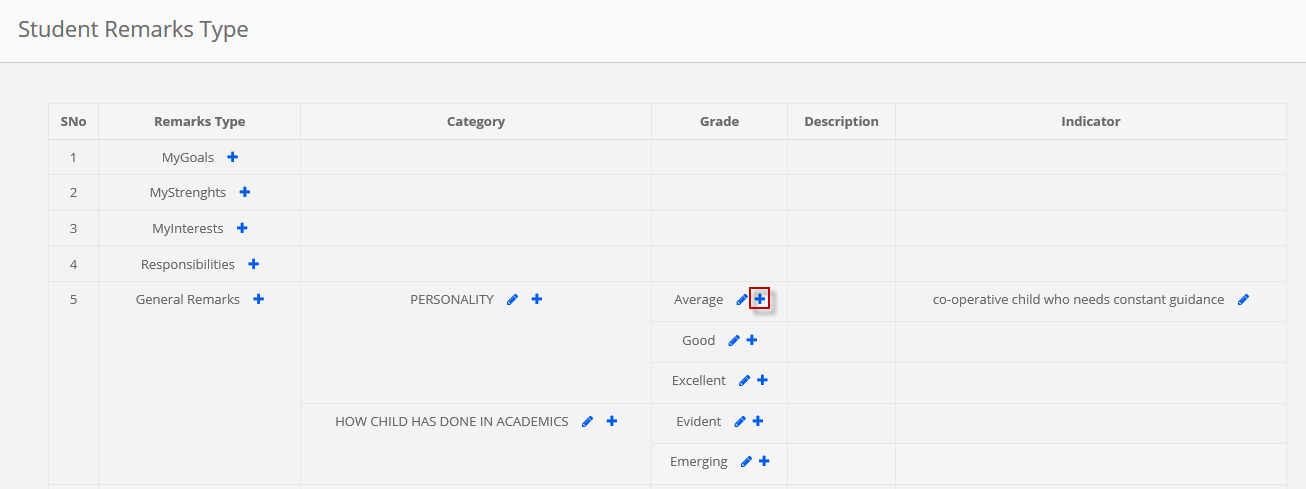
Step 13: To enter one more indicator against the same grade Click on Plus “+” Sign against the Grade a repeat step 12.

Step 14: To edit the grade indicator, click on the edit icon against the grade.

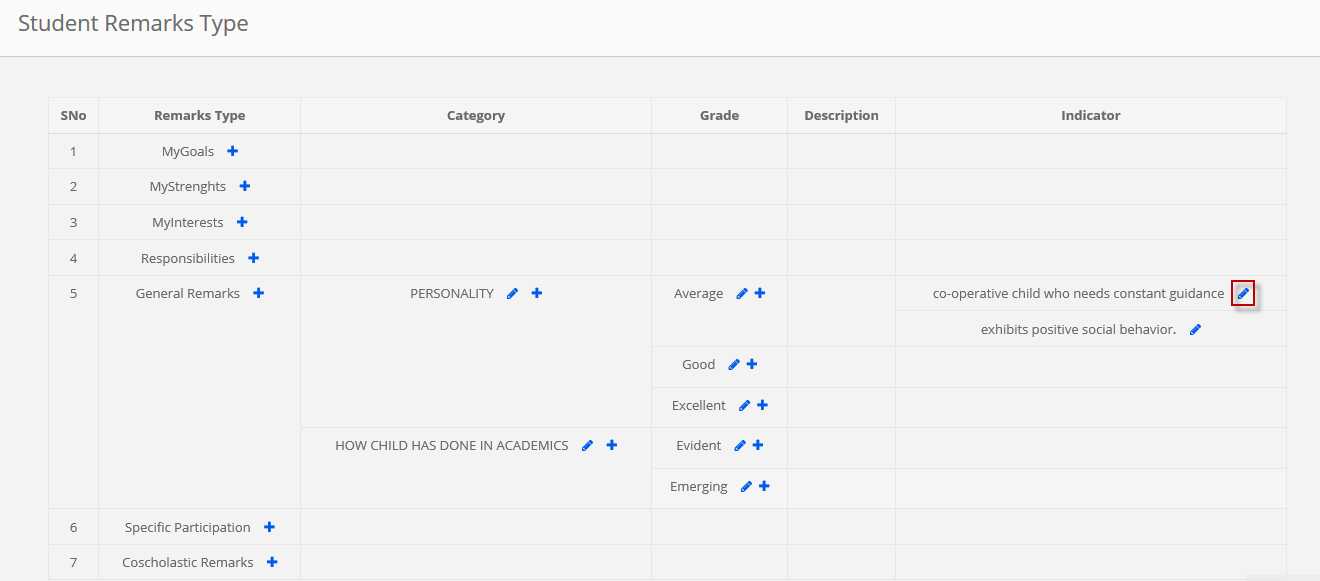
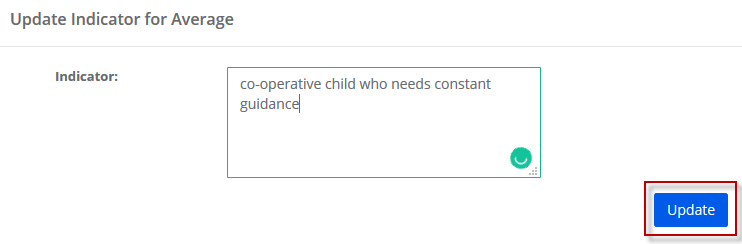
Step 15: Make the necessary changes and click on the Update button to save the changes.

Enter Grade and Indicator for a category:

Grades and Indicators can be added from a class teacher login and principal login.

Step 16: Login to MCB with principal / Class teacher login credentials. Click on Grade book module on the top menu bar.

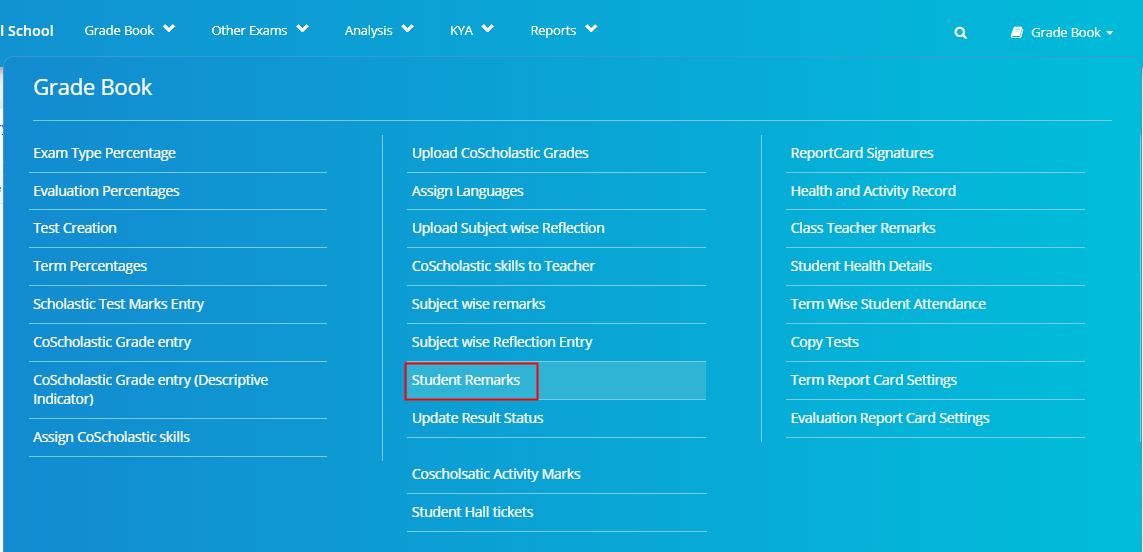
Step 17: Click on Student Remarks option under Grade Book Menu.

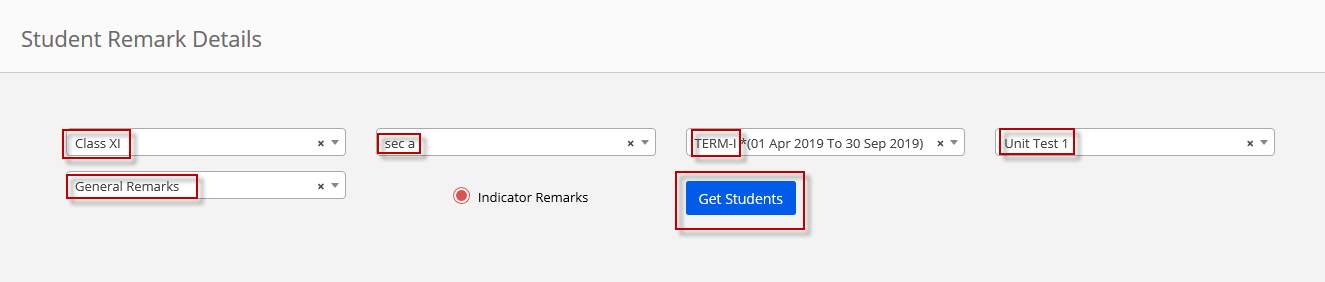
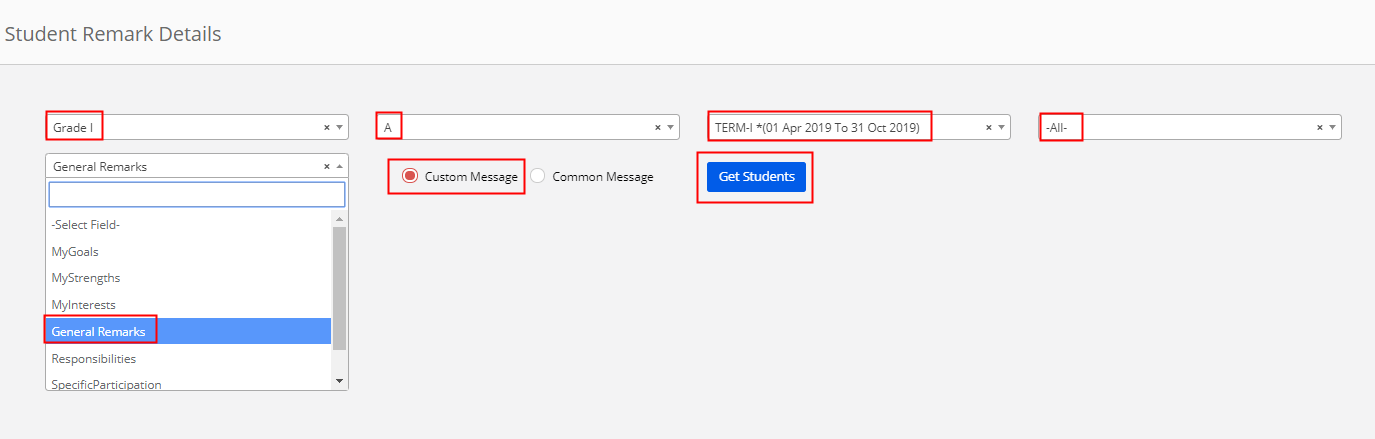
Step 18: Choose Class, Section, Term, All evaluations or a specific evaluation, remarks type for which indicators are created and click on Get Students.

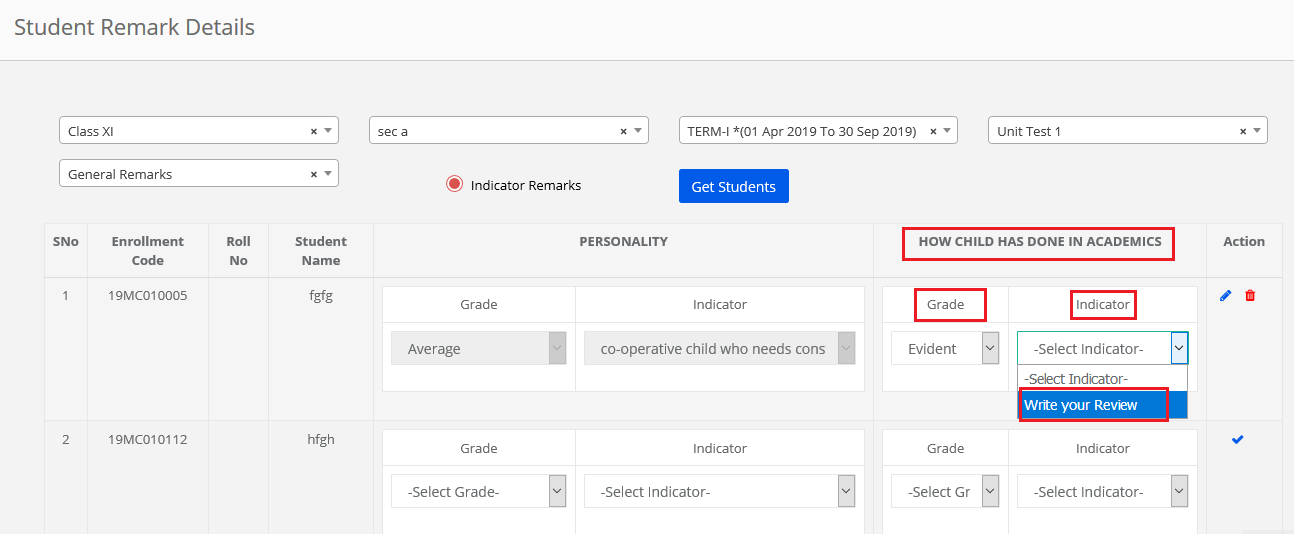
Step 19: Under the Category, choose Grade, Remarks from the drop-down and click on Tick mark to Save.

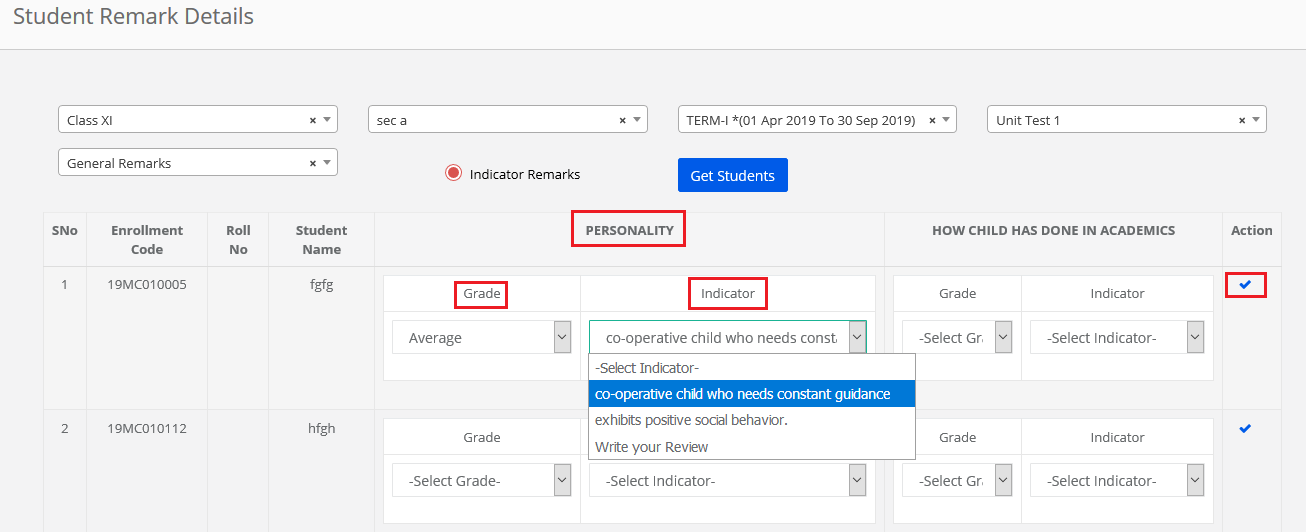
Step 20: If you would like to write your Own Remark against the Grade, Click Write your
Review option from the dropdown. Click on Tick mark to save the grade and remarks.

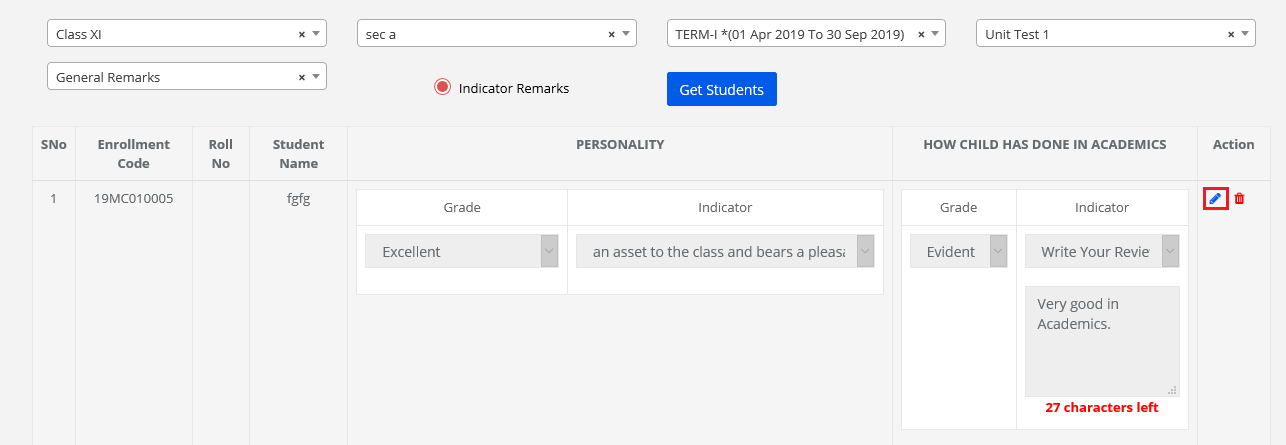
Step 21: To edit the grade and remarks, click on the edit icon.

Step 22: Make the necessary changes and click on Tick marks to save the changes or Cross mark to revert the changes.

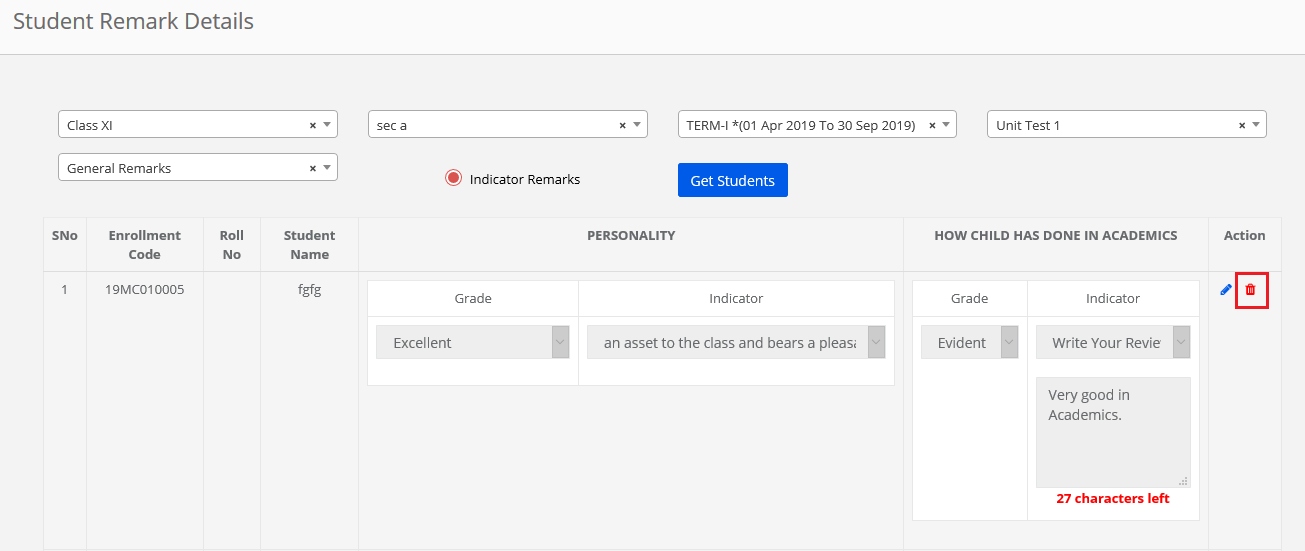
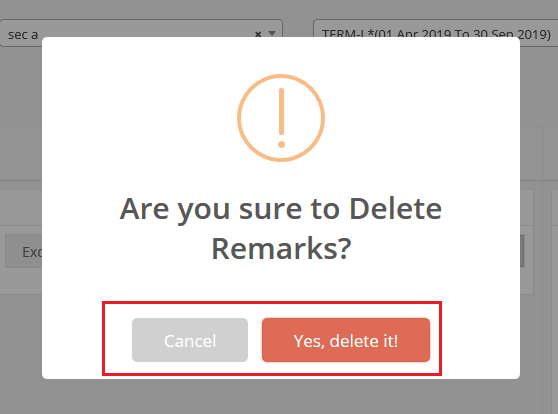
Step 23: To delete the grade and remarks, click on the delete icon.

Step 24: To confirm the deletion, click on yes, delete it! Option. To cancel the deletion click on Cancel Option.

Enter remarks manually without grade and indicator for the category:
To enter remarks manually without any grade and indicator, Please make sure the indicators are not created for the remarks type which you are going to enter remarks.

please follow the steps mentioned below.

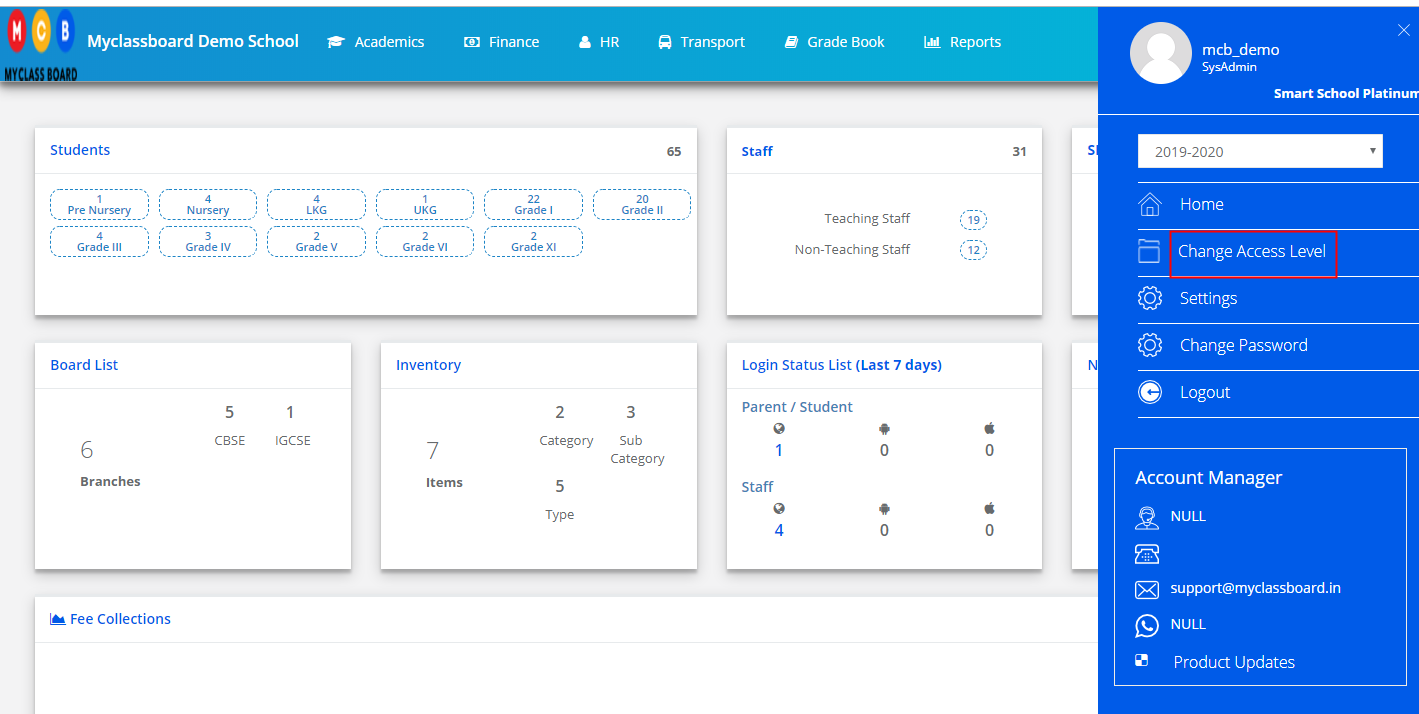
Step 25: Login to MCB and Switch to branch level by clicking on Change access level on the right panel as you click on the user profile picture.

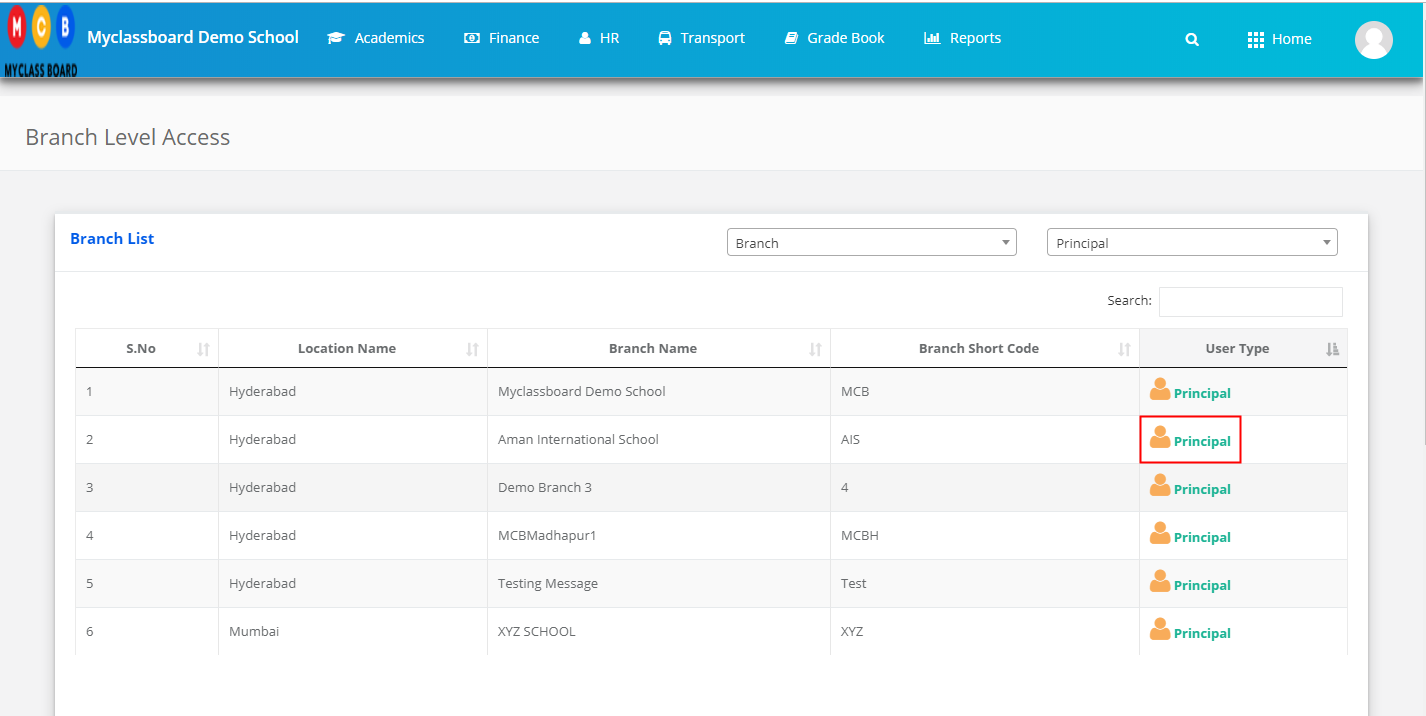
Step 26: Click on the user type against the branch name.

Step 27: Click on the Gradebook on the top menu bar.

Step 28: Choose Student Remarks option under Grade Book menu.

Step 29: Choose Class, Section, term, if you wish to enter remarks for term then, select All or if you wish to enter remarks for specific evaluation, choose the evaluation name from the drop-down, choose remarks type based on your requirement and click get students to get the list of students for the entry.

Please note the two options available as Custom message and common message.

Custom message: This option is used when there are different remarks to be given for the students.

Common message: This option is used when you a certain message common to all students and the remaining message is different. When you add a common message, you will get it in the dropdown. So that you need not type the message again. As you choose the message, it will be placed in the remarks automatically. Then you can edit or add some more message to it.

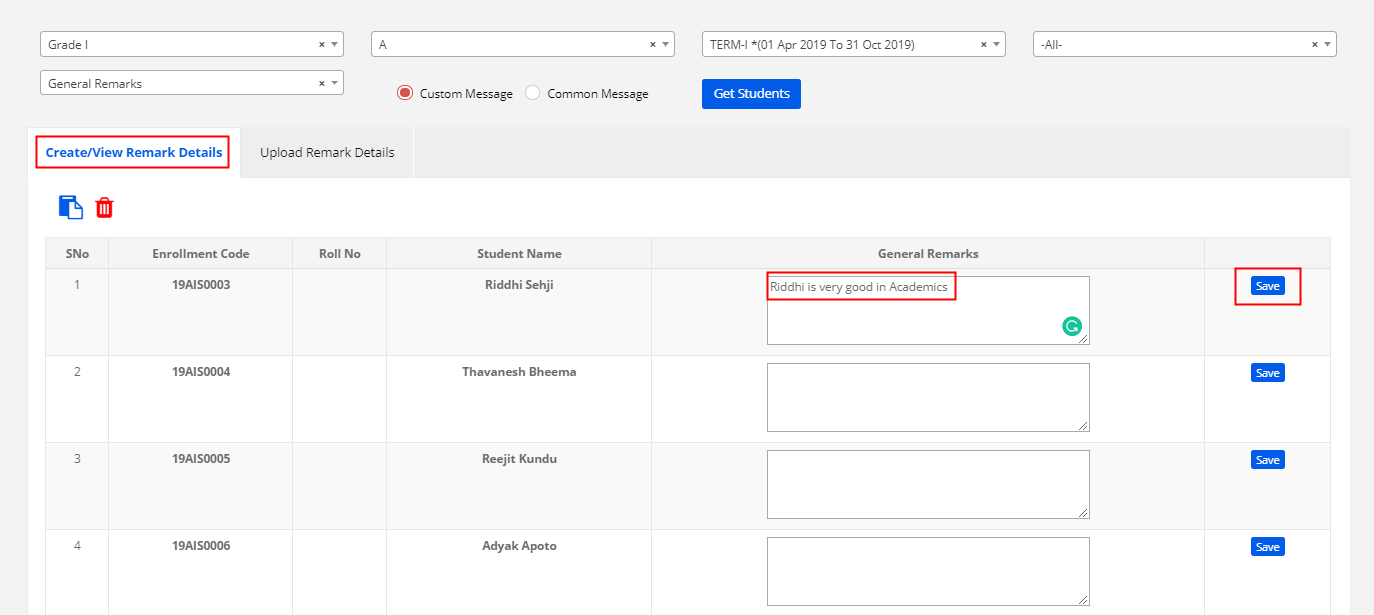
The following screen demonstrates customized remarks.

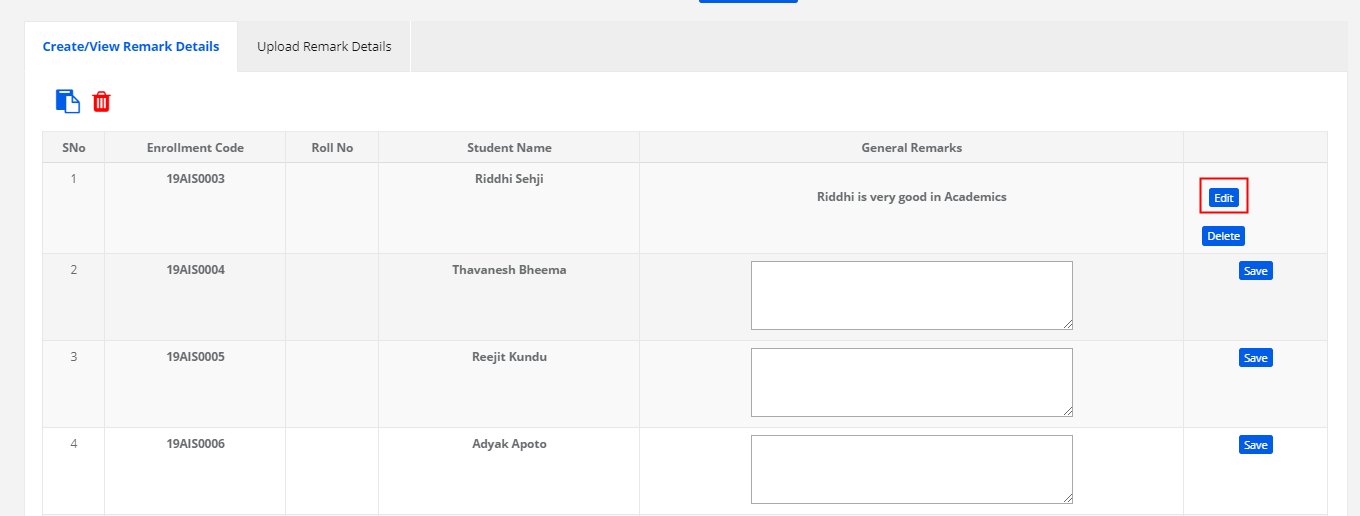
Step 30: To enter remarks manually, choose to Create/View Remarks Details tab, enter remarks against the student name and click on Save.

Step 31: To Edit the remarks, Click on Edit option.

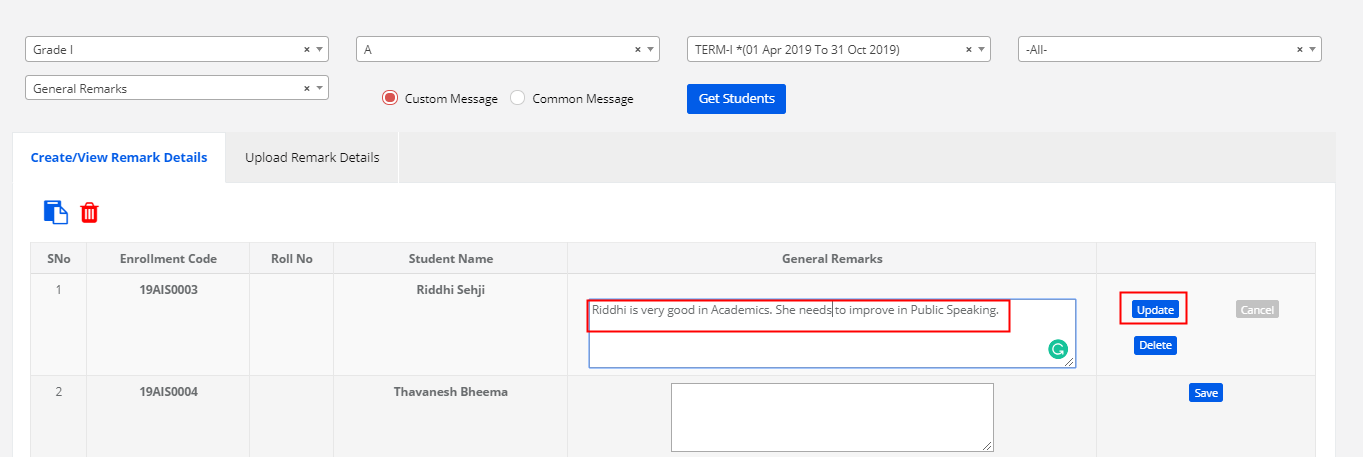
Step 32: Make the required changes in the remarks and click on Update to save or Cancel to revert the remarks.

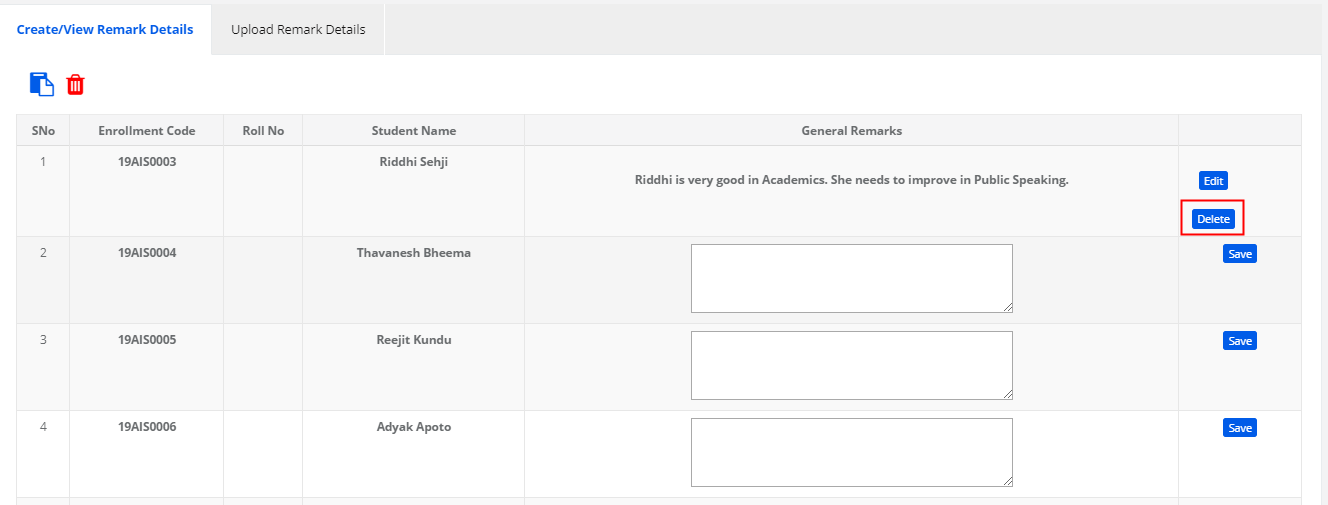
Step 33: To delete the remarks of a student, click on the Delete button.

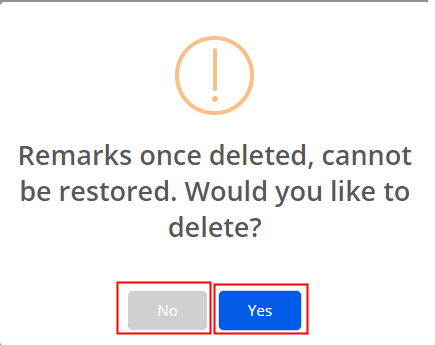
Step 34: Click Yes to confirm the deletion or No to cancel the deletion.

Step 35: To delete remarks of all students at one go, click on the delete icon which is available on the top left corner.

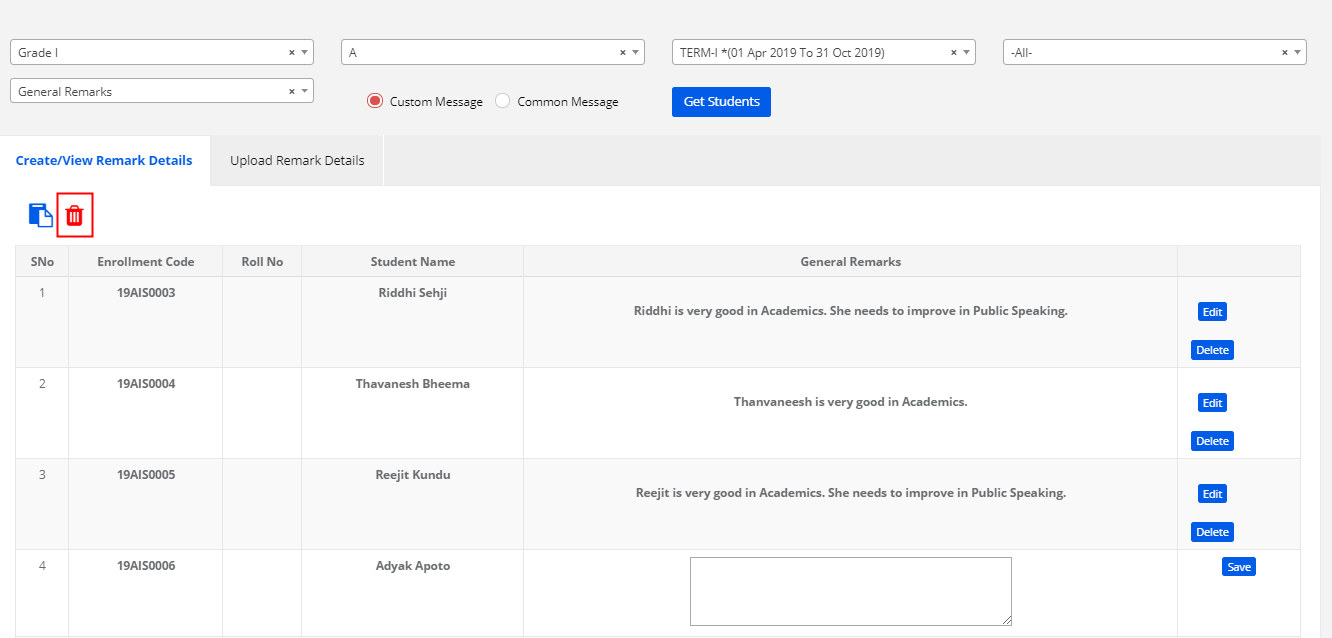
Step 36: Click Yes to confirm the deletion or No to cancel the deletion.

Step 37: To upload Remarks, Click on Upload Remarks details tab. Download the file by clicking on the Download File Format and enter the required remarks.

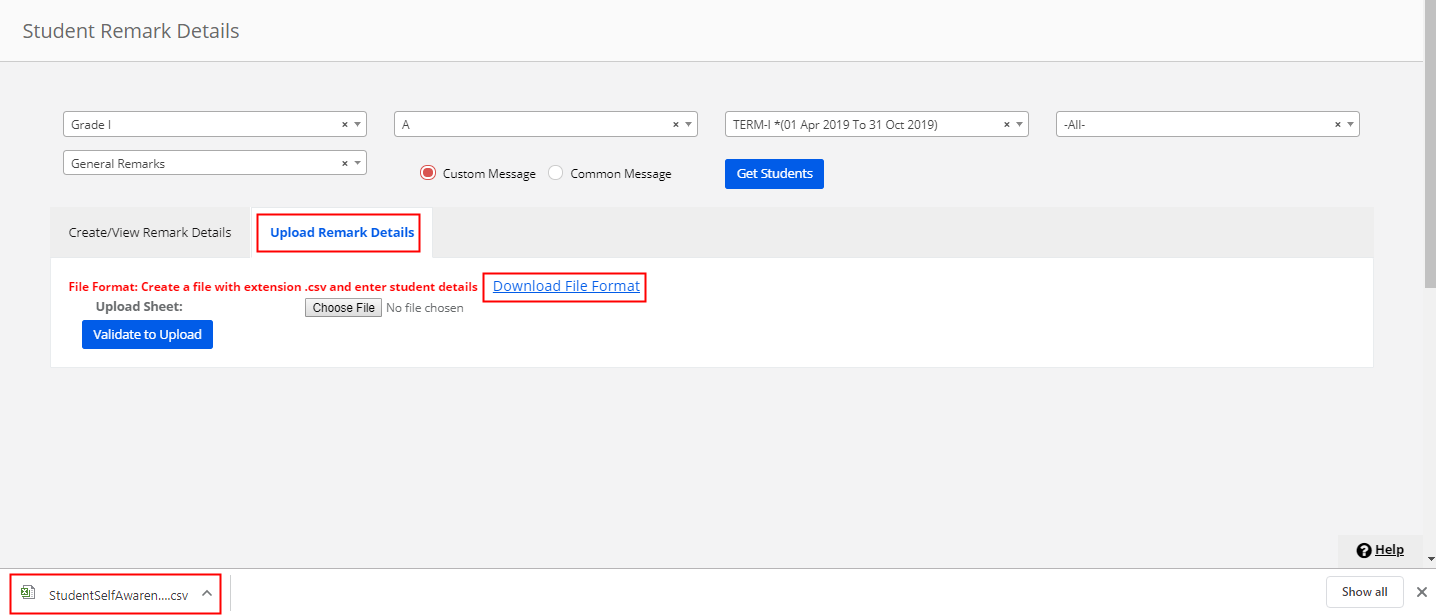
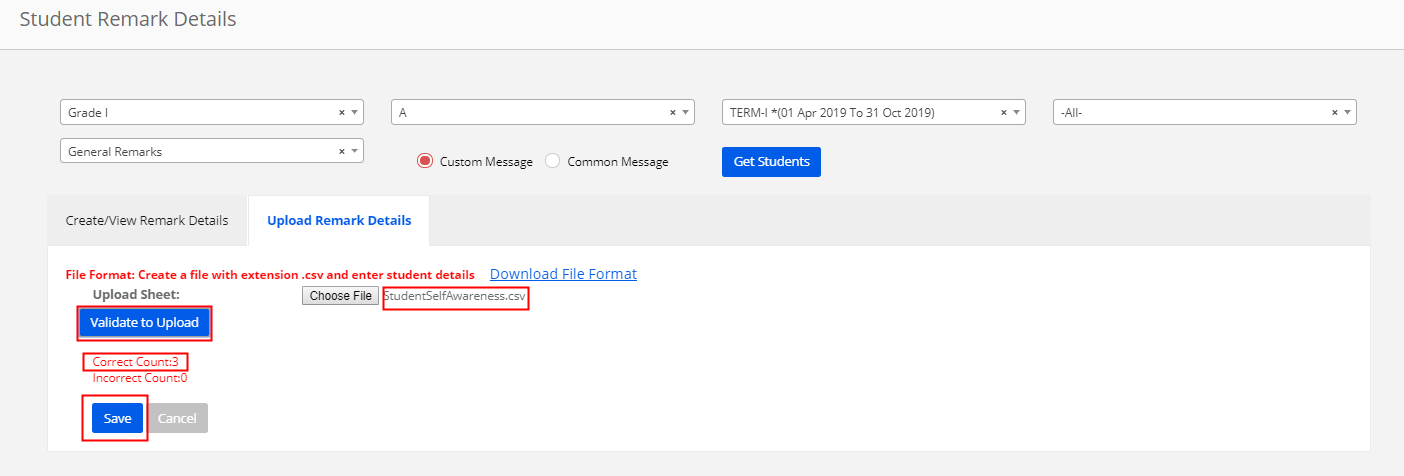
Step 38: Choose the file from your computer and click on Validate to Upload. Check the message displayed after validation. If the records you entered are matching with the correct count. Click on Save to save the remarks or Cancel to cancel the upload.

Please note that, if the validation message shows incorrect records, when you save the file, only the records which are correct will be uploaded. The incorrect records will not be uploaded.

Once the Remarks are uploaded, you can view them under the Create/View Remarks details tab. You can follow the same process as described in the steps above for edit and delete the remarks.

Note: The process of entering and uploading of the remarks is the same for all Remarks types.

How to publish Evaluation report card on parent portal and parent mobile app?

This feature helps you publish the Evaluation report card on parent portal [web] and Mobile App. Unless you make settings for publishing the report card with a date, the report card will not be visible for patents on the portal. By default, the report cards are unpublished on parent portal to prevent the visibility of the marks for the parents as to when the teacher updates the marks before the PTM or the day you wish to release the report cards. The settings can be made only at a branch level.

To use this feature, please follow the steps mentioned below.

Step 1: Login to MCB and Switch to branch level by clicking on Change access level on the right panel as you click on the user profile picture.

Step 2: Click on the user type against the branch name.

Step 3: Click on the Gradebook on the top menu bar.

Step 4: Choose Term Report Card Settings option under the GradeBook menu.

Step 5: Choose Class, Term, Evaluation for which you wish to publish the report card and click on Get.

Step 6: Please find two options as Result Publish date and Report can be viewed on or after.

Result Publish Date: The date you set here is usually used to show it in the report cards at Result Date.
The report can be Viewed on or after The report card is visible for the parent on or after the date you set here.

Step 7: To set the Result to publish date, select all sections or a specific section, choose a date and Click on Save.

Step 8: To publish the report card, click on Edit.

Step 9: Choose Yes under Parent can view report card and choose the date and click on Update to save the settings or cancel to revert.

Step 10: To set the report card publish date and enabling report card on parent portal at a time, Select the section check box, choose the date for report card publish date to include in the report card and to enable the report card for parents, choose yes under Parent can view report card column and date under report can be viewed on or after column and click Save.

Step 11: To unpublish the report card on the parent portal, Choose the class, term and click Get. Click on Edit to enable the edit mode.

Step 12: Choose No under Parent can view report card column and notice that the date disabled under report can be viewed on or after column and click Update to save the settings and cancel to revert.

How to update Evaluation percentages?

Evaluation Percentages can be updated only at the branch level. Please follow the steps mentioned below.

Step 1: Login to MCB and Switch to branch level by clicking on Change access level on the right panel as you click on the user profile picture.

Step 2: Click on the user type against the branch name.

Step 3: Click on the Gradebook on the top menu bar.

Step 4: Choose Evaluation Percentages option under Grade Book menu.

Step 5: Choose the Structure name, Class, Enter percentages based on the weight needs to be considered for the evaluation in each term and click on Save.

Please note that, if a structure is created for multiple classes, you need to update evaluation percentages for each class.

How to assign Co-Scholastic Skills to teachers?

Assigning Co-Scholastic Skills to the teacher makes teachers work easily while entering grades. When the skills are assigned to teachers, only the assigned skills are displayed in the teacher’s login while grades entry instead of displaying all skills created for the class. Teachers can simply enter grades for the skill they are teaching without having to filter their skills.

To assign the skills to teachers, please follow the steps mentioned below.

Step 1: Login to MCB and Switch to branch level by clicking on Change access level on the right panel as you click on the user profile picture.

Step 2: Click on the user type against the branch name.

Step 3: Click on the Gradebook on the top menu bar.

Step 4: Choose co-scholastic skills to teacher option under Grade Book menu.

Step 5: Choose Grade, Section, Co Scholastic Part and click on Get to display the skills available under the selected part.

Step 6: To assign the teacher, click on the Assign option against the skill.

Step 7: Choose the teacher’s name and click on Assign.

What is the use of Scholastic Subject Skills Grade Indicator?

When a school wants to display the grade description differently for each grade entered for subject skill, this feature allows the user to save the description against each grade. So, as you map the subject skill to the test and enter the grade, in the report card the description saved against the grade can be shown. Best suited for rubric-based reporting.

How to use it?

Please follow the steps mentioned below.

Step 1: Login to MCB with System Admin credentials

Step 2: Click on Grade Book menu on the top menu bar.

Step 3: You will be redirected to the Gradebook module. Choose Scholastic Subject Skills Grade Indicator option under Grade Book Menu.

Step 4: Choose Branch, Structure, Part, Class, Subject and Click on Show to get the list of subject skills created for the selected subject.

Step 5: Click on Edit icon Against the sub-skills for which you would like to enter the grade description.

Step 6: Enter description for all grades, Click on Save icon to Save the description and Cross icon to cancel the entry.