How to send wishes to Staff on their Birthday?

Step 1: Login to MCB with Principal login credentials.

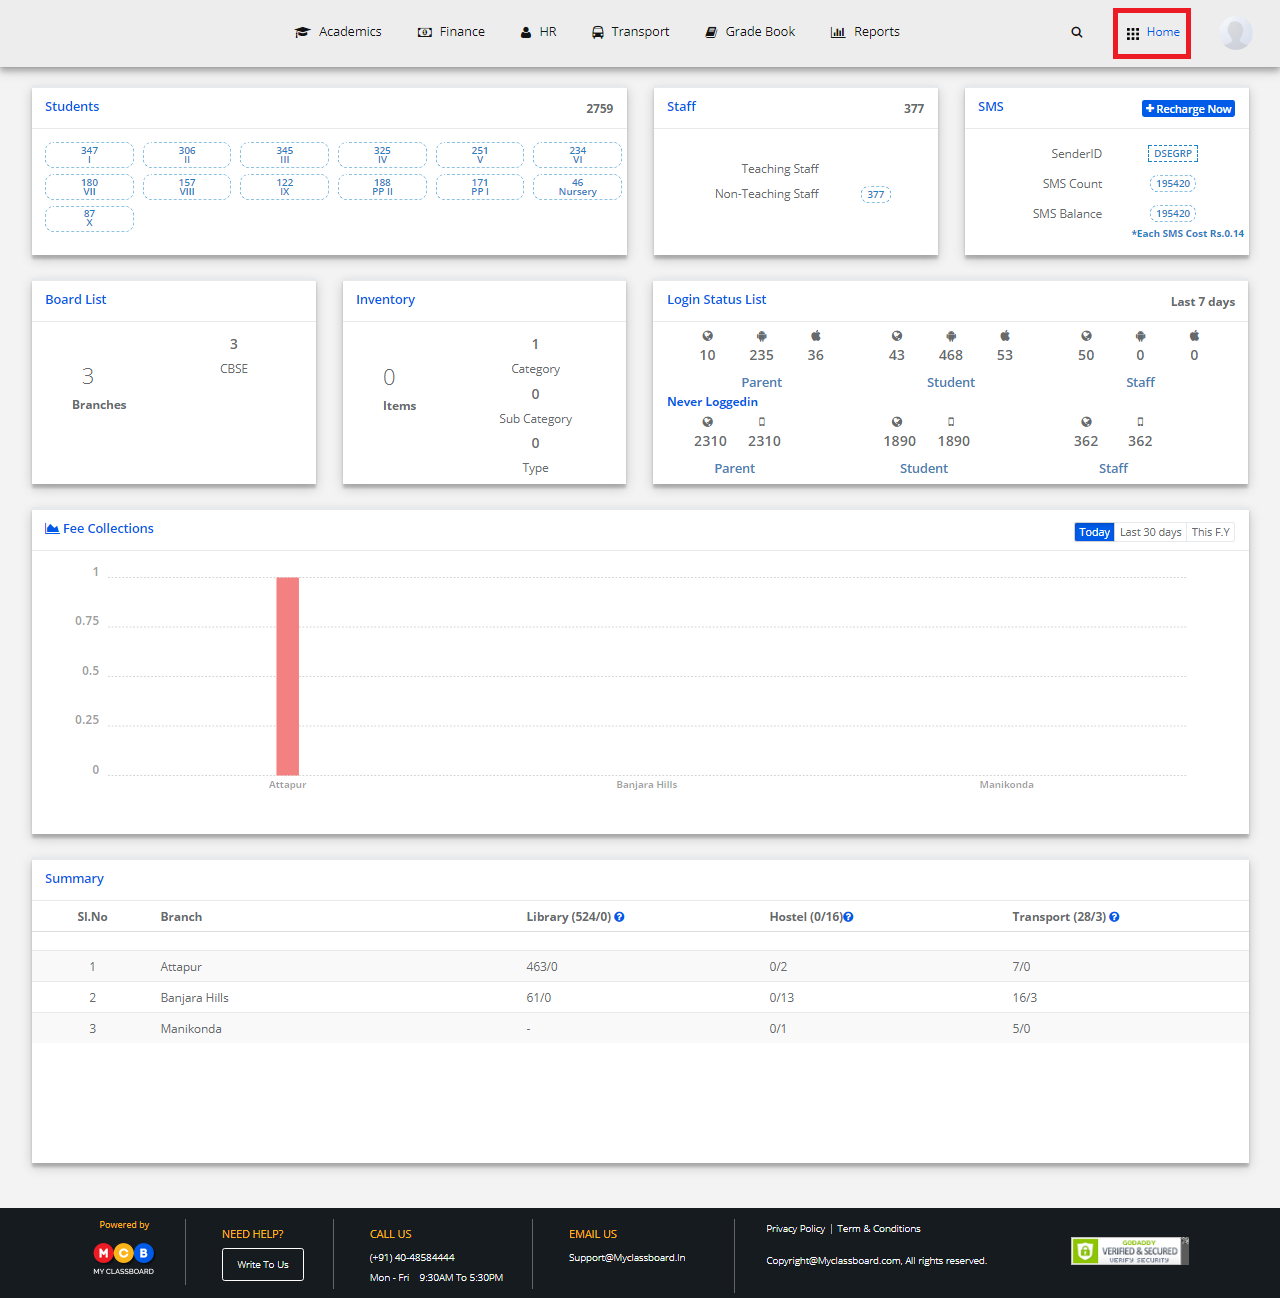
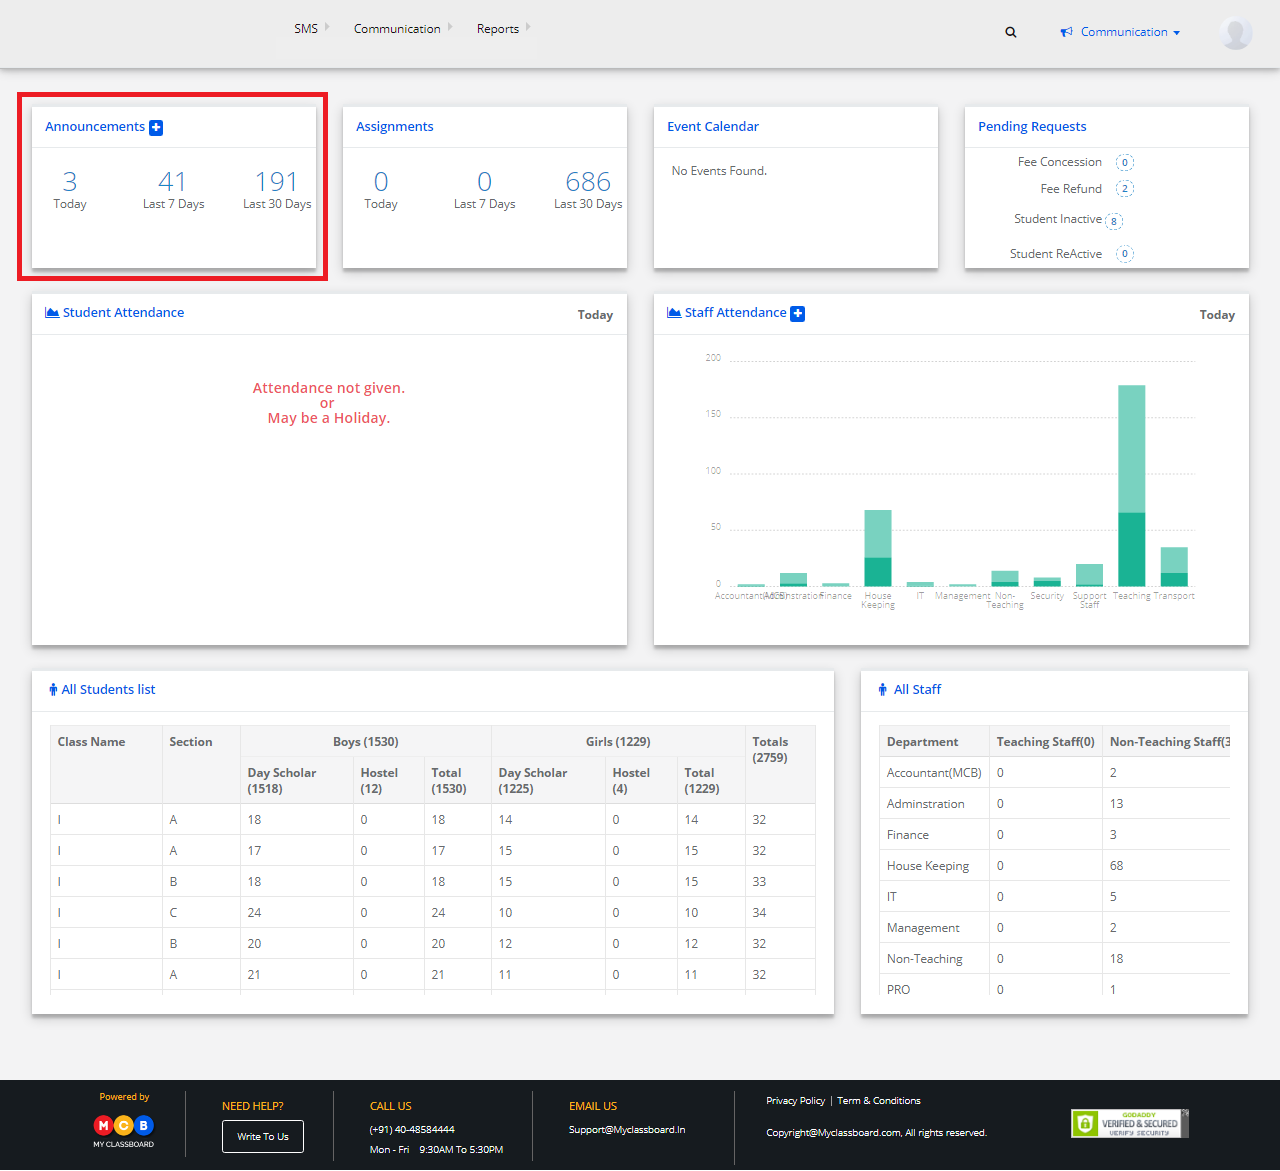
Step 2: Select “Home” on the right-hand top corner.

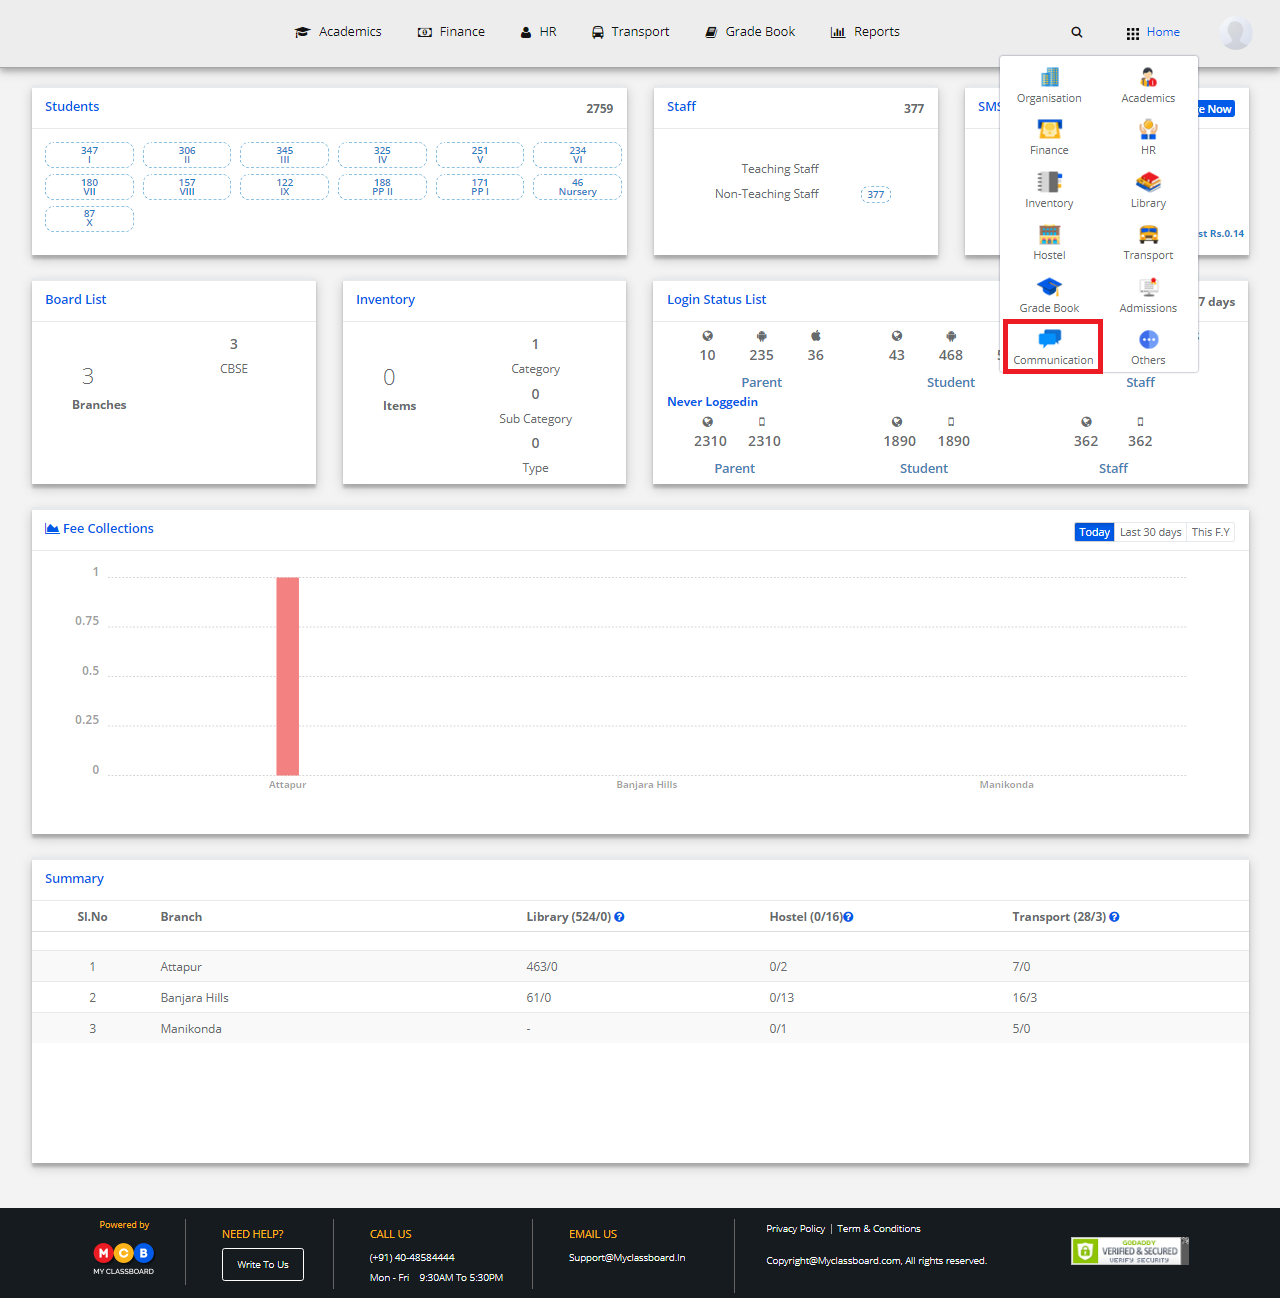
Step 3: Select Communication. You’ll be directed to the “Communication” page

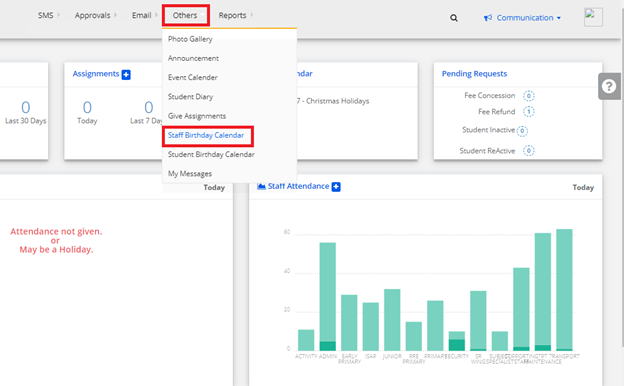
Step 4: Click on “Others” on the menu bar and select “ Student Birthday Calendar”

Step 5: Select the “Branch”, staff department, All months or a specific month and click on “Get”.

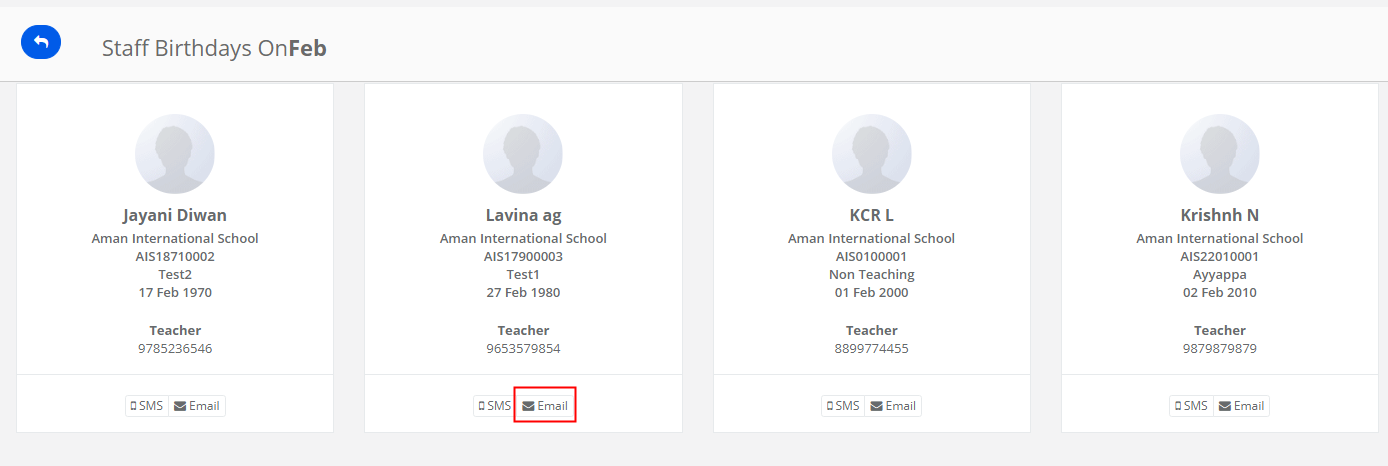
Step 6: Click on the “Month” name, it will take you to the page where you can view the staff details who are celebrating a birthday in the selected month.

Step 7: To send birthday wishes through SMS, Click on SMS.

Step 8: Choose the template from the drop-down and Click on send SMS. Please note that a default template is made available for you to use it right away. Otherwise, you can create your own templates in SMS templates under settings.

Step 9: To send wishes through emails, Click on Email icon against the staff.

Step 10: Choose from address, Enter the subject and content in the email body, attach the file if required and click on Send Email button.

Step 11: If you wish to use templates, click on Select template, choose the template from the gallery, attach a file if required and click on Send Email button.

How to Create/Delete an Announcement?

Step 1: Login to MCB with Admin login credentials.

Step 2: Select “Home” on the right-hand top corner.

Step 3: Select Communication. You’ll be directed to the “Communication” page.

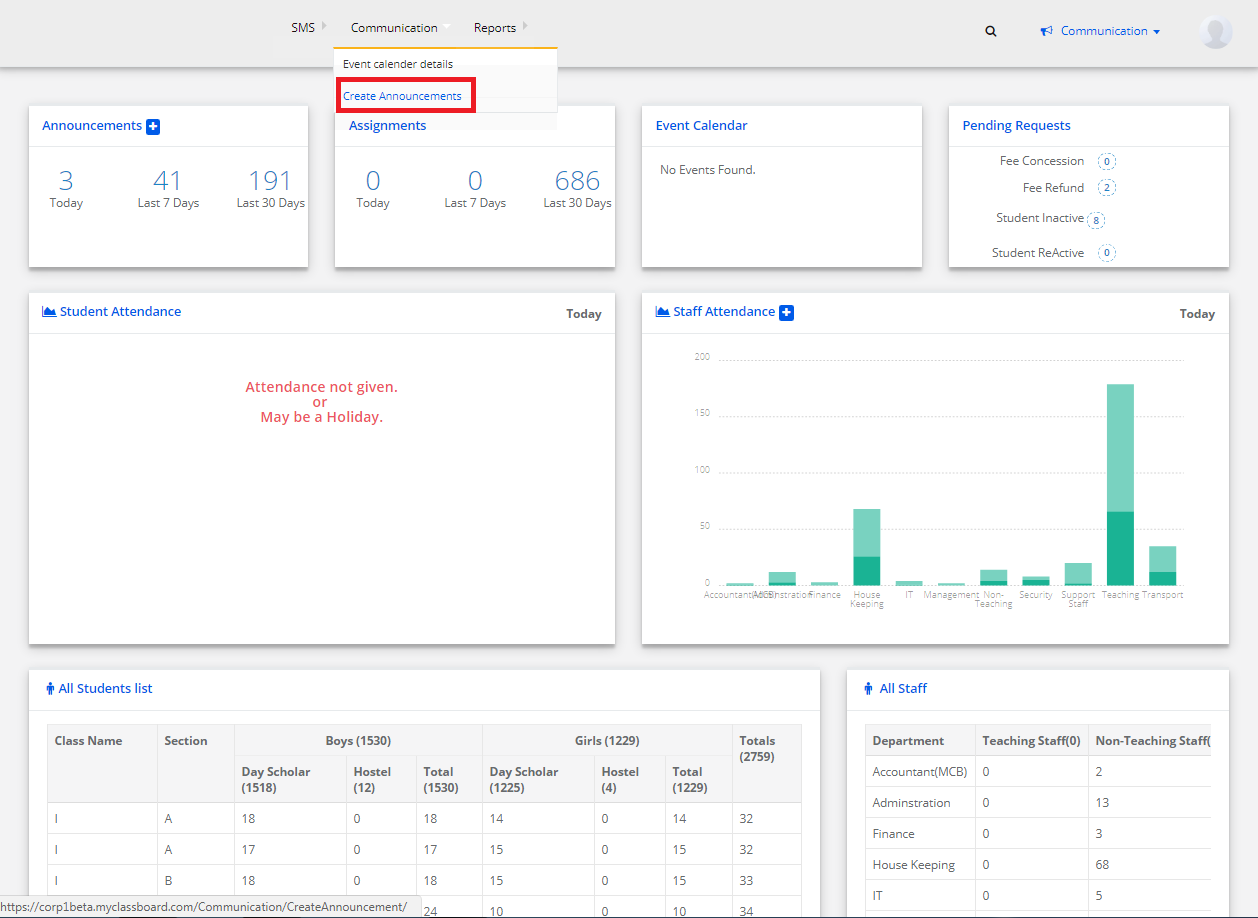
Step 4: Click on “Communication” on the top bar and select “Create Announcements”.

Step 5: Click on “+” symbol showing “Create Announcements” and enter the required details.

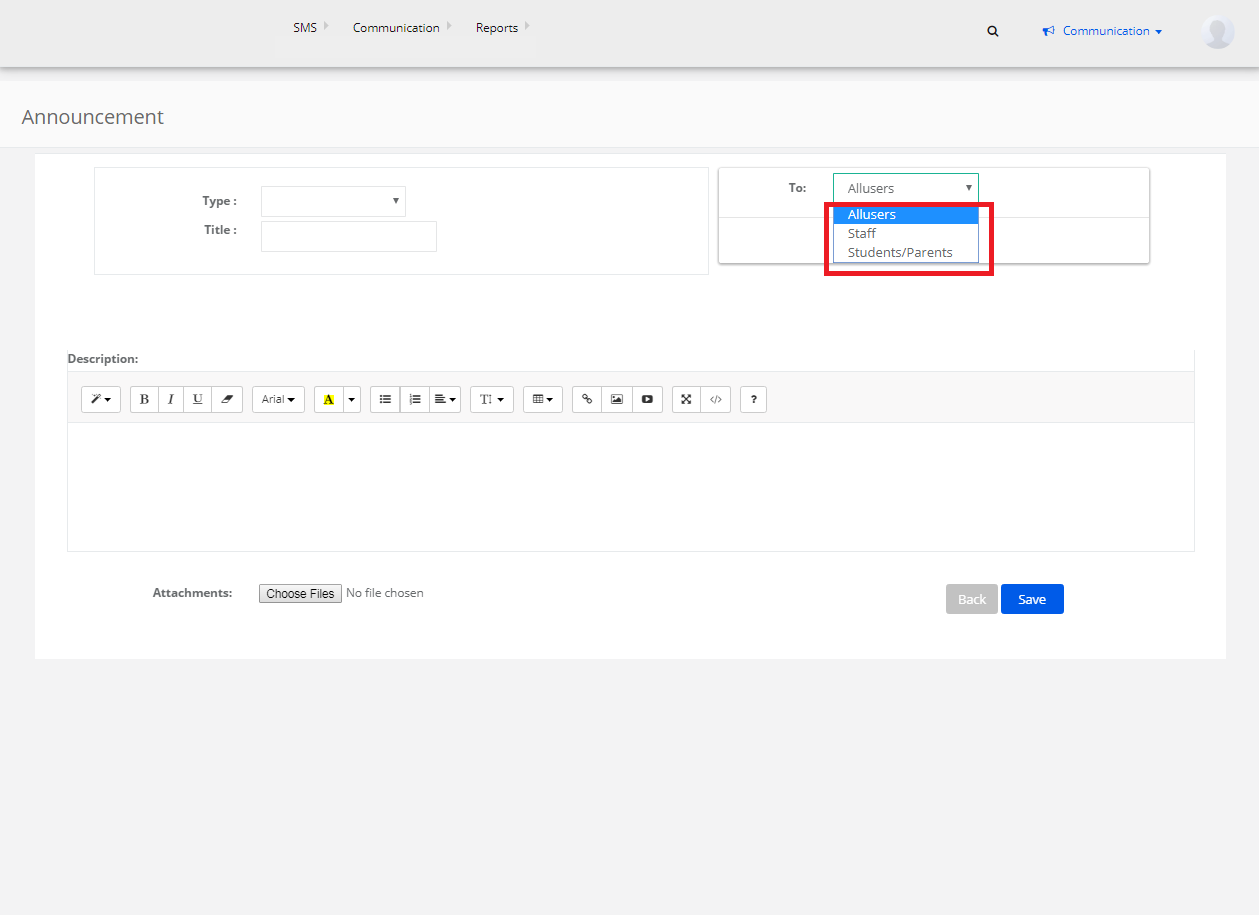
Step 6: You can also select the users here by choosing any of the options like “All users or Staff or Parents/Students”.

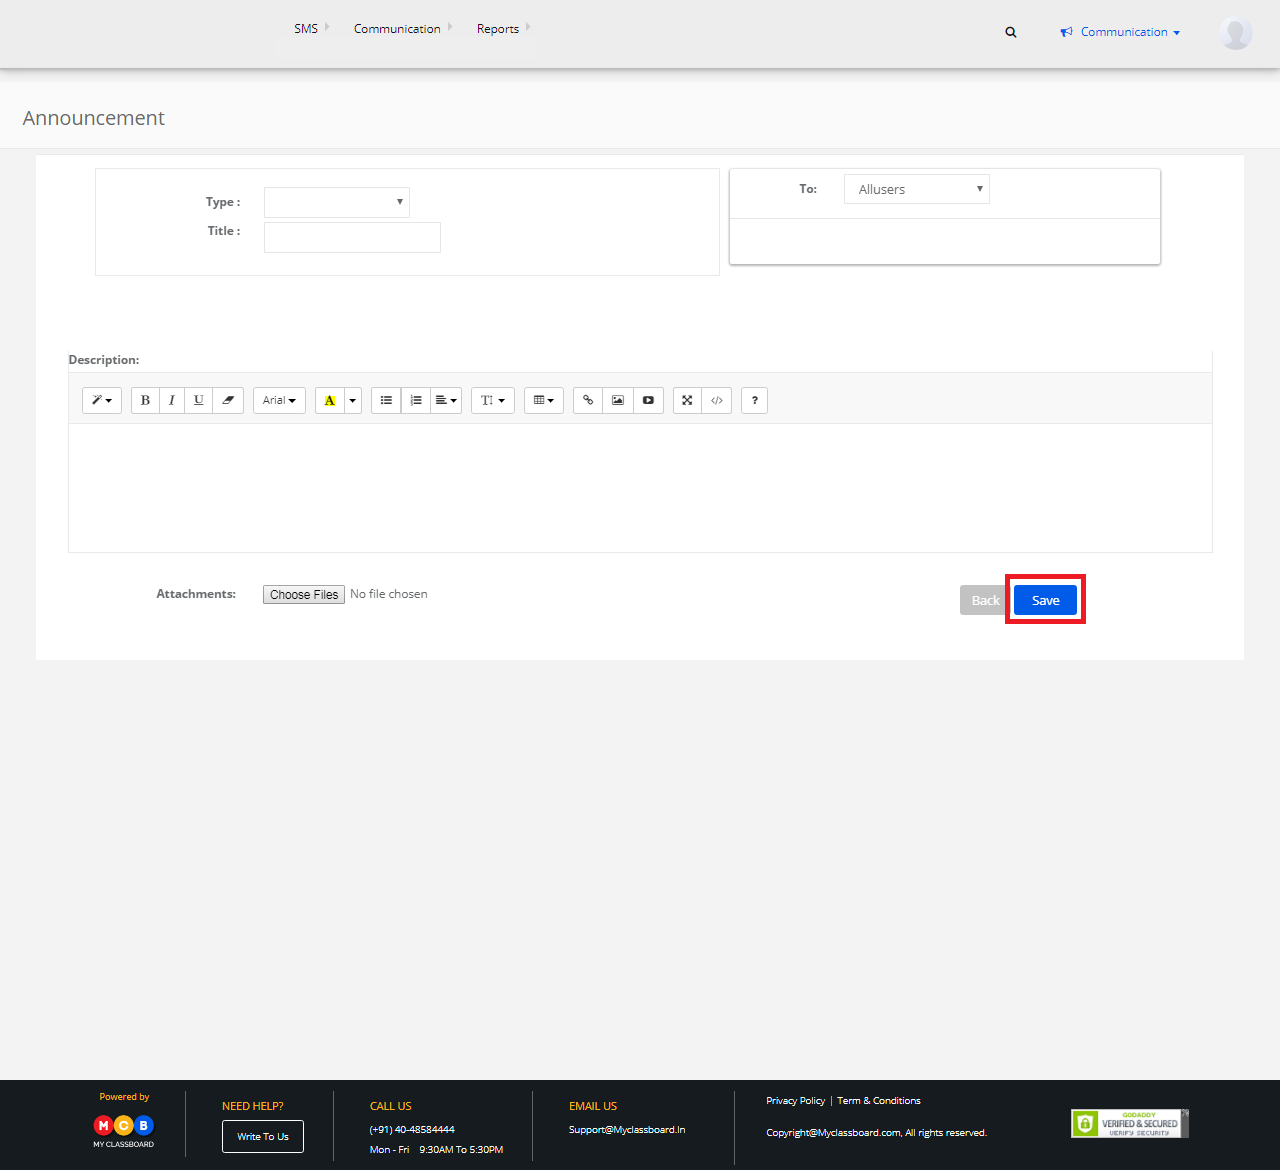
Step 7: Enter the information and Click on “Save”. The announcement is created and shared.

Add attachments

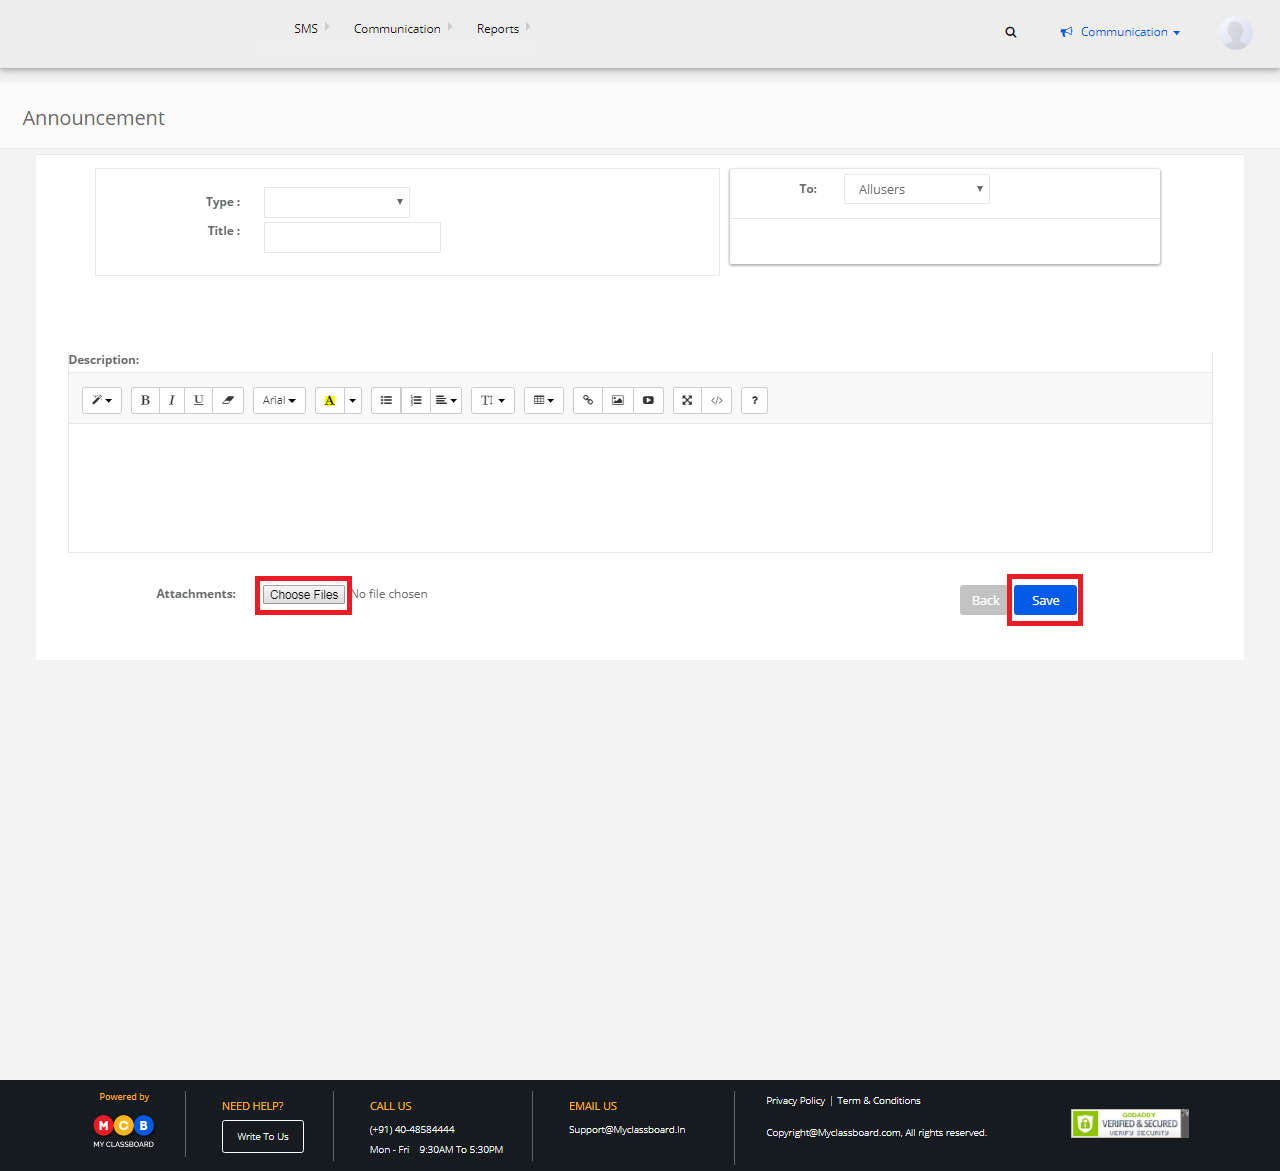
Step 8: If you want to share any documents in the Announcements, the same can be done by simply clicking the Upload option. Upload attachments, documents, pdf files, word files etc to post and click “Save”. The attachments are posted in the Announcement.

Delete an Announcement

Step 1: Go back to “Communication” Dashboard ——> Announcements.

Step 2: To delete, select an announcement that was created by you and click on the “Delete” option shown in the right.

Step 3: Click on delete and the Announcement is successfully deleted.

Note: You can only delete those announcements created by you.

How to mark period wise Attendance?

Period wise Attendance: Period wise attendance works based on the day wise time table set for a specific section. The subject teachers can mark the attendance for the period they conducted the classes. The branch principal and System admin can also update the period wise attendance form their logins. Once the attendance is saved from the subject teacher login, the edit option for them is available only for the current day. Later, the edit option will not be available for the subject teachers. In case of an edit is required, they have to either request principal or system admin for the same.

Please follow the below procedure to update the period wise attendance:

Step 1: Login with subject teacher credentials

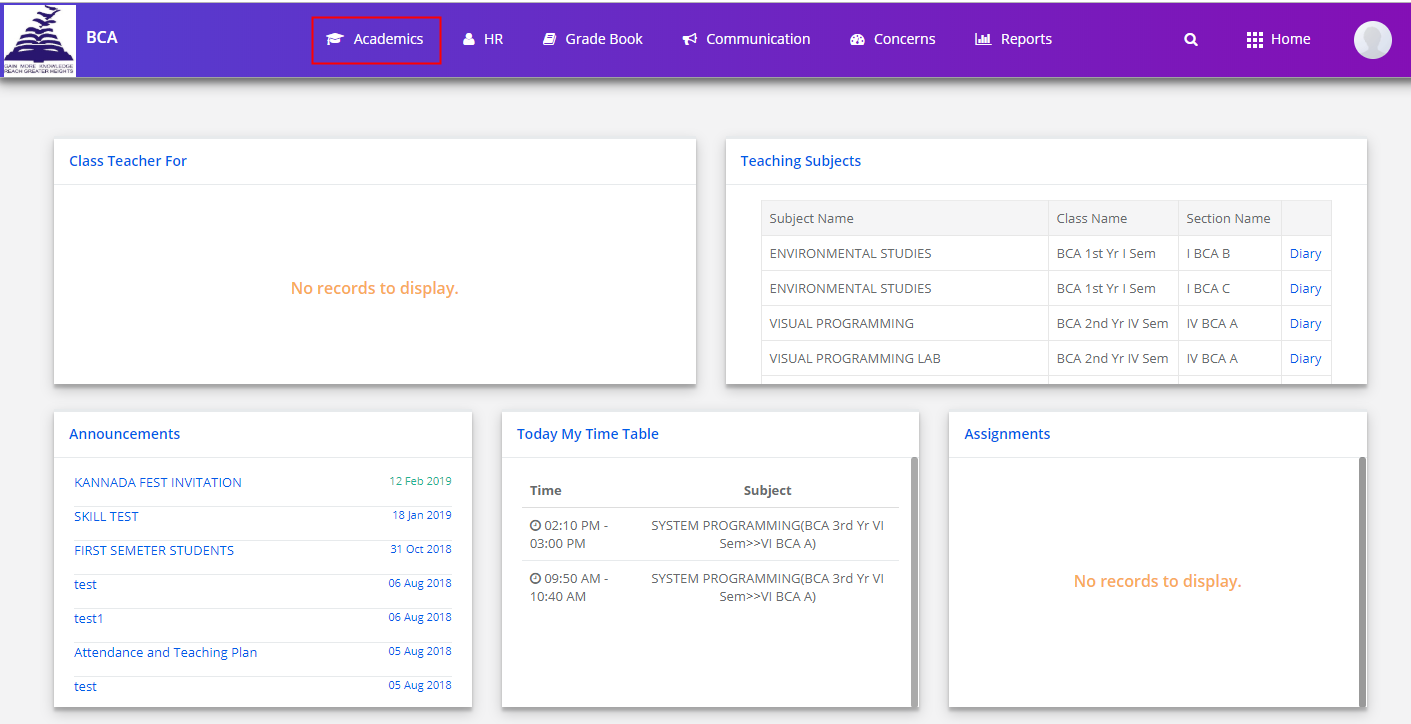
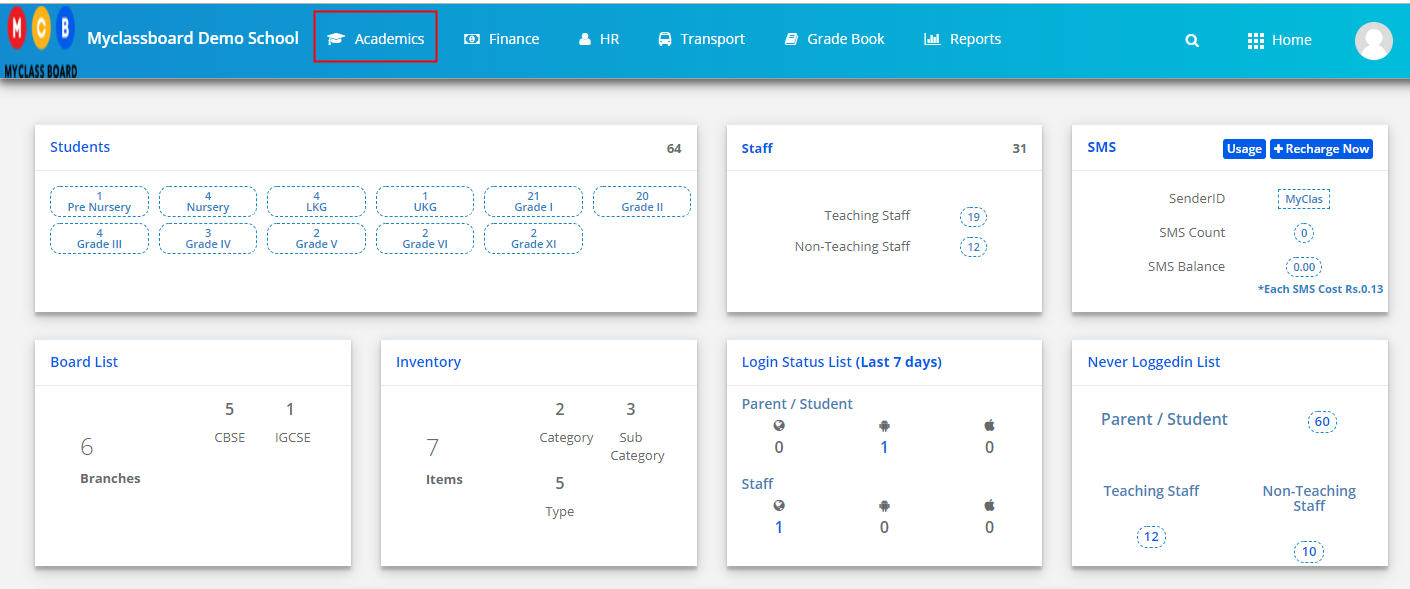
Step 2: Click on Academics on the menu bar

Step 3: Click on Period wise attendance from the dashboard.

Step 4: Choose class, Section, date and click on Get

Step 5: It will list the periods for which the attendance needs to be marked. These periods are listed as per the time table scheduled. Click on Give Attendance.

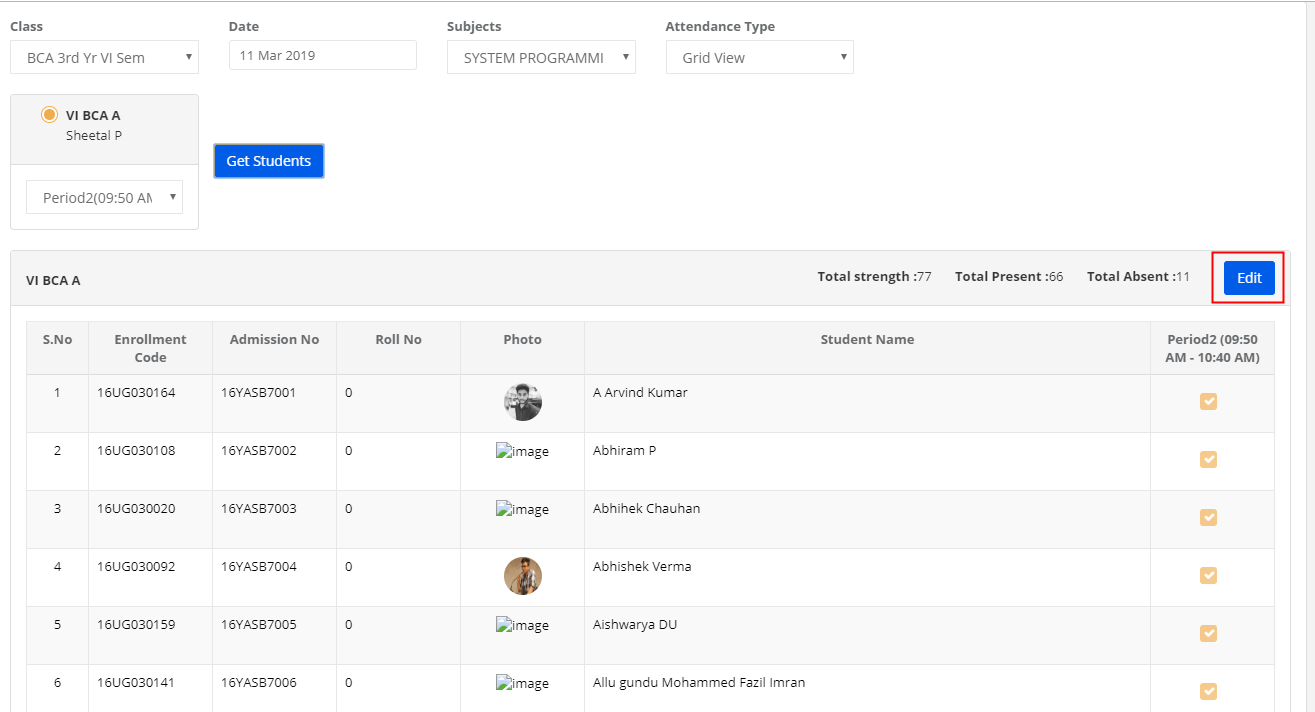
Step 6: Choose the subject and attendance display type, Period and click on Get Students.

If the subject is a language subject and is scheduled as a common class across the sections, the checkbox will be enabled to select multiple sections to facilitate all students list to mark the attendance at a time.

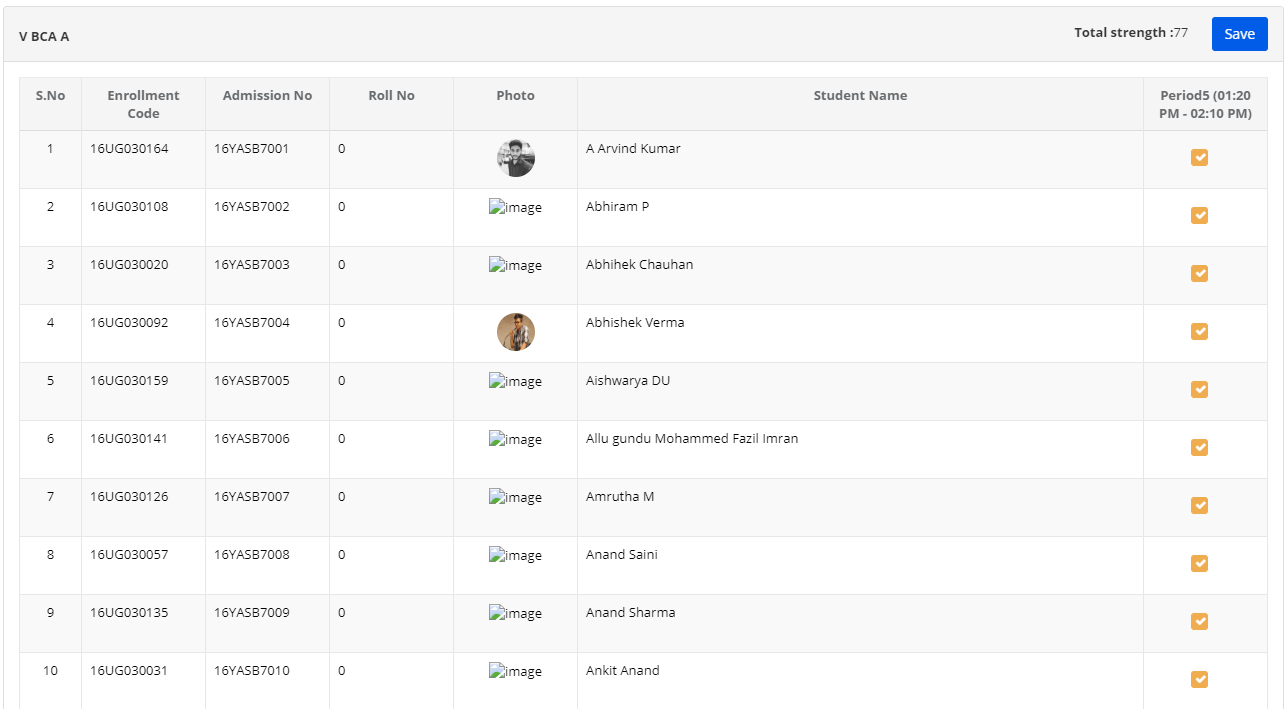
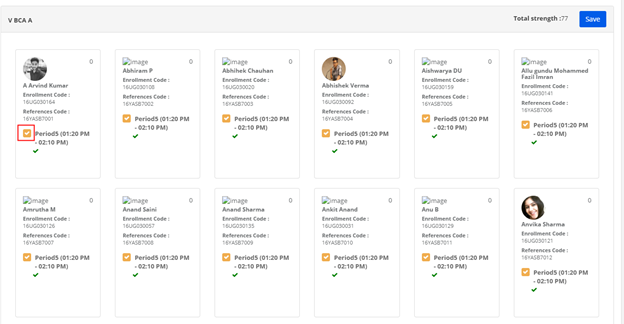
Step 7: To mark present, let the checkbox be selected. To marks absent, pls unselect the checkbox against the student and click on the Save button once you mark the attendance for all students.

Grid View:

Regular View:

Step 8: Once the attendance is marked, you will get the option to view the attendance. To view the attendance, click on View attendance tab under the period.

Step 9: To Edit the attendance, Click on the EDIT button and make the necessary changes and update.

Please note that the EDIT option is available for the teachers only for the current date. Later, to make any changes in the attendance, teachers have to contact either principal or system admin.

How to create a lab timetable?

1. Create subjects as Practical subjects.
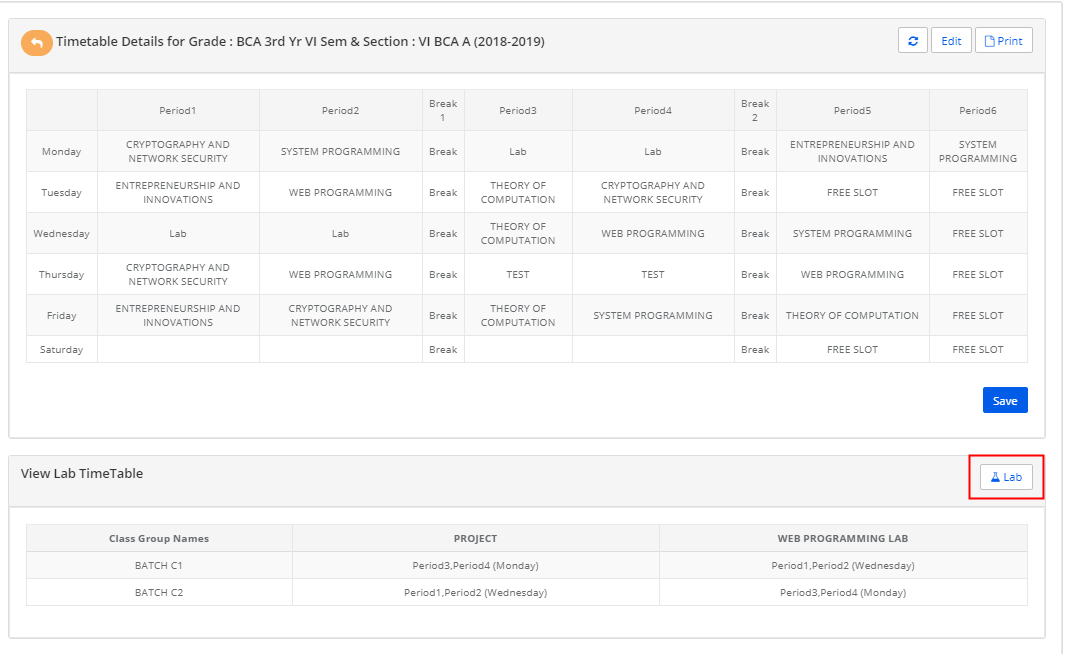
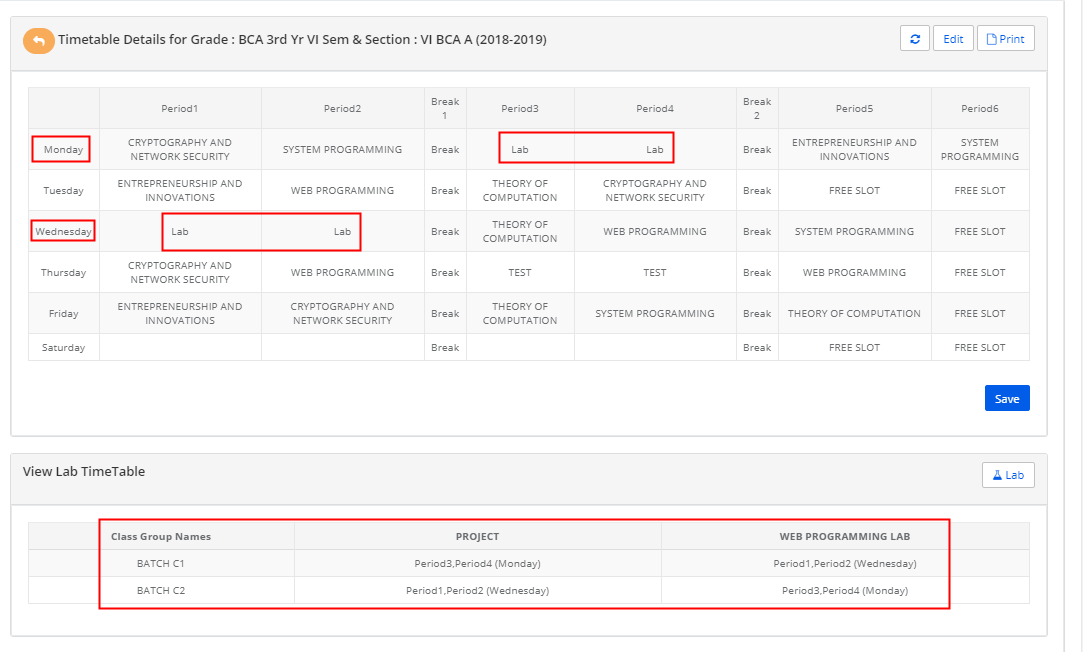
2. Mark Lab period in the time table
3. Create practical groups under students groups and assign students to the groups.
4. Click on Lab icon [highlighted] to get the list the lab subjects for the periods saved as a lab in the time table.
5. Then the lab time table is set. The teachers who are assigned to the lab subjects will be able to mark the attendance when you do steps 1 to 3.

Please note highlighted periods in the time table and lab time table.

How to Update Lab Attendance?

Lab Attendance: Lab attendance can be marked when a subject is created under Practical subject, students are grouped as per batches of the lab, the lab is assigned as a period in the timetable as described in How to create a lab timetable.
Please follow the steps below to mark the attendance from the teacher login:

Step 10: As you log in to staff access, Click on Lab attendance tab in Period wise attendance link.

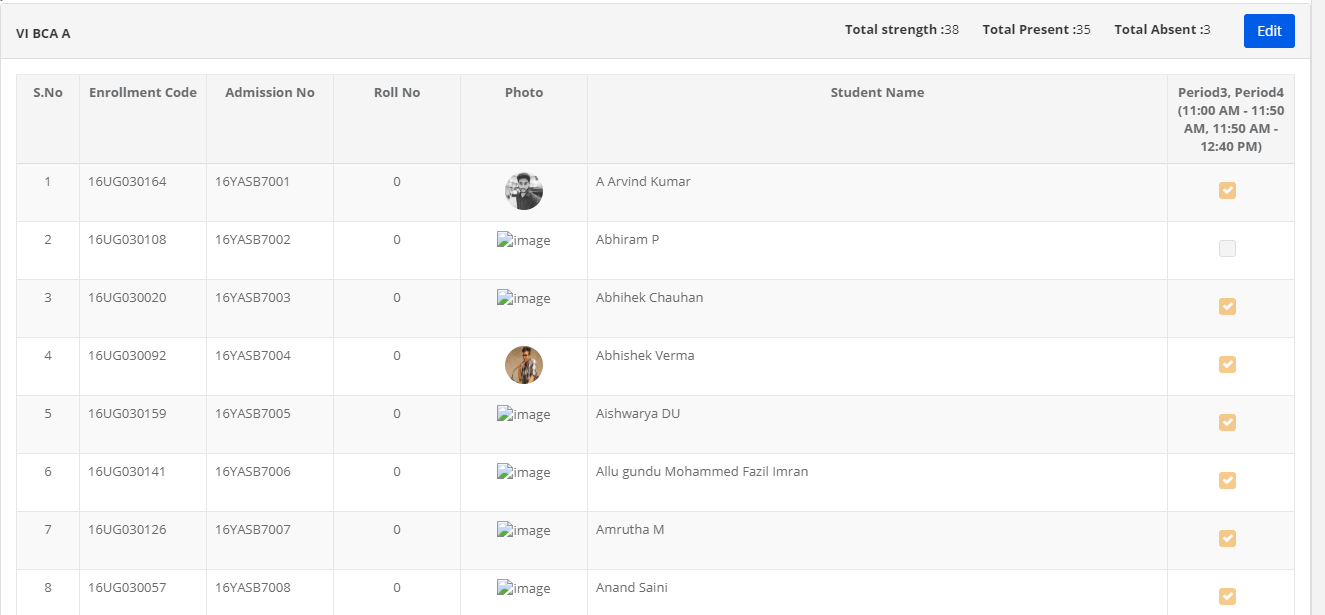
Step 11: Choose Class, date, subject, batch, periods and click on Get Students to get the students list.

Step 12: Mark the students’ attendance for the lab session and click on Save / Update.

How to generate period wise attendance report?

Step 1: Login to MCB with system admin Credentials.

Step 2: Select Academics on the Menu and you will be directed to the Academics module.
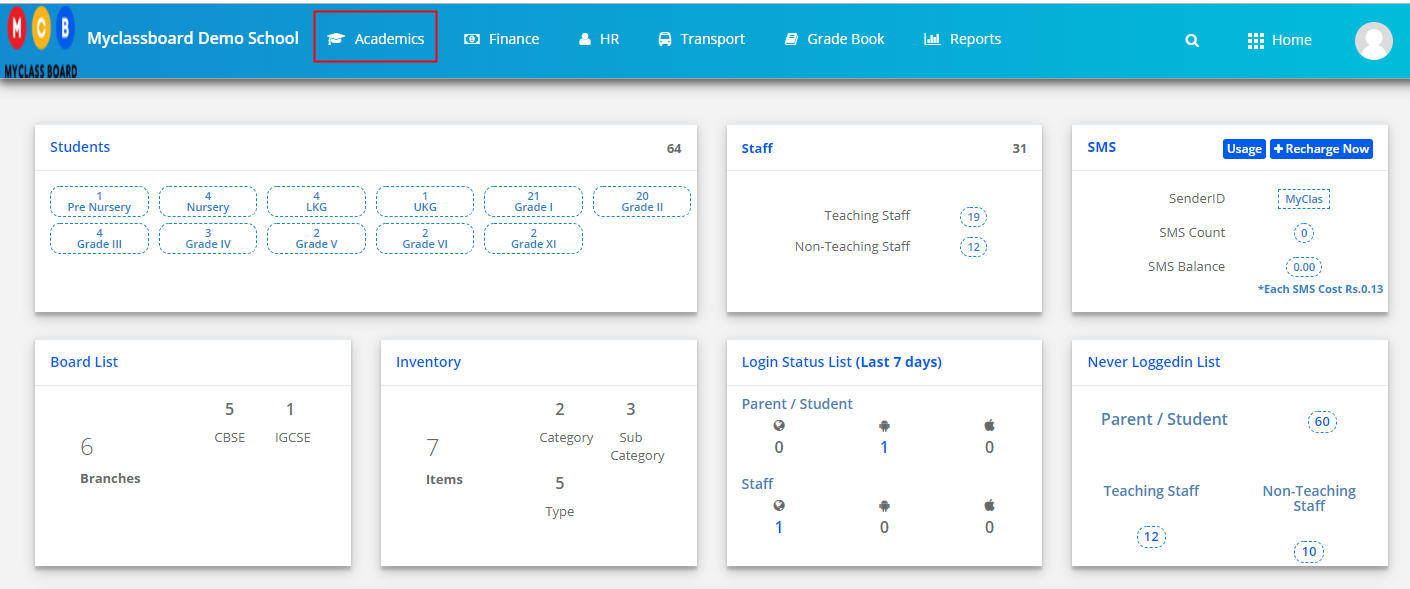
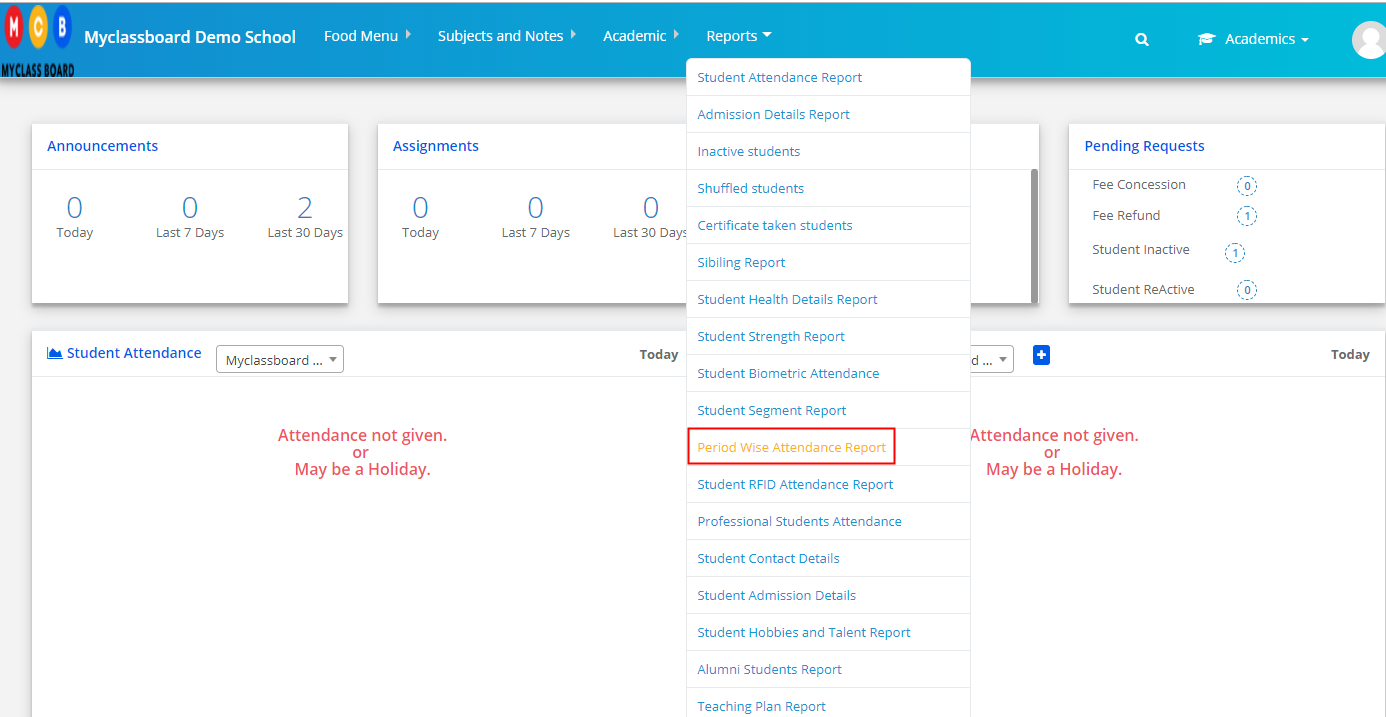
Step 3: Choose Period wise Attendance Report from Reports menu.
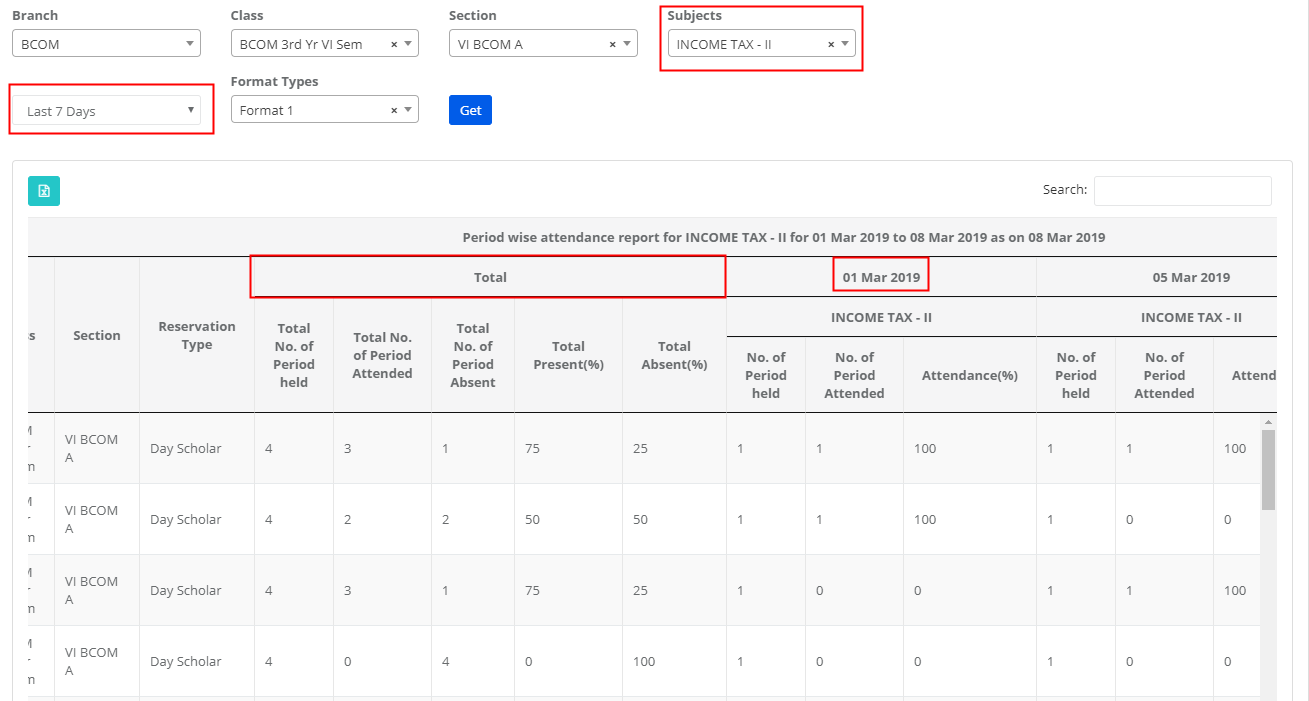
Step 4: Select Branch, Class, All Sections or Specific section, All subjects or a specific subject, period as today or last 7 days, last 30 days, date range, format 1 and click on Get to generate the report.

Step 5: The report will show the total no of periods held, present count and absent count for the days selected days. And it will also show date wise status of each subject with a number of periods held and attended. You can export the report by clicking on the Excel icon which is placed on the top left corner of the report.
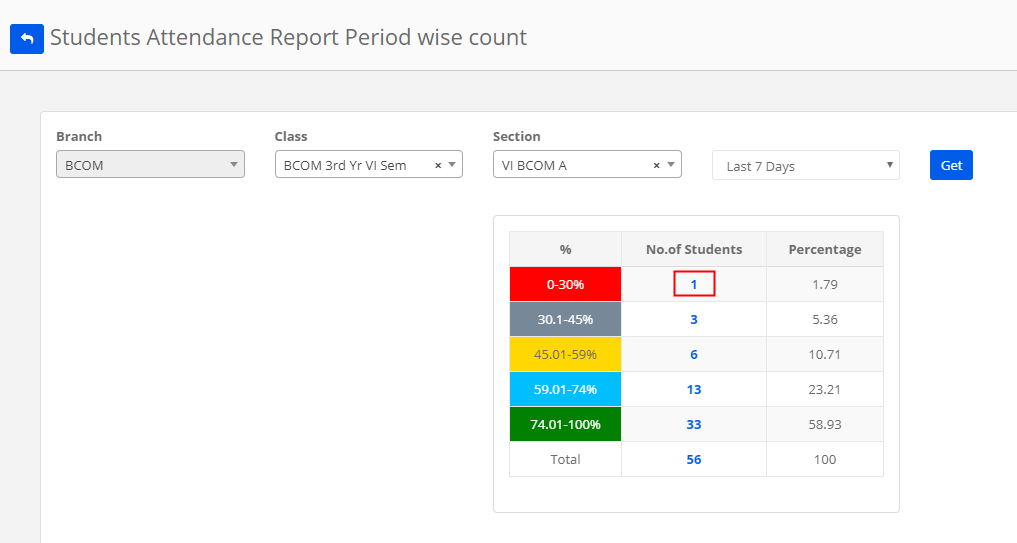
Attendance Percentage: This report gives you no. of student’s count on the attendance percentage breakup.

Step 6: To generate attendance percentage report, click on the attendance percentage tab [as highlighted]

Step 7: Select Branch, Class, Section, Period and click on Get to generate the report.

Step 8: As you click on the number, it will show you the list of students falling under the percentage category.
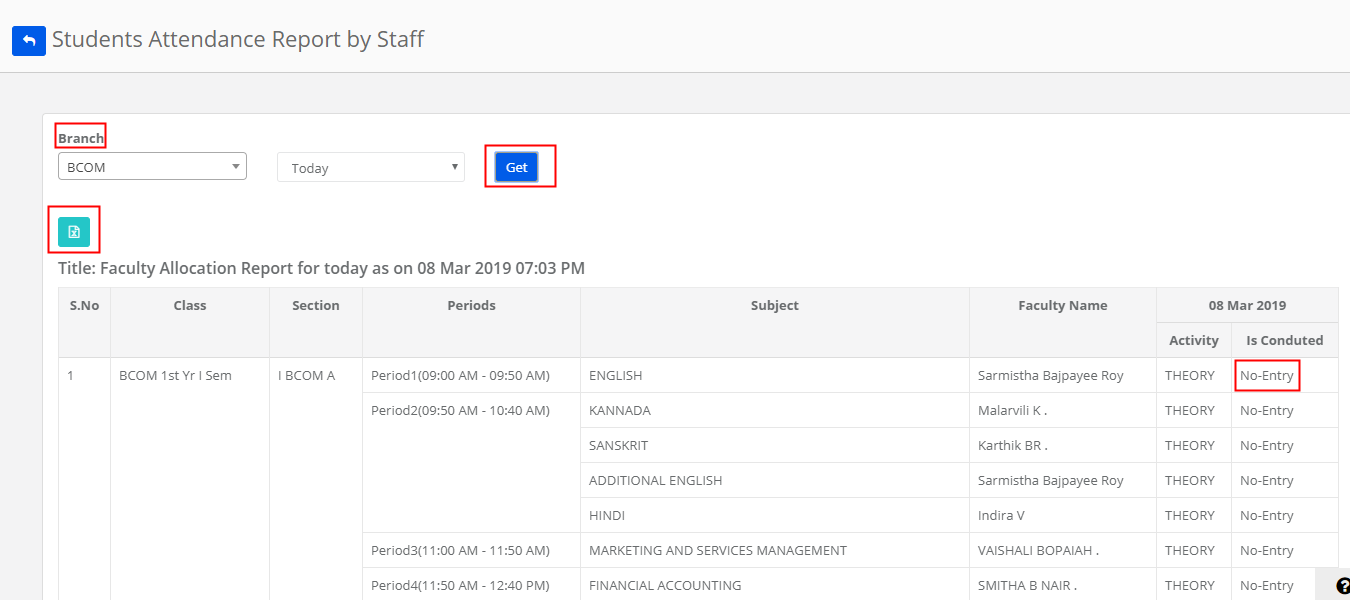
Attendance by Staff: This report gives you the status of attendance updation by faculty.

Step 9: To generate the report, choose the option Student Attendance by Staff [Highlighted]

Step 10: Select the branch and time period and click on Get to generate the report. Locate the status under the column Is Conducted as Entered, Not Entered against each faculty name. To export the report, click on the Excel icon located on the top right corner of the report.
Day wise Attendance: This Report gives you the day wise attendance of all branches.

Step 11: To generate the report, please click on the Day Wise Attendance tab.

Step 12: Select All Branches or a specific branch, Type as All and Absent, Date and Click on Get.
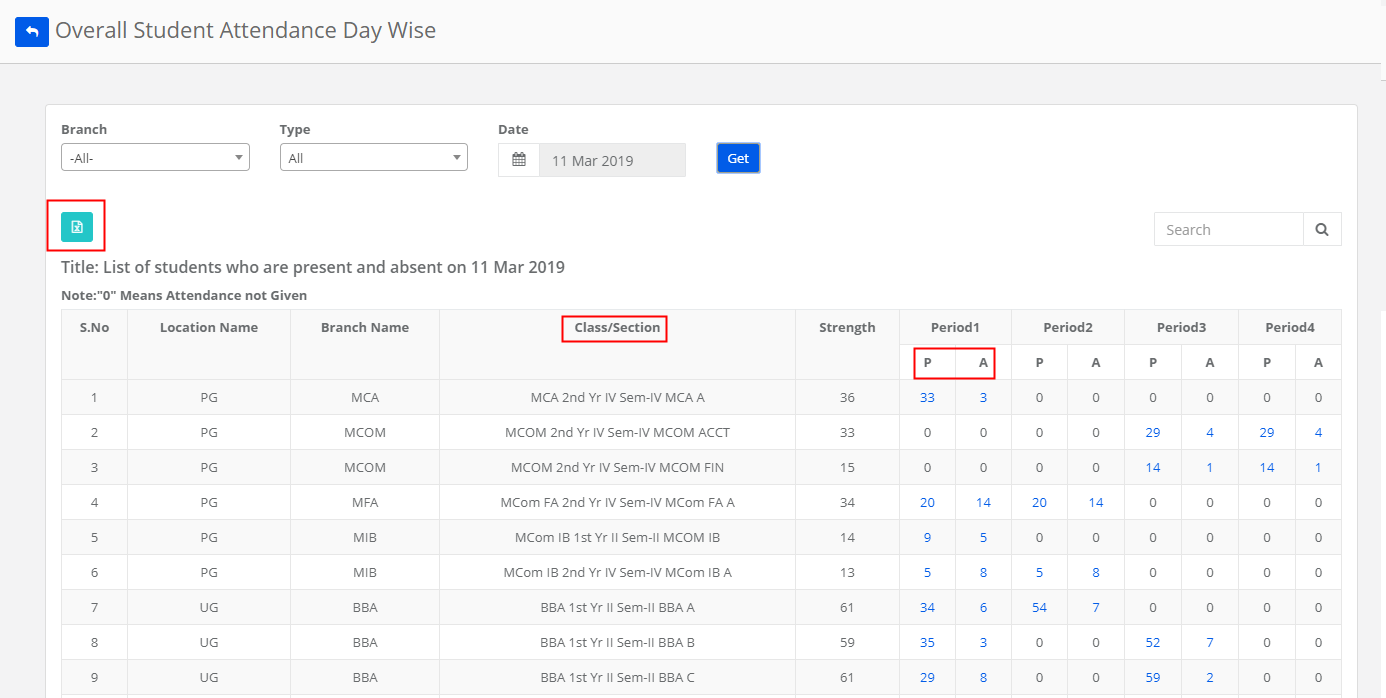
Step 13: When you select ALL option under type, the list gives you count of Present and Absent in each period against the class.

As you click on the number, it will show the list of students.

Click on Excel icon which is placed on the top left corner of the report to export the file in excel format.

How to mark Activity Attendance?

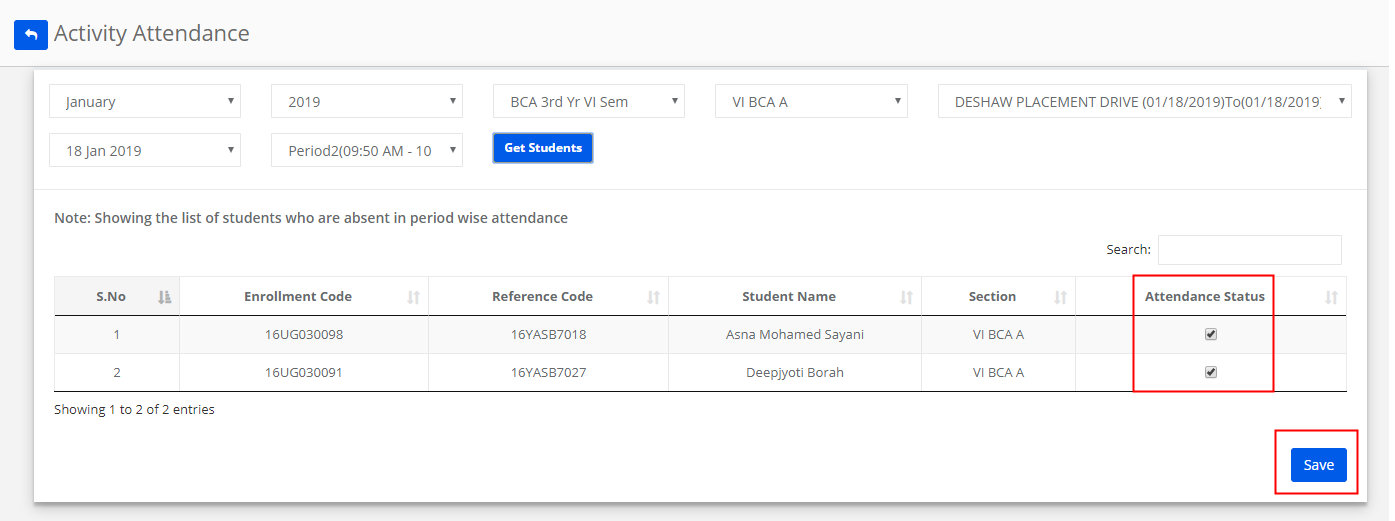
Activity attendance is used for updating the attendance who have attended the activity without attending the regular classes. Inactivity attendance, you will get the list of students who are absent in period wise attendance.

Step 14: To mark the Activity attendance, click on Activity Attendance Tab.

Step 15: Choose the month, year, class, section, activity name, date, period and click on Get students.

It will list the students for whom period wise attendance is marked as absent in the period selected.

Step 16: Change the attendance status as the present by checking the tick mark and unselect the tick mark if the student is absent for the activity. Click on SAVE.
NOTE:

1. You can mark the activity attendance only when the activity is created for the class on the specific date and the days wise time table is created for the class. In the absence of either the day wise timetable or activity creation, activity attendance will not let you update the attendance for activities.
2. The student who is absent in period wise attendance and activity attendance will be treated as Absent for the period.

How to generate list of teachers assigned to subjects?

Step 1: Login to MCB with system admin Credentials.

Step 2: Select Academics on the Menu and you will be directed to the Academics module.

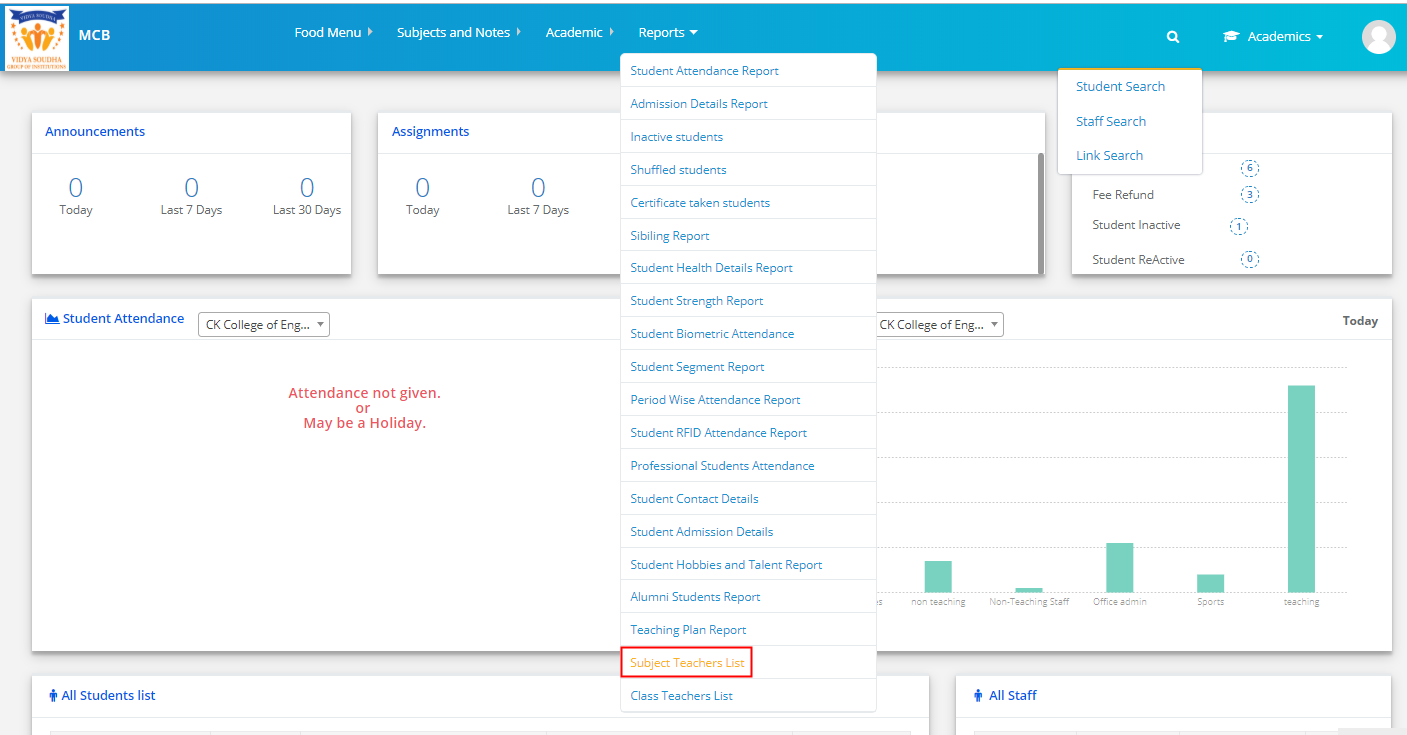
Step 3: Choose Subject Teachers List from the Reports Menu.

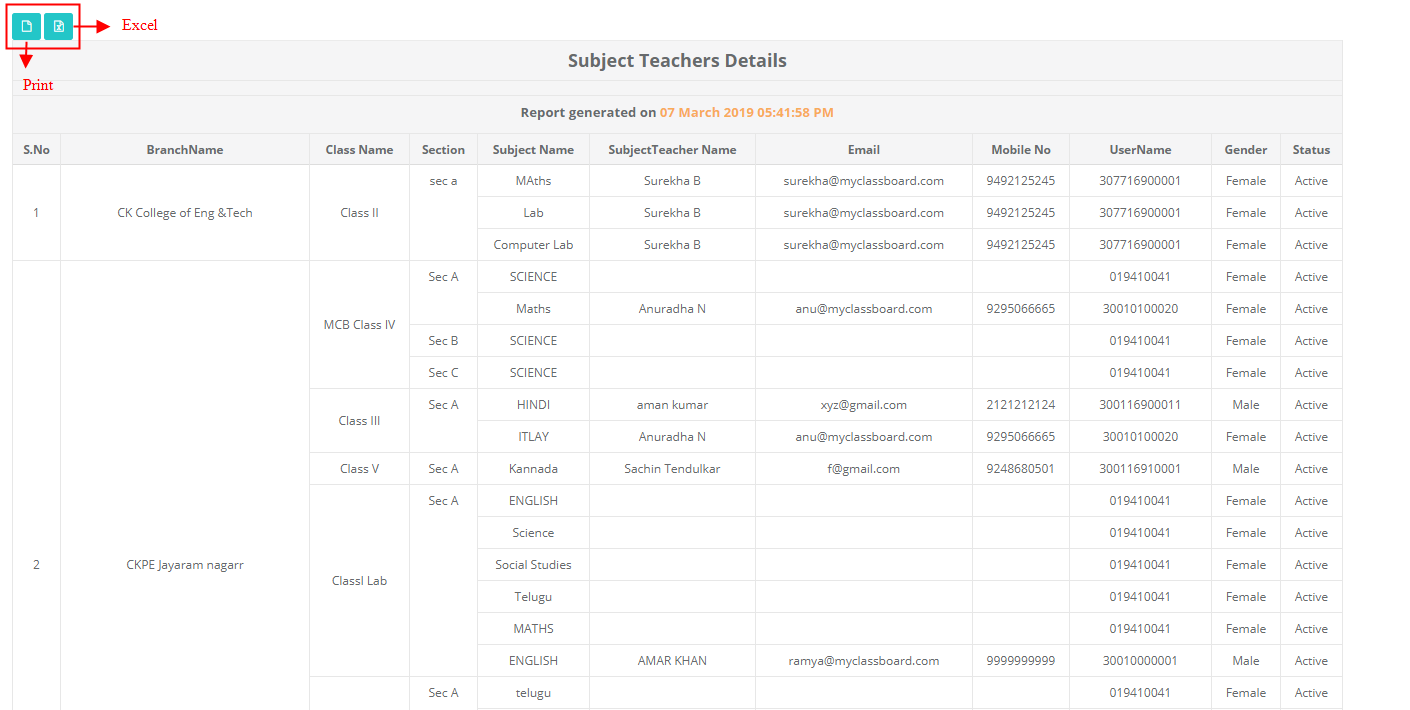
Step 4: Choose All branches or specific branch, All Classes or Specific Class, All Subjects or select subjects and click on Get button to generate the Report.

Step 5: You can Export or Print by clicking on the respective icons.

How to use Email Validation Report?

Email Validation Report:

Email Validation Report gives us the consolidated report on how many emails are valid and invalid of Parents, Guardian and Students which are saved in MCB. This report is available at branch level.

Please follow the steps below to generate the report.

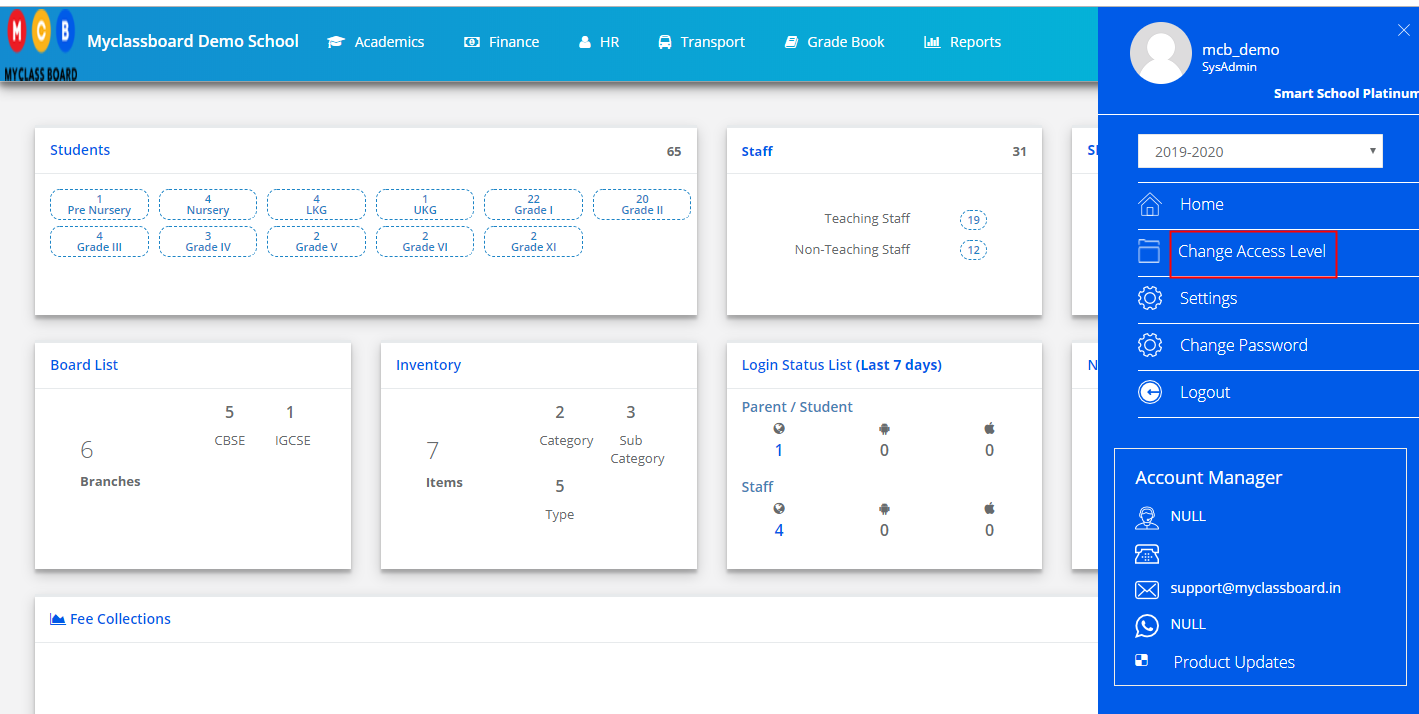
Step 1: Login to MCB and Switch to branch level by clicking on Change access level on the right panel as you click on the user profile picture.

Step 2: Click on the user type against the branch name.

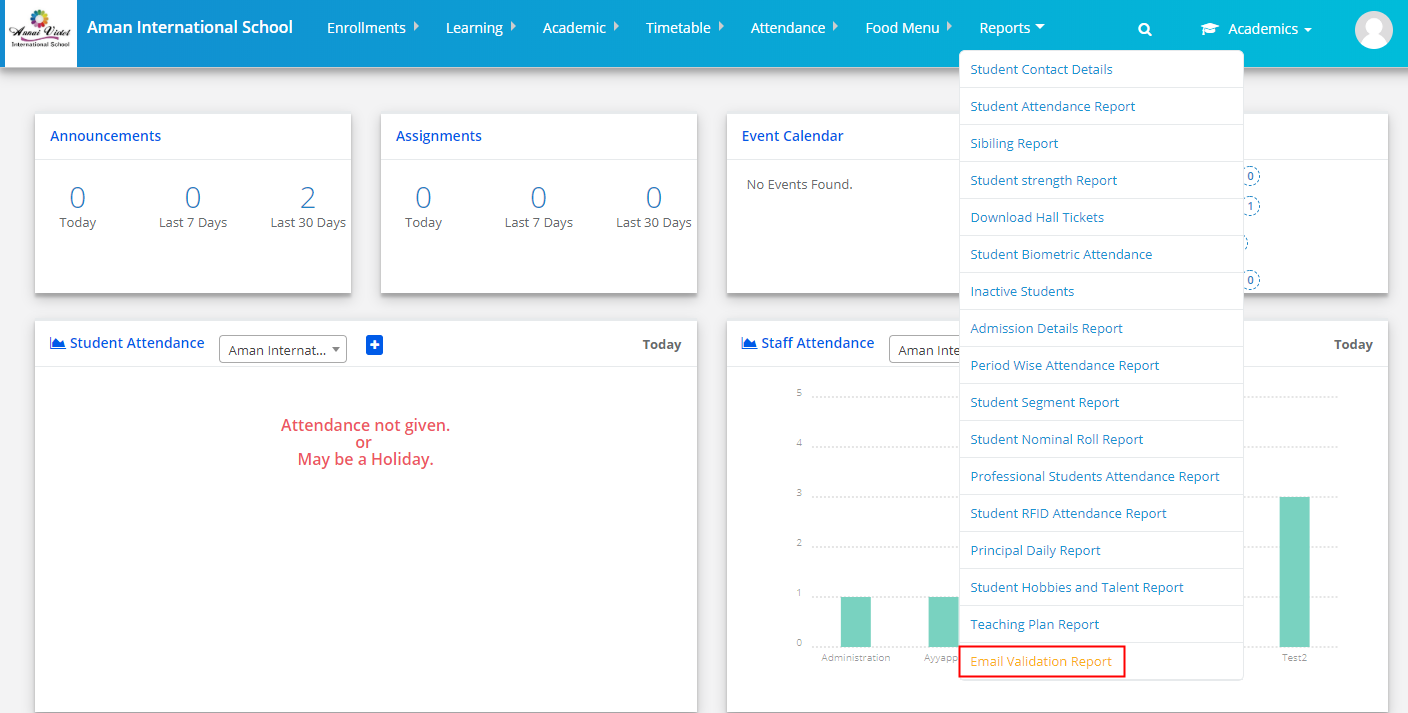
Step 3: Click on the Academics on the top menu bar.

Step 4: Choose Email Validation Report option under Reports menu

Step 5: Verify the branch name and click on Show Report

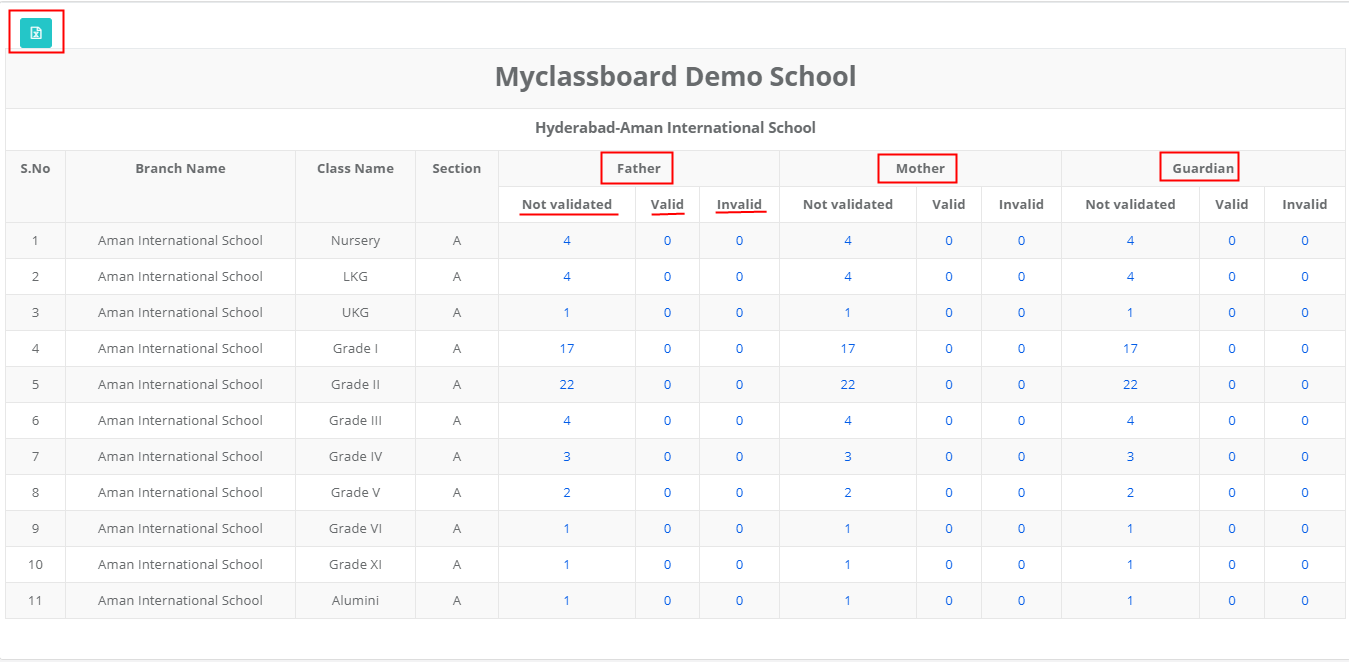
Step 6: The report will show you the count of not validated, valid and invalid counts of each class and section.

Not Validated: No of Emails which are not validated ever. Emails can be validated from update student details – Parent emails tab. Please refer to https://kb.myclassboard.com/how-to-update-student-information/ for help.

Valid: Number of valid emails after validation of each class.

Invalid: Number of invalid emails after validation of each class.

To export the report, click on Excel icon which is on top left corner of the report to download the report in excel format.