How to use Elections in MCB?

School can conduct elections for the designations created in its student council.

Student council can be formed with the designations School wise, class category wise and Class group wise.

Once the designations are added in the student council, you can conduct elections.

To create the election, pls follow the process mentioned below.

Step 1: Login to MCB and click on Academics on the top menu bar.

Step 2: Choose Student council option under academic menu

Step 3: Click on Manage Elections option.

Step 4: Click on Add Election Date option to create the Election.

Step 5: Choose academic year for which you are conduction the election, Branch name, and Election date. Enter Remarks and Click on Add button.

Step 6: To edit the election details, click on the edit icon.

Step 7: Make the necessary changes and click on tick mark to save the changes or cross marks to revert the changes.

Step 8: Click on Delete icon to delete the election.

Step 9: Click Yes to confirm and No to revert.

Step 10: To add contestants, Click on Add Contestants.

Step 11: Choose election date, council type and click on Get to list the designations available for the selected council type.

Step 12: To add contestant for a designation, Click on + sign against the designation.
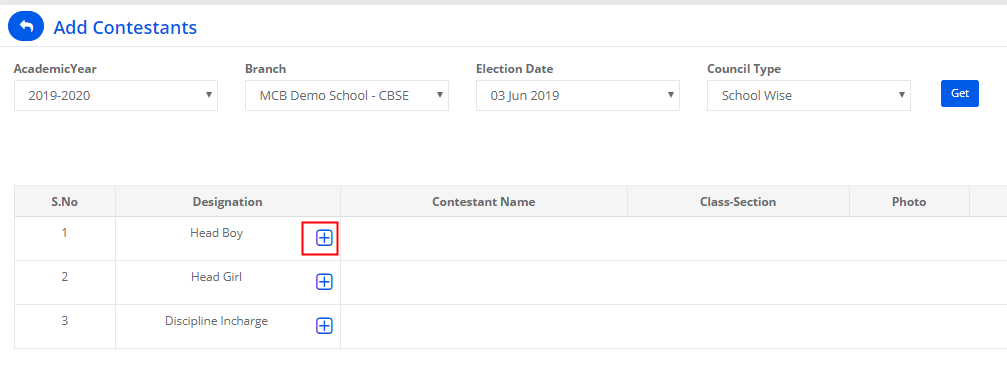
Step 13: Choose the student’s class from which he/she is contesting and name of the contestant. Enter the Slogan and upload the election symbol. Click on Add.
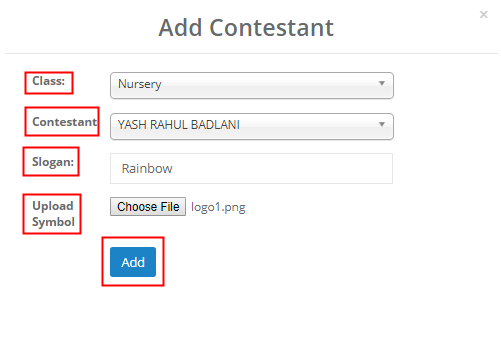
Step 14: Click on Edit icon to change the Slogan and Election symbol.

Step 15: Make the necessary corrections and Click on Update.

Step 16: To delete the contestant, Click on the delete icon.

Step 17: Click Yes to confirm the deletion or No to revert.
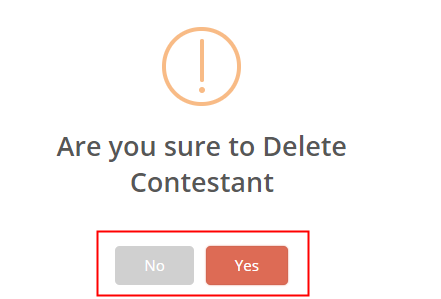
Note: when you delete the contestant, the slogan and symbol are also deleted along with the contestant.

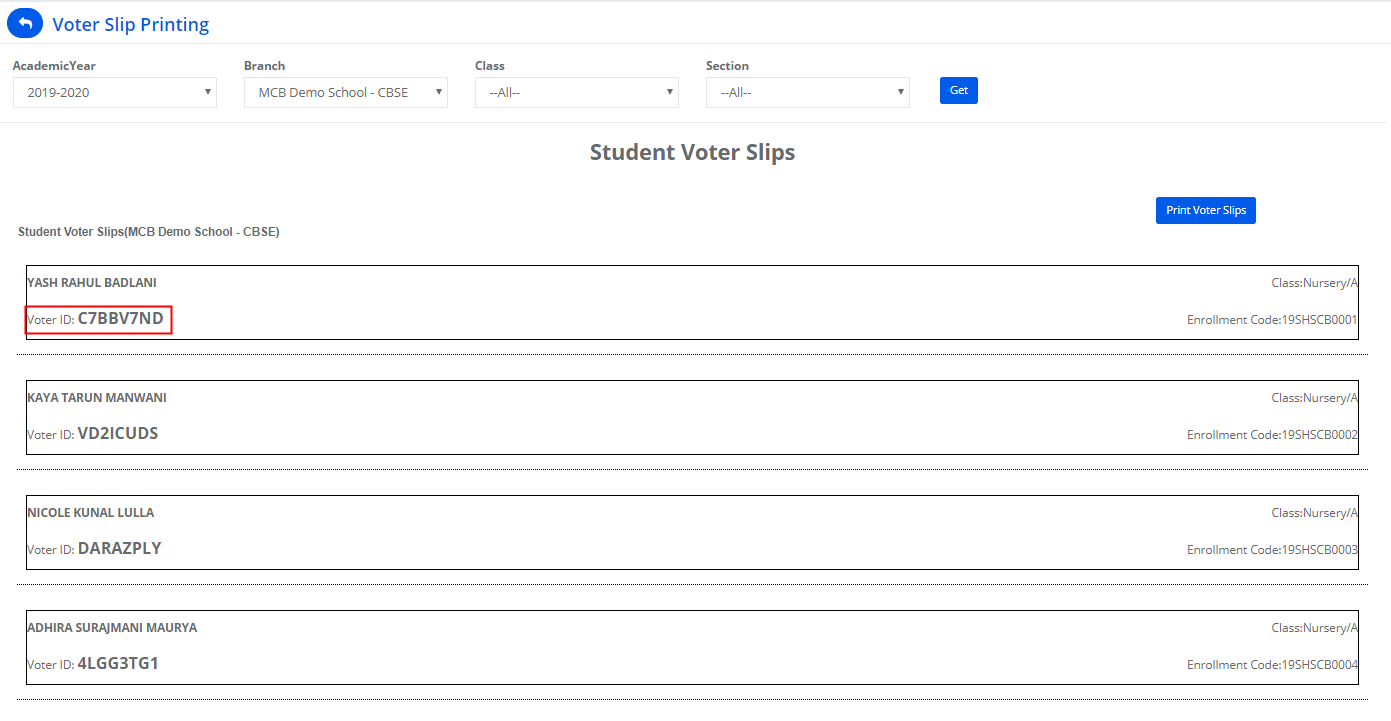
Step 18: Generate voter slip by clicking on Voter Slip printing option.

Step 19: Choose the Academic year, Branch, Class & sections who have the right to vote and click on Get.

Step 20: Click on Print Voter Slip option to print the slips.

Step 21: The Voter ID is used to login to the voting portal to cast the vote.
Step 22: To view the voting link, click on View vote link.

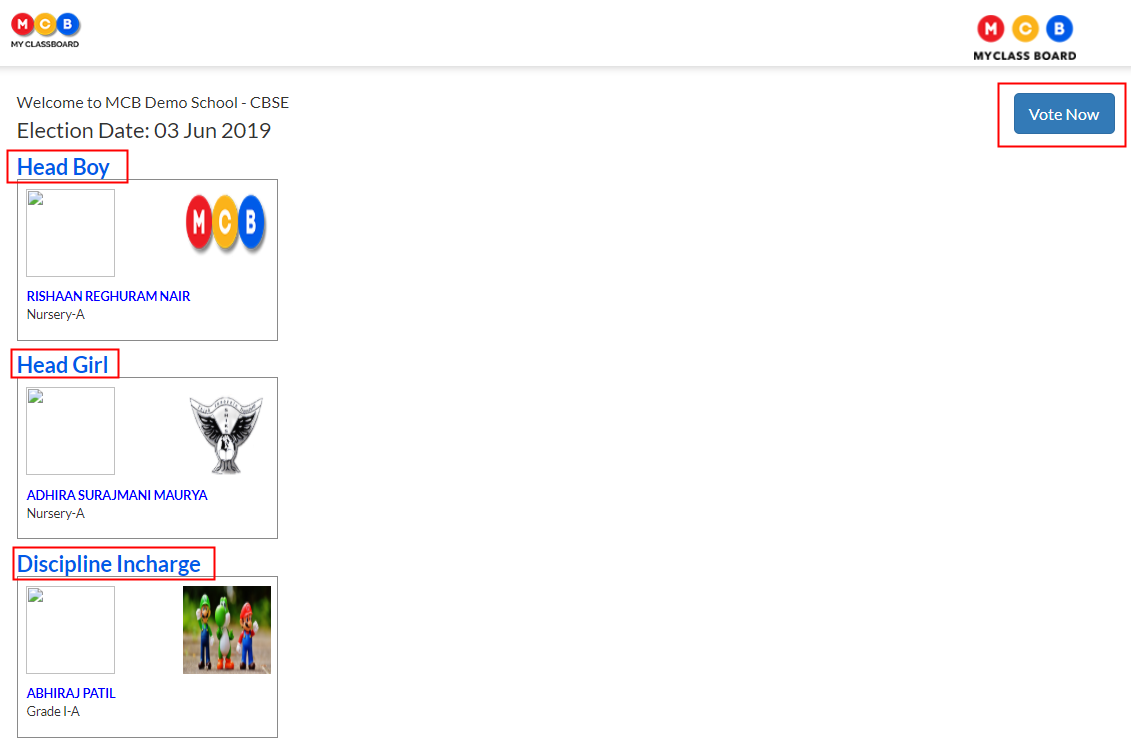
Step 23: The view vote page displays the list of contestant along with their details.
The vote now the link is enabled only on the date of polling.

This link needs to be made available for the students to vote on the day of the election.

Click on vote now to cast the vote.
Step 24: Choose the role and enter the voter ID and click on Search.

Step 25: Student can verify the details and the entered code. Click on Start Voting button.
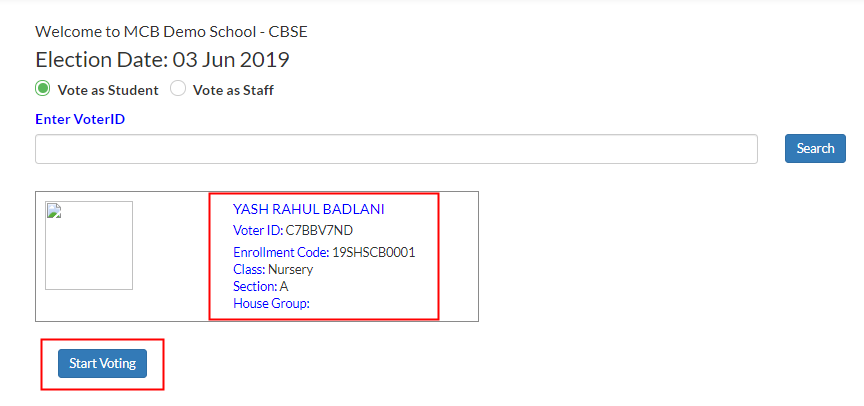
Step 26: Click on the contestant box to cast your vote against each designation and click on Save your vote button.

Step 27: To view the Election Results, Click on Election Results option.

Step 28: Choose Academic year, Branch, Council type, Election name/date and click on Get to view the results.

Step 29: Please note the details like No of votes available, No of student votes and staff votes casted for each contestant. The contestant who gets the more number of votes among all contestants is treated as winner and name is displayed in Green colour.

When you click on the number under student votes or staff votes, you will get the list of students/staff who voted.

You can export the report by clicking on the Excel option available on the top left corner of the report.

How to use Student Council ?

Student Council:

Using MCB Student Council feature, school can define designations House Group wise, School wise and assign students to designations to form the student council.

Please go through the steps below to define and assign students to student council.

Step 1: Login to MCB with system admin Credentials.

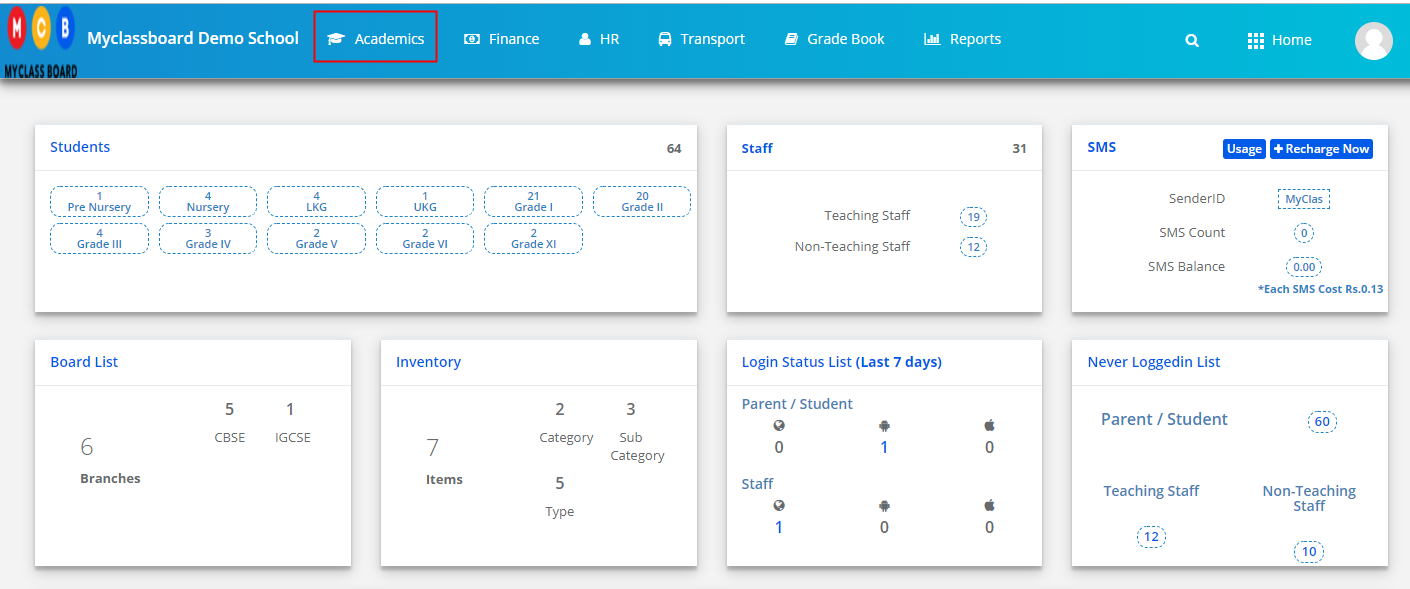
Step 2: Select Academics on the Menu and you will be directed to the Academics module.

Step 3: Choose Student Council under Academics menu.

Step 4: Choose Academic year, Branch name and Council Type [ House Group Wise, School Wise] and click on Get to get the list of students along with their designations defined under student council. If you are the first time user, you will not get the list of students and need to start with the definition of designations.

Step 5: To Manage the designations, Click on Manage Student Council Designations button [Highlighted below].

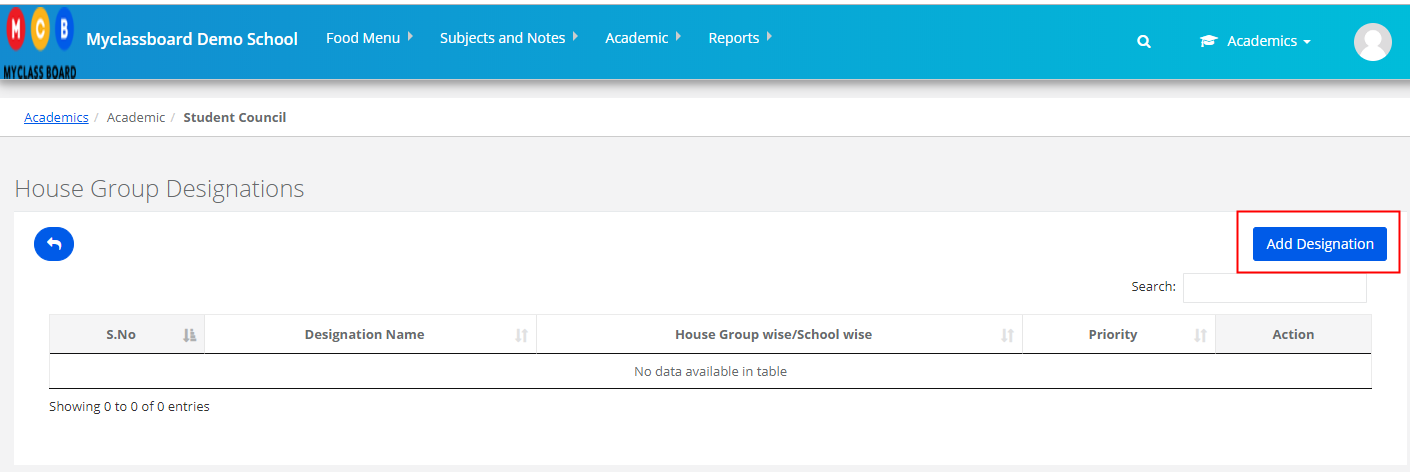
Step 6: It will also list the existing designations. To add a new one, Click on Add Designation

Step 7: We can create designations types as School wise and House group Wise.

School Wise Designations: These designations are applied to students across the school.

Ex: School head boy, School Head Girl, Prefect, etc.,

House Group Designations: These designations are applied to students who are assigned to the houses.

Ex: House Captain, House Vice Captain, etc.

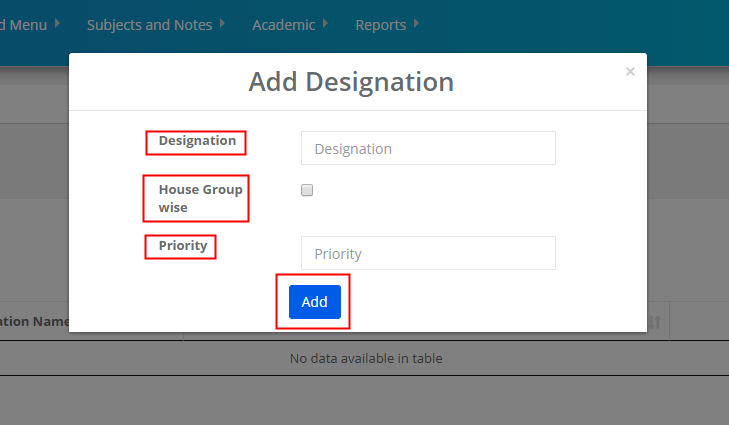
Add Designation name, select House Group check box if the designation is House group wise , other wise the designation is considered as School wise designation. Set the priority and click on Add.

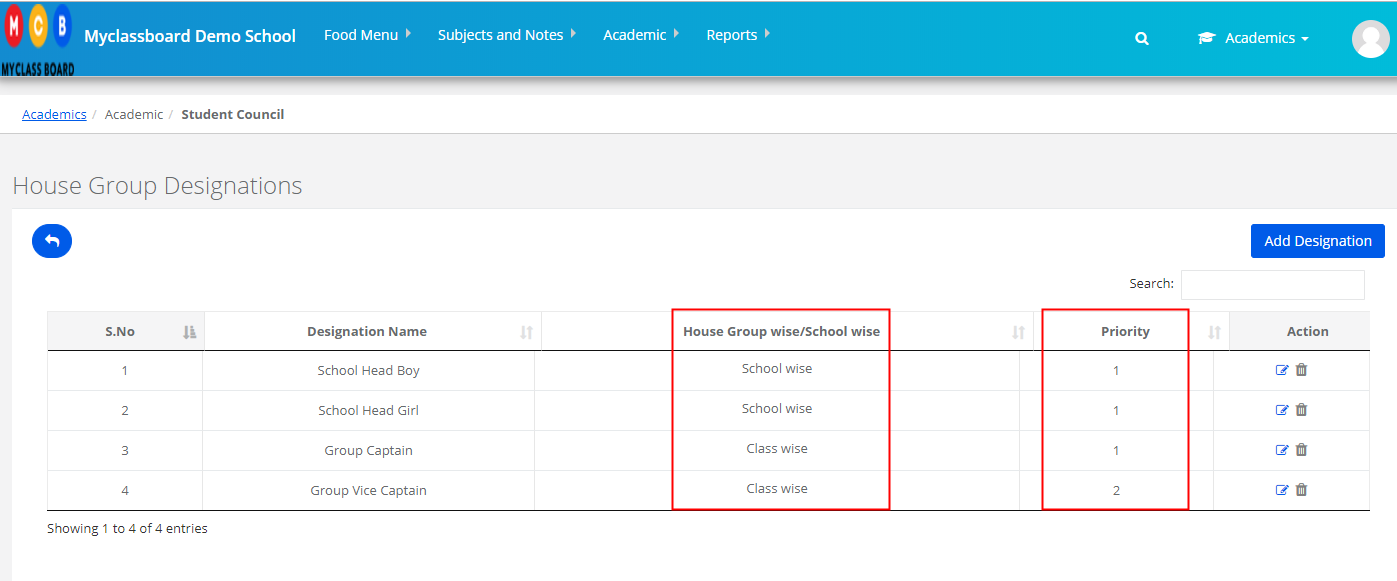
Step 8: As we create the designations, the designations are listed as below. You can Edit and Delete the them as when required.

Adding students to the designations House Groups wise:

Step 9: Please make sure the students are assigned to the House group before adding them to the designations.

Select academic year, Branch and Council Type to get the list of designations along with the house groups. Click on “+” Sign under respective house group name.

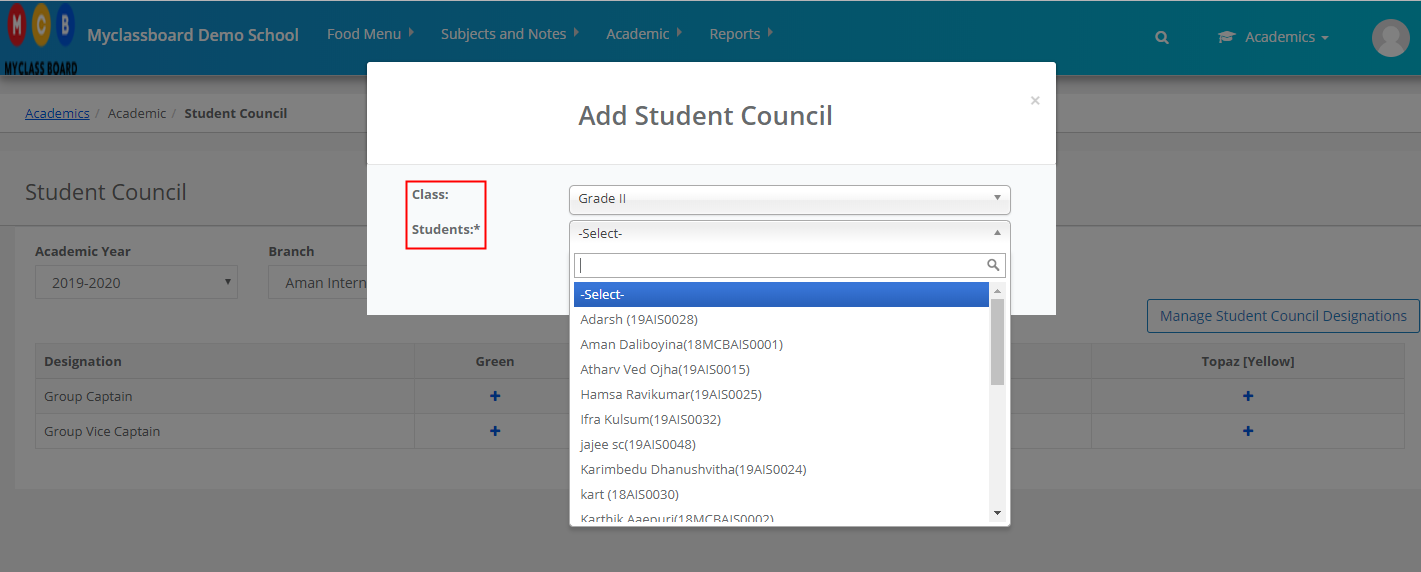
Step 10: Select the class and student name and click on assign to assign the student to the designation. Go on adding the students to designations by repeating the steps 9 and 10.

Adding students to the designations school wise:

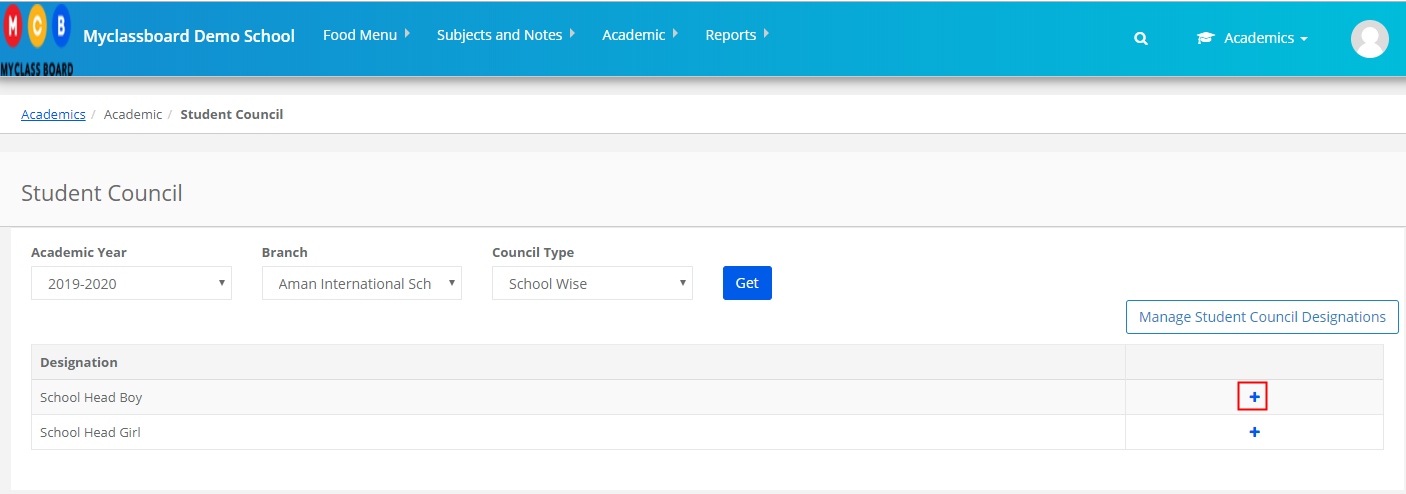
Step 11: Select academic year, Branch and Council Type to get the list of designations available. Click on “+” Sign against the designation.

Step 12: Select the class & student name and click on assign to assign the student to the designation. Go on adding the students to designations by repeating the steps 11 and 12.

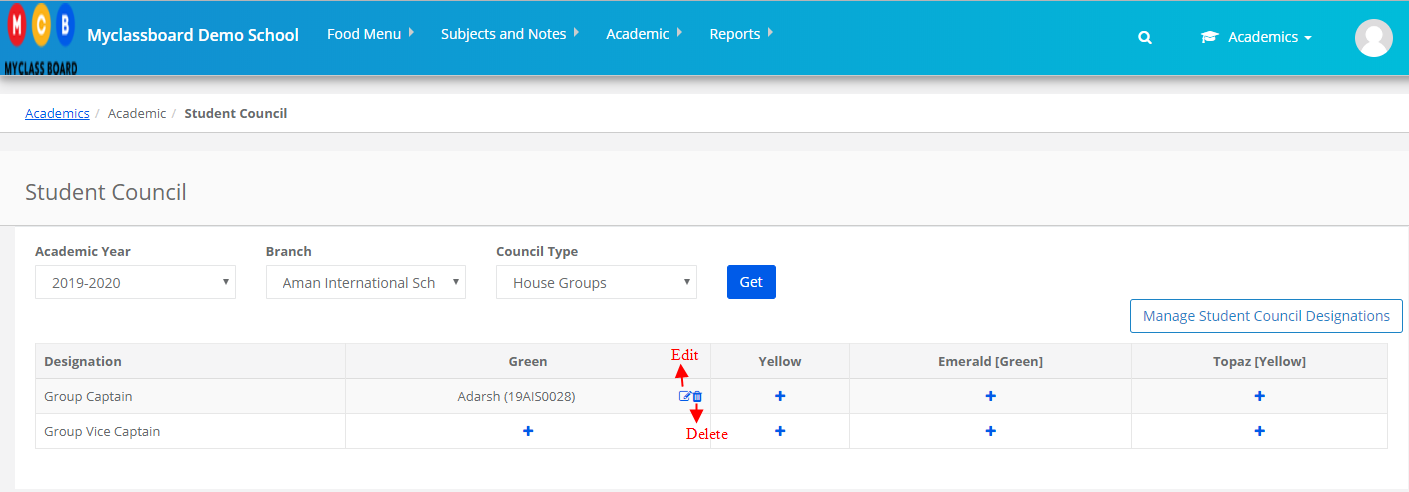
Step 13: To edit and delete assigned students, click on the respective icons as highlighted below to do the same.

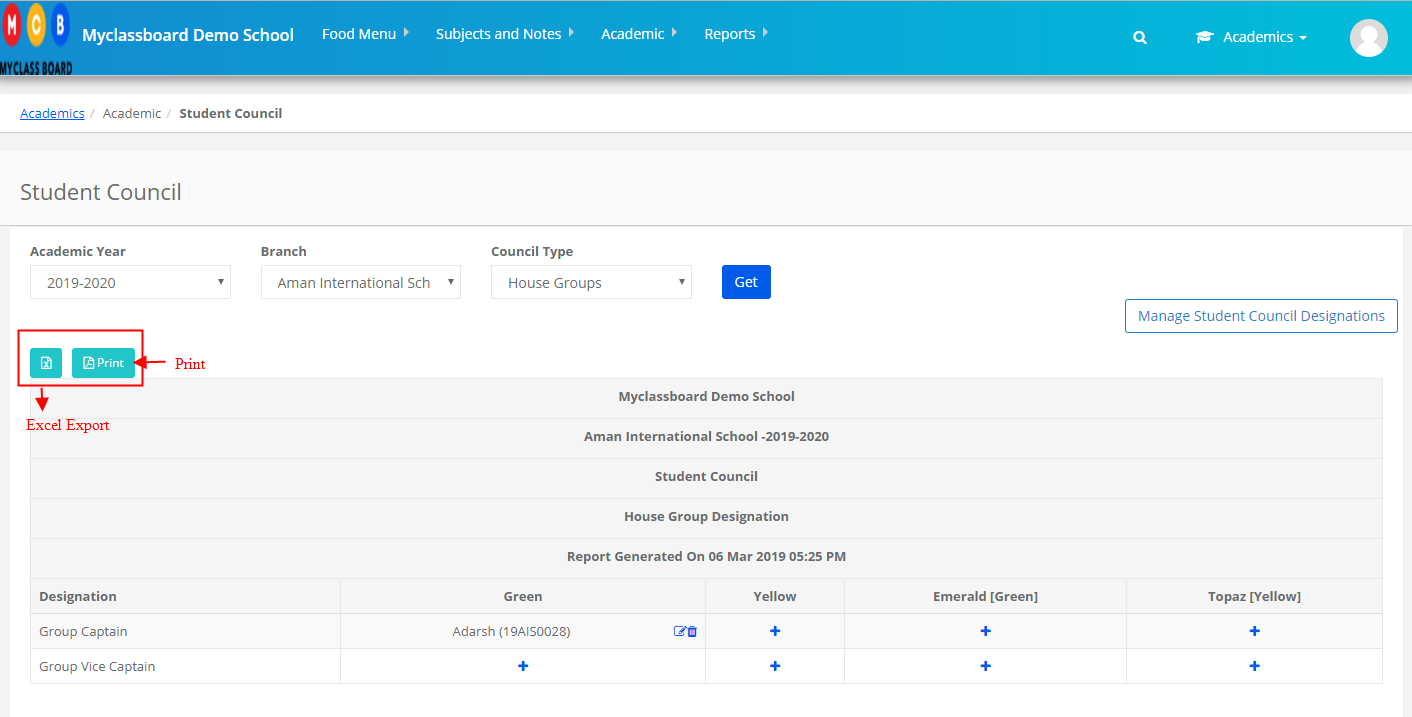
Step 14: To export and Print the list, please click on the respective icons as highlighted below to do the same.

How to record School Achievements?

School Specific Achievements:

School Specific Achievements can be used to record school achievements, individual achievements, and team achievements in different categories like Sports, Co-Curricular, Fine Arts, Celebrity and Others along with the competition details, venue details and event photos.

Please follow the steps below to use School Specific Achievements.

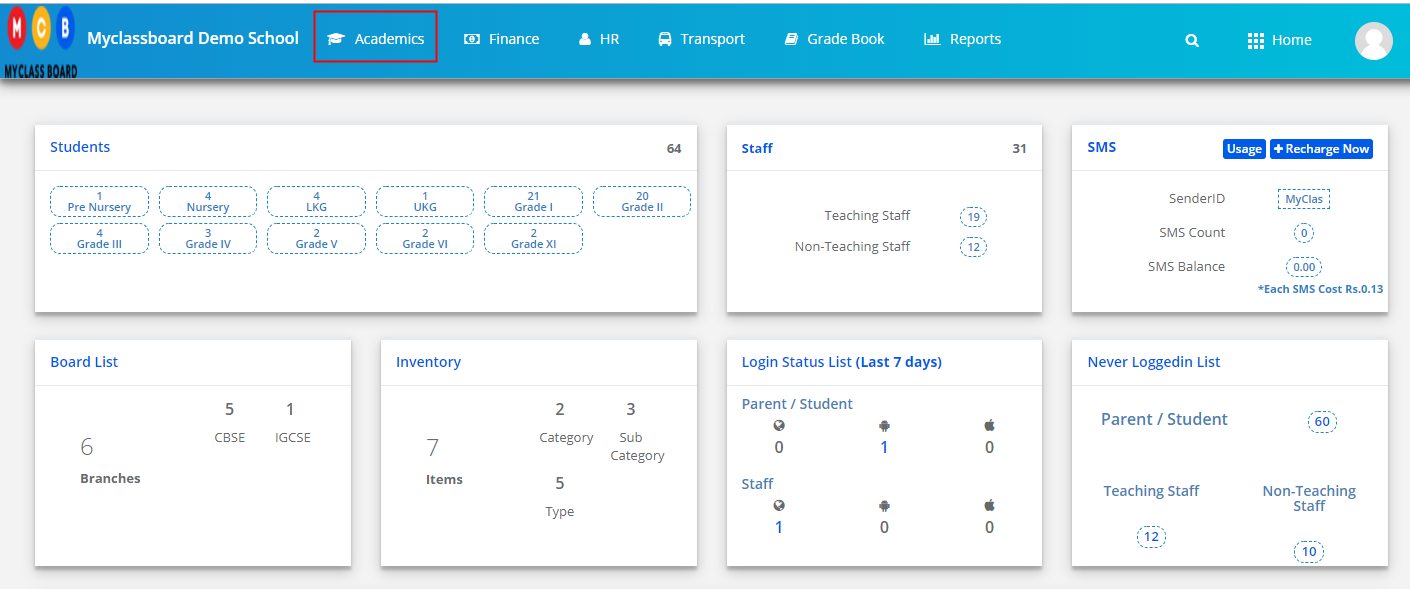
Step 1: Login to MCB with system admin Credentials.
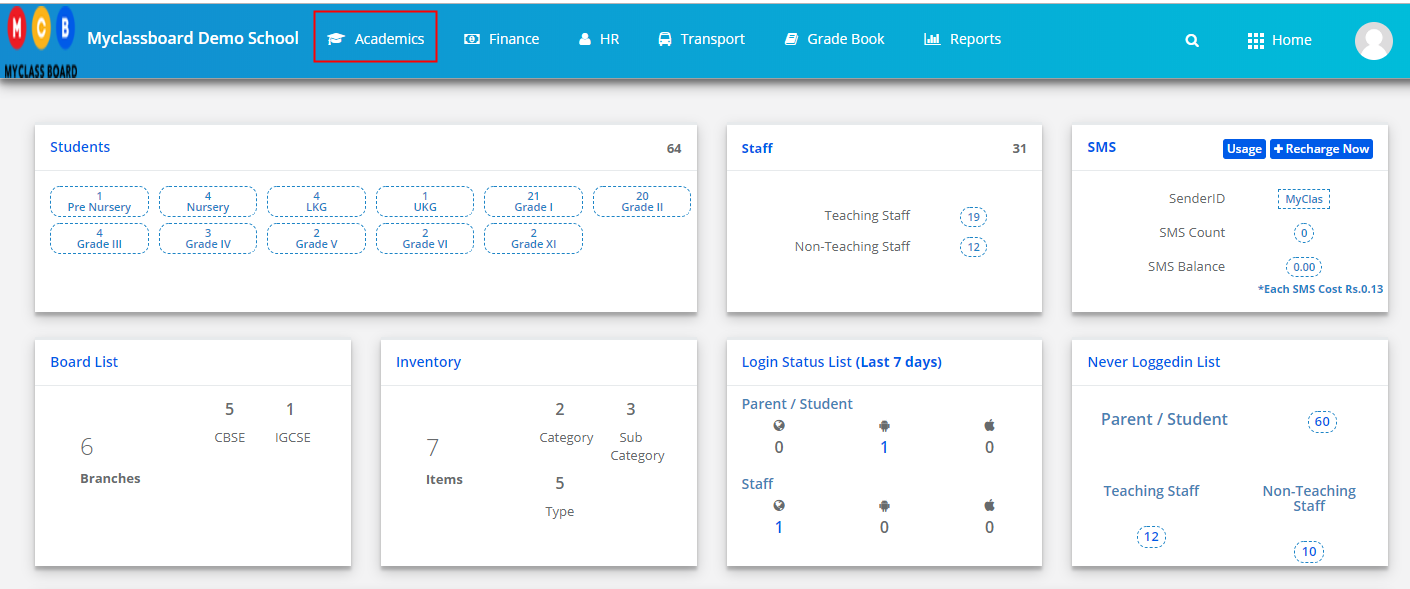
Step 2: Select Academics on the Menu and you will be directed to the Academics module.

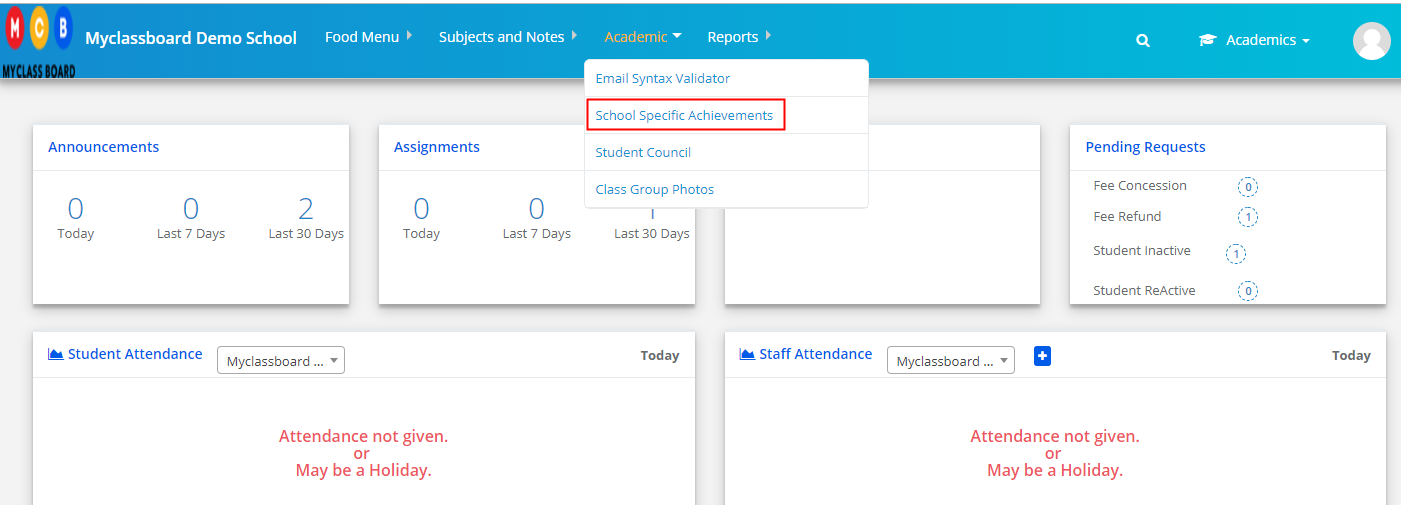
Step 3: Choose School Specific Achievements under the Academics menu.

Step 4: To add the achievement, Please click on “+” Sign which is available on the top right corner [Highlighted below]

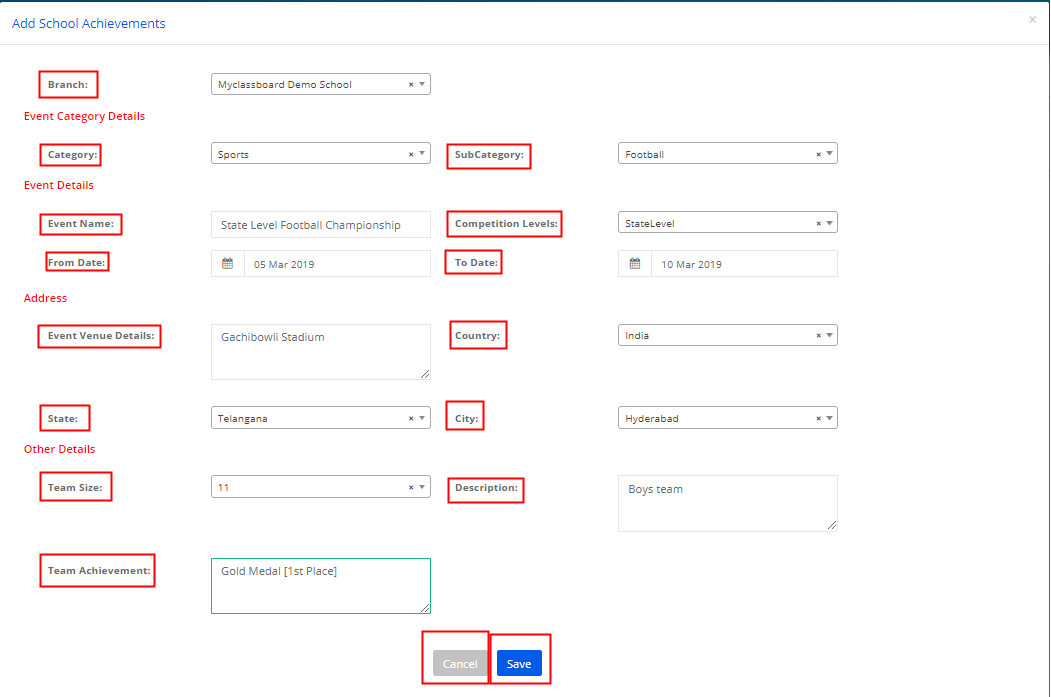
Step 5: Fill in the highlighted fields with the relevant details and click on Save to save the entry or cancel to cancel the entry.

To add the individual achievements and photos:

Step 6: Select branch, event date and click on Show Report

Step 7: To add student achievements, Click on the number under Student Achievements column.

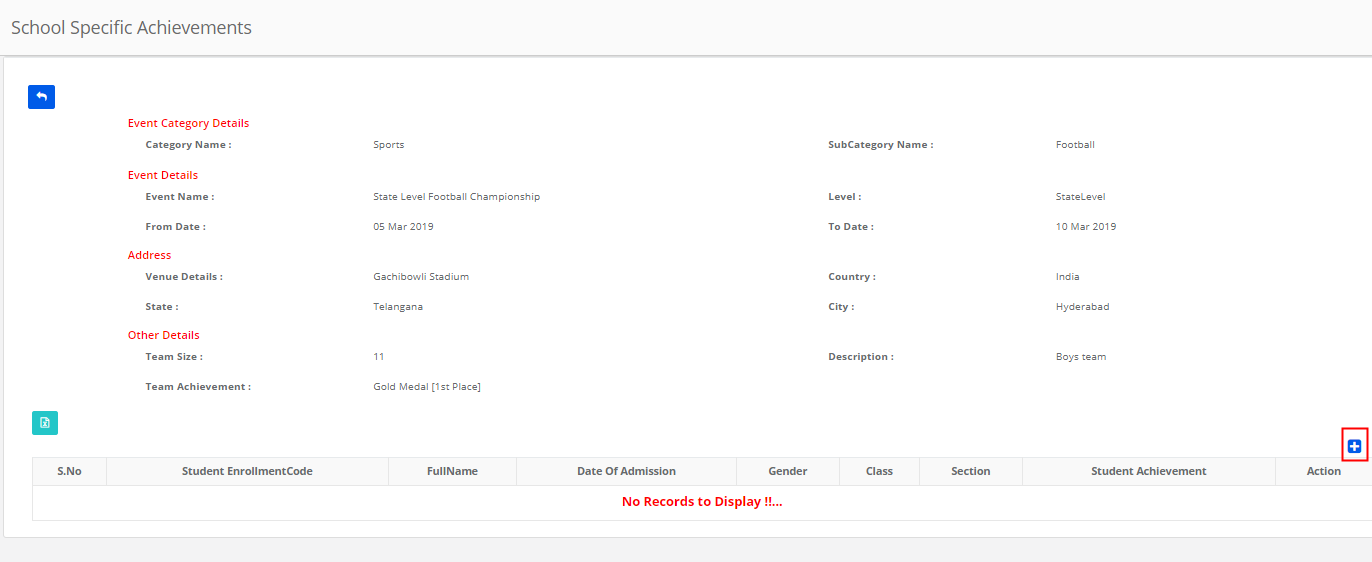
Step 8: Click “+” sign which is available on the top right corner as highlighted below

Step 9: Select Class, Students and add the achievements either from the suggestion available in a drop-down or enter directly and click on Add button.

Step 10: Repeat step 9 to add all students pertaining to the event and click on Save to save the achievements of all students. Please use the delete button to delete the student details from the achievement record.

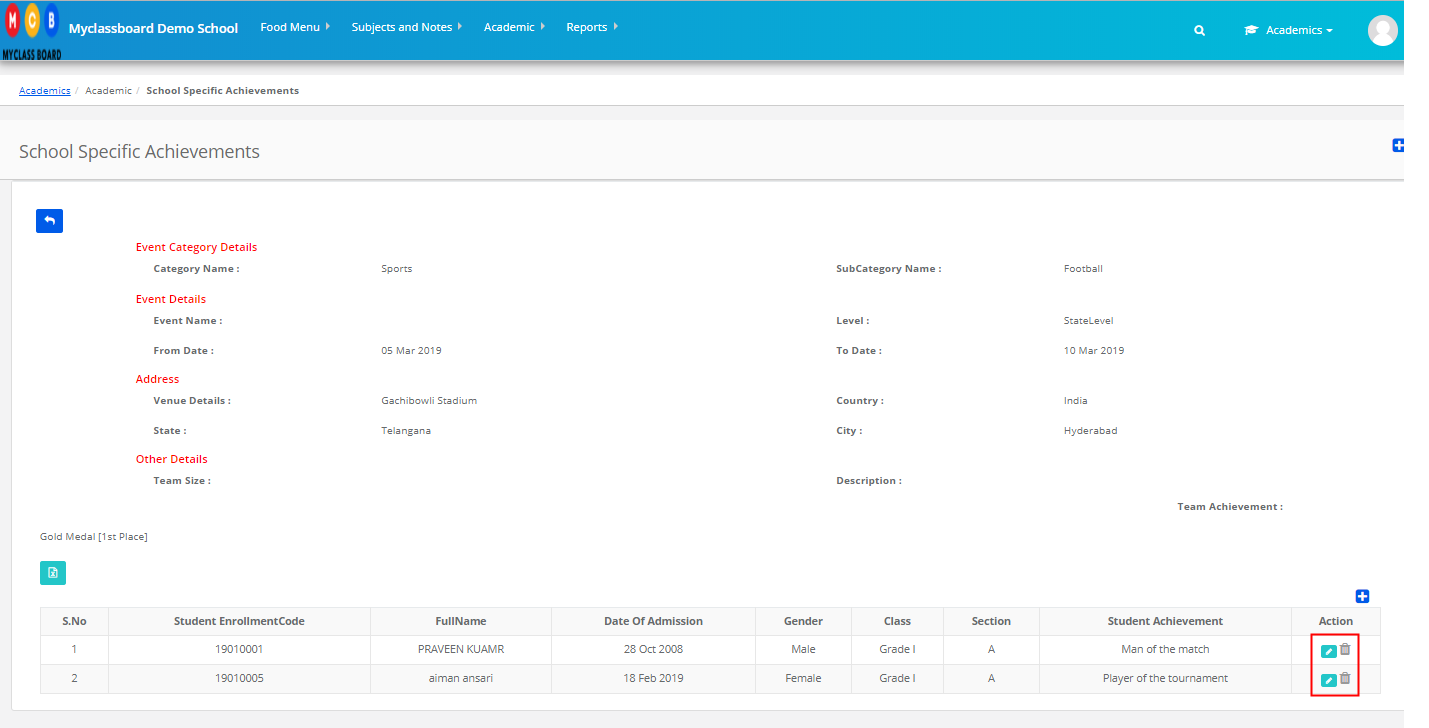
Step 11: To edit and delete the records, please use the respective icons to do the same.

To add Staff Achievements:

Step 12: Click on the number under Staff Achievements column.

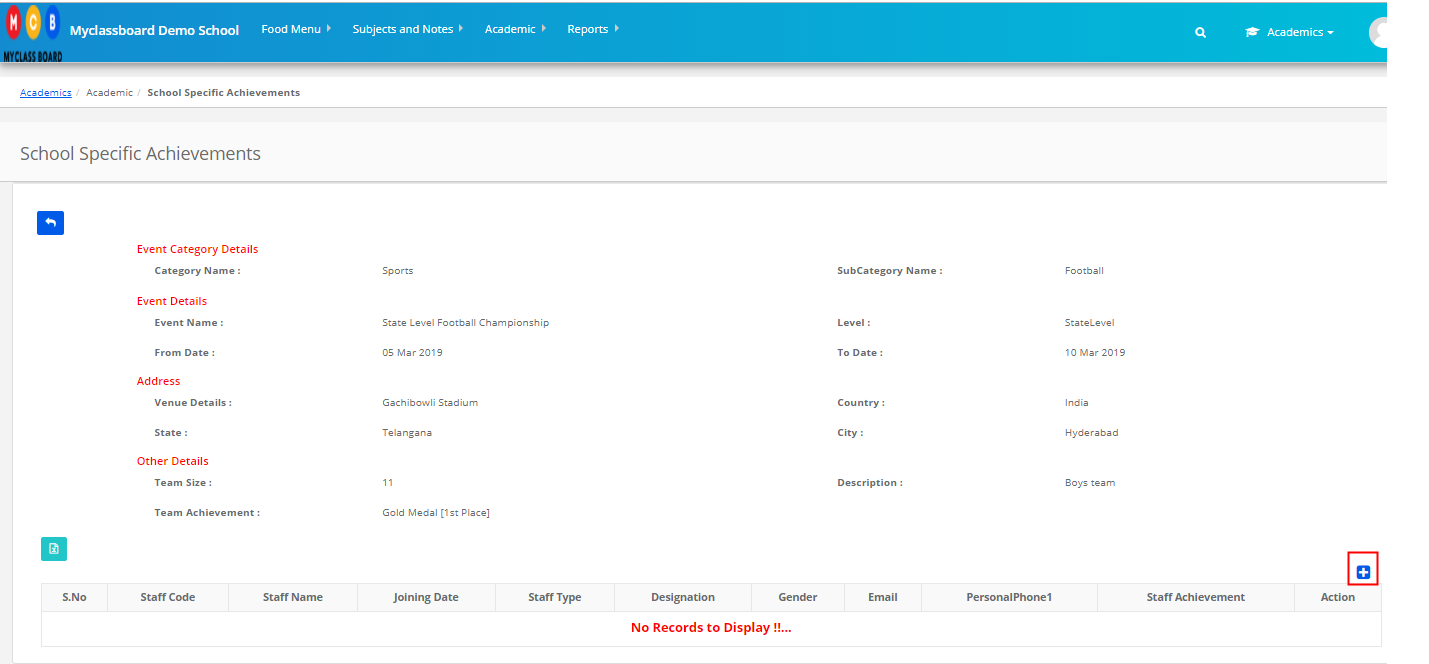
Step 13: Click “+” sign which is available on the top right corner as highlighted below

Step 14: Select Staff type, Staff Name, add the achievements either from the suggestion available in a drop-down or enter directly and click on Add button.

Step 15: Repeat step 14 to add all students pertaining to the event and click on Save to save the achievements of all students. Please use the delete button to delete the student details from the achievement record.

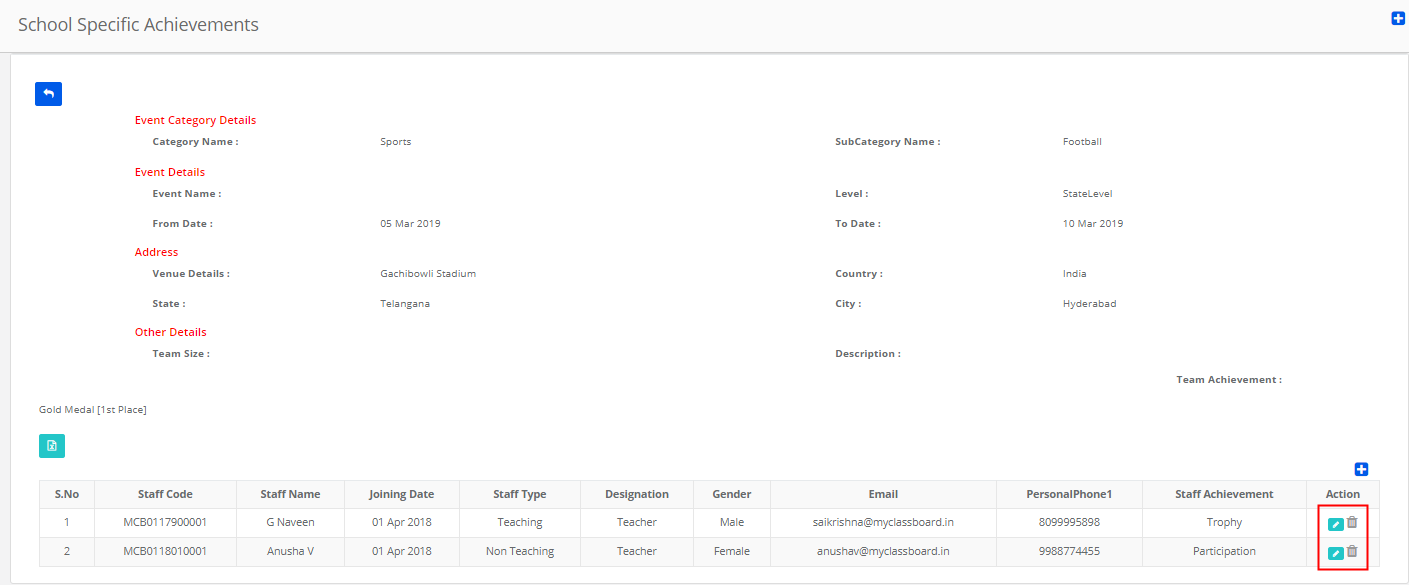
Step 16: To edit and delete the records, please use the respective icons to do the same.

To add Photos of the event:

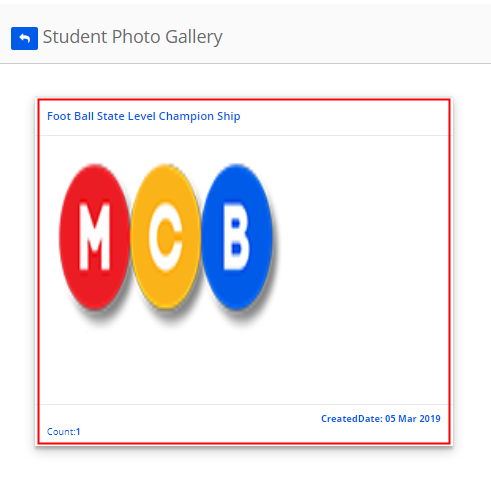
Step 17: Click on the number under the Photo Gallery column.

Step 18: Choose Class, Student name and Click on the Search button

Step 19: Click on Create Album

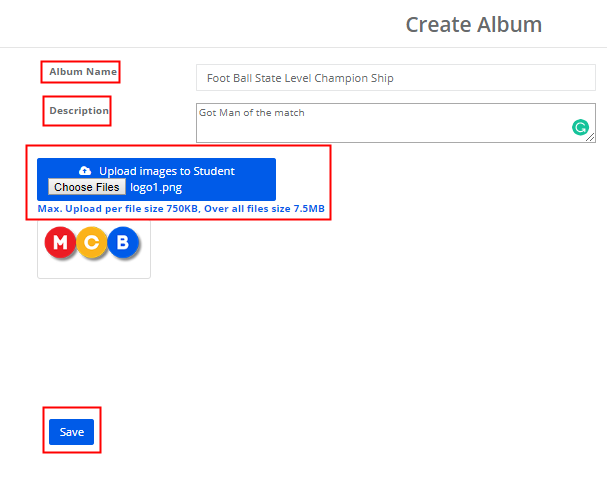
Step 20: Add Album Name, Description, Choose the picture and Save

Step 21: To add more students and pictures to the album, Click on the album

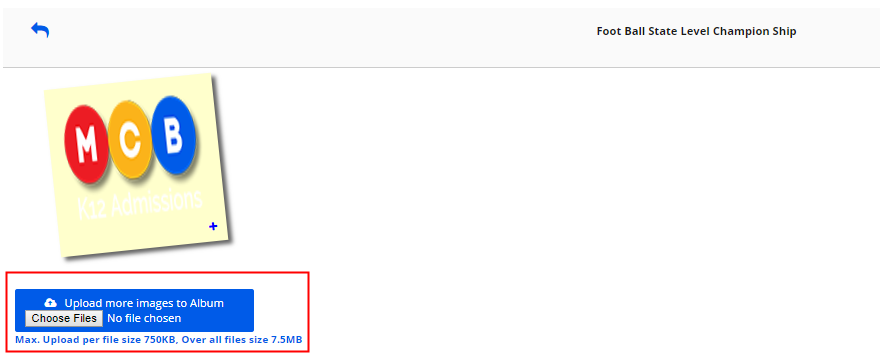
Step 22: To add more pictures to an album, Click on Browse, Choose pictures and Save.

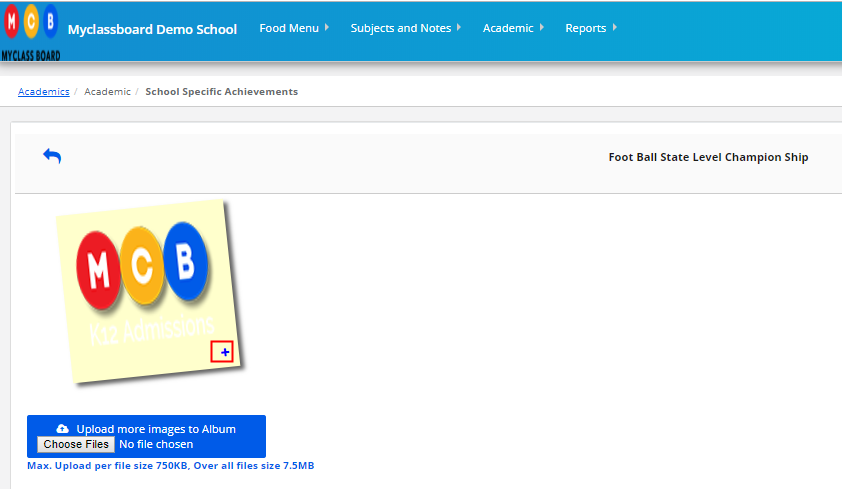
Step 23: To Tag more students to the picture, Click on the “+” sign which is available on the bottom right corner of the picture. [ Highlighted below]

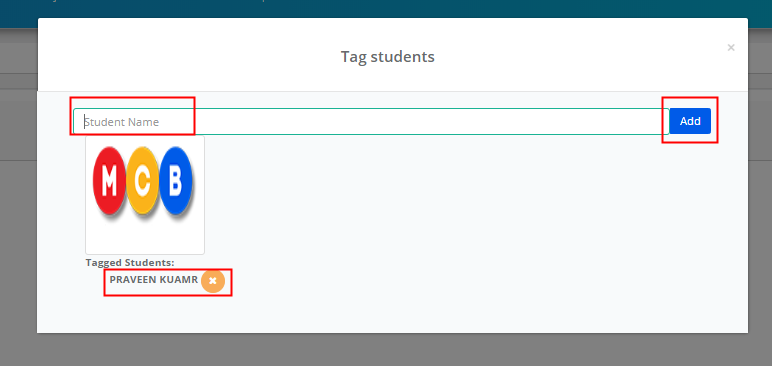
Step 24: Enter Student name and Click on the add button to tag students to the picture.
To untag the student from the picture, click on the cross symbol (x) against the student.

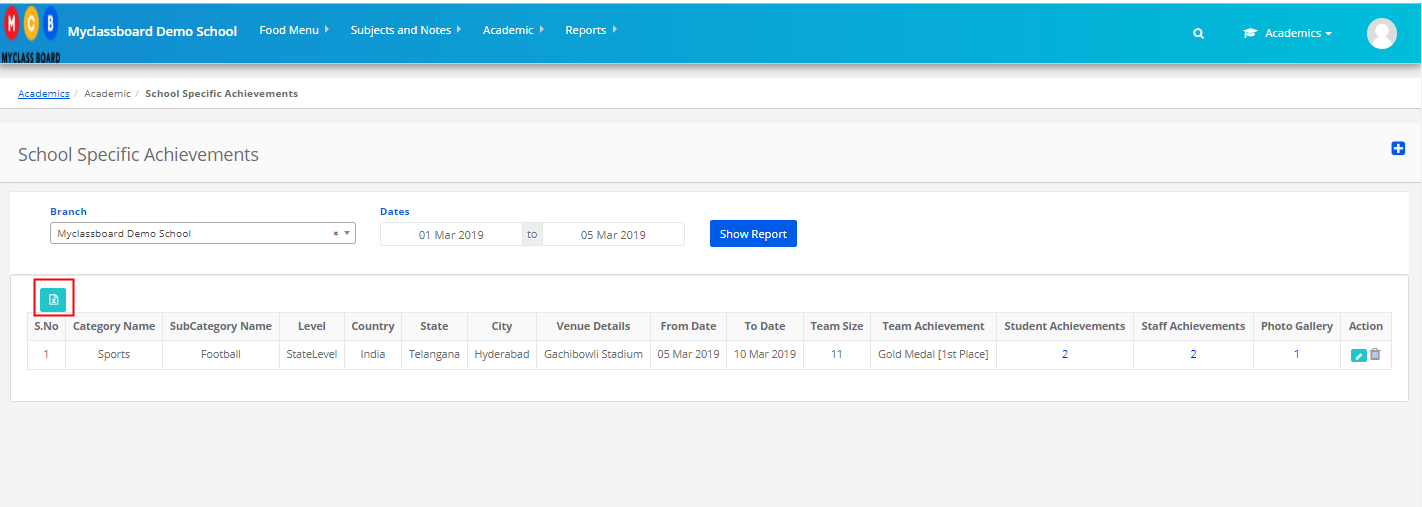
Step 25: To download the report of all achievements recorded between specific dates, Select branch, dates and click on Show Report.
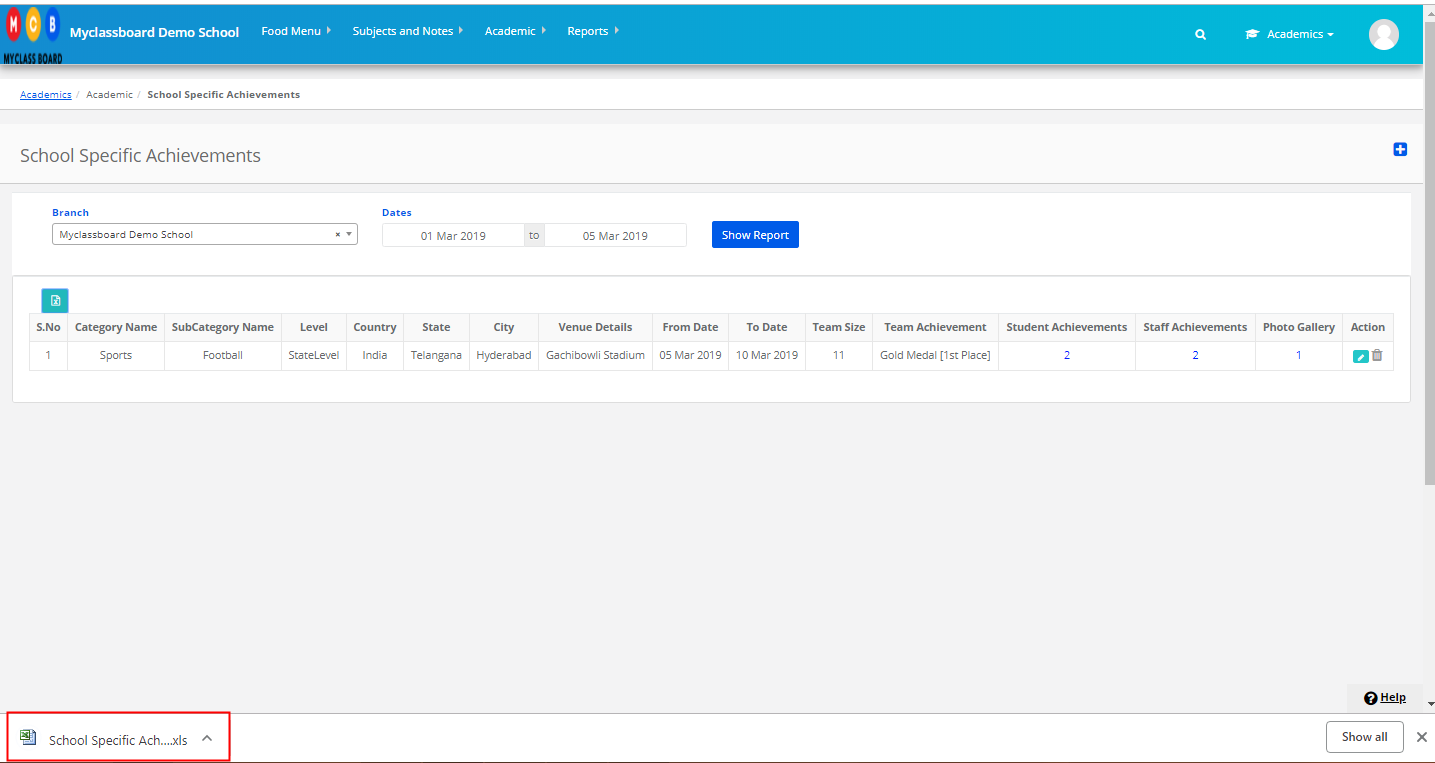
To Export the report, click on excel icon which is available on the top left corner of the screen [Highlighted below].

Step 26: An Excel file showing the report will be downloaded to your computer.

What is an Email Syntax Validator and how to use it?

Email Syntax Validator:

Email Syntax validator will let the users know if properly formatted, verify that it’s mail box exists, and is able to receive the emails.

MCB Email Syntax validator helps the user identify valid and invalid email with clear colour coding.

Green colour indicates the valid email and Red colour indicates the invalid email stored against the student records.

Please note that this feature is included only in the system admin login.

How to use it?

Step 1: Login to MCB with system admin Credentials.

Step 2: Select Academics on the Menu and you will be directed to the Academics module.

Step 3: Choose Email Syntax Validator under Academics menu.

Step 4: This screen will help you to validate both Student and Staff email ids. By default it will open option to validate student parents email ids. As you click on staff Email Syntax Validation, it will open options for validating staff emails.

To validate Student emails, please select branch, classes and sections and click on Get.
Step 5: it will list the emails available in the student records. As highlighted in the picture below, the valid emails are indicated in Green colour and invalid are indicated in Red colour. The report shows how many emails are invalid in the selected classes and an option to delete the invalid emails. So, that you can rest assure that the emails available are valid and the email communication you send will reach to the mailbox without any failures.
How to upload Class Group Photos?

Class Group Photos

School can upload group photo captured during the academic year for each Class and Section.
Please follow the steps described below to use it.

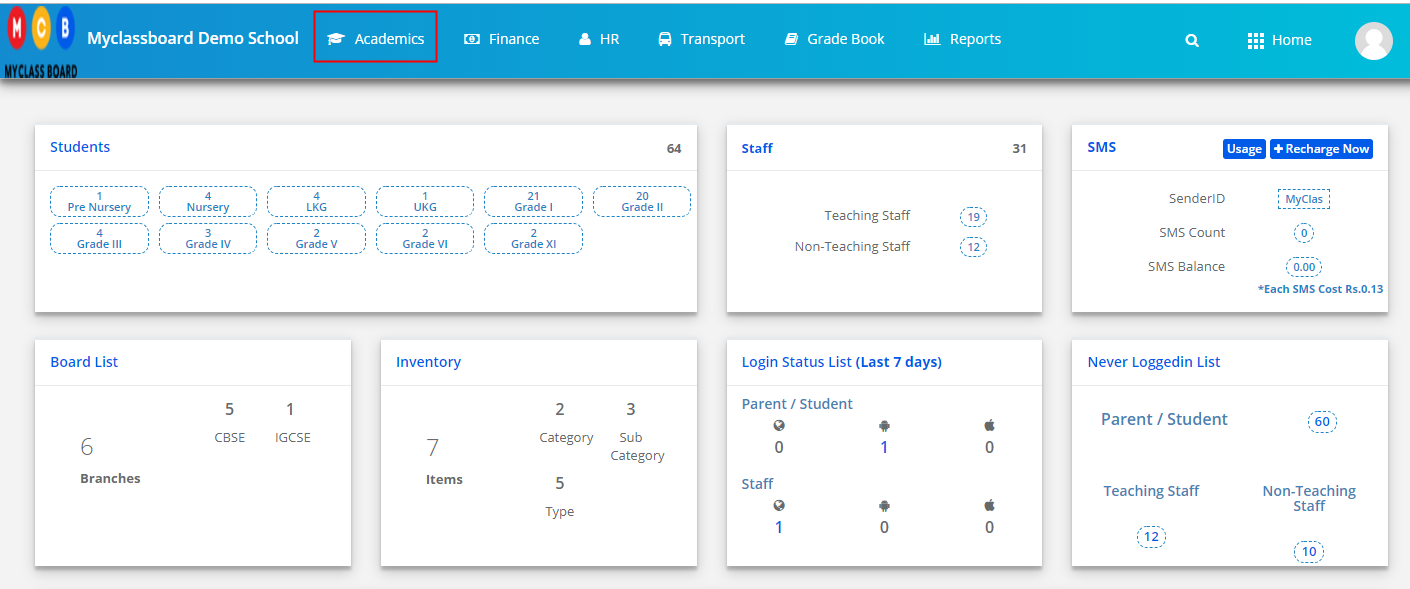
Step 1: Login to MCB with system admin Credentials.
Step 2: Select Academics on the Menu and you will be directed to the Academics module.

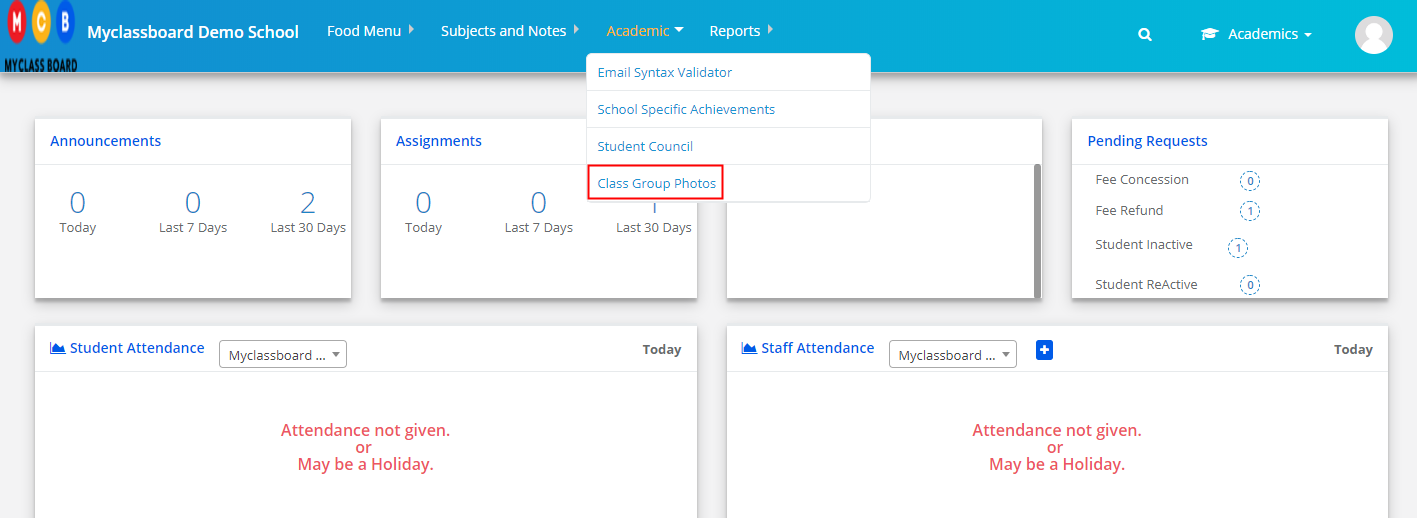
Step 3: Choose Class Group Photos option under Academics menu.

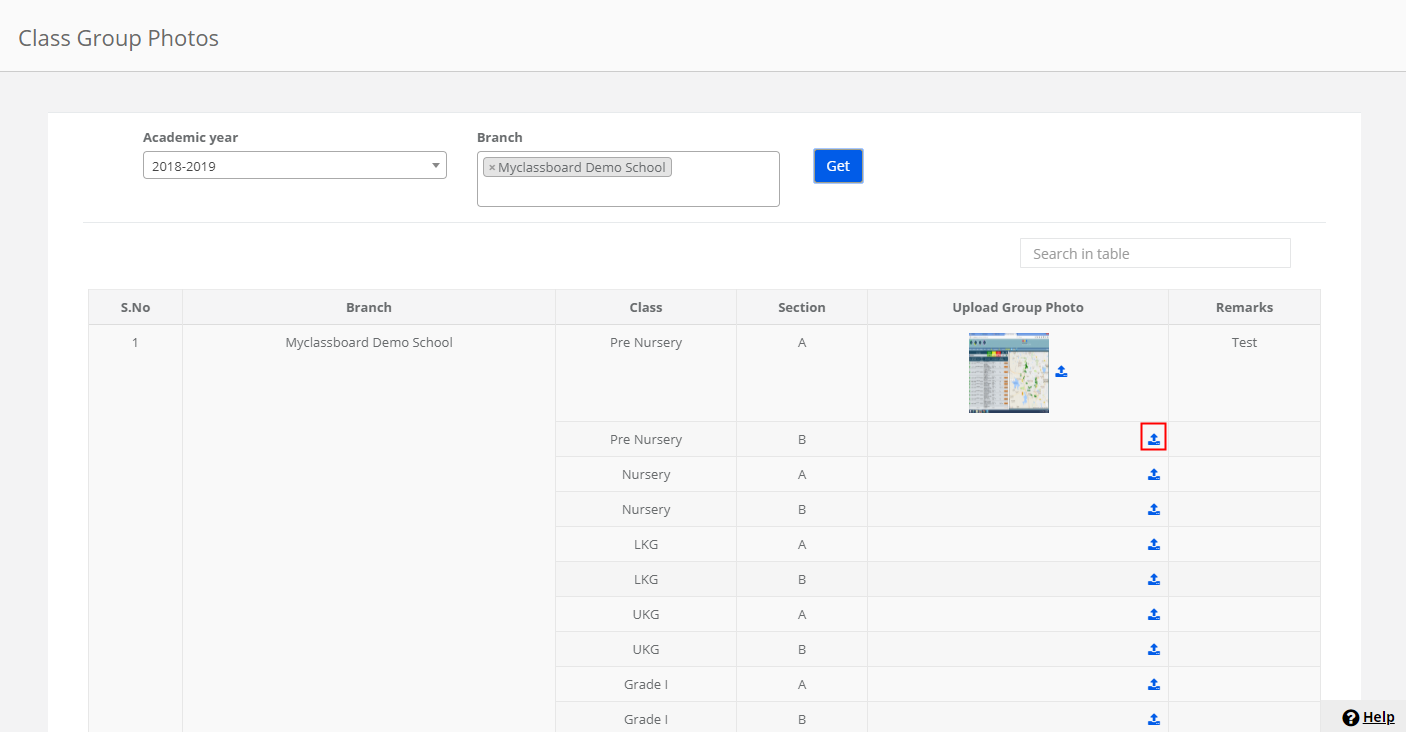
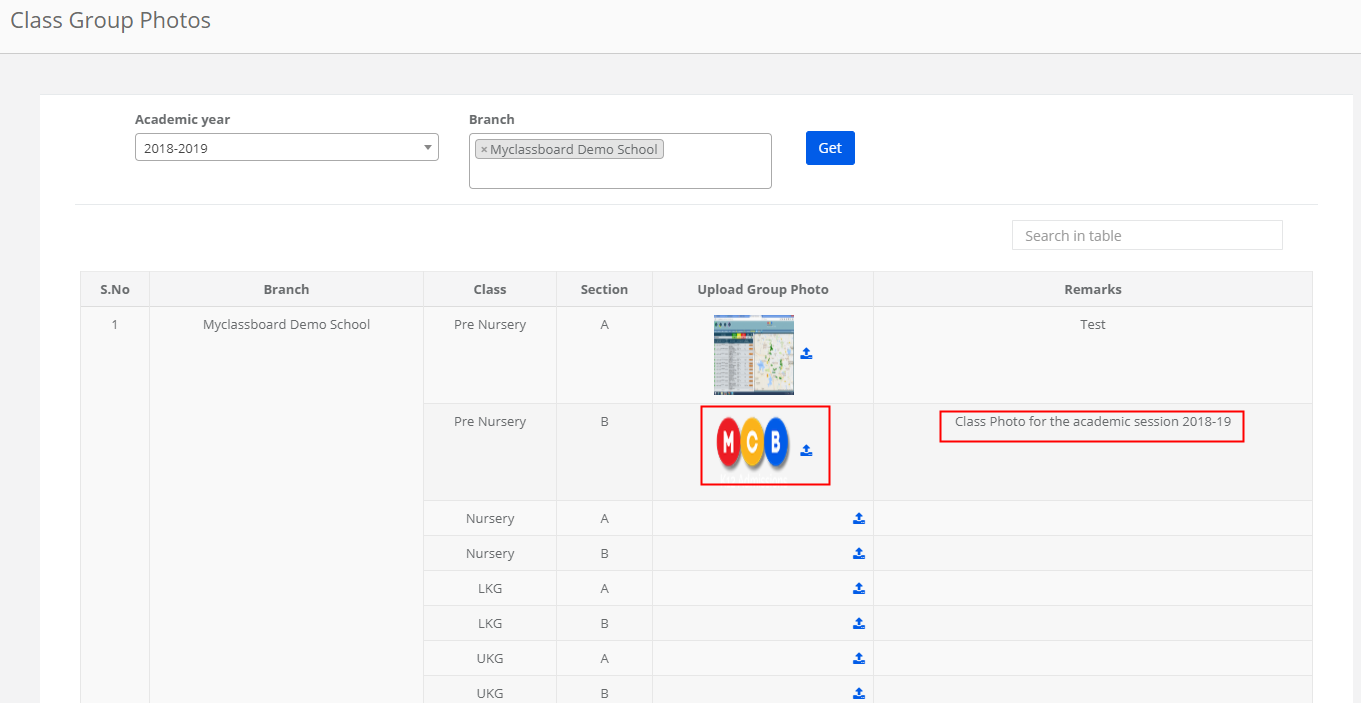
Step 4: Choose Academic year, Branch and Click on Get. If you would like to upload photos for all branches at a time, please select “ALL” option under branches.

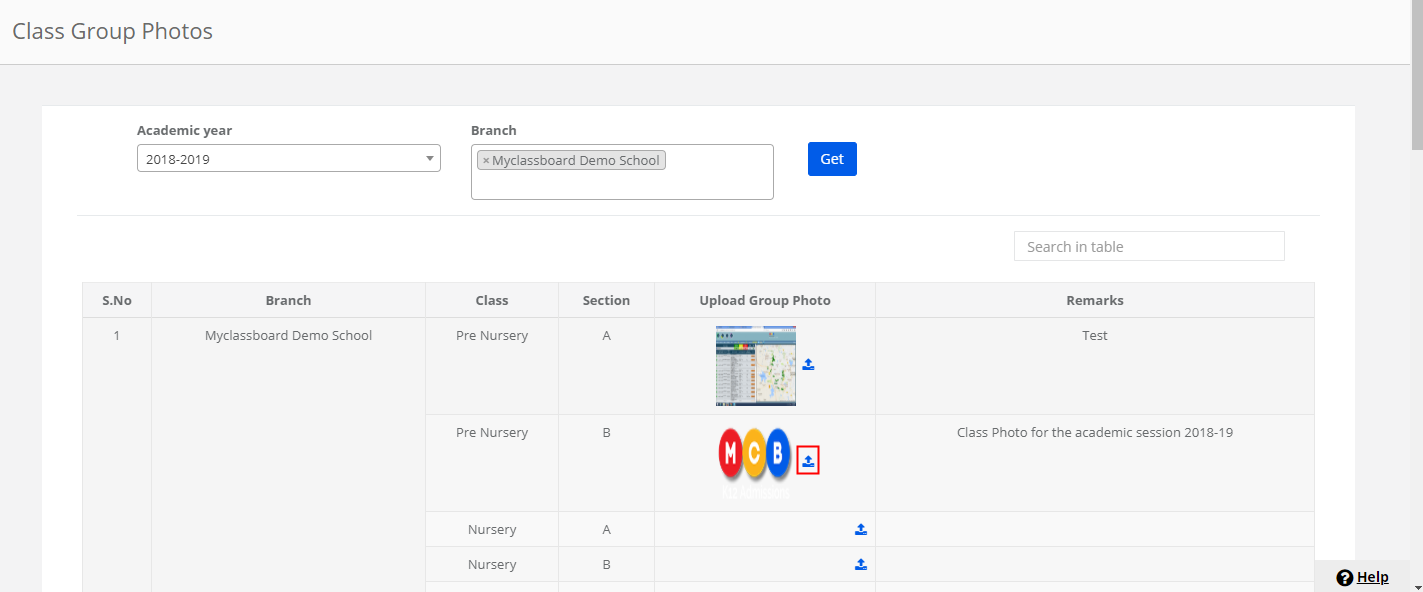
Step 5: It will list all classes and sections available in the selected branch. To upload the class group picture, click on the Upload icon [Highlighted below].

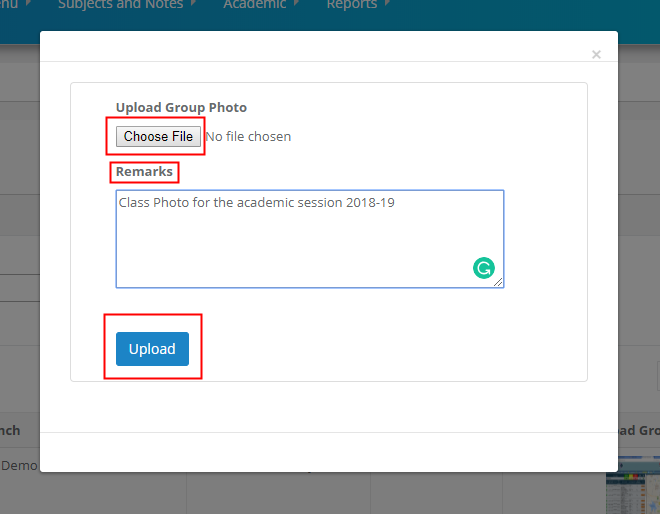
Step 6: Locate the file on a computer, choose the file, Enter Remarks and Click on Upload.

Step 7: Once the pictures are uploaded, you view the file preview and remarks as you choose the academic year and Branch and Get.

Step 8: To change the existing picture and Remarks. Click on the upload button and do the required changes and Save.

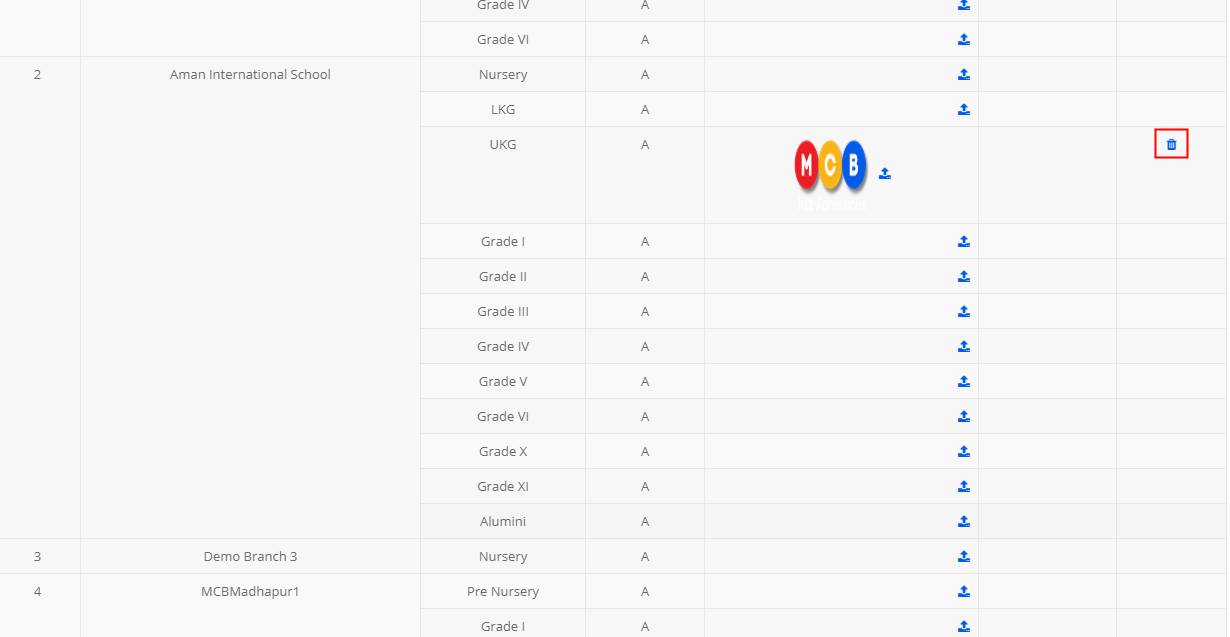
Step 9: To delete the picture, Click on delete option and confirm by clicking yes.