Inter Office Concerns User Manual

School can create different concern types in the defined categories. The person who is assigned as a branch owner can submit the concern by choosing the category and concern type. The concern submitted by the branch owner can be handled by the following roles based on the concerned type defined.

Roles who can act on the concerns:

The concern can be raised by the owner assigned at the branch level.

If the Work Flow to handle the concerns is not defined,

The principal of the branch and system admin user will have access to act on the concern.

If the Work Flow to handle the concern is defined,

The concerns will be handled by the users assigned at different levels. The users (except the highest level user ) at the levels will be able to write the remarks and forward the concern to the next level. The user who is at the highest level only will get the option to close the concern as it is forwarded by the previous users.

Email Communication:

Email communication is enabled as when it is being raised and attended by different people until it is closed/resolved.

Raise a concern – Owner at branch level receive an email as he/she raises the concern.

Assume that the workflow is defined with 2 levels.
Level 1 – Principal or system admin or the person who is assigned at level 1 receives an email with the concern details.

Level 2 – The person who is assigned at level 2 receives an email with the concern details as and when it is forwarded from level 1.

Create Inter office Concerns:

Concern Types and description can be created only in system admin login.

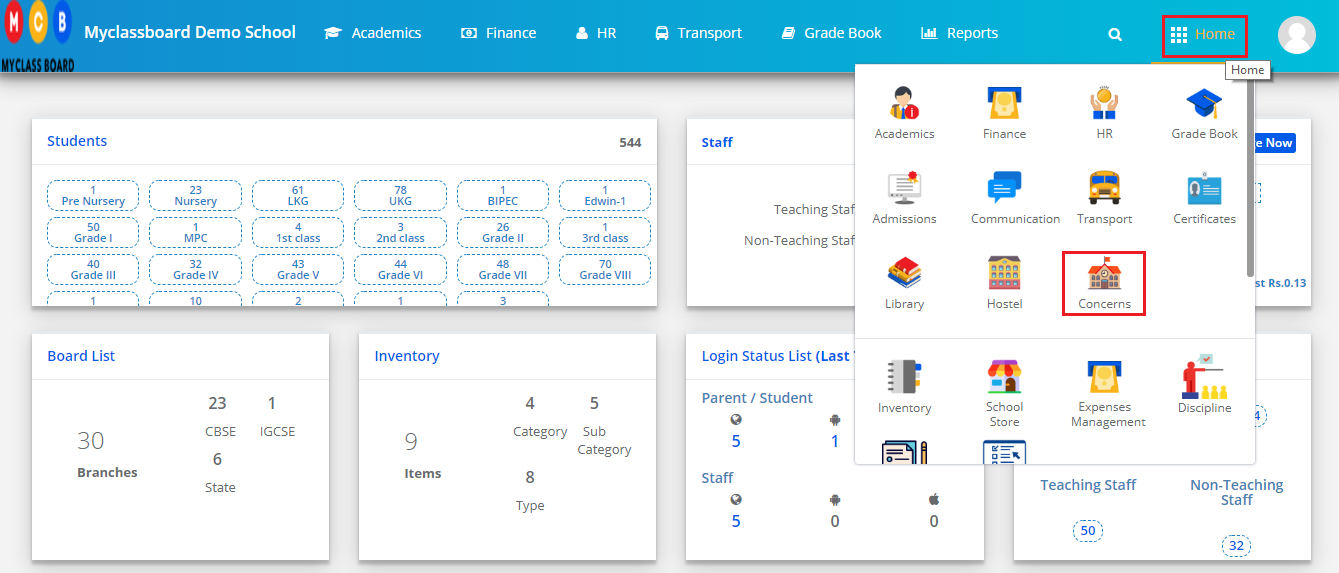
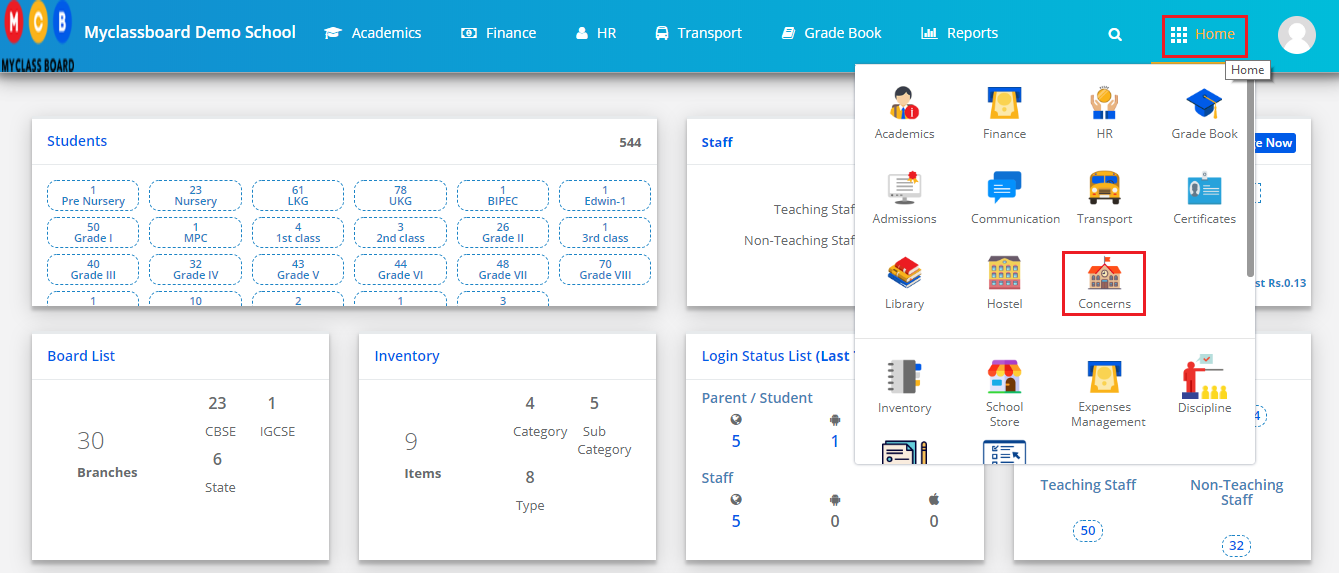
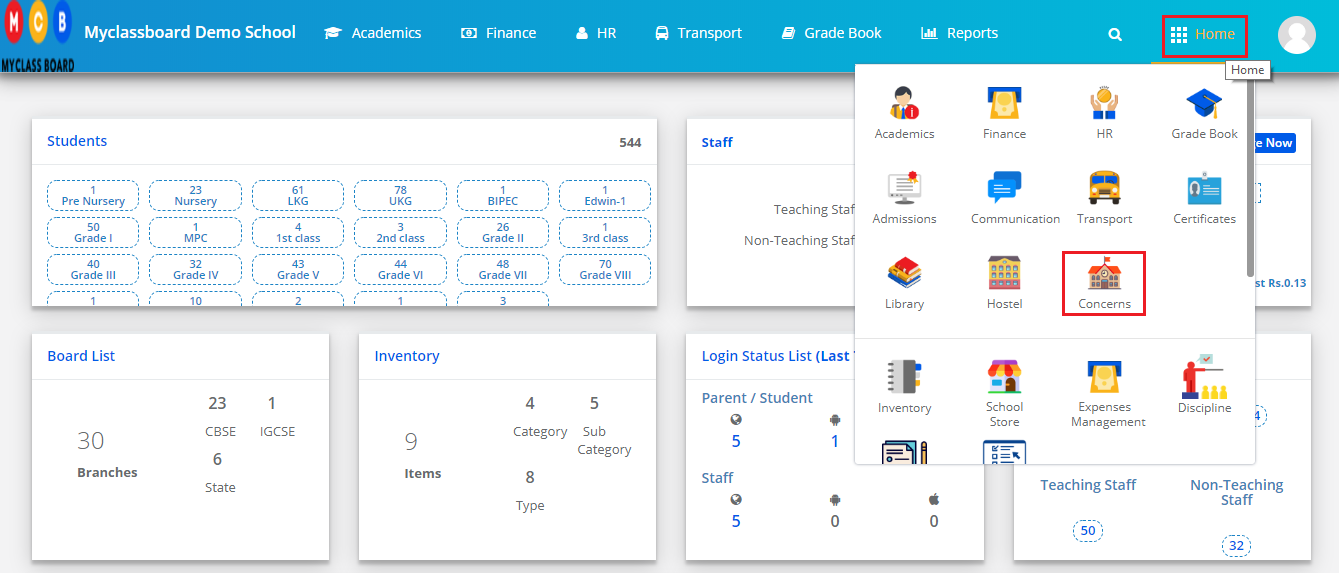
Step 1: Please login to MCB with system admin login credentials. Visit Concerns module by clicking on the Home link on the top right corner.
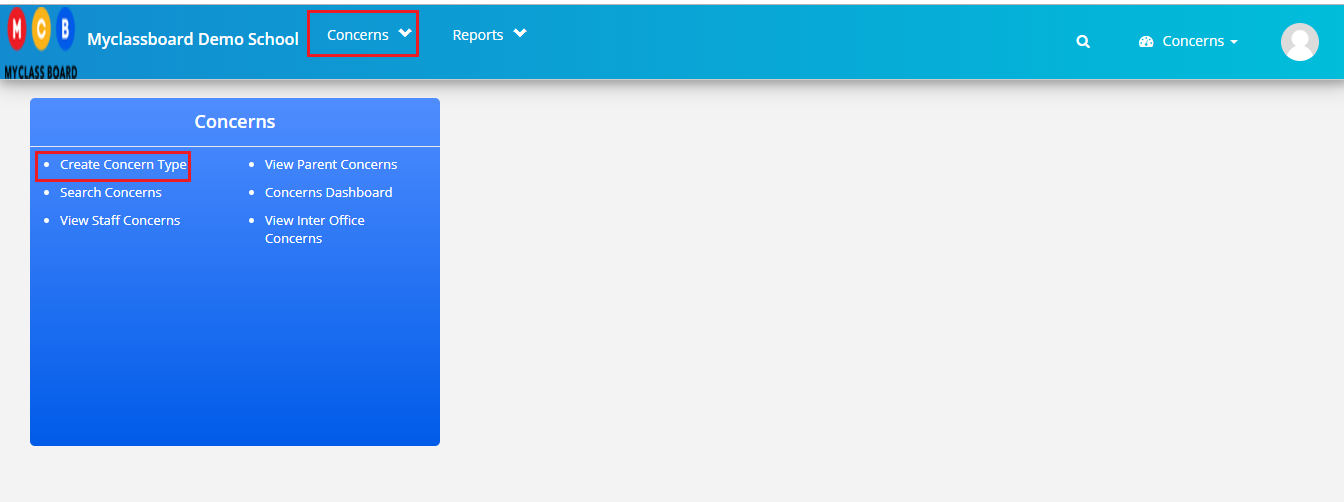
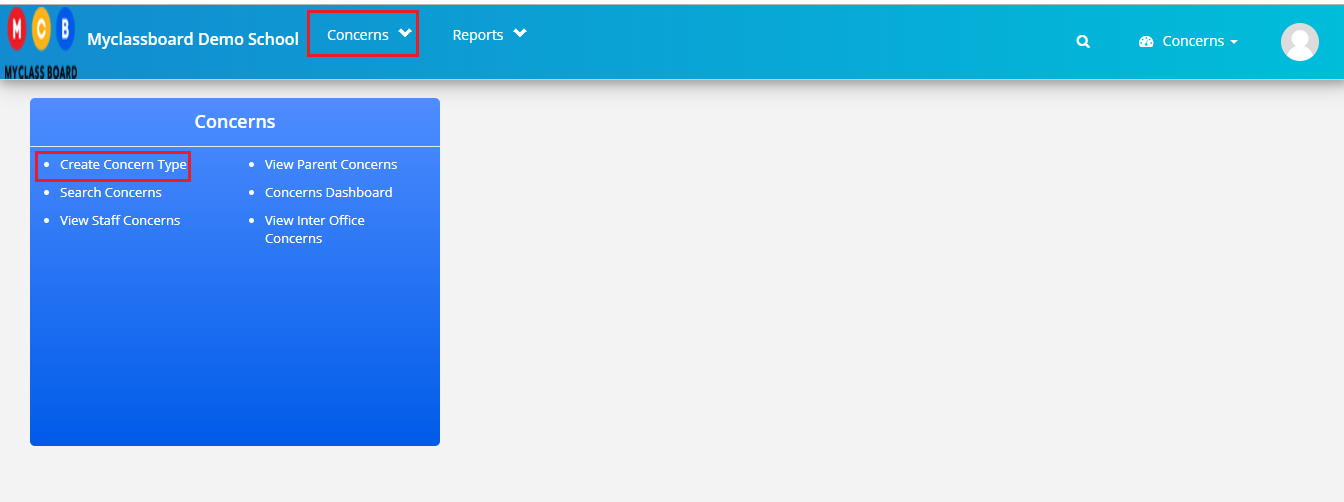
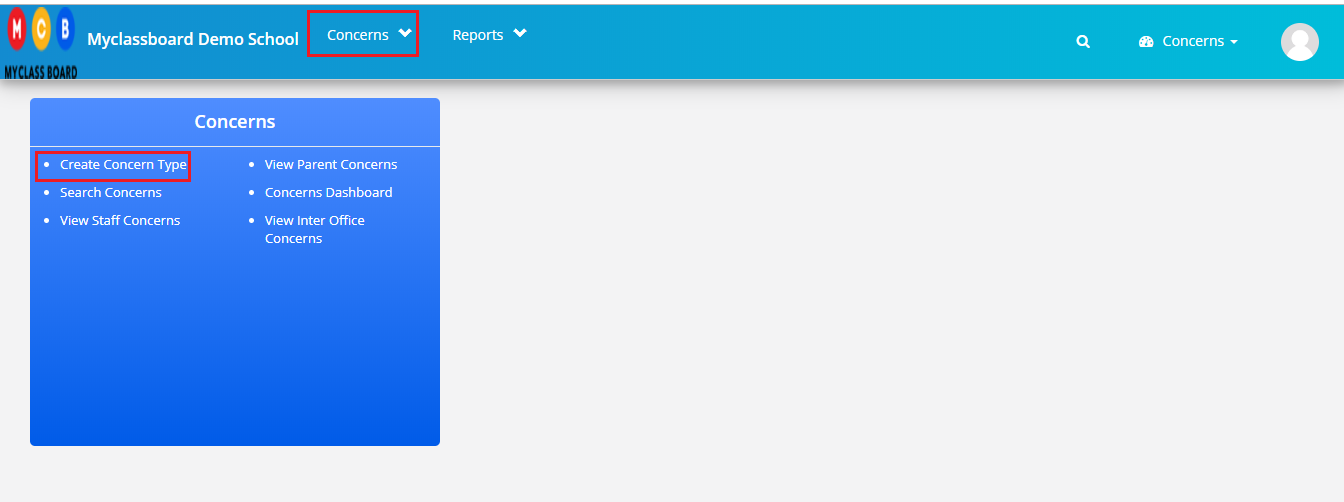
Step 2: Click on Create Concern Type option under Concerns module or on the dashboard.

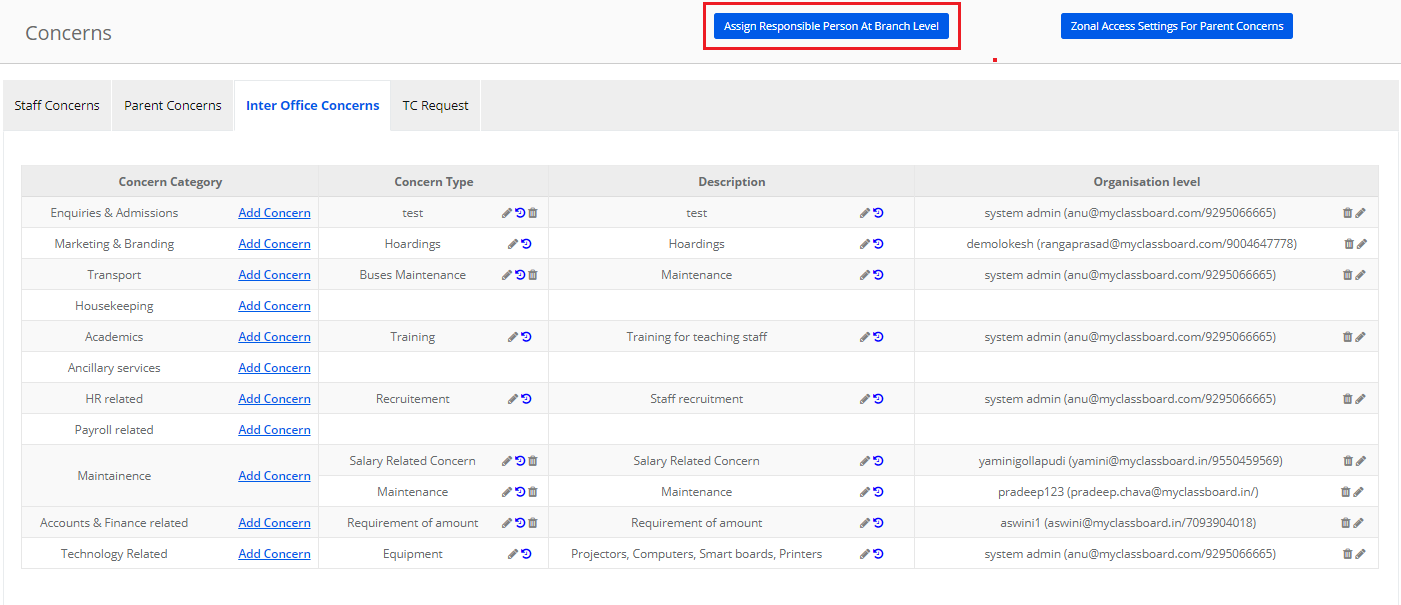
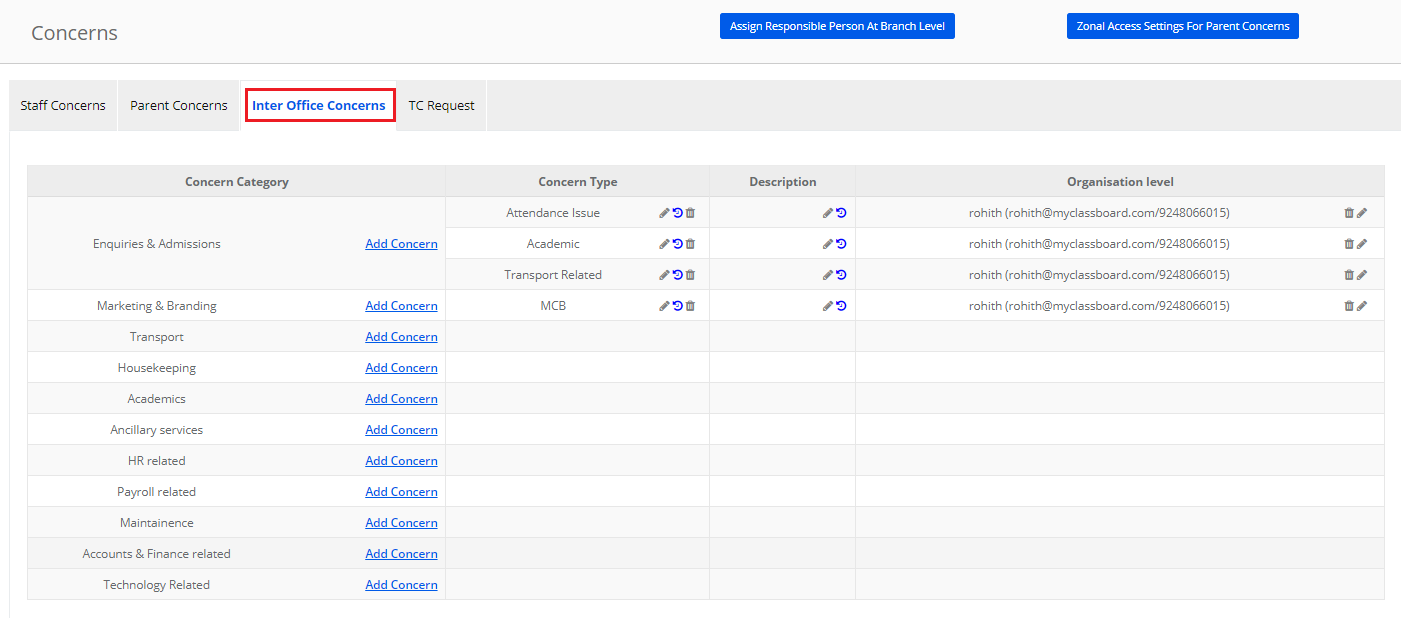
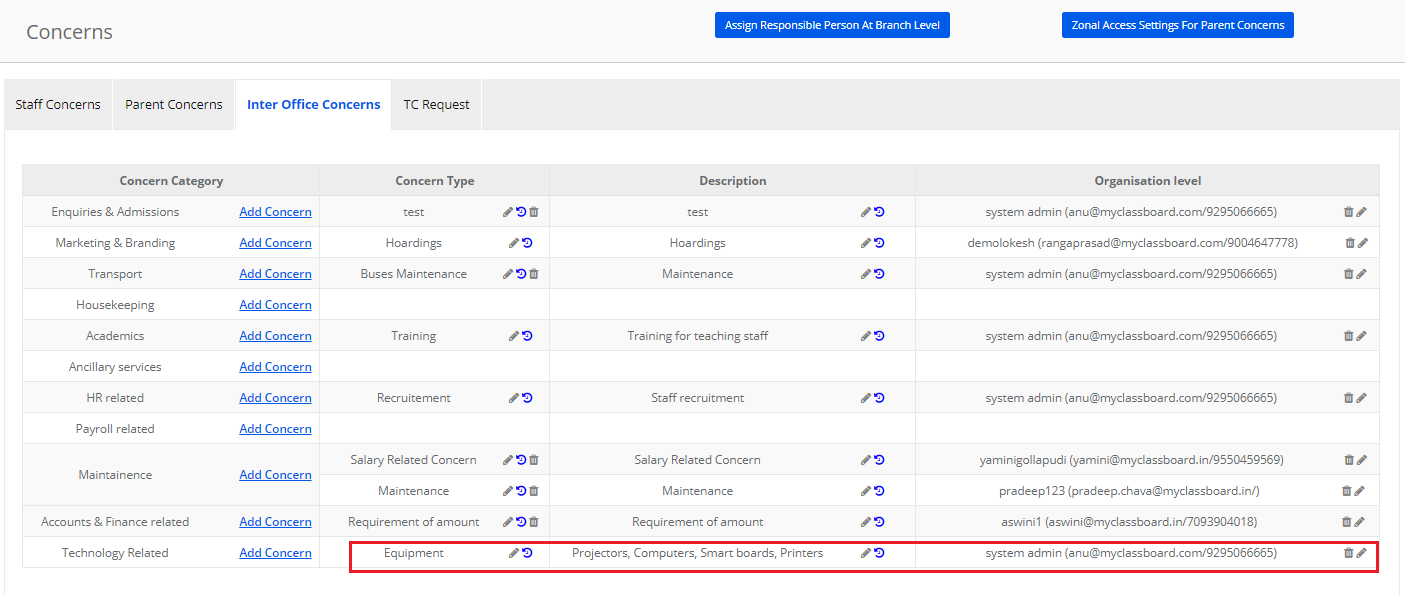
Step 3: Click on Inter office Concerns tab to view or create concern type. As you click on Inter office concerns tab, it will list the existing concern types and the description and user-assigned at the organization level.
Step 4: To create new Concern Type, click on Add Concern option under Concern Category
Step 5:
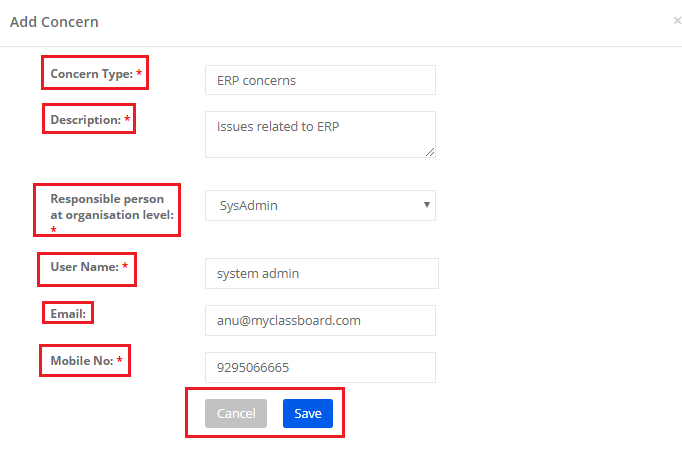
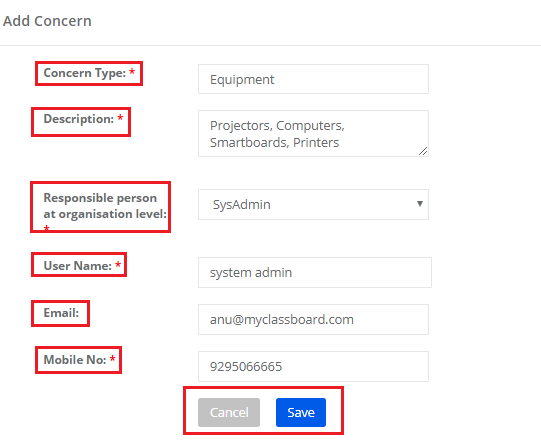
Enter Concern Type, description

Choose a responsible person at the organization level. The user you choose here will receive an email as and when a concern is raised by the staff. For example, if a school’s director wants to be notified when a concern is raised, you add him/her as a responsible person at an organization level. As you enter the user name, the system would show the email and mobile number automatically.

Click on Save to create the concerned type or Cancel to revert.

Please find the concern created along with the existing concern types as shown below.

Assign Branch owners to the Inter office Concerns:

Step 6: Top assign branch owners to the concern types and to define who has to handle at different levels, please click on Assign responsible person at branch level.

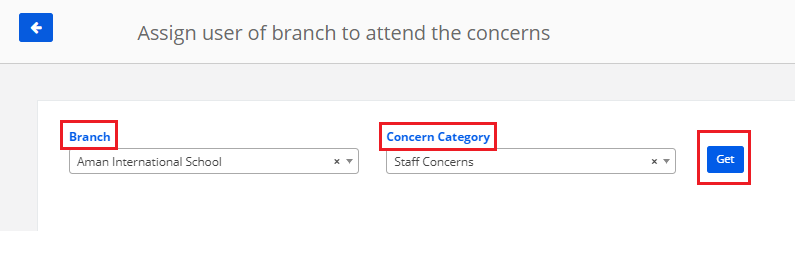
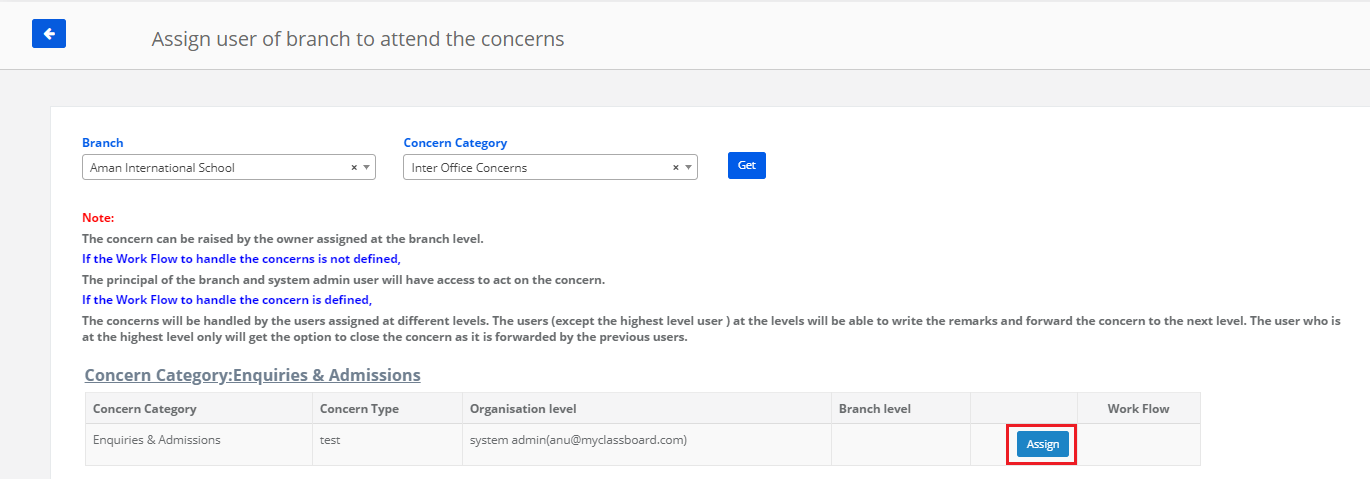
Step 7: Choose Branch and concern type as Inter office concerns and click on Get.

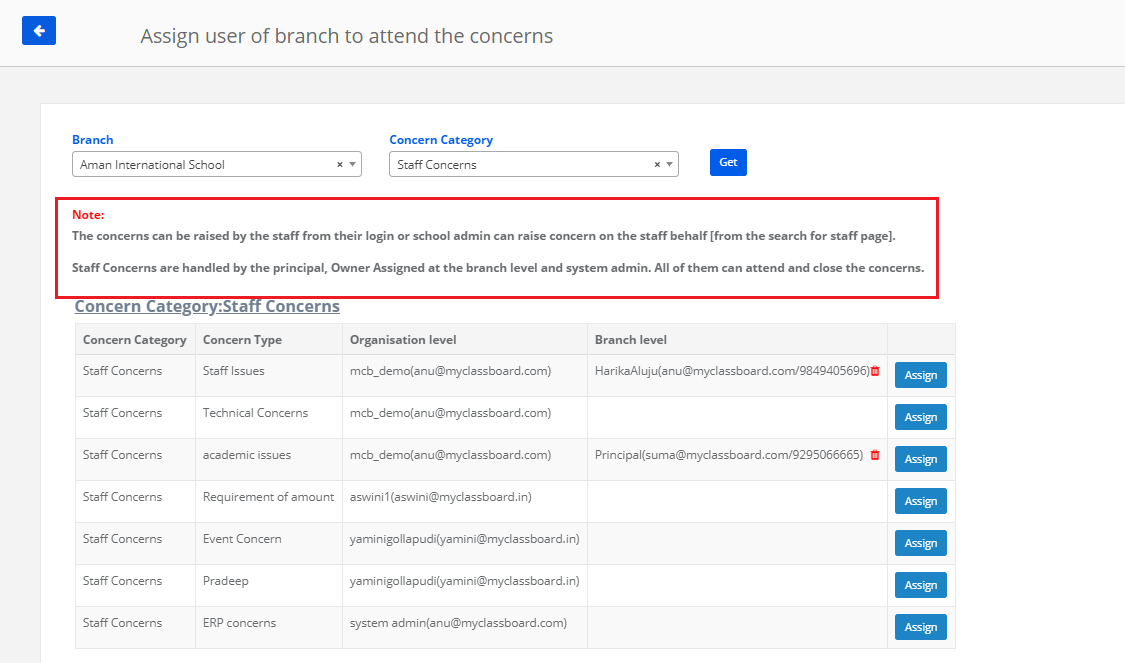
Step 8: Go through the note given for setting up the workflow for each type. Based on your requirement, you may define the workflow against each concern type.
When no workflow is defined, The principal of the branch and system admin user will have access to act on the concern.

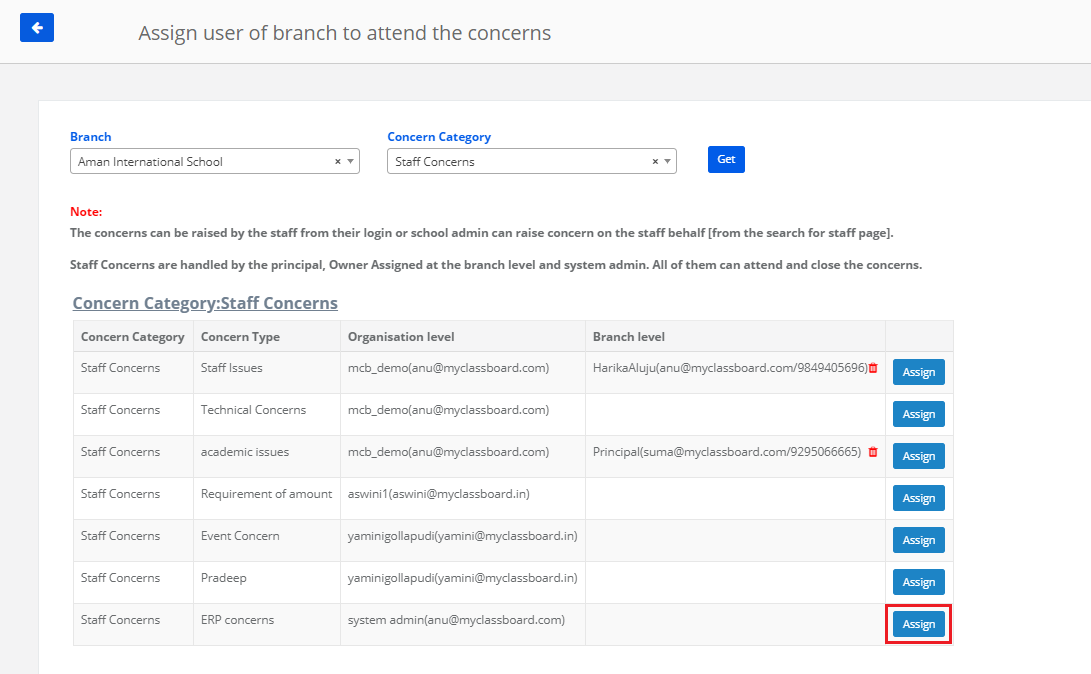
Step 9: To assign a branch owner to raise the specific concern at a branch level, click on the Assign button against the concerned type. Please note that you need to assign a branch owner to each concern types individually.

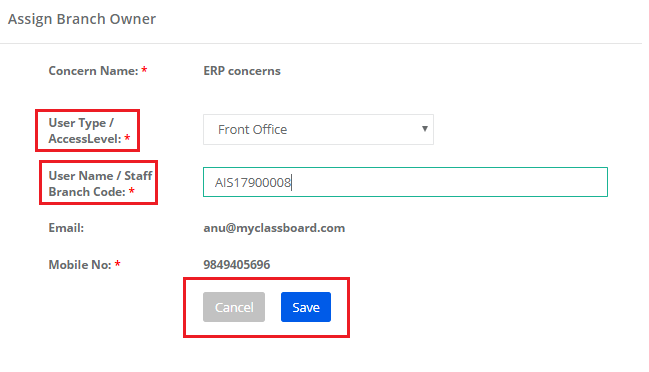
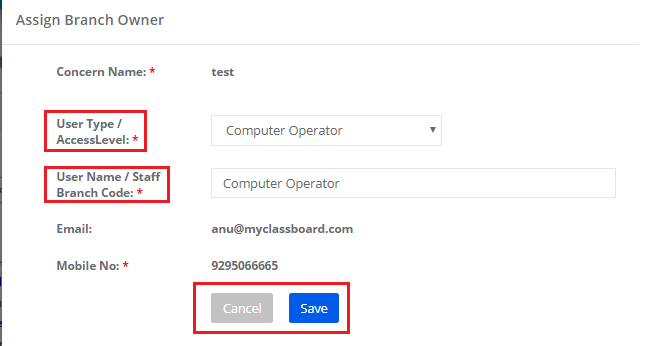
Step 10: You can assign a branch owner through an access level or User type. Choose User type, Access level from the options available in the dropdown.

Enter user name if it is through user type or Branch code if it is through branch access level.

Click on Save button to save the settings or Cancel to revert.

Step 11: To delete the branch owner, click on the delete icon.

Step 12: To define a workflow to handle the concerns, click on +Define workflow to handle the concerns option against the concerned type.
Please note that for each concern type for which there are different people to handle the concerns, workflow needs to be defined.

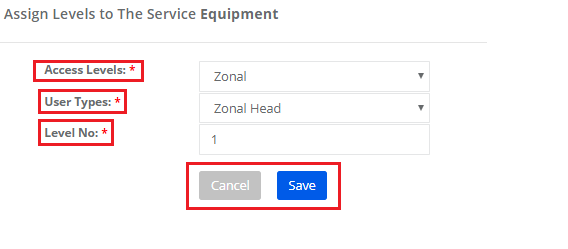
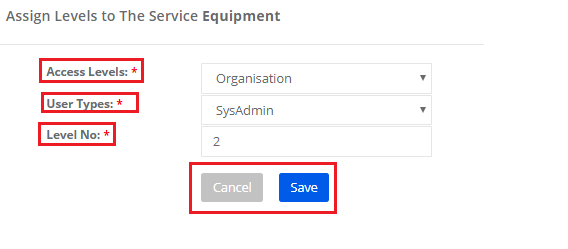
Step 13: Choose access level, user type and enter a level number. Click on save button to define the level or cancel button to revert.

Step 14: To add another level, click on Add level option.

Step 15: Choose access level, user type and enter a level number. Click on save button to define the level or cancel button to revert.

Step 16: To edit the level, click on the edit icon against the level.

Step 17: Make the necessary changes in the level and click on tick mark to save the changes or cross mark to cancel the changes.

Step 18: To delete the user, Click on the delete icon.

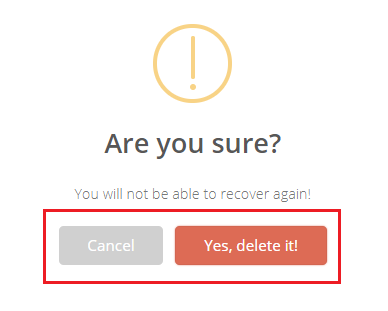
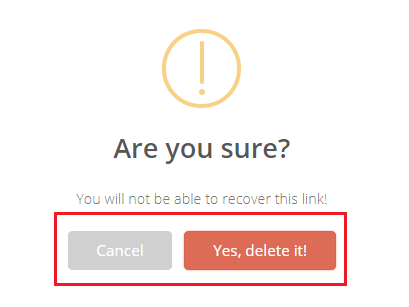
Step 19: Click Yes, delete it! To confirm the deletion and cancel to revert.

How can we raise an Inter office Concern:

The branch owner assigned for a concern type can only raise the concern from his/her login.

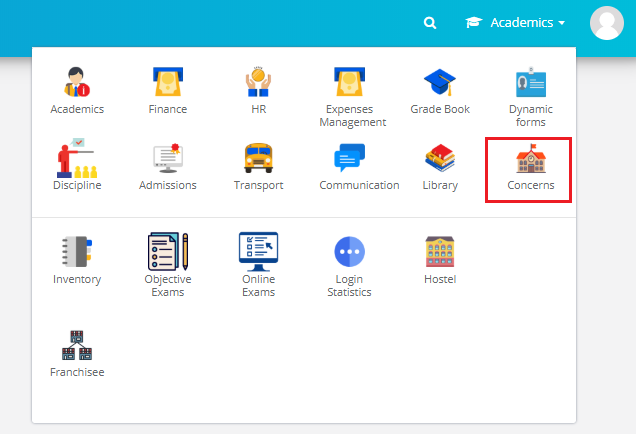
Step 20: Login with branch owner user login credentials, click on concerns module.

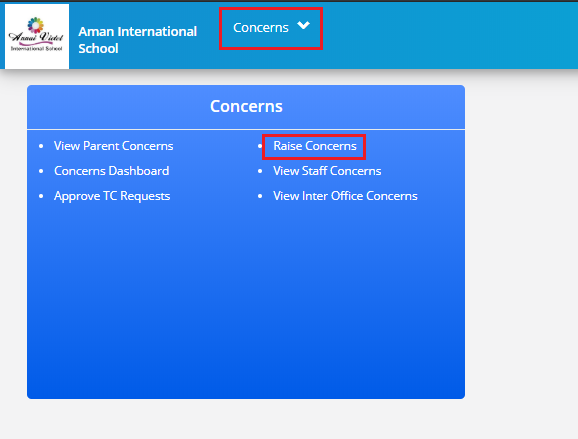
Step 21: Click on Raise concern option on the dashboard or from the concerns menu on the top menu bar.

Step 22: Click on Inter-Office Concerns tab.

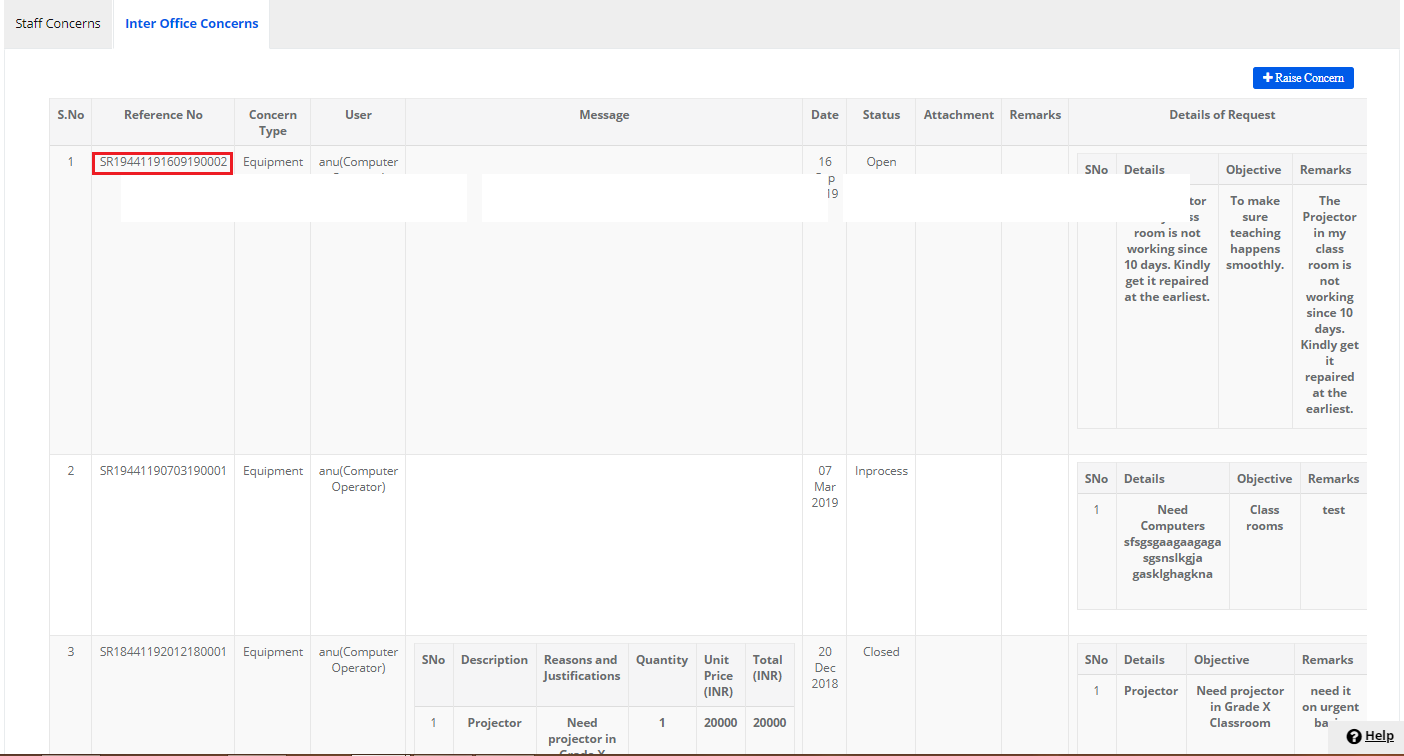
Step 23: It will list the concerns which already raised with the details. To raise a new Concern, Click on +Raise Concern button on the top right corner.

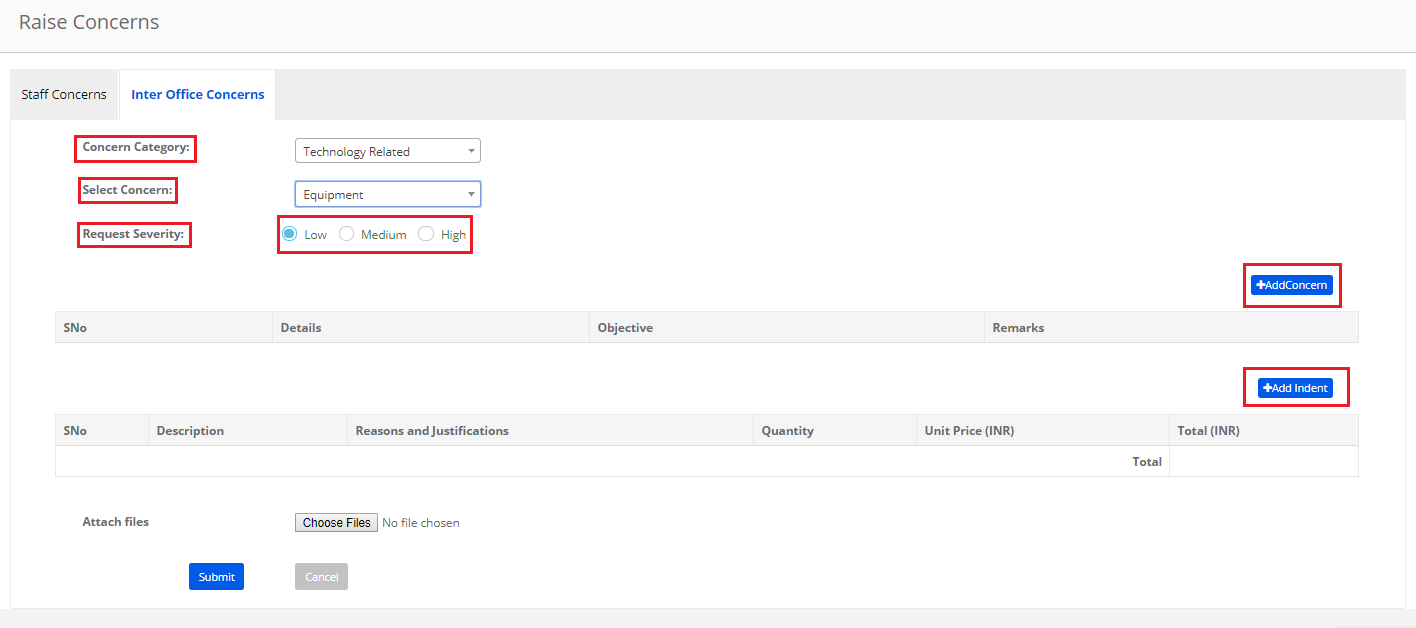
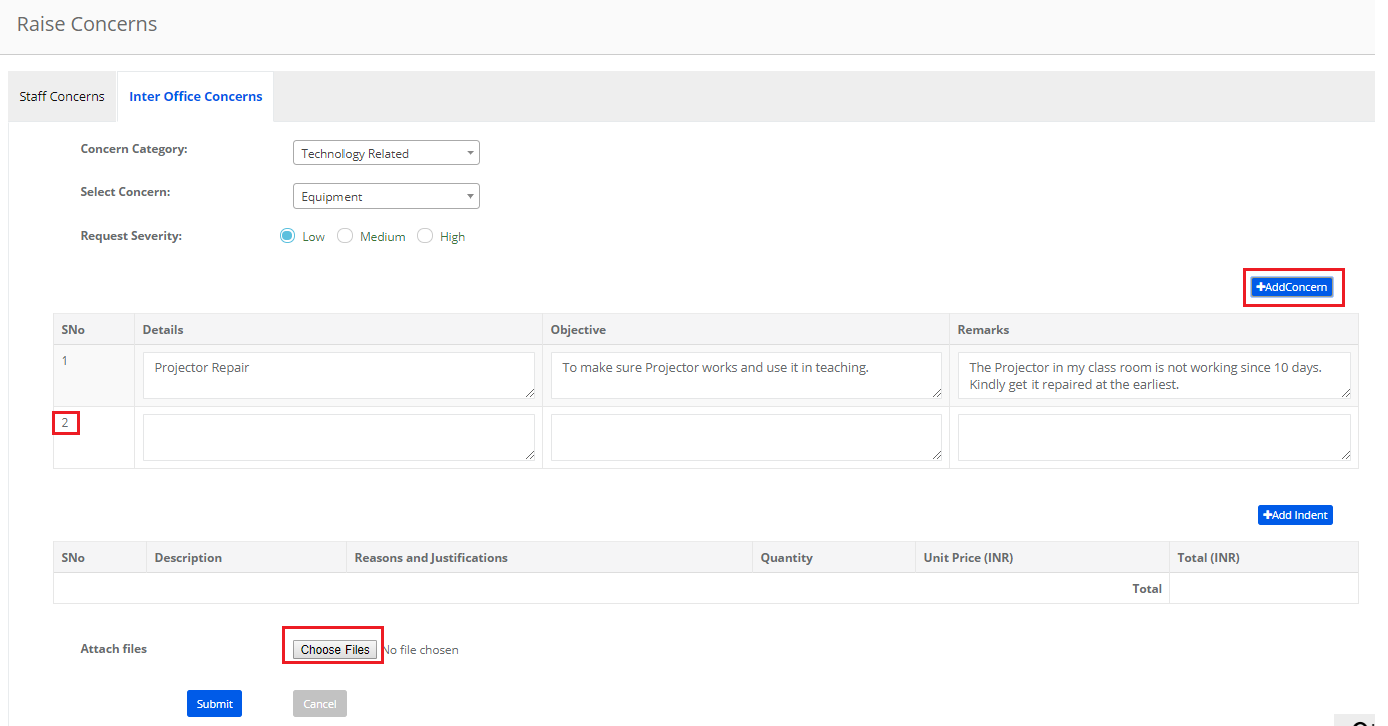
Step 24: Choose Concern Category, Select Concern type, Request Severity as Low or Medium or High based on the severity of the concern which you are raising.

Please note that there is two option as +Add Concern and +Add Indent.

Concern: This option is used for concerns which do not involve finance.

Indent: This option is used when any material, training, etc which involves finance.

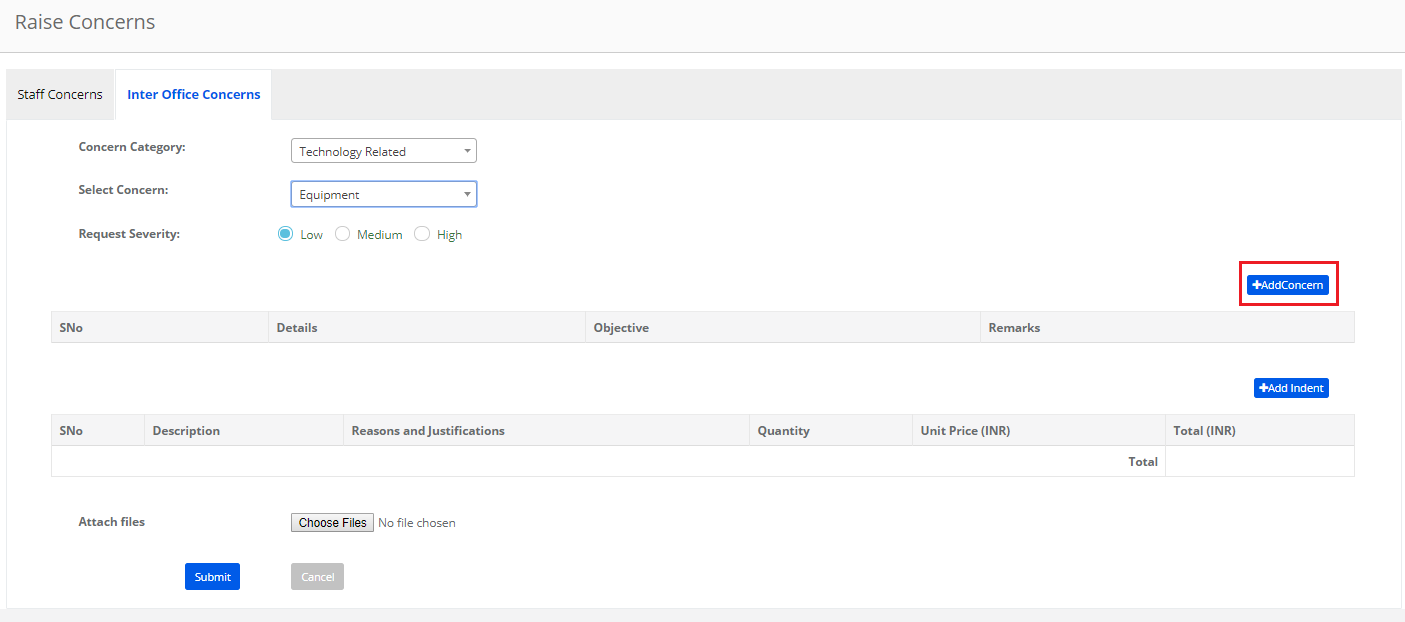
Step 25: To raise a concern, Click on +AddConcern tab.

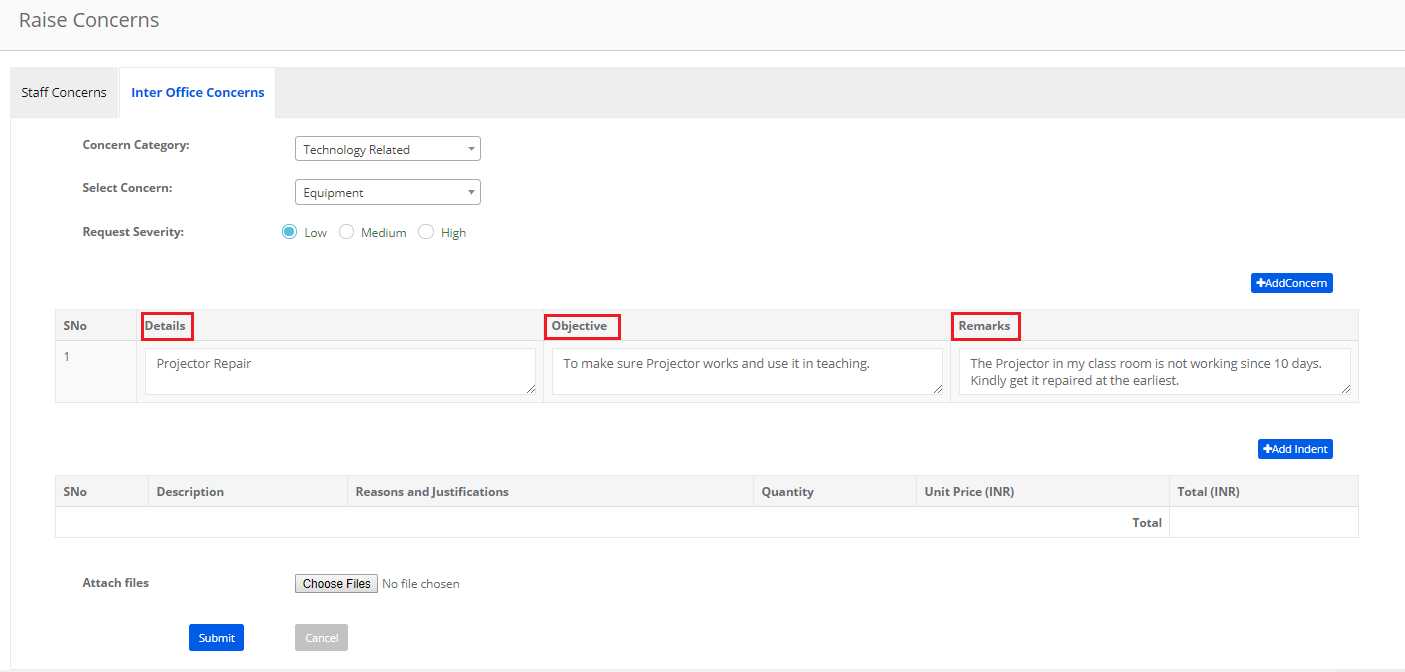
Step 26: Enter Details, Objective and Remarks of the concern.

Step 27: To add more another concern, Click on +AddConcern to get another row added to enter the details.
Enter the details in the second row, attach files if any by clicking on Choose option and selecting the file from your computer.

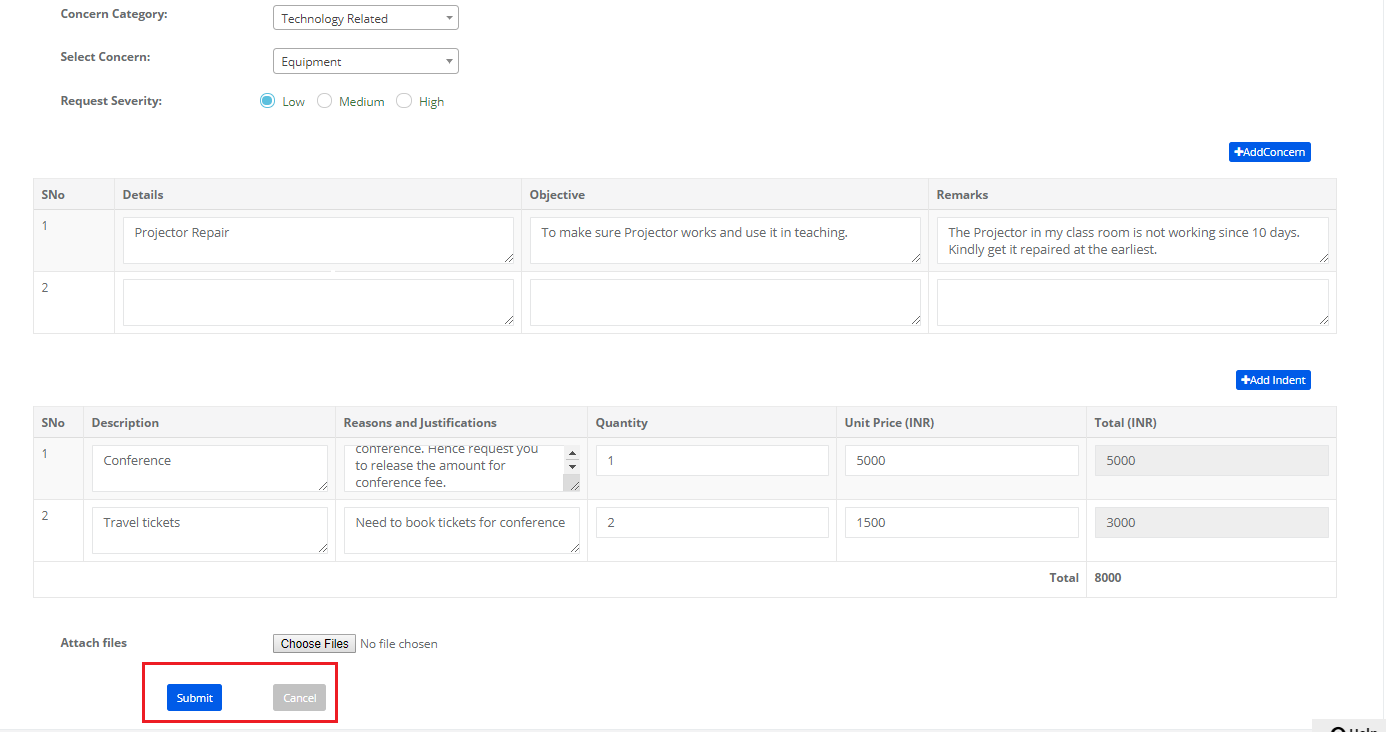
Step 28: To add an indent in the same concern, Click on +Add Indent option.

Step 29: To add another indent, click on +AddIndent option again.

Step 30: Verify the details entered and click on the Submit button to submit the concern or Cancel to revert.

Step 31: As you submit the concern, it generated a unique reference number.

How to attend an Inter office Concern:

Inter office concerns can be attended by people who are assigned at different levels to handle the concerns.

Step 32: Login and click on Concerns module.

Step 33: Click on View inter Office Concern option on the dashboard or from the Concerns menu on the top menu bar.

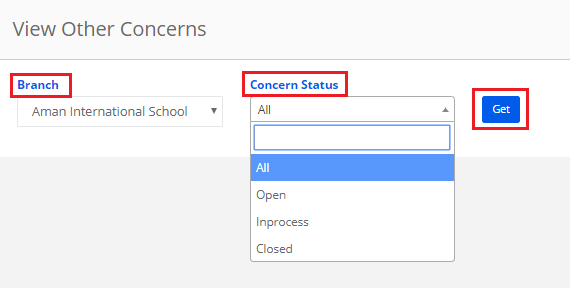
Step 34: All branches or a specific branch, All concerns or concerns with a specific status and click on Get button to view the list of concerns.

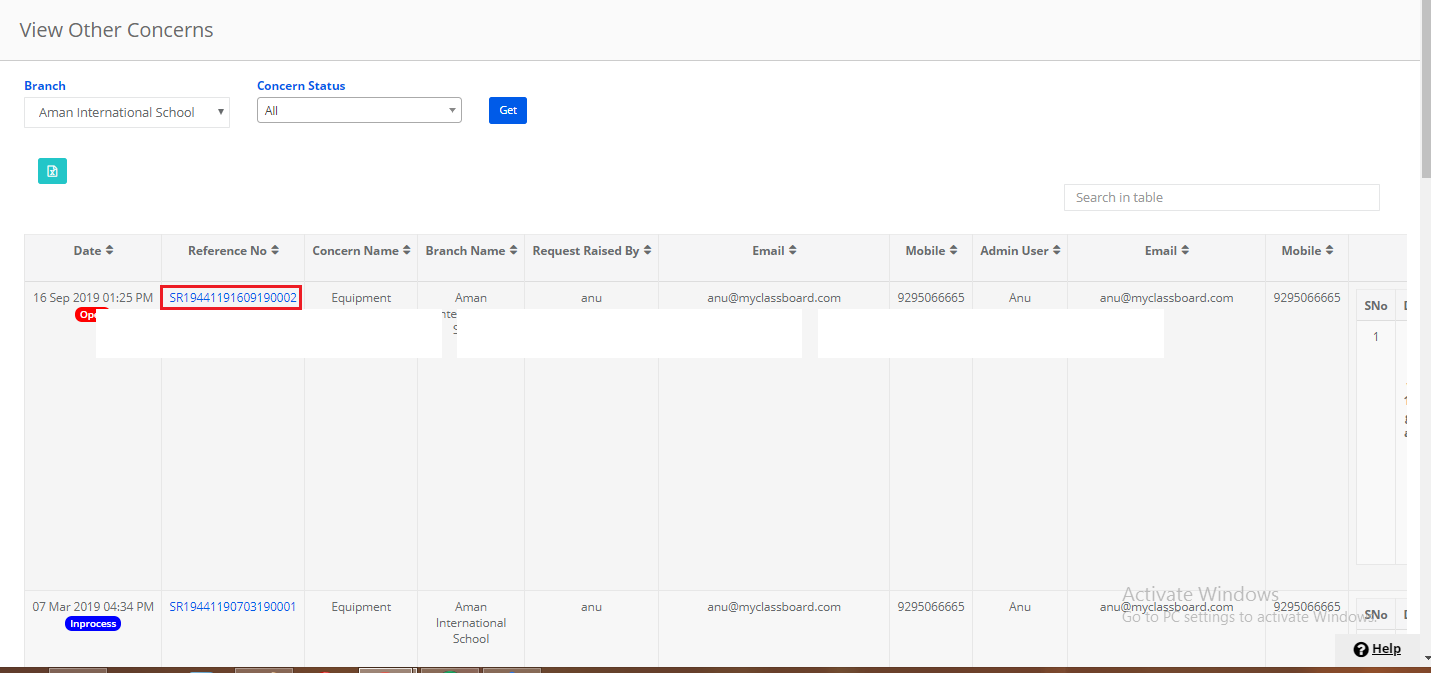
Step 35: It will list the concerns based on the selection. Pls note the status, in-process and closed for all the concerns. A link to open the concern and take action will be enabled at the reference number.

Step 36: To act on the concern, Click on the reference number.

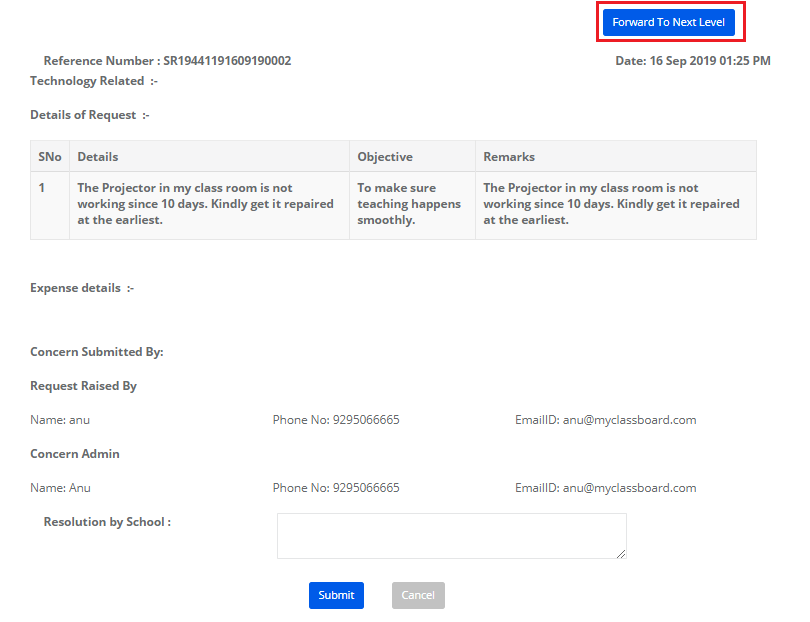
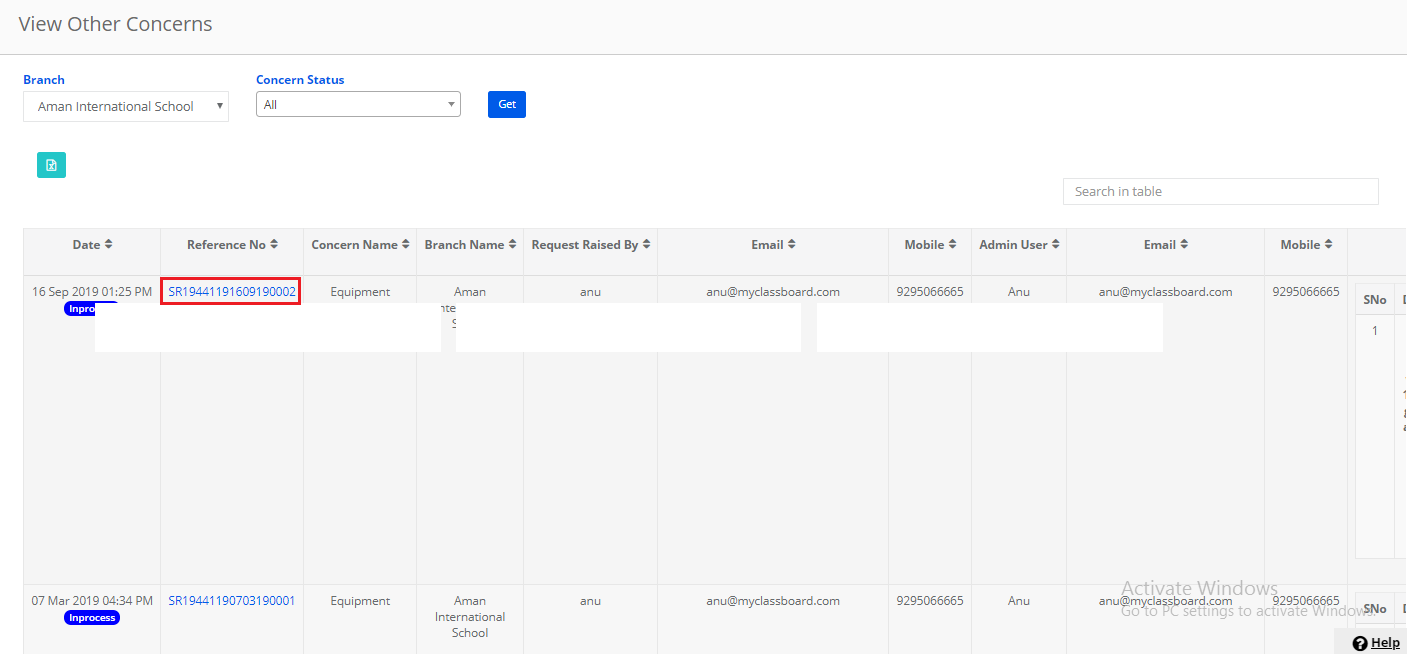
Step 37: Enter the resolution and click o Submit button or Cancel to revert. When you submit the concern the concern status will change as In process. Please note that the person at a lower level cannot close the concern. He/she can provide a resolution if it is in process or forward it to the next level.

Step 38: If you would like the concern to forward it to the next level, click on the Reference number.

Step 39: Click on Forward To Next Level button on the top right corner.

How to handle the concern at the final level:

Step 40: Login and click on Concerns module. Click on View Inter Office Concerns link on the dashboard or from the Concerns menu. Click on the Reference Number to act on the concern.

Step 41: Since it is the final level login, there will be a status option to choose and there will not be a button for you to forwarding it to the next level.

Choose the Status, Enter Resolution and Click on Submit button to update the status or Cancel button to revert.

TC Request Help Manual

TC Requests

School can create different reasons and sub reasons for submitting the TC requests.

TC Request is handled by the following people at school:

Step 1: Parent can raise the TC Request from parent login by choosing the option as leaving school or branch transfer.

Step 2: Class Coordinator can attempt to counsel the parent to withdraw the TC request and close it if the parent is convinced. If the parent is not convinced, the coordinator has to forward the request to the principal of the branch.

Step 3: Principal can further counsel the parent to withdraw the request and close the concern if the parent is convinced. If the parent is not convinced, the principal has to approve the TC request.

Step 4: upon the principal’s approval, the Accountant has to generate the TC if there is no Fee due.

Creating reasons for TC request?

Reasons and sub reasons for TC requests can be created only in system admin login.

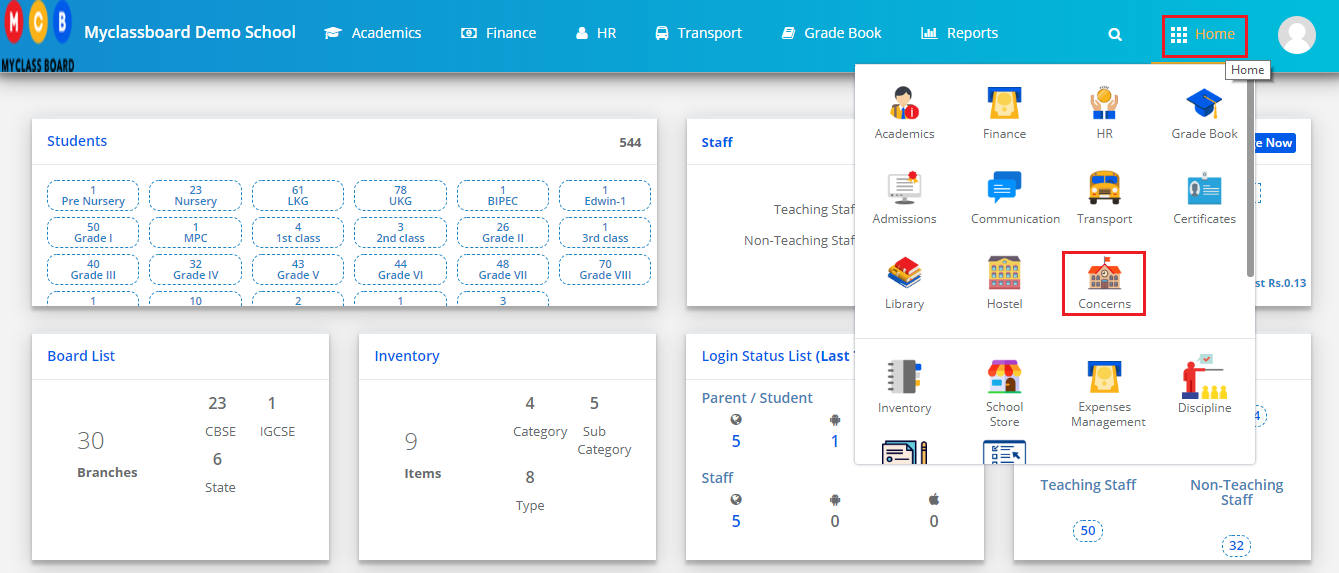
Step 1: Please login to MCB with system admin login credentials. Visit Concerns module by clicking on the Home link on the top right corner.

Step 2: Click on Create Concern Type option under Concerns module or on the dashboard.

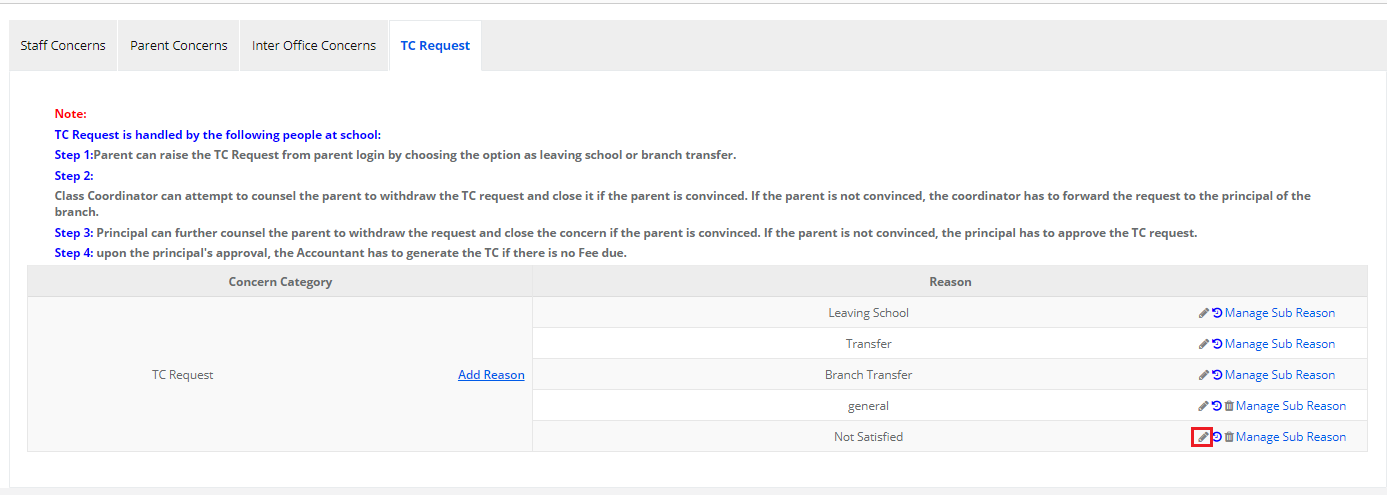
Step 3: Click on the TC Requests tab to view or create new reasons. As you click on the TC Requests tab, it will list the existing reasons and sub reasons available. To add a new reason, click on Add Reason.

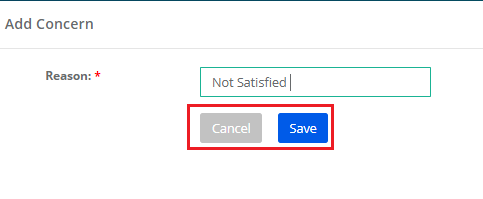
Step 4: Enter the reason and click on the Save button or Cancel to revert.

Step 5: To add Edit a reason, click on the Edit icon.

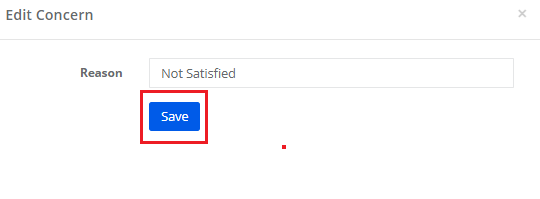
Step 6: Make the changes required, click on Save.

Step 7: To delete the reason, click on the delete icon.

Step 8: Click on Yes, Delete it! Option to confirm the deletion or Cancel option to revert.

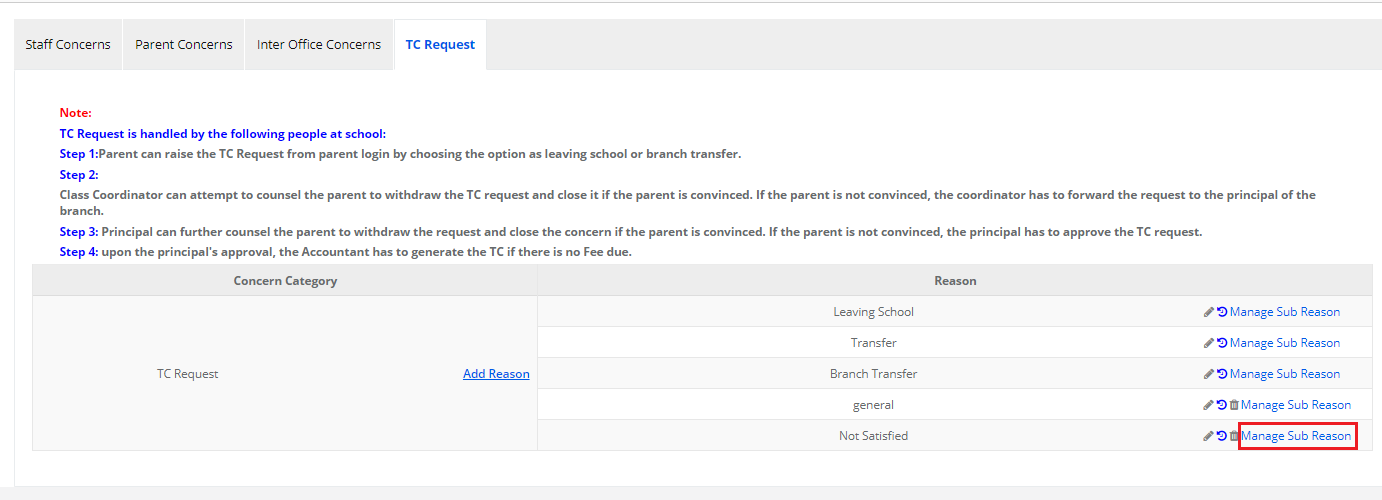
Step 9: To add sub reasons for a reason, Click on manage sub reasons option.

Step 10: Click on Add button to start creating the sub reason.

Step 11: Add the Sub reason, click on Tick mark to save the sub reason or cross mark to cancel.

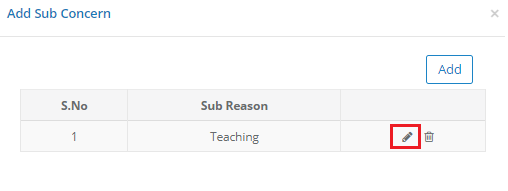
Step 12: To edit the sub reason, Click on Edit icon.

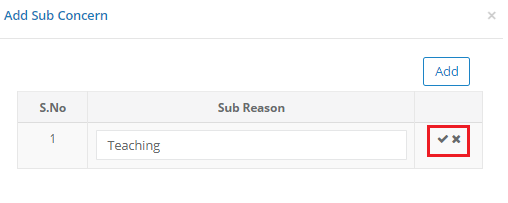
Step 13: Make the changes required and click on Tick mark to save or cross mark to cancel.

Step 14: To delete the sub reason, click on the delete icon.

Step 15: Click Yes to confirm the deletion, No to revert.

How can a parent submit TC request?

The TC Request is available only in the web version at present.

To submit the TC request, please follow the below steps

Step 16: Login to MCB With parent login credentials, Click on TC request

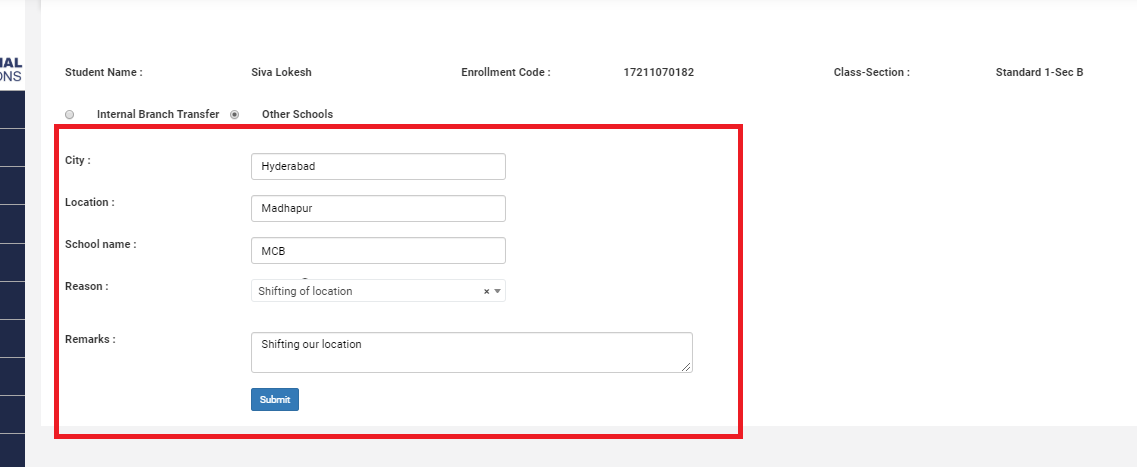
Step 17: Select the type as internal branch transfer or other schools

Step 18: Fill the details with relevant details and click on Submit. Please wait till the pop-up show on the screen as SUBMITTED SUCCESSFULLY.

TC Request approval by Coordinator:

Step 19: Login to MCB with coordinator login credentials.
Click on Concerns on the menu bar and click on Approve TC Requests

Step 20: Select the dates range and click on Get.
Click on Pending tab to view and approve the TC request sent by the parents
Click on Reference code to write the remarks and to update the status

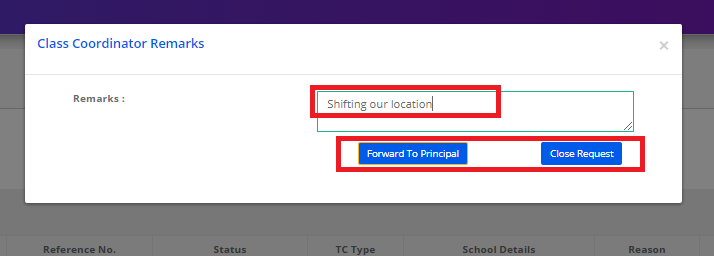
Step 21: Write the remarks and click on Forward To Principal if the parent wants to take TC or click on Close request if the parent wants to withdraw the TC application.

Note: If you click on forward to the principal, the request will be sent to the principal and a mail will be triggered to the principal with the remarks of class coordinator.

TC Request approval by Principal:

Step 22: Login to MCB with principal login credentials and Click on Concerns and click on Approve TC requests.

Step 23: Select the dates range and click on Get

Click on Pending to view and approve the TC request sent by the parents

Click on Reference code to write the remarks and to update the status

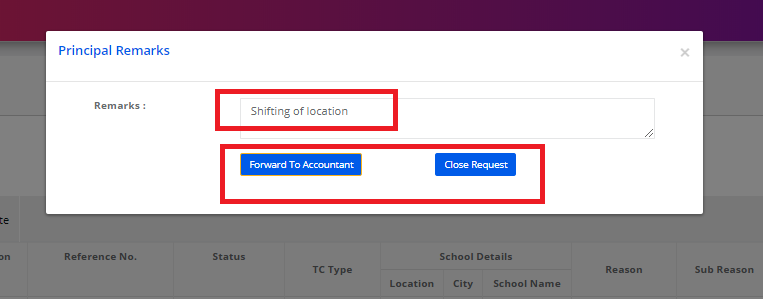
Step 24: Write the remarks and click on Forward To Accountant for checking the dues and for providing TC if a parent wants to take TC or click on Close Request if the parent wants to withdraw the TC application

Step 25: For tracking the status of all TCs, click on In progress/Complete option.

TC Request approval and generation by Accountant:

Step 26: Login to MCB with accountant login credentials. Click on Concerns and click on Approve TC request

Step 27: Select the dates range and click on Get

Click on Pending to view and approve the TC request sent by the parents

If due exist for the student then accountant will not get the option to issue TC

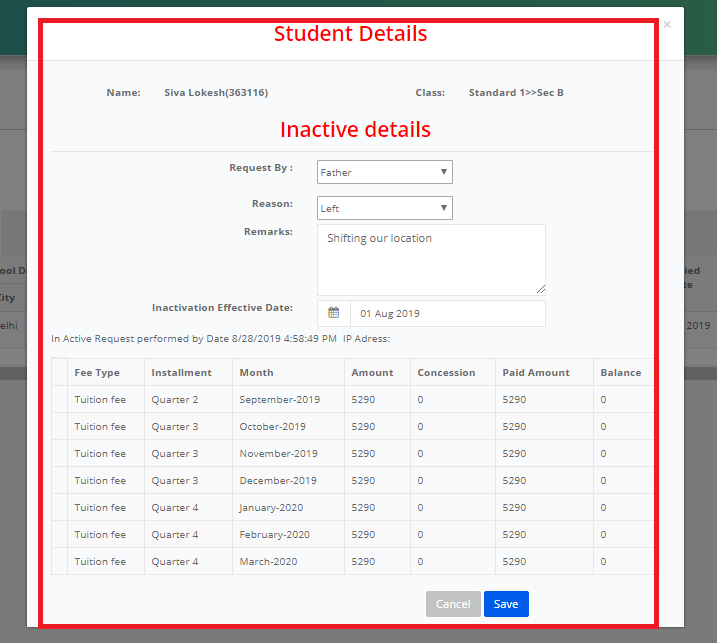
Step 28: After clearing the dues accountant can proceed to issue TC

Step 29: Fill all the details and click on submit

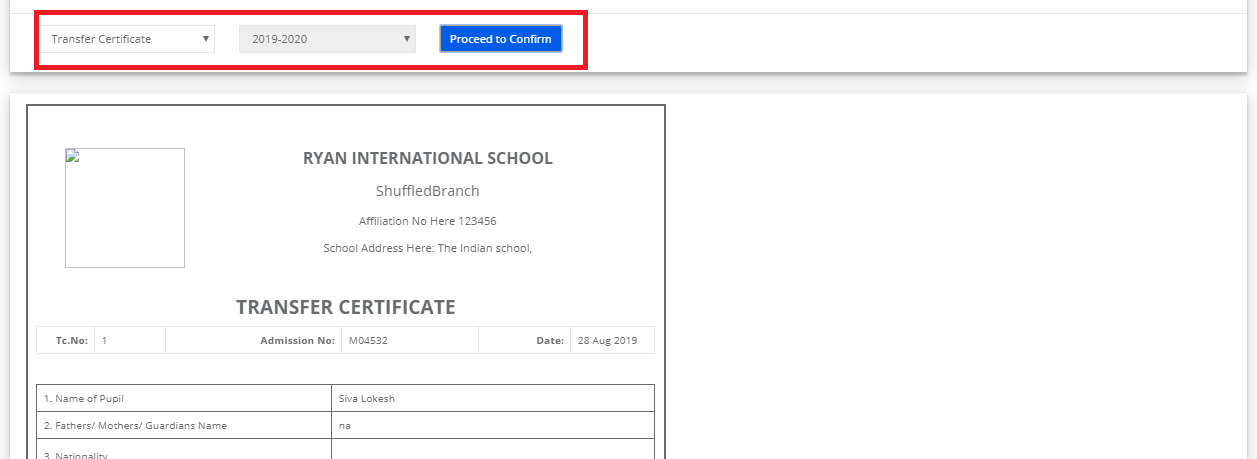
Step 30: Select the TC format and click on proceed to confirm

Step 31: Click on Submit after filling all the details in TC

Staff Concerns User Manual

Using the MCB Concerns module, School can handle Parent concerns, Staff Concerns, and Inter-Office Concerns.

Staff Concerns:

School can create different concern types as per the requirement. Staff can submit the concern by choosing the concerned type. The concern submitted by the staff can be handled by the following roles from the web and mobile app.

Roles who can act on the concerns:

Branch Owner – Any user assigned at a branch level or Principal can act on the concerns.

Email Communication:

Email communication is enabled as when the concern is raised and attended by the concern people till is closed/resolved.

Raise a concern – Staff who raised the concern receives an email with the concern details. Branch owner and principal will also receive an email with the concern details.

Action on Concern – Staff who raised the concern receives an email with the concern details along with the resolution provided by the person who acted on the concern.

Create Staff Concerns:

Concern Types can be created only in system admin login. Please follow the steps mentioned below to complete the setup.

Step 1: Please login to MCB with system admin login credentials. Visit Concerns module by clicking on the Home link on the top right corner.

Step 2: Click on Create Concern Type option under Concerns module or on the dashboard.

Step 3: Click on Staff Concerns tab to view or create concern type. As you click on staff concerns tab, it will list the existing concern types along with the description and user-assigned at the organization level.

Step 4: To create new Concern Type, click on Add Concern option under Concern Category

Step 5: Enter Concern Type, description

Choose a responsible person at the organization level. The user you choose here will receive an email as and when a concern is raised by the staff. For example, if a school’s director wants to be notified when a concern is raised, you can add him/her as a responsible person at an organization level. As you enter the user name, the system would show the email and mobile number automatically.

Click on Save to create the concerned type or Cancel to revert.

Please find the concern created along with the existing concern types as shown below.

Assign Branch owners to the Staff Concerns:

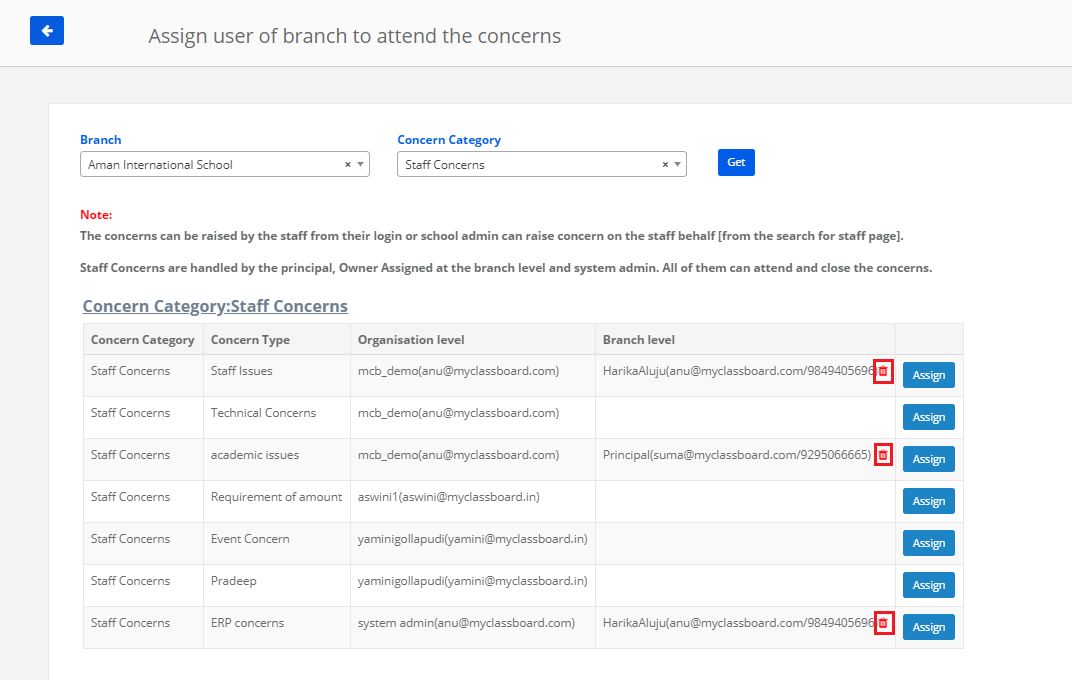
Step 6: Top assign branch owners to the concern types to define who has to handle the concerns, please click on Assign responsible person at branch level.

Step 7: Choose Branch and concern type as Staff concerns and click on Get.

Step 8: Go through the workflow defined for handling the concerns.

Step 9: To assign a branch owner to handle the specific concern at a branch level, click on the Assign button against the concerned type. Please note that you need to assign a branch owner to each concern types individually. Click on Assign button against the concern.

Step 10: You can assign a branch owner through an access level or User type. Choose User type, Access level from the options available in the drop-down.

Enter user name if it is through user type or Branch code if it is through branch access level.

Click on Save button to save the settings or Cancel to revert.

Step 11: To delete the branch owner, click on the delete icon.

How can a Staff raise concern from their login:

Step 12: Login with staff access level, Click on Concerns module.

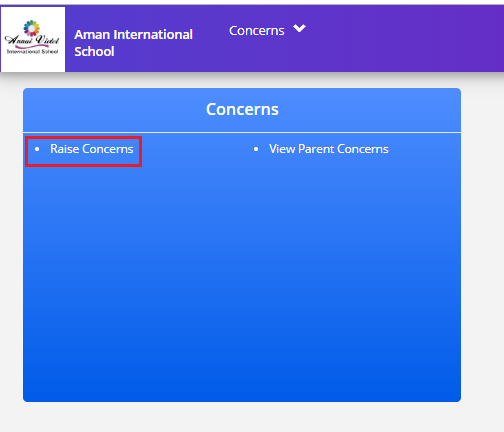
Step 13: Click on Raise concern option on the dashboard or from the concerns menu.

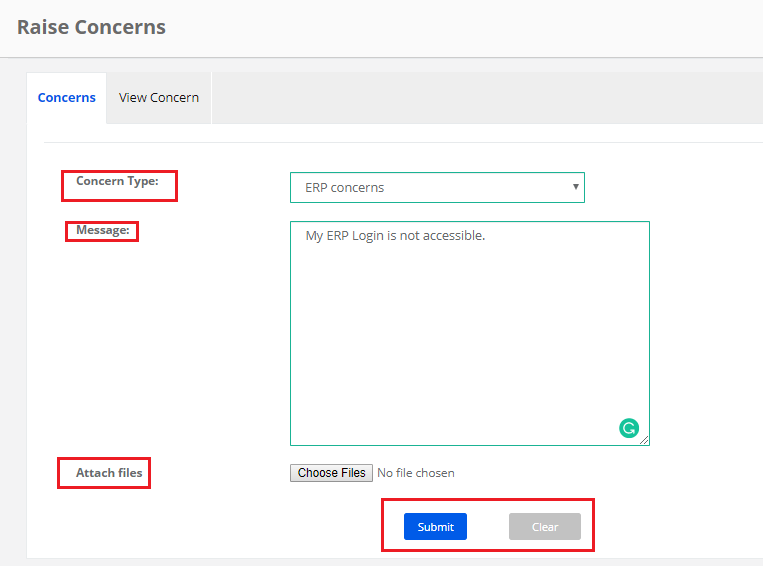
Step 14: Choose the concerned type, enter the concern details, attach files if any and click on Submit button to submit the concern or click on the clear button to cancel the submission.

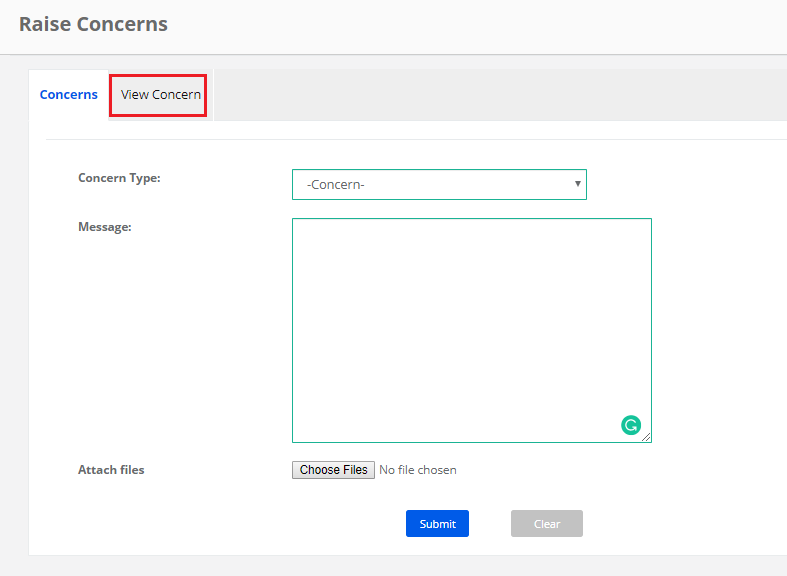
Step 15: To view the submitted concerns and their status, click on view concerns tab.

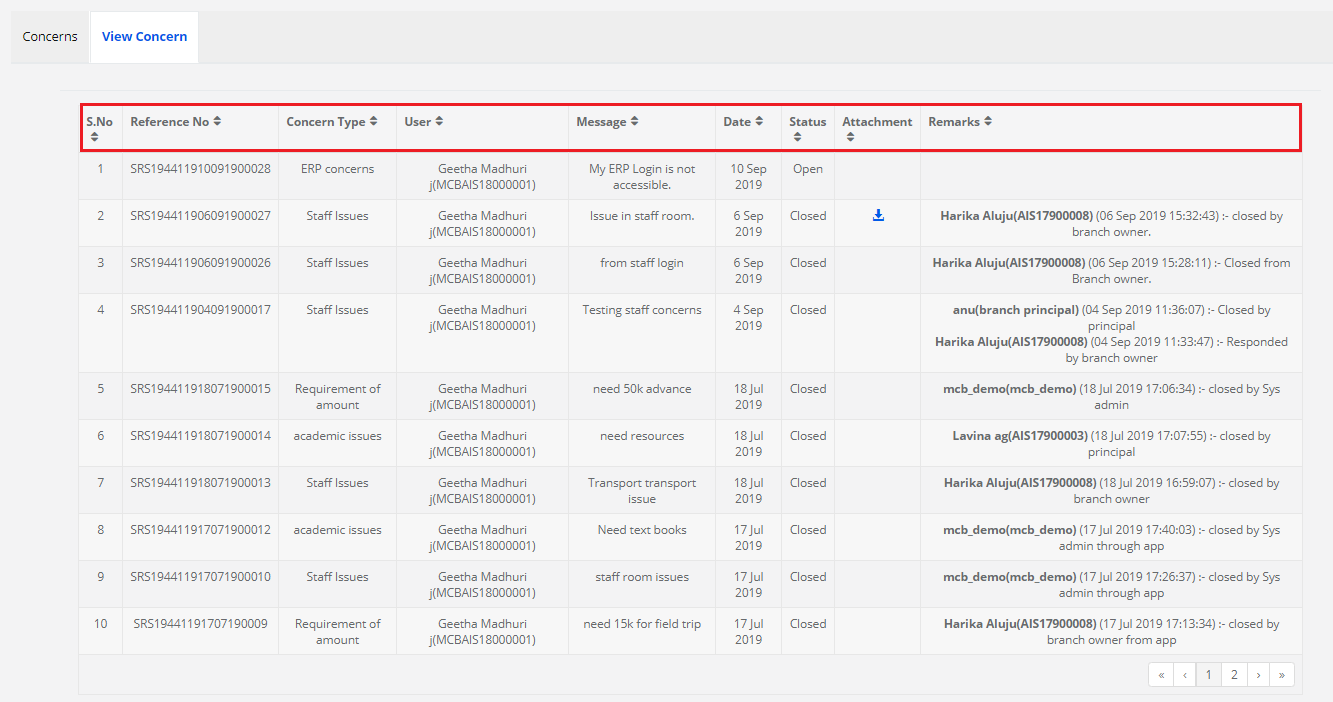
Step 16: You may note the concern details as shown below along with the response you have received, date and time of response from the concerned person.

How can a principal / assigned branch owner can attend a concern from their login:

Step 17: Login with principal or branch owner login credentials. Click on Concerns module.

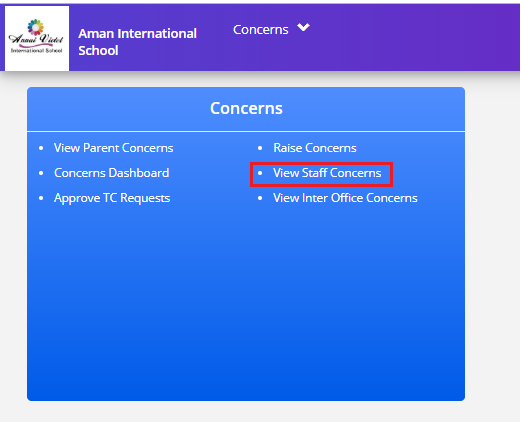
Step 18: Click on View Staff Concerns link to get the list of concerns submitted by the staff.

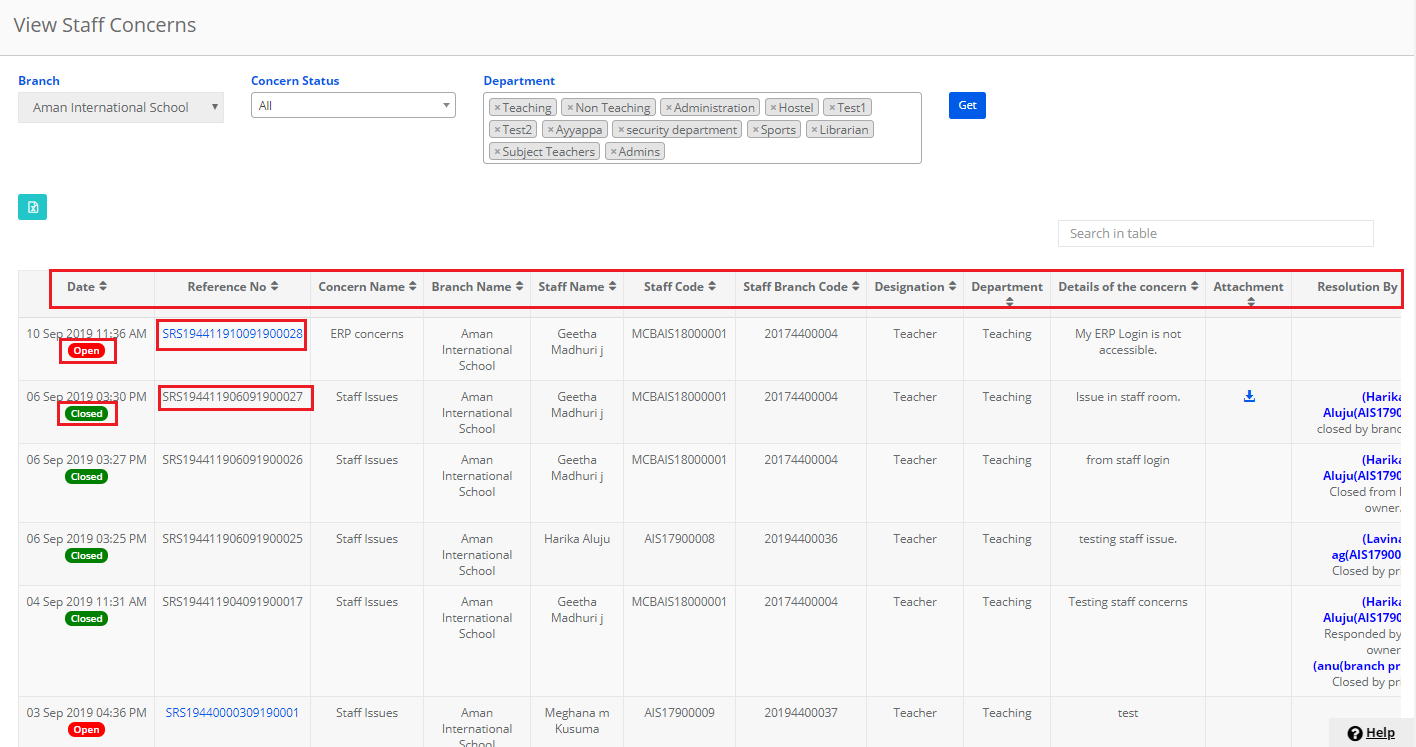
Step 19: Choose the concern status as ALL or a specific status, department as all or a specific department and click on Get button.

Step 20: You may note the concern details as displayed. Open concerns status is displayed in red, closed in green and in process in blue.
You can also export the details to excel by clicking on the Excel icon on the top left corner of the report.

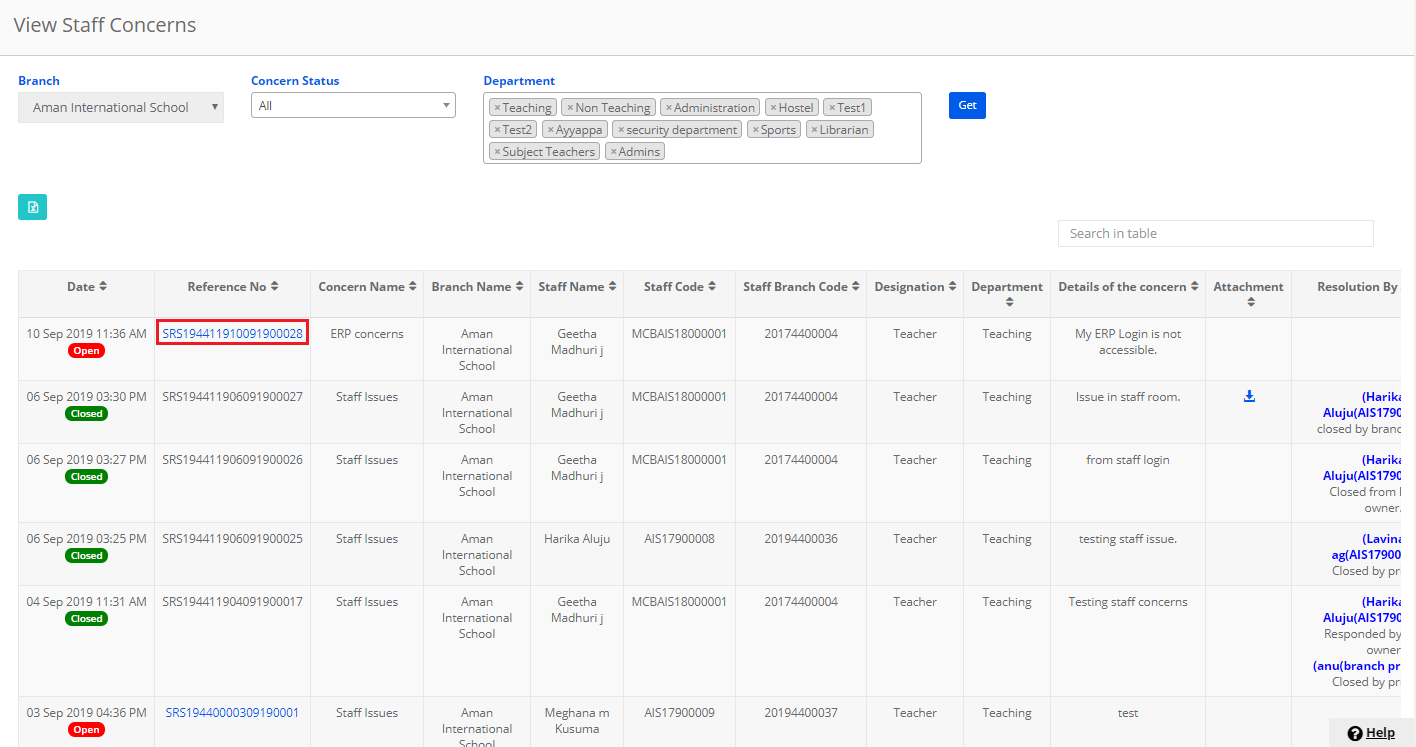
Step 21: To act on the open concerns, click on the concern’s reference number. Please note that you can act on the concerns which are of open and in-process status.

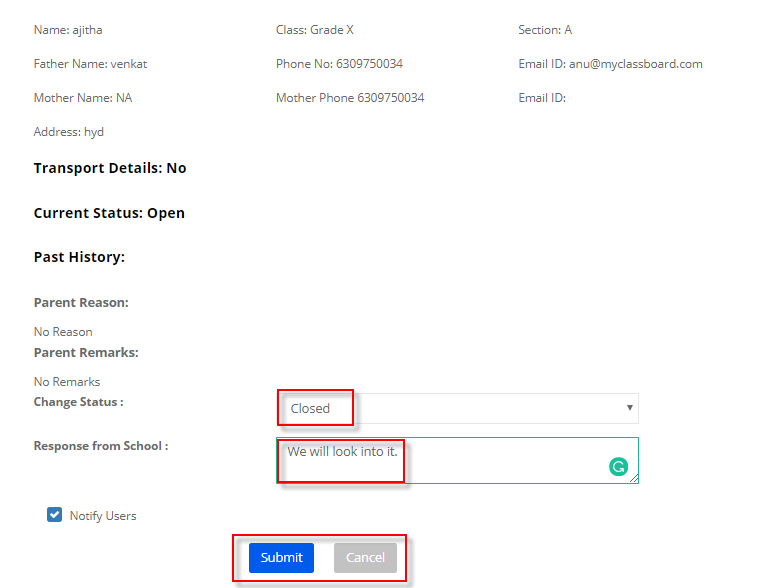
Step 22: Go through the details of the concern, choose the status, enter the response and click on Submit button to save or Cancel button to revert. Please note that, once you close the concern, it cannot be opened.

Parent Concerns User Manual

Using the MCB Concerns module, School can handle Parent concerns, Staff Concerns, and Inter-Office Concerns.

Parent Concerns:

School can create different concern types in Academics, Non- Academics, Transport and General categories. The parent can submit the concern by choosing the category and concern type. The concern submitted by the parent can be handled by the following roles based on the concerned type defined.

Roles who can act on the concerns:

1. Class teacher
2. Branch Owner – Any user assigned at a branch level
3. Principal
4. Zonal access users or Zonal Head

You can define type as 1 or 2 or 3 for each concern type. The handling of concern by the school people happens as follows based on the type defined for each concern type.

Type 1: Concerns are handled by the following roles in different level

Level 1: By Class teacher and Owner assigned at the branch
Level 2: By Principal when the concern is escalated by the parent
Level 3: By Zonal access users / Head when the concern is further escalated by the parent

Type 2: Concerns are handled by the following roles in different level

Level 1: By Owner assigned at the branch. The class teacher can only view concerns.
Level 2: By Principal when the concern is escalated by the parent
Level 3: By Zonal access users /Zonal Head when the concern is further escalated by the parent

Type 3: Concerns are handled by the following roles in different level

Level 1: Concerns are handled by the Owner assigned at branch and Principal. The class teacher can only view Concerns.
Level 2: By Principal when the concern is escalated by the parent
Level 3: By Zonal access users /Zonal Head when the concern is further escalated by the parent

Note: Over and above, system admin has the right to open the closed concerns. Then the concern will be open for everybody right from level 1.

Zonal Access settings:

At level 3, School can define the concerned type to be handled by zonal access users.
The Zonal Access Settings help you choose the person to handle the specific concern types when escalated by the parent.
The users created under zonal access are listed. Choose the user name and assign the concerned type.

Ex: The following are zonal access users and concern types available in an organization.

Zonal access users :

1. Finance Zonal
2. Academic Zonal
3. Admin Zonal

The Concern types:

1. Fee Concern
2. Academic Concern
3. Transport Concern
4. Facilities Concern
5. Communication Concern

If you would like the Academic concerns to be directed to Academic Zonal, Finance concern to be directed to Finance Zonal and all other concerns to Admin Zonal, Assign the concerns as follows.

Academic concern to Academic zonal
Finance concern to Finance zonal
Transport Concern to Admin zonal
Facilities Concern to Admin zonal
Communication Concern to Admin zonal

Note:
When there are no settings made, all concerns types are directed to Zonal Head User by default. No other users types which are created under zonal access will have the option to view/act on concerns. Parent concern set up can be made only from a system admin login.

Email Communication:

Email communication is enabled as when it is being raised and attended by different people it till is closed/resolved.
Raise a concern – Class teacher and owner at branch level receive an email with the concern details.
First escalation – Principal receives an email with the concern details along with the resolution provided by level-1.
Second escalation – Zonal access users assigned to the concerned type/ Zonal head receives an email with the concern details along with the resolution provided by level-1 and level-2.
Parent: The parent will receive an email as and when there is a change in the status of the concern at any level.

Create Parent Concerns:

Concern Types and Subcategories can be created only in system admin login.

Step 1: Please login to MCB with system admin login credentials. Visit Concerns module by clicking on the Home link on the top right corner.

Step 2: Click on Create Concern Type option under Concerns module or on the dashboard.

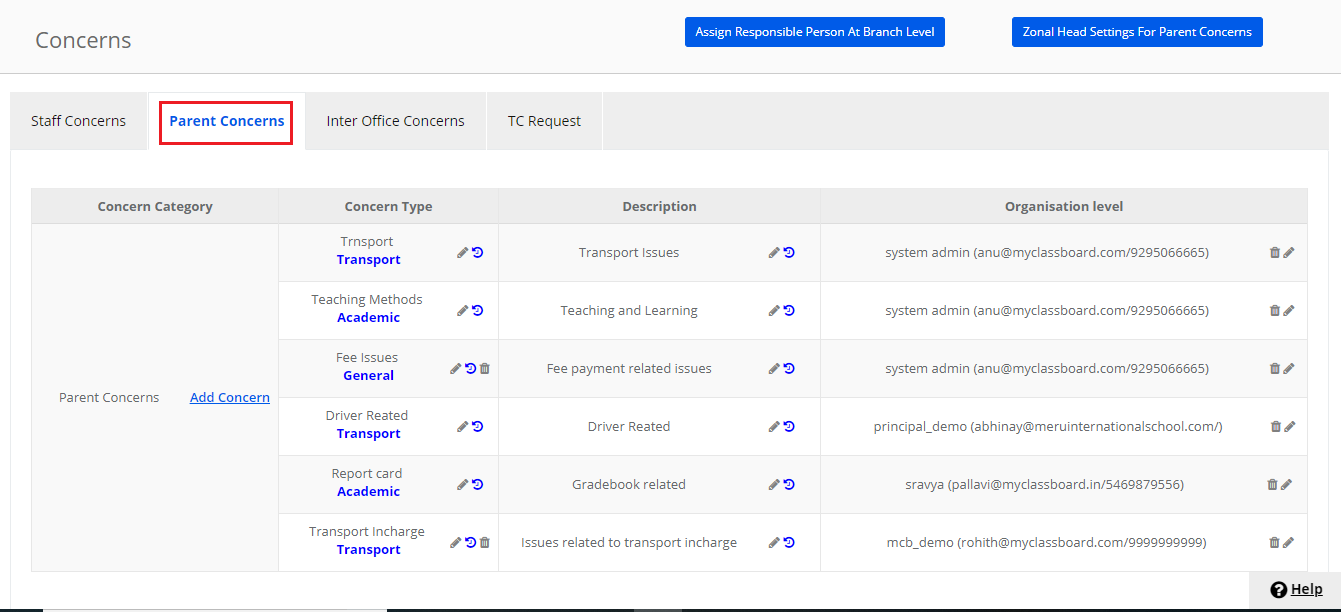
Step 3: Click on Parent Concerns tab to view or create concern type. As you click on Parent concerns tab, it will list the existing concern types and concern categories along with the description and user-assigned at the organization level.

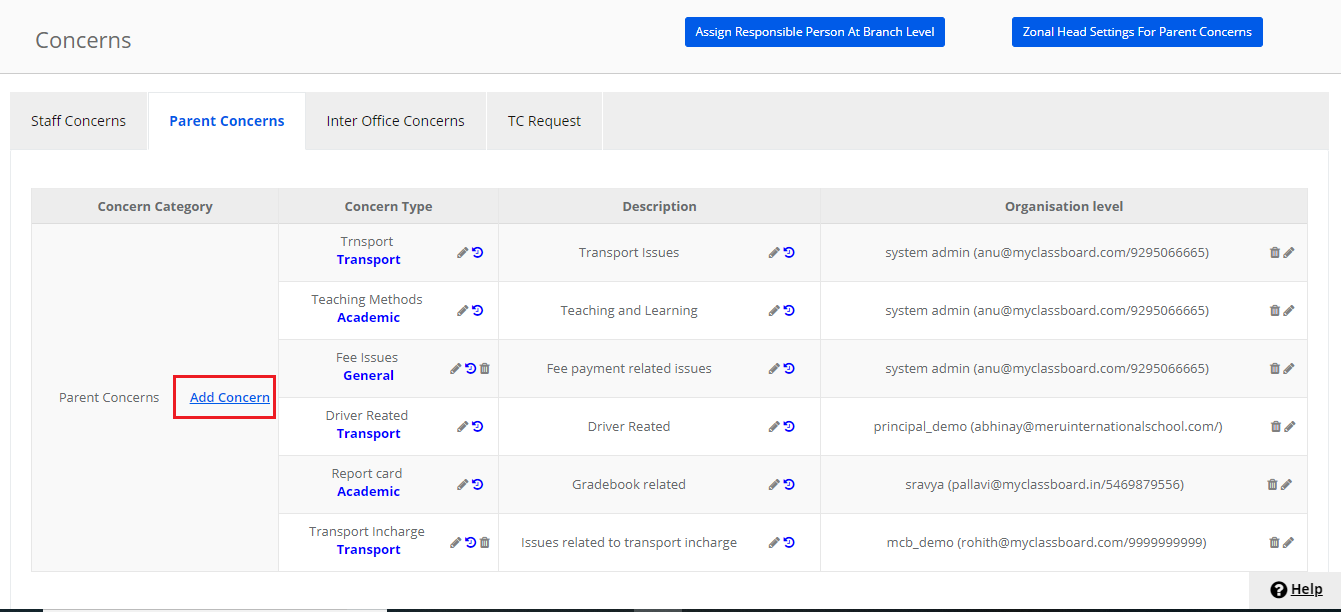
Step 4: To create new Concern Type, click on Add Concern option under Concern Category

Step 5:
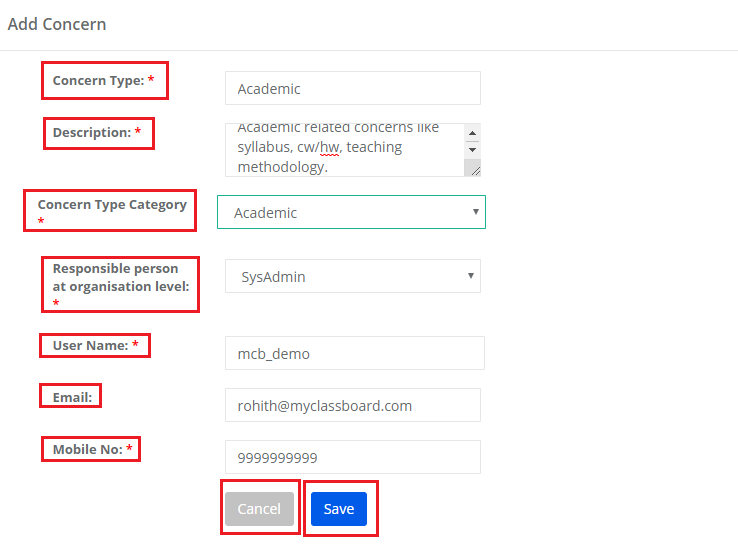
Enter Concern Type, description
Choose concern type category as Academic or Non-Academic or Transport or General.
Choose a responsible person at the organization level. The user you choose here will receive an email as and when a concern is raised by the parent. For example, if a school’s director wants to be notified when a concern is raised, you add him/her as a responsible person at an organization level. As you enter the user name, the system would show the email and mobile number automatically.
Click on Save to create the concerned type or Cancel to revert.

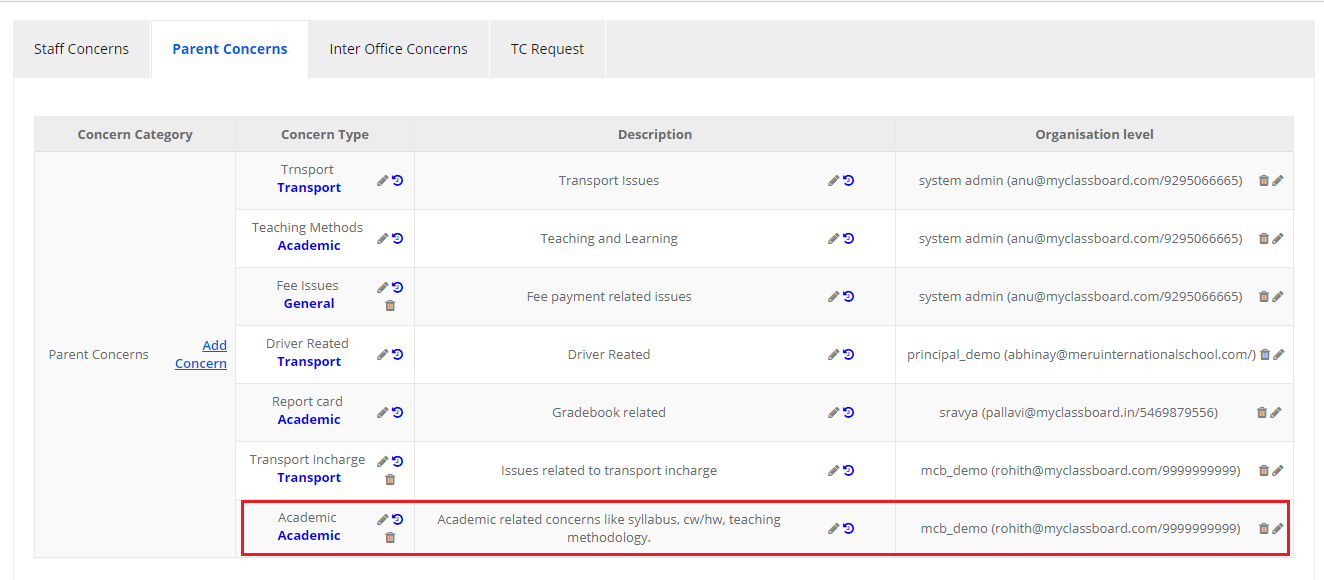
Please find the concern created along with the existing concern types as shown below.
Assign Branch owners to the Parent Concerns:

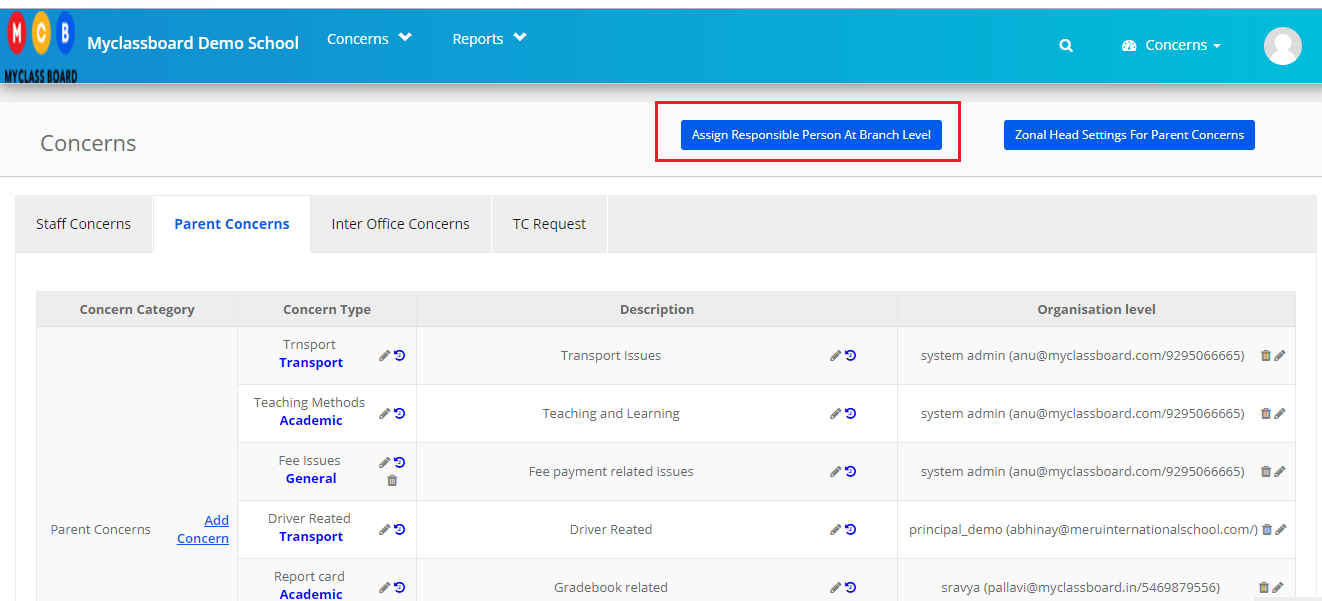
Step 6: Top assign branch owners to the concern types to define who has to handle at different levels, please click on Assign responsible person at branch level.
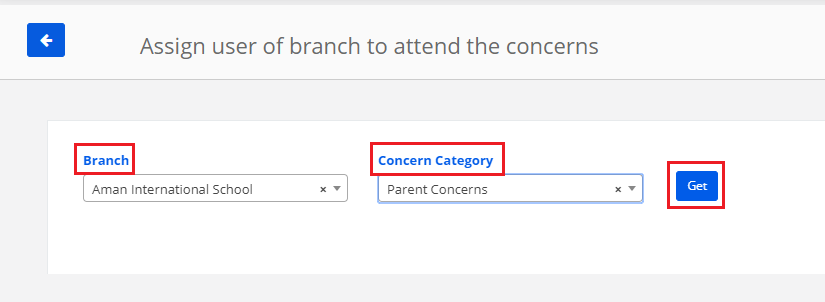
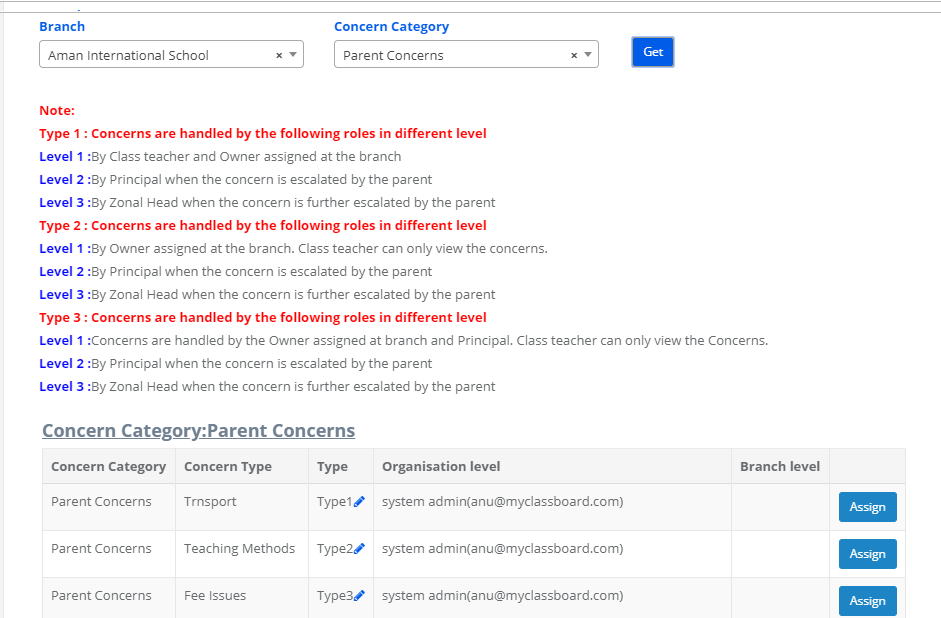
Step 7: Choose Branch and concern type as parent concerns and click on Get.

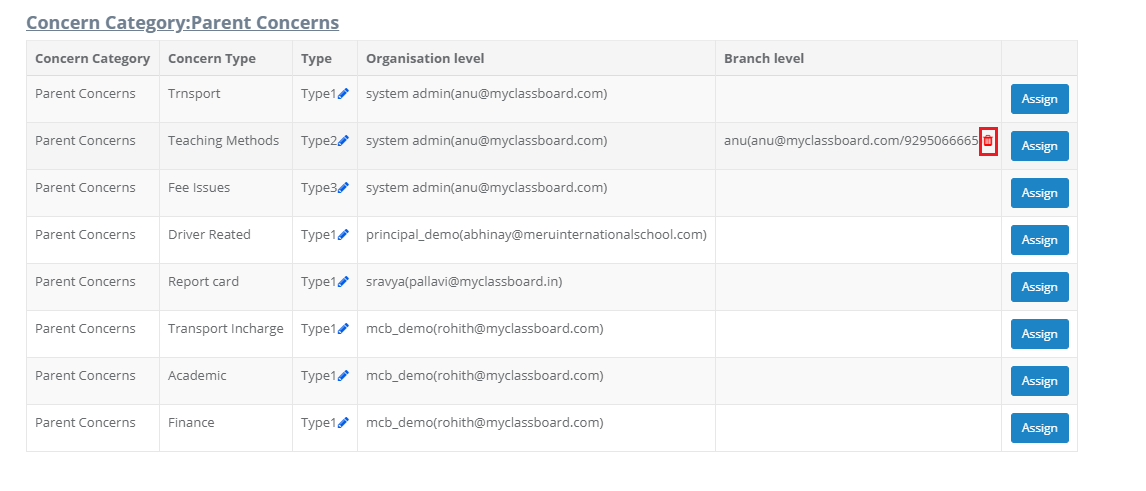
Step 8: Go through the workflow defined for each type you set for the concern. Based on your requirement, you can set the type to the concern by clicking on the edit icon against the type under Type column.
Please note that by default all concern types are updated with Type 1. You may change it based on your requirement.

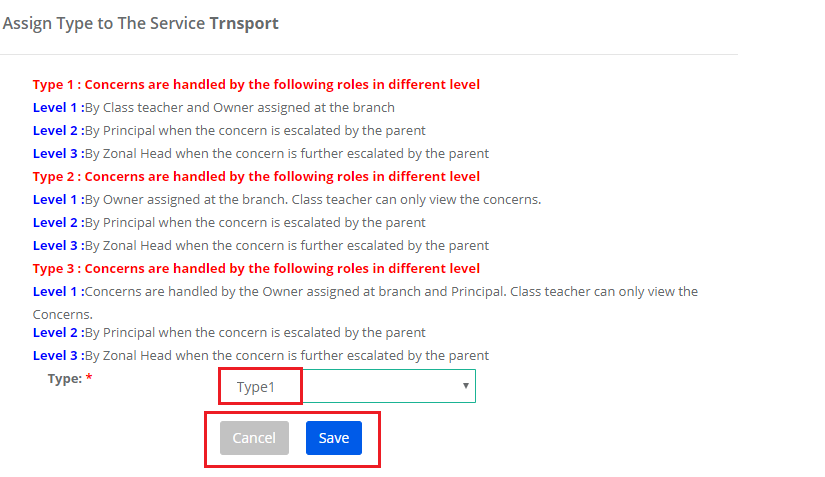
Step 9: Choose the Type as Type 1 or Type 2 or Type 3 based on your requirement of handling concerns. Click on Save button to save the typesetting or Cancel to revert the changes.

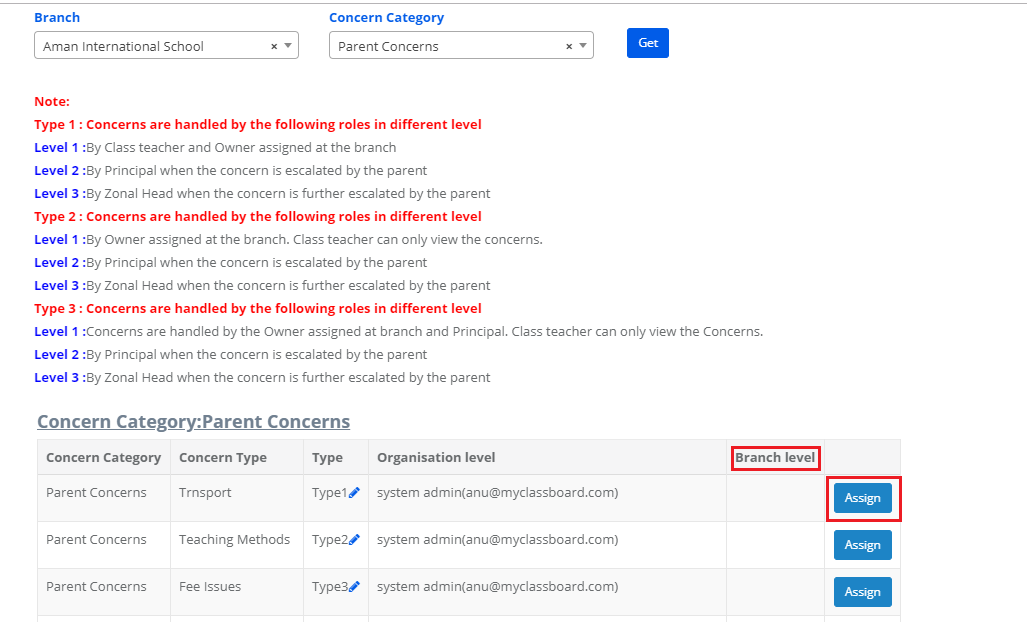
Step 10: To assign a branch owner to handle the specific concern at a branch level, click on the Assign button against the concerned type. Please note that you need to assign a branch owner to each concern types individually.

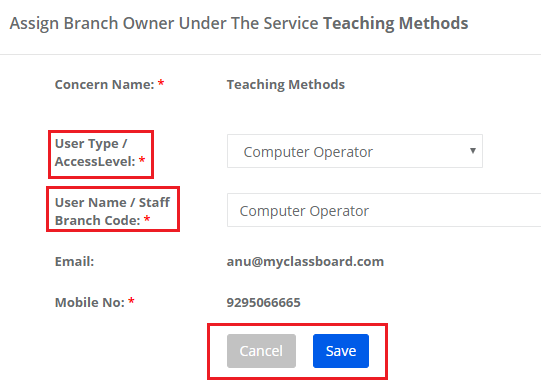
Step 11: You can branch owner through access level or User type. Choose User type, Access level from the options available in the dropdown.
Enter user name if it is through user type or Branch code if it is through branch access level.
Click on Save button to save the settings or Cancel to revert.
Step 12: To delete the branch owner, click on the delete icon.
Assign zonal users to the Parent Concerns:

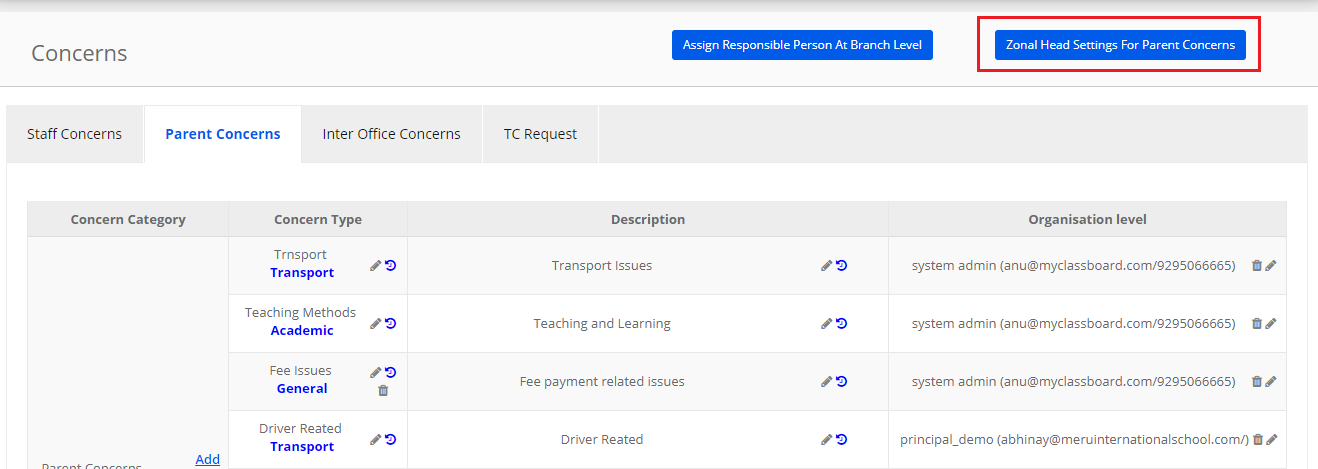
Step 13: To assign specific concerns to the zonal access users to handle the concerns when they are escalated. The users who are assigned to concern type will get a view or act on the concerns raised under the assigned concern type category. If no zonal access users are assigned to any specific concern type, then by default zonal head access user will get a view or act on the concerns.
To make the setting, click on Zonal Head access settings for parent concerns.

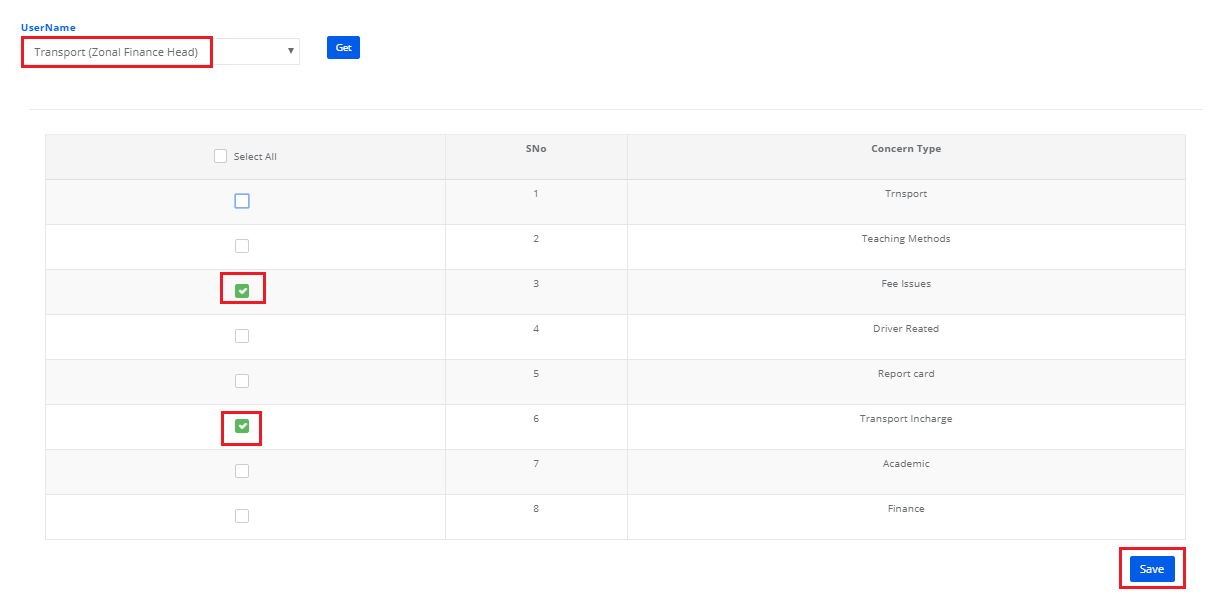
Step 14: The users who are created under zonal access are listed in the dropdown. Choose the user for whom you would like to assign the concerned type based on their role and click on Get.

Step 15: Select the checkbox against the concern types and click on save.


How can a parent raise concern from their login:

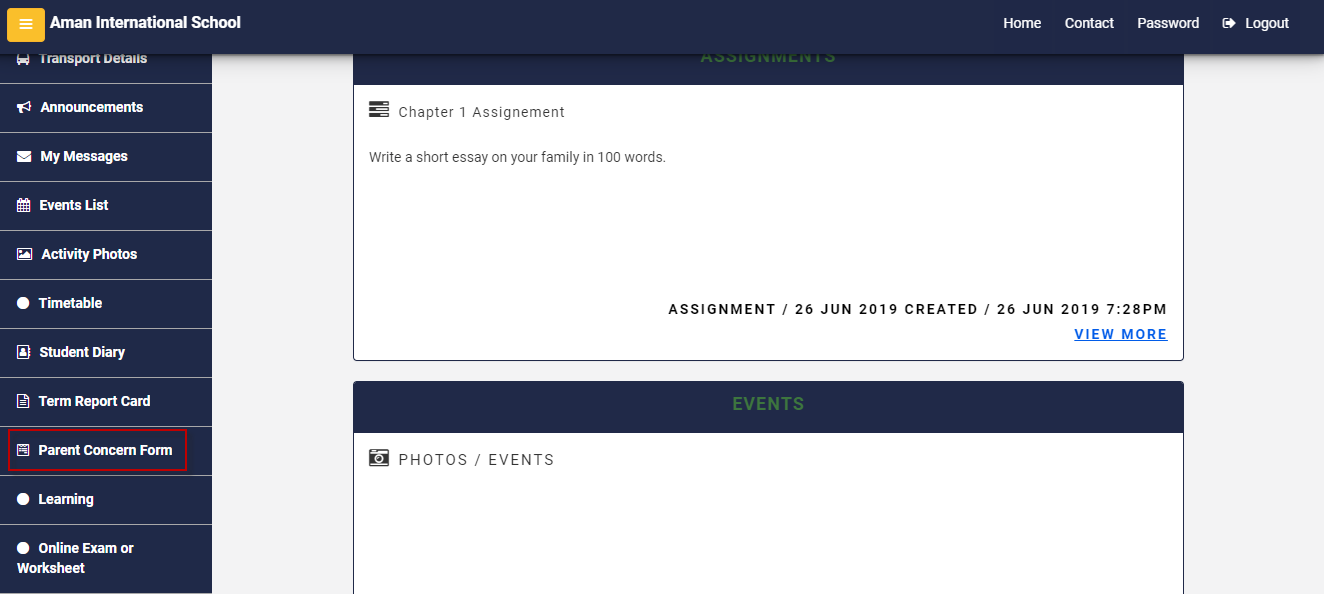
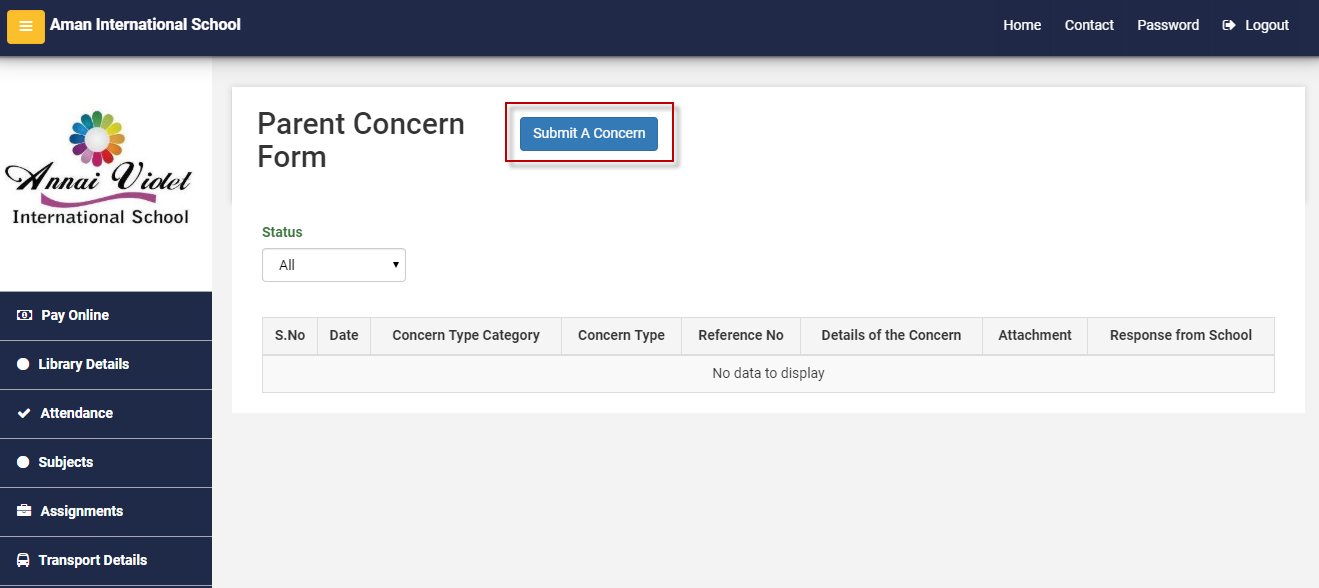
Step 16: Login to parent portal with parent login credentials. Click on Parent Concern Form link on the left menu.

Step 17: To Raise a concern, Click on Submit A Concern button.

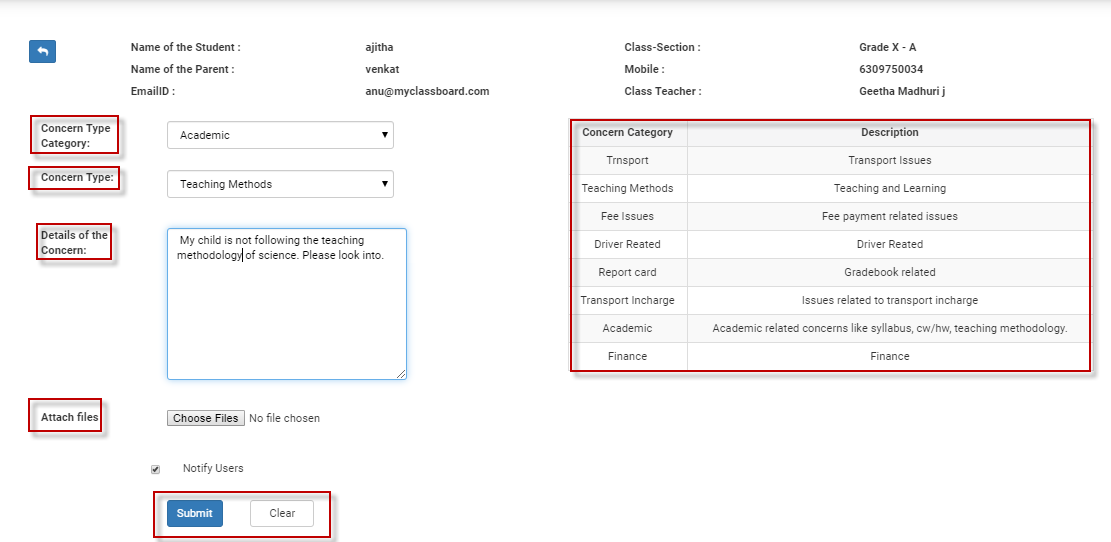
Step 18: Please go through the concerned type and description to understand in which type your concern come under.
Choose Concern Type Category, Concern type, enter the details of the concern, attach files if any and click on the Submit to raise the concern or Clear to revert.

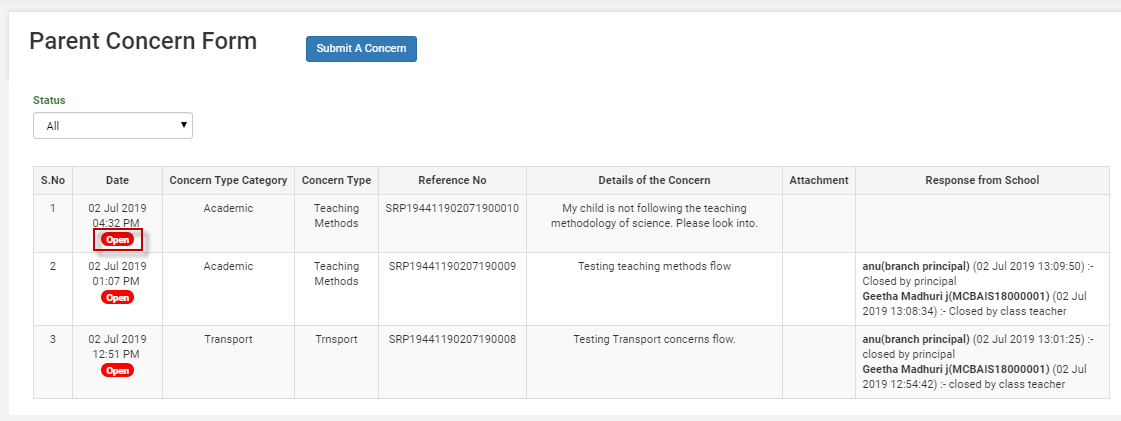
Step 19: Please note that the concern has the following status along with the details of the concern and response given by the school.
1. Open – when it is raised and being attended by the school
2. In Process – when is being attended by the school and may take some time to resolve it and the status is put as in process by the school.
3. Closed – when the concern is attended and closed by the school.

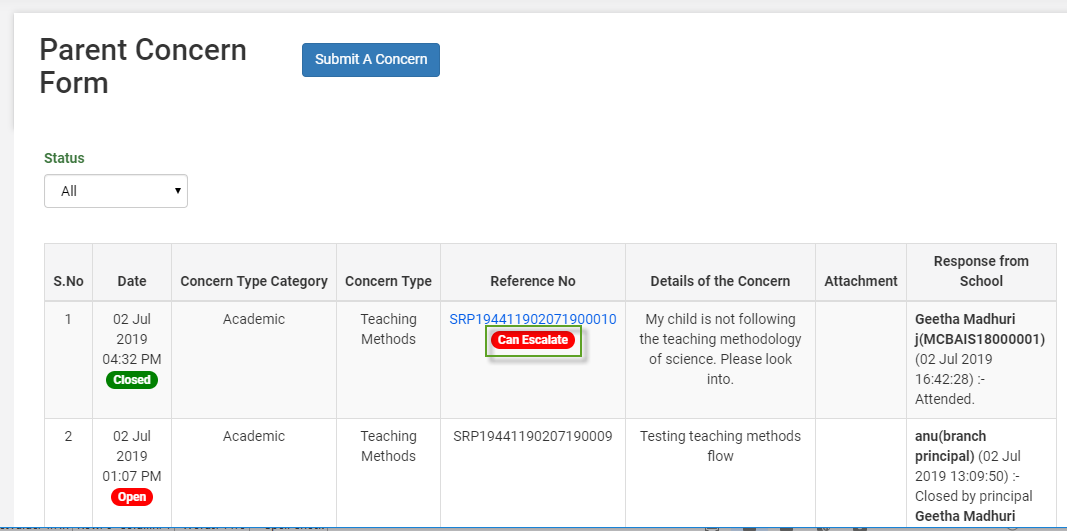
Step 20: A parent can escalate the concern to the next level as long as it is not closed by level 3 school admins. Can escalate label at the concern will let the parent understand that there another level to handle the concern if the parent is not satisfied by the resolution given by class teacher/school admin/principal.

Step 21: To escalate the concern, Click on the Reference number which is right above the Can Escalate Label.
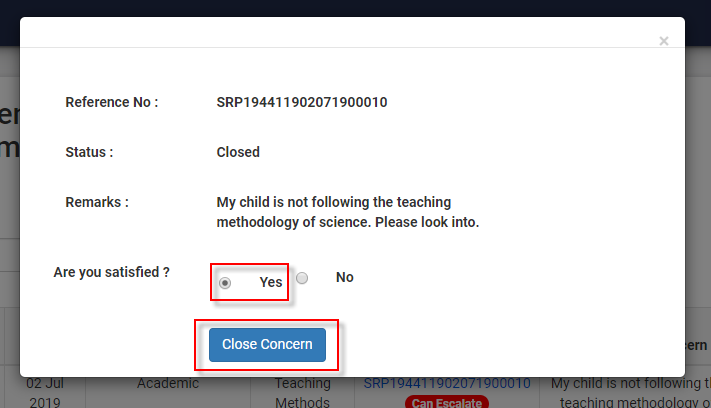
As a parent, if you are satisfied, click on Yes and Close Concern button. The concern will be closed permanently.

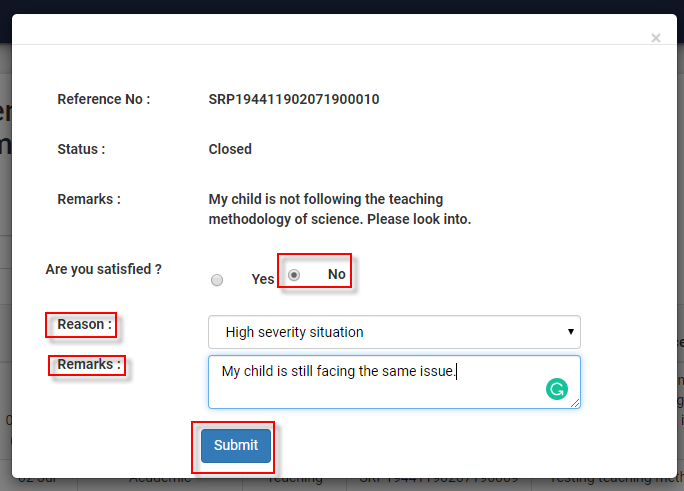
If you have not satisfied, you can escalate by choosing No. Choose the Reason for escalation and enter remarks and click on Submit Button.

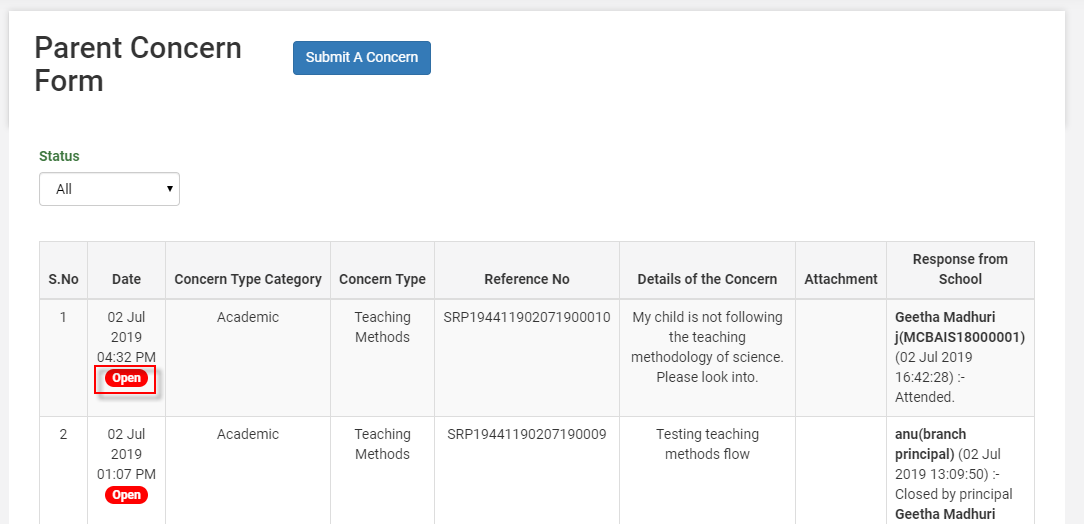
Step 22: As the parent escalates the concern, the status of the concern will change to Open.

How can a school admin/class teacher/principal/ zonal access users can attend a concern from their login:

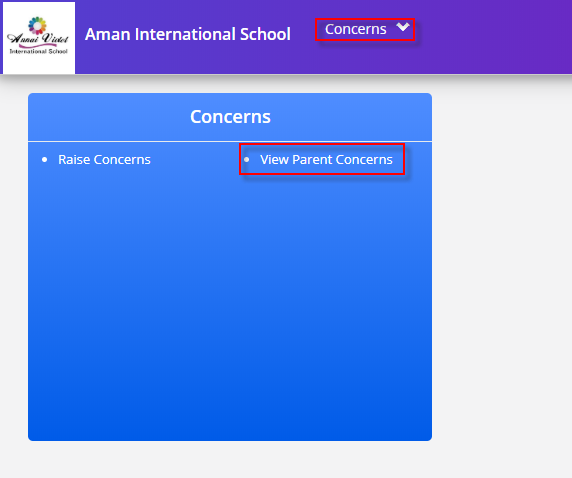
Step 23: Login with staff credentials and visit concerns module.
Click on view parent concerns option on the dashboard or from the concerns menu.

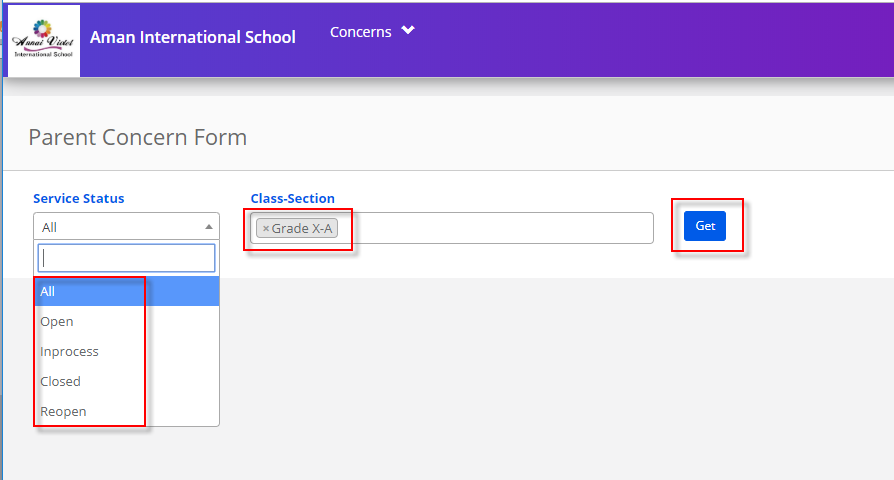
Step 24: Choose the concern status as All or required filter, class&sections and click on Get button to get the list of concerns.

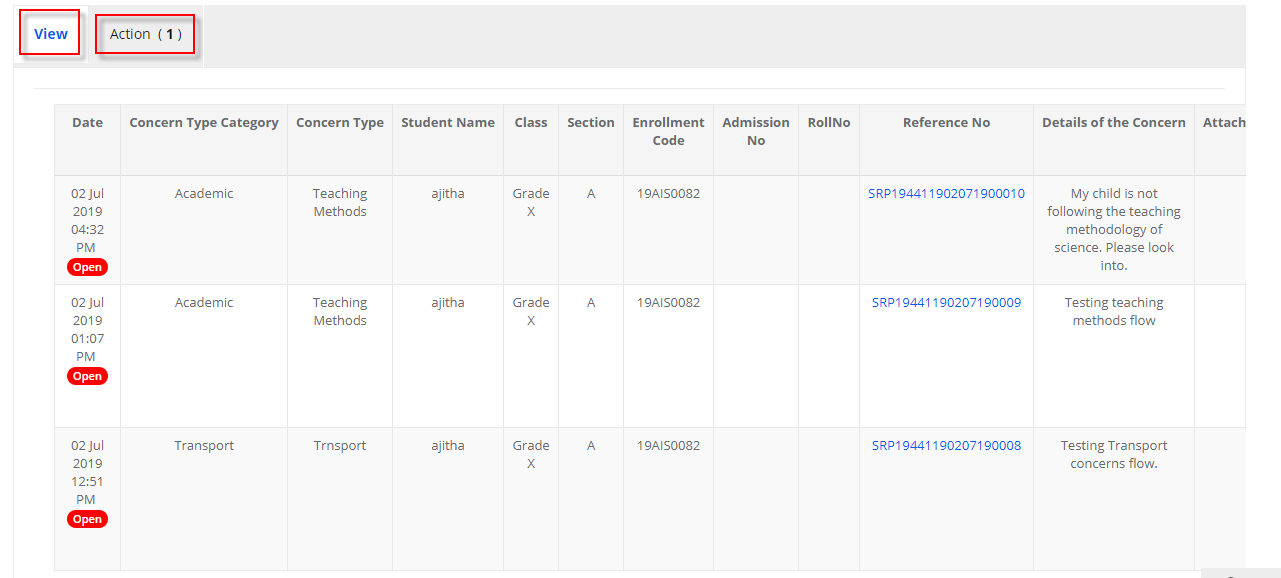
Step 25: The concerns raised by the parents of the selected class are placed in two tabs called View and Action. The concern which does not have access to act upon for the staff are displayed under the view tab. The concerns which are to be acted upon by the staff are placed in the Action tab. The number denotes that the number concerns yet to be attended by the staff.

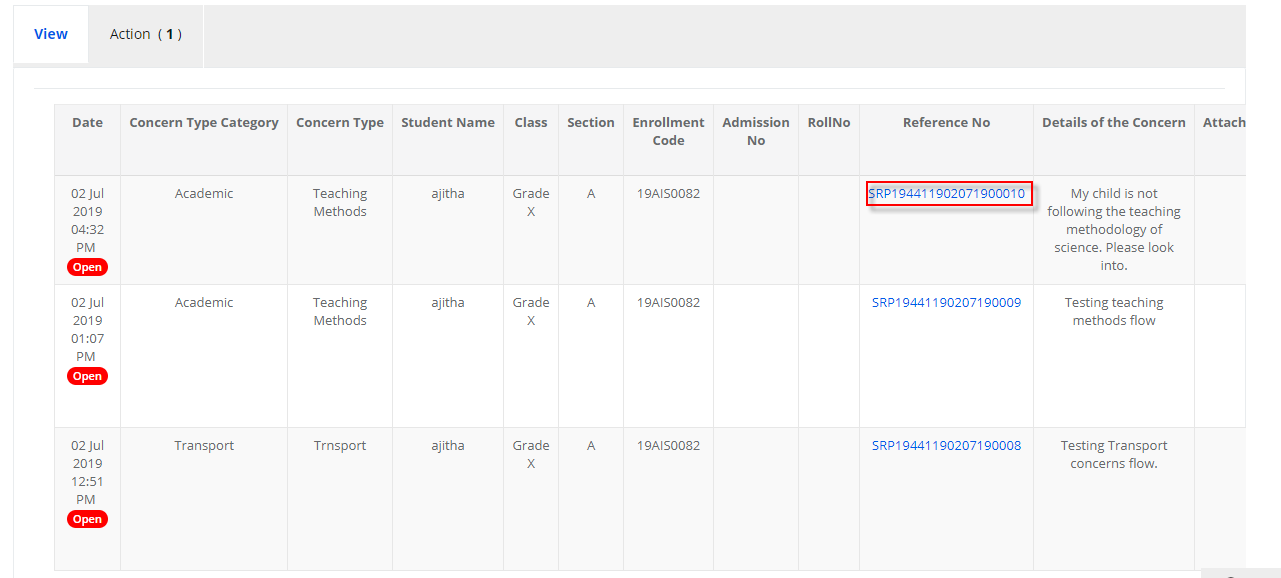
Step 26: To view the concern details Click on the reference number.

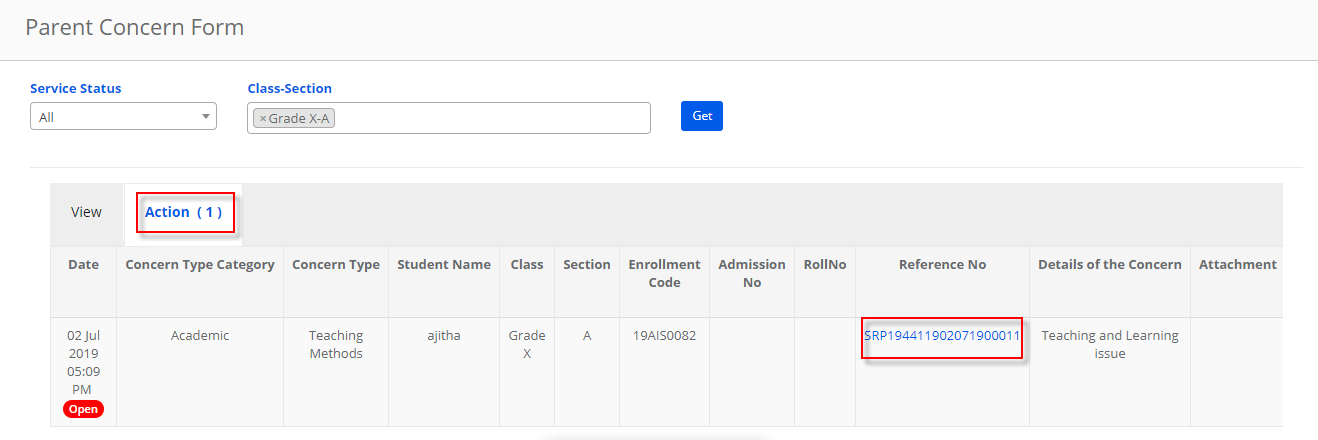
Step 27: To act on the concern, switch to Action tab and click on the reference number.

Step 28: Go through the details of the concern, choose the status, enter the response and click on Submit button to save or Cancel button to revert. Please note that, once you close the concern, it is placed under the view tab.