How to generate branch activity report?

The branch activity report gives you the day wise details of the following activities
1. Admission, Promotions, Inactive, Reactive, Passed Out students.
2. Branch shuffle details
3. Class / section shuffle details

The report helps you understand the students In and our flow. And also the student’s movement between branches /classes/sections.

The report can be generated from the system admin login and branch login. At branch level, you can generate it from the dashboard where student count is shown.

To generate the report, please follow the steps mentioned below:

Step 1: Login to MCB and click on Academics module.

Step 2: Choose Branch Activity Log Report option under Reports Menu.

Step 3: Choose Branch name, Academic year, the date on which you would like to view the activity and click on Show Report option.

Step 4: The report will give you a list of students who are
1. Enrolled, promoted, inactivated, reactivated or passed out from the branch.
2. List of students who are shuffled from the other branch or shuffled to other branches.
3. List of students who are shuffled between the classes or sections.

Step 5: Locate the downloaded file at download location to use.

How to use Elections in MCB?

School can conduct elections for the designations created in its student council.

Student council can be formed with the designations School wise, class category wise and Class group wise.

Once the designations are added in the student council, you can conduct elections.

To create the election, pls follow the process mentioned below.

Step 1: Login to MCB and click on Academics on the top menu bar.

Step 2: Choose Student council option under academic menu

Step 3: Click on Manage Elections option.

Step 4: Click on Add Election Date option to create the Election.

Step 5: Choose academic year for which you are conduction the election, Branch name, and Election date. Enter Remarks and Click on Add button.

Step 6: To edit the election details, click on the edit icon.

Step 7: Make the necessary changes and click on tick mark to save the changes or cross marks to revert the changes.

Step 8: Click on Delete icon to delete the election.

Step 9: Click Yes to confirm and No to revert.

Step 10: To add contestants, Click on Add Contestants.

Step 11: Choose election date, council type and click on Get to list the designations available for the selected council type.

Step 12: To add contestant for a designation, Click on + sign against the designation.

Step 13: Choose the student’s class from which he/she is contesting and name of the contestant. Enter the Slogan and upload the election symbol. Click on Add.

Step 14: Click on Edit icon to change the Slogan and Election symbol.

Step 15: Make the necessary corrections and Click on Update.

Step 16: To delete the contestant, Click on the delete icon.

Step 17: Click Yes to confirm the deletion or No to revert.

Note: when you delete the contestant, the slogan and symbol are also deleted along with the contestant.

Step 18: Generate voter slip by clicking on Voter Slip printing option.

Step 19: Choose the Academic year, Branch, Class & sections who have the right to vote and click on Get.

Step 20: Click on Print Voter Slip option to print the slips.

Step 21: The Voter ID is used to login to the voting portal to cast the vote.

Step 22: To view the voting link, click on View vote link.

Step 23: The view vote page displays the list of contestant along with their details.
The vote now the link is enabled only on the date of polling.

This link needs to be made available for the students to vote on the day of the election.

Click on vote now to cast the vote.

Step 24: Choose the role and enter the voter ID and click on Search.

Step 25: Student can verify the details and the entered code. Click on Start Voting button.

Step 26: Click on the contestant box to cast your vote against each designation and click on Save your vote button.

Step 27: To view the Election Results, Click on Election Results option.

Step 28: Choose Academic year, Branch, Council type, Election name/date and click on Get to view the results.

Step 29: Please note the details like No of votes available, No of student votes and staff votes casted for each contestant. The contestant who gets the more number of votes among all contestants is treated as winner and name is displayed in Green colour.

When you click on the number under student votes or staff votes, you will get the list of students/staff who voted.

You can export the report by clicking on the Excel option available on the top left corner of the report.

How to create Subjects, Chapters, Topics content and Self Assessment/ Exercise?

Subjects can be created from the System admin level. The chapters can be created from both System admin and branch level.

Create Subjects:

Step 1: Choose Subject Creation under Subjects and Notes menu

Step 2: Click on the class for which you would like to create the subjects.

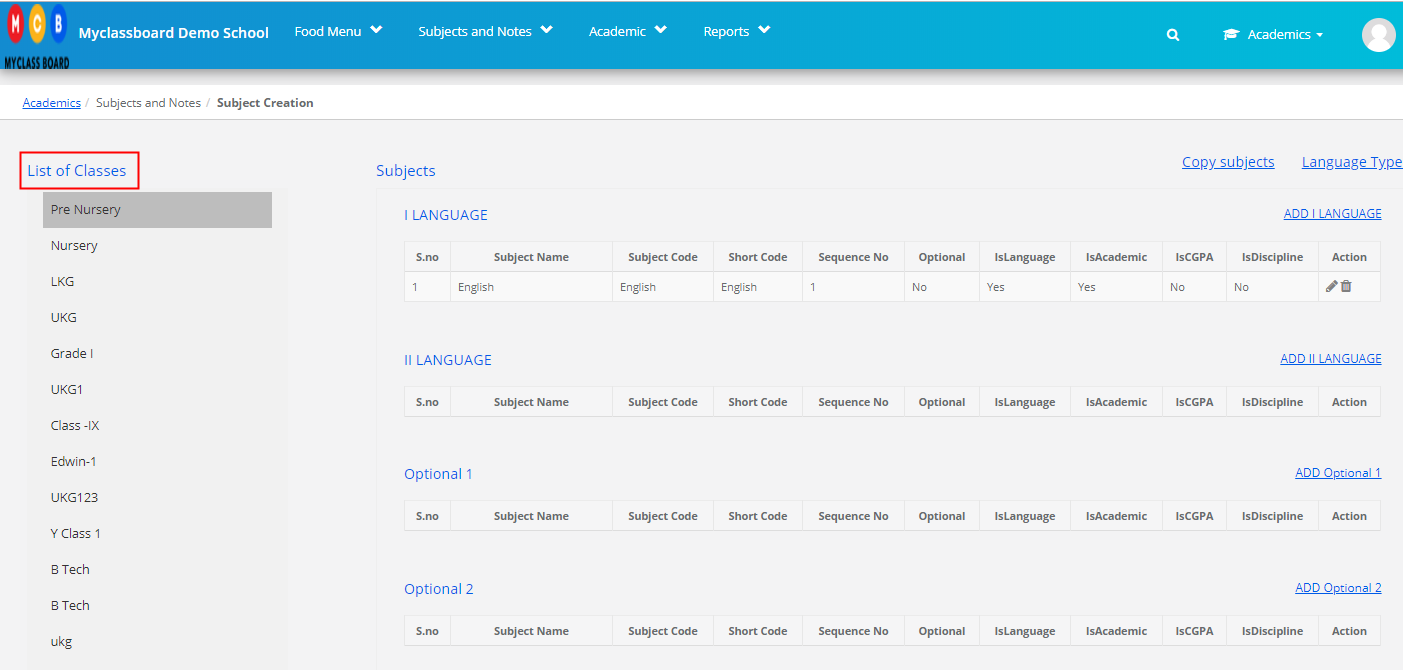
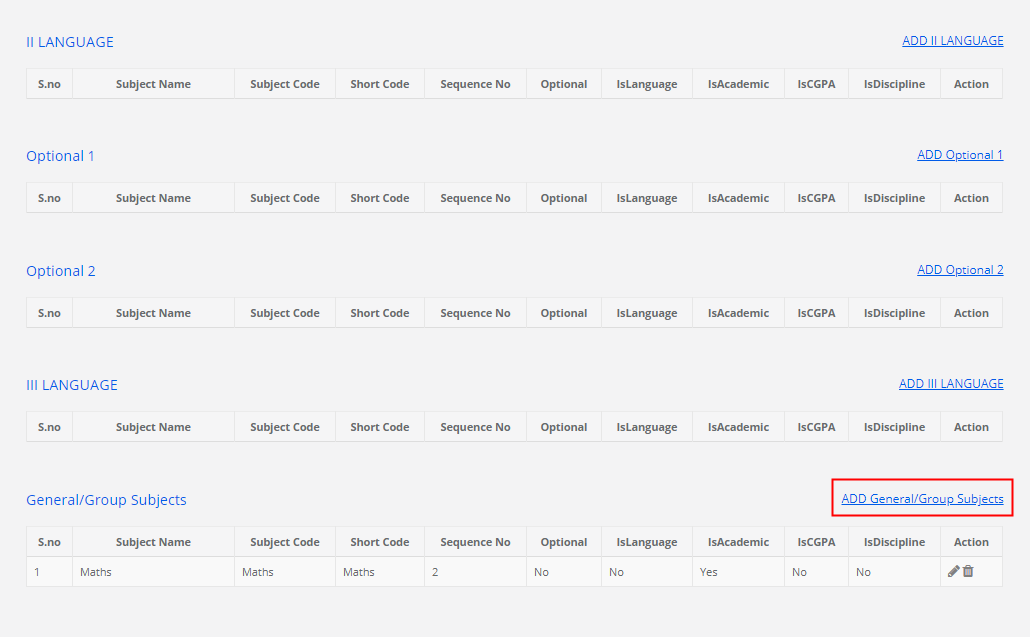
Step 3: You will find Different sections to create languages, optional subjects, and general subjects. Click on Add to create a new subject.

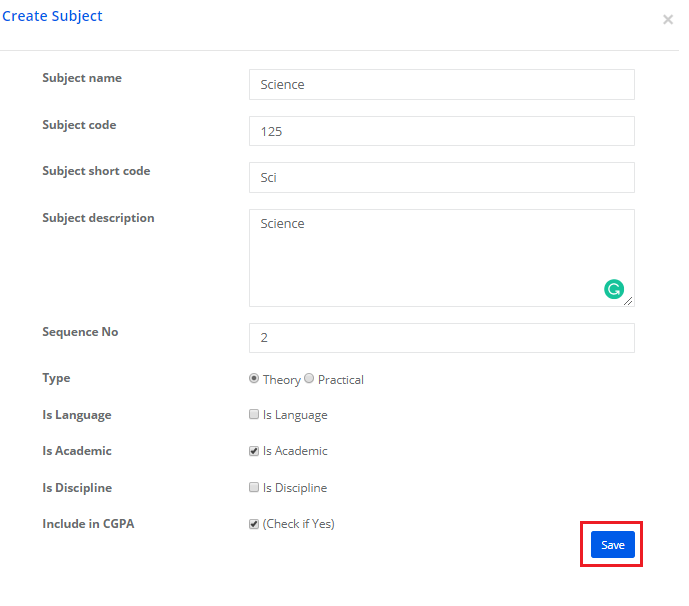
Step 4: Fill in the details, choose the appropriate status and click on the Save button.

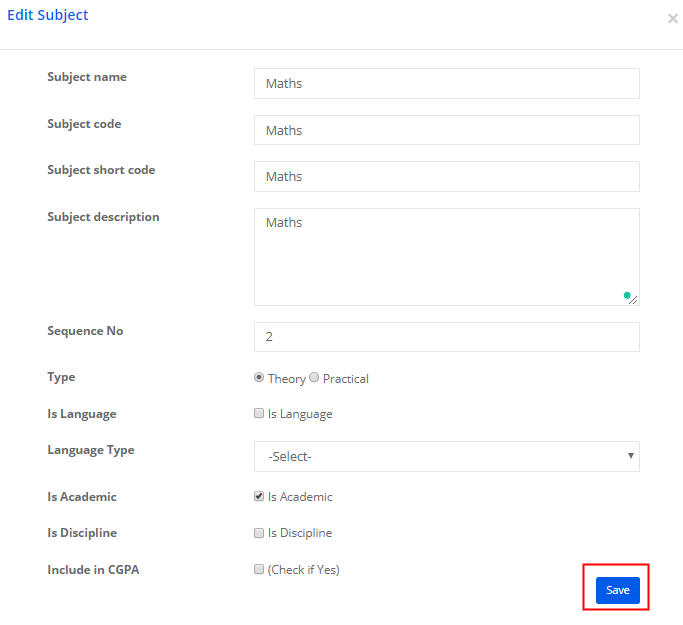
Step 5: To edit the Subject click on edit icon against the subject.

Step 6: Make the necessary changes and click on Save.

Step 7: To delete the subject, Click on delete icon against the subject and confirm.

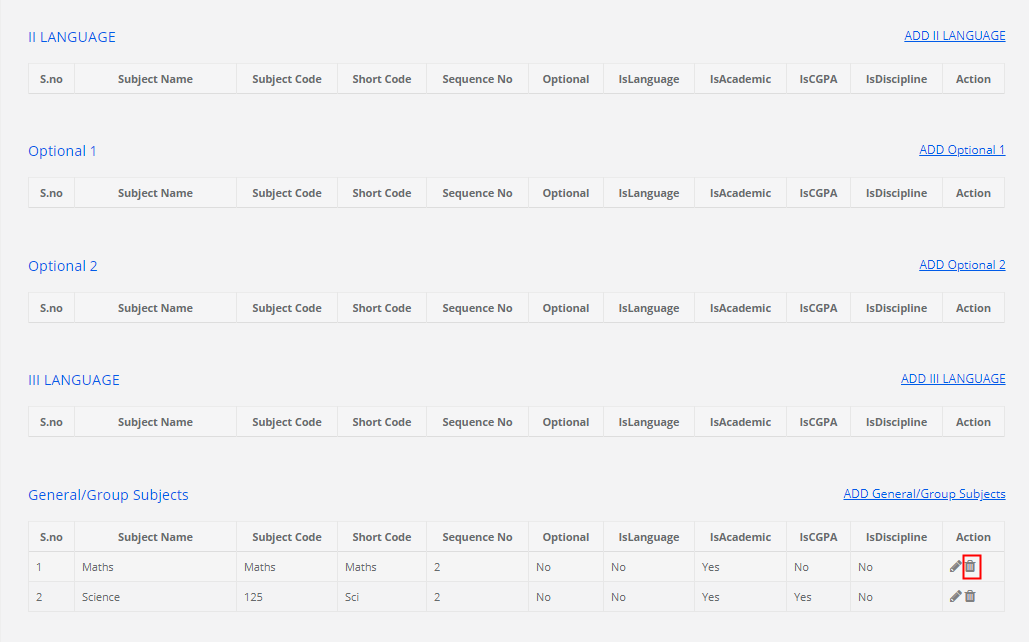
Step 8: Click Yes to confirm the deletion or No to cancel the deletion.

Create Chapters:

Step 9: Click on Learning under Subjects and Notes menu under Academics module.

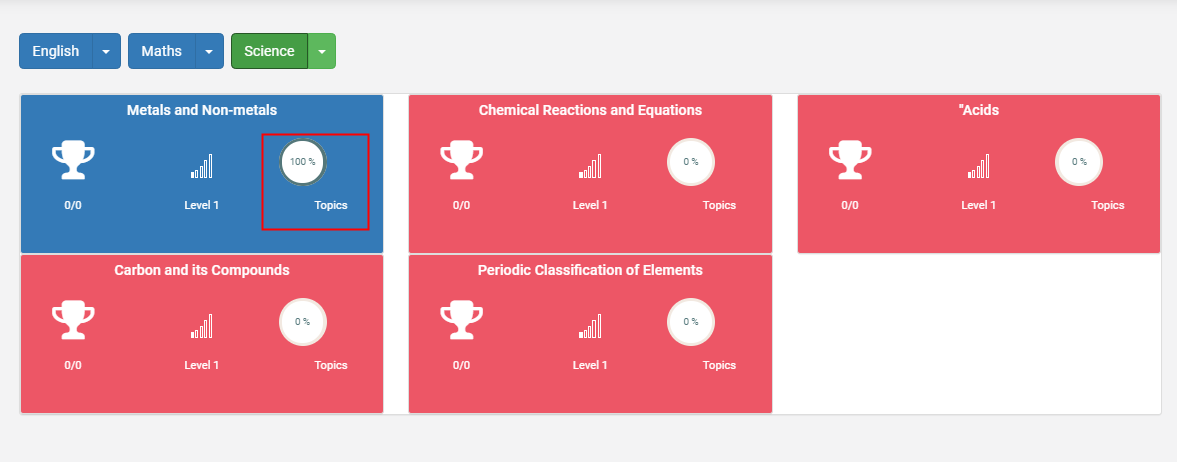
Step 10: It will take you to the Learning Dashboard displaying the number of subjects available under each class. You can add a new subject in any class by clicking on the + button which is placed at the top right corner of each class.

The number next to the subject denotes the number of chapters available under each subject.

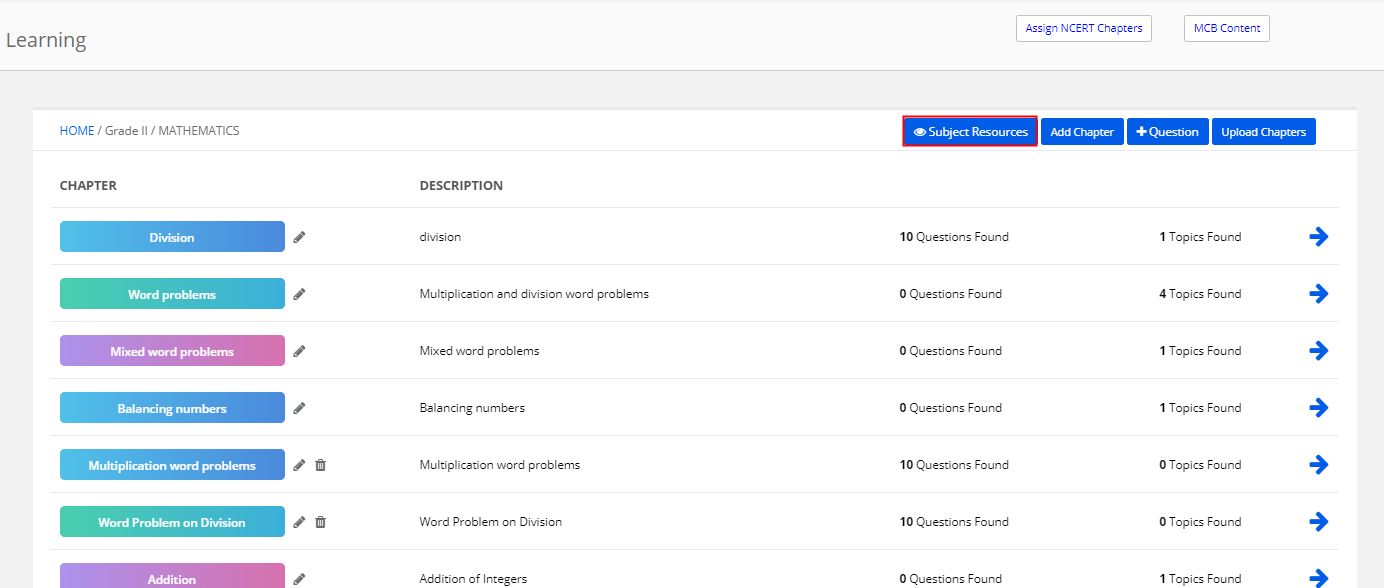
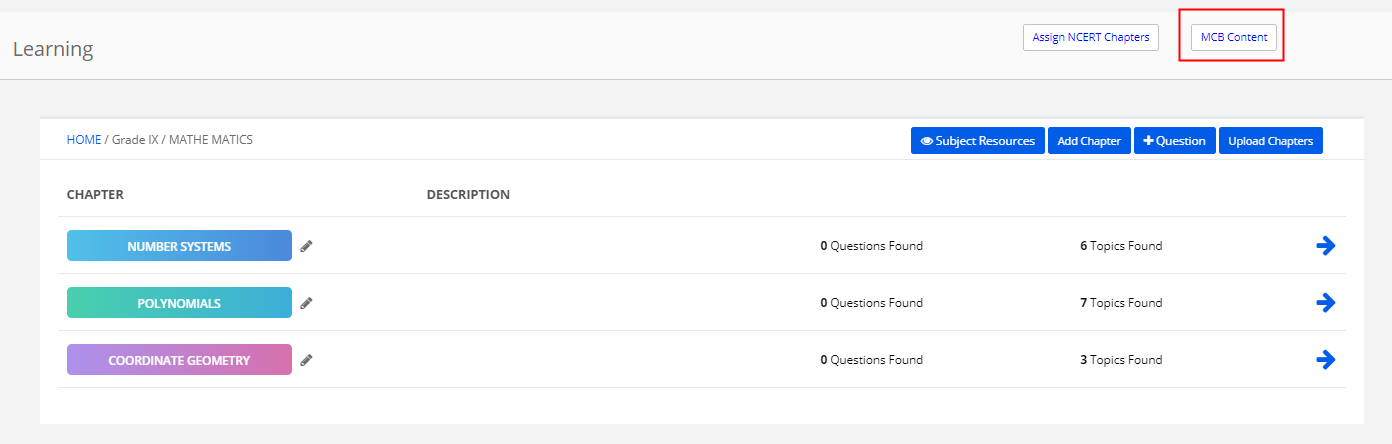
Step 11: To add a new chapter, click on the subject name.

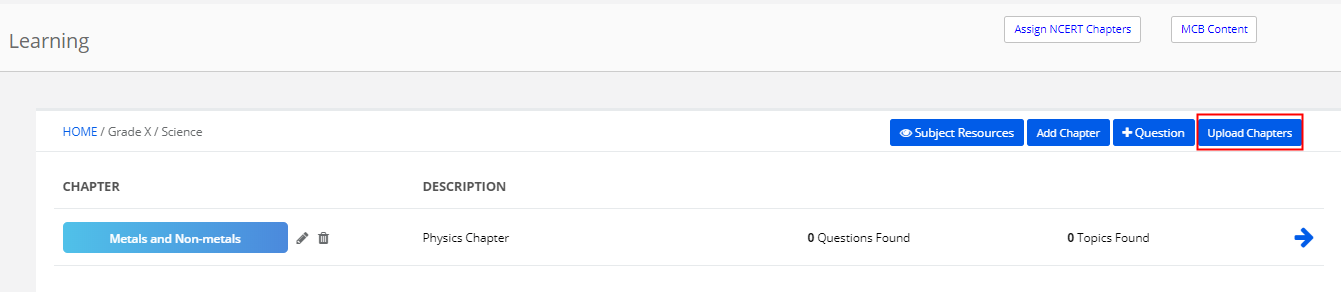
Step 12: Please find the following options and their uses

1. Add Chapter – to add the chapter manually
2. Upload Chapters – to bulk upload chapters though Excel sheet
3. +Question – to add questions in the question bank under the selected subject.
4. Subject Resources – It will list the attachments shared over the diary and assignments of the selected subject. Please note that the resources listed here are from all the academic years together.
5. Assign NCERT Chapters – You can assign all chapters prescribed by NCERT without having to create manually.
6. MCB Content – when you assign chapters from NCERT, It will list the chapters and topics along with a topic description and suggested videos. So that you can, choose the videos you wish to populate for the students in their learning.

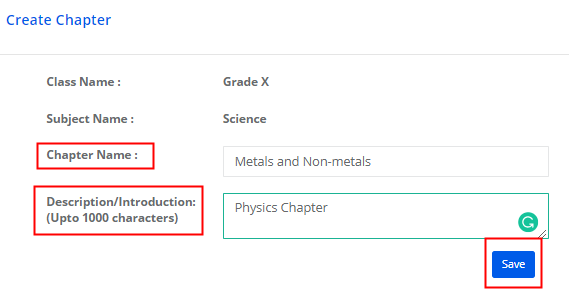
Step 13: To add Chapter manually, Click on Add Chapter option.

Step 14: Enter Chapter Name and Description. Click on Save button to save the chapter.

Step 15: To edit the chapter name, click on the Edit icon available against the chapter name.

Step 16: Make the necessary changes and click on Save to save the changes or Cancel to revert.

Step 17: To upload Chapters, Click on Upload chapters option.

Step 18: Read through the instructions and click on View File Format to download the file.

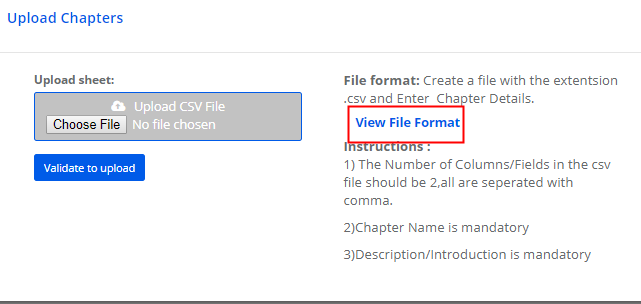
Step 19: Enter the chapter names and Description. Save the file without changing the format. Click on Choose File option, Locate the file on your computer.
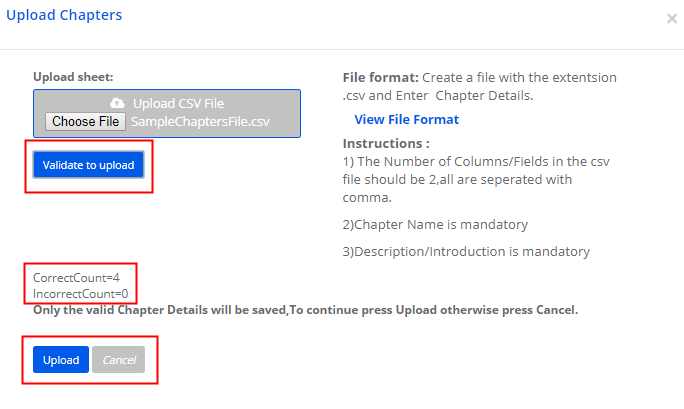
Click on validate to upload, check for the correct count and click on Upload button to upload the chapters. Click on Cancel to revert.

Question Bank:
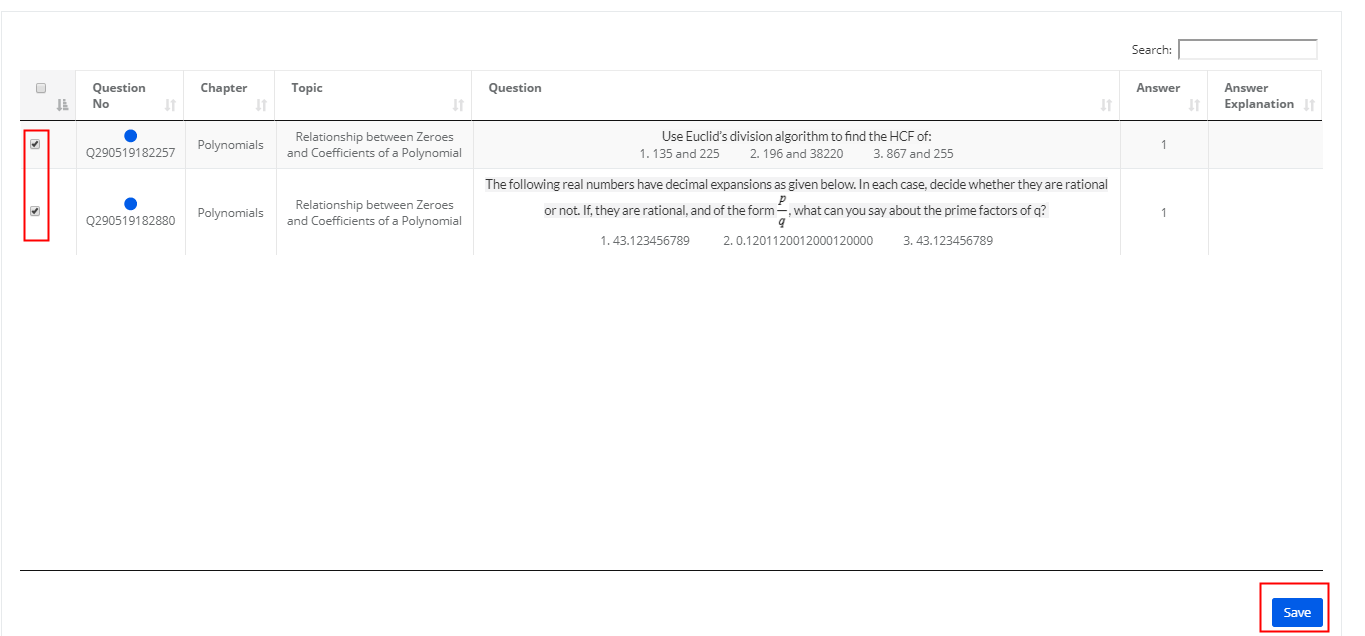
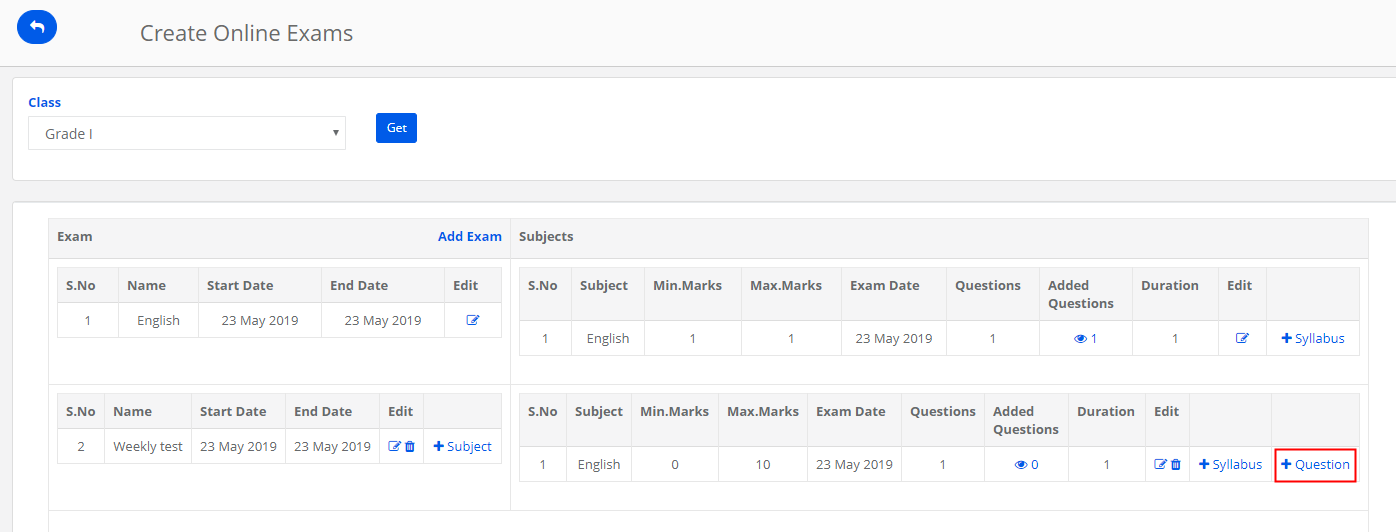
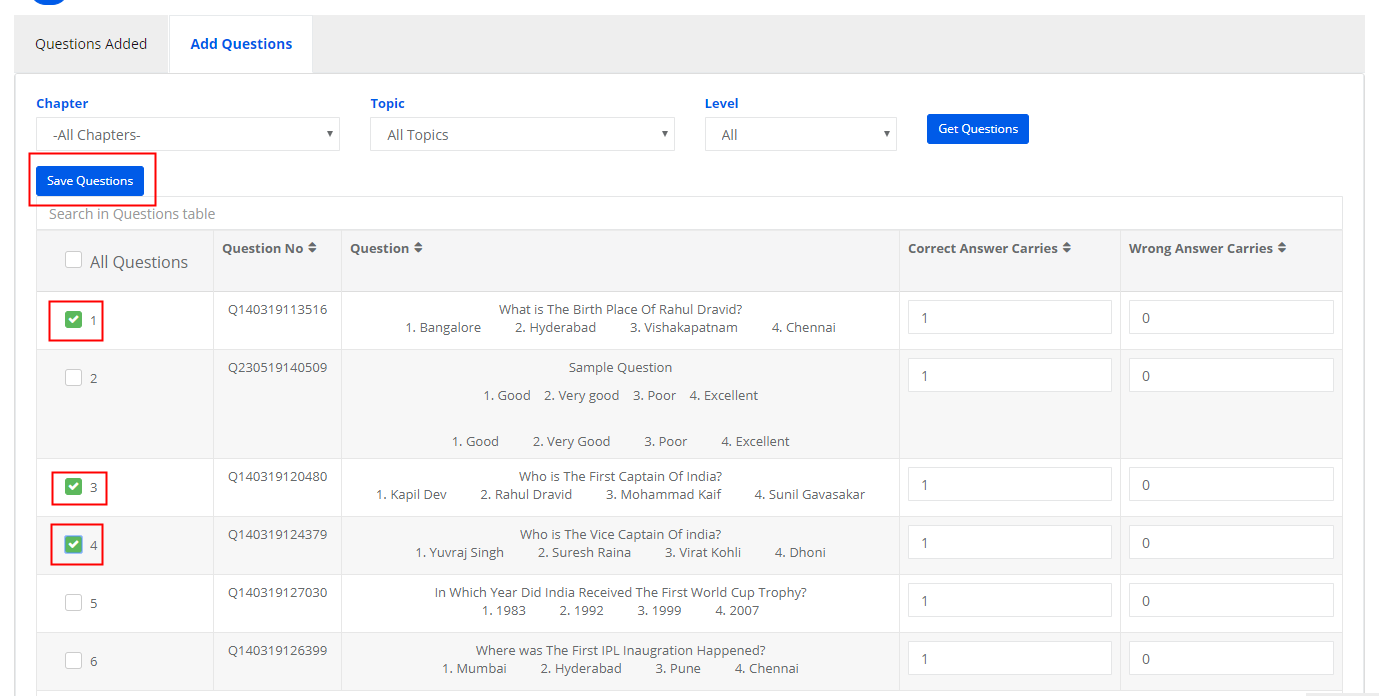
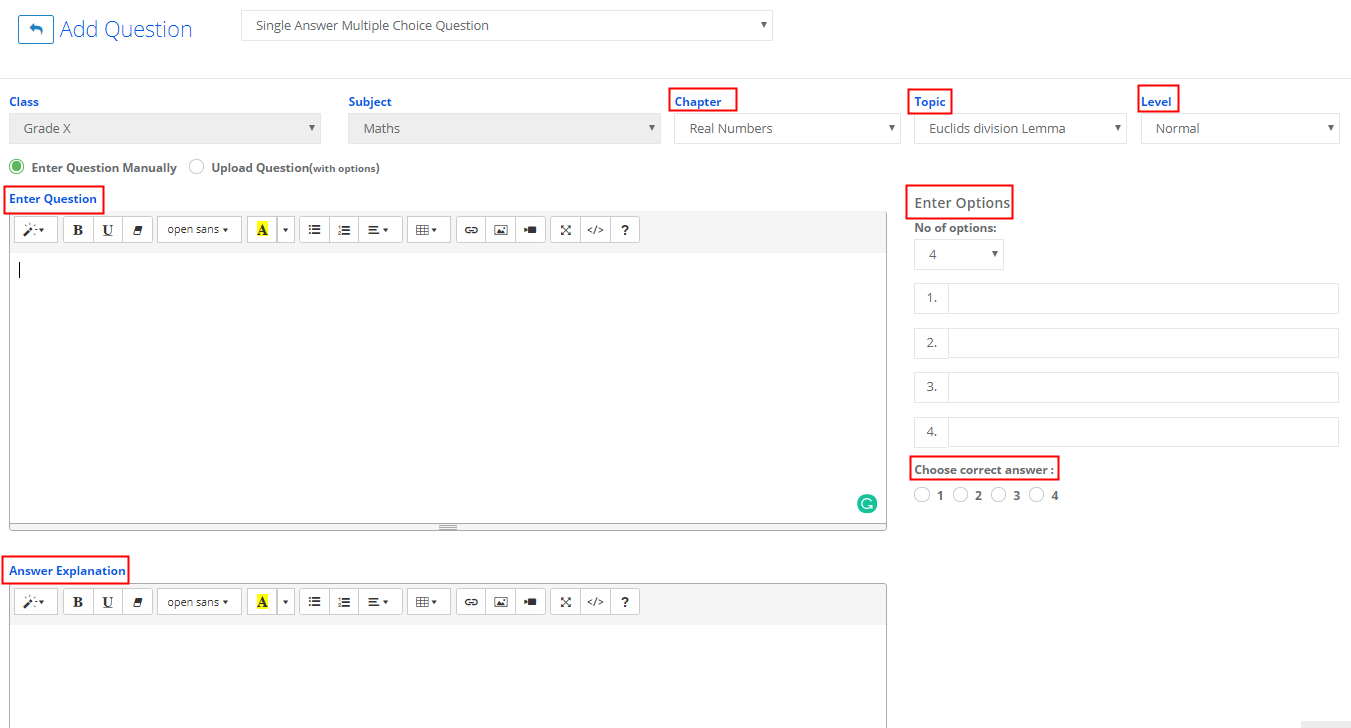
Step 20: To add questions to the chapter or topic, click on the +Question option.

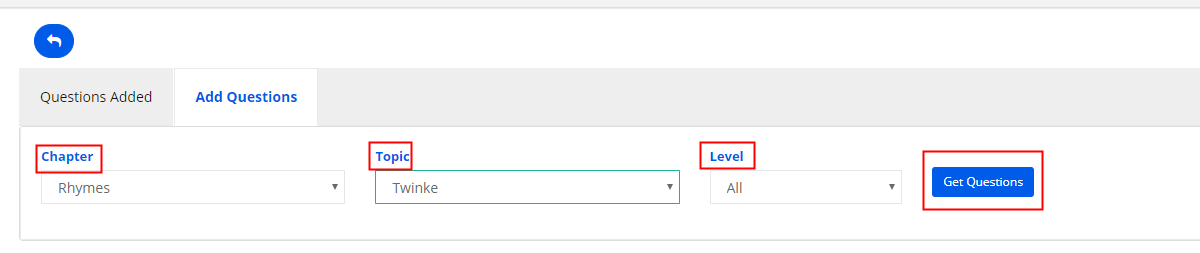
Step 21: Choose question type, chapter, topic and difficulty level of the question.
Enter the Question description, options and choose the correct answer.
Enter the Answer Explanation and click on Save.

Subject Resources:
Step 22: To view the resources shared on the diary and assignment for the subject, click on the Subject Resources tab.

Step 23: You will be directed to the page where you can find three options called All, Assignments and Diary.

All: It will list all the details of the assignments and dairy in one page.
Assignments: It will list the details of assignments alone.
Diary: It will list the details of the diary alone.

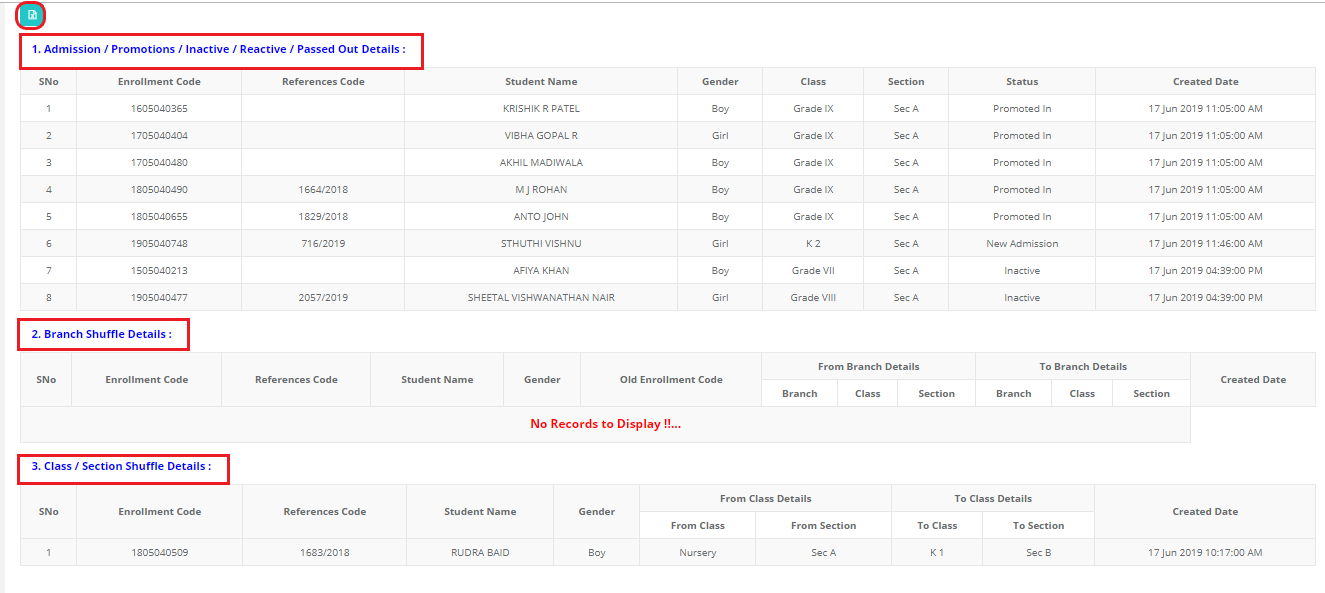
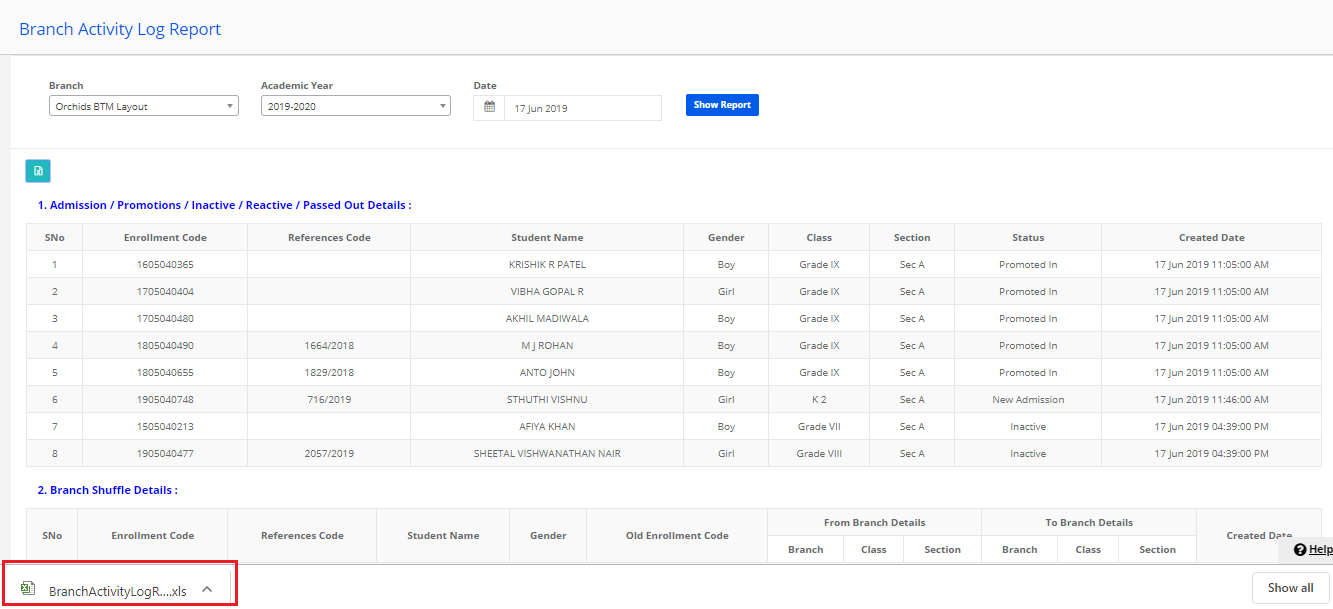
You can export the report to excel by clicking on the Excel icon placed on the top left corner of the report.

Assign NCERT Chapters:

Step 24: To assign NCERT chapters and topics without having to create manually, Click on Assign NCERT Chapters option.

Step 25: Select the Chapters and the topics you wish to assign and click on the Assign button which is available at the bottom.

MCB Content:

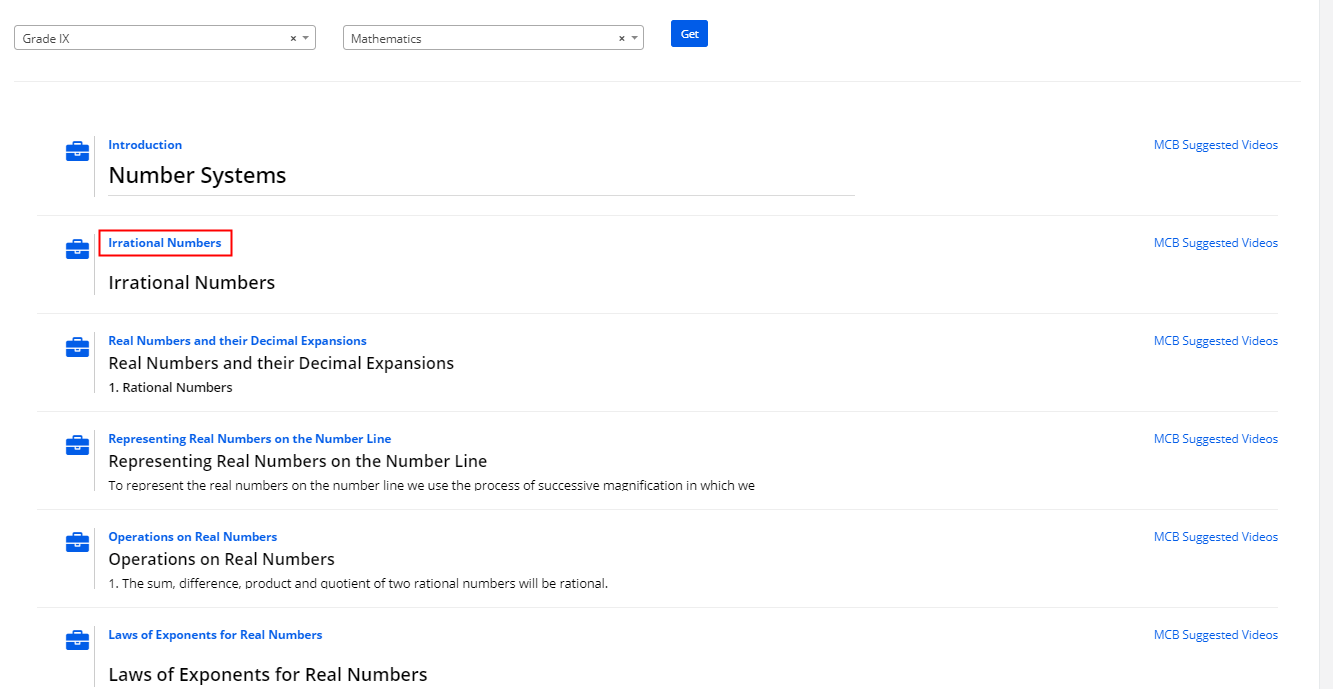
Step 26: To view MCB content available, Click on MCB Content option.

Step 27: Select Grade, Subject and Click on Get option. To view the content, click on the arrow against the Chapter name.

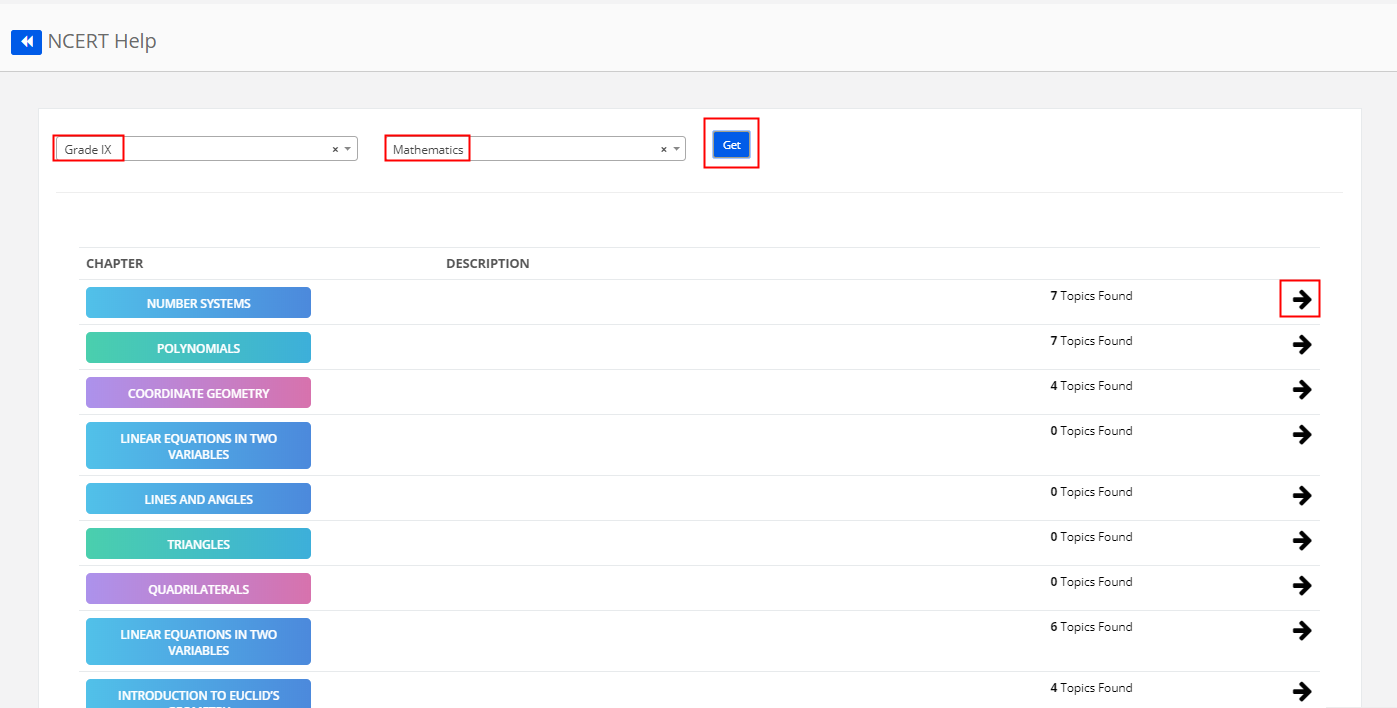
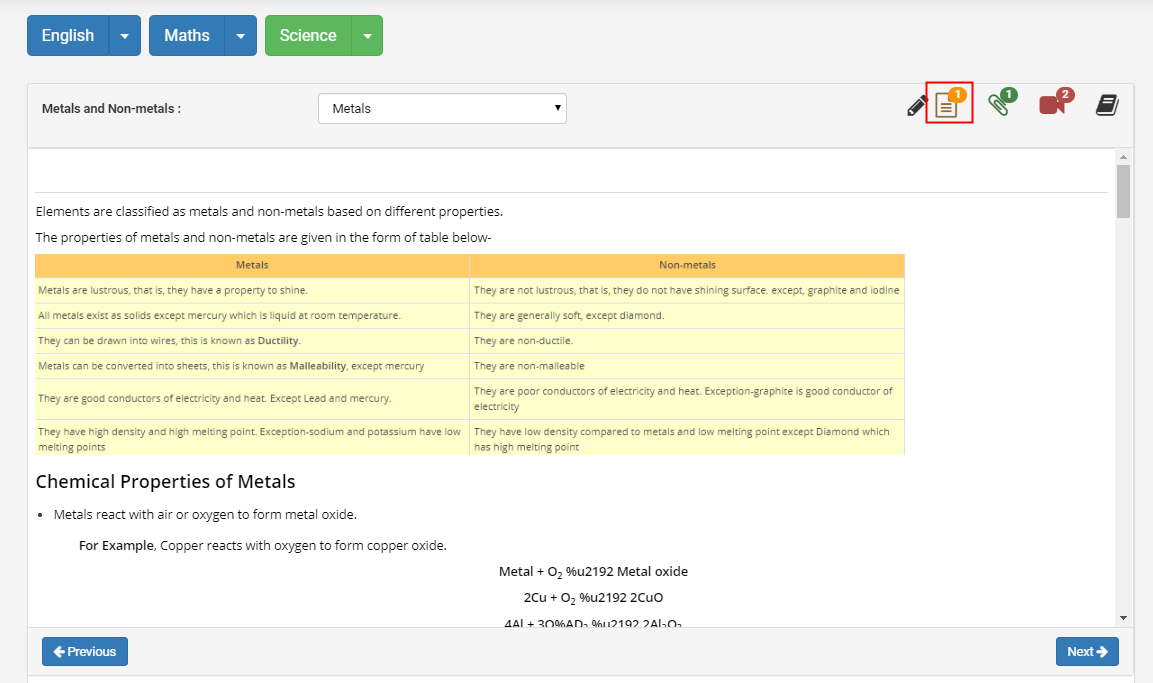
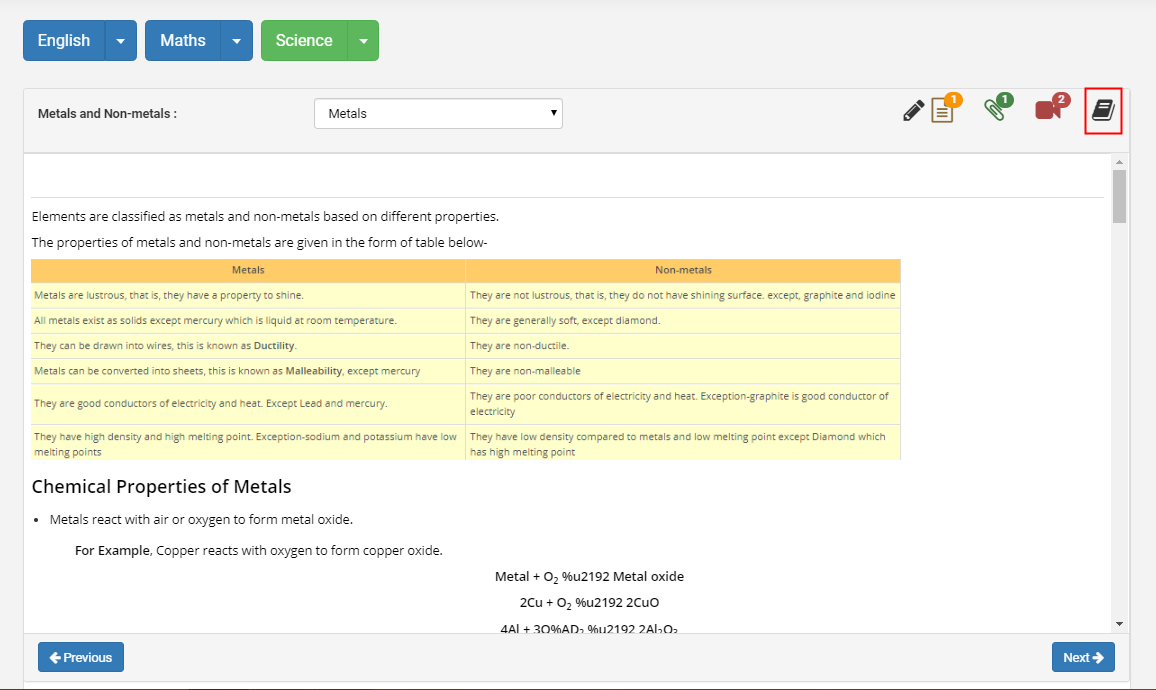
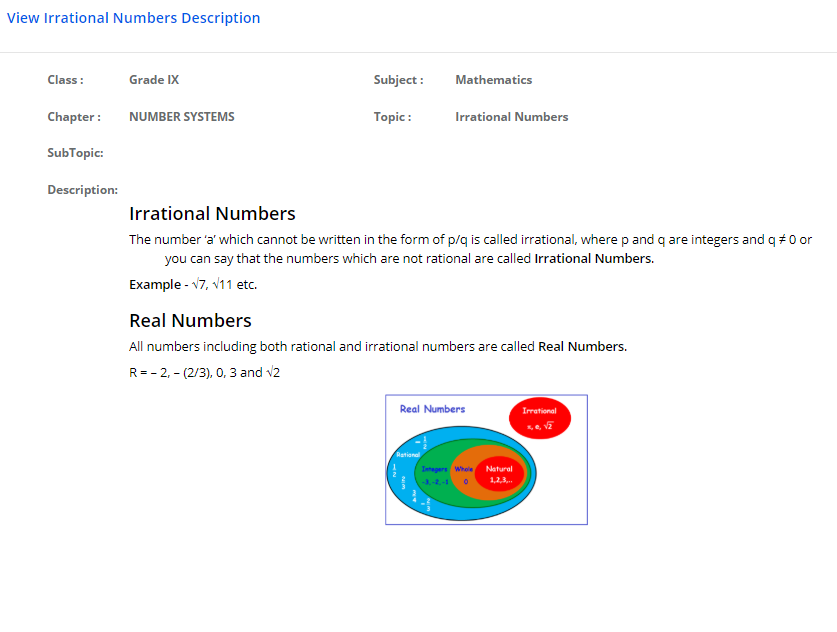
Step 28: It will list the topics available under the chapter. To view the description, click on the topics name.

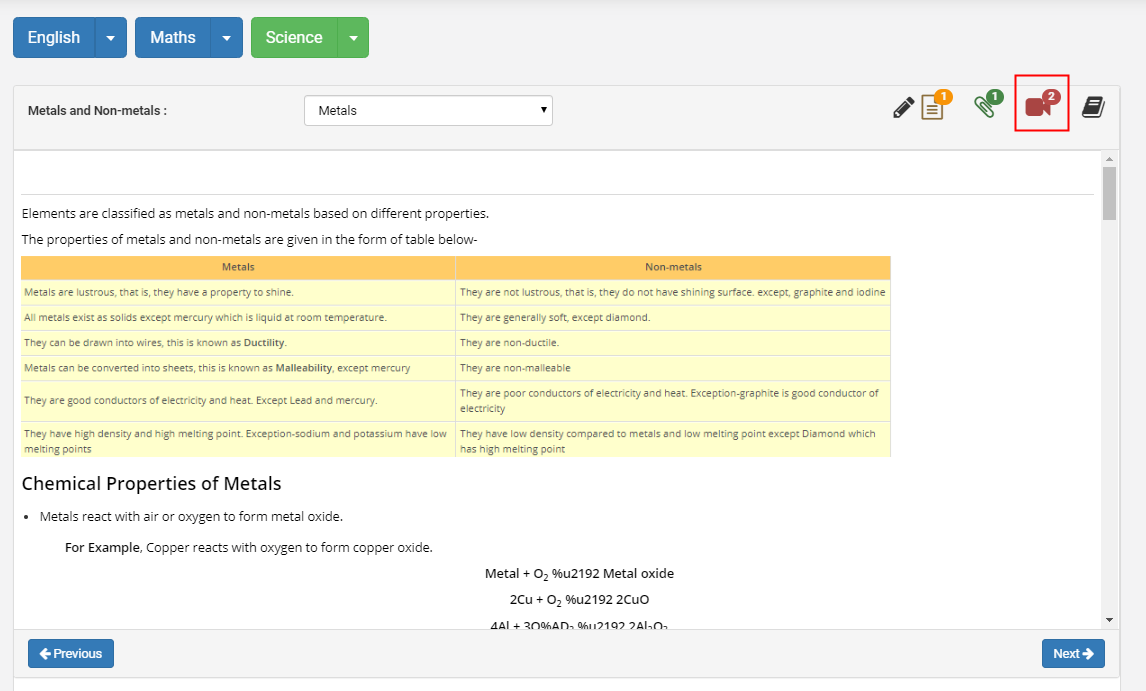
Step 29: It will display the description available for the topic.

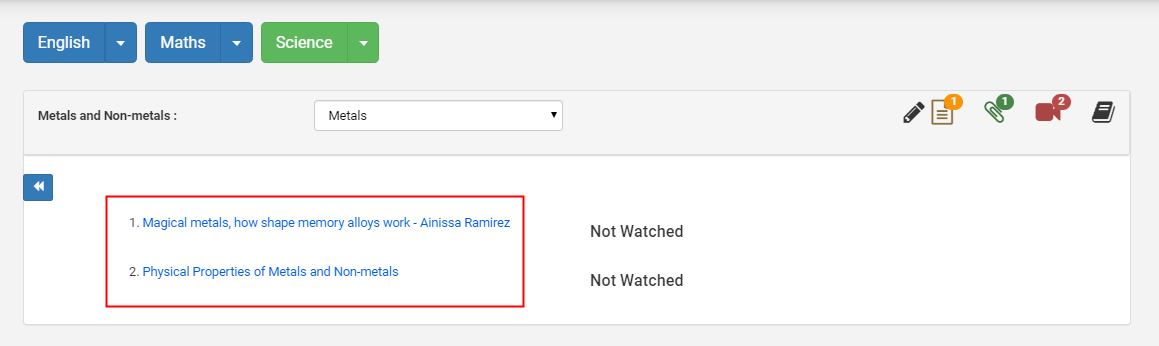
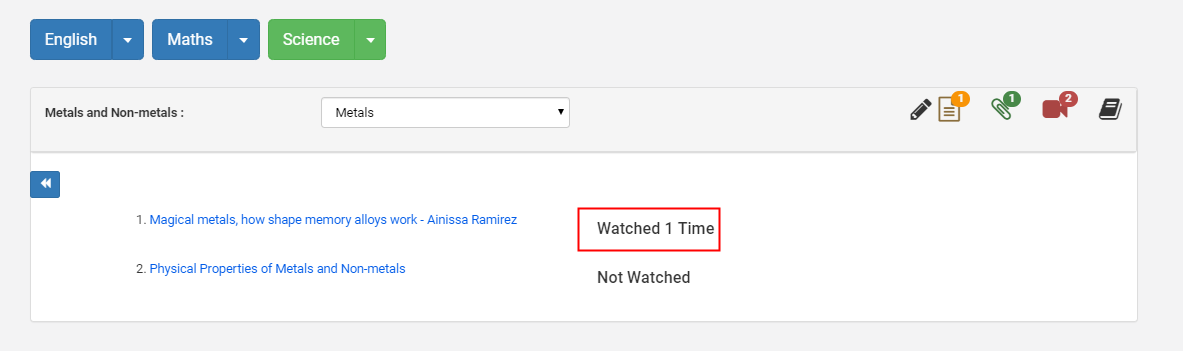
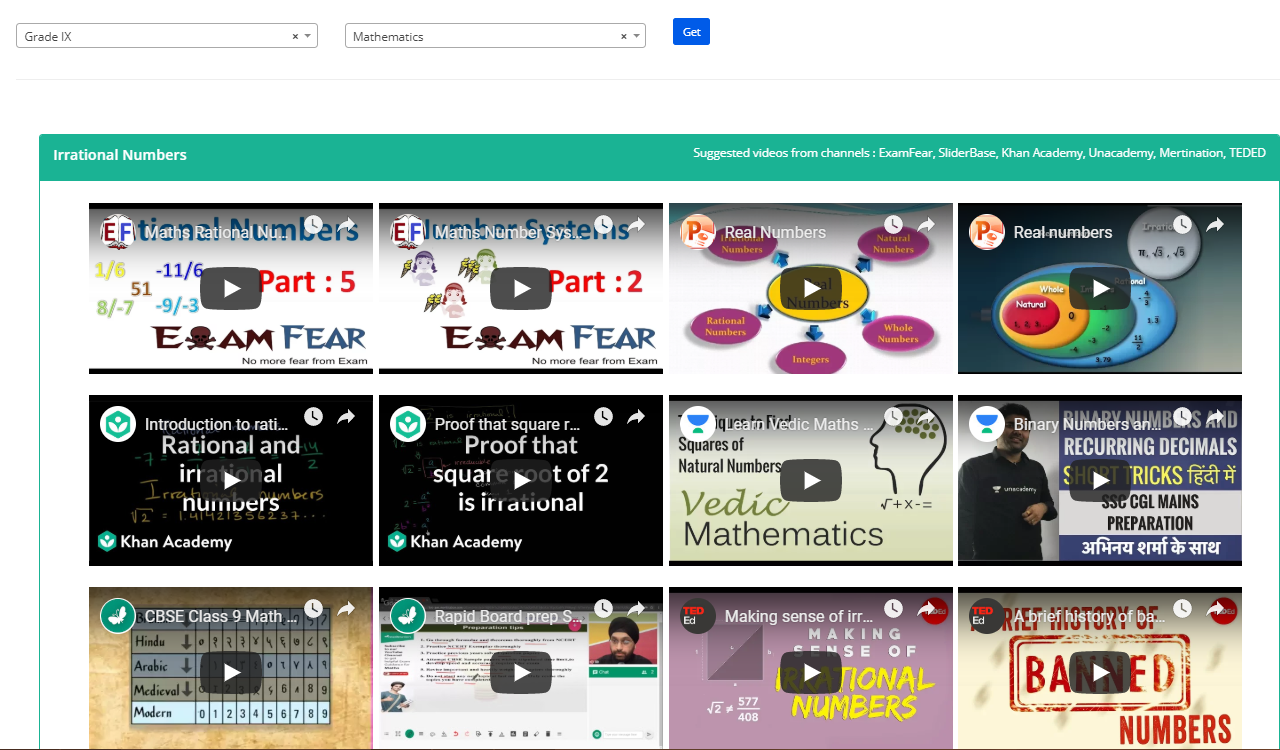
Step 30: To view the suggested videos which are being streamed from different channels, Click on the suggested videos link.

Step 31: You may click on the video to play.

Create Topics:

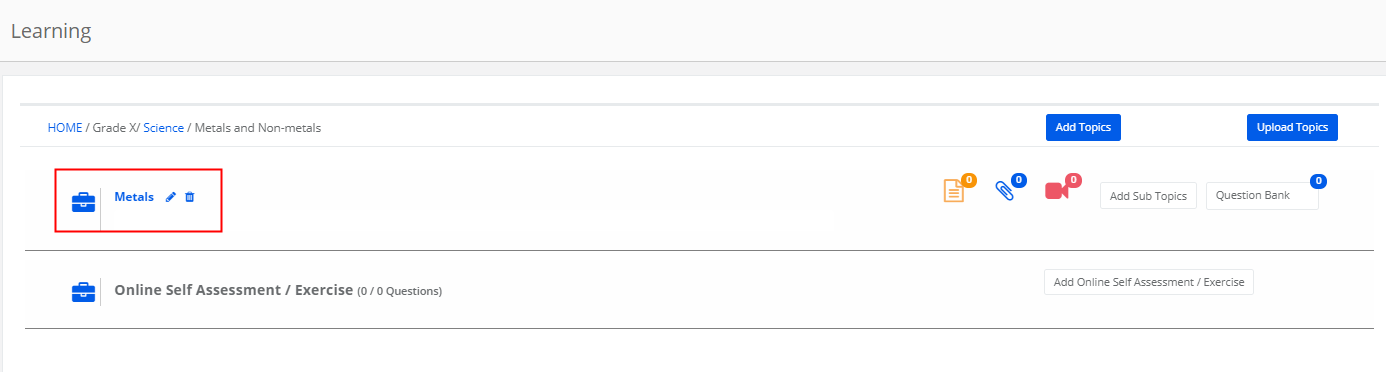
Step 32: To create Topics under a chapter, Click on the arrow against the Chapter name. You can create the topics manually or upload them.

Step 33: To create the topic manually, click on Add topic.

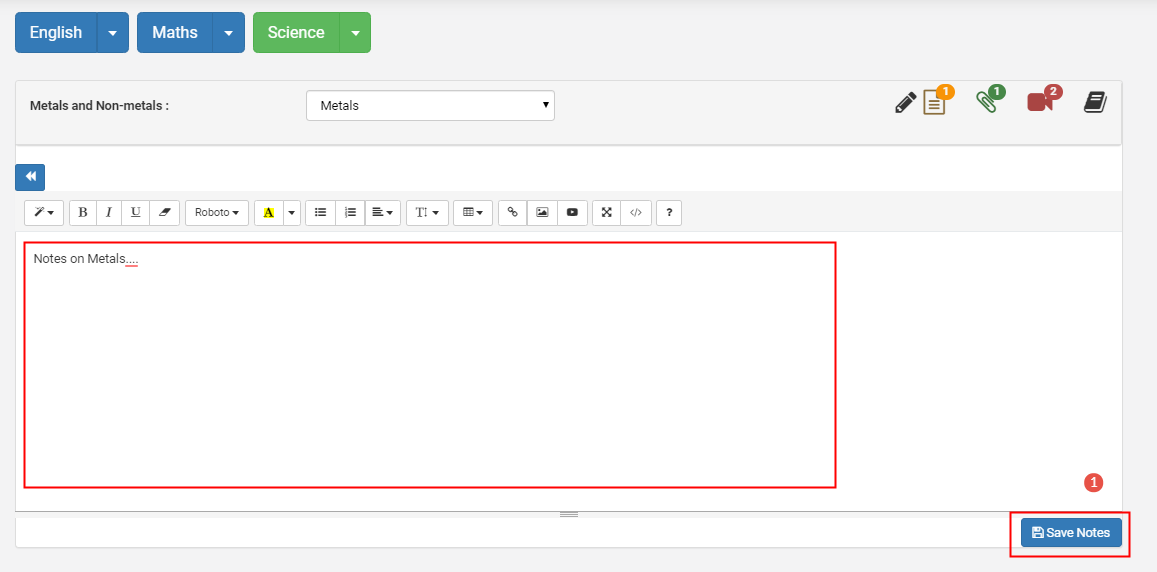
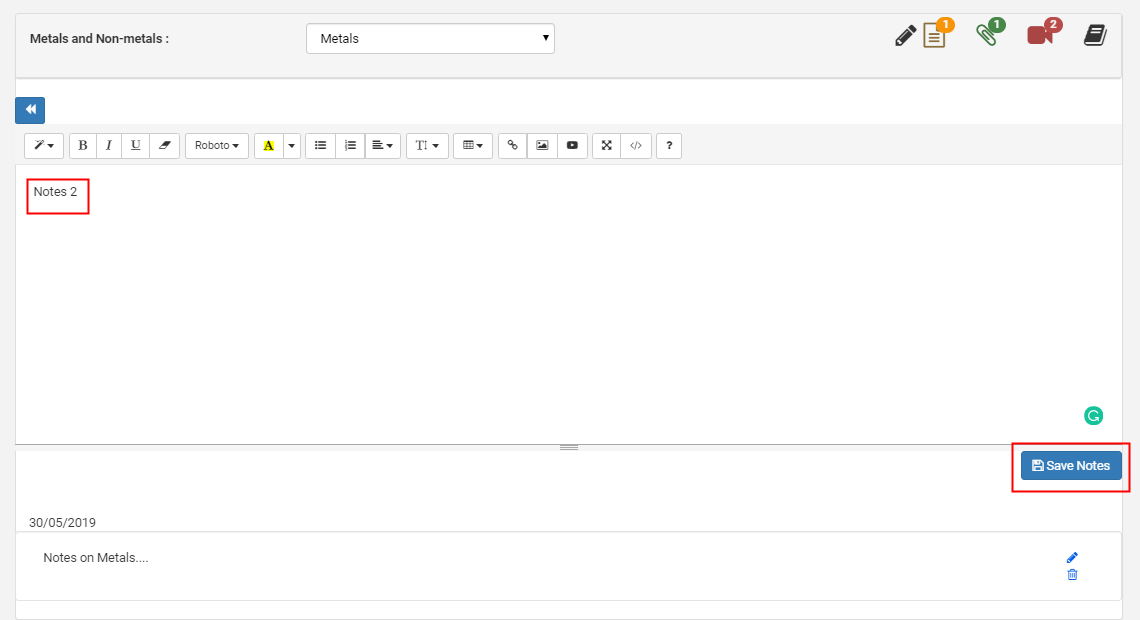
Step 34: Add the Topic name, Description and Click on Save.

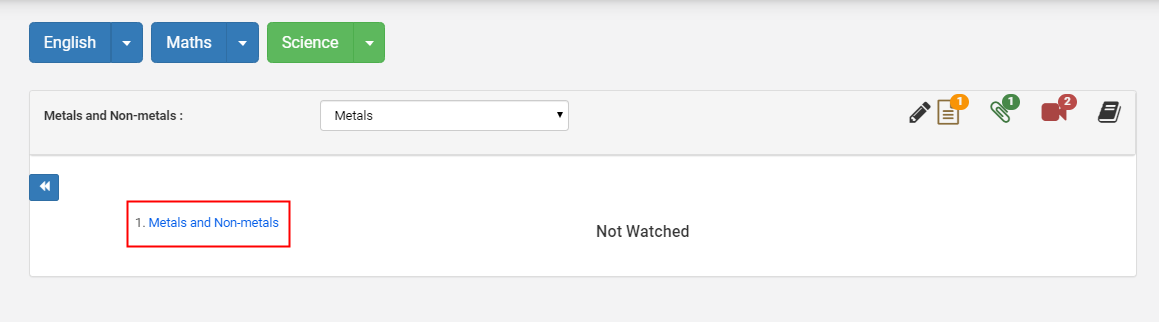
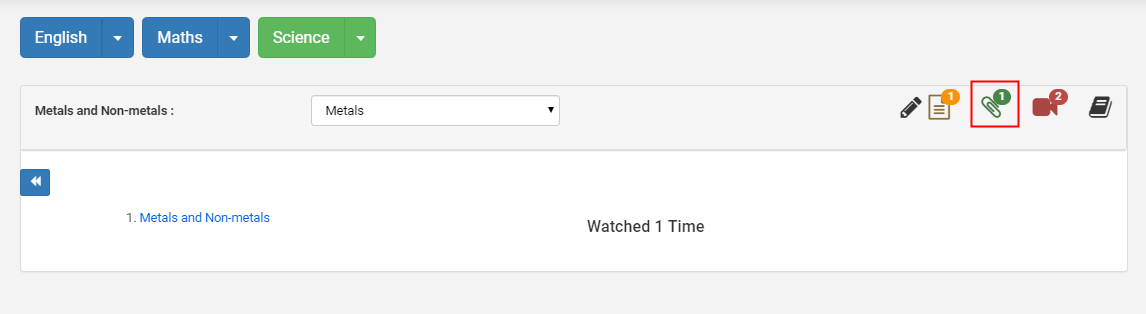
Step 35: You can view the description by clicking on the topic’s name. You can edit or delete the topic by clicking on the respective icons.

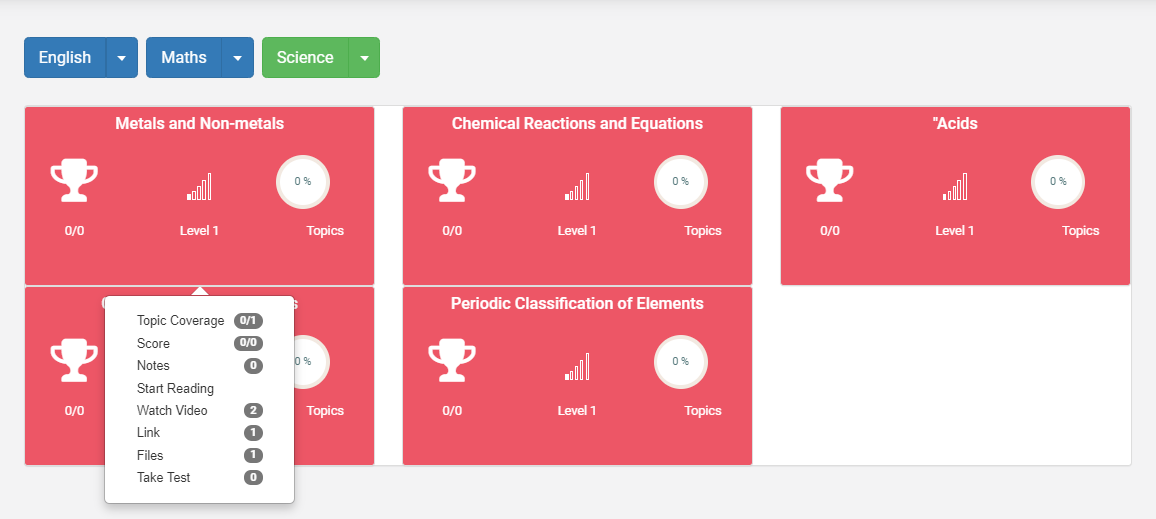
Step 36: MCB Learning module allows you to add learning resources in three formats like files, website links, and videos. To add resource files for the topic, Click on the file icon.

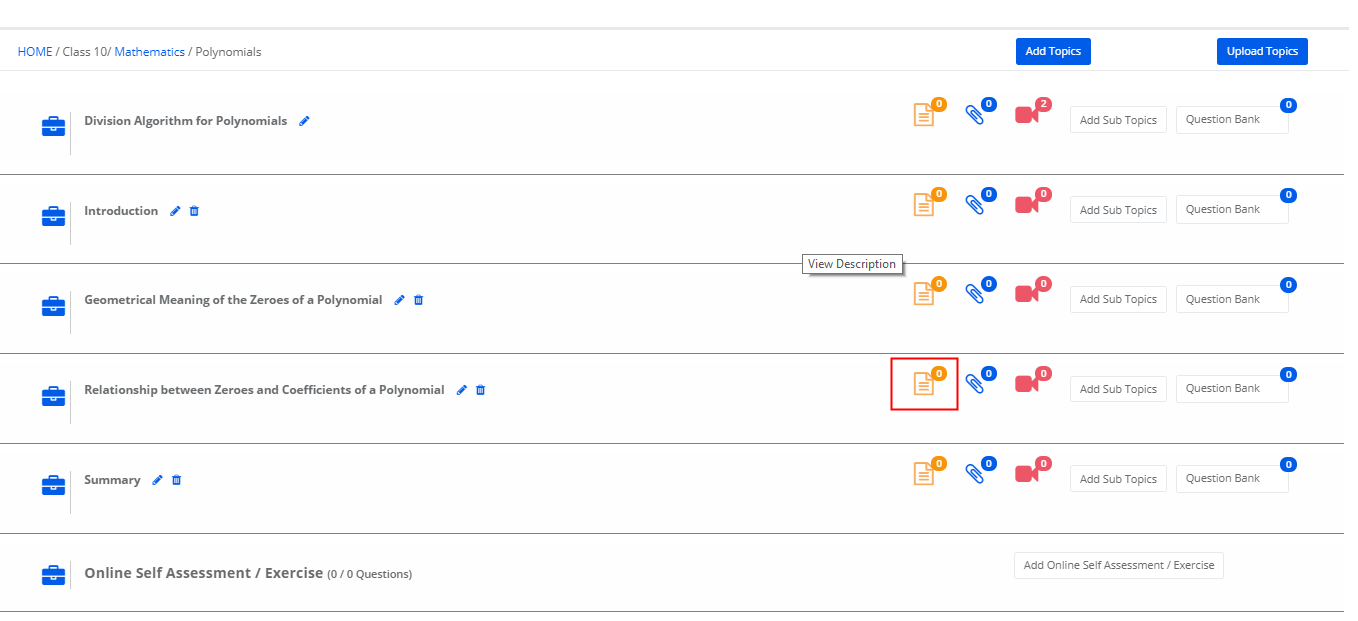
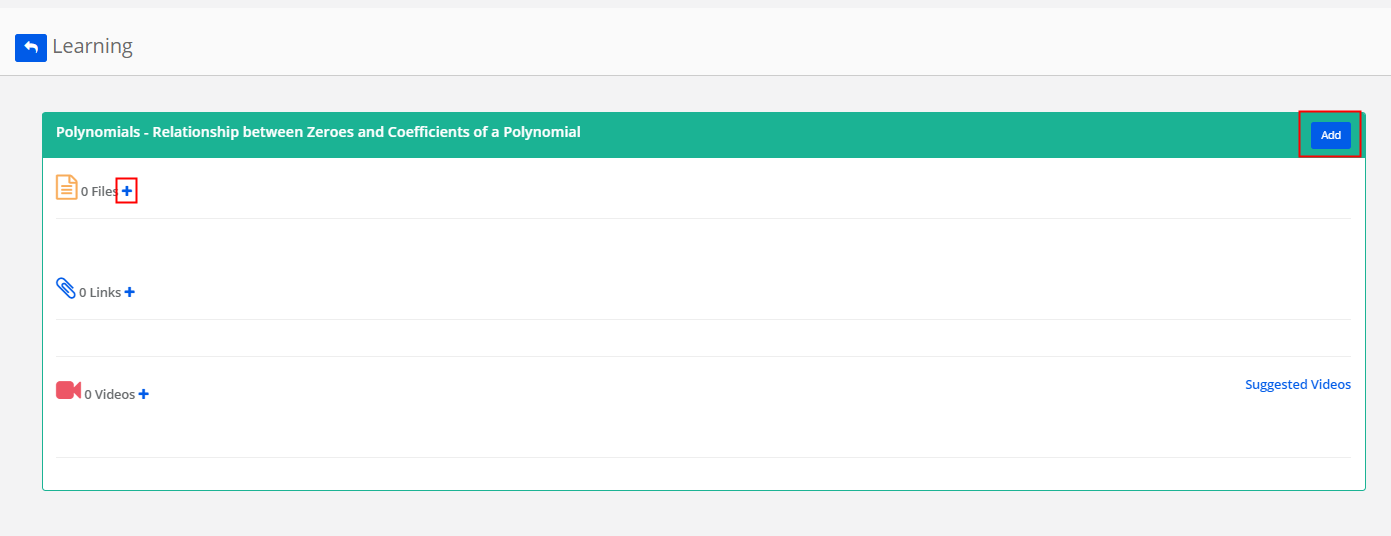
Step 37: Click on Add button on the top corner.
To add a file, Click on + sign against the Files.

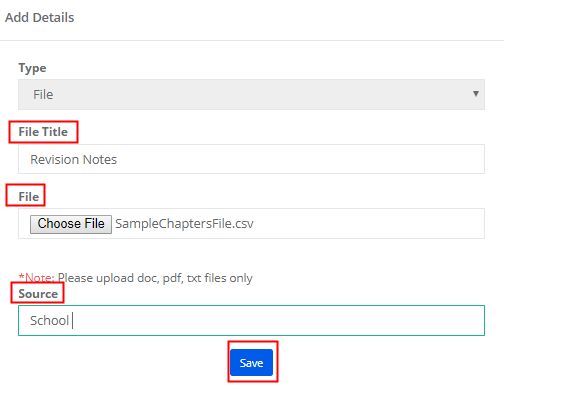
Step 38: Enter the File Title, attach the file, enter the source and click on Save.

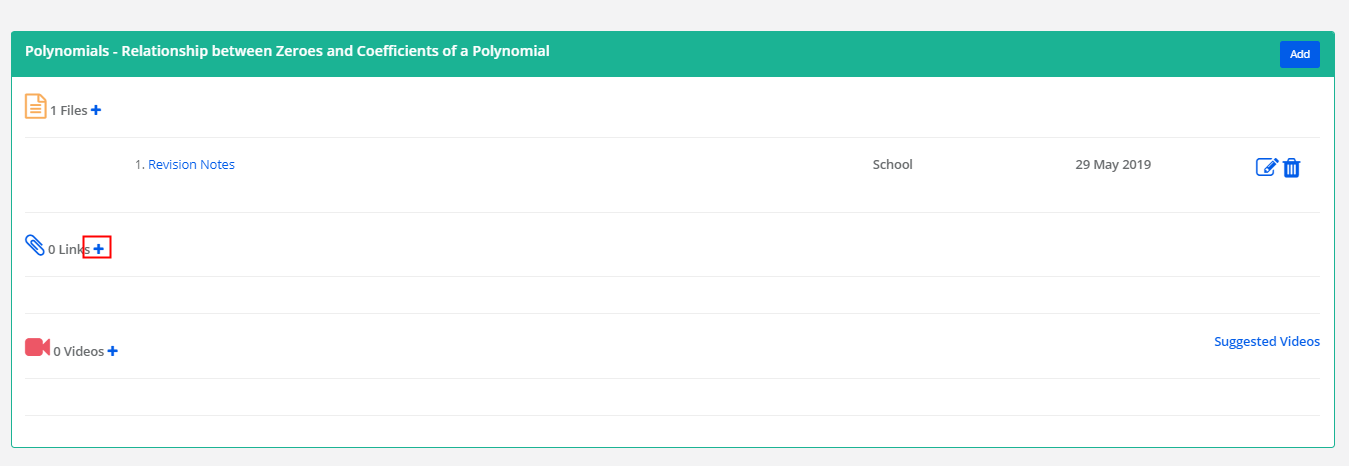
Step 39: You can edit or delete the file by clicking on the respective icon.

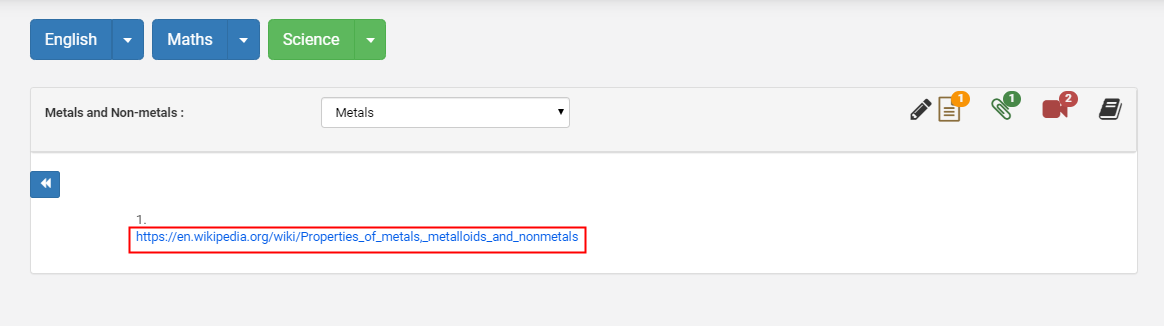
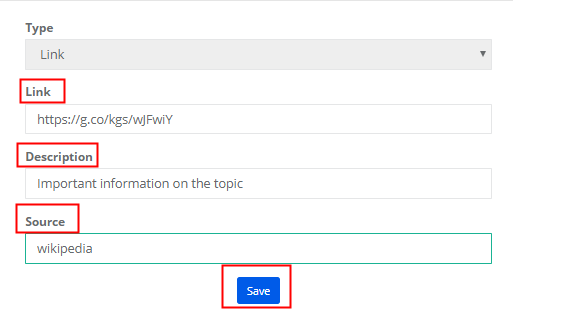
Step 40: To add a link, Click on +sign against the Link option.

Step 41: Enter the link, description, source and click on Save.

Step 42: You can edit or delete by clicking on the respective icons.

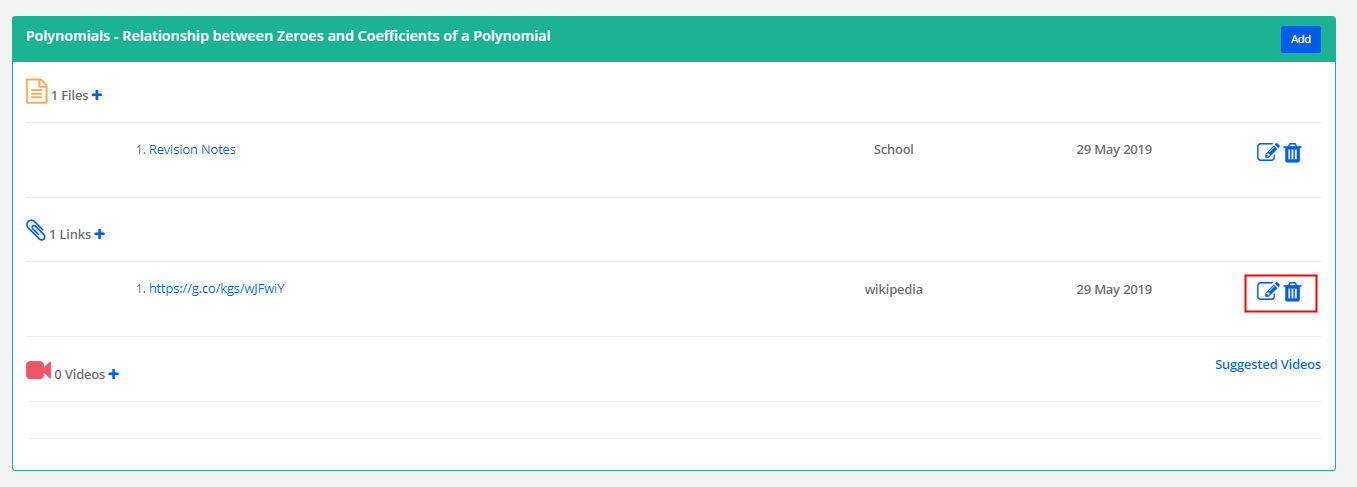
Step 43: To add videos, Click on +Sign against the Videos option.

Step 44: Enter video name, Embedded URL, Sources and click on Save.

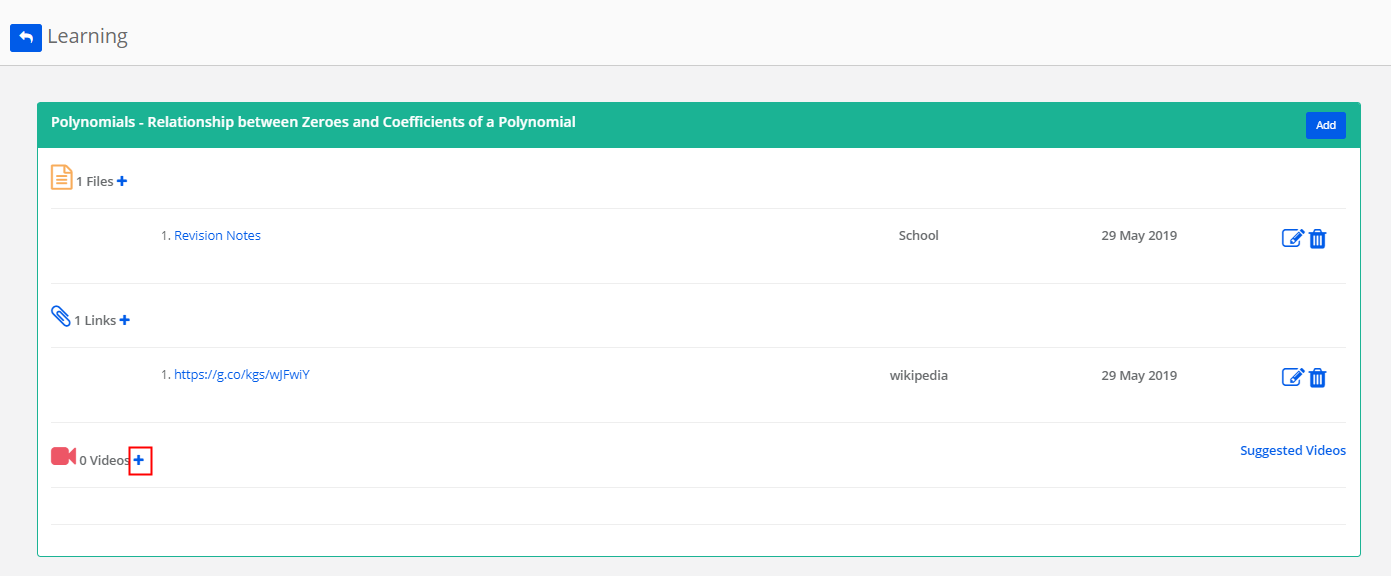
Step 45: To add MCB Suggested videos from open source channels, click on suggested videos option.

Step 46: Please note the channels from which the videos are steamed. Choose the videos that you would like to add them as resources for students and click on Save.

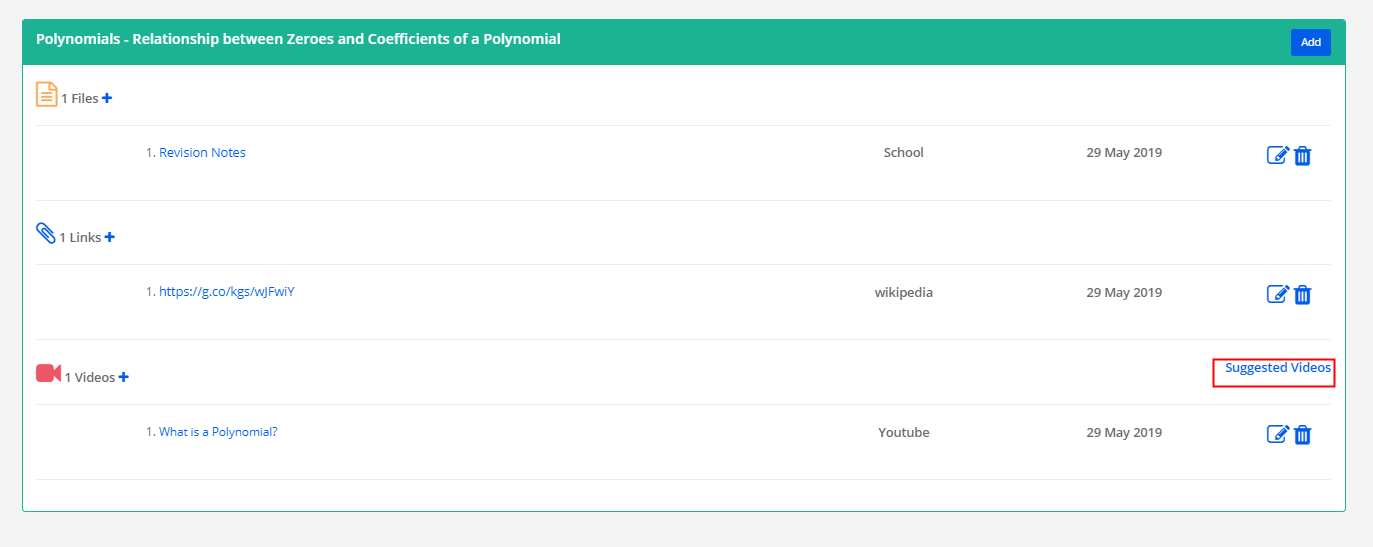
Step 47: You may edit or delete the videos by clicking on the respective icons.

Step 48: As you go back to the topics page, it clearly displays the number of resources available against their respective icons.

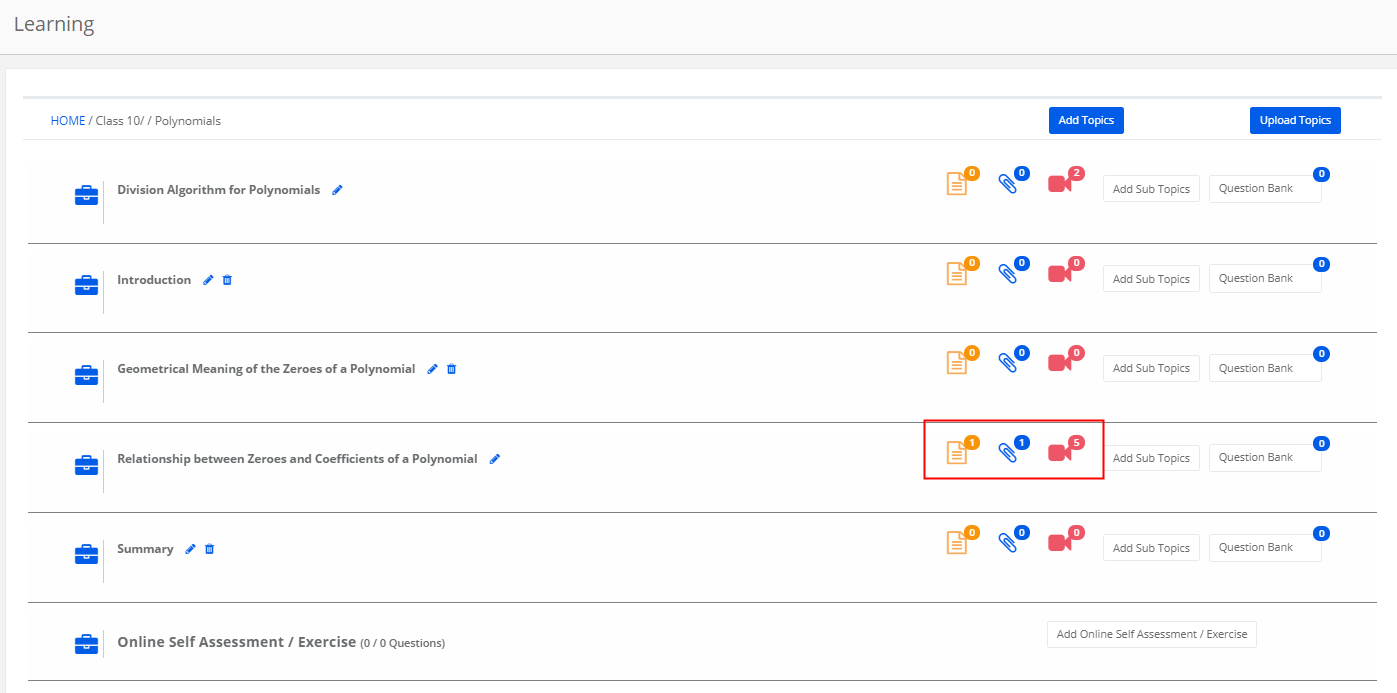
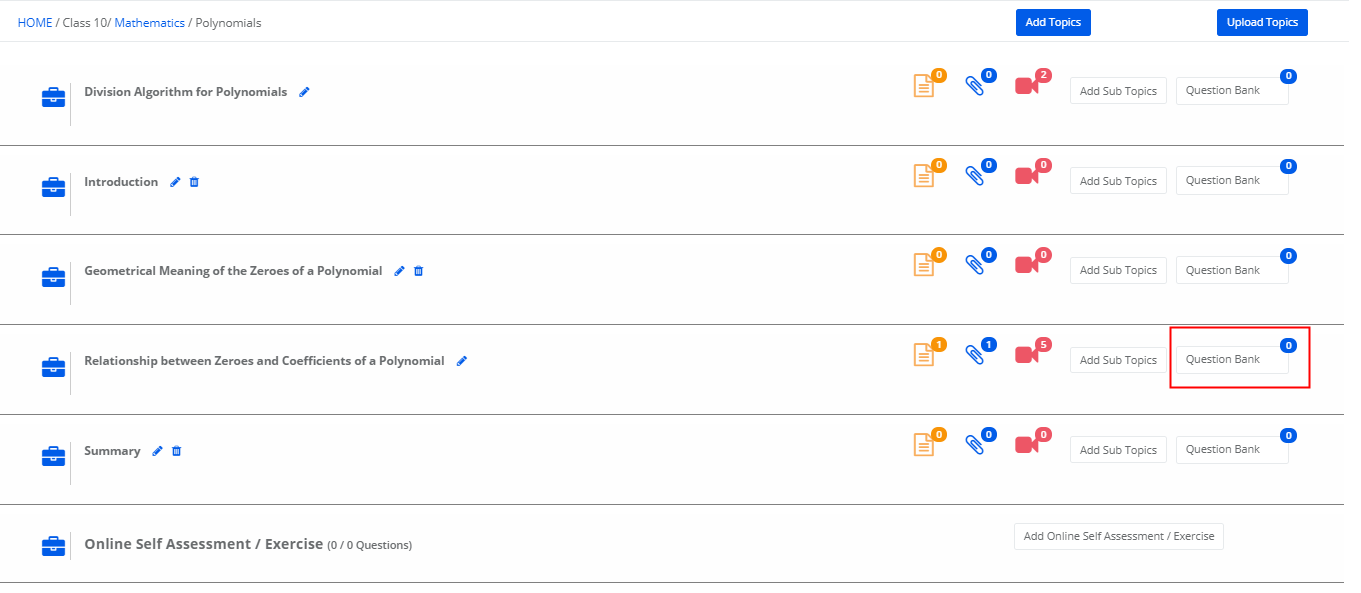
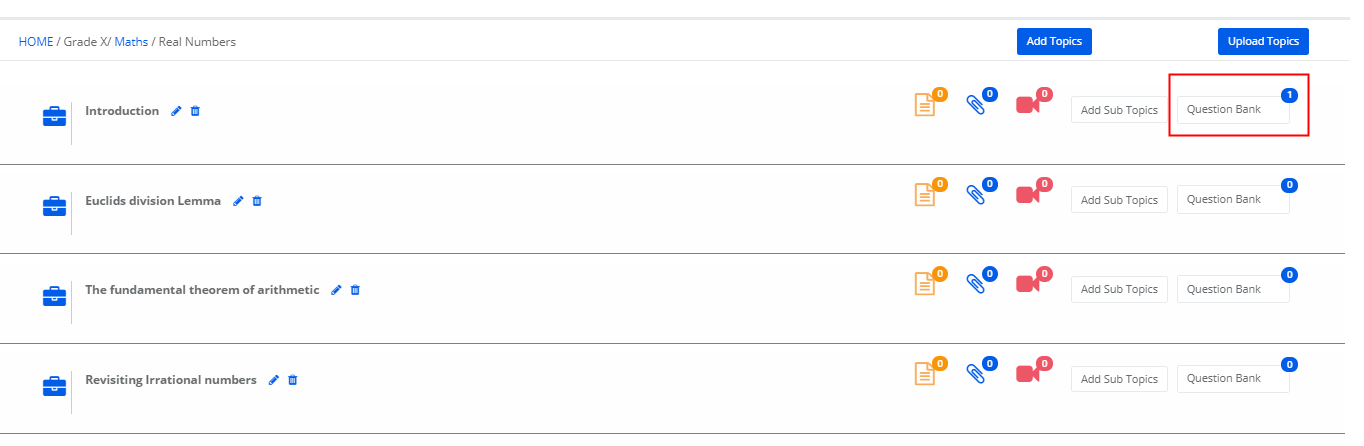
Step 49: To add questions to the topic, click on Question bank.

Step 50: Click on +Question and repeat step 21.

Step 51: When the question is added, you can find them in the count against the topic.

Create a Self Assessment:

Step 52: To create self Assessment or Exercise for the students to practice from their login, Click on Add online Self Assessment / Exercise.

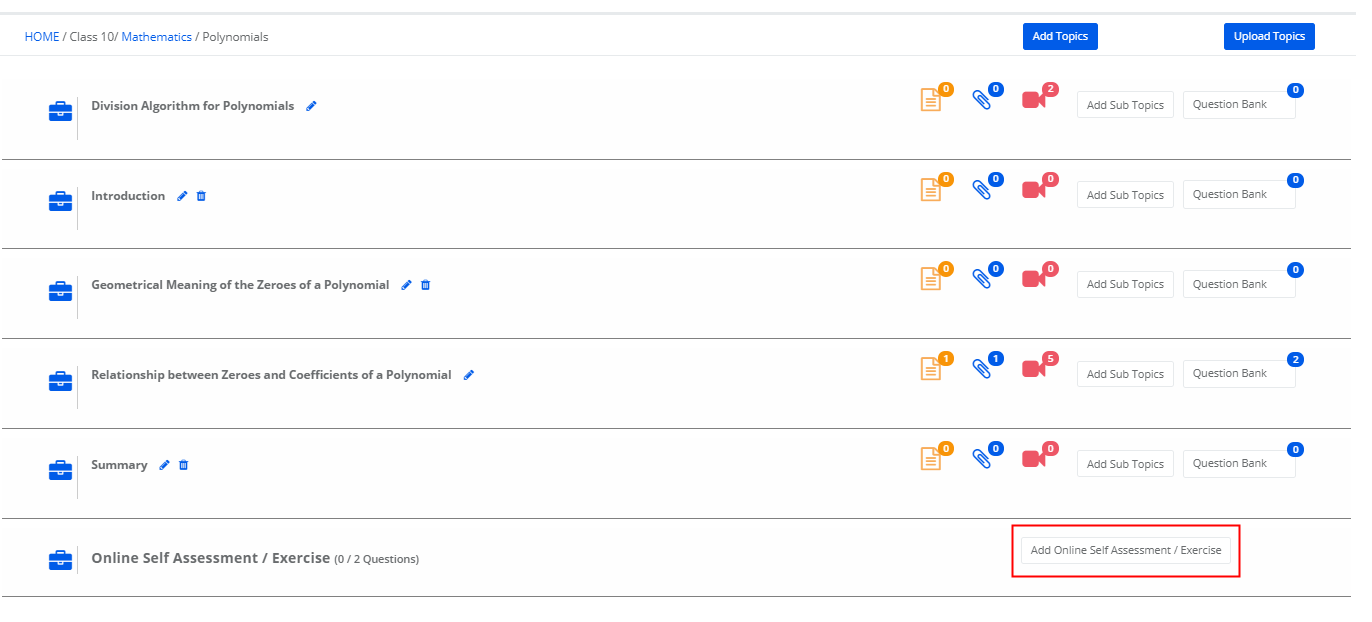
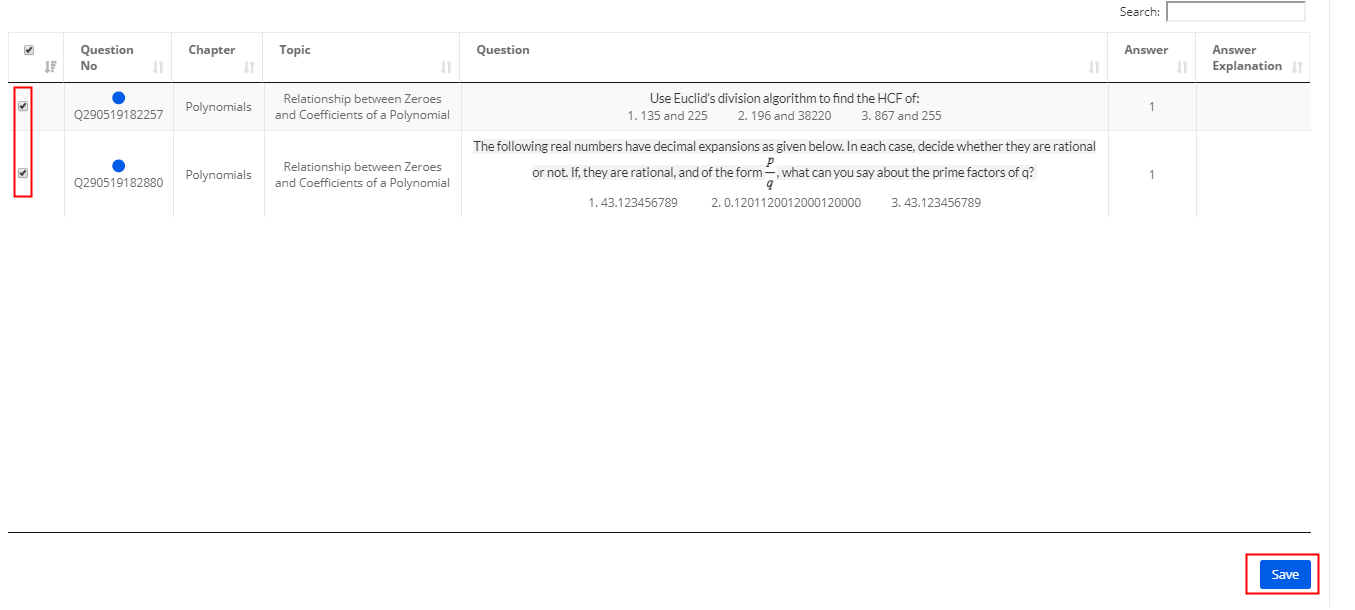
Step 53: Choose the questions available for the chapter and click on Save.

Step 54: To edit the online Self Assessment / Exercise, Click on Manage online Self Assessment / Exercise.

Step 55: Make the required changes and click on Save.

How can a student access learning resources and attempt online exams?

The learning resources, self-assessment/ exercise shared by teachers can be accessed from student/parent login. These resources and self-assessment help students to deepen their understanding of the topics.

The online examinations help students to understand how much more they need to work on the concepts based on their result.

To access the learning resources, please follow the steps mentioned below.

Step 1: As you login to the parent/student portal, locate the Learning management tab and look for the subjects available for learning.

The subjects are listed in the first row. By default, the first subject’s chapters are loaded for learning. If you wish to change the subject Click on the respective subject’s name to list you the chapters available.

Each box represents one chapter of the subject along with the learning stage, percentage of topics completion.

Step 2: As you click on the chapter’s box, the drop-down shows the following options

1. Topic Coverage: Percentage of topics read by the student
2. Notes: Notes made by the student during learning the topic
3. Watch the video: Shows the count of videos available for the chapter.
4. Link: Shows the count of links available for the chapter
5. Files: Shows the count of files available for the chapter
6. Take test: Shows the count of Online assessments/ exercises available for the student to practice.

Step 3: To access the learning resources click on Start reading.

Step 4: You will be directed to the page where you can find the Topics drop down. As you select the topic, it displays the Topic description, Notes, Files, Web links, Videos and Exercise options. The number in the superscript of the icons represents the quantity of the resources available.

Step 5: To enter or view the Notes, Click on Notes Icon.

Step 6: Enter the notes and Click on Save notes.

Step 7: To edit the existing notes, click on the Edit icon.

Step 8: Do the necessary changes and click on the Update button to save the changes.
To cancel the changes, click on the Cancel button.

Step 9: To add another note, Enter the note and click on Save Notes.

Step 10: To access files, Click on Files Icon.

Step 11: It will list the files available for the topic. Click on the file name to view the file. Not watched indicates that the file was not opened by you even once.

Step 12: As you open the file, it will display how many times you accessed the file.

Step 13: To access Links, Click on Links Icon.

Step 14: It will list the links available for the topic. Click on the link to visit the web page.

Step 15: As you open the link, it will display how many times you visited the web page.

Step 16: To access videos, click on the Videos icon.

Step 17: It will list the videos available for the topic along with the watch history. Click on the link to watch the video.

Step 18: As you open the link, it will display how many times you watched the video.

Step 19: To access the Exercise, Click on Exercise Icon.

Step 20: It will list the questions along with the options. Choose the right answer and click on Submit Answer.

Step 21: Once the test is submitted, it will show you the score, answers marked for each question along with the explanation. Same can be viewed when you click on the view results button.

Step 22: Once the topic is covered by accessing the resources, you may click on the Next button to go to the next topic. To access the previous topic, click on the Previous Button.

Note: As you click on Next button, MCB reads it as the completion of the topic and shows the percentage at the learning stage of the chapter. As you complete and click on next at each topic, the percentage is calculated accordingly.

Step 23: The 100 % indicates the completion of all topics learning in a chapter and the box color changes to Blue from Red.

The Red box indicates that the topics haven’t started.

The yellow color indicates that the learning has started and in progress towards completion.

Online Exams

Step 24: To attempt Online Exam, Click on Start Exam. Please note the exam cannot be attempted when the Exam date is crossed. It shows as Due Date Expired against the Exam.

Step 25: Choose the question, right answer and click on next button to attend the next question. You may go to the desired question directly by clicking on the question number.

Step 26: As you answer all the questions, click on Finish Exam.

Step 27: Click on verify to check the given answers once again. Click on Submit to confirm the exam completion.

Step 28: If your school chooses to publish the result instantly, the result is displayed soon after you hit on Submit button. The result includes the overall score, subject wise score, marked answers, and the answer key. You may print the same by clicking on the print icon which is available on the top left corner.

Step 29: The online exam dashboard will show you View Results and Question paper options against the exams which are attempted.

Step 30: To view the question paper, click on the Question paper. It will show the list of questions given for the exam. You may print the same for later use by clicking on the print icon.

Step 31: To view Results, click on View Results. It will display the result of the exam. You may print it by clicking on the print icon.

How to add Online Exam or Worksheet?

Video Tutorial

How to add an Online Exam or Worksheet?

Step 1: Login to MCB with Login Credentials.

Step 2: Switch to Online Exam module by clicking on Home which available next to the profile picture on the right corner.

Step 3: Click on the Question bank option from the dashboard.

Step 4: You will be directed to an online exam dashboard showing number exams available in each class.

Step 5: To view or add the exam, click on the number against the class.

Step 6: It will list the exams created for the class.

To add a new exam, click on the Add Exam Option.

Step 7: Enter the exam name, Start Date, End Date, Class groups.

Select the checkbox to make all questions mandatory for students while writing the exam.

Choose the Publish Result as Instantly or on a selected date.

Instantly: To make the results and key open for the students soon after they complete the exam.

On a selected date: The result and the key will be shown to students only on the date that is selected.

Exam Type: Online exam can be attempted by students in two modes, I.e. Self paced and Time based.

Self-paced: Students can attempt the exam without any time constraint. Students can complete the exam in his/her own pace.

Time-Based: Student has to complete the exam within the time duration set against each subject of the exam. Time duration is considered by adding the time set for all the subjects of an exam. Please note that the exam will be closed once the set duration is over automatically.

Click on Save to create the Exam.

Step 8: To add subjects to the exam, Click on Add Subjects against the exam.

Step 9: Choose the Subject, enter Min. Marks, Max. Marks, No. Of Questions, Exam date, duration of the exam and exam time. Click on Save.

Step 10: To add the syllabus of the exam, Click on Syllabus against the subject.

Step 11: Select the Chapters & topics which are covering in the exam and then save.

Step 12: To Add Questions, Click on Questions option against the Subject.

Step 13: Choose Chapter, Topic and level from which you would like to conduct the exam. Click on Get Questions to list the questions available in the selected chapter and topic.

Step 14: Choose the question which you would like to add to the exam and click on Save Questions. Please note that you can assign the questions based on the no of questions given while adding the subject to the exam.

Step 15: To view questions assigned to the subject, click on the Eye icon next to the questions count.

Step 16: It will show you the list of questions assigned to the subject.

Note: The following are the limitations of the online exam.

  • Online exams can be created academic year wise. The previous year exams are visible only when you switch the academic year.
  • Delete option works only when no student attempts the exam.
  • Delete option for the subjects works only when no student attempts the exam.
  • Adding subjects option is available only when no student attempts the exam.
  • Edit option is disabled for all fields except changing the exam end date if a student attempts the exam.
  • Add questions is available for the subject only when no student attempts the exam.

How to generate Test wise Analysis Report?

To generate the report, please follow the steps mentioned below.

Step 1: Login to MCB and Switch to branch level by clicking on Change access level on the right panel as you click on the user profile picture.

Step 2: Click on the user type against the branch name.

Step 3: Click on the Gradebook on the top menu bar.

Step 4: Choose a Student Test wise Analysis option under the Analysis menu.

Step 5: Choose Class, Section, All Evaluations or a specific Evaluation, Subject type as Academic Subjects or Non Academic Subjects, Under subjects All subjects or specific subjects, All tests or specific tests, Display type as All or boys or girls, Format as Format 1 or Format 2 and click on Show Report.

Step 6: Click on the Excel icon available on the top left corner to export the report.

How to read the report?

Format 1:
The Scores of the selected tests are displayed along with percentage and respective grade for each subject/subjects.

Subject Total Marks: Sum of all subjects marks
Subject Overall Grade: Subject percentage is calculated by Sum of all subject marks / Sum of Max Marks of Subjects * 100 and then based on percentage range the Grade is displayed.
Total Marks: Sum of total marks of all subjects
Overall Grade: Total percentage is calculated by Sum of Total marks / Sum of Max marks of subjects * 100 and then based on the percentage range the Grade is displayed.

TestWise Analysis (All) The report picks up the students of all genders from the sections selected.

Test Name: List of tests selected during the report generation.
Max Marks: Sum of maximums marks of the test
Student count: Strength of the section
Attended: Number of Students present for the test
Absent and %: Number students marked as Ab [In the marks entry]
Pass: The number of students who score above the least grade set on the grading scale.
Example: If a grading scale is set as A, B, C, D. The students who score grades C and above are considered as pass.
Pass %: Number of passed students/number of students attended the exam * 100
Fail: The number of students who score the least grade set on the grading scale.
Example: If a grading scale is set as A, B, C, D. The students who score grade “D” are considered as Fail.
Fail %: Number of failed students/number of students attended the exam * 100
Grades set in the grading scale: Number of students falling under each grade of the grading scale based on their performance.
Average: Average marks scored by students of the selected tests
Highest: Highest marks scored in the test.
Lowest: Lowest marks scored in the test.
Grade wise Analysis Chart: The chart represents the number of students falling under each grade of the grading scale based on their performance. The count is shown evaluation wise representing in different colors.

Testwise Analysis (Boys):
The report picks up the students having Boys as gender from the sections selected. The remaining parameters of the report can be read similar to the Test wise Analysis [ALL].

Testwise Analysis (Girls):
The report picks up the students having Girls as gender from the sections selected. The remaining parameters of the report can be read similar to the Test wise Analysis [ALL].

Format 2:
The report displays the number of students falling under each percentage range defined in the grading scale along with the absent count of each subject under the selected evaluations from the selected sections.