How to create Subject Wise Reflections?

The subject wise reflection types can be created only in system admin login.

School can define Reflection type and subtypes to enter grades and remarks against the main reflection type or sub reflection type.

Upon grades and remarks updation by class teacher or subject teacher or branch admin, the report will be reflected in parent login instantly if school enables the link for parents.

Class teachers, subject teachers or branch admin can also generate the subject reflection reports student wise in bulk from their respective logins.

The reflection remarks against the reflection type for a section can be entered at branch level.

To create the Subject Reflection Type, please follow the steps mentioned below.

Step 1: Login to MCB with System Admin credentials

Step 2: Click on Grade Book menu on the top menu bar.

Step 3: You will be redirected to the Grade book module. Choose Subject wise reflections option under Grade Book Menu.

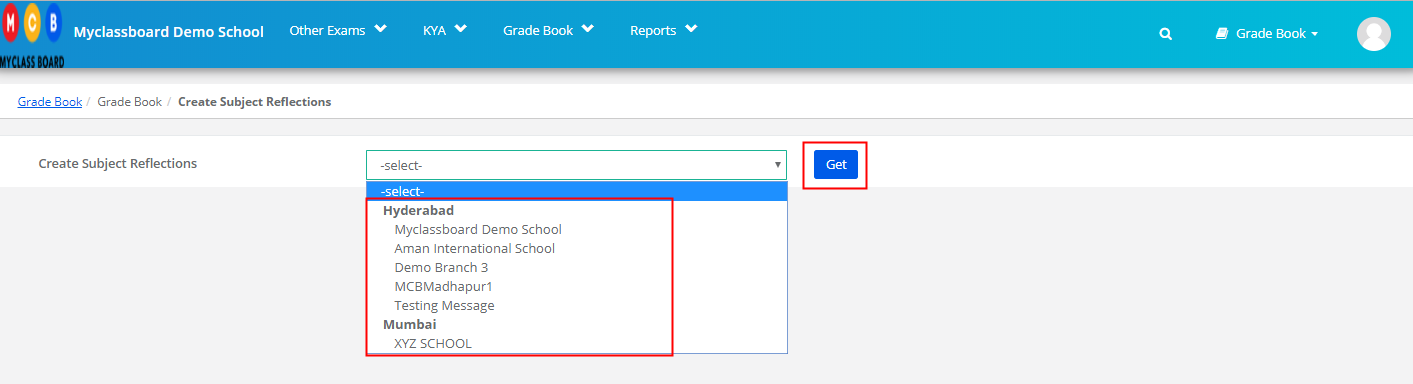
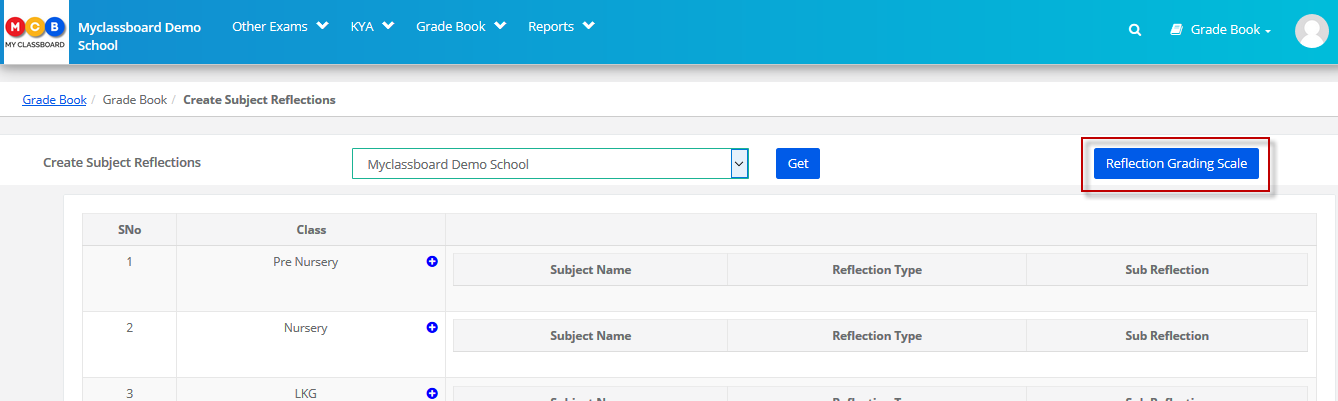
Step 4: Choose Branch for which you would like to create the reflection type and click on the Get button to get the list of classes.

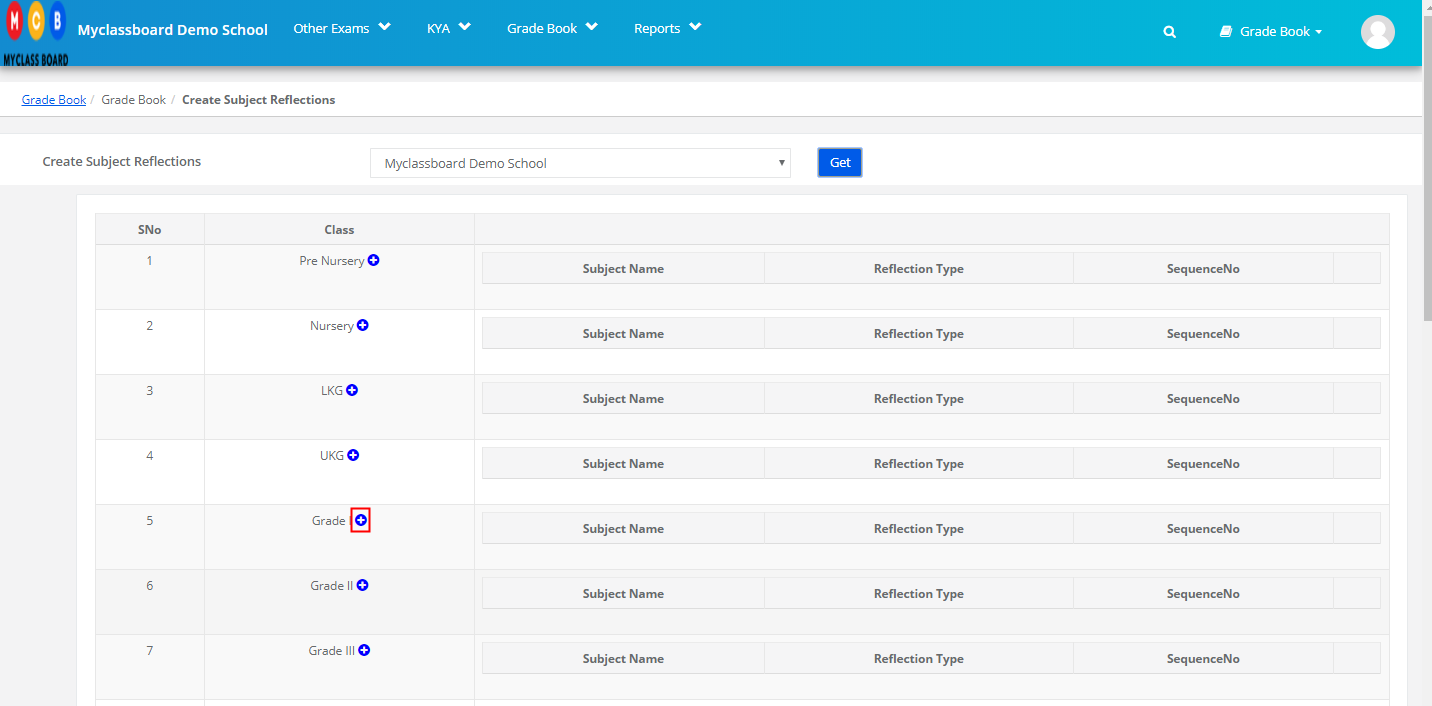
Step 5: To add the reflection type, Click on plus(+) sign.

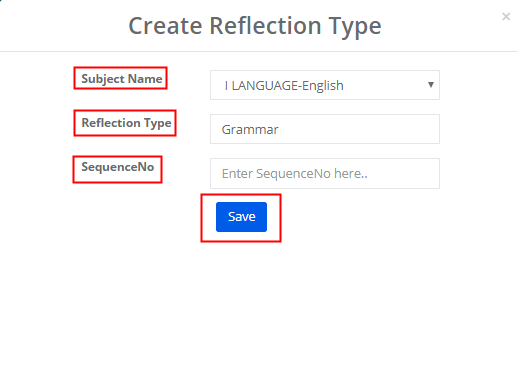
Step 6: Choose the subject for which you need to create the Reflection type, Enter Reflection Type, Sequence No and click on Save.

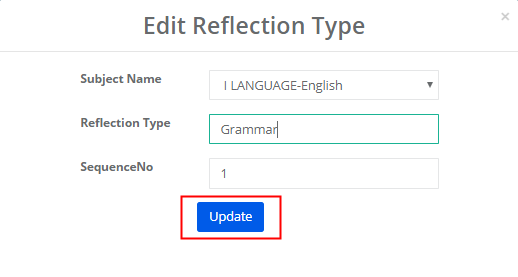
Step 7: To edit the Reflection Type, Click on Edit icon against the type.

Step 8: Make the required changes and click on Update.

Sub Reflection:

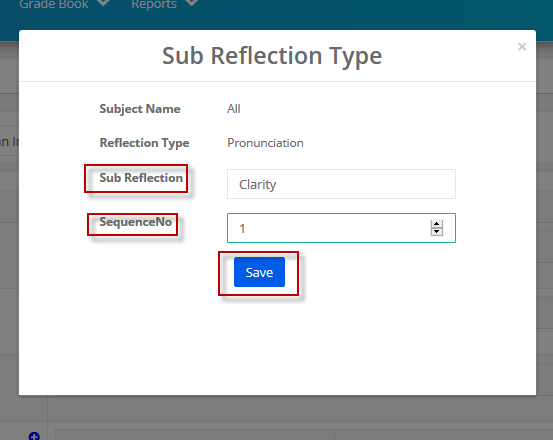
Step 9: To create Sub Reflection, Click on Plus(+) sign against the reflection type under which you would like to create the sub reflection.

Step 10: Enter the sub reflection type and sequence number. Click on Save button.

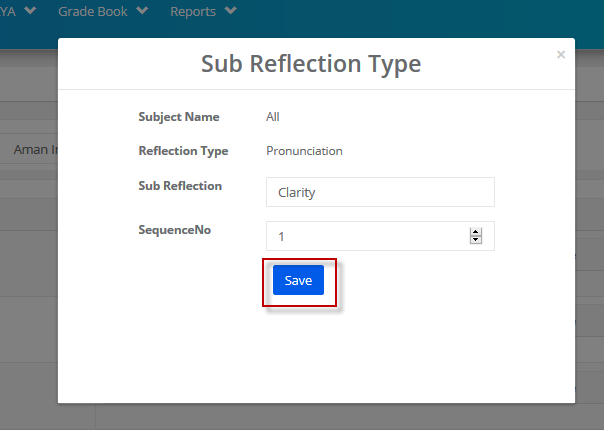
Step 11: To edit Sub reflection type, click on the edit icon against the sub reflection type.

Step 12: Make the changes required and click on the Save button to save the changes.

Step 13: To delete the sub reflection type, Click on delete icon against the sub reflection type.

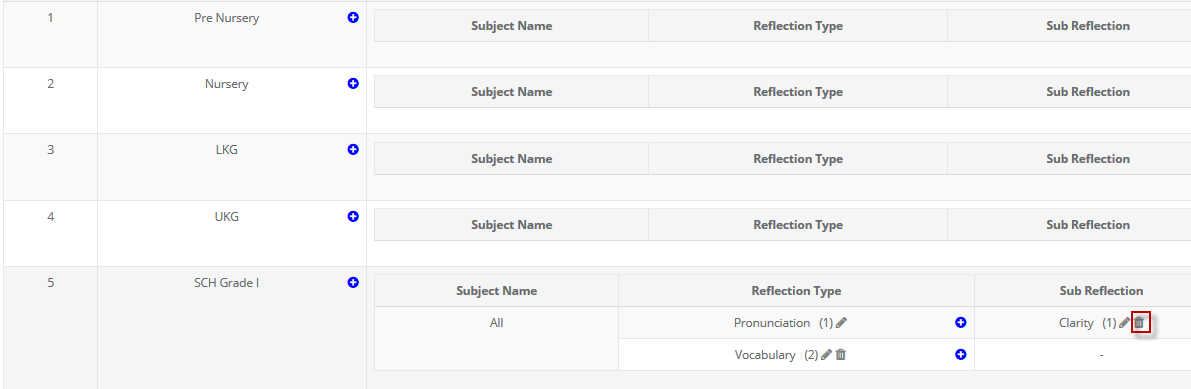
Step 14: Click on yes, delete it option to proceed with the deletion or click on Cancel option to revert.

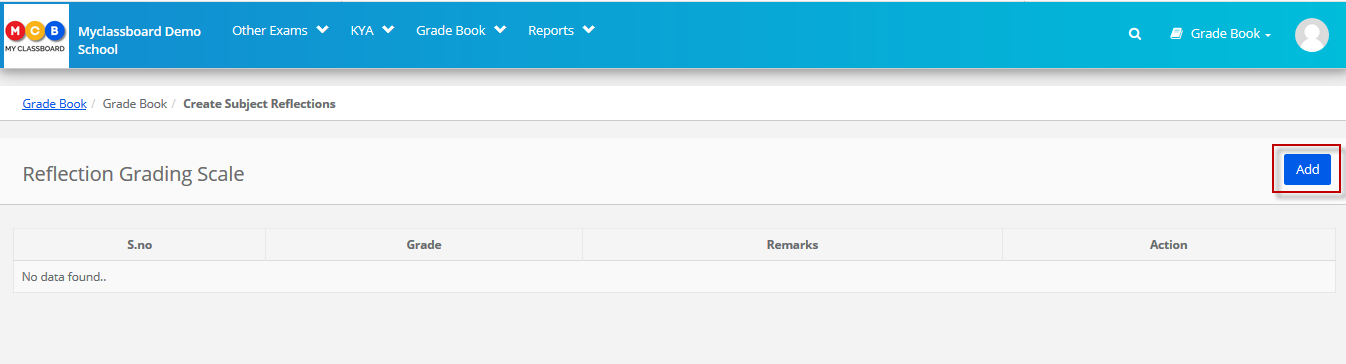
Reflection Grading Scale:

Step 15: To create Reflection Grading Scale, Click on Create Reflection Grading Scale Option present on the top right corner.

Step 16: Click on Add button to create the grading scale

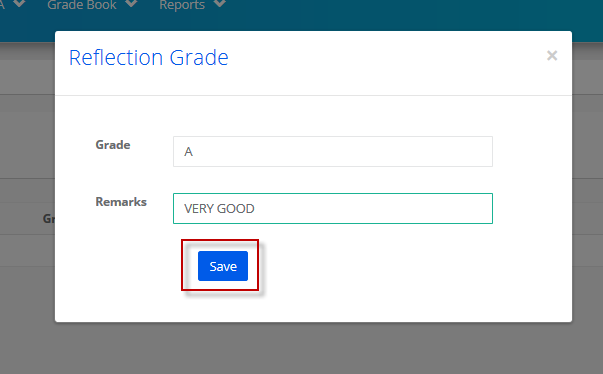
Step 17: Enter Grade, Remarks and click on Save.

Step 18: To edit the grade, click on the edit icon against the grade.

Step 19: Make the necessary changes and click on Save button.

Step 20: To delete the grade, click on delete icon against the grade.

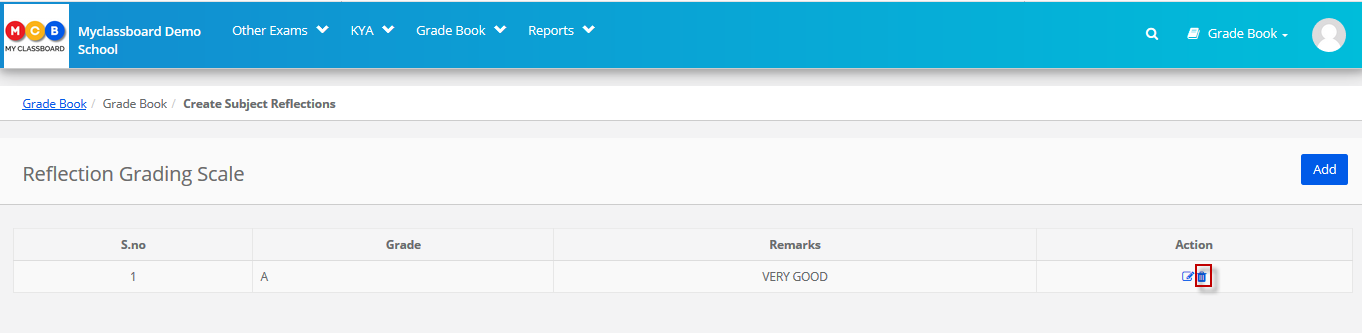
Step 21: Click on “Yes, Delete it! Option to proceed with deletion or Cancel to revert.

How to generate Usage Analysis Report?

Usage Analysis Report gives you the statistics on the Announcements, Photo Gallery, Diary, Student Logins, Parent Logins, and Staff Logins to understand the usage of the basic features which connects between parents and staff.

To use the report, pls follow the steps mentioned below:

How to use?

Step 1: Login to MCB with System Admin credentials.

Step 2: Select “Home” on the right-hand top corner.

Step 3: Select Communication. You’ll be directed to the “Communication” page

Step 4: Choose Usage Analysis Report from Reports menu.

Step 5: Choose Branch, Dates range to define from which date to which date you would like to generate the report for and click on Show Report.

Step 6: statistics on the Announcements, Photo Gallery, Diary, Student Logins, Parent Logins, and Staff Logins to understand the usage of the basic features which connects between parents and staff.

Step 7: As you click on the number under any category, it will show you the details of the respective category.
For example, if you click on the count under diary, it will show you the detailed report of diary with the details like Diary created to date, class, section, class work, Home Work, Description of the diary, subject name and
staff name who created it.

As you click on Excel icon on the top left corner, the report will be exported to excel.

How to use SMS Alerts?

How are SMS Alerts useful for schools?

Receive a snapshot of important information specific to Organization and Branches without having to login MCB on your mobile through SMS.

SMS Alerts provide timely updates on the following areas on a regular/weekly/ Monthly basis for your review.

Organization SMS Alerts:
Staff Birthday Greetings: Birthday greetings to Staff on their Birthday. There is a default template available in MCB. If you would like to customize the message, you could add one in SMS templates [Available in settings].

Student Birthday Greetings: Birthday greetings to Students on their Birthday. There is a default template available in MCB. If you would like to customize the message, you could add one in SMS templates [Available in settings].

Branch SMS Alerts:
Fee Collections: Fee collections for the previous day (Payment Mode wise) is sent to the mobile number set every day at 4 am. You can set a mobile number of the person who wishes to receive the message branch wise.

How to use?

Step 1: Login to MCB with System Admin credentials.

Step 2: Select “Home” on the right-hand top corner.

Step 3: Select Communication. You will be redirected to the“Communication” page

Step 4: Choose SMS Alerts option under Communication Alerts Menu.

Step 5: Users can set SMS alerts Organisation and branch wise.

Step 6: To Activate SMS alerts at Organisation level, Click on the icon under Active option against the Alert Type.

Step 7: In the drop down chose the template and Click on Activate. If there is a customized template available, it would appear in the drop-down.

Step 8: Once SMS alert is activated, you will get the alert as per the schedule frequency at the specified time. To change the template, click on Edit icon against the SMS template, make the necessary changes and update. If you would like to receive the SMS alert immediately, click on Execute option under SMS alert type. SMS will be sent to the mobile numbers set. To inactive, the alert, click on Tick mark and confirm.

Step 9: To Activate SMS alerts at the Branch level, Click on the icon under Active option against the Alert Type.

Step 10: Enter the mobile numbers with comma separation to whom SMS has to be sent in the branch and click on the Activate button.

Step 11: Once SMS alert is activated, you will get the alert as per the schedule frequency at the specified time. To change the mobile numbers, click on Edit icon against the SMS template, make the necessary changes and update. If you would like to receive the SMS alert immediately, click on Execute option under SMS alert type. SMS will be sent to the mobile numbers set. To inactive, the alert, click on Tick mark and confirm.

How to use Notification Alerts?

How are Notification Alerts useful for schools?

Receive a snapshot of important information specific to Branches without having to login MCB on your mobile through Notifications.
Notification Alerts provide timely updates on the following areas on a daily basis for your review.

Notification Alerts:

RFID Attendance – In: When a student walks through / Swipe the RFID in the school for the first time in the day

RFID Attendance – Exit: When a student walks through / Swipe the RFID in the school for the last time in the day.

Student Attendance: When attendance of the student is marked for the day in daily attendance.

Staff Attendance – First session: When a staff punches in biometric machine / swipe the RFID Card / walks through the gate while entering the campus.

Staff Attendance – Second session: When a staff punches in biometric machine / swipe the RFID Card / walks through the gate during while leaving the campus.

Biometric Student Attendance – In: When a student punches in the biometric machine while entering the campus.

Biometric Student Attendance – Exit: When a student punches in the biometric machine while leaving the campus.

Student Birthday Wishes: Wishes to students on their Birthday

Staff Birthday Wishes: Wishes to Staff on their Birthday

How to use?

Step 1: Login to MCB with System Admin credentials.

Step 2: Select “Home” on the right-hand top corner.

Step 3: Select Communication. You will be redirected to the “Communication” page

Step 4: Choose Notification Alerts option under Communication Alerts Menu.

Step 5: When you click on the question mark at the notification type, it will show the message format of the notification. Choose the time to send the notification from the available options under Schedule frequency. Click on Cross icon to activate/inactivate the Alerts.

Step 6: Click Yes to confirm the Action.

How to schedule automatic fee reminder SMS and Emails?

Automatic Fee Reminder through SMS and Email helps to avoid sending SMS and Emails manually by remembering the specific day.

You can set them automatically in MCB using your preferred template, no of days before due days and time. This can be set to class wise or all classes of a branch for the specific academic year or all academic years.

How to use it?

Step 1: Login to MCB with System Admin credentials.

Step 2: Select “Home” on the right-hand top corner.

Step 3: Select Communication. You will be redirected to the“Communication”page

Step 4: Choose Fee Reminder SMS / Email option under Communication Alerts Menu.

Step 5: To set Fee Reminder through Email, Choose Fee Reminder Through Email Option and Click on Add Reminder Setting option.
Click on View templates to check the templates available.

Step 6: Enter Schedule Name, Choose No of days from the drop down[ 1 to 30 days], All branches or specific Branch, All classes or specific class, All academic years or specific academic year, Template type and respective Name of template, schedule time from the available timing option to send Email and click on Tick mark to activate or cross mark to Cancel the schedule.

Step 7: You can Edit or Delete by clicking on the respective icons. View the template by clicking on Template name.

Step 8: To set Fee Reminder through SMS, Choose Fee Reminder SMS option and Click on Add Reminder Settings.

Step 9: Enter Schedule Name, Choose No of days from the drop down[ 1 to 30 days], All branches or specific Branch, All classes or specific class, All academic years or specific academic year, Template type and respective Name of template, schedule time from the available timing option to send SMS and click on Tick mark to activate or cross mark to Cancel the schedule.

Step 10: You can Edit or Delete by clicking on the respective icons. View the template by clicking on Template name.

How to use Email Alerts?

How are Email Alerts useful for schools?

Receive a snapshot of important information specific to Organization and Branches without having to login MCB on your Email.

MCB Email Alerts provide timely updates on the following areas on a regular/weekly/ Monthly basis for your review.

Organization Email Alerts:

1. Enrollment review counts: Enquiry / Application Enrollment Review Counts for the Academic Year as on Date and weekly.

2. Fee collection Summary:

  • Fee collections for (Previous Academic Year),
  • Fee collections for (Current Academic Year),
  • Back Date Receipts Entry (Previous Day),
  • Manual Invoice Modifications / Adjustments (Previous Day),
  • Inquiry/ Application Enrolment Review Counts (Previous Day & Till Date)
  • Cheque Bounce Entries (Previous Day)

3. Online payment statistics: Number of payment transactions with each status.

4. Parent Concerns Summary: Branch wise No. of concerns received, No. of concerns being attended, No. of concerns closed, No. of Concerns Escalated.

5. SMS Usage: Branch wise No. of SMS sent, the cost incurred in comparison with previous month’s usage.

6. Email Usage: Branch wise No. of Emails sent in comparison with the previous month.

7. TC Requests Summary: Branch wise No of TC request raised, No of requests in process and No. of TC requests withdrawals and No of TCs issued.

8. User Login Summary: Branch user logins statistics day wise for the week.

9. Staff Attendance Details: Staff attendance status department wise and shift wise along with in time and out time.

10. Staff Leave Details: Staff details who are on leave for the day.

11. Student, Parents and Staff Birthday Greetings: Birthday greetings to students, Parents and Staff on their Birthday.

12. Staff Wedding Anniversary Greetings: wishes to staff on their wedding anniversary.

Branch Email Alerts:

Student Attendance Summary: Present and Absent count and the percentage as per Section wise strength along with the staff name daily in the morning and evening.

Student Absentees: List of students who are absent in the first session and the second session.

Consecutive Absentees: list of students who are absent for more than 7days consecutively.

Student Dairy: Section wise General diary and Subject diary with Classwork and Homework details.

Staff Activity Summary: No. of Announcements, No. of Assignments, Student Diary and No. of Activity photos uploaded by each staff for the day or Month.

Vehicle Document Expiry Alert: A comprehensive report on vehicle documents expiry dates of each vehicle.

How to use?

Step 1: Login to MCB with System Admin credentials.

Step 2: Select “Home” on the right-hand top corner.

Step 3: Select Communication. You’ll be directed to the “Communication” page

Step 4: Choose Email Alerts option under Communication Alerts Menu.

Step 5: Users can set Email alerts Organisation and branch wise.

Step 6: To Activate Email alerts, Click on the icon under Active option against the Alert Type.

Step 7: Enter Email ID to receive the alerts on in TO, CC, BCC email fields and Click on Activate button. If you would like to add multiple Email ids to receive the alerts, please add an email with comma separation.

Step 8: Once email alert is activated, you will get the alert as per the schedule frequency at the specified time.

Click on view Image to check the format of the alert that goes as an email to the emails ids set.

To edit the email ids set, click on Edit icon against the email ids, make the necessary changes and update.

If you would like to receive the email alert immediately, click on Execute option under Email alert type. Email will be sent to the specified email set.

To inactive, the alert, click on Tick mark and confirm.

Note: Please follow Step 6 to 8 to set the branch wise email alerts